


|
This section describes how to design the first node in your business process (the Start node) to represent the starting point of a business process.
A business process can be started as a result of receiving a request from a client or as the result of receiving a message from a Message Broker channel to which the business process is subscribed (a business process can subscribe to channels to receive events from for example: File event generators, JMS event generators, and Timer Event Generators), and by a choice of one of several events. This section includes the following topics:
A Start node represents the starting point of a business process. Depending on the method by which your business process starts, the Start Event of your process can contain any combination of Client Request, Client Request with Return, or Subscription nodes. You design the Start Event of your process by double-clicking the Start Event place holder placed just below your Start node.
To create a new business process, complete the tasks described in Creating a Business Process Application. When you create a new business process, it initially contains an empty Start node, a Start Event place holder, and a Finish node, as shown in the following figure Figure 3-1.
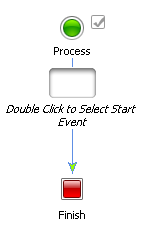
The first action in the business process is specified at the Start node. That is, you specify how the business process is started at run time by defining a Start Event. The empty node attached to the Start node, as well as the gray check box  , shown in the preceding figure, indicate that the start method for this business process is not defined.
While you are building your business process by adding process nodes to it, you can go back to the start node to check the stateless status of your process. If your process at any time becomes stateful, the stateless property in the Start node property editor displays false. To learn more about stateless and stateful business processes, see Building Stateless and Stateful Business Processes.
The Start Node also indicates any business-process-wide problems, such as when a control declaration has an error or when an incorrect variable type is used for a variable. Any such problems are indicated by an ![]() appearing next to the Start Node. If you place your cursor over this icon, Oracle Workshop for WebLogic will display a message about the problems.
appearing next to the Start Node. If you place your cursor over this icon, Oracle Workshop for WebLogic will display a message about the problems.
You can design the start node properties by invoking the starting event node builder. Node builders provide a task-driven interface that allow you to specify the logic required at nodes in your business process.
The node builder displays, as shown in Figure 3-2.
Select this option if you want your business process to start as the result of receiving a message from a client.
Select this option if you want your business process to start as the result of receiving a synchronous request from a client. Any nodes added between the receive and send nodes inside the Client Request with Return group will be executed within the scope of the synchronous operation.
Select this option if you want your business process to start as a result of receiving an asynchronous message from a Message Broker channel. You create a static subscription to a Message Broker channel on this node. This option also allows you to start your business process via an event through File, JMS, Email, or Timer Event Generator, which facilitate publishing events to Message Broker channels.
| Note: | In Oracle WebLogic Integration, subscriptions to Message Broker channels defined at a Start node are referred to as static subscriptions, and subscriptions defined using a Message Broker Subscription control are referred to as dynamic subscriptions. See “Note about Static and Dynamic Subscriptions” in Javadocs. |
Select this option if you want your business process to start as a result of receiving a synchronous message from a Message Broker channel. You create a static subscription to a Message Broker channel on this node. This option also allows you to start your business process via an event through File, JMS, Email, or Timer Event Generator, which facilitate publishing events to Message Broker channels.
Select this option if you want your business process to start as a result of receiving one of a number of possible events. When an Event Choice node is used at the start of a business process, you can configure it to contain Client Request, Client Request with Return, or Message Broker Subscription nodes.
The drop target on the Start node is populated with an icon representing the method by which the business process starts.
To learn more about specifying the appropriate start node for your business process, see:
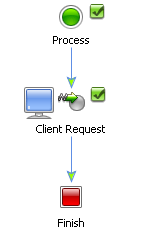
If you specified that your business process starts when it receives a message from a client, that is using the Invoked via a Client Request option, your Start node is displayed as shown in Figure 3-3.
Client Operations and Control Communication Methods
If you specified that your business process starts when it receives a message from a client and a synchronous response is sent back to the client, that is using the Invoked synchronously via a Client Request with Return option, your Start node is displayed as shown in Figure 3-4.
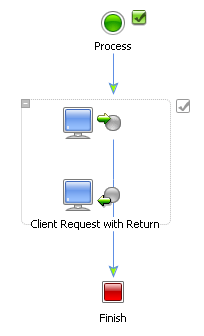
Note the following properties for the Client Request with Return group node:
 indicates that the design of this node is incomplete. To complete the design, see
To Complete the Design of Your Client Request with Return Node Group.
indicates that the design of this node is incomplete. To complete the design, see
To Complete the Design of Your Client Request with Return Node Group.After you add any node to your business process, you can design its properties and behavior by invoking the node builder and completing the tasks appropriate for that node. You can also add optional nodes between the Request and Return part of the Client Request with Return node. This allows you to process data or perform tasks after the message from the client is received and before the return is sent back to the client. For more information on how to add optional nodes to your Client Request with Return node, see Adding Nodes to Your Client Request with Return Node Group .
The following sections describe how to complete the design of your Client Request with Return nodes:
To design your Client Request with Return node, you need to complete the following sections:
 icon (upper icon) in the Client Request with Return node group in your business process.
The node builder is invoked. It contains two tabs: General Settings and Receive Data.
The name you assign to the method is the name of the method that is exposed via the Web Services Description Language (WSDL) when you make your business process available as a Web service. To learn more about how the methods in your project are exposed to clients, see Components of Your Application.
Lists Java primitive and classes data types
Lists the XML Schemas that are available in your business process project and the untyped XMLObject and XMLObjectList data types. To learn how to import a Schema into your project, see Importing XML Schema.
Lists the Message Format Language (MFL) files available in your business process project and the untyped RawData data type. Oracle WebLogic Integration uses a metadata language called Message Format Language (MFL), based on XML, to describe the structure of non-XML data. Every MFL file available in your project is listed in Non-XML Types. Note that an XML Schema representation of each MFL file is built by Oracle Workshop for WebLogic and is also available in the XML Types listing.
For more detailed descriptions of the data types, see Working with Data Types.
| Note: | If you selected typed XML or typed non-XML data type in the previous step, you can select the Validate box to have the incoming message validated against your specified schema before the message is received by the node. For more information about schemas, see Validating Schemas and Creating and Importing Schema Files. |
This tab allows you to define one or more variables to hold the data that your business process receives from clients. The Receive Data tab has two modes:
The Client Sends field is populated with the parameter(s) you specified on the General Settings tab.
The node builder transformation window displays the data types expected by your method in the Client Sends pane.
| Note: | To remove a parameter from the node builder pane, select the parameter in the list and then click Remove. This action removes the variable from the node builder, not from your business process. The variable is still included in your business process; it is visible in the Variables pane in the Data Palette. |
When designing a business process, you use a Transformation to create maps between disparate data types. If an instance of a Transformation control (defined by a data transformation file) already exists in your project, then that instance is used to create the map.
The XQuery Mapper Tool displays a representation of the source schema and target schema in Source and Target panes. You can create a map between the data type of the method parameter and the data type of the variable, or variables, to which you assign the data. To learn how to create and test a map using the XQuery Mapper Tool, see the Guide to Data Transformation.
| Note: | To return to node builder, in the Package Explorer pane, double-click the Process.java file. |
You can edit the configuration at any node by opening the node builder and changing the existing specifications. If you add or remove variables in a node builder that already contains a configured transformation, you must edit or recreate the transformation. To do so, add or remove the variables, then click Edit Transformation or Create Transformation.
| Note: | When selecting a variable in a node builder’s Transformation pane, and then clicking Remove, removes the selected variable from the node builder, not from your business process. The variable is still included in your business process; it is visible in the Variables pane in the Data Palette. |
 icon (lower icon) in the Client Request with Return node in your business process.
The request part of the node builder is displayed. It contains two tabs: General Settings and Send Data.
The name you assign to the method is the name of the method that is exposed via the Web Services Description Language (WSDL) when you make your business process available as a Web service. To learn more about how the methods in your project are exposed to clients, see Components of Your Application.
Lists the XML Schemas that are available in your business process project and the untyped XMLObject and XMLObjectList data type.
Lists the Message Format Language (MFL) files available in your business process project and the untyped RawData data type. Oracle WebLogic Integration uses a metadata language called Message Format Language (MFL), based on XML, to describe the structure of non-XML data. Every MFL file available in your project is listed in Non-XML Types. Note that an XML Schema representation of each MFL file is built by Oracle Workshop for WebLogic and is also available in the XML Types listing.
For more detailed descriptions of the data types, see Working with Data Types .
This tab allows you to define one or more variables to hold the data your business process send to clients.
The Client Expects field is populated with the return type you specified on the General Settings tab.
The node builder transformation window displays the data types expected by your method displayed in the Client Expects pane.
| Note: | To remove a variable from the node builder pane, select the variable in the list and then click Remove. This action removes the variable from the node builder, not from your business process. The variable is still included in your business process; it is visible in the Variables pane in the Data Palette. |
When designing a business process, you use a Transformation to create maps between disparate data types. If an instance of a Transformation control already exists in your project, then that instance is used to create the map.
The XQuery Mapper tool displays a representation of the source schema and target schema in Source and Target panes. You can create a map between the method parameter and the variable, or variables, to which you assign the data. To learn how to create and test a map using the XQuery Mapper tool, see Guide to Data Transformation.
| Note: | To return to node builder, in the Package Explorer pane, double-click the Process.java file. |
| Note: | To learn about changing the configuration you design in the Transformation pane of a node builder, see About Editing Node Configurations. |
In the Design view, the  icon indicates that you completed the configuration and design of this node.
The Client Request with Return node functions as a combination of a Client Request node and a Client Receive node within a synchronous interaction. As such, you can add additional nodes in between the request and the return part of your Client Request Node but you cannot add any nodes that wait or block. To add a node to your Client Request with Return node, select the node you want to add in the Palette and drag and drop it into your Client Request with Return node.
The following nodes can be added:
The names that you assign to methods on your Client Request with Return nodes correspond to the names of the methods that are exposed via the Web Services Description Language (WSDL) when you make your business process available as a Web service. The name must be a valid Java class name.
Client Operations and Control Communication Methods
If you specified that your business process is started via the Subscribe to a Message Broker channel and start via an Event (Time, Email, File, Adapter, etc.) option (see To Define the Start Method for Your Business Process), your Start node is displayed as shown in Figure 3-5.
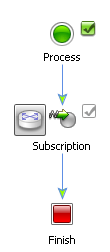
A static subscription to a Message Broker channel is defined on the Subscription node. Your business process is started as the result of receiving a message from a Message Broker channel.
| Note: | In Oracle WebLogic Integration, subscriptions to Message Broker channels defined at a Start node are referred to as static subscriptions, and subscriptions defined using a Message Broker Subscription control are referred to as dynamic subscriptions. See Note about Static and Dynamic Subscriptions. |
The following sequence concisely describes the message flow at run time:
| Note: | An asynchronous subscription start causes the subscribed business process to run in a different transaction from the publisher’s transaction. In general, this is the recommended design pattern to use when you want to design your business process to start when it receives a message from a Message Broker channel. To learn about the scenarios for which a synchronous subscription start is recommended, see About Choosing Synchronous or Asynchronous Subscription Start Nodes. |
Tabs on the node builder include:
The data type and format of the data your subscription request method (that is, the data type for the method parameter) is specified automatically, based on the configuration of your channel file.
| Note: | If no appropriate channels are available for you to select, you must create a Channel file that specifies the Message Broker channels for your application . |
Specifying a filter is optional. Filters can be applied to the data type the business process receives from the channel, or when you have specified a qualified metadata type in your channel configuration.
The field in the Specify Filter tab is populated with the data type for the subscription method parameter you specified on the preceding tab. If you specified your channel to be able to receive qualified metadata, the Qualified Metadata attribute is also listed and you can filter on that parameter instead.
| Note: | If you want to filter on an XMLObject parameter, you have to enter the XQuery statement in the Filter field or edit your source code directly. |
This tab allows you to define one or more variables to hold the data that your business process receives from the channel.
The Client Sends field is populated with the parameter(s) you specified on the General Settings tab, in other words, the parameter type of the channel.
The node builder transformation screen is displayed; the data types expected by your method are displayed in the Client Sends pane.
| Note: | To remove a variable from the node builder pane, select the variable in the list and then click Remove. This action removes the variable from the node builder, not from your business process. The variable is still included in your business process; it is visible in the Variables pane in the Data Palette. |
When designing a business process, you use a Transformation to create maps between disparate data types. Your project must contain an instance of a Transformation control defined by a data transformation files for you to create the map.
The transformation tool displays a representation of the source schema and target schema in Source and Target panes. You can create a map between the data type of the method parameter and the data type of the variable, or variables, to which you want to assign the data.
| Note: | To return to node builder, in the Package Explorer pane, double-click the Process.java file. |
| Note: | To learn about changing the configuration you design in the Transformation pane of a node builder, see About Editing Node Configurations. |
In the Design View, the  icon indicates that you completed the configuration and design of this node. To learn about buffering on your subscription node, see
Buffering Client Messages.
Client Operations and Control Communication Methods
If you specified that your business process is started via the Subscribe synchronously to a Message Broker channel and start via an event option (see To Define the Start Method for Your Business Process), your Start node is displayed as shown in Figure 3-7.
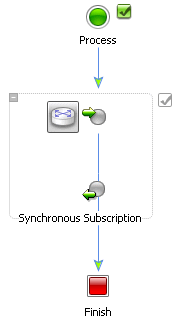
A synchronous static subscription to a Message Broker channel is defined on the Synchronous Subscription node. Your business process is started as the result of receiving a synchronous message from a Message Broker channel.
| Note: | In Oracle WebLogic Integration, subscriptions to Message Broker channels defined at a Start node are referred to as static subscriptions, and subscriptions defined using a Message Broker Subscription control are referred to as dynamic subscriptions. |
The following sequence summarizes the message flow at run time for the scenario in which you design a Synchronous Subscription node at the start of your business process:
In general, an asynchronous subscription start pattern is recommended because it causes the subscribed business process to run in a different transaction from the publisher’s transaction. In contrast, a synchronous subscription start causes the subscribed business process to run in the same transaction as the publisher. This type of subscription decreases loose coupling and can associate the results of a transaction rollback of one subscriber with an otherwise independent subscriber. However, there are two scenarios in which the synchronous subscription start pattern is recommended:
When a JMS event generator publishes to a channel that is known to have one subscriber, it generally improves performance to use the synchronous subscription start method on the subscriber. Note that in this case, the subscriber is doing work on the event generator thread, so you should adjust the event generator thread count accordingly.
Setting suppressible to true specifies that the static subscription is suppressed in favor of dynamic subscriptions. In other words, you use suppressible=true to prevent specific messages on a Message Broker channel from starting a new business process; instead the messages can be received, using a dynamic subscription, by a business process that is already running.
| Note: | You can configure only the node that represents the message received by the business process. That is, you can only invoke a node builder for the first of the icons in the pair that represents the Synchronous Subscription Start node. |
Tabs on the node builder include:
| Note: | If no appropriate channels are available for you to select, you must create a channel file that specifies the Message Broker channels for your application. |
The data type and the format of the data your subscription request method (that is, the data type for the method parameter) is specified automatically, based on the configuration of your channel file.
Specifying a filter is optional. Filters can be applied to the data type the business process receives from the channel, or when you have specified a qualified metadata type in your channel configuration.
The field in the Specify Filter tab is populated with the data type for the subscription method parameter you specified on the preceding tab. If you specified your channel to be able to receive qualified metadata, the Qualified Metadata attribute is also listed and you can filter on that parameter instead.
| Note: | If you want to filter on an XMLObject parameter, you will have to enter the XQuery statement in the Filter field or edit your source code directly. |
This tab allows you to define one or more variables to hold the data that your business process receives from the channel.
The Client Sends field is populated with the parameter(s) you specified on the General Settings tab, in other words, the parameter type of the channel.
The node builder transformation pane is displayed; the data types expected by your method are displayed in the Client Sends pane.
| Note: | To remove a variable from the node builder pane, select the variable in the list and then click Remove. This action removes the variable from the node builder, not from your business process. The variable is still included in your business process; it is visible in the Variables pane in the Data Palette. |
When designing a business process, you use a Transformation to create maps between disparate data types. If an instance of a Transformation control already exists in your project, then that instance is used to create the map.
The transformation tool displays a representation of the source schema and target schema in Source and Target panes. You can create a map between the data type of the method parameter and the data type of the variable, or variables, to which you want to assign the data.
| Note: | To return to node builder, in the Package Explorer pane, double-click the Process.java file. |
| Note: | To learn about changing the configuration you design in the Transformation pane of a node builder, see About Editing Node Configurations. |
In the Design view, the check box icon  indicates that you completed the configuration and design of this node.
Client Operations and Control Communication Methods
If you specified that your business process is Invoked via one of several Client Requests or Subscriptions (Event Choice), (see To Define the Start Method for Your Business Process), your Start node is displayed as shown in Figure 3-8.
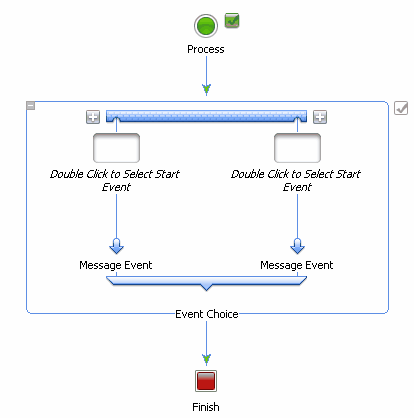
By default, Event Choice nodes are created with two branches. Click  to create additional branches. A new branch is added on the left or right of the existing branches.
You can add additional nodes to the paths in your Event Choice node to specify the events executed at run time after the business process starts. The Start Event targets at the start of each branch indicate that only certain nodes are allowed at these locations: specifically, when you use an Event Choice node at the start node in your business process, it can contain only Client Request, Client Request with Return or Subscription nodes.
| Note: | When you create an Event Choice node at locations other than the Start node in your business process, it can contain Client Request nodes and Control Receive nodes. To learn more about designing Event Choice nodes, see Receiving Multiple Events. |
To specify the events to be executed on each branch of your Event Choice Start node, complete the following tasks for each branch of the node:
The drop target on your Event Choice branch is changed to reflect the event you specified.
You can create a global exception handler for your business process by creating an exception path for the Start node. You create the logic for the exception handler path to define the flow of execution in the case when an exception is thrown by your business process. A global exception handler responds to exceptions that are otherwise not handled in the business process.
To learn how to create exception handler paths on Start nodes, see Handling Exceptions.


|