5 Working with Manually Created Demand Header Records
This chapter contains the following topics:
-
Section 5.1, "Understanding Manually Created Demand Header Records"
-
Section 5.4, "Entering Address and Contact Information for Demand Records"
-
Section 5.5, "Entering Supplemental Database Information for Demand Scheduling"
5.1 Understanding Manually Created Demand Header Records
Typically, information for demand records is created automatically using electronic data interchange (EDI). You can also create demand header records manually and use the Work with Demand Header for to locate existing demand records to revise or delete entries. You can view information that relates to a specific customer, such as cumulative information, dates, times, and attachments.
You can also navigate among the various demand maintenance forms and applications, including:
-
Work With Demand Detail (W40R10D).
-
CUM Maintenance (P40R12).
-
Demand History (P40R41).
-
Demand Addresses (P40R14).
-
Supplemental Data (P00092).
|
Note: If a header record does not exist, the system automatically creates a demand header record when you create a demand detail record.When creating a demand header record, you can add demand header attachments. To do so, select Header Attachment from the Form menu. You can also specify in the Demand Header Attachments processing option whether to automatically display the Media Objects form when creating records. |
5.2 Manually Creating Demand Header Records
This section lists the prerequisites, forms, and discusses how to manually create demand header records.
5.2.1 Prerequisites
Before you complete the tasks in this section:
-
Ensure that you have set up the UDCs for Category Codes 1 through 10 (40R/01 through 40R/10) and Critical Indicator (40R/CI).
-
Set up the Demand Maintenance processing options (P40R10) to specify how the system processes demand records. For example, you can specify information such as which forms to display when creating a record, which versions the system should use for demand processing, and the values for net variance processing.
5.2.2 Forms Used to Create Demand Header Records Manually
| Form Name | Form ID | Navigation | Usage |
|---|---|---|---|
| Work With Demand Header | W40R10A | Demand/CUMs menu (G40R12), Demand Maintenance Header | Locate demand header records. |
| Demand Header Revisions | W40R10B | On Work With Demand Header, click Add. | Create demand header records manually. |
5.2.3 Setting Processing Options for Demand Maintenance — Header (P40R10)
Processing options enable you to specify the default processing for programs and reports.
5.2.3.1 Process
These processing options enable you to specify how the system processes information when you add demand maintenance records.
- 1. Create Schedule
-
Specify whether the system runs the Create Schedule UBE (R40R010) after changes have been made to demand information. When the system runs this batch application, it uses the version that you specify in the Create Schedule processing option on the Process tab in the Demand Maintenance (P40R10) processing options. Values are:
Blank: No
1: Yes
- 2. Demand Header Attachments
-
Determine whether the system automatically displays the Demand Header Attachments form after you add a demand header record. Values are:
Blank: Do not display screen
1: Display screen
- 3. Demand Header Supplemental Data
-
Determine whether the system automatically displays the Demand Header Supplemental Data form after you add a demand header record. Values are:
Blank: Do not display screen
1: Display screen
- 4. Demand Header Address
-
Determine whether the system automatically displays the Demand Header Addresses form after you add a demand header record. Values are:
Blank: Do not display screen
1: Display screen
- 5. Demand Detail
-
Specify whether the system automatically displays the Demand Detail form after you add a demand header record. Values are:
Blank: Do not display screen
1: Display screen
- 6. Demand Detail Attachments
-
Determine whether the system automatically displays the Demand Detail Attachments form after you add a demand detail record. values are:
Blank: Do not display screen
1: Display screen
- 7. Demand Detail Supplemental Data
-
Determine whether the system automatically displays the Demand Detail Supplemental Data form after you add a demand detail record. Values are:
Blank: Do not display screen
1: Display screen
- 8. Demand Packaging
-
Determine whether the system automatically displays the Demand Detail Packaging form after you add a demand detail record. Values are:
Blank: Do not display screen
1: Display screen
- 9. Demand Detail Addresses
-
Determine whether the system automatically displays the Demand Detail Addresses form after you add a demand detail record. Values are:
Blank: Do not display screen
1: Display screen
- 10. Prevent Edits Status
-
The Sales Order Next Status after which the Production Sequencing specific fields listed cannot be modified and the control is disabled: Pull Signal Production Sequencing Job Number Job Sequence Number Card Number Delivery Batch Number Item Revision Level Item Revision Level Qualifier IPP Tag IPP Reason Code.
Blank: All fields are disabled.
- 11. Inquire Sales Order [Release 9.1 Update]
-
Specify whether the system uses Sales Order Entry (P4210) or Sales Order Entry (P42101) to inquire on sales orders associated with the demand detail. Values are:
Blank: The system uses Sales Order Entry (P4210).
On the Version tab, you must specify the version for Sales Order Entry (P4210).
1: The system uses Sales Order Entry (P42101).
On the Version tab, you must specify the version for Sales Order Entry (P42101).
5.2.3.2 Versions
These processing options enable you to specify which program versions the system uses when you add demand maintenance records.
- 1. Create Schedule UBE (R40R010)
-
Specify the version of the Create Demand Schedule program (R40R010) that the system uses.
- 2. Launch Net Variance Workflow (R40R1110)
-
Specify the version of the Launch Net Variance Workflow (R40R1110) that the system uses.
- 3. Supplemental Demand Detail (P00092)
-
Specify the version of the Supplemental Demand Detail (P00092)that the system uses.
- 4. Supplemental Demand Header (P00092)
-
Specify the version of the Supplemental Demand Header (P00092) that the system uses.
- 5. CUM Maintenance (P40R12)
-
Specify the version of the CUM Maintenance (P40R12) that the system uses.
- 6. Item Standard Packs (P460131)
-
Specify the version of the Item Standard Packs (P460131) that the system uses.
- 7. Std Pack Carton Recommendations (P4615)
-
Specify the version of the Standard Pack Carton Recommendations (P4615) that the system uses.
- 8. Sales Order Entry (P4210) [Release 9.1 Update]
-
Specify which version of Sales Order Entry (P4210) the system uses to inquire on sales orders.
- 9. Sales Order Entry(P42101) [Release 9.1 Update]
-
Specify which version of Sales Order Entry (P42101) the system uses to inquire on sales orders.
5.2.3.3 Net Variance
- 1. Critical Indicator Range Minimum
-
Specify the UDC default value (40R/CI) for Demand Maintenance (P40R10). The critical indicator is a user-defined value that indicates how critical a quantity change to a demand detail record is.
- 2. Critical Indicator Range Maximum
-
Specify the UDC default value (40R/CI) for Demand Maintenance (P40R10). The critical indicator is a user-defined value that indicates how critical a quantity change to a demand detail record is.
- 3. Calculate Net Variance
-
Indicate whether the system calculates a net variance when it compares demand detail records among prior releases. Values are:
Blank: No
1: Yes
- 4. Net Variance Notification
-
Determine whether you receive notification when a net variance exceeds the maximum variance as defined in Advanced Preferences. A net variance is the difference in demand detail records between two releases. Values are:
Blank: No
1: Yes
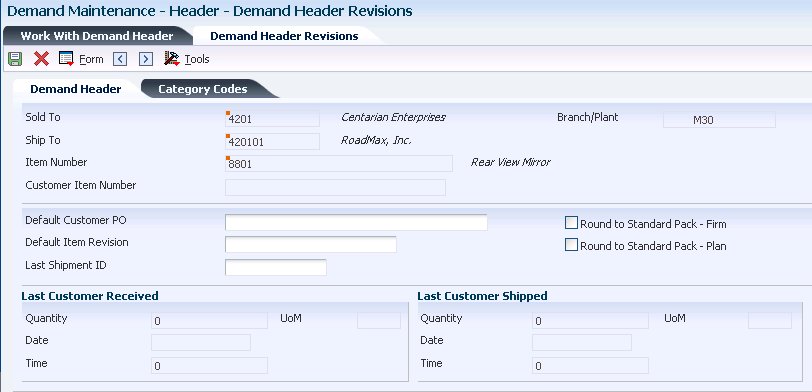
5.2.4 Manually Creating Demand Header Records
Access the Demand Header Revisions form.
- Customer Item Number
-
(Optional). Enter the cross-reference item number that the system assigns to an item number. A cross-reference number enables you to use a supplier's item number if it is different from the item number when you are processing an order or printing. You set up this number in the Item Cross Reference program (P4104).
- Default Customer PO (default customer purchase order)
-
(Optional). Enter a number that represents the default customer purchase order that the system uses in demand detail records when a customer purchase order has not been entered. The system also uses this number as a reference to the sales order or blanket sales order.
- Default Item Revision
-
(Optional). Enter a number that the system retrieves from the EDI transaction set or message. This revision level is based on the revision level for the item that is set up in the F4101 table. You can enter this number manually.
- Vendor Part Number
-
(Optional). Enter a number that identifies the vendor's part and is typically sent by the customer in an EDI message.
- Last Shipment ID (last shipment identification)
-
(Optional). Enter the number that identifies the last shipment that the customer has received.
- Round to Standard Pack Firm
-
Select this option to specify whether the system rounds up firm quantities to the pack quantity for a standard carton. For example, assume that you have selected this option. If a customer whose standard pack quantity is a carton of 500 items requests a reduced shipment of 475 items, then the supplier must still ship 500 items.
You can set up an advanced preference to specify whether this option is activated by default when the system automatically creates a demand header record. You set this up using the Advanced Preferences Name Revisions program (P4071).
- Round to Standard Pack Plan
-
Select this option to specify whether the system rounds up plan quantities to a standard carton pack quantity. For example, if a customer's standard pack requirement is 500, and they request a shipment of 475, the supplier must ship 500. If you leave this option blank, the system does not round up firm quantities to a standard carton pack quantity.
You can set up an advanced preference to specify whether this option is activated by default when the system is automatically creating a demand header record. You set this up using the Advanced Preferences Name Revisions program (P4071).
5.3 Revising Demand Detail Records
This section provides an overview of and discusses demand detail records and label information.
-
Add demand detail information.
-
Revise shipment details.
-
Revise EDI information for demand details.
-
Revise miscellaneous demand detail information.
-
Revise destination information.
-
Revise pull signal information.
-
Revise category codes for demand details.
5.3.1 Understanding Demand Detail Records
After demand header records are entered manually into the system, or automatically through electronic data interchange (EDI), you can review and change the detail information as necessary. Demand detail information includes the values for firm demand (sales orders) and planned demand (forecasts), including quantities, dates, and the customer purchase order number. Using this information, you can compare releases and perform net change and variance reporting and processing.
You differentiate demand detail records from each other based on the combinations of the Requested Ship Date, Requested Ship Time, Customer PO, Demand Processing, Demand Period, Pull Signal, Job Number, and Job Sequence Number fields:
| Requested Shipment Date | Requested Shipment Time | Demand Type | Demand Period | Quantity |
|---|---|---|---|---|
| 07/05 | 00:00:00 | Firm | Daily | 500 |
| 07/05 | 00:00:00 | Plan | Weekly | 2500 |
| 07/05 | 00:00:00 | Plan | Monthly | 15000 |
If a demand header record does not exist, the system automatically creates one when you create a demand detail record.
From the Demand Detail Revisions form, you can access these demand maintenance forms and applications:
-
Demand Maintenance (P40R10)
-
CUM Maintenance (P40R12)
-
Demand History (P40R41)
-
Demand Addresses (P40R14)
-
Demand Packaging (P40R13)
-
Label Data Submitted (W40R10F)
-
Detail Attachments
The system uses these tables when processing demand records:
-
F40R10
-
F40R11
-
F40R13
-
F40R14
-
F40R143
-
F40R141
-
F40R142
-
F40R41
-
F00092
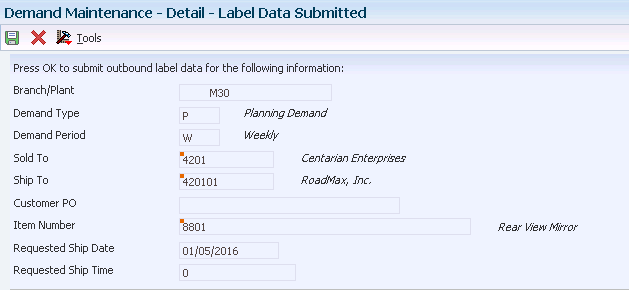
5.3.2 Understanding Label Information
When you submit label information, the system retrieves outbound label information for a demand detail row. Shipment information is retrieved if a sales order has been created for the demand and assigned to a shipment.
The system uses the F40R11 table for processing label information.
5.3.3 Forms Used for Revising Demand Detail Records
| Form Name | Form ID | Navigation | Usage |
|---|---|---|---|
| Work With Demand Detail | W40R10D | Demand/CUMs menu (G40R12), Demand Maintenance Detail | Locate demand detail records. |
| Demand Detail Revisions | W40R10E | On Work With Demand Detail, click Add. | Add demand detail information and revise various details, such as shipment information, EDI, destination, and category codes. |
| Demand Packaging Revisions | W40R13B | On Work With Demand Detail, locate a record and select Demand Packaging from the Row menu. | Revise demand packaging information. |
| Label Data Submitted | W40R10F | On Work With Demand Detail, locate the record and select Submit Label Data from the Row menu. | Submit label information. |
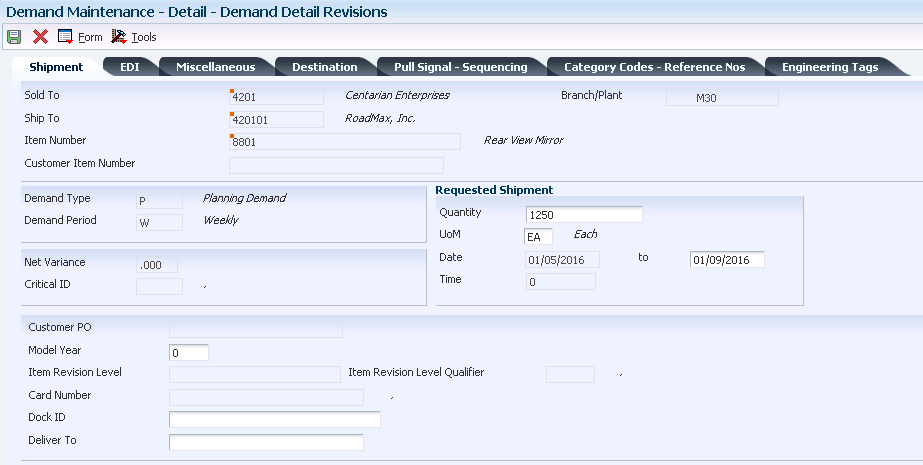
5.3.4 Adding Demand Detail Information
Access the Demand Detail Revisions form
5.3.4.1 Shipment
Select Shipment
- Demand Type
-
Enter a UDC (40R/DT) that specifies whether the demand is firm or planned. The demand type determines how the system processes demand.
- Demand Period
-
Enter a code (40R/PD) that identifies the period for a demand record.
5.3.4.2 EDI
Select EDI
- Number
-
Enter a number that identifies the release for a customer.
- Date
-
Enter the date that the customer provides for a release. The system uses this date with the release time to identify a release.
- UoM (unit of measure)
-
Enter the unit of measure in which an item was last shipped to the customer.
The system creates the header record when one does not exist.
|
Note: When adding a demand detail record, you can add demand detail attachments. To do so, select Dmd Dtl Attachment from the Row menu. You can also specify in the Demand Detail Attachments processing option whether to automatically display the Media Objects form when creating records. You can also add a demand header record by selecting Dmd Hdr Attachment from the Form menu. |
5.3.5 Revising Shipment Details
Access the Demand Detail Revisions form
5.3.5.1 Shipment
Select Shipment
- Quantity
-
Enter the quantity of items that the customer has requested you to ship.
- UoM (unit of measure)
-
Enter a UDC (00/UM) that indicates the quantity in which to express an inventory item, for example, CS (case) or BX (box).
- Dock ID (dock identification)
-
Enter the dock location from which an outbound shipment is assigned to depart or at which an inbound shipment is assigned to arrive.
- Deliver To
-
Enter the address number of the person who receives the goods ordered. The delivered to address might differ from the ship to address when ordered goods are processed through a distribution center (which is the delivered to address) before reaching their final destination (the ship to address).
5.3.5.2 EDI
Select EDI
- Type
-
Enter a code from the EDI transaction set/message that indicates the type of EDI message.
- Subset
-
Enter a secondary name of the EDI transaction or message.
- Name
-
Enter the name of an EDI X.12 transaction set of an EDIFACT message. For example, the name might be 830 or DELFOR.
- Purpose
-
Enter a code (47/PU) that identifies the purpose of the transaction set. The first character of the second description in that table controls how the transaction is processed. Refer to ANSI X.12 Data Item 353.
- Start
-
Enter the date that specifies the beginning of a schedule period. For example, if a customer issues eight weeks of requirements for the months of June and July, the horizon start date is 06/01.
- End
-
Enter a date that specifies the end of a schedule period. For example, if a customer issues requirements for eight weeks during the months of June and July, the horizon end date is 07/31.
- Type
-
Enter a code from the EDI transaction set/message that indicates the type of demand.
- Frequency
-
Enter a code from the EDI transaction set/message that indicates the frequency of demand.
- Demand Pattern
-
Enter a user-defined value (within an EDI message) that determines the shipment pattern of the demand. For example, you might enter 13 to indicate ship on Monday.
5.3.5.3 Miscellaneous
Select Miscellaneous
- Contract Number
-
Enter a unique number assigned by the company to identify a particular contract.
A contract is defined as a legally enforceable promise and must include these factors: an offer, an acceptance, consideration, legality of subject matter, capacity of parties to execute, and more. You may want to assign some significance to the contract number (such as a contract type code, state, year, and so forth). A contract may have multiple supplements (field GSUP) to record addenda or changes.
- Customer Order Number
-
Enter a customer assigned reference number that identifies an order.
- Hazardous Goods Classification
-
Enter a code that the customer creates for identifying the type of hazardous goods.
- Labor Hours
-
Enter the number of working hours in the order cycle.
- Part Release Status Code
-
Enter a code from the EDI transaction set/message that indicates to the supplier that the customer is sending a final release on the part.
- Text Reference Number
-
Enter a number that is contained in an EDI message that associates the text with EDI message type 864.
- Ultimate Customer's Article Number
-
Enter a number that the customer assigns to an article.
- Quantity Canceled
-
Enter the number of units that were canceled during in sales order or work order processing, using either the entered or the primary unit of measure that were defined for this item.
In manufacturing, this can also be the number of units scrapped to date.
- Create Sales Order Status
-
Enter a code that the system uses to track the status of a demand record throughout the processes of creating sales orders and creating schedules. Values are:
Blank: Has not submitted the demand record for the creation of a sales order.
0: Has processed the demand record successfully.
1: Has submitted the demand record for processing.
2: An error occurred during processing.
3: Successfully processed the demand record, and the demand record is now outside of the schedule fence.
4: An error occurred due to a job sequence number or a delivery batch number without a job number, or a job number without a job sequence number.
5.3.5.4 Destination
Select Destination
- Number
-
Enter a number that identifies an assembly. The system uses this number for production sequencing.
- Line Feed
-
Enter a value that is received from the customer's EDI set/message. This value identifies an actual receiving location on an automotive assembly line for delivery of the product.
- Reserve Line Feed
-
Enter a value that is received from the customer's EDI set/message. This value identifies an actual receiving location on an automotive assembly line for delivery of the product.
- Line Location
-
Enter a code that identifies a location in the customer's production line.
- Route
-
Enter a code that represents a sequence of points at which goods are collected on the assembly line.
- Suffix
-
Enter the suffix from the EDI transaction set/message that identifies the sequence of points where goods are collected.
- Date
-
Enter the date an item is scheduled to be delivered to the customer.
- Time
-
Enter the promised time for a delivery. Enter the time using the 24 hour time format (HHMMSS). For example, enter 6:00 a.m. as 060000, and enter 7:00 p.m. as 190000.
5.3.5.5 Pull Signal — Sequencing
Select Pull Signal — Sequencing
- Kanban Start Number
-
Enter the starting number (in a range of reference numbers) that is assigned to a Kanban card by a consignee.
- Kanban End Number
-
Enter the ending number (in a range of reference numbers) that is assigned to a Kanban card by a consignee
5.3.5.6 Category Codes — Reference Nos.
Select Category Codes — Reference Nos.
- Demand Code
-
Enter a three-character category code (UDC 40R/06) that is reserved for customer use.
- Reference Number
-
Enter a number that identifies a demand entity.
5.3.5.7 Engineering Tags
Select Engineering Tags
- Engineering Tag
-
Enter a number that identifies the initial production part (IPP) tag being returned on an advance ship notice (ASN). Companies typically use the IPP tag to indicate that a new part is being shipped because of an engineering change, a new supplier, and so on. The tag number is generated outside the supplier's system and input for the ASN preferably through scanning. The supplier associates the IPP tag with the serial number for a specific carton and attaches the tag to the first shipment of changed parts.
- Engineering Tag Reason Code
-
Enter a code that identifies the reason associated with an initial production part (IPP) tag being returned on an advance ship notice (ASN). Companies typically use the IPP tag to indicate that a new part is being shipped because of an engineering change, a new supplier, and so on.
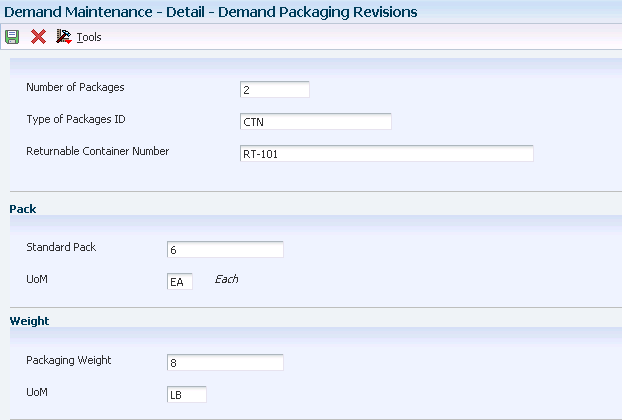
5.3.6 Revising Demand Packaging Information
Access the Demand Packaging Revisions form.
Figure 5-3 Demand Packaging Revisions form
Description of ''Figure 5-3 Demand Packaging Revisions form''
Typically, packaging information is sent through EDI and contains the Sold To packaging instructions that is required within the ASN or bar coding system. The demand record must have a specific Sold To, Ship To, and item number within the demand detail to revise packaging information.
- Type of Packages ID (type of packages identification)
-
Enter a code that identifies the type of packaging to use when you ship an item.
- Standard Pack
-
Enter a number that indicates the standard quantity within a container.
- UoM (unit of measure)
-
Enter a UDC (00/UM) that indicates the quantity in which to express an inventory item, for example, CS (case) or BX (box).
5.4 Entering Address and Contact Information for Demand Records
This section provides an overview of and discusses address and contact information.
5.4.1 Understanding Address and Contact Information for Demand Records
You can enter address book and contact information that is unique to demand scheduling, and store this information at the demand header or detail level. You use these addresses to represent different types of parties. For example, a demand address can represent a buyer, a seller, a carrier, an expediter, or transit principal.
For each demand address you enter, you can add contact information, such as a contact person or general office expediter, and telephone contact information.
|
Note: In the Demand Maintenance (P40R10) processing options, you can use the Demand Header Addresses and the Demand Detail Addresses processing options on the Process tab to specify whether to automatically display the Demand Header Address or the Demand Detail Addresses forms when adding a demand header or detail record. |
The system stores demand address and contact information in the F40R14 table. You can also cross-reference common addresses, such as plants or customer numbers, with the Address Book system, as applicable.
5.4.2 Forms Used for Entering Address and Contact Information for Demand Records
| Form Name | Form ID | Navigation | Usage |
|---|---|---|---|
| Work With Demand Header | W40R10A | Demand/CUMs menu (G40R12), Demand Maintenance Header | Locate demand header records. |
| Work With Demand Addresses | W40R14A | Work With Demand Header, locate a record and select Demand Address from the Row menu. | Locate demand address records. |
| Demand Address Revisions | W40R14B | Work With Demand Addresses, click Add. | Enter demand address information. |
| Demand Contact Name Revision | W40R141B | On Work With Demand Addresses, locate the record and select Demand Contacts from the Row menu. | Enter contact information. |
| Demand Contact Phone Revisions | W40R141A | On Demand Contact Name Revision, select Demand Contact No from the Row menu. | Enter contact phone information. |
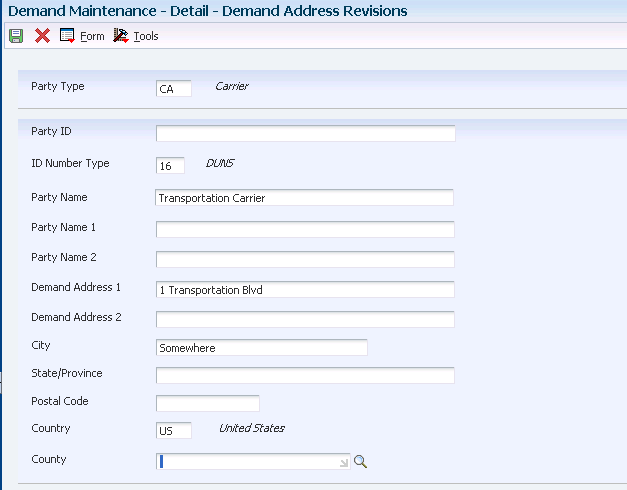
5.4.3 Entering Demand Address Information
Access the Demand Address Revisions form.
Figure 5-5 Demand Address Revisions form
Description of ''Figure 5-5 Demand Address Revisions form''
- Party Type
-
Enter a code that identifies the type of party in an EDI message. This code is typically the first element of the N1 segment of an X12 transaction set.
- ID Number Type (identification number type)
-
Enter a UDC (40R/ID) that indicates the type of identification number.
- Party ID (party identification)
-
Enter a code that identifies the party in an EDI message. This code is typically the fourth element of the N1 segment of an X12 transaction set.
5.4.4 Entering Demand Contact Information
Access the Demand Contact Name Revisions form.
- Contact Type
-
Enter a UDC (40R/CT) that identifies the type or purpose of a contact. For example, you can set up codes to identify a contact as an expediter or as an information contact.
- Contact Name
-
Enter the name of the caller, customer, or other contact.
- Contact Name ID (contact name identification)
-
Enter an alphanumeric value that is associated with a contact name.
5.4.5 Entering Demand Contact Phone Information
Access the Demand Contact Phone Revisions form.
- Phone Type
-
Enter a UDC (40R/PT) that identifies the type of contact number. For example, you can set up a code to represent a telephone contact.
- Contact Number
-
Enter an alphanumeric code that is associated with a contact. Examples are a telephone number or an email address.
5.5 Entering Supplemental Database Information for Demand Scheduling
This section provides an overview of and discusses entering supplemental database information used in demand scheduling.
5.5.1 Understanding Supplemental Database Information for Demand Scheduling
You use supplemental data to store information that is not included in the standard master tables. Examples of supplemental data include remarks, amounts, dates, codes, and times. For demand scheduling, you can store defined text and defined time.
The information you set up in the supplemental database for the Demand Maintenance program (P40R10) is accessible only from the Work With Demand Header (W40R10A) and Work With Demand Detail (W40R10D) forms.
The system can store supplemental data at the demand header or detail level. The supplemental data codes are:
-
DH (demand header)
-
DD (demand detail)
The system uses these tables when processing supplemental data:
5.6 Reviewing Demand History Records
This section provides an overview of and discusses demand history and how to review demand history records.
5.6.1 Understanding Demand History Records
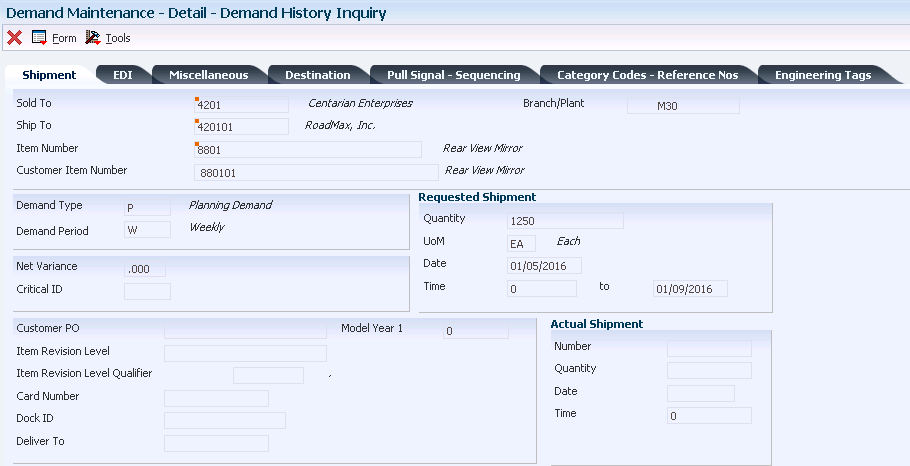
The system maintains a snapshot of demand detail and demand address information, and distinguishes this information based on the date and time the snapshot was created. The Demand History program (P40R41) is for inquiry only. You cannot modify history records written to the F40R41 table.
5.6.2 Forms Used for Reviewing Demand History Records
| Form Name | Form ID | Navigation | Usage |
|---|---|---|---|
| Work With Demand History | W40R41C | Demand/CUMs menu (G40R21), Demand History | Locate demand history records. |
| Demand History Inquiry | W40R41D | On Work With Demand History, locate the record and click Select. | Review demand history. |
5.6.3 Reviewing Demand History
Access the Demand History Inquiry form.
|
Note: This form is for informational purposes only. |
5.7 Purging Demand History Records
This section provides an overview of and discusses demand history purge.
5.7.1 Understanding the Demand History Purge
You can use the processing options on the Process tab to specify whether to archive purged information. The system does not archive supplemental data information.
The system purges information from these tables:
-
F40R41
-
F40R143
-
F00092
5.7.2 Purging Demand History
Demand Advanced and Technical Ops menu (G40R31), Purge Demand History.
