9 Tracking Applicants
This chapter contains the following topics:
9.1 Understanding Applicant Tracking
One opening in the company can result in hundreds of resumes. You need to be able to quickly identify the applicants who meet the requirements of an open requisition. With Human Resources Applicant Tracking, you can manage extensive information about each applicant, such as desired salary, available date, education, prior experience, and foreign language proficiency.
You can then search for applicants who meet specific criteria. The systems extensive search capabilities help you reduce a list of applicants to those whom you want to seriously consider. You can then provide the managers with a list of qualified applicants.
You can use the detailed information that you track about applicants to perform these tasks:
-
Link applicants to requisitions.
-
Evaluate the qualifications of each applicant.
-
Meet government reporting requirements.
You might track standard types of applicant information:
-
Personal information, such as name, address, and tax identification number.
-
The job and position for which each applicant applies.
-
Governmental reporting information, such as that required to meet Equal Employment Opportunity (EEO) and Canadian Employment Equity requirements.
The system also gives you the flexibility to track any other type of information that the organization needs. You can use the supplemental data feature to track entire categories of auxiliary information for applicants, such as job skills or professional licenses.
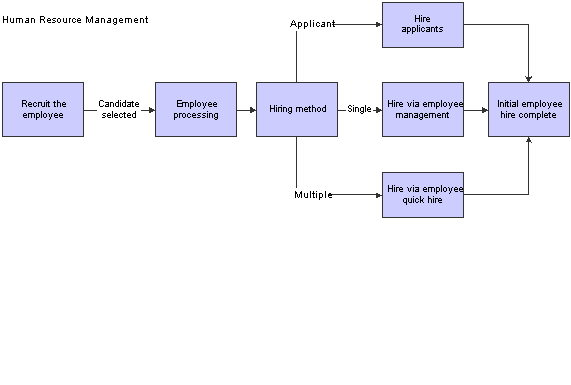
When you hire an applicant, the system automatically updates the persons employee master record to indicate that he or she is an employee. You can also set up the system to require someone to enter payroll information before the hiring process is complete.
This diagram illustrates the applicant tracking process:
9.2 Entering Applicant Information
This section provides an overview of applicant information entry and discusses how to:
-
Set processing options for the Applicant Information program (P08401).
-
Enter applicant information.
-
Enter country-specific information for an applicant.
9.2.1 Understanding Applicant Information Entry
Before you can begin evaluating applicant information, you must add a record that contains personal information about the applicant to the database. Adding new applicant records includes entering basic applicant information, plus address book and country specific information.
Basic information includes information about the applicant, such as the job for which the applicant is applying.
Address book information includes information such as the applicant name, address, and phone number. Entering address book information automatically adds the applicant to Address Book. After you enter address book information for an applicant, you can locate the applicant record in the database by name. You do not need to know the applicant number.
Country-specific information is information that is required only in the country where the applicant works. For example, U.S. country-specific information includes information that is required for government reporting, such as veteran and disability status.
You can track detailed information about applicants so that you can evaluate the applicant's qualifications and match applicants to open requisitions. You can also track the applicant information that you need to meet government reporting requirements.
(Release 9.1 Update) You can access the Disability and Veteran Status Responses program (P085595) from the Applicant Entry program (P08401) to review, add, update, or delete an applicant's disability and protected veteran status information. To access the Disability and Veteran Status Responses program, select an applicant and then select Vet/Dis Responses from the Row menu.
After you enter initial information for an applicant, you can enter supplemental data, which is any additional information that you want to track for an applicant.
When you hire an applicant, the system updates one of these tables:
-
Unedited Quick Hire Transaction File (F060116Z).
-
Employee Master Information table (F060116).
If you select the Initiate Hire option after you add an applicant record, the system updates the Unedited Quick Hire Transaction File table. This table is part of the Employee Quick Hire program (P060116Q). The applicant record does not become an employee record in the Employee Master table until you run the Process Pending Employees report (R060116P). This report copies the applicant record from the Unedited Quick Hire Transaction table to the Employee Master Information table and changes the search type from applicant to employee.
The Unedited Quick Hire Transaction File table does not automatically update the Employee Master Information table, so you can review and revise the applicant records before they are copied to the Employee Master Information table. You can review and revise applicant records with the Employee Work File Revisions program (P060116P), and then run the Process Pending Employees report to update the Employee Master Information table (F060116).
If you click the Hire option after you add an applicant record, the system updates the Employee Master Information table and changes the search type on the record from applicant to employee.
|
Note: If you are using Payroll to report applicant information to the Equal Employment Opportunity Commission (EEOC), you must enter all applicants into the database, regardless of the applicant qualifications. |
After you complete the steps to enter address book information for an applicant, the Work With Applicants form appears. You enter country specific information for each applicant. When you enter country-specific information, the system displays fields only for the information that applies to the country code that you entered for the applicant. Many of the fields that appear on the Applicant Information - National Data - Revisions form can be customized to meet the specific needs of your organization.
|
See Also: |
9.2.2 Forms Used to Enter Applicant Information
9.2.3 Setting Processing Options for the Applicant Information Program (P08401)
Processing options enable you to specify the default processing for programs and reports.
For programs, you can specify options such as the default values for specific transactions, whether fields appear on a form, and the version of the program that you want to run.
For reports, processing options enable you to specify the information that appears on reports. For example, you set a processing option to include the fiscal year or the number of aging days on a report.
Do not modify JD Edwards EnterpriseOne demo versions, which are identified by ZJDE or XJDE prefixes. Copy these versions or create new versions to change any values, including the version number, version title, prompting options, security, and processing options.
9.2.3.1 Hire
These processing options enable you to transfer specific applicant information to the Employee Master Information table (F060116) or the Unedited Quick Hire Transaction File table (F060116Z) after you add an applicant record.
- 1. Status Code
-
Use this processing option to specify the user-defined code (08/AS) that the organization uses to indicate that an applicant is hired. When you complete the steps to hire an applicant, the system automatically updates the applicant status with the code that you enter.
- 2. Requisition Information
-
Use this processing option to specify whether you want the system to automatically transfer information that you entered for the requisition, including the position ID, home business unit, job type, job step, and security business unit, to the applicant record when you enter an applicant.
When you hire an applicant, the system transfers this information to the applicant employee record. Values are:
1: Yes. Transfer requisition information to the applicant and employee records.
Blank: No. Do not transfer requisition information.
If you enter 1 for this processing option, you must enter a requisition number for each applicant when you enter the applicant record.
- 3. Job Information
-
Use this processing option to specify whether you want the system to automatically transfer information that you entered for the job to the employee record when you hire an applicant. The system does not automatically transfer this job information to the applicant record. Values are:
1: Yes. Transfer job information to employee records.
Blank: No. Do not transfer job information.
If you enter 1 for this processing option, you must enter a job type for each applicant when you enter the applicant record. If the organization uses job steps, you must also enter a job step for each applicant.
- 4. Transfer Supplemental Data
-
Use this processing option to specify whether you want the system to automatically transfer applicant supplemental data to the employee supplemental database when you hire an applicant. The system transfers the information that you entered in the applicant supplemental data types to the equivalent supplemental data types for employees. Values are:
1:Yes. Transfer supplemental data for applicants.
Blank: No. Do not transfer supplemental data for applicants.
- 5. Notification Message
-
Use this processing option to specify the address book number of the person that you want to notify when you select Initiate Hire to hire an applicant. Typically, the person that you notify is the person who is responsible for entering employee information for new employees.
9.2.3.2 Delete
This processing option enables you to automatically delete certain information.
- 1. Delete Supplemental Data and Address Book Record
-
Use this processing option to define whether you want the system to automatically delete the supplemental data that you entered for an applicant when you delete the applicant record. Values are:
1: Yes. Delete supplemental data for applicants.
Blank: No. Do not delete supplemental data for applicants.
9.2.3.3 Add
This processing option enables you to specify whether the system requires you to complete the Date of Birth, Gender, and Ethnic Code fields.
- 6. Date of Birth, Gender, and Ethnic Code Required
-
Use this processing option to specify whether the system requires you to complete the Date of Birth, Gender, and Ethnic Code fields when you enter applicant information. Values are:
1: Yes. Date of Birth, Gender, and Ethnic Code fields are required.
Blank: No. Date of Birth, Gender, and Ethnic Code fields are not required.
Note:
Canada requires date of birth information for tax purposes.
9.2.3.4 Versions
These processing options specify the version for the Resource Competency Information (P05100), Competencies Gap Analysis (P08008), and Address Book Revisions (P01012) programs.
- 1. Resource Competency Information Version
-
Use this processing option to define the version of the Resource Competency program (P05100) that you want to use when you add or change information. If you leave this field blank, the system enters the default version ZJDE0001.
- 2. Gap Analysis Version
-
Use this processing option to define the version of the Gap Analysis program (P08008) that you want to use when you add or change information. If you leave this field blank, the system enters the default version ZJDE0003.
- 3. Address Book Version
-
Use this processing option to define the version of the Address Book program (P01012) that you want to use when you add or change information. If you leave this field blank, the system enters the default version ZJDE0003.
9.2.4 Entering Applicant Information
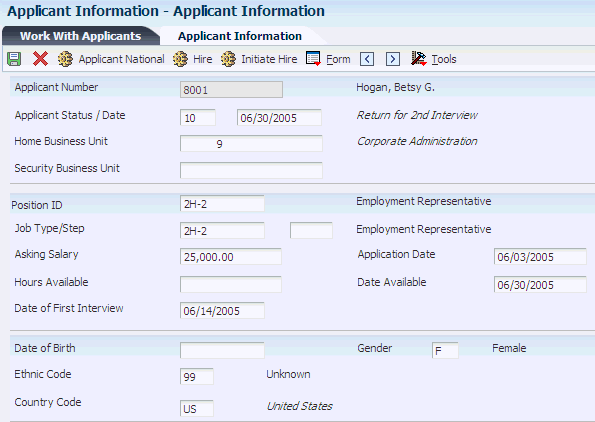
Access the Applicant Information form.
- Date Available
-
Enter the date an applicant is available to begin work.
- Date of First Interview
-
Enter the date the applicant first interviewed for the job.
- Asking Salary
-
Enter the amount an applicant has requested for salary.
- Hours Available
-
Enter the number of hours an applicant is available to work, if hired.
- Date of Birth
-
Enter the employee date of birth.
- Type Structure
-
Enter a user-defined code (00/TS) that identifies the type of organization structure, such as financial or responsibility. Each type of organization structure can have a separate hierarchy.
9.2.5 Entering Country-Specific Information for an Applicant
Access the Applicant Information - National Data - Revisions form.
Figure 9-3 Applicant Information - National Data - Revisions form
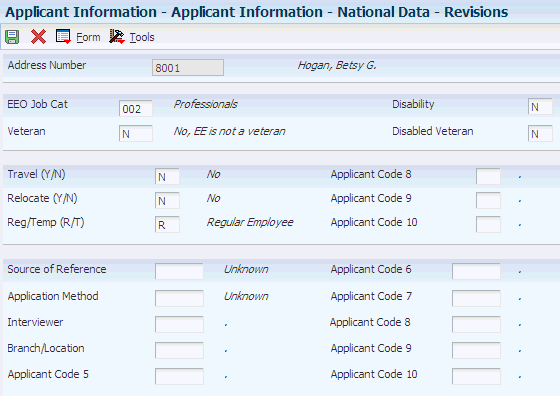
Description of ''Figure 9-3 Applicant Information - National Data - Revisions form''
- EEO Job Cat (Equal Employment Opportunity job category)
-
Enter a user-defined code (07/J) that specifies classifications established by the U.S. Equal Employment Opportunity Commission (EEOC) or the Canadian Employment Equity Occupational Group (EEOG) for use in reporting levels of minority employment. Do not change any of the codes provided by the JD Edwards EnterpriseOne system. You can add codes if needed.
- Veteran
-
Enter a code that indicates the veteran status of the employee for EEO reporting purposes. Values are:
N: No, this employee is not a veteran.
V: This employee is a Vietnam veteran.
S: This employee is a Newly Separated veteran.
W: This employee is a Vietnam and Other veteran.
X: This employee is a Vietnam and Newly Separated veteran.
Y: This employee is an Other and Newly Separated veteran.
Z: This employee is a Vietnam, Other, and Newly Separated veteran.
O: This employee is a veteran, classified as Other, as defined by the U.S. Department of Labor.
- Disability
-
Enter a code indicating whether this employee has a mental or physical disability. Codes are:
Y: Yes, this employee has a mental or physical disability.
N: No, this employee does not have a mental or physical. disability.
U: Unknown.
- Disabled Veteran
-
Enter a code indicating whether this employee is a disabled veteran. Codes are:
Y: Yes, this employee is a disabled veteran.
N: No, this employee is not a disabled veteran.
This field is used to generate the Veterans Employee (VETS-4212) report.
- Applicant Code 5
-
Enter a code used to define applicant information.
- Travel (Y/N) (travel [yes/no])
-
Enter a code that indicates whether an applicant is willing to travel. Values are:
Y: Yes, this applicant will travel.
N: No, this applicant is not willing to travel.
- Relocate (Y/N) (relocate [yes/no])
-
Enter a code that indicates whether an applicant is willing to relocate. Codes are:
Y: Yes, the applicant will relocate.
N: No, the applicant is not willing to relocate.
- Reg/Temp (R/T) (regular/temporary)
-
Enter a code that indicates whether the applicant is to be a regular or a temporary employee. Values are:
R: The applicant is to be a regular employee.
T: The applicant is to be a temporary employee.
- Source of Reference
-
Enter a code that explains how an applicant was referred to the position or to the company. See user-defined code table 08/N1.
This code is a more specific source of reference than that in the Application Method (data item HN02) field.
- Application Method
-
Enter a code that defines how an applicant applied for the job. You can define these codes using user-defined code table 08/MA.
This code reflects a less specific source of information than that in the Source of Information (data item HN01) field.
- Interviewer
-
Enter a code that identifies the person who interviewed the applicant. Use user-defined code table 08/N3. You can enter more specific interview information using the data types linked to the detailed applicant resume process.
- Branch/Location
-
Enter a code that defines the branch or geographic location for which the applicant is being considered. Define this code using user-defined code table 01/01. This code is helpful for reporting purposes.
9.3 Entering Supplemental Data for Applicants
This section provides an overview of supplemental data for applicants and lists the forms used to enter supplemental data for applicants.
9.3.1 Understanding Supplemental Data for Applicants
Supplemental data is any type of additional, defined information that you want to track about:
-
Requisitions
-
Applicants
-
Employees
-
Jobs
-
Dependents
-
Beneficiaries
-
Health safety management
When you set up Human Resources, you specify the types of supplemental data (data types) that you want to track. Supplemental data is not required by the system.
You might include these types of supplemental data for applicants:
-
Applicant status history
-
Work experience
-
Education
-
Job skills
-
References
The method that you use to enter supplemental data is the same for any type of supplemental information that you track.
After you enter supplemental data, you can use it to locate applicants who meet specific criteria that are required to fill vacancies within the organization. For example, you might need someone with an MBA degree who can speak Spanish. You can access the Supplemental Data Multiskill Search program (P080250) to search for all applicants who meet these requirements.
|
See Also: |
9.3.2 Forms Used to Enter Supplemental Data for Applicants
9.4 Hiring an Applicant
This section provides an overview of the applicant hire process and discusses how to hire an applicant.
9.4.1 Understanding the Applicant Hire Process
When you offer an applicant a job and the applicant accepts, you need to indicate that the applicant is hired. When you hire an applicant, you can either complete the employee record or send a message to the person in the organization who is responsible for creating new employee records in the database.
When the person who hires applicants typically is the same person who creates new employee records, you can save time and eliminate redundant data entry by setting up the system to automatically copy applicant information to the employee database when you hire an applicant. You can copy both initial applicant information, such as name, address, and position information, and applicant supplemental data.
Because you typically need to retain applicant records for government reporting requirements, copying applicant information to the employee database does not delete the information from the applicant database.
When you hire an applicant, you can enter additional employee information. To ensure that you enter the information that is required to process the employee through a payroll cycle, you can use a processing option to require someone to enter that information before the hiring process is complete.
After you hire an applicant, the system automatically updates the Address Book record to indicate that he or she is an employee.
Use the Employee Quick Hire program (P060116Q) to expedite the hiring of many new employees.
|
See Also: |
9.4.2 Prerequisite
Before you complete the tasks in this section:
-
Set up the system to transfer selected types of supplemental data when you hire an applicant.
-
Review the processing options for this program and for the Employee Information program (P0801).
To transfer supplemental data for applicants to the employee supplemental database, you must set up the appropriate processing options.
-
Verify that the applicant status is set up in the Supplemental Data Setup program (P00091).
9.4.3 Forms Used to Hire an Applicant
9.4.4 Hiring an Applicant
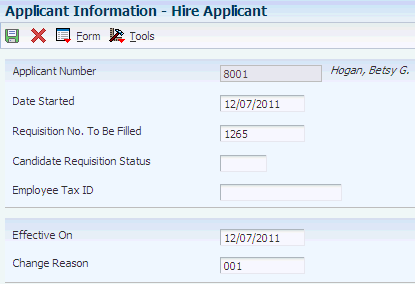
Access the Hire Applicant form.
-
On the Work With Applicants form, locate the applicant.
-
Select the applicant record, and then click Select.
-
On the Applicant Information form, do one of these:
-
Click the Hire button to hire the applicant and enter complete employee information for the applicant.
-
Click the Initiate Hire button to hire the applicant and send an email message to the person who needs to enter complete employee information for the applicant.
-
-
On the Hire Applicant form, complete these fields and click OK:
-
Date Started
-
Requisition No. To Be Filled
-
Candidate Requisition Status
-
Effective On
-
Change Reason
-
-
Click OK to either hire the applicant or send notification to the person who will complete the hiring process.
-
On the History Effective Date Confirmation form, click OK.
-
On the Hire Applicant form, click OK.
If you clicked the Hire button to hire the applicant, the Employee form appears.
-
On the Employee form, complete the remaining steps to add a new employee record.
- Date Started
-
Enter the date on which the employee actually reported to work for the most recent period of hire. When an employee initially begins working, the default value is the original hire date. If no original hire date exists, the system uses the current date. This field can be updated multiple times if, for example, an employee is a seasonal worker.
For the calculation tables in Payroll and the eligibility tables and date codes in Human Resources, the system also uses this date as a start date when it calculates deductions, benefits, and accruals.
- Requisition No. To Be Filled
-
Enter the number that identifies the position requisition. This number must be unique. The next number program assigns this number if no other number is provided when the requisition is initially entered.
- Candidate Requisition Status
-
Enter the current activity level of a candidate record that is attached to a requisition. The system retrieves these codes from user-defined code table 08/CN.
You can group candidate requisition status codes based on the hard-coded special handling code values in the table. Values are:
CAN: Any candidate code.
DET: Any code indicating that the position is detached or no longer filled.
FIL: Any code indicating that the position has been filled.
REJ: Rejected.
TMP: Temporarily filled.
Candidate requisition status codes that have a special handling code of either FIL or TMP update the Filled Headcount field. However, only those status codes that have special handling codes of FIL can cause the system to change the requisition status to Filled and Closed.
- Effective On
-
A future date when all changes will take effect or the date when the changes went into effect. If you do not enter a date in this field, the system uses the current date as the effective date.
- Change Reason
-
Enter a code that indicates the reason for:
-
Changing an active employee record.
-
Terminating an employee.
-
Recommending a change in salary or rate.
This is a user-defined code (06/T). If you are reactivating an employee, the code must be numeric. The code for new hires is the default reason code.
-
9.5 Creating Applicant Letters
This section provides an overview of applicant letters, lists the prerequisite, and discusses how to:
-
Set processing options for Print Applicant Letters (P08450).
-
Create applicant letters.
9.5.1 Understanding Applicant Letters
To send written information to applicants, you can use the mailmerge features of the JD Edwards EnterpriseOne software to produce letters for small, infrequent mailings effectively. Using the Print Applicant Letters program (P08450), you can select one or more applicants, specify a form letter, and print customized copies for each recipient. You can also select a specific group of applicants for whom you want to print letters, such as all applicants who have been called for an interview.
You can use either of these two methods to customize the contents of letters that you print for specific individuals:
-
Enter direct changes to a selected form letter just before you print it.
-
Edit an existing form letter or create a new letter using the MailMerge Workbench Setup program (P980014).
9.5.2 Prerequisite
Create or customize letters that you can use with the merge process.
9.5.3 Forms Used to Create Applicant Letters
9.5.4 Setting Processing Options for the Print Applicant Letters Program (P08450)
Processing options enable you to specify the default processing for programs and reports.
For programs, you can specify options such as the default values for specific transactions, whether fields appear on a form, and the version of the program that you want to run.
For reports, processing options enable you to specify the information that appears on reports. For example, you set a processing option to include the fiscal year or the number of aging days on a report.
Do not modify JD Edwards EnterpriseOne demo versions, which are identified by ZJDE or XJDE prefixes. Copy these versions or create new versions to change any values, including the version number, version title, prompting options, security, and processing options.
9.5.4.1 Process
This processing option specifies the letter template to use for the applicant letters.
- Applicant Letter Document Name
-
Use this processing option to specify which letter template will be used when generating applicant letters.
9.5.5 Creating Applicant Letters
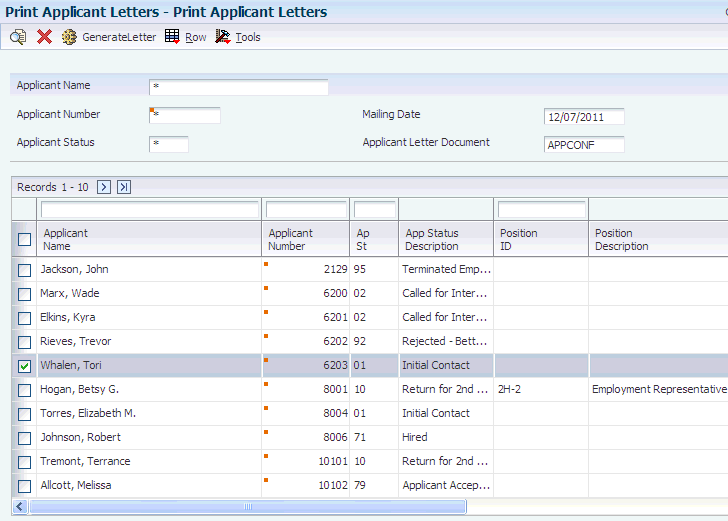
Access the Print Applicant Letters form.
To create an applicant letter:
-
On the Print Applicant Letters form, to create multiple letters, click Find to display all applicants, and then select multiple applicant records from the detail area.
-
To create a single letter, complete one or more of these fields, click Find, and then select the applicant record:
-
Applicant Name
-
Applicant Number
-
Applicant Status
-
-
If you want to print a date other than the current system date on the letter, complete the Mailing Date field:
If the letter has been set up to use this value, this date prints on the letter.
-
Complete the Applicant Letter Document field to select the desired letter template:
-
Select Generate Letter from the Row menu.
The system displays a copy of the letter, including the merged information. You can modify the letter if necessary.
-
On the Mail Merge Letter Display form, select Print from the Form menu.
- Applicant Name
-
Enter the text that names or describes an address. This 40 character alphabetic field appears on a number of forms and reports. You can enter dashes, commas, and other special characters, but the system cannot search on them when you use this field to search for a name.
- Applicant Status
-
Enter a code that defines a step in the hiring process that the applicant has completed, such as initial contact, first interview, and so on. This is a defined code (08/AS).
When you enter or change the status of an applicant with the Applicant Entry program (P08401), the system adds a record to the supplemental data type for applicant status. To review the history of an applicant status, you can view the information that has been added to this supplemental data type.
- Mailing Date
-
Enter the date that prints on the letter.
- Applicant Letter Document
-
Enter a code that identifies which Applicant Letter document will be used from the Mail Merge (P980014) application.
9.6 Reviewing Applicant Reports
This section provides an overview of applicant report information.
9.6.1 Understanding Applicant Reports
To review detailed information about applicants, you can print applicant reports. You can use these reports to:
-
Search for applicants who have specific skills.
-
Satisfy government reporting requirements.
-
Evaluate the hiring practices of the organization.
To review a summary of applicant information, as well as detailed supplemental information for each applicant, you can print applicant listing and applicant supplemental data reports. You can review applicant supplemental information by individual employee or by data type.
|
See Also: |
