6 Managing Physical Inventories
This chapter contains the following topics:
6.1 Understanding Physical Inventory Management
To account for all items, organizations conduct a physical inventory, in which items are physically counted on a particular date and time. Accurate inventories help you to:
-
Reduce backorders.
-
Reduce monetary amounts that are invested in inventory.
-
Reduce downtime that is attributed to stock outages.
-
Increase on-time deliveries.
To reconcile the online inventory records and physical inventory, you can use both:
-
Cycle counts
A cycle count is the item-based method of counting inventory. Using the cycle count process, you select items to be counted at various intervals throughout the year.
-
Tag counts
A tag count is the location-based method of counting. It is designed for an end-of-year, wall-to-wall physical inventory.
6.2 Processing Cycle Counts
This section provides an overview of cycle counts, lists prerequisites, and discusses how to:
-
Run the Select Items for Count program.
-
Set processing options for Select Items for Count (R41411).
-
Review cycle count status.
-
Print cycle count sheets.
-
Set processing options for Print Cycle Count Sheets (R41410A).
-
Cancel cycle counts.
-
Enter cycle count results.
-
Enter counted quantity on an existing license plate.
-
Review cycle count variances.
-
Revise cycle count quantities.
-
Print a variance report.
-
Set processing options for Print Variance Detail (R41403)
-
Approve cycle counts.
-
Run the Cycle Count Update program.
-
Set processing options for Cycle Count Update (R41413).
6.2.1 Understanding Cycle Counts
A cycle count is the item-based method of counting inventory. You record data, such as item numbers, descriptions, and locations on printed inventory count sheets, which you later use to update the online inventory records.
You can use a cycle count to:
-
Group items to be counted at specific intervals throughout the year.
-
Track variances.
-
Reduce costs and backorders.
You can use a cycle count in conjunction with a tag count to ensure accuracy. You also can use these programs to indicate that counted quantity is on certain existing license plates.
6.2.2 Prerequisites
Before you complete the tasks in this section, you must:
-
Verify that these automatic accounting instructions (AAIs) are set up:
-
AAI table 4152, which provides the inventory account to offset against any count variance.
-
AAI table 4154, which provides the cost of goods sold account to update.
-
AAI table 4141, which provides the variance account to update (set up only if you use standard costs).
-
AAI tables 4122, 4124, 4126, and 4128, which provide the accounts for zero-balance adjustments.
-
-
Set up the Cycle Count Category Code field using the Item Master (P4101) and Item Branch (P41026) programs. This field must be set up for you to use the associated method of updating in the Cycle Count Update program (R41413).
-
Verify that you have not changed any printer file override information before you print cycle count sheets.
Any changes to information, such as report length or width, might affect the appearance of the report.
6.2.3 Forms Used to Process Cycle Counts
| Form Name | FormID | Navigation | Usage |
|---|---|---|---|
| Work With Cycle Count Review | W41240A | Inventory Count Alternatives (G4121), Cycle Count Review |
|
| Cycle Count Entry | W4141A | On the Work With Cycle Count Review form, select a cycle count and select Enter Cycle Count from the Row menu. |
|
| Work With Cycle Count Detail | W41241A | On the Work With Cycle Count Review form, select a record and then select Cycle Count Detail from the Row menu. | Review cycle count variances. |
| Cycle/Tag Count LPN Detail Entry | W46L42A | On the Cycle Count Entry form, select LPN Detail Entry from the Row menu. | Enter counted quantity on an existing license plate.
Note: You can use the license plate processing functions only if you have the JD Edwards EnterpriseOne Warehouse Management system and when licence plate processing is activated for the branch/plant. |
6.2.4 Running the Select Items for Count Program
Select Inventory Count Alternatives (G4121), Select Items for Cycle Count.
Before you start the cycle count process, you must run the Select Items for Count program (R41411). The R41411 program creates a record for each inventory item to be counted and records the current on-hand quantity and cost for each item. The system then generates the Select Items for Count report, which lets you compare the actual on-hand quantity with the online records.
The system processes the information in this way:
-
Selects items to be counted based on the data selection.
-
Copies the current on-hand balance to the Quantity On-hand at Count field in the F4141 table.
-
Creates a cycle count header in the F4140 table that contains the status codes for the processes that have been completed for Cycle Count items.
-
Updates this data in the F4141 table for each item in the selected locations:
-
Item information.
-
Quantity on hand.
-
Amount on hand.
-
-
Produces the Select Items for Count report, which lists the selected items for each location and the quantity on hand at the time of the count.
You can use data selection to group items by:
-
Cycle count categories (for example, monthly and semiannually).
-
ABC codes (for example, count A items monthly).
You cannot change this sequence for the Select Items for Count report:
-
Item number (short)
-
Lot
-
Location
6.2.5 Setting Processing Options for Select Items for Count (R41411)
Processing options enable you to specify the default processing for programs and reports.
6.2.5.1 Print
- 1. Cycle Count Description
-
Specify a user-defined cycle count description.
- 2. Print Production Number Inventory Details
-
Specify whether the system prints production number inventory details on the report. Values are:
Blank: The system does not print production number inventory details on the report.
1: The system prints production number inventory details on the report.
6.2.6 Reviewing Cycle Count Status
Access the Work With Cycle Count Review form.
Figure 6-1 Work With Cycle Count Review form

Description of "Figure 6-1 Work With Cycle Count Review form"
Before you perform the cycle count, review the online status of each cycle count and access detailed information, such as descriptions of each item in the count. In the processing options, you specify a range of status codes and that the program uses to select which cycle count records to view. You can change the range of status codes at any time when you are reviewing the cycle count.
Sometimes transactions occur during the time between running the Select Items for Cycle Count program and the actual count, resulting in an inaccurate value in the Quantity On Hand field in the F4141 table. Before you count items, you can use the Work With Cycle Count Review form to update the on-hand quantity to the most current number. The system refers to this procedure as resetting the frozen value.
The program updates the Quantity on Hand field in the F4141 table with the Quantity on Hand from the Item Location File table, updates the Amount field based on the new quantity, and clears the Quantity Counted field.
- Item Number
-
Enter an identifier for an item.
- Quantity On Hand
-
Enter the total quantity on hand in the primary unit of measure for an item at the beginning of the cycle count.
- Quantity Counted
-
Enter the total quantity that is counted for the item in all locations.
6.2.7 Printing Cycle Count Sheets
Select Inventory Count Alternatives (G4121), Print Cycle Count Sheets.
After you select the items to include in the cycle count and have reviewed them online, you can run the Print Cycle Count Sheets program (R41410A) to print information from the F4141 table onto the count sheets that you will use to perform the actual count. You can also print cycle count sheets from the Cycle Count Review program (P41240). The system uses the version that you specified in the processing options.
To print a specific cycle count number, specify the count number in the data selection.
Use this sequence for the R41410A report:
-
Cycle Count Number
-
Item Number
-
Branch/Plant
After you print the count sheets, the value Printed. appears in the Cycle Status field on the Work With Cycle Count Review form.
6.2.8 Setting Processing Options for Print Cycle Count Sheets (R41410A)
Processing options enable you to specify the default processing for programs and reports.
6.2.8.1 Print
- Print Non-canceled sheets
-
Specify whether to print non-canceled sheets. Values are:
Blank: Print all cycle sheets.
1: Print non-canceled sheets.
6.2.9 Canceling Cycle Counts
Select Inventory Count Alternatives (G4121), Cycle Count Review.
You can cancel a cycle count at any time before you update it. For example, if several days pass between the time that you print cycle count sheets and actually perform the cycle count, you can cancel the cycle count and reprint it later.
After you cancel the cycle count number, the value Canceled appears in the Cycle Status field on the Work With Cycle Count Review form.
6.2.10 Entering Cycle Count Results
Access the Cycle Count Entry form.
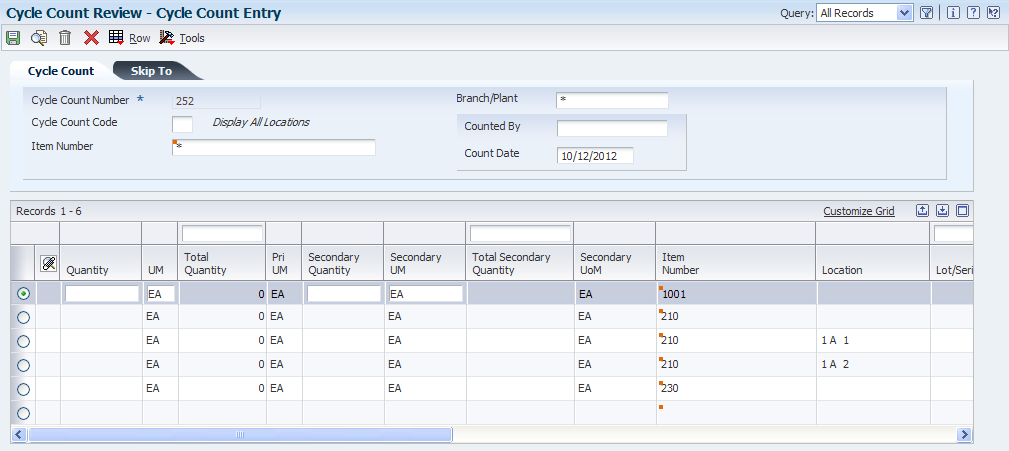
After you have performed the cycle count and recorded the information on the cycle count sheets, you must enter the results in the online inventory records, even if the result of the count is zero.
If the count included an item that is found in a new location, you can add the new location on a blank line of the Cycle Count Entry form. However, if the Location Control constant is turned on, you must set up the new location in the F4100 table before you can enter the quantity on the Cycle Count Entry form.
When you enter a new location, the system creates an item location record and a variance for the entire quantity and amount after you enter the cycle count results and then run the Cycle Count Update.
- Quantity
-
Enter the number of units that the system counts in the primary unit of measure.
- UM (unit of measure)
-
Enter a code from UDC table (00/UM) that indicates the quantity in which to express an inventory item, for example, CS (case) or BX (box).
- Total Quantity
-
Enter the total quantity that is counted for the item in all locations.
- Secondary Quantity
-
If the secondary unit of measure option in Inventory Constants is selected, this field will appear on data entry screens.
- Secondary UM (secondary unit of measure)
-
Enter a code from UDC table (00/UM) that indicates an alternate unit of measure for the item.
6.2.11 Entering Counted Quantity on an Existing License Plate
Access the Cycle/Tag Count LPN Detail Entry form.
|
Note: Before you can enter counted quantity on an existing licence plate, the advanced warehouse management functionality needs to be active, and all necessary warehouse and license plating setup must be in place. |
If no license plate item detail record exists in the F46L11 table, you cannot access the Cycle/Tag Count LPN Detail Entry form. Also, the system cannot process license plate detail under these conditions:
-
The branch/plant is not warehouse controlled.
-
LPN processing is not activated for this branch/plant.
-
LPN item detail does not exist for this location.
-
The stocking type is not valid.
-
The inventory interface option is not valid.
-
The item is a bulk item.
-
Routing is not at the on-hand step.
-
Asynchronous processing is not completed.
- License Plate Number
-
Enter a value that uniquely identifies a collection of items and or other license plates. The license plate number is typically used to simplify movements and inventory transactions.
- Quantity Counted
-
Enter the total quantity that is counted for the item in all locations, in a primary unit of measure.
- Dual Quantity Counted
-
Enter the quantity that is counted in a dual unit of measure. The system displays this field only if an item is a dual unit of measure (UOM) item.
6.2.12 Reviewing Cycle Count Variances
Access the Work With Cycle Count Detail form.
Figure 6-3 Work With Cycle Count Detail form
Description of "Figure 6-3 Work With Cycle Count Detail form"
After you enter the results of the cycle count, the system automatically calculates variances. A variance is the difference between the on-hand quantity and the counted quantity. Variance information can help you resolve discrepancies online. The system records variances to the F41021, F4111, and F0911 tables when the system updates the count.
On the Work with Cycle Count Detail form, you can review this information for each item:
-
On-hand quantity
-
Counted quantity
-
Variance
To help you resolve discrepancies, you can print the Print Variance Detail report to list the variances between the results of the cycle count and the inventory records. You can access this report from either the Form menu or directly from the Inventory Count Alternatives menu. When you run this report from the Form menu, the system uses the variance criteria that are set up on the form and overrides any processing option defaults. When you run the report from the Inventory Count Alternatives menu, the system uses the processing options for the version.
- Quantity Variance and Amount Variance
-
Enter the variance type that determines whether a quantity or an amount variance is calculated and displayed.
- Amount
-
Enter a number that identifies the amount that the system will add to the account balance of the associated account number. Enter credits with a minus sign (–) either before or after the amount.
- Absolute Value
-
Specify whether a variance amount appears when it is greater than an absolute value or greater than a percentage of the original.
- Percentage
-
Specify whether a variance amount appears when it is greater than an absolute value or greater than a percentage of the original.
- Relationship
-
Enter a code from UDC table (00/VA) that indicates the relationship between the ranges of variances that you display. Values are:
EQ: Equal to
LT: Less than
LE: Less than or equal to
GT: Greater than
GE: Greater than or equal to
6.2.13 Revising Cycle Count Quantities
Access the Cycle Count Entry form.
After you enter and review the cycle variance information, you might recount some items and subsequently revise the cycle count quantity. After you recount and revise, you can review variances again, both online and through the Print Variance Detail (R41403) program.
You can revise the cycle count quantity using one of these methods:
-
Replace the count
-
Add and subtract quantities
6.2.14 Printing a Variance Report
Select Inventory Count Alternatives menu (G4121), Cycle Variance Detail Print.
To resolve discrepancies, you can print a report of the variances between the results of the cycle count and the inventory records. Use data selection to print a variance report for a specific cycle count.
6.2.15 Setting Processing Options for the Print Variance Detail (R41403)
Processing options enable you to specify the default processing for programs and reports.
6.2.15.1 Processing
- 1. Enter '1' to select on Quantity Variance (default) or '2' to select on Amount Variance
-
Specify a value that determines the type of variance the system uses. Values are:
1: Quantity Variance (default)
2: Amount Variance
- 2. Enter the Relation to use for the variance selection. (Default is greater than)
-
Specify a user-defined code from UDC table (00/VA) that identifies the relationship between the range of variances that appear.
- 3. Enter the Quantity or Amount to use to compare with the variance for selection.
-
Specify a value that determines the quantity or amount to use to compare with the variance for selection.
- 4. Enter '1' to compare the Percent Variance or '2' to compare the Unit Variance (default).
-
Specify a value that determines the type of variance to compare. Values are:
1: Percent Variance
2: Unit Variance (default)
6.2.16 Approving Cycle Counts
Access the Work With Cycle Count Review form.
After you enter and review the cycle count and have it approved by the appropriate person, you must update the cycle count status to indicate approval. Approving a cycle count advances the status code so that the cycle count is available for the update process. You can override counts as needed. The system stores the status in the F4140 table.
6.2.17 Running the Cycle Count Update Program
Select Inventory Count Alternatives (G4121), Cycle Count Update.
After the cycle count has been entered, reviewed, and approved, run the Cycle Count Update program (R41413) to update ledgers and balances. This program records variances to the F4111, F0911, and F41021 tables.
Use data selection to specify the cycle count number for the update. Cycle counts must have a cycle count status of Approved to be updated. After a successful update, the Cycle Count Update program updates the cycle count status to Complete. The program does not generate an error log if the update is not successful. In the case of an unsuccessful update, the cycle count status remains at Approved.
The program updates the next count date field in the Item Location File table in preparation for the next cycle count. A processing option determines the method that the program uses. These are the available methods:
-
The cycle count category codes in UDC table (41/8) define the frequency and number of days for cycle counts.
To use this method, the cycle count code that applies must be entered in the F4101 and F4102 tables.
For example, if you enter 1 in the Next Count Date processing option on the Defaults tab and the item has QTR stored in the Cycle Count Category field, the system calculates the next count date from the current date using the number of days (91) in the Description 02 field for QTR.
-
If you leave Next Count Date processing option on the Defaults tab blank, the ABC Codes method correlates the ABC Code 1-Sales-Inventory ranking for the item with UDC table (41/NC) to determine the next count date.
You can review this date in the Next Count Date field on the Location Revisions form, and you can specify the field as data selection in the Select Items for Count program.
6.2.18 Setting Processing Options for Cycle Count Update (R41413)
Processing options enable you to specify the default processing for programs and reports.
6.2.18.1 Defaults
These processing options define the dates that the system will use for general ledger posting and for the next cycle count.
- 1. General Ledger Date
-
Specify the date that the system associates with the cycle count variances when they are posted to the F0911 table. Enter a specific date or select a date from the calendar. If you leave this processing option blank, the system uses the current date.
- 2. Next Count Date
-
Specify how the system determines the date for the next cycle count. The Cycle Count Entry (P4141) program updates the Next Count Date field in the F41021 table in preparation for the next cycle count.
The system bases the date on either the cycle count category codes or on the ABC codes. Both methods depend on a set of UDCs that provide a correlation between a code and the number of days until the next cycle count. You must enter the appropriate code in the F4101 and F4102 tables during item entry or when you revise the item.
When the cycle-count category codes method is used, the system references UDC table (41/8). In addition, items must have a cycle count code in the Cycle Count Category field in the Item Master and Item Branch tables. For example, if the item has QTR in the Cycle Count Category field, the system calculates the next count date by adding the number of days (such as 91) that is stored in the Description 02 field for QTR in UDC table (41/8) to the current date.
When the ABC Codes method is used, the system references UDC table (41/NC). For this method, items must have an ABC sales code in the ABC Code 1 field (Sales - Inventory) in the Item Master and Item Branch tables.
You can review the calculated date in the Next Count Date field on the Location Revisions form, and you can specify the field as data selection in the Select Items for Count (R41411) program.
Values are:
Blank: The system bases the date on ABC codes.
1: The system bases the date on the cycle count category codes.
6.2.18.2 Process
- 1. Delete Detail Records from Cycle Count and Warehouse Transaction tables
-
Specify whether the system deletes detail records from the F4141 and F4142 tables after processing. Detail records contain the on-hand quantities and amounts that are stored in the general ledger. They also contain the quantities that were counted for locations, the unit cost, the name of the person who performed the count, and the date. Values are:
Blank: Do not delete detail records. You can use file utilities or create a batch program to delete the detail records from the Cycle Count Transaction File and Warehouse Count Transaction tables at a later time.
1: Delete detail records from the Cycle Count Transaction File table and the Warehouse Count Transaction table. You must run a variance report before you run the Cycle Count Update (R41413) program. After you run the program, no detail records will exist to calculate the variance.
- 2. Create Item Ledger Records for zero variances
-
Specify whether the system creates records in the F4111 table for transactions with variances of zero. Values are:
Blank: Do not create records for variances of zero.
1: Create records for variances of zero.
- 3. Dual Unit of Measure G/L Variance Offset Account
-
Specify how the system calculates variances and creates GL entries for an offset account for an item with a dual unit of measure. You can use this account to track losses, such as those from theft or shrinkage. The system uses AAI 4156 for the offset entries. Values are:
Blank: The system does not use AAI 4156.
1: Calculate a variance based on the difference between the primary quantity and the secondary quantity in the cycle count transaction.
2: Calculate a variance based on the secondary quantity in the cycle count transaction.
6.2.18.3 Interop
- 1. Transaction Type
-
Specify a user-defined code from UDC table (00/TT) that identifies the transaction type that the system uses when creating outbound interoperability transactions. If you leave this processing option blank, the system does not perform outbound interoperability processing for cycle count transactions.
6.3 Processing Tag Counts
This section provides an overview of tag counts and discusses how to:
-
Run the Select Items for Count program.
-
Print inventory tags.
-
Set processing options for Print Inventory Tags (R41607).
-
Record tag distribution and receipt information.
-
Set processing options for Tag Status Review (P41604).
-
Enter tag count results.
-
Review tag count variances.
-
Run tag count updates.
-
Set processing options for Tag Inventory Update (R41610).
6.3.1 Understanding Tag Counts
A tag count is the method for counting all items in a location. When you perform a tag count, you physically tag and count all items twice by location. Typically, a tag count occurs at the end of the year or any frequency that is scheduled by a company. To complete a tag count, two teams independently perform the same physical inventory and record their data on two different parts of the tag. Later, you use each team's data to compare results and resolve variances.
Consider using a tag count in conjunction with a cycle count to ensure accuracy. You also can use the following programs to indicate that counted quantity is on certain existing license plates. You can access LPN Detail Entry program (P46L42) from the Row menu on Cycle Count Entry form or from the Form menu on the Tag Count Entry form.
6.3.1.1 Tag Distribution Information
Before you distribute tags to the teams, you must record who is responsible for each tag number. You use this information to track:
-
Who tagged each item.
-
Who returned the parts of each tag.
You must inform the teams of any receipts, shipments, and item breakage that occur during the count. The counters must record by location all items that are added and moved during the count.
You cannot enter additional tags to an existing group. Print a new group of sequentially numbered tags using the Print Inventory Tags program. You also cannot delete tags on Tag Status Review because all tag numbers must be accounted for. You can, however, change the status of a tag to DS (destroyed) to indicate that the tag should not be used.
If you need to enter counts for specific location detail records, set the appropriate processing option in the Tag Status Review (P41604) program.
6.3.2 Forms Used to Process Tag Counts
| Form Name | FormID | Navigation | Usage |
|---|---|---|---|
| Work With Tag Status Review | W41604A | Inventory Count Alternatives (G4121), Tag Status Review
Inventory Count Alternatives (G4121), Tag Issues and Receipts |
Review tag status. |
| Tag Issues and Receipts | W41604E | On the Work With Tag Status Review form, select a record and select Issues/Receive from the Row menu. | Record tag distribution and receipt information. |
| Tag Count Entry | W41604P | On the Work With Tag Status Review form, select a record and select Enter Count from the Row menu. | Enter tag count results. |
| Work With Tag Status Summary | W41604O | On the Work With Tag Status Review form, select a record and select Status Summaries from the Form menu. | Review tag status summaries. |
| Work With Tag Variance Review | W41604L | On the Work With Tag Status Review form, select a row and select Variance Review from the Form menu. | Review tag count variances. |
6.3.3 Running the Select Items for Count Program
Select Inventory Count Alternatives (G4121), Select Items for Tag Count.
Before you start the tag count process, you must run the Select Items for Count-Tag Inventory program (R416060) to build a record for each inventory item to be counted and the current on-hand quantity and cost for each item.
Before you run the R416060 program, exclude these stocking types because they represent non-stock items:
-
K: Kits.
-
F: Features.
-
Any other user-defined stocking types.
6.3.4 Printing Inventory Tags
Select Inventory Count Alternatives (G4121), Tag Print.
Run the Print Inventory Tags (R41607) program to print inventory tags for each location. Although you can print tags at any time, you typically print tags at the beginning of the tag count process and distribute them to the teams who are counting items. The tag is a two-part form that includes this information:
-
Tag number
-
Date printed
-
Branch/plant
You can vary the tag's format to accommodate the business needs. The system stores the tag number and tag status in the F4160 table.
Data selection and data sequencing are not available for the R41607 program. Instead, you use the processing options to specify the number of tags to print.
6.3.5 Setting Processing Options for Print Inventory Tags (R41607)
Processing options enable you to specify the default processing for programs and reports.
6.3.5.1 Defaults
- Number of Tags
-
Specify the number of tags that you want to print.
- Branch / Plant
-
Specify the branch/plant to print on the tags.
6.3.6 Recording Tag Distribution and Receipt Information
Access the Tag Issues and Receipts form.

- Tag Status
-
Enter a code from UDC table (41/TS) for the status of a tag in the tag inventory count process.
- Tag Team ID - Issued
-
Enter the address book number of the individual or team to which you issued the tags.
- Tag Team ID - Received
-
Enter the address book number of the individual or team from which you received tags.
6.3.7 Setting Processing Options for Tag Status Review (P41604)
Processing options enable you to specify the default processing for programs and reports.
6.3.7.1 Defaults
- Status One through Status Four
-
Specify user-defined codes from UDC table (41/TS) that identify the statuses that are valid for a tag change.
- Default Primary Location and Lot
-
Specify whether to use a default location and lot. Values are:
Blank: Do not use a default location and lot.
1: Use the location and lot from the primary location. (default)
If you are using blank secondary locations, this processing option is invalid.
- Add Secondary Location
-
Specify whether to allow the addition of a secondary location. Values are:
Blank: Do not allow the addition of secondary location records.
1: Allow the addition of secondary location records.
6.3.7.2 Warehouse
- Location Detail
-
Specify how to select location detail records. Values are:
Blank: The system selects the location detail records.
1: Use the Location Detail Selection Window to enter counts for specific location detail records.
6.3.8 Entering Tag Count Results
Access the Tag Count Entry form.
After the tag count is complete, you must enter the information from each tag into the system.
6.3.9 Reviewing Tag Count Variances
Access the Work With Tag Variance Review form.
Figure 6-6 Work With Tag Variance Review form
Description of "Figure 6-6 Work With Tag Variance Review form"
After you enter the results of the tag count, you can review the variance between the amount and cost of inventory online and the amount of inventory that the teams counted.
6.3.10 Running Tag Count Updates
Select Inventory Count Alternatives (G4121), Tag Update.
After you have entered the tag count results and reviewed variances, run the Tag Inventory Update program (R41610) to:
-
Compare the online on-hand count to the physical count.
-
Calculate the quantity and amount of variances.
-
Update the new quantity information in the item location record and item ledger.
-
Create entries to the general ledger based on AAIs.
The system does not accept any additional count entries for the group of tags that were used for the update. After the update, the system updates the status in the Tag Inventory table to CL (closed) or deletes the record, depending on how you set the processing options. You can verify the results of the update on Item Ledger Inquiry and General Journal Review.
6.3.10.1 Data Sequence
You should use this sequence for the Tag Inventory Update program (R41610):
-
Item Number-Short
-
Branch/Plant
-
Location
-
Lot
6.3.11 Setting Processing Options for Tag Inventory Update (R41610)
Processing options enable you to specify the default processing for programs and reports.
6.3.11.1 Process
- 1. Tag Delete
-
Specify whether the system deletes tags from the F4160 table after an update. Values are:
Blank: Do not delete.
1: Delete.
- 2. GL Date
-
Specify the GL date that the system associates with the tag inventory update. Enter a specific date or select a date from the calendar. If you leave this processing option blank, the system uses the current date.
- 3. Dual Unit of Measure G/L Variance Offset Account
-
Specify how the system calculates variances and creates GL entries for an offset account for an item with a dual unit of measure. You can use this account to track losses, such as those from theft or shrinkage. The system uses AAI 4156 for the offset entries. Values are:
Blank: The system does not use AAI 4156.
1: The system uses AAI 4156 based upon the difference between primary and secondary units.
2: The system uses AAI 4156 based upon the secondary units.
6.3.11.2 Interop
- 1. Transaction Type
-
Specify a user-defined code from UDC table (00/TT) that identifies whether the system processes outbound interoperability transactions through the subsystem. If you leave this processing option blank, the system does not perform outbound interoperability processing.