4 Setting Up Provider Groups
This chapter contains the following topics:
-
Section 4.1, "Understanding Provider Groups and Escalation Methods"
-
Section 4.2, "Setting Up Provider Group User Defined Codes (UDCs)"
-
Section 4.8, "Setting Up Case Priorities Using Notification Escalation Method"
-
Section 4.9, "Setting Up Priorities Using Skill-Level Escalation Method"
-
Section 4.10, "Setting Up Processing Options for the Work With Provider Groups Program (P17506)"
4.1 Understanding Provider Groups and Escalation Methods
Set up provider groups to ensure that cases are assigned to the appropriate people. For example, you might set up and organize provider groups according to product lines and group consultants who are knowledgeable about each product into specific provider groups. You might also create provider groups to ensure that foreign language cases are directed to the appropriate groups.
Set up routing information to define the sequence and method by which cases are routed to the appropriate provider group.
The service and warranty management (S/WM) escalation method that you define in the S/WM System Constants program (P17001) determines how the system defines provider groups and escalates cases.
|
Note: Setup requirements that are specific to an escalation method are noted in the applicable setup procedure. |
4.1.1 Notification Escalation Method
If you decide to escalate cases using the notification method (escalation method 1 in the S/WM System Constants program), use the Distribution List Control program (P02150) to attach assignees to provider groups. Use the Queue Security program (P01135) to specify whether groups or specific users can make changes to the distribution lists.
Through the Queue Properties program (P01133P), define which programs distribution list members view when they open their Workflow queue.
The escalation percentages you define on the Case Priority Revisions form determine how the system routes and escalates cases to distribution list members. When a case is assigned to a provider group, the system uses the values in this form to determine the escalation response time and sends notification to members on the distribution list assigned to the provider group.
4.1.2 Skill-Level Escalation Method
If you decide to escalate cases using the skill-level method (escalation method 2 in the S/WM System Constants program), you can assign members to provider groups using the Work With Provider Group Employees program (P90CG506). Through this program, you assign address book records, such as employees or contractors, to provider groups and specify a skill-level for each provider group member. You can assign any address book record to one or more provider groups, as long as the address book record has been set up as a service provider.
When cases are assigned to provider groups, the system compares the skill-levels and case loads of each provider group member and assigns cases appropriately.
The escalation percentages that you define on the Case Priority Revisions form determine when the system routes and escalates cases to provider group members.
4.2 Setting Up Provider Group User Defined Codes (UDCs)
This section provides an overview of provider group UDCs.
4.2.1 Understanding Provider Group UDCs
Before you can use any of the features of Provider Groups, you need to define information that the system uses for processing. You also need to specify the data that is used when you set up provider groups in the system. You can access these UDCs from the Case User Defined Codes menu (G90CG01).
This table describes the information that you must set up for provider groups:
| UDC | Type of Data |
|---|---|
| 90CG/SL | Skill Level
Define the skill levels that the system uses for escalation when the Escalate using Skill Levels option is selected. The system starts with the provider group member with the lowest skill level and proceeds to the next highest level within the provider group when processing escalations. You can enter additional skill levels, as needed; however, you must enter integers. For example, enter 5, 6, 7, and so on, as skill levels. |
| 17/PR | Case Priority
Use case priorities to define and organize cases by severity level. |
4.3 Setting Up Provider Groups
This section provides an overview of provider groups, lists a prerequisite, and discusses how to:
-
Set up a provider group.
-
Assign provider group members using skill levels.
-
Assign provider group members using distribution lists.
4.3.1 Understanding Provider Groups
Provider groups are a particular search type (UDC 01/ST) in the Address Book. Use the Work With Provider Groups program to set up provider groups. When you set up a provider group, the system adds a record to the F1797 and F0101 tables.
If you escalate cases using skill levels, use the Provider Group Employees program to identify the members of each provider group and the skill level associated with each member.
If you escalate cases using distribution lists, use the Distribution List Control program to attach assignees to provider groups. When you define organizational structures, you create hierarchies of relationships between parents and children.
4.3.2 Prerequisite
All provider group members must first be set up in the Address Book and defined as service providers.
4.3.3 Forms Used to Set Up Provider Groups
| Form Name | FormID | Navigation | Usage |
|---|---|---|---|
| Provider Group Revisions | W17506B | Case Setup (G90CG), Provider Group Revisions
Click the Add button on the Work With Provider Groups form. |
Set up provider groups. You might need to add provider groups if the organization expands its product groups or if you decide to assign specialists to cases based on knowledge of product groups. |
| Provider Group Employees | W90CG506B | On the Work With Provider Groups form, search and select a provider group, and click Provider Grp Empl (provider group employee) from the Row menu. | Define members and associate skill levels with the provider group.
Note: Use this form if you are escalating cases using skill levels. If you have not set the escalation constant in the S/WM System Constants program to escalate using skill level, the Provider Grp Empl option will not be available from the Row menu. Any address book record Search Type, not just employees, can be assigned to a provider group. The only requirement is that they must be set up as service providers in the Address Book. |
| Work With Distribution Lists | W02150A | On the Work With Provider Groups form, search and select a provider group, and click Workflow Grp Rev(workflow group revisions) from the Row menu.
Alternatively, select Case Setup (G90CG), Group Revisions. |
Review distribution list information.
Note: Use this form if you are escalating cases using the notification method. |
| Address Parent/Child Revisions | W0150A | On the Work With Distribution Lists form, click Add. | Set up distribution lists for provider groups.
Note: Use this form if you are escalating cases using the notification method. |
4.3.4 Setting Up a Provider Group
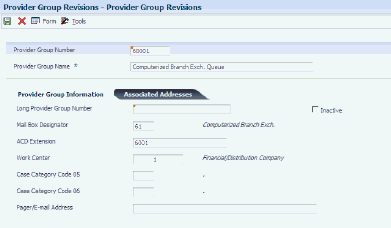
Access the Provider Group Revisions form.
4.3.4.1 Provider Group Information
Access the Provider Group Information tab.
- Provider Group Number/Name
-
Enter an existing Address Book number.
You can either manually enter a provider group number, or you can leave the field blank and have the system assign a provider group number. The system creates an Address Book record for this new provider group with that provider group number.
- Name
-
Enter the provider group name. This 40-character alphabetic field appears on many forms and reports. You can enter dashes, commas, and other special characters, but the system cannot search on these special characters when you use this field to search for a name.
- Long Provider Group Number
-
Enter a value in this field to enter and locate information. If you enter a value other than the Address Book number such as the long address or tax ID, you must precede it with the special character that is defined in the Address Book constants. When the system locates the record, it returns the Address Book number in this field.
For example, if Address Book number 4100 (total solutions) has a long address TOTAL and an asterisk (*) distinguishes it from other entries (as defined in the Address Book constants), you might type *TOTAL into the field, and the system would return 4100.
- Mail Box Designator
-
Enter a mailbox code from UDC 02/MB associated with the provider group that should be used on delivery of the message.
- ACD Extension (automatic call distributor extension)
-
Enter the telephone number of the provider group. Do not enter a prefix or special characters, such as hyphens or periods. You can use any applicable telephone number format for a country. This field is used in conjunction with the Prefix field; you enter the first segment of the telephone number, which is called the area code in the U.S. When you search for an address using a phone number, you must enter the number exactly as it is set up in Oracle's JD Edwards EnterpriseOne Address Book system, including any special characters.
- Work Center
-
Complete this field to calculate commitment date and time if you are not using entitlements. The system also uses the work center to calculate the elapsed time and the time remaining on the request.
- Case Category Code 05 and Case Category Code 06
-
Enter the case category codes (UDCs 17/05 and 17/06) to record additional information for a provider group. You can use this information for reporting on provider groups.
- Pager/E-mail Address
-
Enter the provider group's page or email information. This field is a text field.
4.3.4.2 Associated Addresses
Access the Associated Addresses tab.
- 1st Address Number, 2nd Address Number, 3rd Address Number, 4th Address Number, 5th Address Number, and 6th Address Number
-
Completes the address number information for a case assigned to a provider group.
Do not associate the Address Book number of consultants who receive cases for this provider group. Instead, associate consultants with the provider groups that are appropriate for reporting purposes or for workflow. To associate consultants to a provider group, include them as a member of the provider group.
4.3.5 Assigning Provider Group Members Using Skill Levels
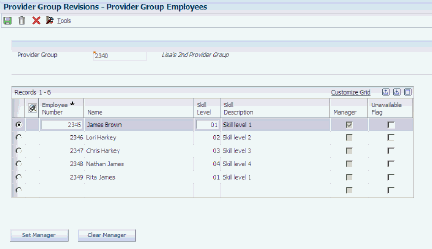
Access the Provider Group Employees form.
- Employee Number
-
Enter the Address Book number of the person whom you assign to the provider group. You can assign Address Book numbers with all search types to a provider group as long as the Address Book record has been set up as a service provider.
- Skill Level
-
Enter the provider group member's skill level. Use a value from UDC 90CG/SL. The system uses each provider group member's skill level to assign cases and process escalations. When assigning cases, the system starts with the provider group member with the lowest skill level and then proceeds to the next skill level.
- Manager
-
Define the manager for the provider group. You can select only one manager per provider group. To select the provider group's manager, you must click the radio button by the member and then select Set Manager. The manager of each provider group receives the past due notification and is assigned to all unresolved cases. The manager still receives past due case assignments even if the Unavailable Flag is selected.
- Unavailable Flag
-
Select this field for members who are unavailable for case assignment; for example, when they are on vacation or out of the office. Provider group members that have the Unavailable Flag selected do not have any cases assigned to them until the field is cleared.
4.3.6 Assigning Provider Group Members Using Distribution Lists
Access the Address Parent/Child Revisions form.
Figure 4-3 Address Parent/Child Revisions form

Description of "Figure 4-3 Address Parent/Child Revisions form"
- Parent Number
-
Enter the parent number for the distribution list. The system uses this number to associate addresses with the parent distribution list. Any value that you enter in this field updates the F0150 table for the blank structure type. This address number must exist in the F0101 table for validation purposes.
The Address Book number of the primary level in a hierarchy, or reporting relationship. A parent in one hierarchy can be a child in another hierarchy. A hierarchy can be organized by business unit, employee, or position. For example, you can create a hierarchy that shows the reporting relationships between employees and supervisors.
- Structure Type
-
Enter a value from UDC 01/TS that identifies a type of organizational structure that has its own hierarchy in the JD Edwards EnterpriseOne Address Book system (for example, email).
When you create a parent-child relationship for Oracle's JD Edwards EnterpriseOne Accounts Receivable system, the structure type must be blank.
The field identifies the type of distribution list, such as WFS for workflow, ORG for group, and EML for email. Enter WFS as the value.
- Group
-
Enter the group number. When you define case priorities, the Message Level field in the Case Priorities program uses the value in this field to determine who receives messages when cases are escalated.
See Setting Up Case Priorities Using Notification Escalation Method.
- Address Number
-
Enter a number that identifies an entry in the Address Book, such as employee, applicant, participant, customer, supplier, tenant, or location.
- Remark
-
Enter a remark, description, name, or address. This field is a generic field.
- Begin Eff Date (beginning effective date)
-
Enter the date on which the address number appears in the structure. The Beginning Effective Date field prevents the address number from occurring in the structure until the beginning effective date is the same as the current date.
If left blank, the address number always occurs in a structure unless there is an ending effective date.
- End Eff Date (ending effective date)
-
Enter the date on which the Address Book record ceases to exist in the structure.
|
Note: Threshold values, escalation hours, and escalation minutes are not used for cases. |
4.4 Setting Up Queue Security
This section provides an overview of queue security and discusses how to set up queue security.
4.4.1 Understanding Queue Security
If you are escalating cases using the notification method, you can set up the security status for a user or group of users within a workflow message queue. You can add security by user, distribution list, or both.
4.4.2 Form Used to Set Up Queue Security
| Form Name | FormID | Navigation | Usage |
|---|---|---|---|
| Workflow Message Security Revisions | W01135A | Case Setup (G1743), Queue Security
Click the Add button on the Work With Workflow Message Security form. |
Set up queue security.
Note: For security reasons, this form is available only in the Windows client. |
4.4.3 Setting Up Queue Security
Access the Workflow Message Security Revisions form.
- User
-
Enter a user in the workflow system. This field can also specify a group.
- Group/Role
-
Enter a group or list of users in the workflow system; the Address Book number that identifies a list of users in the workflow system.
- Authority Y/N
-
Enter whether the user is authorized to make changes to security information.
For workflow, this field indicates whether the user can view other queues in the Work Center.
4.5 Setting Up Queue Properties
This section provides an overview of queue properties and discusses how to set up queue properties.
4.5.1 Understanding Queue Properties
If you escalate cases using the notification method, you can set up queue properties to provide a link to an JD Edwards EnterpriseOne application if, for example, you want recipients to review information within an JD Edwards EnterpriseOne application whenever they open messages in that particular queue.
4.5.2 Forms Used to Set Up Queue Properties
| Form Name | FormID | Navigation | Usage |
|---|---|---|---|
| Work With Queues | W01133PA | Case Setup (G1743), Queue Properties | Review the list of queues. |
| Queues Properties Revisions | W01133PB | Click the Add button on the Work With Queues form. | Set up queue properties.
Note: For security reasons, this form is only available in Windows Client. |
4.5.3 Setting Up Queue Properties
Access the Queues Property Revisions form
- Queues
-
Enter a field that determines the mailbox associated with the queue that is used on delivery of the message.
- Application
-
Enter the name that identifies a system object. JD Edwards EnterpriseOne architecture is object-based. Discrete software objects are the building blocks for all applications, and developers can reuse the objects in multiple applications. The object librarian tracks each object. Examples of system objects include:
Batch applications (such as reports).
Interactive applications.
Business views.
Business functions.
Business function data structures.
Event rules.
Media object data structures.
- Form Name
-
Enter a unique name that identifies a form.
- Version
-
Enter a specific set of data selection and sequencing settings for the application. Versions can be names using any combination of alphanumeric characters. Versions that begin with XJDE or ZJDE are delivered with the JD Edwards EnterpriseOne system.
4.6 Setting Up Routing Information
When you set up routing information, you can direct cases to provider groups in the order that you determine as the most logical.
This section provides and overview of routing sequences and rules and discusses how to set up:
-
Routing sequence
-
Routing rules
4.6.1 Understanding Routing Sequences and Rules
Use routing sequence to manage the order that a case is routed to provider groups. Use routing sequence to define how the system searches through the routing rules to determine the provider group to which an incoming case is directed.
Use routing rules to define the prescribed path for assigning cases to the proper provider groups. You might assign cases to certain provider groups or individuals bases on their knowledge of a product family or language.
Through the Routing Rules form, you can assign cases to a provider group or person based on any of the following or any combination of the following information:
-
Customer Address Book number.
-
Call center location.
-
Product model.
-
Product family.
-
Environment.
-
Address Book language code.
-
Address Book geographic region code.
You can define the call center location in the Address Book for the service provider, the person entering the case. In the Address Book Revisions form, access the Address Book record for the service provider and enter the call center location in the Business Unit field.
4.6.2 Forms Used to Set Up Routing Information
| Form Name | FormID | Navigation | Usage |
|---|---|---|---|
| Case Provider Group Routing Rules Sequence | W17506H | Case Setup (G90CG), Provider Group Revisions
On the Work With Provider Groups form, select Routing Sequence from the Form menu. |
Define the order that the system uses to search for a match between the case and routing rules. The system uses a hierarchical search method, from most specific to most general.
Record a number in the Sequence Number field and then enter Y in the fields that the system includes in the hierarchical search. |
| Case Provider Group Routing Rules Revisions | W17506G | On the Work With Provider Groups form, select Routing Rules from the Form menu. | Set up routing rules to direct cases to the proper provider groups.
Specify either a person (assignee) or a provider group and then use any of the other active fields such as Product Model, Product Family, Environment, and so on, to determine the routing rule. |
4.6.3 Setting Up Routing Sequence
Access the Case Provider Group Routing Rules Sequence form.
Figure 4-4 Case Provider Group Routing Rules Sequence form

Description of "Figure 4-4 Case Provider Group Routing Rules Sequence form"
4.6.4 Setting Up Routing Rules
Access the Case Provider Group Routing Rules Revisions form.
Figure 4-5 Case Provider Group Routing Rules Revisions form (1 of 2)
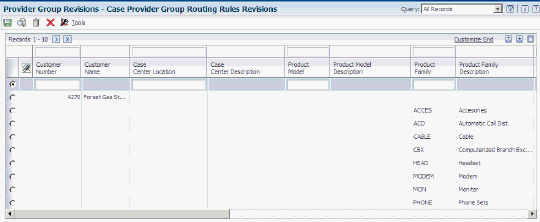
Description of "Figure 4-5 Case Provider Group Routing Rules Revisions form (1 of 2)"
Figure 4-6 Case Provider Group Routing Rules Revisions form (2 of 2)
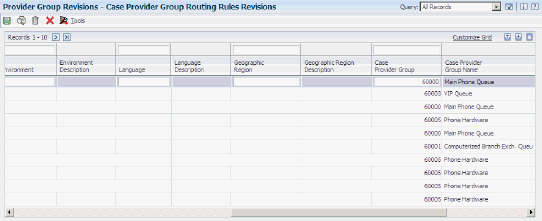
Description of "Figure 4-6 Case Provider Group Routing Rules Revisions form (2 of 2)"
- Case Provider Group
-
Enter the Address Book number of the provider group if you are entering routing rules for provider groups.
- Assignee Number
-
Enter the Address Book number of the assignee if you are entering routing rules for an assignee.
- Product Model
-
Enter a value from UDC 17/PM that classifies an inventory item into a model.
- Product Family
-
Enter a value from UDC 17/PA that classifies an inventory item into a group.
- Environment
-
Enter a value from UDC 17/EN to define the operating environment of the user.
- Language
-
Enter a value from UDC 01/LP that specifies the language.
Before specifying a language, a language code must exist at either the system level or in the user preferences.
- Geographic
-
Enter a value from UDC 17/GR to specify the geographic region of the customer.
4.7 Setting Up Case Types
Set up case types to organize cases and then assign specific case types to provider groups.
This section provides an overview of case types and discusses how to set up generic and provider-group-specific case types.
4.7.1 Understanding Case Types
You can set up various case types, depending on how the organization receives cases. The types of cases might include:
-
Facsimile
-
Live telephone call
-
Returned phone call
-
Email
Set up generic case types to apply to all provider groups. You can then define specific case types for each provider group, as needed.
If you do not set up specific case types for a provider group, the values associated with the generic version of the case type are associated by default with the provider group.
You use the same form to set up generic and provider group-specific case types; however, the navigation to the form is different.
4.7.2 Forms Used to Set Up Case Types
| Form Name | FormID | Navigation | Usage |
|---|---|---|---|
| Case Type Revisions | W17506C | Case Setup (G90CG), Provider Group Revisions
On the Work With Provider Groups form, select Provider Group Type from the Form menu. |
For generic case types, define the default Case Type from UDC 17/CT, Default Case Sourcefrom UDC 17/SC, and Resp Time (response time) for all provider groups. |
| Case Type Revisions | W17506C | On the Work With Provider Groups form, select the provider group and select Prdr Grp Types (provider group types) from the Row menu. | For provider group-specific case types, define the default case type from UDC 17/CT, Default Case Source from UDC 17/SC, and Resp Time (response time) for the selected provider group.
Note: To define a case type, you must first create the case type value in the UDC 17/CT table. |
4.7.3 Setting Up Generic and Provider-Group-Specific Case Types
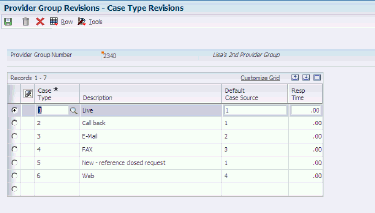
Access the Case Type Revisions form.
- Provider Group Number
-
For generic case types, this field is blank.
For provider-group-specific case types, the provider group number appears by default.
- Case Type
-
Enter a value from UDC 17/CT to specify the type of case.
- Default Case Source
-
Enter a value from UDC 17/SC to specify the source of a case.
- Resp Time (response time)
-
Enter a response time to define a guaranteed length of time when a consultant must respond to a case. This guaranteed response time is a component that is used to calculate commitment date and time, and escalation date and time if the case is not covered under a contract. This unit of time relates to the service type in the F1725 table. Enter the response time in hours.
Note:
If a contract covers a case, then the contract response time overrides the response time on the Case Request Types Revisions form.
4.8 Setting Up Case Priorities Using Notification Escalation Method
This section provides an overview of priorities and escalations, and discusses how to set up generic and provider-group-specific priorities.
4.8.1 Understanding Priorities and Escalations
The escalation method that is defined in the S/WM system constants determines how you can set up case priorities in the system. For both escalation methods, you use the Work With Case Priorities form to define how the system escalates cases; however, the form contains different fields, and the form numbers are different.
Each time that the system escalates a case, it uses the detail data from the Case Priority Revisions form to calculate:
-
New escalation date and time.
-
Message level within the parent distribution list for sending messages.
-
Priority.
When you enter a case, the escalation level is 1. The system locates the detail line containing an escalation level of 1. If the case is assigned, the system uses the Assigned Percentage value to calculate the escalation date and time. If the case is unassigned, the system uses the Unassigned Percentage field value to make the calculation. The system also uses the Commitment Date/Time value and the Response Time value in calculating the escalation time.
If you do not close the case by the escalation date and time, the system sends messages to individuals on the distribution lists, it changes the escalation level, and it calculates a new escalation date and time. The system continues to escalate the case and increment the escalation level until you close the case or until the system does not find a detail line containing the next escalation level.
You must define a generic priority that applies to all provider groups. You can specify an escalation process for each case priority (UDC 17/PR).
After you set up generic priorities, you can then set up priority values for each provider group. If a provider group does not have specific values assigned, the generic values apply by default.
You use the same form to set up generic and provider-group-specific priorities; however, the navigation to the form is different.
4.8.2 Forms Used to Set Up Priorities
| Form Name | FormID | Navigation | Usage |
|---|---|---|---|
| Work With Case Priorities | W17506J | On the Work With Provider Groups form, select Prdr Grp Priorities (provider group priorities) from the Form menu. | Review generic case priorities and commitment percentages. These values apply by default for all provider groups. |
| Case Priority Revisions | W17506I | On the Work With Case Priorities form. click Add. | Define the generic case priorities that are the default values for all provider groups. When you set priorities, the system updates the F1753 table. |
| Work With Case Priorities | W17506J | On the Work With Provider Groups form, select a provider group and select Prdr Grp Priorities (provider group priorities) from the Row menu. | Review the specific case priorities and commitment percentages that apply to the provider group. |
| Case Priority Revisions | W17506I | On the Work With Case Priorities form, select the provider group and click Add. | Define the case priorities for the provider group. When you set priorities, the system updates the F1753 table.
You can set up as many escalation levels as necessary. The system sends escalation messages until the issue is closed or until no more escalation levels exist. |
4.8.3 Setting Up Generic and Provider-Group-Specific Priorities
Access the Case Priority Revisions form.
- Provider Group
-
For generic priorities, this field is blank.
For provider-group-specific priorities, the provider group number appears by default.
- Priority
-
Enter the level of severity pertaining to the customer issue.
- Commit Percentage
-
Enter the percentage to use when calculating the escalation due time. The commit time is based on the case type. When a case is not covered under a contract, the system uses the value in this field to calculate escalation time.
Escalation Time = Current Time + (Commit Time × Percentage)
- Escalation Level
-
Enter the status code used to track commitment to the customer or an escalation. The escalation level is derived from a case and must be greater than or equal to 1.
- Message Level
-
Enter the message level. The message level is associated with the group number on the Address Parent/Child Revisions form and enables the system to determine who receives messages when the case is escalated.
- Unassigned Percentage and Assigned Percentage
-
Enter the percentage to use when calculating the escalation due time.
Escalation Time = Current Time + (Commit Time × Percentage)
The commit time is based on the type of case. The percentage is based on the request priority and whether the request is assigned to an individual.
The system uses the unassigned percentage to calculate escalation date and time for unassigned cases. The formula is Escalation Date and Time = Commitment Date/Time × Unassigned Percentage.
Note:
For Assigned Percentage, the values in the percentage field can be over 100 percent because you can send escalation messages after the commit time has been reached. - Escalation Priority
-
Enter a value from UDC 17/PR to specify the escalation priority.
4.9 Setting Up Priorities Using Skill-Level Escalation Method
This section provides an overview of priorities and escalations, and discusses how to set up generic and provider-group-specific priorities.
4.9.1 Understanding Priorities and Escalations
The escalation method defined in the S/WM system constants determines how you can set up case priorities in the system. For both escalation methods, you use the Work With Case Priorities form to define how the system escalates cases; however, the form contains different fields, and the form numbers are different.
Using the values in the F1753 table, the system assigns and processes the case through the provider group members assigned to the case. The values in this table enable the system to determine how long a provider group member works on a case before the case is systematically escalated to the next highest level member of the provider group.
You must define a generic priority that applies to all provider groups. After you set up generic priorities, you can then set up priority values for each provider group. If a provider group does not have specific values assigned, the generic values apply by default.
You use the same form to set up generic and provider group-specific priorities; however, the navigation to the form is different.
4.9.2 Forms Used to Set Up Priorities
| Form Name | FormID | Navigation | Usage |
|---|---|---|---|
| Work With Case Priorities | W17506J | On the Work With Provider Groups form, select Prdr Grp Priorities (provider group priorities) from the Form menu. | Review generic case priorities and commitment percentages. These values apply by default to all provider groups. |
| Case Priority Revisions | W17506E | On the Work With Case Priorities form, click Add. | Define the generic case priorities that are the default values for all provider groups. When you set priorities, the system updates the F1753 table. |
| Work With Case Priorities | W17506J | On the Work With Provider Groups form, select a provider group and select Prdr Grp Priorities (provider group priorities) from the Row menu. | Review the specific priorities and their associated commitment percentages that are specified for the selected provider group. |
| Case Priority Revisions | W17506E | On the Work With Case Priority form, click Add. | Define the case priority details for the provider group. When you create the priority and its details, the system updates the F1753 table.
You can set up as many escalation levels as necessary. The system sends escalation messages until the issue is closed or until the case has been escalated to the highest skill level. If the case is still not closed a message is sent to the manager. |
4.9.3 Setting Up Generic and Provider Group-Specific Priorities
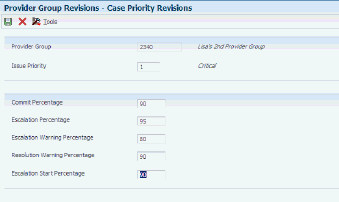
Access the Case Priority Revisions form.
- Provider Group
-
For generic priorities, this field is blank.
For provider-group-specific priorities, the provider group number appears by default.
- Issue Priority
-
Enter a value from UDC 17/PR to specify the issue priority.
- Commit Percent
-
Enter the percentage to use when calculating the escalation due time. The commit time is based on the case type. When a case is not covered under a contract, the system uses the value in this field to calculate escalation time.
Escalation Time = Current Time + (Commit Time × Percentage)
- Escalation Percentage
-
Enter the percent of the total response time scheduled to elapse between each of the case's escalation intervals. An escalation interval is the time that lapses between the case's assignment to a provider group member and the case's escalation to the provider group member with the next highest skill level.
For example, if you enter 25 in this field and the response time for the case is 4 hours, the first skill level assigned to this case will have the case for one hour and each skill level thereafter will have the case for 1 hour until the response time is depleted.
- Escalation Warning Percentage
-
Enter the percent of the current escalation interval that remains when the assignee is warned about an upcoming escalation to another provider group member.
For example, if you enter 25 in this field and the provider group member has the case for an hour, the system generates and delivers a warning message 15 minutes before the case is escalated to the next skill level.
- Resolution Warning Percentage
-
Enter the percentage of the entire escalation routine that remains when the current assignee is warned about an upcoming escalation to the provider group manager.
For example, if you enter 10 in this field and the response time is 4 hours (240 minutes), the assignee working on the case when 24 minutes remain receives a warning message.
- Escalation Start Percentage
-
Specify the percent of the response time assumed to have already lapsed or expired before the first escalation interval begins
For example, if you enter 10 in this field and the response time is 4 hours (240 minutes) the first provider group member assigned to the case will be assigned as soon as the case is created and saved, but the complete escalation interval will not begin until 24 minutes have elapsed.
4.10 Setting Up Processing Options for the Work With Provider Groups Program (P17506)
Processing options enable you to specify the default processing for programs and reports.
4.10.1 Versions
The processing option on this tab defines the version that the system uses when it calls this program:
- 1. Address Book MBF (10100041) Version (address book master business function (10100041) version)
-
If you leave this processing option blank, the system uses the ZJDE0001 default version.
4.10.2 Default
The processing option on this tab defines the default values that the system uses when you work with provider groups.
- 1. Document Type
-
Specify the default document type for provider group revisions. CL (call) is the default. Change the default as needed.
4.10.3 Display
The processing options on this tab indicate the information that the system displays when you inquire on provider groups using this version of the Work With Provider Groups program.
- 1. Display Case Provider Groups or Work Order Provider Groups
-
Specify which provider group the system displays. Values are:
Blank: Work order provider groups.
1: Case provider groups.
