7 Processing Records of Employment
This chapter contains the following topics:
7.1 Understanding ROEs
Human Resources Development Canada (HRDC) requires employers to issue an ROE when an employee has an interruption of earnings. An interruption of earnings occurs when an employee quits, is laid off or terminated, or has seven consecutive calendar days without both work and insurable earnings. Interruptions of earnings also occur when insurable earnings fall below 60 percent of normal weekly earnings due to situations such as illness, injury, and pregnancy.
The HRDC uses the ROE to calculate Employment Insurance benefits for the employee. The ROE that the system generates meets all of the HRDC reporting requirements.
All ROE processing originates on the ROE Workbench (P770631).
7.1.1 Setting Up Pay Tables for ROE Reporting
You can set up pay tables to calculate amounts that are reported on an ROE for vacation or statutory holiday pay. You set up these pay tables in the Workers Compensation Insurance Basis Table program (P079071). Similar to workers compensation tables, pay tables for ROE reporting refer to a range of PDBA codes.
To set up pay tables, follow the steps for setting up workers compensation insurance basis tables.
|
Note: You do not need to complete the Exclude Premiums field when you are setting up pay tables for ROE reporting. |
You indicate the pay tables that you have set up for ROE reporting in the processing options for the ROE Workbench (P770631).
7.2 Prerequisite
Set up pay tables for ROE processing.
7.3 Setting Up a Holiday Table for ROEs
This section provides an overview of holiday tables, lists a prerequisite, and discusses how to set up a holiday table.
7.3.1 Understanding Holiday Tables
When you create ROEs, you must identify any statutory holidays for which the employee should be paid in the final payment or later. You can set up a holiday table that lists the dates of the paid statutory holidays for all provinces and territories. On the ROE entry forms, you can select the holidays from the table and have the system enter the appropriate date on the ROE.
You do not need to create a new holiday table each year unless the dates that are covered in the table no longer apply. You can use the same holiday table information for all ROEs.
7.3.2 Prerequisite
Set up user-defined code list 06/HC (holiday codes) to identify the codes for each holiday that the company acknowledges.
7.3.3 Forms Used to Set Up a Holiday Table for ROEs
| Form Name | FormID | Navigation | Usage |
|---|---|---|---|
| Work With Holidays | W776915A | System Setup (G07BUSP4), Holiday Table | Access the Revise Holiday Table form. |
| Revise Holiday Table | W776915B | On the Work With Holidays form, click Add. | Set up a holiday table. |
7.3.4 Setting Up a Holiday Table
Access the Revise Holiday Table form.
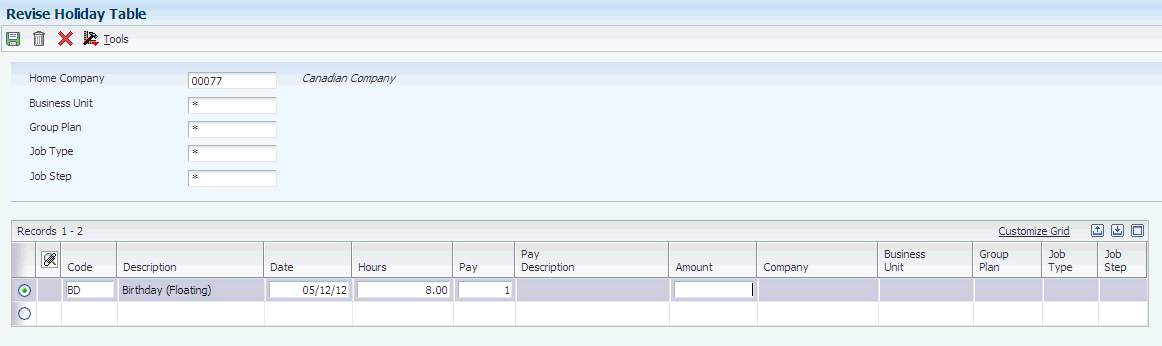
- Group Plan
-
Enter a user-defined code (06/UN) that represents the union or plan in which the employee or group of employees work or participate.
- Code
-
Enter a user-defined code (06/HC) that designates the defined statutory holiday.
- Date
-
Enter the date of the holiday.
- Hours
-
Enter the number of hours that are associated with each transaction.
- Pay
-
Enter a code that defines the type of pay, deduction, benefit, or accrual.
Pay types are numbered from 1 to 999. Deductions and benefits are numbered from 1000 to 9999.
- Amount
-
Enter a lump sum amount, an adjustment amount, or an amount that represents an employee's gross pay. This amount temporarily overrides any pay calculation that the system normally performs.
7.4 Creating ROEs
This section provides an overview of ROE creation, lists a prerequisite, and discusses how to:
-
Create a single ROE.
-
Create multiple ROEs.
-
Set processing options for the ROE Workbench program (P770631).
7.4.1 Understanding ROE Creation
You can create single ROEs or multiple ROEs at the same time, depending on the needs of the organization.
7.4.1.1 Creating a Single ROE
You can enter a single ROE when an employee:
-
Takes a leave of absence.
-
Submits a resignation.
-
Terminates employment for any reason.
-
Requests an ROE, and a seven-day interruption of earnings has occurred.
7.4.1.2 Creating Multiple ROEs
You might need to process many ROEs at one time, for example, at the end of a seasonal employment period or during a layoff. When you create multiple ROEs, you enter information that applies to every employee who is receiving an ROE, such as the reason for the ROE and the expected recall date. You then use data selection to specify the employees who receive ROEs.
7.4.2 Prerequisite
Create a version of Create Multiple ROEs (R770631A) with data selection set to select the employees for whom you are creating ROEs.
7.4.3 Forms Used to Create ROEs
| Form Name | FormID | Navigation | Usage |
|---|---|---|---|
| Work With ROEs | W770631A | ROE Processing (G77BCAP16), ROE Workbench | Access the ROE Workbench. |
| Revise ROE | W770631B | On the Work With ROEs form, click Add. | Create a single ROE. |
| Create Multiple ROEs | W770631C | On the Work With ROEs form, select Create Multi ROEs (create multiple records of employment) from the Form menu. | Create multiple ROEs. |
7.4.4 Creating a Single ROE
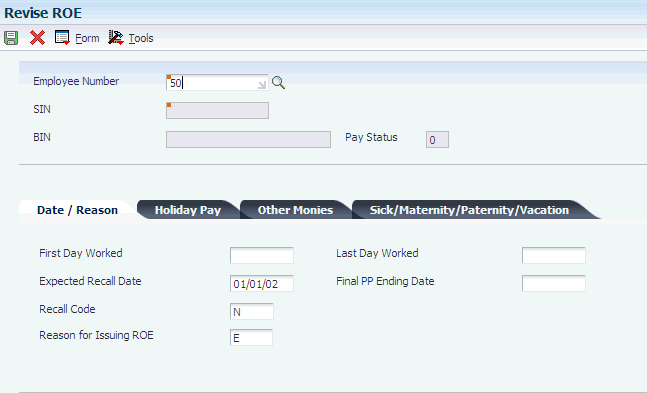
Access the Revise ROE form.
To attach comments to an ROE, select Comments from the Form menu.
- First Day Worked
-
Enter the actual day that the employee started to work.
If you do not know the actual first day worked and the employee has worked for more than two years, enter the date that was exactly two years before the interruption of earnings.
If the employee has worked for the same organization on several occasions, enter the start of the most recent period in which the employee returned to work (since you last issued an ROE to this person).
- Last Day Worked
-
Enter the last date for which the employee was paid.
If the employee has reached age 65 and continues to work, enter the date of the last day that was worked in the month in which the 65th birthday occurred.
- Expected Recall Date
-
Enter the date on which the employee can be recalled for employment, if known.
- Final PP Ending Date (final payroll processing ending date)
-
Enter the date that corresponds to the end of the payroll processing period during which the employee's last day worked occurred.
- Reason for Issuing ROE (reason for issuing record of employment)
-
Designates the appropriate reason for the work stoppage or interruption when a record of employment is issued.
If you enter the reason codes K00 or K15, (Release 9.1 Update) you must use the Comments function from the ROE Workbench to attach explanatory comments to the ROE.
- Code
-
Enter a code that specifies the statutory holiday.
- ROE Holiday Pay 1 (record of employment holiday pay 1)
-
Enter the statutory holiday pay that is paid after the last day worked. The system automatically provides this amount based on the Statutory Pay table that is indicated in the processing options for ROE Workbench, Box 17/19. The Statutory Pay table is established in the Workers' Compensation Insurance Basis Tables program (P079071).
Note:
System allows up to 10 Holiday information. (Release 9.1 Update) - Explanation
-
Enter a short description of the types of payments that are paid or payable in contemplation of, on, or after separation from employment. Examples of types of payments are pension payments, severance pay, retirement benefits, accumulated retirement or sick leave credits, bonuses or gratuities, wage in lieu of notice, retroactive wage increases, payments in kind, and all other monies. This code specifies the Other Monies option in box 17 on the ROE form (user-defined code table 77/OC (Release 9.1 Update)).
- Start Date (Release 9.1 Update)
-
Enter the Other Monies start date.
- End date (Release 9.1 Update)
-
Enter the Other Monies end date.
Note:
System allows up to 3 Other Monies information.(Release 9.1 Update) - Termination Other Pay 1
-
Enter the amount of the payments that are owed to the employee due to an interruption of earnings.
- Special Payment Type (Release 9.1 Update)
-
Enter a code that specifies the sick, maternity, or parental leave, or group wage-loss indemnity payment.
Note:
Prior to introducing this field on the form, you must enter the values for Special Payment Type through Payroll Category Code UDC. This provision is no longer available and values for Special Payment Types must be entered through this field. - Start Date (Release 9.1 Update)
-
Enter the date that payments start for paid sick, maternity, or parental leave or group wage-loss indemnity payments.
- End Date (Release 9.1 Update)
-
Enter the date that payments end for paid sick, maternity, or parental leave or group wage-loss indemnity payments.
Note:
System allows up to 4 Special Payment information. - Sick/Maternity/Vacation Amount
-
Enter the rate of the payments, either per day or per week, that an employee will receive for paid sick, maternity, or parental leave, or group wage-loss indemnity after the last day worked.
- Vacation Code (Release 9.1 Update)
-
Enter a code that specifies how vacation pay is paid to an employee.
- Start Date (Release 9.1 Update)
-
Enter a date for any vacation pay the employer has paid or will pay to the employee for a specific period of leave after the date entered in Block 11 on the ROE.
- End Date (Release 9.1 Update)
-
Entera a date for any vacation pay the employer has paid or will pay to the employee for a specific period of leave after the date entered in Block 11 on the ROE.
- Vacation Pay
-
Enter the amount of vacation pay that has been paid or is owed to the employee at the time of the interruption of earnings. The system automatically updates this amount, based on the Vacation Pay table that is indicated in the processing options for ROE Workbench, Box 17/19. The Vacation Pay table is established in the Workers Compensation Insurance Basis Tables program (P079071).
7.4.6 Setting Processing Options for the ROE Workbench Program (P770631)
Processing options enable you to specify the default processing for programs and reports.
7.4.6.1 Defaults
These processing options specify values that the system uses when generating ROEs.
- 1. Recall Code
-
Specify whether the employees who are receiving ROEs are expected to be recalled.
The value that you enter for this processing option is useful if you are issuing a large number of ROEs to employees who are terminating or being laid-off and will likely be rehired together, such as seasonal workers. You can edit individual ROEs after they are created to specify a different return status. Values are:
Y: Yes, employee is expected to be recalled.
N: No, employee is not expected to be recalled.
U: It is unknown whether employee will be recalled.
These values are stored in user-defined code table 07/RE.
- 2. Reason For Issuing ROE
-
Specify the type of work stoppage or interruption for which multiple ROEs are being issued. Values for this processing option are stored in user-defined code table 77/SC.
If you enter the reason codes K00 or K15, you must use the Comments function from the ROE Workbench to attach explanatory comments to the ROE.
- 3. Expected Recall Date
-
Specify the date that you expect to recall the employees for whom you are creating ROEs using the Create Multiple ROEs program (R770631A). For example, you might use this processing option if you are issuing ROEs to seasonal workers who will return to work on a predetermined date. Entering a date in this processing option does not obligate you to rehire employees on this date.
- 4. Single-Print Version
-
Specify the version of the Print ROEs/Update History report (R770631B) that the system uses to print single ROEs. If this processing option is left blank, the system uses version XJDE0001.
7.4.6.2 Box 17
These processing options specify the codes that the system uses to supply values for vacation pay and statutory holiday pay on ROEs (box 17).
- 1. Vacation Pay Table
-
Specify the code that the company uses for vacation pay types. Values for this processing option are stored in user-defined code table 06/IP. You attach the appropriate pay types to the code using the Workers Compensation Insurance Basis Tables program (P079071).
Completing this processing option enables the system to calculate the amount of vacation pay that the employee who is receiving the ROE is being paid upon interruption of earnings. This amount is reported in box 17A on the ROE.
- 2. Holiday Pay Table
-
Specify the code that the company uses for Statutory Holiday pay types. Values for this processing option are stored in user-defined code table 06/IP. You attach the appropriate pay types to the code using the Workers Compensation Insurance Basis Tables program (P079071).
Completing this processing option enables the system to calculate the amount of statutory holiday pay that the employee who is receiving the ROE is paid on interruption of earnings. This amount is reported in box 17B on the ROE.
7.4.6.3 Contact/Issuer
These processing options specify default values that appear on all ROEs.
- 1. Contact Name
-
Specify the name of the individual who can be contacted with questions concerning the ROE. This name prints on the ROE.
- 2. Contact Telephone Number
-
Specify the phone number of the individual who can be contacted with questions concerning the ROE. This phone number prints on the ROE, and it must be entered in the following format:
aaa-ppp-nnnn-xxxx, where:
-
aaa is the area code.
-
ppp-nnnn is the prefix and telephone number.
-
xxxx is the optional extension.
-
- 3. Issuer Name
-
Specify the name of the individual who is issuing the ROE. This name prints on the ROE.
- 4. Issuer Telephone Number
-
Specify the telephone number of the issuer or employer in Box 21. Enter the number in the format aaa-ppp-nnnn-xxxx, where aaa is the area code (required), ppp-nnnn is the prefix and telephone number (required), and xxxx is the extension (optional).
- 5. Preferred Language For Communication
-
Specify the language that is preferred by the individual who can be contacted with questions concerning the ROE. Values for this processing option are stored in user-defined code table 01/LP.
The contact's preferred language is printed on the ROE. This processing option does not determine the language of the ROE.
7.4.6.4 ROE Web
These processing options support ROE Web XML file processing.
- 1. File Path with File Name (Without Extension)
-
Enter the file path and file name. This is the location and name of the XML or flat file that the R770631B creates. Do not enter the file extension in this processing option. This example illustrates the format you use to complete this processing option:
drive:\{path}\export\WebRoeIf you leave this option blank, the system places files in the export folder of the enterprise server path.
- 2. Processing Method
-
Specify the mode for processing ROEs. You can process ROEs in draft or submission mode. After you process ROEs in submission mode, all revisions and reprints of the ROE must be done online using ROE Web. Values include:
Blank or D: Draft
S: Submission
- 3. 13 Weeks Pay Period
-
Use this processing option to specify the pay cycle code if 13 week processing is used.
- 4. Organization Number (Release 9.1 Update)
-
Use this processing option to identify the owner's organization number of the CRA Payroll Account Number. It is assigned by Canada once an organization is created in ROE Web. Consult your organizations' ROE Web profile to obtain this number. If you cannot find your organization number, contact the Employer Contact Centre (ECC) in Canada.
- 5. Folder Name (formerly divisions) (Release 9.1 Update)
-
Use this processing option to identify in which folder the ROE in the payroll extract file is to be filed.
Provide the FolderCD if your organization uses folders (formerly known as divisions).
7.4.6.5 ROE Laser Print
These processing options enable you to export ROE information to a text file so that you can later process it by using the ROE Laser Print program.
|
Note: The Canadian government no longer accepts laser ROEs. |
- 1. Export ROE Information
-
Specify whether to export the ROE information to a text file so that it can later be processed through the ROE Laser Print program. If the information is exported, the file name will be EmployeeLastName-AddressNumber.roe, for example, CHRETIEN-1234.roe. New records are appended to existing records in the text files (that is, nothing is deleted and one ROE text file exists per employee).
Note:
The directory where the files are written must be entered in the next processing option.Values are:
Blank: Do not export
1: Export
- 2. Path And Directory Of Exported Files
-
Specify the path and directory where the exported ROE text files are written. This path must be recognized by the computer where the Print ROE/Update History report (R770631B) is run. This report is launched automatically when you print an ROE statement through the ROE Workbench program. For example, if R770631B is set up to run locally, you might enter C:\ROE_Files\
Note:
You must enter a slash at the end of the path. In addition, the combined length of the file name plus the path name cannot be more than 255 characters.
7.5 Printing and Updating ROEs
This section provides an overview of ROE processing, lists prerequisites, and discusses how to:
-
Print and update a single ROE.
-
Print and update multiple ROEs.
|
Note: You can not use the EnterpriseOne system to print or update ROEs that have been submitted in final mode using ROE Web. |
7.5.1 Understanding ROE Processing
You must print and issue ROEs to employees within five days of an interruption of earnings. Employees can use ROEs to submit claims for Employment Insurance (EI) benefits.
When you print ROEs, the system updates the F06176 table with ROE serial numbers so that the EI history is not included in any subsequent ROE records. The update also keeps a record of ROEs. ROE records must be complete and correct, particularly if the government requests an audit. After successfully printing the ROE, the system locks the employee records in table F06176.
In addition to updating history when you print ROEs, you can update history for ROEs that you have issued manually.
Each time that you print and update ROEs, the system generates a report if it encounters any of these errors:
-
Employee number is not found in Address Book.
-
Company number is not found in Address Book.
-
Tax ID number is not found in the tax ID table.
-
Insurable gross pay exceeds the yearly limit.
-
EI rate for the yearly maximum is not set up.
If, while printing and updating a single ROE, the system detects an error, the system prints only the exception report. The update is not complete, and the system does not print an ROE.
If the system detects an error while printing and updating multiple ROEs, it prints and updates history only for ROEs that are not in error. The system lists each ROE that is in error on the exception report.
|
Note: If you submit ROEs using XML or flat files using ROE Web, the print and update options are disabled. All printing and updating for ROEs submitted through ROE Web must be done online. |
7.5.1.1 Reissuing an ROE
You can reissue an ROE to correct a mistake on the original ROE or to replace an ROE that has been lost. The system creates a new ROE from the old record and requires that you print and update the ROE again.
When you reissue an ROE, the system creates a duplicate record in the F06176 table. The system stores the original ROE record with the original serial number and a notation that the ROE was reissued.
|
Note: If you submitted ROEs using ROE Web, you must use ROE Web to reissue the ROE. |
7.5.1.2 Deleting an ROE
You can delete an ROE that was issued if you determine that the ROE is erroneous or unnecessary or that it is a duplicate. For example, an unnecessary ROE might be one that you created in anticipation of a layoff that did not occur.
When you delete an issued ROE, the system unlocks the record in the F06176 table and deletes the ROE serial number. You use this procedure only after an ROE has been updated to history.
You can delete an ROE before updating it to history. You cannot delete a reissued ROE. Additionally, you cannot delete an ROE that was submitted using ROE Web.
7.5.2 Prerequisites
Create a version of the Print ROEs/Update History (R770631B) program with data selection set to select the ROEs that you are printing and updating.
See JD Edwards EnterpriseOne Tools Foundation Guide.
7.5.3 Forms Used to Print and Update ROEs
| Form Name | FormID | Navigation | Usage |
|---|---|---|---|
| Work With ROEs | W770631A | ROE Processing (G77BCAP16), ROE Workbench
On the Work With ROEs form, select a record in the detail area and click Delete. |
Access the ROE Workbench, and delete ROEs. |
| Print ROEs/Update History (single) | W770631I | On the Work With ROEs form, select a record in the detail area and select Print Single ROE from the Row menu. | Print or update a single ROE. |
| Print ROEs/Update History (multiple) | W770631I | On the Work With ROEs form, select Print Multi ROEs from the Form menu. | Print or Update multiple ROEs. |
| Re-issue of Issued ROE | W770631E | On the Work With ROEs form, select a record in the detail area and select Re-Issue Single ROE from the Row menu. | Reissue an ROE. |
7.5.5 Printing and Updating Multiple ROEs
Access the Print ROEs/Update History form.
- Pay Cycle Code
-
Enter a code that identifies the values for a master payroll cycle.
- ROE Issue Date (record of employment issue date)
-
Enter the date on which the ROEs are mailed.
- Version
-
Enter a user-defined set of specifications that control how applications and reports run. You use versions to group and save a set of user-defined processing-option values and data selection and sequencing options. Interactive versions are associated with applications (usually as a menu selection). Batch versions are associated with batch jobs or reports. To run a batch process, you must select a version.
7.6 Submitting ROEs using ROE Web
This section provides an overview of ROE Web, and discusses how to generate XML and flat files for ROE Web.
|
Note: ROE Web functionality requires that users are on JD Edwards EnterpriseOne tools release 8.96A1 or higher. |
7.6.1 Understanding ROE Web
The Canadian government has recently began accepting ROE submissions online using the ROE Web system. ROE Web also enables employers to submit XML or flat files that include batches of ROE information. Employers can choose, at their discretion, whether they submit XML or flat files.
|
Note: The Canadian government no longer accepts laser ROEs. Therefore, all employers who currently submit laser ROEs must revert to filing paper ROEs or using ROE Web. |
ROE Web enables employers to submit ROE information in two ways:
-
Enter ROE information online.
-
Create batch XML or flat files to submit to the Canadian government.
Whichever method you choose, you must first create ROEs using the ROE workbench. The ROE creation process gathers the information that you need to enter ROE information online, or to create XML and flat files.
To enter ROE information online, you first complete the steps for creating an ROE. Once the ROE is created, you use the information to enter the ROE online. Contact your taxing authority to obtain the correct website, login credentials, and online entry instructions.
To create an XML or flat file that contains ROE information, you must first use the ROE Workbench to create the ROEs. After you have created the ROEs, you complete these steps:
-
Using Form menu options, generate XML and flat files for multiple ROEs.
-
Using Row menu options, generate XML and flat files for a single ROE.
-
Submit your files to the appropriate taxing authority.
When you select an option to generate flat or XML files for ROEs, the system launches the Print ROE/Update History program (R770631B). This program:
-
Includes 53 weeks of data for each selected employee.
-
Calls the R770631D program, which creates the XML and flat files for ROEs.
-
Validates data against the XML file requirements.
-
Updates the system with the processing status.
When you process files in draft mode, the system clears the DMT, PCT#, and ROEN fields in the F0717, F0717A, F07171, (Release 9.1 Update) and the F06176 tables, enabling users to continue to update the ROEs using the EnterpriseOne system. When you process files in final submission mode, the system updates the ROEN field with XMLS. This value specifies that the ROE(s) have been created in final submission mode, and users can no longer update or print the ROE from the EnterpriseOne system. All ROE maintenance after final submission processing must be done online using ROE Web.
7.6.1.1 Updating ROEs With ROE Web
When you generate XML and flat files for ROEs, you specify whether you are creating draft or submission (final) version ROEs. You specify draft or submission version processing using a processing option from the P770631 program.
If you create files for ROEs in draft mode, you can update the ROEs and regenerate the file as many times as necessary. Each time that you generate flat files in draft mode, the system appends the newly generated data to the existing file.
After you create files for ROEs in submission mode, you cannot update, revise, or print them from the EnterpriseOne system. All maintenance of the ROE must be done online using ROE Web.
|
Note: You can generate and submit draft files to the Canadian government for verification purposes. However, the Canadian government recommends that you do not submit a draft version for verification more than one time. |
7.6.2 Generating XML and Flat Files for ROE Web
This section lists forms used to generate XML and flat files for ROE Web and discusses how to:
-
Generate files for single ROEs.
-
Generate files for multiple ROEs.
7.6.3 Prerequisites
Before creating files for ROE Web, you must:
-
Create the ROEs that you want to include in the file.
-
Set the processing options for the ROE Workbench to specify whether you are processing draft or submission files.
7.6.4 Forms Used to Generate XML and Flat Files for ROE Web
| Form Name | FormID | Navigation | Usage |
|---|---|---|---|
| Work With ROEs | W770631A | ROE Processing (G77BCAP16), ROE Workbench | Access the ROE Workbench, and search for ROEs. |
7.6.5 Generating Files for a Single ROE
Access the Work With ROEs form.
-
Select the record that contains the employee for which you want to generate ROE files, and then select Generate Single from the Row menu.
-
Select one of these options to specify which type of file to generate:
-
XML ROEWeb
-
Flat File ROEWeb
-
-
On the ROE Web Confirmation form, click OK.
-
On the Create Single {File Type} File ROE Build form, complete these fields and then click OK.
The system creates the file and stores it in the location that you specified in the processing options of the ROE Workbench.
-
Pay Cycle Code
-
ROE Issue Date
-
Version of R770631B
-
7.6.6 Generating Files for Multiple ROEs
Before you complete this task, you must create a version of the R770631B program, and specify which employees to process using data selection. You will specify this version when completing the task.
Access the Work With ROEs form.
-
Generate Multi from the Form menu.
-
Select one of these options to specify which type of file to generate:
-
XML ROEWeb
-
Flat File ROEWeb
-
-
On the ROE Web Confirmation form, click OK.
-
On the Create Multiple {File Type} XML File ROE Build form, complete these fields and then click OK.
The system creates the file and stores it in the location that you specified in the processing options of the ROE Workbench.
-
Pay Cycle Code
-
ROE Issue Date
-
Version of R770631B
-
- Pay Cycle Code
-
Specify the pay cycle code to use for ROE processing.
- ROE Issue Date
-
Specify the date on which the ROEs will be issued to the employees.
- Version of R770631B
-
Specify the version of the Print ROE/Update History program to use during this process.
Note:
Only the employees who are included in the data selection of this version will be included in the file.