3 Setting Up Payroll Cycle Information
This chapter contains the following topics:
3.1 Understanding the Pay Cycle Setup Process
Before you process payroll for the employees, you need to set up information that the system uses during payroll cycle processing.
To define the dates for each payroll cycle in a year, you set up master pay cycles. The system uses these dates during payroll cycle processing.
You set up payroll cycle control parameters to define which users have authority to process each step of the payroll cycle and which users have authority to reset each step. Typically, the system administrator for the system is responsible for setting up payroll cycle control parameters.
The system includes many reports that can help you verify the accuracy of the payroll information when you process a payroll cycle. When you set up payroll cycle reports, you define the reports that you want the system to automatically generate during each step of the payroll cycle. You also create a version for each report that defines the data selection and data sequence for the report.
Before you can print payments for employees, you must define which programs and versions the system uses to create each type of payment.
Additionally, you might set up multiple versions of certain pay cycle steps that offer that functionality. If the organization is large, you might find significant processing time reductions if you process multiple versions simultaneously.
3.2 Common Fields Used in This Chapter
- Pay A (pay annual)
-
Enter the number of the pay period for employees who are paid annually. This field is used in conjunction with the Pay Period to Calculate field on the DBA (deduction, benefit, and accrual) Setup form to determine which deductions, benefits, and accruals are to be calculated during this payroll cycle.
- Pay B (pay biweekly) and Period No B (period number biweekly)
-
Enter the number of the pay period, within the month, for employees who are paid biweekly. The system uses this value and the pay period to calculate, from the DBA Setup form, to determine which DBAs to calculate during the current payroll cycle.
- Pay Cycle Code
-
Enter the code that identifies the values for a master payroll cycle.
- Pay M (pay monthly) and Period No M (period number monthly)
-
Enter the number of the pay period, within the month, for employees who are paid monthly. This field is used in conjunction with the Pay Period to Calculate field on the DBA Setup form to determine which DBAs are to be calculated during this payroll cycle.
- Pay O (pay other) and Period No O (period number other)
-
Enter the number of the pay period, within the month, that is used in conjunction with the Pay Period to Calculate field on the DBA Setup form to determine which DBAs are calculated during this payroll cycle.
- Pay S (pay semimonthly) and Period No S (period number semimonthly)
-
Enter the number of the pay period, within the month, for employees who are paid semimonthly. The system uses this value and the pay period to calculate, from the DBA Setup form, to determine which deductions, benefits, and accruals to calculate for the current payroll processing cycle.
- Pay W (pay weekly) and Period No W (period number weekly)
-
Enter the number of the pay period, within the month, for employees who are paid weekly. This field is used in conjunction with the Pay Period to Calculate field on the DBA Setup form to determine which deductions, benefits, and accruals the system will calculate during the current payroll cycle.
- Report ID (report identification)
-
Enter the name of the program or report that you are assigning to the payroll cycle step.
3.3 Setting Up the Payroll Cycle Workbench
This section provides an overview of the payroll cycle workbench, lists a prerequisite, and discusses how to:
-
Set processing options for Payroll Cycle Workbench (P07210).
-
Set up master pay cycles.
-
Copy master pay cycles.
-
Create a payroll ID.
-
Attach a master pay cycle to a payroll ID.
-
Set up payroll cycle control parameters.
3.3.1 Understanding the Payroll Cycle Workbench
Before you can process payroll information, you must set up the payroll cycle workbench to process information according to the rules and policies of the organization. You must define the dates that make up each pay cycle, and you must define the criteria that are used to select employees for pay cycle processing. In addition, you must define the reports that you want to generate during pay cycle processing.
Finally, due to the sensitive nature of payroll information, you must set up security on the payroll cycle workbench. You set up this type of security using pay cycle control parameters.
3.3.1.1 Setting Up Master Pay Cycles
You set up master pay cycles to define the dates for each payroll cycle of the year. When you process pre-payroll, you can retrieve the dates that you entered in the master pay cycle. Setting up master pay cycles minimizes the risk of data entry errors during pre-payroll because certain values have already been entered. Within a master pay cycle, you define the length of the pay periods and the corresponding payment dates.
Master pay cycles enable you to define:
-
Pay period ending dates.
-
Identifiers for the pay period.
-
Payment dates for each pay period.
-
Withholding period indicators to determine the calculation of DBAs.
-
Integrity period numbers for storing payroll history.
-
Standard hours per pay period for autopay.
You set up a master pay cycle for the current year to run payroll cycles for the current year. You must set up a new master pay cycle each year. If you already have a master pay cycle for the current year, you can set up a master pay cycle for the next year.
|
Important: Do not set up additional pay periods at the end of a master pay cycle to use for year-end adjustments. Quantum tax calculations are based on the number of pay periods in the master pay cycle. Adding additional pay periods can cause tax amounts for the entire year to be calculated incorrectly.For example, a semimonthly master pay cycle should contain only 24 pay periods. If you must run additional payroll cycles at the end of the year, you can reuse pay period 24 as many times as necessary. |
To simplify the setup process, you set up a master pay cycle for the next year that is similar to the current year's master pay cycle. You can duplicate a current master pay cycle and indicate whether you want to increment the pay period ending dates for the new year. For example, if the company's payment dates are the 15th and last day of each month, you do not want to increment, or align, dates. However, if the company always pays on a biweekly basis, you should increment dates to account for the changed date in the new year.
3.3.1.2 Setting Up Pay Period Workweeks (Release 9.1 Update)
To comply with the Executive Order for Fair Pay and Safe Workplaces that is effective from January 1, 2017, federal contractors are required to provide transparency in the paychecks that they issue to their employees. According to the Order, paychecks must contain information about the hours worked, overtime hours, pay, and any additions to or deductions made from an employee's pay. This additional compensation information enhances workers' awareness and understanding, promotes greater employer compliance with labor laws, and increases economy and efficiency in government contracting.
Use the Pay Period Workweeks program (P059064) to set up the weekly periods within the pay period dates that are established in the Master Pay Cycle. This setup determines the weekly date ranges for the weekly detail stub lines. You need to associate the workweeks by pay cycle code, year, and period number.
3.3.1.3 Establishing Pay Type Ranges for Weekly Reporting (Release 9.1 Update)
Use the Workweek Pay Types program (P059065) to enable customers to define the pay types that are applicable to reporting by workweek when the Paycheck Transparency functionality is enabled. These pay types control which timecards are subject to reporting by workweek.
3.3.1.4 Creating a New Payroll ID
The payroll cycle is controlled by a payroll ID. Before you process pre-payroll, you must enter a payroll ID that you use to specify the employees to be paid. You use the same payroll ID for all of the steps of a payroll cycle. You can use different payroll IDs to simultaneously process multiple payroll cycles.
You must create a new payroll ID when you process payroll for a selected group of employees for the first time. You can create a new payroll ID for processing regular payments, interim payments, or both. When you create a new payroll ID, you enter the pay period information that the system needs before it can process the payroll cycle.
You must assign a program version to the payroll ID. You use this program version to select the employees to include in that payroll cycle. If no suitable program version exists, you can add a new program version when you create the new payroll ID.
|
Note: Verify that the program version that you enter is not already assigned to another payroll ID. Each version should be assigned to only one payroll ID.Also, if you are using multiple versions of pre-payroll, you can enter any one of the versions that you create for that payroll ID when setting up the payroll ID. However, you must also include this version when setting up processing information for multiple versions. |
3.3.1.5 Data Selection for Pre-Payroll
When you enter the data selection for a version of the pre-payroll process, observe these guidelines:
-
All of the employees that you select must have the same country code.
-
When you add a new pre-payroll program version, do not include an employee in more than one payroll cycle.
If you do, the system includes the employee in only the first payroll ID that you process.
-
All employees in the same payroll ID must have the same pay frequency.
-
Including pay status in the data selection is recommended.
-
If you are processing multiple versions of pre-payroll for a single payroll ID, make sure that employees are included in only one of the versions.
You should use ranges of address book numbers to evenly divide employees among the multiple versions that you create.
To include terminated employees in pre-payroll processing, include the terminated pay status in the data selection for the pre-payroll program version. During the pre-payroll process, the system selects only those terminated employees whose termination dates are on or after the beginning date of the pay period.
3.3.1.6 Setting Up Payroll Cycle Control Parameters
The JD Edwards EnterpriseOne Payroll system includes payroll cycle control parameters that you can use to prevent unauthorized users from processing specific steps in a payroll cycle and from resetting steps. Typically, the system administrator sets up payroll cycle control parameters before anyone in the organization begins processing payroll cycles. Payroll cycle control parameters define which users have authority to process each step in the cycle and which users have authority to perform each type of reset.
If no payroll cycle control parameters are set up, the person who initiates a payroll cycle has authority to process and reset each step. No other users have this authority.
Payroll cycle control parameters are specific to a payroll ID. Therefore, users who have authority to process payroll cycles for a particular group of employees can be prohibited from processing payroll cycles for other groups. For example, the organization might limit certain payroll clerks from processing the payroll ID that includes the organization's executives.
3.3.2 Prerequisite
Set up user-defined code (UDC) 06/PY to define the names of the pay cycles.
3.3.3 Forms Used to Set Up the Payroll Cycle Workbench
3.3.4 Setting Processing Options for Payroll Cycle Workbench (P07210)
Set these processing options before you run any payroll cycles.
3.3.4.1 Process
Use these processing options to specify how the system processes information during the payroll cycle.
- 1. Reports Setup Model
-
Specify the name of the reports setup model. A reports setup model is a user-defined group of reports that contains all available payroll reports. The default value is MODEL.
- 2. Premiums
-
Specify whether to update the F0911 table for premium labor entries. Premium labor entries are entries for pay types that have a pay type multiplier that is greater than 1. Values are:
1: Update. Select this option when you want journal type PR to include labor hours in the Units field.
0: Do not update. Select this option when you want only journal type LD to include labor hours in the Units field.
This processing option applies only when the P069042 table is set up in this way:
The journal type PR has been added to the table.
The company burden rules are set up to separate the premium portion of a pay type from the regular portion.
- 3. Overpayment DBA
-
Specify the PDBA code for overpayments to employees. When an employee's pay is insufficient to pay all deductions, you can set up the JD Edwards EnterpriseOne Payroll system to either reduce the deductions or to place the deductions in arrears. When you set up the JD Edwards EnterpriseOne Payroll system to reduce the deductions, the system uses the PDBA code for overpayments to create a new deduction that the system will deduct from the employee's next paycheck. The default value is 9997.
- 4. Time Entry Version
-
Specify the version of the Time Entry Master Business Function program (P050002A) to use to process timecards that you entered using Line Detail Time Entry (P051131). If you leave this processing option blank, the system uses the default version, ZJDE0001.
- 5. Process Future Data Revisions
-
Specify whether to process future data revisions during the final update of the payroll cycle. Values are:
0: Do not process. This value is the default.
1: Process.
Processing future data revisions during final update ensures that the revisions take effect at the appropriated times; however, this method can significantly increase the processing time that is required for final update. If you choose not to process future data revisions during final update, you must process them separately, using the Future Data Employee Master Update program (R06394).
- 6. Future Data Revisions Version
-
Specify the version of the Future Data Revision program (R06394) that you want to run during final update. Enter a version in this processing option only if you have indicated that you want to process future data revisions during final update. If you leave this processing option blank, the system uses the default version, ZJDE0001.
- 7. Job Step Progression
-
Specify whether the system updates the pay rate in the F060116 table during final update when an employee advances to the next job level using job step progression. You might choose not to update this processing option automatically if you want to review job advancements before updating the pay rate. If you choose not to update the pay rate during final update, you must manually update the pay rate for the employee before the next payroll is processed. Values are:
Blank: Do not update.
1: Update.
- 8. Interim ID Dates (interim identification dates)
-
Specify whether the system automatically advances pay cycle dates for interim payroll IDs that have the same pay cycle code as the payroll ID that the system is processing, and that have payment dates that are less than or equal to the payment date of the payroll ID. The update is done during the final update step of the payroll cycle. This update occurs only if the Merge Interims option or the Interims Only option is selected for the payroll ID that is being processed. If you do not use this option, you can roll the dates forward for interim IDs using the Roll Date function from the Interim Payment Workbench.
Note:
If you use this option, the system assigns the same pay cycle dates that are used for the payroll ID to all interim IDs for which dates are rolled. Therefore, you should use this option only if you always want payroll ID and interim ID dates to match. Also, the system assigns the user ID of the person that processes the payroll ID to all interim IDs that are rolled during the period.Values are:
Blank: Do not advance. This is the default.
1: Advance.
- 9. Show Historical Tax Information on Payroll Instruments
-
Specify tax information for which no current amount exists, but a year-to-date (YTD) amount is printed on the payment advice. Values are:
0: Advice shows only taxes that have an amount that is calculated for the current pay period.
1: Advice shows all of the taxes that have a YTD amount, regardless of whether an amount is calculated for the current pay period.
- 10. Component Pay
-
Specify whether to generate the component pay automatically for the base pay timecards. Values are:
Blank: do not generate component pay for base timecards. The base timecards will not be locked to the payroll.
1: Generate component pay timecards automatically within the payroll process.
- 11. Auto Pay Proration
-
Specify whether auto pay amounts are prorated across days worked during the current pay period, based on each employee's payment start date. If this processing option is set to 1 and the start date for a salaried employee's payment occurs within the current period, that employee's total hours and associated gross pay are based only on the days between the payment start date and the pay period end date. This proration takes into account all days within this time frame and not just the actual work days. Values are:
Blank: Do not prorate auto pay salary amounts.
1: Prorate auto pay salary amounts.
- 12. Jurisdiction Interaction Treatments
-
Specify the way in which the system should use Jurisdictional Interaction Treatment (JIT) to calculate work tax. Values are:
Blank: If a formal reciprocal agreement exists, the system assumes that the Nonresident Certificate has not been filed and calculates the work tax. The system passes the blank value of JIT into the Vertex tax engine for both work and resident states.
1: The system does not calculate work tax for nonresident employees who worked in a state with a formal reciprocation agreement with their state of residence. The system passes the value of JIT as 1 into the Vertex tax engine for both work and resident states.
3.3.4.2 Print
- 1. Print Retro Overtime pay detail on the paystub
-
Specify whether to print retro-pay detail on the paystub. Values are:
Blank: Do not print retro-pay detail on the paystub.
1: Print retro-pay detail on the paystub.
- 2. Hide Paycheck Transparency Weekly Detail Stub Lines (Release 9.1 Update)
-
Specify whether to display or hide the Paycheck Transparency weekly detail stub lines on the paystub when you review pay details on the Employee Pay Stub Detail (P07352) application. Values are:
Blank: Display the Paycheck Transparency weekly detail stub lines.
1: Do not display the Paycheck Transparency weekly detail stub lines.
3.3.4.3 ADP Files
Use these processing options to activate the integration with Automatic Data Processing (ADP) tax filing.
- 1. Use ADP Tax Service Filing
-
Specify whether you are using ADP Tax Service Filing to submit taxes. Values are:
0: Do not use.
1: Use.
3.3.5 Setting Up Master Pay Cycles
Access the Pay Period Constants Revisions form.
Figure 3-1 Pay Period Constants Revisions form
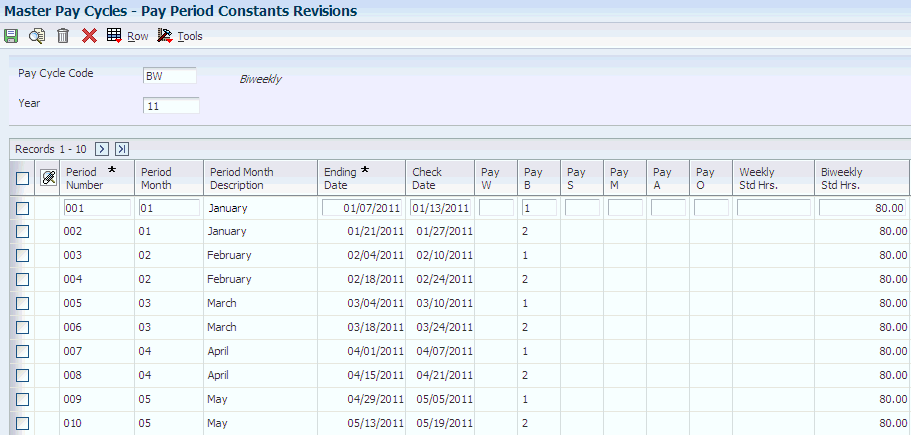
Description of ''Figure 3-1 Pay Period Constants Revisions form''
- Year
-
Enter a two-digit number that specifies the applicable year. If you leave this field blank, the program uses the system date.
- Period Number
-
Enter the number of the pay period from the beginning of the year. For instance, a monthly payroll cycle beginning in January has a total of 12 periods with October being the 10th period.
Typical values are:
001–052 (Weekly Payroll Cycle)
001–026 (Biweekly Payroll Cycle)
001–024 (Semimonthly Payroll Cycle)
001–012 (Monthly Payroll Cycle)
001–004 (Quarterly Payroll Cycle)
001–001 (Annual Payroll Cycle)
- Period Month
-
Enter the number of the month (01–12) in which the pay period resides.
- Weekly Std Hrs. (weekly standard hours)
-
Enter the standard number of hours to be paid employees whose pay frequency is Weekly (W). The number that is entered into this field is used during pre-payroll processing when the system calculates autopay. The system uses the hours in this field instead of calculating the hours based upon gross pay divided by the hourly rate.
If you leave this field blank, the hours worked are calculated during the generation of timecards.
- Biweekly Std Hrs. (biweekly standard hours)
-
Enter the standard number of hours to be paid employees whose pay frequency is Bi-Weekly (B). The number in this field is used during pre-payroll processing when the system calculates autopay. The system uses the hours in this field instead of calculating the hours based upon gross pay divided by the hourly rate.
- Monthly Std Hrs. (monthly standard hours)
-
Enter the standard number of hours to be paid employees whose pay frequency is Monthly (M). The number in this field is used during pre-payroll processing when the system calculates autopay. The system uses the hours in this field instead of calculating the hours based upon gross pay divided by the hourly rate.
- Other Std Hrs. (other standard hours)
-
Enter the standard number of hours to be paid employees whose pay frequency is Other (O). The number in this field is used during pre-payroll processing when the system calculates autopay. The system uses the hours in this field instead of calculating the hours based upon gross pay divided by the hourly rate.
- Annual Std Hrs. (annual standard hours)
-
Enter the standard number of hours to be paid employees whose pay frequency is Annually (A). The number in this field is used during pre-payroll processing when the system calculates autopay. The system uses the hours in this field instead of calculating the hours based upon gross pay divided by the hourly rate.
- Semi Std Hrs. (semimonthly standard hours)
-
Enter the standard number of hours to be paid employees whose pay frequency is Semimonthly (S). The number in this field is used during pre-payroll processing when the system calculates autopay. The system uses the hours in this field instead of calculating the hours based upon gross pay divided by the hourly rate.
3.3.6 Copying Master Pay Cycles
Access the Duplicate Pay Cycle form.
- Pay Cycle Code (New)
-
Enter the code that identifies the values for a master payroll cycle.
- Year (New)
-
Enter a two-digit number that specifies the applicable year. If you leave this field blank, the program uses the system date.
- Align Date
-
Enter a value that defines whether the system increments the pay period ending dates by one day. Values are:
1: Each pay cycle, the pay-period ending date increments by one day.
0: The next pay cycle will have the same pay-period ending date as the current cycle.
3.3.7 Creating a Payroll ID
Access the Pre-Payroll Processing form.
- Interim Only
-
Select if the payroll cycle includes only interim payments.
- Merge Interims
-
Select to process interim payments in this payroll cycle.
- AutoPay
-
Select to calculate autopay for this payroll ID.
- Changes Only
-
Select if you must process a pre-payroll for changes only before you proceed to the next step in the payroll cycle. You process a changes-only pre-payroll when you have corrected employee salary or timecard information after processing a regular pre-payroll. During changes-only pre-payroll processing, the system processes only those employee records that have changed.
- Leave Balance
-
Select to maintain leave balance history information. If you choose to maintain leave balance history, the system creates records in the F07149 and F07147 tables. If you do not want to track leave balance history, do not select this option.
- Submit Pre-Payroll
-
Select to process pre-payroll information. When you click OK, the system processes pre-payroll.
- Country Code
-
Enter a code from UDC 00/CN that indicates the country for which you are processing payroll. All of the employees that you include in the payroll cycle must reside in the country that you specify in this field.
- Pay Period End Date
-
Enter the last day of the processing period (pay period, month, quarter, or year). This field is automatically populated when you attach a master pay cycle to the payroll ID.
- Century/Year
-
Enter the applicable year, including the century. The year that you enter for pre-payroll processing must match the year that is entered for the corresponding pay period in the master pay cycle.
3.3.7.1 Date/Detail Info
Select the Date/Detail Info tab.
|
Note: The fields on this tab are automatically populated when you attach a master pay cycle to the payroll ID. If you do not attach a master pay cycle, you can enter the necessary information manually.If you enter the information manually rather than attaching a master pay cycle, double-check the dates to avoid inadvertently overlapping the previous or subsequent pay cycle. |
- Std. Hours W (standard hours weekly)
-
Enter the standard number of hours to be paid employees whose pay frequency is Weekly (W). The number in this field is used during pre-payroll processing when the system calculates autopay. The system uses the hours in this field instead of calculating the hours based upon gross pay divided by the hourly rate. If you leave this field blank, the hours worked are calculated during the generation of timecards.
- Std. Hours B (standard hours bi-weekly)
-
Enter the standard number of hours to be paid employees whose pay frequency is Bi-Weekly (B). The number in this field is used during pre-payroll processing when the system calculates autopay. The system uses the hours in this field instead of calculating the hours based upon gross pay divided by the hourly rate.
- Std. Hours S (standard hours semi-monthly)
-
Enter the standard number of hours to be paid employees whose pay frequency is Semi-Monthly (S). The number in this field is used during pre-payroll processing when the system calculates autopay. The system uses the hours in this field instead of calculating the hours based upon gross pay divided by the hourly rate.
- Std. Hours M (standard hours monthly)
-
Enter the standard number of hours to be paid employees whose pay frequency is Monthly (M). The number in this field is used during pre-payroll processing when the system calculates autopay. The system uses the hours in this field instead of calculating the hours based upon gross pay divided by the hourly rate.
- Std. Hours O (standard hours other)
-
Enter the standard number of hours to be paid employees whose pay frequency is Other (O). The number in this field is used during pre-payroll processing when the system calculates autopay. The system uses the hours in this field instead of calculating the hours based upon gross pay divided by the hourly rate.
3.3.7.2 Additional Parameters
Select the Additional Parameters tab.
- InterCompany Settlements
-
Enter the code that determines where intercompany settlements are generated. You can enter 1 in this field to specify the intercompany settlements to be generated through the JD Edwards EnterpriseOne Payroll system before they are posted to the general ledger. Or you can enter 0 to specify the settlements to be generated through the JD Edwards EnterpriseOne General Accounting system, not the JD Edwards EnterpriseOne Payroll system.
If you leave this field blank, the system uses 0.
- Company
-
Enter the code that identifies a specific organization, fund, or other reporting entity. The company code must already exist in the F0010 table and must identify a reporting entity that has a complete balance sheet. At this level, you can have intercompany transactions.
If you enter a value in this field, the system disregards the data selection that you set up for pre-payroll processing, and processes only those timecards for which the company code matches this value.
Note:
You can use company 00000 for default values such as dates and automatic accounting instructions (AAIs). You cannot use company 00000 for transaction entries. - Step Progression Automation
-
Enter the code that specifies whether to process job step progression information during payroll cycle processing or whether to process the information as a standalone feature outside of the payroll cycle. Processing job step progression during the payroll cycle might significantly increase pay cycle processing time.
Note:
This field works in conjunction with the Step Progression Process field on the Company Options form. To process job step progression information, you must set the Step Progression History Update field to 1 or 2/ Also, this field is initially populated with the value from the Company Options setup. You can override this value for each payroll ID that you process. However, if you change the value on the Company Options form, the value in the Step Progression Automation field for each payroll ID will not change.Values are:
Y: Process during payroll processing.
N: Process as a standalone feature. (this is the default).
- Bank Account Number
-
Enter the number of the bank account (general ledger account) to be updated automatically when receipts or disbursements are entered. The bank account number is assumed to be the same for every document in a batch. Therefore, it is not cleared from entry to entry. However, if you do not enter the bank account number, the system retrieves a default bank account number from the F0012 table, item number RB for Accounts Receivable and PB for Accounts Payable.
- Auto-Deposit Override
-
Enter the code that specifies whether to override auto-deposits. A Y turns off auto-deposit for all employees in this pre-payroll processing version and prints checks instead of automatic deposit advice slips. This field lets you override auto-deposit instructions in one place instead of changing auto-deposit instructions individually for each employee in the version. Values are:
Y: Yes, override auto-deposit instructions. Use this code for regular payment processing.
N: No, do not override auto-deposit instructions.
P: Override auto-deposit instructions during interim payment processing.
- Pay Cycle Code/Type
-
Enter the UDC (06/PG) that indicates a pay cycle group. If you enter a pay cycle group code here, the system processes only those timecards for which business unit has that pay cycle group assigned in the business unit constants. The type code determines which business unit is used in the selection process.
This field and the accompanying Type field override the DREAM Writer home business unit selection. Employees must first be selected in the DREAM Writer data selection; then, timecards for those employees are selected based on Pay Cycle Group code and type.
- Group Plan Override
-
Enter the code to use the employee level list of DBAs and not to calculate DBAs in the group plan even though the employee may be union. For example, if you enter HR for the Human Resources benefit group plan here, the system uses that value to calculate benefits even though a union group is listed in the employee master.
- Calc. Monthly D/B/A's (Y/N) (calculate monthly deductions/benefits/accruals (yes/no))
-
Enter a value that determines whether the pre-payroll programs calculate benefits and accruals that are based on calendar month amounts (dollars/hours). Values are:
Y: Yes. The pre-payroll programs calculate benefits and accruals that are based on calendar month amounts (dollars/hours).
Blank or N: No. The pre-payroll programs do not calculate benefits and accruals that are based on calendar month amounts (dollars/hours).
- Minimum Pay Amount
-
Enter the lowest amount to be generated as a check, bank advice, or pay slip. The system does not allow zero amount checks if you have specified a minimum check amount. You can leave this field blank. Generally, this value specifies the minimum amount that must be paid to the employee.
3.3.7.3 Paycheck Transparency (Release 9.1 Update)
Select the Paycheck Transparency tab.
- Processing Flag
-
Enter a value from UDC 07/WT that determines whether paycheck transparency is turned on or off during pre-payroll and interim payment processing. It also determines how paycheck transparency processing should be applied to both non-exempt and exempt employees when the feature is turned on. Valid values are:
Blank: Paycheck Transparency off
1: Print for all employees
2: FLSA Non-Exempt, Exempt Status
3: FLSA Non-Exempt, No Status
- Source Business Unit
-
Enter a value from UDC 07/SK to control the business unit from the Timecard Detail (F06116) record that is to be used to determine whether the business unit has been defined as certified. Valid values are:
Blank/Default: Chargeout Business Unit (MCUO)
1: Work Business Unit (MCU)
2: Home Business Unit (HMCU)
- Certified Category Code
-
Enter a value that represents the Business Unit Master (F0006) Category Code (RP01 - RP50) data item that identifies a business unit as certified. Enter a value between RP01 and RP50, such as RP05.
- Certified Category Code Value
-
Enter a value that represents the Business Unit Master (F0006) Category Code (RP01 - RP50) data item that identifies a business unit as certified. Enter a value between RP01 and RP50, such as RP05.
- Custom Line Detail Level
-
Enter a value from UDC 07/DL that determines the level of detail to be shown on Paycheck Transparency custom stub lines. Valid values are:
Blank/Default: Display full detail (hours, rate and gross pay are all shown)
1: Display hours only (rate and gross pay are not shown)
- Autopay Weekly Detail
-
Enter a value from UDC 07/AK to indicate whether the system should report hours for autopay timecards according to the workweeks established in the Pay Period Workweeks program (P059064) using the percentages defined for each workweek. If you set this value to 1, the system allocates and reports the hours for autopay timecards according to the workweeks and percentages indicated. Valid values are:
Blank/Default: Do not allocate and report autopay timecards by workweeks
1: Allocate and report hours for autopay timecards according to the workweeks and percentages indicated.
Note:
If autopay timecards are reported by workweeks, the system adjusts the total hours in each workweek by any additional timecards that appear in the workweek according to the autopay method (IIAP) associated with the pay type on those timecards. - Certified Jobs Only
-
Select this check box to control whether all jobs or only certified jobs are processed when the Paycheck Transparency processing is turned on. If you check this box, the system prints weekly totals for certified jobs only, and if you leave it unchecked, the system prints weekly totals for all jobs.
Note:
You can specify a job as certified by entering a 'Y' in the Certified Job (CERT) field on the Business Units Constants Revisions form within the Business Unit Constants program (P059051A).Additionally, you can specify a job as certified by entering a particular value in one of the Category Code (PR01 - PR50) fields on the Business Unit Master (F0006) record.
3.3.8 Attaching a Master Pay Cycle to a Payroll ID
Access the Pay Period Constants Revisions form from the Pre-Payroll Processing form.
3.3.9 (Release 9.1 Update) Setting Up Pay Period Workweeks
Access the Pay Period Workweeks Revisions form from the Work With Pay Period Constants Revisions form.
- Pd. No.
-
Enter the number of the pay period from the beginning of the year. For instance, a monthly payroll cycle beginning in January has a total of 12 periods with October being the 10th period. Valid values are:
001-052 (Weekly Payroll Cycle)
001-026 (Biweekly Payroll Cycle)
001-024 (Semimonthly Payroll Cycle)
001-012 (Monthly Payroll Cycle)
001-004 (Quarterly Payroll Cycle)
001-001 (Annual Payroll Cycle)
- Week Begin Date
-
Enter the week beginning date for the date ranges to represent the workweeks within each pay period.
- Week End Date
-
Enter the week ending date for the date ranges to represent the workweeks within each pay period.
- Workweek Percent Hours
-
Specify the percentage of autopay hours to be allocated to the pay period workweek for paycheck transparency. The system multiplies the percentage by the period hours for the employee to determine the number of hours for the week. Before allocating the autopay hours, it reduces the hours for the week by any existing timecards within the week, thereby reducing auto pay hours.
3.3.10 (Release 9.1 Update) Setting Up Workweek Pay Types
Access the Workweek Pay Types form from the Work With Pay Period Constants Revisions form.
- PT From Pay Type
-
Enter the starting value for the range of pay types for a pay cycle code that you want to include in the paycheck transparency process.
- PT Thru Pay Type
-
Enter the ending value for the range of pay types for a pay cycle code that you want to include in the paycheck transparency process.
3.3.11 Setting Up Payroll Cycle Control Parameters
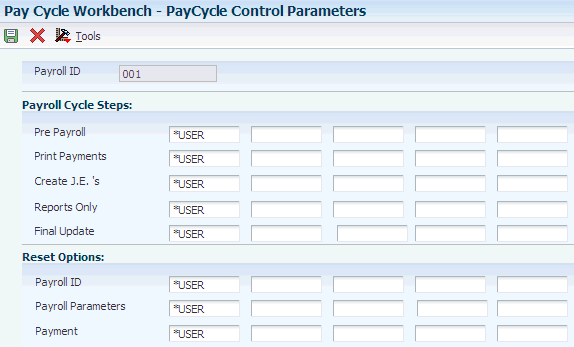
Access the PayCycle Control Parameters form.
Figure 3-2 PayCycle Control Parameters form
Description of ''Figure 3-2 PayCycle Control Parameters form''
- Pre Payroll
-
Enter the user ID of a person who has authority to process pre-payroll for this payroll ID. Values are:
Any user ID: Authorizes a specific user to process pre-payroll.
*All: Authorizes all users to process pre-payroll.
*USER: Authorizes the user who processed pre-payroll to process it again.
- Print Payments
-
Enter the user ID of a person who has authority to print payments for this payroll ID. Values are:
Any user ID: Authorizes a specific user to print payments.
*All: Authorizes all users to print payments.
*USER: Authorizes the user who printed payments to print them again.
- Create J.E.'s (create journal entries)
-
Enter the user ID of a person who has authority to process journal entries for this payroll ID. Values are:
Any user ID: Authorizes a specific user to process journal entries.
*All: Authorizes all users to process journal entries.
*USER: Authorizes the user who processed journal entries to process them again.
- Reports Only
-
Enter the user ID of a person who has authority to print reports for this payroll ID. Values are:
Any user ID: Authorizes a specific user to print reports.
*All: Authorizes all users to print reports.
*USER: Authorizes the user who printed reports to print them again.
- Final Update
-
Enter the user ID of a person who has authority to process final update for this payroll ID. Values are:
Any user ID: Authorizes a specific user to process final update.
*All: Authorizes all users to process final update.
*USER: Authorizes the user who processed final update to process it again.
- Payroll Parameters
-
Enter the user ID of a person who has authority to reset payroll parameters for this payroll ID. Values are:
Any user ID: Authorizes a specific user to perform the reset.
*All: Authorizes all users to perform the reset.
*USER: Authorizes the user who previously performed the reset to perform it again.
- Payment
-
Enter the user ID of a person who has authority to reset payments for this payroll ID. Values are:
Any user ID: Authorizes a specific user to perform the reset.
*All: Authorizes all users to perform the reset.
*USER: Authorizes the user who previously performed the reset to perform it again.
3.4 Setting Up Pay Cycle Reports
This section provides an overview of payroll cycle reports setup, lists prerequisites, and discusses how to set up payroll cycle reports.
3.4.1 Understanding Payroll Cycle Reports Setup
Before you process a payroll for the first time, you set up the reports that you want to review during the payroll cycle. When you set up reports, you also designate when in the cycle to generate each report. For example, you might generate the payroll register during pre-payroll processing. You can choose from the reports that are included with the system, as well as any custom reports that you have created.
After you create a payroll ID, you can define the reports to generate during the various steps of the payroll cycle. Although the payroll cycle includes a reports step, the production of reports is not limited to this step. You can generate each report at any step in the payroll cycle and at multiple steps. For example, you can generate the Payroll Register report, which provides a breakdown of the gross-to-net pay calculations, after the pre-payroll step of the cycle as well as during the reports step of the cycle.
During the payroll cycle, the generated reports include all of the employee records that are included in the data selection for the payroll ID. When you set up the reports, you can create unique versions of each report so that you can specify the processing options, data selection, and data sequence.
The demonstration data for the JD Edwards EnterpriseOne Payroll system includes a model report setup. You can use this model to help you determine the step during which you might want to generate each report.
3.4.2 Prerequisites
Before you complete the tasks in this section:
-
Create the payroll ID for which you are setting up reports.
-
Create a version of each report that you intend to set up.
3.4.3 Forms Used to Set Up Payroll Cycle Reports

3.5 Setting Up Payment Information
This section includes an overview of payment information, lists prerequisites, and discusses how to:
-
Set processing options for Print Checks (R07231).
-
Set processing options for Print Autodeposit Advices (R07233).
-
Set processing options for Create Auto Deposit Tape File (R07235).
-
Set up payment types.
-
Set up debit account information for automatic deposits.
3.5.1 Understanding Payment Information
To create payments during the payroll cycle, you must first specify the programs to create payments. You can set up each of those programs to use information that is specific to the organization.
Before you print payments for the first time, you must indicate which programs and versions the system uses to create each type of payment. You can use the standard programs and versions that are included with the system or any custom programs that you have created.
You use the Payment Setup form to set up payment types only. You cannot print payments from this form.
3.5.1.1 Setting Up Debit Account Information for Automatic Deposits
When you pay employees using automatic deposit, you must set up bank account information about the account from which the payroll payments are made. The accounts from which the payments are made are known as debit accounts. Many organizations pay all of their payroll payments from one debit account. Other organizations use different debit accounts for each company or business unit.
You must enter information into the system for each debit account that the organization uses for payroll payments. This information is included in the bank files that are created for pre-note transactions, which banks use to verify account information before actual automatic deposits are made, and for automatic deposit payments.
If the organization uses a single debit account for all payroll payments, you can enter the information for that bank account as the default account. To do so, set up default debit account information for home company 00000 only, without specifying a home business unit. This ensures that all pre-note and automatic deposit transaction files are created using the same debit account information.
If the organization uses a separate debit account for each company, you must set up debit account information for each home company, without specifying a home business unit. If only certain companies use a separate debit account, you can set up default account information for home company 00000, and then enter account information only for the companies that have separate accounts. If no information is set up for a specified company, the system uses the account information that you set up for company 00000.
Similarly, if the organization uses separate debit accounts for individual business units, you must set up each of these accounts. To do so, you must set up debit account information for each home company and home business unit combination that uses a separate account. If only certain business units use separate debit accounts, you can set up default account information using company 0, and then enter account information only for the business units that have a separate account. If no information is set up for a specified business unit, the system uses the account information that you set up for company 0.
|
Note: If you use the R07235 (Create Auto Deposit Tape File) to generate Auto Deposit information, the system determines which debit account information to use based on the employee's home company and business unit. When creating the bank file that contains pre-note transactions, the system uses the home company and business unit information that is stored in the F060116 table. When creating the bank file that contains actual automatic deposit payments, the system uses the home company and business unit from the employee's timecard records. The system retrieves the debit account information from the P07236 (Auto Deposit Instructions for Company). If the R07236 (Create Auto Deposit Tape File by Payroll Version) is used instead of the R07235, the system will use the debit account information from the processing options of the version of the R07236 instead of using the information from the P07236.(Release 9.1 Update) To comply with Executive Order 13673, Fair Pay and Safe Workplaces, and the Paycheck Transparency requirements, the Print Checks program (R07231) also supports printing the employee pay information by workweek. |
3.5.2 Prerequisites
Before you complete the tasks in this section:
-
Create the payroll ID for which you are setting up payment types.
-
Create a version of each program that you intend to use to produce payments.
3.5.3 Forms Used to Set Up Payment Information
3.5.4 Setting Processing Options for Print Checks (R07231)
Set these processing options before you print checks.
3.5.4.1 Print Options
These processing options determine what information prints on payroll checks.
- 1. Translation Code
-
Specify the type of currency to translate the amounts on the checks from numbers to words. Values are:
X00500: Translate US dollar amounts.
X00500CH: Translate Chinese RMB amounts.
X00500FR: Translate French franc amounts.
X00500S1: Translate Spanish peso amounts (female).
X00500S2: Translate Spanish peso amounts (male).
Blank: Do not translate amounts.
- 2. Company Name and Address
-
Specify whether the company name and address appear on payroll checks. Values are:
1: Do not print company name and address.
2: Print company name only.
3: Print company name and address.
Blank: Do not print company name and address.
- 3. Company Number
-
Specify the number of the company for which the name and address appear on the payroll checks. This processing option applies only if you specify in the Company Name and Number processing option to print that information on the checks. If you leave this processing option blank, each check displays the name and address of the employee's home company.
- 4. Employee Identification Number
-
Specify the type of employee identification number that appears on the checks. Values are:
2: Tax ID number.
3: Third employee number.
Blank: Address book number.
3.5.5 Setting Processing Options for Print Autodeposit Advices (R07233)
Set these processing options before you create automatic deposit advices.
3.5.5.1 Print Options
These processing options determine what information is printed on automatic deposit advices.
- 1. Company Name and Address
-
Specify whether the company name and address appear on automatic deposit advice slips. Values are:
1: Do not print company name and address.
2: Print company name only.
3: Print company name and address.
Blank: Do not print company name and address.
- 2. Company Number
-
Specify the number of the company for which the name and address appear on the automatic deposit advice slips.
This processing option applies only if you specify in the Company Name and Number processing option to print that information on the automatic deposit advice slips. If you leave this processing option blank, each automatic deposit advice slip displays the name and address of the employee's home company.
- 3. Employee Identification Number
-
Specify the type of employee identification number that appears on the automatic deposit advice slip. Values are:
2: Tax ID number.
3: Third employee number.
Blank: Address book number.
3.5.6 Setting Processing Options for Create Auto Deposit Tape File (R07235)
The values that you enter in the processing options are established with the organization's automated clearinghouse bank. The Automated Clearing House Association (ACHA) publishes guidelines that you can use to determine how to set the processing options. These guidelines are available through regional offices of the ACHA.
3.5.6.1 Company Options
These processing options specify company-specific information that is required by the banking institution.
- 1. Enter Effective Deposit Date
-
Specify the date on which funds are to be deposited into an employee's bank account. If you leave this processing option blank, the system date is used.
Note:
If you enter an offset number in the Offset Effective Deposit Date processing option, the system adds the number of days in that processing option to the date in this processing option to determine the effective deposit date. If you leave this processing option blank and enter an offset number, the system adds the number of days that you enter in that processing option to the system date to determine the effective deposit date. - 2. Off Set Effective Deposit Date
-
Specify a date to be used with the offset formula to determine the date on which funds should be deposited into an employee's bank account. If you enter a number in this processing option, the system adds that number of days to the date in the Effective Deposit Date processing option to determine the deposit date for the funds. If you leave that processing option blank, the system adds the offset days to the system date to determine the deposit date.
For example, if you enter 1 in this processing option and leave the Enter Effective Deposit Date processing option blank, the system uses the deposit date system date plus 1. If you leave this option blank or enter 0, the system uses the date that you enter in the Enter Effective Deposit Date processing option.
Note:
This feature is enabled only if the date in the Enter Effective Deposit Date processing option uses the MMDDYY format, as required by the clearing house facility. - 3. Enter Trace Number (7 pos.) (enter trace number (7 positions))
-
Specify the trace number, which is assigned by the ODFI and is used for the creation of automatic deposit and pre-note transaction records. This number, which can be up to 15 characters in length, is used in conjunction with the batch number, transmission date, and file ID modifier to identify records within a file.
3.5.6.2 Optional Items
These processing options enable you to specify additional information to include in the auto-deposit tape file.
- 1. Enter Tape Processor's Name if different from Company Name
-
Specify the name of the ACH operator or sender. Typically, this is the name of the company or the entity for which you are creating an automatic deposit or pre-note transaction file. If you leave this processing option blank, the system automatically uses the company name.
- 2. Descriptive Date
-
Specify the date description to appear to the receiver of the automatic deposit or pre-note transaction file. This six-character code is used for descriptive purposes only and does not control the timing of fund deposits. Examples of possible entries for this processing option are 011305,01 05,JAN 13, and JAN 05.
Note:
If you use the Offset Descriptive Days processing option, you must enter this date using the MMDDYY format. - 3. Off Set Descriptive Date
-
Specify a date if you want the offset date formula to determine the date for the descriptive date. If you enter a number in this processing option, the system adds this number to the date in the Descriptive Date processing option. For example, if you enter 2 in this processing option, the actual descriptive date in the pre-note transaction file is the date in the Descriptive Date processing option plus 2. If you leave this processing option blank or if you enter 0, the system uses the date in the Descriptive Date processing option.
Note:
For you to use this feature, the date in the Descriptive Date processing option must be in the MMDDYY format. - 4. Reference Code for Auto Deposits
-
Identify user-defined information that is specific to the organization.
- 5. Company Entry Description (10 pos.)
-
Specify a 10-character description of the purpose of the file that you are sending. This code is used for information purposes only and does not affect the processing or calculation of automatic deposit or pre-note transaction records. Examples of codes that you might use are REG SALARY,BONUS PAY, or HOLIDAY.
- 6. Enter if Pre-Note is to be run in update or proof mode.
-
Specify the mode of processing when running the pre-note transaction program. When you run this process in proof mode, the system creates a report to display the changes that will be made. When you run this process in update mode, the system updates the F060116 and F065016 tables, changes the Pre-Note flag, and adds the auto deposit start date. Values are:
0: Proof Mode.
1: Update Mode.
|
Note: The R07235 is used to debit auto deposits from various accounts based on the employees home company and home business unit. For example, if an employee works at company 50, business unit 50, and the debit information is set up in the P07236 program, the ACH file that is created will use the information for company 50, business unit 50 (transit number, account number, and so on). However, you may want the ability to debit by payroll ID, regardless of what company or business unit an employee worked in. The Create Auto Deposit Tape File by Payroll Version (R07236) is used for this purpose. The R07236 program will not use any information from the Auto Deposit Instructions for Business Units (P07236) program; it relies only on the processing options. You can set up a payroll ID and, in print payment setup, choose the R07236 program and the version with the correct processing option information. The ACH file will now be created based on the R07236 version and not the employee's home company and home business unit. |
3.5.7 Setting Up Payment Types
Access the Print Payment Setup form.
- Print Program
-
Indicates the program that prints payroll checks.
- Stub Lines
-
Indicates the number of lines that you can print on the check stub or auto-deposit advice. If the number of lines is greater than the value that you enter in this field, the system produces an attachment to print the remaining information.
- Attachment Program
-
Indicates the program that prints payroll check or auto-deposit advice attachments.
- Advice Program
-
Indicates the program that prints the auto-deposit advices.
- Bank File Program
-
Indicates the program that creates the auto-deposit file.
3.5.8 Setting Up Debit Account Information for Automatic Deposits
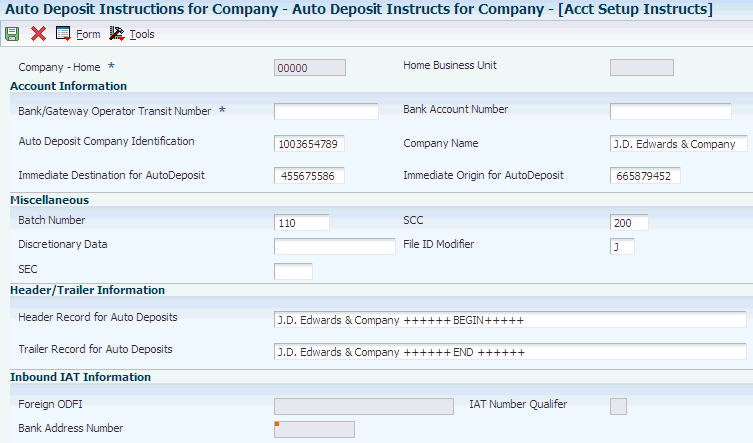
Access the Account Setup Instructions form.
Figure 3-5 Account Setup Instructions form
Description of ''Figure 3-5 Account Setup Instructions form''
- Bank Transit Number
-
Enter the payment routing number for the employee's financial institution. This number is on the employee's check or deposit slip. It is located between the MICR colons (:) at the bottom of the check. If you change this number for an employee, the system creates a pre-note for the employee's next auto-deposit.
- Bank Account Number
-
Enter the employee's unique account number at the financial institution. You can obtain the number from the MICR line of a voided check or a deposit slip from the employee's account. You must include dash cue symbols in the field. However, they are recorded in a translated mode as a hyphen. You can also obtain account numbers from other sources, such as passbooks or debit cards.
When transcribing information, left justify and enter only numbers (0 through 9), alphabetic characters (A through Z), and hyphens (-). If less than 17 characters are required, leave the unused spaces blank. Spaces left within the depositor's account number are ignored when the paperless entry is prepared. For example, 0123 4 56789 appears as 0123456789 in the entry record, and 0123-4 56789 appears as 0123-456789.
If you change this number, the system automatically pre-notes the employee's auto-deposit record again.
- Auto Deposit Company Identification
-
Enter the ten-character, alphanumeric code that identifies the originator of a file. You must include this code on all prenotification records and on each entry that is initiated pursuant to such prenotification. The company ID can begin with the ANSI one-digit Identification Code Designators (ICD), followed by the identification number. The ANSI identification numbers and related ICDs are:
1: IRS Employer Identification Number (EIN)
3: Data Universal Numbering Systems (DUNS)
9: User Assigned Number
- Immediate Destination for AutoDeposit
-
Enter the ten-character code that specifies the routing number of the ACH operator or receiving point to which the pre-note file is being sent. This code begins with a blank in the first position, followed by the four-digit Federal Reserve Routing Symbol, the four-digit ABA Institution Identifier, and the check digit (bTTTTAAAAC).
- Immediate Origin for AutoDeposit
-
Enter the ten-character code that specifies the routing number of the ACH operator or the sending point that is sending the pre-note file. This code begins with a blank in the first position, followed by the four-digit Federal Reserve Routing Symbol, the four-digit ABA Institution Identifier, and the check digit (bTTTTAAAAC).
- Batch Number
-
Enter the batch number that is assigned to the auto-deposit that is included in the workfile build.
- SCC (service class code)
-
Enter the code that identifies the general classification of dollar entries to be exchanged. This standard is used to facilitate transmission of data between organizations. ACH entries that are required for payroll deposits use these service class codes:
200: ACH entries mixed debit and credits.
220: ACH credits only (batch format).
225: ACH debits only (batch format).
At present, only the use of class 200 is recommended.
- Discretionary Data
-
Enter codes that are of significance only to the company. This field enables specialized handling of all subsequent entries in the batch. No standardized interpretation exists of the value that you enter by the banking system.
- File ID Modifier (file identification modifier)
-
Enter the code in the file header record that the system uses to distinguish multiple files that were created on the same date and among the same participants. Values can include only uppercase characters A–Z and numeric characters 0–9.
- Header Record for Auto Deposits
-
Enter the code that identifies the first physical records on magnetic tape files. The header record identifies the data file and provides security and control information that is relative to that file.
- Trailer Record for Auto Deposits
-
Enter the code that identifies the trailer record for auto-deposit tape files. This code is used for magnetic tape files only. It represents the last physical records for each file. The trailer record identifies the data file and tape volume and provides the checking mechanism for processing verification (that is, block counts).
3.6 Setting Up Multiple Version Processing
This section provides an overview of the multiple version setup process, lists a prerequisite, and discusses how to attach multiple version information to a payroll ID.
3.6.1 Understanding the Multiple Version Setup Process
Before you can process multiple versions of pay cycle steps, you must set up information about the multiple versions. To do so, you must first create multiple versions of each of the pay cycle steps for multiple version processing. After you create the versions to process during a payroll cycle, you must assign those versions to a payroll ID. After you assign the versions to the payroll ID, you can review the information to ensure that you have set up the right versions for each step of the payroll cycle.
You can assign multiple version information for each step of the payroll cycle at one time, or you can assign multiple versions of pay cycle steps to each step individually.
Before you can assign multiple versions to a payroll ID, you must create versions of pay cycle programs. This table identifies the programs for which you need to create versions in order to use multiple version processing for each pay cycle step:
| Pay Cycle Step | Program |
|---|---|
| Pre-Payroll | Pre-Payroll Driver UBE (R07200) |
| Interims Only | Interims Only Driver UBE (R07200I) |
| Changes Only | Pre-Payroll Changes Only (R07200C) |
| Journal Entries | Generate Payroll Journal Entries (R072902) (This program is used to submit and revise payroll journal entries.) |
| Final Update | Final Update Driver UBE (R07250) |
|
Note: If you assign all versions to the payroll ID using Reports Setup, you must manually enter program names and pay cycle steps on the Reports Setup form. If you use the Process Multiple row menu options, the system automatically enters that information.This information describes how to assign all multiple version information at once. However, you can use the Process Multiple row menu options from the Work With Pay Cycle Work Bench form to assign multiple version information by process. |
3.6.2 Prerequisite
Create versions for each of the pay cycle programs for which you want to use multiple version processing.
3.6.3 Forms Used to Set Up Multiple Version Processing
3.6.4 Attaching Multiple Version Information to a Payroll ID
Access the Reports Setup form.
- Step Code
-
Enter a value that specifies the step of the payroll cycle to which you are assigning a version of a program. Values are:
C: Changes Only - Multiple.
F: Final Update - Multiple.
J: Journal Entries - Multiple.
M: Merge Only - Multiple.
P: Pre-Payroll - Multiple.