16 Using Event Attributes to Rate Events in Real Time
This chapter describes how to define rates in your Oracle Communications Billing and Revenue Management (BRM) price list by using event attributes such as telephone call origins and destinations.
Before you read this chapter you should be familiar with rating and price lists. See "About Creating a Price List".
About Using Event Attributes to Rate Events
As explained in "About Creating a Price List", if BRM can measure a billable event, it can rate it. It can rate an event based on multiple event attributes, such as the date and time that the event occurred. With attribute-based rating, you can specify additional event attributes to consider for rating, for example, phone call origin and destination.
Note:
You can use a rate plan selector to rate cycle events. To do so, you can use account or service attributes, but not event attributes, to select the rate plan.Using Event Attributes to Select Rate Plans
To use attribute-based rating, you use the Pricing Center rate plan selector. The rate plan selector associates a value in an event attribute with a rate plan. For example, by using the event attribute that stores the telephone call destination, you can choose rate plans like this:
-
If the call is made to France, use the Calls to Europe rate plan.
-
If the call is made to Ghana, use the Calls to Africa rate plan.
Figure 16-1 shows a rate plan selector that chooses a different rate plan depending on call type. In this case, the telephony event includes an attribute named CALL_TYPE, which specifies the type of call, for example, a call made with a calling card. To rate a call made with a calling card differently from a call without a calling card, you assign a different rate plan based on the call type.
Figure 16-1 Rate Plan Selector Configuration for Call Type

Description of ''Figure 16-1 Rate Plan Selector Configuration for Call Type''
The event attributes that you use for rating often depend on the source of the usage data. For example, when rating telephone calls, some PBX-to-gateway/gatekeeper systems do not supply the ANI value. In that case, you can use the CALL.ORIG value instead.
Using Event Attributes to Define Impact Categories
You use impact categories to apply different balance impacts for the same rate plan. For example, you can assign a set of telephone calls and destinations to a single rate plan:
Rate plan: IP Telephony
Impact category: USA to Europe
Balance impact: .10
Impact category: USA to Asia
Balance impact: .15
In Figure 16-2, calls made to Europe are assigned to the USA - Europe impact category, and calls made to Asia are assigned to the USA - Asia impact category:
Notice that the same rate plan is used for all calls, but the impact category specifies different balance impacts.
Even though you are using a single rate plan here, you must use the rate plan selector to assign impact categories. Therefore, you must choose Rate plan selector when creating the product, not Single rate plan.
You use the rate plan selector to associate event attributes with impact categories. The event attributes and impact categories shown in the figure above would look like Figure 16-3 in the rate plan selector:

The event attributes ANI (call origin) and DNIS (call destination) are entered as country codes:
-
1 = USA
-
33 = France
-
49 = Germany
-
81 = Japan
-
86 = China
A call from the USA to France might have this call origin and destination:
-
Origin: 15555121212
-
Destination: 3372621234
BRM matches the numbers in the rate plan selector with the telephone numbers. Since only country codes are used, all calls from each country match the numbers in the rate plan selector. For example, ”3372621234” matches ”33.”
In the balance impacts for this rate plan, the impact categories define how much to charge as shown in Figure 16-4:
Figure 16-4 Balance Impacts Based on Impact Category
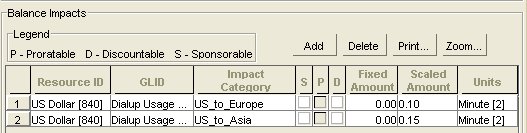
Description of ''Figure 16-4 Balance Impacts Based on Impact Category''
Note:
In Balance Impacts, you can use asterisk (*) as a wildcard character in the Impact Category column to apply the balance impact to all impact categories defined for the rate plan.Using the above examples, here is how BRM assigns a balance impact to a call:
-
The customer makes a call from the USA to France.
-
During rating, BRM finds the call origin and destination data in the event.
-
BRM looks through the data in the rate plan selector to find entries that have a call origin of USA and a call destination of France. This information tells BRM which rate plan to use, and which impact category to use.
-
BRM looks in the IP Telephony rate plan for the balance impact.
-
BRM looks through the IP Telephony balance impacts to find one that uses the USA_Europe impact category. BRM uses that balance impact to calculate the charge for the call.
About the Default Impact Category
You use the default impact category to apply a balance impact when none of the other impact categories can be used. The default impact category provides a fail-safe; without it, some events might not be rated at all.
The default impact category name is default.
Setting the impact category to default applies the balance impacts of the rate plan according to standard rating attributes, and ignores all impact category conditions.
Creating Impact Categories
To make impact categories available to Pricing Center, you edit the pin_impact_category file, then run the load_pin_impact_category utility to load the contents of the file into the /config/impact_category object in the BRM database.
Important:
The load_pin_impact_category utility requires a configuration (pin.conf) files.-
Edit the pin_impact_category file in BRM_Home/sys/data/config. The pin_impact_category file includes examples and instructions.
Caution:
The load_pin_impact_category utility overwrites existing impact categories. If you are updating impact categories, you cannot load new impact categories only. You must load a complete set of impact categories each time you run the load_pin_impact_category utility. -
Save the pin_impact_category file.
-
Use the following command to load the file into the database:
load_pin_impact_category pin_impact_categoryIf you are not in the same directory as the pin_impact_category file, include the complete path to the file, for example:
load_pin_impact_category BRM_Home/sys/data/config/pin_impact_category
For more information, see "load_pin_impact_category".
-
Stop and restart the Connection Manager (CM). If necessary, stop and restart Pricing Center.
To verify that the impact categories were loaded, you can display the /config/impact_category object by using the Object Browser, or use the robj command with the testnap utility.
Creating Unassigned Impact Categories
You can include more impact categories in the pin_impact_category file than you need. You do not have to assign a balance impact to all impact categories.
For example, you can plan ahead for origin/destination pairs that you will add later and create the impact categories that they will use.
About Charging for Custom Events and Attributes
BRM supports a default set of event attributes, such as geographical zones, quality of service, and so on. You can define charges for these attributes by using the Rate Plan Selector.
If you want to rate custom attributes of events or non-event attributes or if your rating guidelines are more complex than the defaults provided with BRM, you must modify the PCM_OP_ACT_POL_SPEC_RATES policy opcode.
For example, you can rate administrative events or non-event attributes such as an account attribute or a profile attribute. You can modify the policy to rate percentage values or values containing a greater than or less than operator. You can rate an event one way if an attribute is greater than 10, and another way if it is less than 10.
Charging for Custom Events and Attributes
To charge for custom events and attributes:
-
Modify the PCM_OP_ACT_POL_SPEC_RATES policy opcode or write a custom policy opcode to analyze the event data and assign the rate plan and impact category.
See the policy source file of the PCM_OP_ACT_POL_SPEC_RATES policy opcode for a sample implementation.
For information on how generic rating works, see the description of PCM_OP_ACT_USAGE.
-
Edit the pin_spec_rates file in BRM_Home/sys/data/config to associate the opcode to the event type that it rates.
The pin_spec_rates file includes examples and instructions.
Caution:
When you run the load_pin_spec_rates utility, it overwrites the existing setup for administrative events charges. If you are updating a set of administrative events charges, you cannot load new charges only. You load complete sets of charges each time you run load_pin_spec_rates. -
Create a configuration file for the "load_pin_spec_rates" utility.
-
Run the load_pin_spec_rates utility to load the contents of the pin_spec_rates file into the database.
load_pin_spec_rates pin_spec_rates_file
-
Edit the pin_impact_category file in the BRM_Home/sys/data/config directory to define impact categories for the event.
The pin_impact_category file includes examples and instructions.
Caution:
When you run the load_pin_impact_category, it overwrites the existing impact categories. If you are updating a set of impact categories, you cannot load new impact categories only. You load complete sets of impact categories each time you run the load_pin_impact_category utility. -
Run the "load_pin_impact_category" utility to load the impact categories into the database.
load_pin_impact_category pin_impact_category_file
-
If you use pipeline batch rating, add the custom cycle event to the following locations:
-
The EAI payload configuration file. See "About the Payload Configuration File" in BRM Installation Guide.
-
Your system's event notification list. The information you must add to the list is in the pin_notify_ifw_sync file.
-
-
In Pricing Center, create the rate plans that can be used to rate an event that uses custom event analysis.
-
In your pricing plan, assign a rate for the impact category.
-
Use the Pricing Center to create products that use the rates defined in your custom opcodes. Ensure that the products use custom event analysis.
Using Custom Fields with Real-Time Rating
If you add rating-related custom fields to BRM, you must make these fields available to the rating opcodes. For instructions, see "Making Custom Fields Available to Your Applications" in BRM Developer's Guide.
About Using Zones to Group Event Attributes
You use zones to group event attribute values into manageable categories. For example, to apply the same rate plan or impact category to all area codes in Northern California, you can create a zone that includes all Northern California area codes. Another zone might include all Southern California area codes. You then might include both zones in a zone for all California area codes, as shown in the following example:
California zone
Northern California
408
415
650
Southern California
213
714
424
A zone map contains a hierarchy of zones and data, such as phone numbers, IP addresses, and Quality of Service (QoS) data.
Figure 16-5 shows a zone map with multiple nested zones. The data consists of area codes:
If you use a zone map for an event attribute, all of that type of event attribute must be defined with a zone or data from that zone map. You cannot mix hard-coded values in a rate plan selector that uses zones.
For more information on zone and zone maps, see "About Zoning" and "About Zone Models".
About Setting Up Zones
When you use zone maps to rate events, BRM looks for the product to use for rating an event. If the product is configured to use a pipeline zone model, the real-time rating opcodes send the event to a real-time zoning pipeline to retrieve the zoning information. If the product is not configured to use a pipeline zone model, the real-time rating opcodes search the BRM database for the zoning information for the event.
You can define zones to rate events by using Pricing Center or Zone Mapper:
-
To use zone information for rating both real-time and batch rating, use Pricing Center. Zone maps defined using Pricing Center are stored in the Pipeline Manager database.
If you use both real-time and batch processes for rating events, or if you are a new BRM user, define your zones by using Pricing Center.
See "About Zoning" and "Setting Up Zones by Using Pricing Center".
-
To use zone information for rating only real-time events, use Zone Mapper in Pricing Center. Zone maps defined by using Zone Mapper are stored in the BRM database.
If you have already defined zone maps in BRM by using Zone Mapper, you can continue to use your existing zone maps.
Pricing Center displays the zone-map names and impact categories from both the Pipeline Manager database and the BRM database. You can use the zone maps stored in either database to configure price plans.
Real-Time Zoning Pipeline Architecture
A real-time zoning pipeline processes events as follows:
-
When the CM receives an event with a zoning request, the real-time rating opcodes check the event and the product that rates the event.
-
If the product is configured for pipeline zoning, the real-time rating opcodes extracts the calling number, called number, service calls, event time, and zone map name from the event and product flist.
-
BRM sends the event flist in a request to the NET_EM module to get the impact category from the Pipeline Manager database for the event. The CM sends the request for specific zone map data, such as standard zone-map data and geographic zone-map data. See "Configuring the NET_EM Module for Real-Time Processing" in BRM System Administrator's Guide.
-
When an event flist is passed to a real-time zoning pipeline, the input module in the pipeline converts the event data from the flist format used by real-time rating opcodes to the EDR format used in the pipeline.
-
The FCT_Zone module processes the zoning EDR and uses the DAT_Zone module to search for the zone map for the event.
-
When zoning is complete, the EDR, now containing zoning information for the event, is converted back into flist format by the output module in the pipeline. The output module also passes the event back to the real-time rating opcodes.
-
If a correct zone map for the event is not found in the Pipeline Manager database, the pipeline zoning module returns an empty flist to the CM. The CM logs the error and the event is not rated.
Figure 16-6 illustrates the data flow for real-time pipeline zoning:
Figure 16-6 Data Flow for Real-Time Pipeline Zoning
Description of ''Figure 16-6 Data Flow for Real-Time Pipeline Zoning''
Setting Up Zones by Using Pricing Center
-
In Pricing Center, set up your zone models, which are stored in the Pipeline Manager database.
Important:
Ensure that the zone map names are unique between both the BRM and Pipeline Manager databases. -
Configure the NET_EM to receive events from the real-time rating opcodes.
-
Configure the CM to point to the NET_EM.
-
Configure the INP_Realtime module.
Use this entry for the OpcodeMapping entry:
OpcodeMapping = ./formatDesc/Formats/Realtime/zonemap_event.xml
-
Configure the OUT_Realtime module.
-
Configure the FCT_Zone module to specify a connection to the DAT_Zone module.
-
Configure the DAT_Zone module to process real-time events.
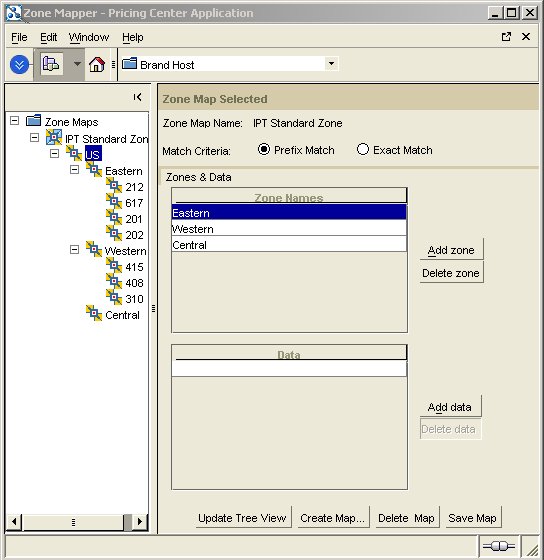
About Setting Up Zones by Using Zone Mapper
You use Zone Mapper to create zones and zone maps, which are stored in the BRM database. Zone Mapper is a component of Pricing Center. You can create multiple zone maps.
Important:
You can use a rate plan selector to rate cycle events. To do so, you can use account or service attributes, but not event attributes, to select the rate plan.Note:
A zone map name can include a maximum of 255 characters.Figure 16-7 shows Zone Mapper.
About Defining Zone Maps for Products
Each product can have only one zone map. However, one zone map can be used by multiple products. You can create multiple zone maps for one system or for branded systems.
Note:
All brands in a database can use any of the zone maps stored in that database.Options for Matching Event Attribute Values
When you create zones using Zone Mapper, you specify how BRM matches a value in an event with the data in the zone map. You have two choices:
-
Prefix: BRM searches for the value in the zone map that best matches the event. For example, in an IP telephony service, if the customer calls 202-555-5678, and the zone map includes 202, BRM will find the zone with 202. If the zone map includes both 202 and 202-555, BRM will find the zone that includes 202-555.
-
Exact Match: BRM searches only for the value in the zone map that exactly matches the event. For example, if the customer calls 202-555-5678, BRM looks only for a zone map that includes 202-555-5678.
Changing and Deleting Zone Maps
You can either change a zone name, modify the data for a zone, or delete a zone map entirely. When you delete a zone map that you used to define a product in Pricing Center, you must also remove the map from that product. When you delete a zone map, you also delete the zones that belong to it.
Caution:
-
Deleting a zone map permanently removes the map from the BRM database.
-
If customers have already purchased a product that includes a zone map that you are deleting, you must cancel the product that includes the old zone map, and purchase the product that includes the new zone map.
Selecting Multiple Rate Plans and Impact Categories
You can use the rate plan selector to choose rate plans and assign impact categories at the same time.
Figure 16-8 shows a rate plan selector that selects rate plans based on three event attributes:
-
Call origin
-
Call destination
-
Call type

Customizing Zone Mapping
The zone mapping opcodes perform zoning for real-time rating.
For background information, see "About Using Zones to Group Event Attributes".
How Zone Mapping Works
To manage zones, for example, create, delete, and update zone maps, use PCM_OP_ZONEMAP_COMMIT_ZONEMAP. Zone maps are stored in /zonemap objects.
By default, PCM_OP_ZONEMAP_COMMIT_ZONEMAP takes an array of zone maps as its input, each of which represents the new, modified, or deleted zone map. In the case of a deletion, the opcode marks the zone map to be deleted in the input flist.
The PCM_OP_ZONEMAP_COMMIT_ZONEMAP output is an flist that links zone maps and products.
To retrieve zone map information from the database, use PCM_OP_ZONEMAP_GET_ZONEMAP. The default implementation enables you to retrieve zone maps in several ways:
-
You can use it get all the zone maps by providing a zone map type POID
-
You can use it get a specific zone map by providing the zone map name
-
You can get the zone map associated with a product by providing the valid product POID
PCM_OP_ZONEMAP_GET_ZONEMAP is called by the Zone Mapper to retrieve zone map data and displays it in the user interface. It is also called by the zone map search opcode, PCM_OP_ZONEMAP_POL_GET_LINEAGE.
Customizing Zone Mapping
Use the following opcodes to customize zone mapping:
-
PCM_OP_ZONEMAP_POL_GET_LINEAGE. See "Finding Zone Maps".
-
PCM_OP_ZONEMAP_POL_GET_ZONEMAP. See "Getting Zone Maps from the BRM Database".
-
PCM_OP_ZONEMAP_POL_SET_ZONEMAP. See "Saving Zone Map Data".
-
PCM_OP_RATE_POL_EVENT_ZONEMAP. See "Getting Zone Maps and Impact Categories from the Pipeline Manager Database".
Finding Zone Maps
To search in a zone map for data associated with a given string, use PCM_OP_ZONEMAP_POL_GET_LINEAGE.
You supply a string and a zone map name. It then searches the zone map for the given string and returns the matching node with all ancestors of the matching node (the lineage).
This opcode calls the zone-based rating load opcode, PCM_OP_ZONEMAP_GET_ZONEMAP.
Getting Zone Maps from the BRM Database
To customize which zone map data to retrieve from the database, use PCM_OP_ZONEMAP_POL_GET_ZONEMAP. This opcode provides zone maps to display in the Zone Mapper.
This opcode retrieves the original zone map data from the BRM database, and depending on the calling program, it converts the binary format of zone map data into a readable flist, or it returns the binary format to be used in the lineage search.
The input flist must include either the PIN_FLD_POID for routing purposes or PIN_FLD_NAME to search by name.
Saving Zone Map Data
To customize how to save zone map data, use PCM_OP_ZONEMAP_POL_SET_ZONEMAP. This opcode saves zone map in the BRM database when you commit zone maps in the Zone Mapper.
This opcode retrieves the original zone map data from the BRM database, and depending on the calling program, it converts the binary format of zone map data into a readable flist, or it returns the binary format to be used in the lineage search.
The input flist must include either the PIN_FLD_POID for gateway routing purposes or PIN_FLD_NAME to search by name.
Getting Zone Maps and Impact Categories from the Pipeline Manager Database
To get zoning data from the Pipeline Manager database, use the PCM_OP_RATE_POL_EVENT_ZONEMAP policy opcode. This opcode returns the zone map name and impact category for an event from the Pipeline Manager database.
You can customize this policy to add new event classes that you have created, if those event classes use a real-time zoning pipeline.
PCM_OP_RATE_POL_EVENT_ZONEMAP performs the following functions:
-
Reads the event storable class.
-
Based on the service, it retrieves the calling number, the called number, and the zone map name from the event.
-
Prepares the input flist for a real-time zoning pipeline input module.
-
If it finds a matching impact category for the event zone, returns the impact category for the event.
-
If it doesn't find a matching impact category, returns an empty string and logs an error.
PCM_OP_RATE_POL_EVENT_ZONEMAP returns the zone map name and impact category for the event. If the opcode fails, it returns an empty string and logs an error.
Using the Rate Plan Selector in Pricing Center
Before you use the rate plan selector, you must create impact categories. See "Creating Impact Categories".
When you use a rate plan selector in Pricing Center, you start with an empty rate plan selector as shown in Figure 16-9:
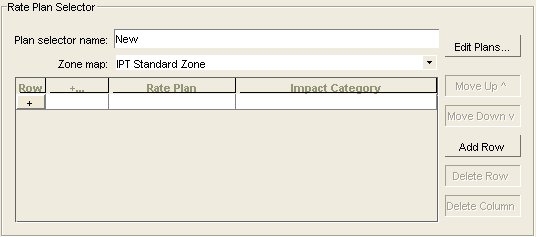
After you provide a name for the rate plan selector, and (optionally) choose a zone map, you specify the attribute type and attributes you want to use.
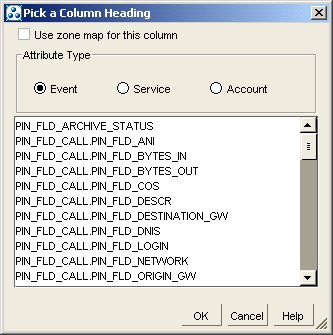
To choose the attribute type, you click the appropriate option. To choose attributes, you select from a list of all attributes in the object. Figure 16-10 shows the list for an IP dialup session event:
Figure 16-10 IP Dial Up Session Attributes in Rate Plan Selector Configuration
Description of ''Figure 16-10 IP Dial Up Session Attributes in Rate Plan Selector Configuration''
To add rate plans and impact categories, you choose from lists. You can create a rate plan if it is not on the list, but impact categories must already be defined.
Set the impact category to default to apply the balance impacts of the rate plan according to standard rating attributes, and ignore all impact category conditions.
Using Wildcards to Match Event Data
In a rate plan selector, use an asterisk (*) as a wildcard as follows:
-
In attribute columns, enter an asterisk to match any value in an event.
-
In the Impact Category column, do not use an asterisk. BRM does not support its use as a wildcard in this column.
See "Using Event Attributes to Define Impact Categories" for information about using wildcard characters in rate plan balance impacts.
Specifying the Priority for Attributes
The order of the rows in the rate plan selector determines the order in which rate plans are processed. The top row has the top priority. For example, you can specify to use one rate plan for one value of an attribute, and another rate plan for all other values. To do this, you give the value the top priority as shown in Figure 16-11:

When you use multiple attributes, they are processed in the order from left to right.