Using Business Service Objects
Overview
A business service object, formerly known as Service Bean, is a high-level service component that allows OA Framework or BC4J (Business Components for Java) components to be deployed as web services. This type of interfaces provides access to SOA services and facilitates integration between Oracle E-Business Suite and trading partners.
Business service object interfaces can be exposed as SOAP-based and REST-based services. To better understand how to utilize business service objects, this chapter takes a SOAP service as an example to explain the service invocation. An integration repository administrator or a system integration developer can first generate a SOAP service, and then the administrator can deploy it to an application server. The developer can then orchestrate the deployed SOAP service into a meaningful BPEL process with service endpoints. This process can take the data from a business partner and then insert or update Oracle E-Business Suite if necessary.
To better understand how each individual web service can be used in inserting or updating application data, this chapter provides detailed design-time and runtime tasks to guide you through the service invocation process. For the example described in the following sections, we use Oracle JDeveloper 10.1.3.3.0 as a design-time tool to create the BPEL process and use Oracle SOA Suite BPEL server 10.1.3.3.0 for the process deployment.
This chapter includes the following topics:
Using Business Service Object SOAP Services
SOA Composite Application with BPEL Process Scenario
This example uses PurchaseOrderService /oracle/apps/fnd/framework/toolbox/tutorial/PurchaseOrderService business service object interface to explain the BPEL process creation.
When a purchase order approval request is received, the purchase order details is read by a File Adapter. The order data is then passed to the approvePurchaseOrder method within the PurchaseOrderService to initiate the single PO approval process. The approval information is then replied back to the requestor.
If the BPEL process is successfully executed after deployment, you should notice the purchase order status changed from Incomplete to Approved.
Prerequisites to Create a BPEL Process Using a Business Service Object Web Service
-
An integration repository administrator needs to successfully generate and deploy a web service to the application server.
-
An integration developer needs to locate and record the deployed WSDL URL for the BSO interface exposed as a web service.
-
Header variables need to be populated for web service authorization.
Generating and Deploying WSDL URL
An integration repository administrator must first generate a SOAP service for a selected interface definition, and then deploy the service from Oracle Integration Repository to the application server.
For example, the administrator must perform the following steps before letting the integration developers use the deployed WSDL in creating a BPEL process:
-
To generate a SOAP service, locate the business service object interface definition first from the Oracle Integration Repository (such as PurchaseOrderService
/oracle/apps/fnd/framework/toolbox/tutorial/PurchaseOrderService) and click Generate WSDL in the SOAP Web Service tab of the interface details page. See: Generating SOAP Web Services, Oracle E-Business Suite Integrated SOA Gateway Implementation Guide. -
To deploy a generated SOAP service, select at least one authentication type and click Deploy in the SOAP Web Service tab of the interface details page to deploy the service. Once the service is successfully deployed, the selected authentication type(s) will be displayed along with 'Deployed' SOAP Service Status. For more information on securing web services with authentication types, see Managing Web Service Security, Oracle E-Business Suite Integrated SOA Gateway Implementation Guide.
For detailed instruction on how to deploy a web service, see Deploying and Undeploying SOAP Web Services, Oracle E-Business Suite Integrated SOA Gateway Implementation Guide.
Searching and Recording WSDL URL
Apart from the required tasks performed by the administrator, an integration developer needs to log on to the system to locate and record the deployed SOAP service WSDL URL from the SOAP Web Service tab of the deployed BSO interface details page.
SOAP Web Service Tab with Deployed WSDL Link
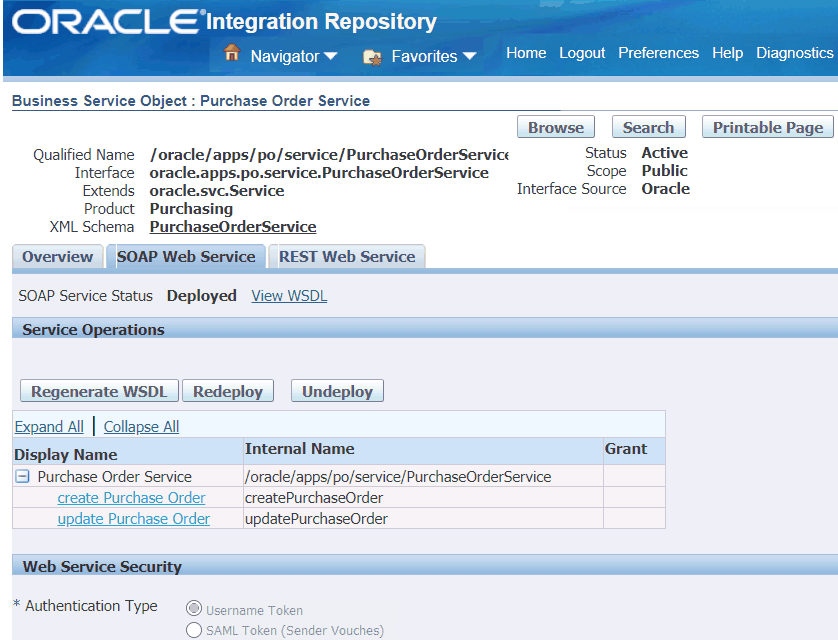
This WSDL information will be used later in creating a partner link for the interface exposed as a SOAP service during the BPEL process creation at design time.
For information on how to search for an interface and review the interface details, see Searching and Viewing Integration Interfaces.
Setting Header Variables for SOAP Request
You need to populate certain variables in the BPEL process for header elements to pass values that may be required to set application context during service execution. These header elements for Business Service Object interface type are RESPONSIBILITY_NAME, RESPONSIBILITY_APPL_NAME, SECURITY_GROUP_NAME, NLS_LANGUAGE, and ORG_ID.
Note: The user information is defined by the wsseUsername property passed within the security headers. Detailed instructions on how to pass the security headers along with the SOAP request, see Passing Values to Security Headers.
The expected values for these elements are described in the following table:
| Element Name | Expected Value |
|---|---|
RESPONSIBILITY_NAME |
responsibility_name (such as "System Administrator") or |
RESPONSIBILITY_APPL_NAME |
Application Short Name (such as "FND") |
SECURITY_GROUP_NAME |
Security Group Key (such as "STANDARD") |
NLS_LANGUAGE |
NLS Language (such as "AMERICAN") |
ORG_ID |
Org ID (such as "202") |
Note: NLS_Language and ORG_ID are optional values to be passed.
-
If the NLS Language element is specified, SOAP requests can be consumed in the language passed. All corresponding SOAP responses and error messages can also be returned in the same language. If no language is identified, then the default language of the user will be used.
-
If a service execution is dependent on any particular organization, then you must pass the ORG_ID element in the ServiceBean_Header of that SOAP request.
The context information can be specified by configuring an Assign activity before the Invoke activity in the BPEL PM.
Detailed information on how to set header variables for the SOAP request, see Assigning ServiceBean_Header Parameters.
Using Business Service Object WSDLs at Design Time
Based on the Purchase Order Service scenario described earlier, this section includes the following design-time tasks:
-
Create a SOA Composite Application with BPEL Process
Use this step to create a new SOA Composite application with BPEL project called
ApprovePO.bpel. This automatically creates two dummy activities - Receive and Reply - to receive input from a third party application and to reply output of the BPEL process to the request application. -
Use this step to create a partner link for the PurchaseOrderService web service.
-
Add a Partner Link for File Adapter
This is to synchronously read purchase order details received from the requestor.
-
Use this step to create two Invoke activities in order to:
-
Point to the File Adapter - Synchronous Read operation to read the purchase order from the input file.
-
Point to the PurchaseOrderService web service to initiate the single purchase order approval process.
-
-
Use this step to create three Assign activities in order to:
-
Set the SOAHeader details.
-
Pass the purchase order details read from the File Adapter as an input to the Invoke activity for the PurchaseOrderService web service.
-
Pass single purchase order approval information to the requestor through the Reply activity.
-
For general information and basic concept of a BPEL process, see Understanding BPEL Business Processes and Oracle BPEL Process Manager Developer's Guide for details.
Creating a New BPEL Project
Use this step to create a new BPEL project that will contain various BPEL process activities.
To create a new BPEL project:
-
Open JDeveloper BPEL Designer.
-
From the File menu, select New. The New Gallery dialog box appears.
-
Select All Items from the Filter By box. This produces a list of available categories.
-
Expand the General node and then select Projects.
-
Select BPEL Process Project from the Items group.
-
Click OK. The BPEL Process Project dialog box appears.
-
In the Name field, enter a descriptive name for example
ApprovePO. -
From the Template list, select Synchronous BPEL Process and then select Use Default Project Settings.
-
Use the default input and output schema elements in the Input/Output Elements dialog box.
-
Click Finish.
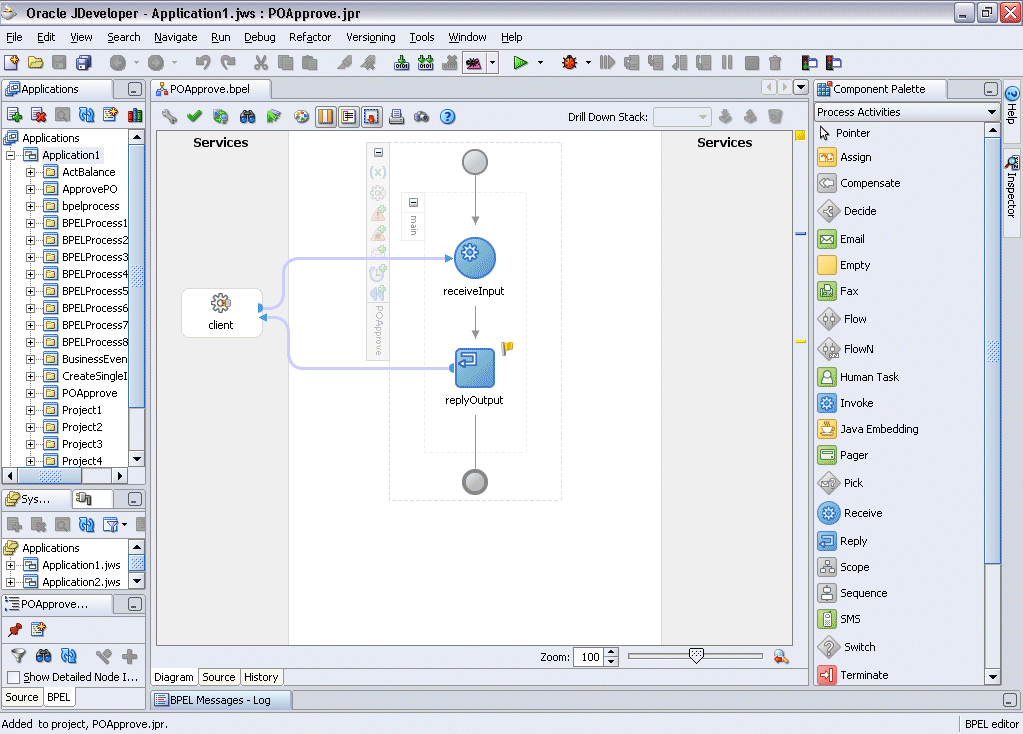
A new synchronous BPEL process is created with the Receive and Reply activities. The required source files including bpel.xml, using the name you specified (for example,
ApprovePO.bpel) are also generated.New BPEL Process Diagram
Creating a Partner Link
Use this step to configure a Partner Link called PurchaseOrderService.
To create a partner link for PurchaseOrderService:
-
In JDeveloper BPEL Designer, drag and drop the PartnerLink service from the Component Palette into the Partner Link border area of the process diagram. The Service Name dialog box appears.
-
Copy the WSDL URL corresponding to the PurchaseOrderService
/oracle/apps/fnd/framework/toolbox/tutorial/PurchaseOrderServicethat you recorded earlier in the WSDL File field.A Partner Link Type message dialog box appears asking whether you want the system to create a new WSDL file that will by default create partner link types for you.
Click Yes to have the
PurchaseOrderServicepartner link created in the process diagram.The Partner Name and Partner Link Type values populated automatically. You can select the Partner Role value from the drop-down list.
Click Apply.
Passing Values to Security Headers
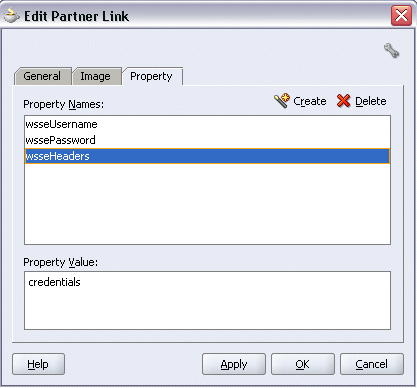
Select the Property tab and click the Create Property icon to select the following properties from the property name drop-down list in order to pass the security headers along with the SOAP request:
-
wsseUsername
Specify the username to be passed in the Property Value box.
-
wssePassword
Specify the corresponding password for the username to be passed in the Property Value box.
-
wsseHeaders
Enter
credentialsas the property value.
Click Apply to save the selected property values.
Edit Partner Link: Property Tab
-
-
Click OK to complete the partner link configuration. The partner link is created with the required WSDL settings, and is represented in the BPEL project by a new icon in the border area of the process diagram.
Adding a Partner Link for File Adapter
Use this step to synchronous read the purchase order details received from the third party application.
To add a Partner Link for File Adapter:
-
In JDeveloper BPEL Designer, drag and drop the File Adapter service from the Adapter Service section of the Component Palette into the Partner Link area of the process diagram. The Adapter Configuration Wizard welcome page appears.
-
Click Next. The Service Name dialog box appears.
-
Enter a name for the file adapter service for example
ReadPO. You can add an optional description of the service. -
Click Next and the Operation dialog box appears.
-
Specify the operation type, for example Synchronous Read File. This automatically populates the Operation Name field.
Click Next to access the File Directories dialog box.
-
Select Physical Path radio button and enter the input payload file directory information. For example, enter
/usr/tmp/as the directory name.Uncheck the Delete Files after successful retrieval check box. Click Next to open the File Name dialog box.
-
Enter the name of the file for the synchronous read file operation. For example, enter 'Input.xml'. Click Next. The Messages dialog box appears.
-
Select Browse for schema file in Schema Location. The Type Chooser window is displayed.
-
Click Import Schema Files button on the top right corner of the Type Chooser window.
-
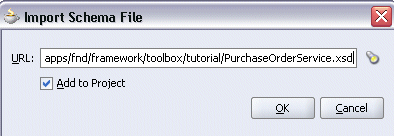
Enter the schema location for the service. Such as
http://<myhost>:<port>/webservices/AppsWSProvider/oracle/apps/fnd/framework/toolbox/tutorial/PurchaseOrderService.xsd.Schema location for your service can be found from the service WSDL URL (for example,
http://<myhost>:<port>/AppsWSProvider/oracle/apps/fnd/framework/toolbox/tutorial/PurchaseOrderService?wsdl).Import Schema File Dialog
-
Select the Add to Project check box and click OK.
-
Click OK for Import schema prompt.
The Imported Schemas folder is automatically added to the Type Chooser window.
-
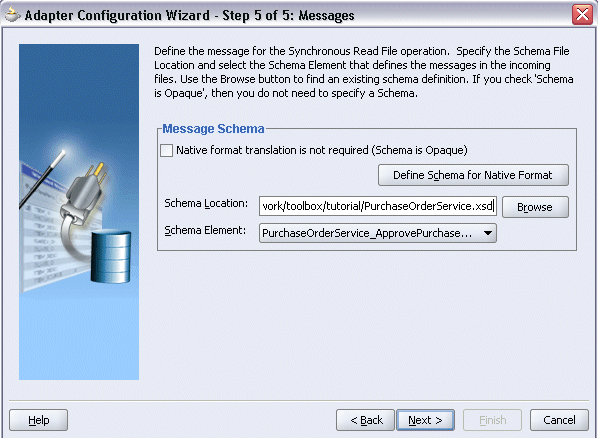
Select schema element by expanding the Imported Schemas folder > PurchaseOrderService.xsd > PurchaseOrderService_ApprovePurchaseOrder.
Click OK.
The selected schema location and element values are displayed.
Message Dialog with Selected Message Schema
-
-
Click Next and then Finish. The wizard generates the WSDL file corresponding to the partner link. The main Create Partner Link dialog box appears, specifying the new WSDL file
ReadPO.wsdl.Create Partner Link Dialog
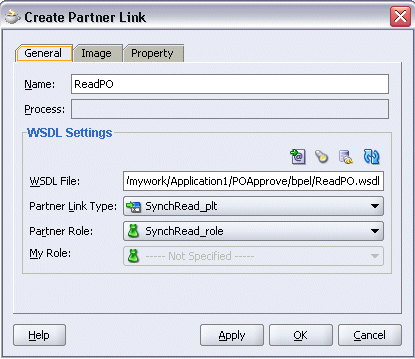
Click Apply and then OK to complete the configuration and create the partner link with the required WSDL settings for the File Adapter Service.
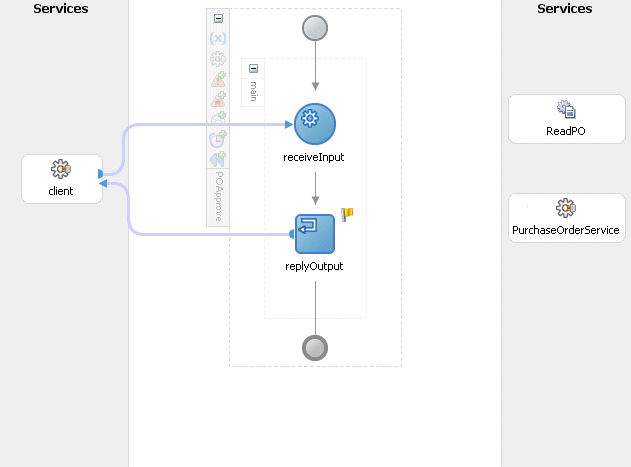
The
ReadPOPartner Link appears in the BPEL process diagram.BPEL Process Dialog with Partner Link for File Adapter
Adding an Invoke activity
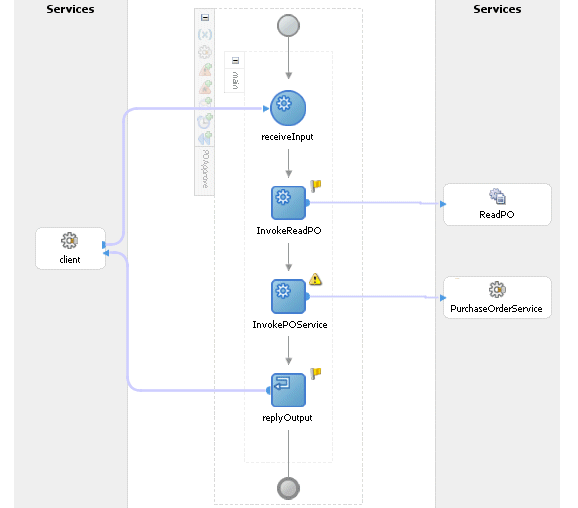
This step is to configure two Invoke activities:
-
Point to the File Adapter
ReadPOto synchronous read the purchase order from the Receive activity. -
Point to the
PurchaseOrderServicepartner link to send the transaction information that is received from the Assign activities to initiate the single purchase order approval process.
To add an Invoke activity for ReadPO Partner Link:
-
In JDeveloper BPEL Designer, drag and drop the Invoke activity from the Component Palette into the Activity box of the process diagram, between the Receive and Reply activities.
-
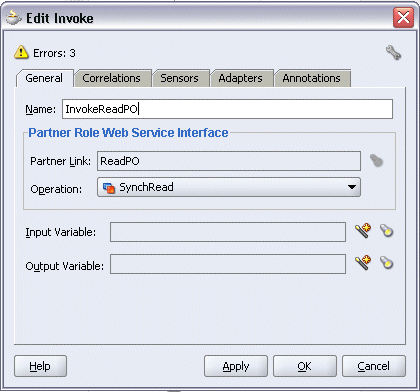
Link the Invoke activity to the
ReadPOservice. The Invoke activity will send event data to the partner link. The Edit Invoke dialog box appears.Edit Invoke Dialog
-
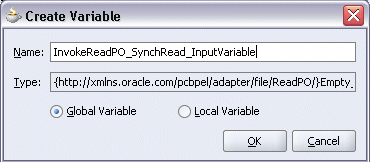
Enter a name for the Invoke activity, and then click the Create icon next to the Input Variable field to create a new variable. The Create Variable dialog box appears.
Create Variable Dialog
-
Select Global Variable and then enter a name for the variable. You can also accept the default name. Click OK.
-
Enter a name for the Invoke activity and then click the Create icon next to the Output Variable field to create a new variable. The Create Variable dialog box appears.
-
Select Global Variable and then enter a name for the variable. You can also accept the default name. Click OK.
-
Click Apply and then OK in the Edit Invoke dialog box to finish configuring the Invoke activity.
The Invoke activity appears in the process diagram.
To add an Invoke activity for PurchaseOrderService Partner Link:
-
In JDeveloper BPEL Designer, drag and drop the Invoke activity from the Component Palette into the Activity box of the process diagram, after the Invoke and Reply activities.
-
Link the Invoke activity to the
PurchaseOrderServiceservice. The Invoke activity will send event data to the partner link. The Edit Invoke dialog box appears. -
Enter a name for the Invoke activity such as 'InvokePOService'. Create input and output variables described in the first Invoke activity. Click OK to close the Create Variable dialog box.
-
Click Apply and then OK to finish configuring the Invoke activity.
The Invoke activity appears in the process diagram.
BPEL Process Dialog with Invoke Activities
Adding an Assign activity
This step is to configure three Assign activities:
-
To set the header details.
Note: You need to populate certain variables in the BPEL process for ServiceBean_Header elements to pass values that may be required to embed application context into SOAP envelopes for Web service authorization. These ServiceBean_Header elements for Business Service Object interface type are
RESPONSIBILITY_NAME, RESPONSIBILITY_APPL_NAME, SECURITY_GROUP_NAME, NLS_LANGUAGE, andORG_ID.Detailed information on how to set ServiceBean_Header for the SOAP request, see Assigning ServiceBean_Header Parameters.
-
To pass the purchase order details read from the File Adapter as an input to the second Invoke activity for
PurchaseOrderServicepartner link. -
To pass single purchase order approval information to the requestor through the dummy Reply activity.
To add the first Assign activity to pass header details:
Assigning ServiceBean_Header Parameters:
-
In JDeveloper BPEL Designer, drag and drop the Assign activity from the Component Palette into the Activity box of the process diagram, between the two Invoke activities.
-
Double-click the Assign activity to access the Edit Assign dialog box.
-
Click the General tab to enter the name for the Assign activity, such as 'SetServiceBeanHeader'.
-
On the Copy Operation tab, click Create and then select Copy Operation from the menu. The Create Copy Operation window appears.
-
Enter the first pair of parameters:
-
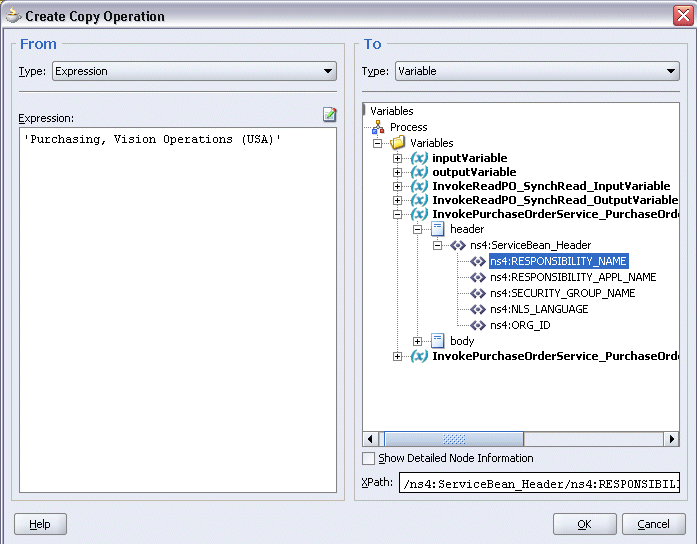
In the From navigation tree, select type Expression and then enter 'Purchasing, Vision Operations (USA)' in the Expression box.
-
In the To navigation tree, select type Variable. Navigate to Variable > Process > Variables > InvokePurchaseOrderService_PurchaseOrderService_AcknowledgePurchaseOrder_InputVariable > header> ns4:ServiceBean_Header and select ns4:RESPONSIBILITY_NAME. The XPath field should contain your selected entry.
Create Copy Operation Dialog for Assigning Responsibility Parameter Value
-
Click OK.
-
-
Enter the second pair of parameters by selecting Copy Operation from the Create drop-down list with the following values:
-
In the From navigation tree, select type Expression and then enter 'PUR' in the Expression box.
-
In the To navigation tree, select type Variable. Navigate to Variable > Process > Variables > InvokePurchaseOrderService_PurchaseOrderService_AcknowledgePurchaseOrder_InputVariable > header> ns4:ServiceBean_Header and select ns4:RESPONSIBILITY_APPL_NAME. The XPath field should contain your selected entry.
-
Click OK.
-
-
Enter the third pair of parameters:
-
In the From navigation tree, select type Expression and then enter 'STANDARD' in the Expression box.
-
In the To navigation tree, select type Variable. Navigate to Variable > Process > Variables > InvokePurchaseOrderService_PurchaseOrderService_AcknowledgePurchaseOrder_InputVariable > header> ns4:ServiceBean_Header and select ns4:SECURITY_GROUP_NAME. The XPath field should contain your selected entry.
-
Click OK.
-
-
Enter the fourth pair of parameters:
-
In the From navigation tree, select type Expression and then enter 'AMERICAN' in the Expression box.
-
In the To navigation tree, select type Variable. Navigate to Variable > Process > Variables > InvokePurchaseOrderService_PurchaseOrderService_AcknowledgePurchaseOrder_InputVariable > header> ns4:ServiceBean_Header and select ns4:NLS_LANGUAGE. The XPath field should contain your selected entry.
-
Click OK.
-
-
Enter the fifth pair of parameters by selecting Copy Operation from the Create drop-down list with the following values:
-
In the From navigation tree, select type Expression and then enter '204' in the Expression box.
-
In the To navigation tree, select type Variable. Navigate to Variable > Process > Variables > InvokePurchaseOrderService_PurchaseOrderService_AcknowledgePurchaseOrder_InputVariable > header> ns4:ServiceBean_Header and select ns4:ORG_ID. The XPath field should contain your selected entry.
-
Click OK.
-
-
The Edit Assign dialog box appears.
-
Click Apply and then OK to complete the configuration of the Assign activity.
To enter the second Assign activity to pass PO details to the InvokePOService Invoke activity:
-
In JDeveloper BPEL Designer, drag and drop the Assign activity from the Component Palette into the Activity box of the process diagram, between the Assign and Invoke activities.
-
Double-click the Assign activity to access the Edit Assign dialog box.
-
Click the General tab to enter the name for the Assign activity, such as 'SetPOApproval'.
-
On the Copy Operation tab, click Create and then select Copy Operation from the menu. The Create Copy Operation window appears.
-
Enter the following information:
-
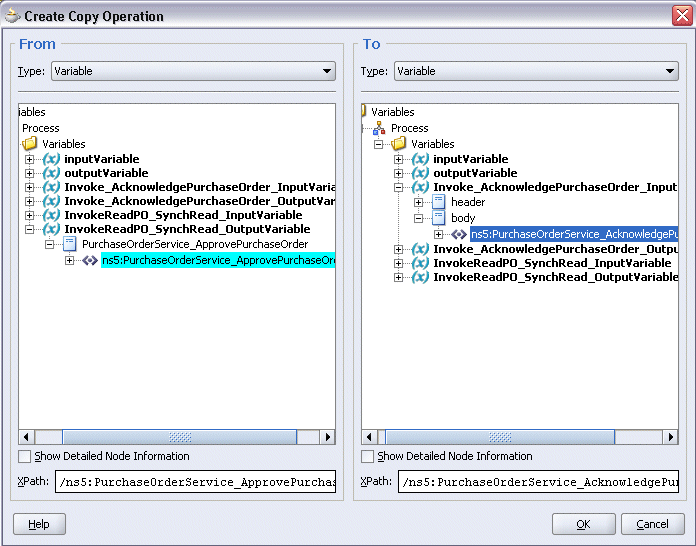
In the From navigation tree, navigate to Variable > Process > Variables > InvokeReadPO_SynchRead_OutputVariable > PurchaseOrderService_ApprovePurchaseOrder > and select ns5:PurchaseOrderService_ApprovePurchaseOrder. The XPath field should contain your selected entry.
-
In the To navigation tree, select type Variable. Navigate to Variable > Process > Variables > InvokePurchaseOrderService_PurchaseOrderService_AcknowledgePurchaseOrder_InputVariable > body and select ns5:PurchaseOrderService_AcknowledgePurchaseOrder. The XPath field should contain your selected entry.
Create Copy Operation Dialog
-
Click OK.
-
-
Click Apply and then OK to complete the configuration of the Assign activity.
To enter the third Assign activity to set the SOAP response to output:
-
Add the second Assign activity by dragging and dropping the Assign activity from the Component Palette into the Activity box of the process diagram, between the
InvokePOServiceInvoke and the Reply activities. -
Repeat Step 2 to Step 4 described in creating the first Assign activity to add the second Assign activity called 'SetPOStatus'.
-
Enter the following information:
-
In the From navigation tree, select type Variable. Navigate to Variable > Process > Variables > InvokePurchaseOrderService_PurchaseOrderService_AcknowledgePurchaseOrder_OutputVariable and select body.
-
In the To navigation tree, select type Variable. Navigate to Variable > Process > Variables > outputVariable and select payload.
-
Click OK.
The Edit Assign dialog box appears.
-
-
Click Apply and then OK to complete the configuration of the Assign activity.
Deploying and Testing the BPEL Process at Runtime
After creating a BPEL process using the WSDL URL generated from the business service object interface definition, you can deploy it to a BPEL server if needed. To ensure that this process is modified or orchestrated appropriately, you can also manually test the BPEL process by initiating the business process contained in the BPEL process to test the interface integration.
Prerequisites
Before deploying the BPEL process using Oracle JDeveloper, you must ensure that you have established the connectivity between the deign-time environment and the runtime servers including the application server and the integration server.
How to configure the necessary server connection, see Configuring Server Connection.
To validate your BPEL process, perform the following runtime tasks:
-
Once you deploy the process to a BPEL server, it becomes available so that you can run the process manually to test it for validation.
-
After deploying a BPEL process, you can manage the process from the BPEL console to manually initiate the business process and test the interface integration contained in your BPEL process.
Deploying the BPEL Process
You must deploy the Approve Purchase Order BPEL process (POApprove.bpel) that you created earlier before you can run it.
To deploy the BPEL process:
-
In the Applications Navigator of JDeveloper BPEL Designer, select the POApprove project.
-
Right-click the project and click Make action from the menu.
Look for any compilation error messages in Message Log.
Right-click the project and select Deploy >Integration Server Connection name > Deploy to Default Domain action from the menu.
For example, you can select Deploy > BPELServerConn > Deploy to Default Domain to deploy the process if you have the BPEL Process Manager setup appropriately.
-
Look for 'Build successful' message in Apache Ant – Log to ensure that the BPEL project is compiled and successfully deployed.
Testing the BPEL Process
Once the BPEL process is deployed, it can be seen in the BPEL console. You can manage and monitor the process from the BPEL console. You can also test the process and the integration interface by logging on to Oracle E-Business Suite to manually initiate the processes.
To test the BPEL process:
-
Log in to Oracle Application Server 10g BPEL Console (
http://<soaSuiteServerHostName>:<port>/BPELConsole). The BPEL Console login page appears. -
Enter the username and password and click Login.
The Oracle Enterprise Manager 10g BPEL Control appears.
-
In the BPEL Console, confirm that 'POApprove' has been deployed.
-
Click the ApprovePO link to open the Initiate tab
-
Enter the payload input field and click Post XML Message to initiate the process.
-
The audit trail provides information about the steps that have been executed. You can check the audit trail by clicking the Audit Instance icon.
This is to verify that a purchase order is approved successfully.
Validating the Process in Oracle E-Business Suite
Additionally, you can validate the BPEL process in Oracle E-Business Suite. Log in to Oracle E-Business Suite with the Purchasing responsibility. Open up the Purchase Orders form and search for the supplier to bring up the purchase order details. Notice that the Status field is 'Approved'.
Using Business Service Object REST Services
REST Service Invocation Scenario
To explain how to use a Business Service Object REST service, this scenario takes an interface "Location Business Object Services" (oracle.apps.ar.hz.service.party.LocationService) as an example to guide you through the Business Service Object REST service invocation.
At runtime when a request of providing location business object details is received, the getLocation service operation contained in the "Location Business Object Services" interface is invoked to fetch the location details of that particular location business object from TCA.
After a successful service invocation, the REST response message that contains the specific location business object details is sent back to the requestor.
Invoking a Business Service Object REST Service
Based on the REST service invocation scenario described here, this chapter includes the following topics:
Deploying a Business Service Object REST Service
Use the following steps to deploy the Business Service Object "Location Business Object Services" (oracle.apps.ar.hz.service.party.LocationService) as a REST service:
-
Log in to Oracle E-Business Suite as a user who has the Integration Administrator role.
Select the Integrated SOA Gateway responsibility and the Integration Repository link from the navigation menu.
-
In the Integration Repository tab, click Search to access the main Search page.
-
Enter the following key search values as the search criteria:
-
Internal Name: Location Business Object Services
-
Interface Type: Business Service Object
-
-
Click Go to run the search.
Click the "Location Business Object Services" interface name link to open the interface details page.
-
In the REST Web Service tab, enter the following information:
-
Service Alias: location
The alias will be displayed as the service endpoint in the WADL and schema for the selected method or operation.
-
Select Desired Service Operations
In the second row
getLocation, select both the GET and POST HTTP method check boxes.
-
-
Click Deploy to deploy the service to an Oracle E-Business Suite WebLogic environment.
Once the REST service has been successfully deployed, 'Deployed' appears in the REST Service Status field along with the View WADL link. Click the View WADL link to view the deployed service WADL description.
Interface Details Page with REST Web Service Tab
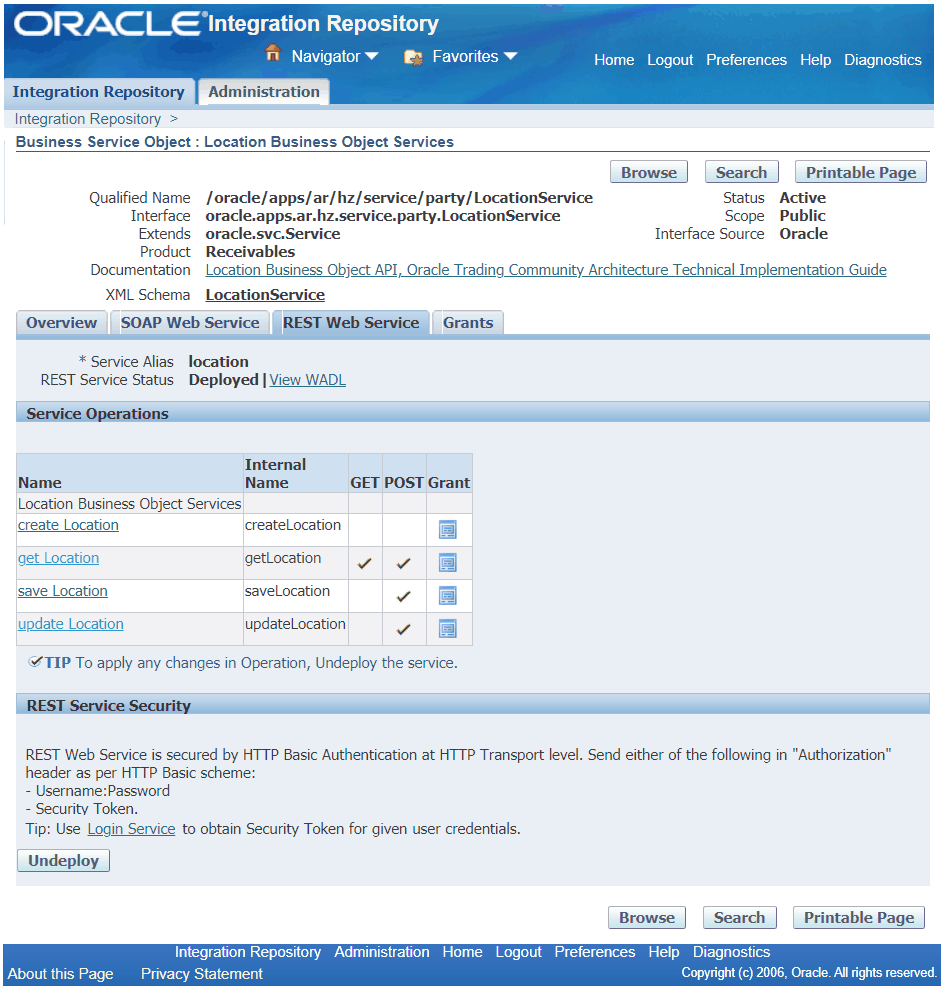
For more information on deploying REST services, see Deploying REST Web Services, Oracle E-Business Suite Integrated SOA Gateway Implementation Guide.
Creating a Security Grant for the Deployed Service
After deploying the "Location Business Object Services" as a REST service, the integration administrator can create a security grant to authorize the service or method access privileges to a specific user, a user group, or all users.
Use the following steps to create a security grant:
-
Log in to Oracle E-Business Suite as a user who has the Integration Administrator role. Select the Integrated SOA Gateway responsibility and the Integration Repository link from the navigation menu.
-
Perform a search to locate the "Location Business Object Services" service the administrator just deployed earlier.
-
In the interface details page of the selected "Location Business Object Services", click the Grants tab.
-
Select the
getLocationmethod check box and then click Create Grant. -
In the Create Grants page, select "All User" as the Grantee Type.
Note: In this example, the
getLocationservice operation is granted to all users. In actual implementation, you should define strict security rules. Create grant to a user or more appropriately to a group of users defined by roles and responsibilities.Click Create Grant. This grants the selected method access privilege to all Oracle E-Business Suite users.
Recording Resource Information from Deployed WADL
To obtain service resource information from the deployed "Location Business Object Services" service, an integration developer clicks the View WADL link in the REST Web Service tab. This displays the WADL description in a different window.
Copy or record the REST service endpoint from the WADL description. This will be used later when invoking the service.
http://<hostname>:<port>/webservices/rest/location/getLocation/
Replace location, the alias in this sample deployment, with the alias name you used in your deployment.
Invoking a REST Service Using Command Lines
In this example, the deployed getLocation service operation with the GET method will be invoked to fetch data.
A third party command line tool called cURL is used to transfer data using URL syntax. This tool is available by default on most Linux environments.
Note: You can test the REST service invocation using any REST client.