Reviewing Debrief and Billing
The Administrator Portal is implemented as a separate menu under the Field Service Administrator Portal Responsibility. The Administrator Portal replaces and extends Oracle Application Windows Enterprise Debrief functionality. The portal provides Field Service managers and administrators with the ability to review and correct field technician debrief reports.
For more information on performing debrief, see Understanding Debrief Procedures.
This chapter covers the following topics:
- Overview: Administrator Portal Dashboard
- Querying Technician Schedules
- Reviewing and Correcting Debrief Information
- Reviewing, Correcting, and Submitting Charges
Overview: Administrator Portal Dashboard
The Field Service Support Dashboard is the entry point for administrators or managers to perform multiple functions on behalf of their reporting field technicians. The Field Service Support Dashboard is similar to the Field Service Technician Dashboard. Both of the dashboards function and operate basically the same except with the Field Service Support Dashboard you can query on task-related information for a specific resource. For information on the Field Service Technician Dashboard, see Explaining the Elements of the Field Service Technician Dashboard.
The Field Service Support Dashboard consists of:
-
Simple Search (based on service request number, task number, and customer), Advanced Search, and Resource Search fields
-
Quick Links region
-
Create Service Request region
-
Search Knowledge Base region
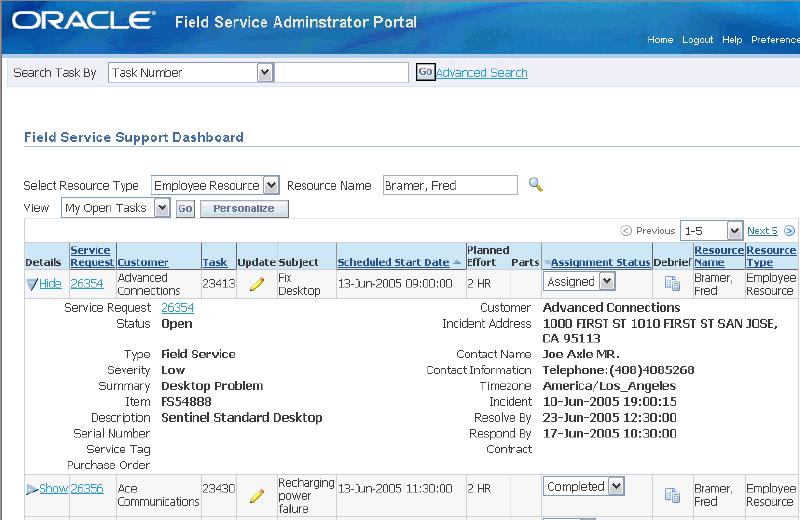
Resource Search
The manager can search for information related to tasks assigned to a specific resource by selecting a Resource Type, and then providing a complete or partial value in the Resource Name search field. See Querying Technician Schedules.
Quick Links
The Quick Links region provides access to pages where the manager can:
-
Create parts orders for a technicians sub-inventory.
-
Receive shipments into a technicians sub-inventory.
-
Return excess parts from a technicians sub-inventory.
-
Return defective parts from a technicians sub-inventory.
-
View the calendar for a specific technician.
-
Manage trunk stock for a sub-inventory.
Create Service Request
In the Create Service Request region, the manager or administrator can select a service identifier from the Search Key list of values, enter a value, and then launch the Create Service Request page.
Search Knowledge
In the Search Knowledge region, the manager can enter keywords, and then conduct either a Knowledge Search or an Advanced Solution Search.
Main View
In the Main View, managers and administrators can select from the list of seeded views, and can create additional personalized views to display selected columns of information in the desired sequence.
Show/Hide Details
The Details column displays for every seeded and personalized view. After task-related information is retrieved for a specific resource, click the Show link or "+" icon to:
-
View the details of the service request associated with a task.
-
View the details of a repair order associated with a task, when the task is from a repair order.
Update Icon
An Update icon appears in each row. Clicking the Update icon opens the Update Task page to the Details tab, where the manager can:
-
Update task details.
-
Click the Create Follow-Up Task button to create and schedule a follow-up task to the current task.
-
Schedule a task.
Debrief Icon
A Debrief icon appears in each row. Clicking the Debrief icon opens the Update Task page to the Debrief tab, where the manager can:
-
Update labor, material, expense, and counter readings.
-
Compose notes.
-
Capture travel time and distance information.
Parts Icon
A Parts icon appears in rows for tasks having associated service parts. Clicking the Parts icon opens the Update Task page to the Parts tab, where the manager can create a parts order for a specific task.
Schedule Icon
A Schedule icon appears for each row. Clicking the Schedule icon opens the Schedule Task page where the manager can schedule the task.
Pro Forma Invoice Button
After the debrief is completed and posted, view the pro forma invoice, by clicking the Pro Forma Invoice button in the Show Service Request region in the Update Task page. When you click the Pro Forma Invoice button the Service Request Charges Report page appears displaying a summary of charges, estimated charges, submitted charges, and unsubmitted charges.
Supported Features
-
Display time in incident time zones.
-
Service for owned assets installed at location addresses other than party sites.
-
Debrief for Depot Repair order tasks.
-
Capture electronic signatures for compliance with CFR part 11 regulations.
Querying Technician Schedules
Use this procedure to load information about a specific technicians schedule into the Field Service Administrator Portal (Field Service Support Dashboard).
Steps
-
Navigate to the Field Service Support Dashboard.
The Field Service Support Dashboard appears displaying the default view of task-related information.
-
To search for specific task-related information, begin by selecting either Employee Resource or Supplier Contact from the Resource Type list of values. Technicians are usually employee resources of the service organization.
-
Next, provide partial or complete values in the Resource Name field.
-
Enter the technicians name in the Resource Name field, or
-
Enter part of the technicians name into the Resource Name field, and then click the Tab key.
The Search and Select: Resource Name page appears displaying names that contain the entered search string. For example, type 'bram' in the Resource Name field, and then press the Tab key. Resource Names: George Abrams, Fred Bramer, and BalasuBramani Jones are retrieved. Click the Quick Select icon in the row for the Resource Name that you want to have return to the Field Service Support Dashboard, or
-
If you do not have any partial information for the Resource Name, leave the Resource Name field blank, and then click the Search for Resource Name icon.
The Search and Select: Resource Name page appears. Click Go. All resource names of the selected resource type are listed. Click the Quick Select icon in the row for the resource name that you want to have return to the Field Service Support Dashboard.
-
-
To filter the tasks that display, select a view from the View list of values, and then click Go.
The Dashboard appears with tasks assigned to the selected resource, and that also match the View filter.
Note: To create a personalized View, click Personalize. See Personalizing the View Display.
Tip: When selecting columns to display in a personalized view, keep in mind that many details are available by displaying the Details column (Hide/Show).. Therefore you can decrease screen clutter by selecting only the frequently needed information for the personalized view, and then view details as needed.
-
To view details for a task, in the row for a task, click the Show/Hide link in the Details column.
Details for the task appear below the selected row.
Reviewing and Correcting Debrief Information
Using the Field Service Administrator Portal or the Field Service Technician Portal (Dashboard) you can review and correct debrief information.
If the debrief information has not been processed yet, the Field Service administrator, manager, or technician can make a simple data correction to the debrief lines that need correcting. If the debrief information has been processed a few more steps are required by the Field Service administrator, manager, or technician to ensure that the corrected debrief information is handled and posted correctly.
A typical business process flow for debrief correction after the task has been closed may include these steps:
-
The call center will answer the customer call and collect the data (customer number, service request number, task number) for the customer.
-
Field Service administrator or manager will retrieve and display the service request and task number using the Field Service Administrator Portal.
-
Field Service administrator or manager will change the task assignment status to a status that does not have the closed flag enabled.
Specific transaction status change rules will have been created which enables them to change the task assignment status.
-
Field Service administrator or manager will correct the debrief lines by entering return type transactions and save the changes.
Return type service activity codes will have been created which will enable them to post return type transactions to the different debrief lines (material, labor, expense and so on).
-
Field Service administrator or manager will change the task assignment status to a status that has the closed flag enabled.
The task assignment change will initiate the CSF: Update Debrief Lines concurrent program.
Use this procedure to review and correct debrief transaction details previously submitted by Field Service technicians:
See also Understanding Debrief Procedures.
Prerequisites
- Debriefs for one or more tasks have been created.
- Service activity codes are defined with a line category of return.
For information on defining service activity codes, see Setting Up Billing Types and Service Activity Codes, Oracle Field Service Implementation Guide.
Correcting Debrief Lines That Have Not Been Processed
Accessing Debrief
-
Navigate to the Field Service Support Dashboard.
-
Enter search criteria and click Go.
-
Click the Debrief icon for the task that you want to update.
The Update Task page appears displaying the Debrief tab.
-
Expand and then update information in the Travel, Labor, Material, Expense, Counters, and Notes regions.
-
Click Apply.
Correcting Debrief Lines That Have Been Processed
Accessing Debrief
-
Navigate to the Field Service Support Dashboard.
-
Enter search criteria and click Go.
-
Click the Debrief icon for the task that you want to update.
The Update Task page appears displaying the Debrief tab.
Updating Task Assignment Status
-
Select the new task Assignment Status from the list of values.
-
Click Apply.
Correcting Travel, Counters, and Note Information
-
Update information in the Travel, Counters, and Notes sections.
-
Click Apply.
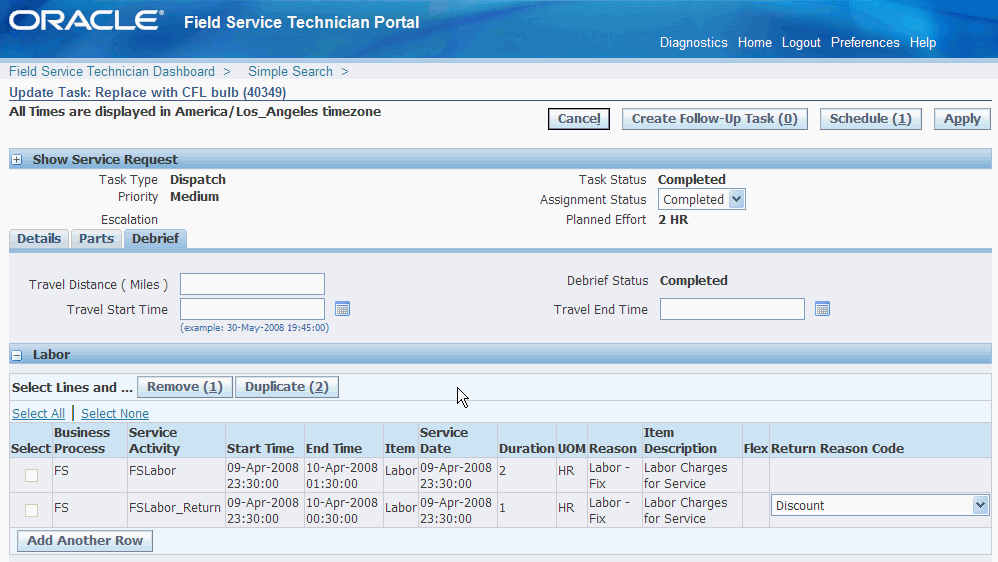
Correcting Labor Debrief Lines
This functionality will override the profile option CSF: Allow Overlapping Labor Lines in Debrief.
-
Expand the Labor section.
-
Click Add Another Row.
-
Select a Business Process and a Service Activity code that has been defined with a line category of return.
-
Enter the labor correction line in the same format as the original labor line was entered.
Enter one of the following:
-
Correct Start Time and End Time.
The Service Date and Duration are populated by the system.
-
Correct Start Time, End Time, and Item.
The Service Date and Duration are populated by the system.
-
Correct Item and Duration.
The Service Date is populated by the system.
-
-
Enter the Return Reason Code.
-
Click Apply.
The labor line is saved.
Example of Labor Correction Line
Correcting Material Debrief Lines
-
Expand the Material section.
-
In the Material - Return section, click Add Another Row.
This expands the Material - Return region, where the administrator can enter information to create a material line.
-
Select a Business Process.
-
The Business Process default value appears when the Service Request Type has an associated Business Process.
-
If no Business Process is associated, then the Business Process default value is set to the value of the profile option CSF: Default Business Process.
-
If no Business Process is associated, and if the profile option CSF: Default Business Process is not set, then the technician must select the Business Process from the list of values.
-
-
Select a Service Activity code.
This is the activity for the material you are reporting. The item you are able to select is filtered based upon the Service Activity code and sub-inventory you select.
-
If the profile option CSF: Default Service Activity Code is set with a value that has the Line Type: Order, then that value is the default for this field.
-
If the profile option CSF: Default Service Activity Code is not set, then the technician must select the Service Activity code from the list of Service Activity codes that are associated to the Business Process selected in the previous step.
-
-
Select the Subinventory. The list of values for the Sub-inventory field depends on the Line Category Code defined in the Service Activity Code setup window.
-
If the Line Category Code is defined as Order the sub-inventory populates with the default usable sub-inventory. The list of values displays all usable sub-inventories.
-
If the Line Category Code is Return the sub-inventory populates with the default defective sub-inventory. If the default defective sub-inventory is not identified, then the default usable sub-inventory is populated. The list of values for the Sub-inventory field displays both usable and defective sub-inventories.
-
-
Select the Item number by clicking the Search for Item icon.
When you click the Search for Item icon the Search and Select: Item page appears. Enter the item search criteria and click Go. You can search by Item, Item Description, Subinventory, or Revision.
The list of Items that display depend on the Service Activity code setup:
-
If the Update IB check box is checked for the selected Service Activity Code in the IB transactions subtype, then the Item list displays both trackable and non trackable items. Otherwise, the Item list displays only non trackable items.
-
In case an item is Installed Base trackable and the Line Category Code on the Service Activity Code setup window is Order, the Parent Instance and the Recovered Instance fields are enabled.
-
The Parent Instance field displays the list of all the instances installed at the customer location.
-
Additionally, the operational status of the part or asset instances being installed into another piece of equipment (the parent) automatically inherit the operational status of the parent instance.
-
When the part or asset installed is without reference to a parent, in other words, it is a stand alone part or asset, then the technician needs the ability to enter and update its Install Base operational status. The operation status contains these values:
-
Not Used
-
Installed
-
In Service
-
Out of Service
The operational status of the part or asset being installed is updated when the Material Debrief is posted.
-
-
-
In case of line category code Return, the Recovered Instance field is enabled.
The system populates the Item field in the Material section, with the one selected on the Search and Select: Item page.
-
-
The UOM, Operational Status, and Service Date fields default once you select the Item.
-
The UOM field appears by default from the selected item UOM attribute. You can select a different unit of measure from the list of values, if necessary.
-
The Service Date appears by default from the system date and time. The technician can select a Service Date from the date list of values.
-
The service date and time must be greater than the earlier of the incident report date and time or the service request creation date and time.
-
The service date and time must be less than or equal to the system date.
-
-
-
Enter the quantity for the item returned in the Quantity field.
In the case of serialized items, Quantity is set equal to 1, and the Quantity field is disabled.
-
Enter the Serial Number, Lot, Locator, Revision, and Instance Number details depending on the item attributes.
The list of values for these fields are validated based upon the item and sub-inventory combination.
-
(Optional) Select a Reason for the material transaction from the list of values.
-
Select the Return Reason from the list of values.
-
Click Apply.
The material line is saved.
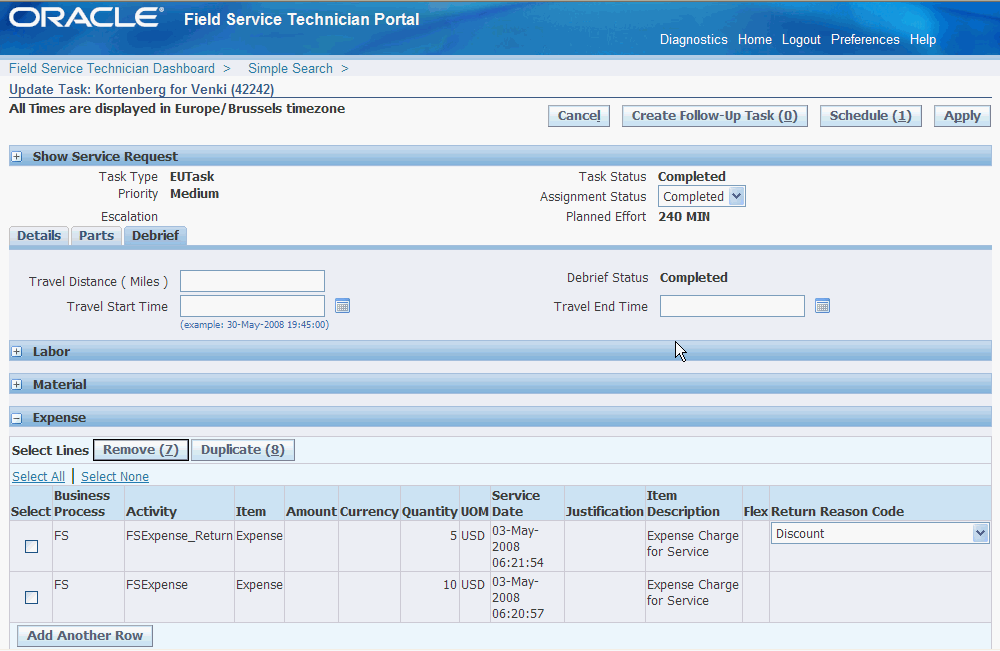
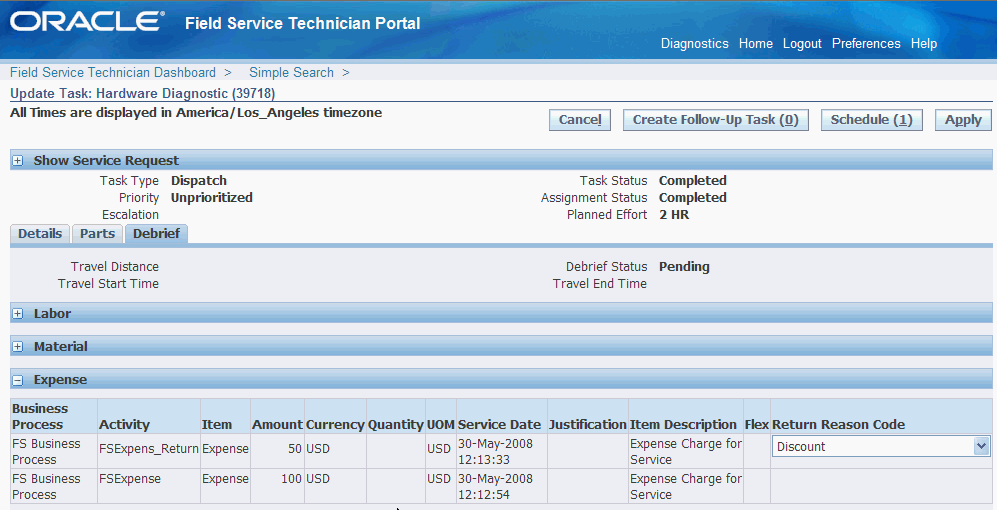
Correcting Expense Debrief Lines
-
Expand the Expense section.
-
Click Add Another Row.
-
Select a Business Process, Service Activity code that has been defined with a line category of return, and Item.
The Currency, UOM, and Service Date fields are populated by the system.
-
Enter the expense correction line in the same format as the original expense line was entered.
Enter one of the following:
-
Correct Amount and Currency.
-
Correct Quantity and UOM
-
-
Enter the Return Reason Code.
-
Click Apply.
The expense line is saved.
Example of Expense Correction Line (Quantity and UOM)
Example of Expense Correction Line (Amount and Currency)
Updating Debrief Lines
-
Change the Task Assignment Status to one of the following:
-
Rejected
-
On Hold
-
Completed
-
Canceled
-
Closed
Changing the task assignment status to one of these values initiates the CSF: Update Debrief Lines concurrent program. The concurrent program CSF: Update Debrief Lines sends debrief line information to Oracle Inventory, Install Base, and Charges.
The Update Debrief Lines concurrent program can have the following values:
-
Pending: Indicates the concurrent program is waiting for computing resources.
-
Running: Indicates the concurrent program is running but not yet completed.
-
Complete: Indicates the debrief lines have been sent to Oracle Inventory, Install Base, and Charges successfully.
-
Completed with errors: Indicates the concurrent program encountered at least one error. Error information can be viewed in the error column for the debrief lines.
The concurrent program CSF: Update Debrief Lines sends information to Oracle Inventory, Install Base, and Charges only if the task status has one of the following check boxes selected in the Task and Escalation Status window:
-
Rejected
-
On Hold
-
Completed
-
Canceled
-
Closed
-
Reviewing, Correcting, and Submitting Charges
Reviewing, correcting, and submitting charges to Order Management for invoicing is accomplished using the Charges tab of the Service Request window.
Use this procedure to review, correct, and submit charges:
Prerequisites
- The CSF: Update Debrief Lines concurrent program completed successfully for at least one labor, material, or expense line.
Steps
-
Navigate to the Service Request window.
The Service Request window appears.
-
Query for the service request you want to work with.
View > Query By Example > Enter
-
Enter the service request number in the Number field, and then run the query.
View > Query By Example > Run
The service request appears on the Service Request window.
-
Select the Charges tab.
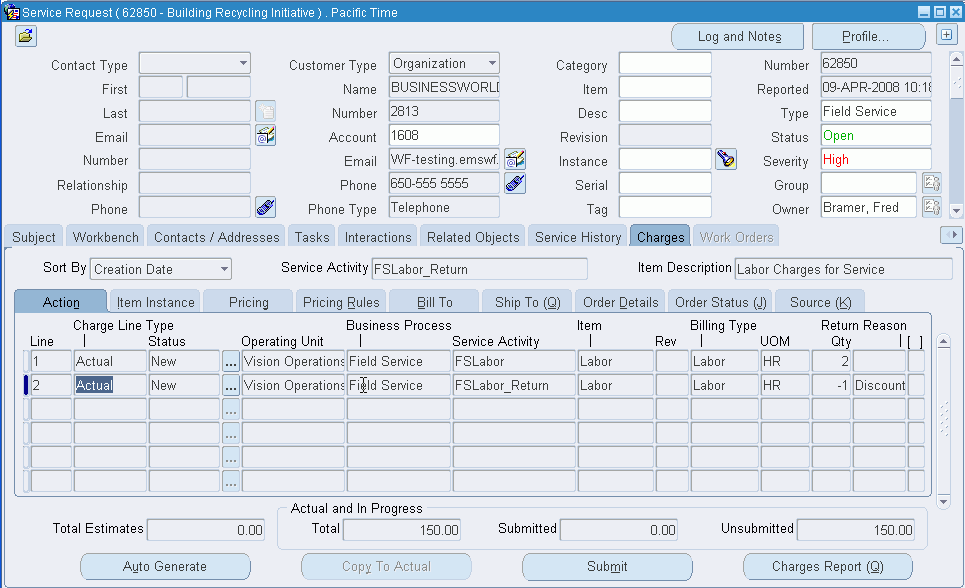
Charges information displays for the service request. This screen shot is displaying labor line charges.
-
Select the Pricing tab and verify the charge lines are correct for the service request.
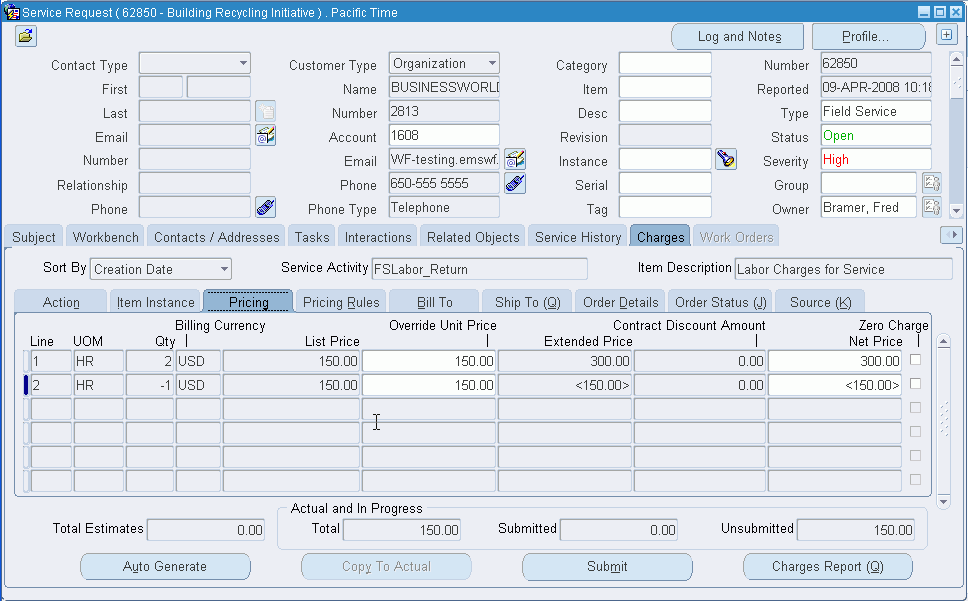
Labor and expense charge lines are created with negative amounts if any corrections were made to these types of debrief transactions. This screen shot is displaying pricing information for labor lines.
-
Review and correct charges information as appropriate.
-
To submit charges to Order Management, click Submit.