HTML-Based Applications
Using HTML-Based Applications
HTML-based applications use the following common components:
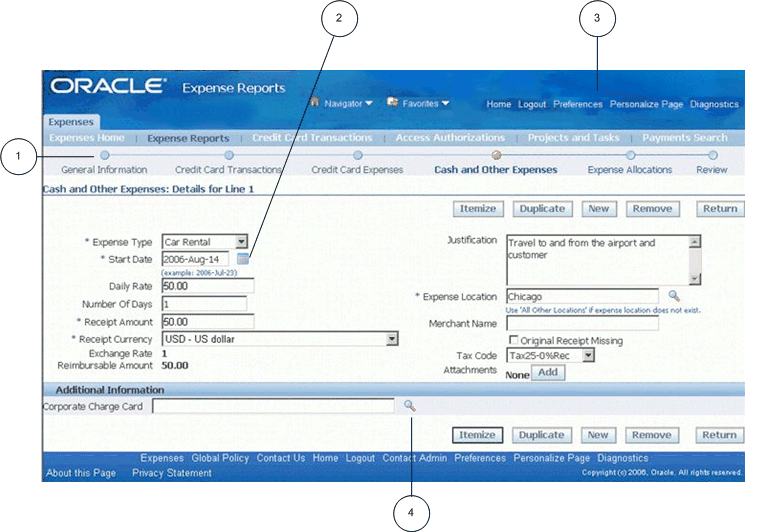
-
Process Train
-
Date Picker
-
Global Links
-
List of Values Icon
Navigating
Navigate to functions in an HTML-based application using tabs, subtabs, and side navigation elements. As you drill down through these elements, locator links display your navigation path.
When you navigate through records in a table, use the Previous and Next links. When you navigate through steps of a task, use the Back and Next buttons.
Important: Use these forward and backward navigation elements provided by the application. Do not use your browser's buttons.
Process Train
If you are executing a process, a process train shows the location of the current page in the process. Some process trains are interactive. These allow you to jump one or more steps backward in the process by selecting the step icon.
Locator Links
Locator links (sometimes called "breadcrumbs") are series of links and text that show your navigation path through an application. Use the links to return to a previous point in your navigation path.
Navigator and Favorites Menus
The Navigator and Favorites menus appear as links on every HTML page.
Use "Manage Navigator" to hide or show entries in this list.
Use "Manage Favorites" add or remove entries in this list. Use "Add to Favorites" to add the current page to the Favorites list.
Note: This feature must be enabled by your system administrator through a profile option.
Using Oracle E-Business Suite Secure Enterprise Search
By leveraging Oracle Secure Enterprise Search (SES), Oracle E-Business Suite Secure Enterprise Search provides a centralized search capability allowing you to use text search on applications content without compromising on the security and context sensitive information.
Through a secure text search, not only can you enjoy the immediate search results with accuracy, but you can also easily refine the search by narrowing down the results or tracing back to original results in an efficient way.
Note: Oracle E-Business Suite Secure Enterprise Search does not replace all the Search pages, instead it is deployed where it makes the most sense in searching for applications content. See Querying and Viewing Data for other search pages.
For more information on administering Oracle E-Business Suite Secure Enterprise Search, see the Oracle E-Business Suite System Administrator's Guide - Maintenance.
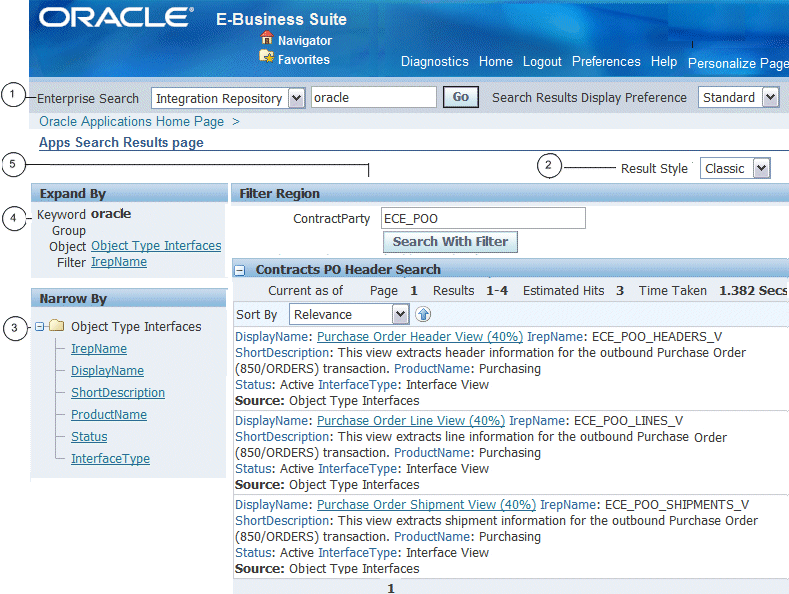
From the Oracle E-Business Suite Secure Enterprise Search region embedded in your application, you can:
-
Perform a search in the Search region.
-
View your search results in classic or tabular format.
-
Narrow down your search results using the Narrow By region.
-
Roll back to your previous search results using the Expand By region.
-
Enter filters in the Filter region to narrow down the search results on a searchable object only.
Using the Search Region
The Search region appears on top of the Oracle E-Business Suite Home page or your product home page.
To perform a search using the Search region
-
Select a searchable business category from the LOV.
To secure the application data to only those who have the access privileges, Oracle E-Business Suite Secure Enterprise Search only displays the searchable categories in the LOV that you have been authorized for access.
For example, if you are authorized to access 'Customer Relation' business category, you should find 'Customer Relation' from the LOV.
Note: If "All" business category is selected, then you will not find search results for objects that require security based on full security context privileges such as "Vacancies" object in iRecruitment. This is because "All" category search is designed to give results for objects with normal security (or not based on full security context) only. Instead, you will need to search on the group (such as "Vacancies") or narrow down to the object to get results if you have the access privileges.
If the 'Customer Relation' business category contains Contracts and Customer Account business objects, after executing a search on 'Customer Relation' category, you will find these two business objects displayed in a tree structure in the Narrow By region. See: Narrowing Down the Search Results Using Narrow By.
-
Enter a keyword search or enter partial values containing wildcard characters (regular expressions wildcard '*', not '%') on the selected category.
Note: Because date based columns are precrawled and indexed in the form of YYYY-MM-SS, if you want to base search on a date value, use the same format 'YYYY-MM-SS' as the query string. For example, use '2007-04-25' to search for records dated on 25-Apr-2007.
The search text entered here is also recorded in the Expand By region. See: Tracing Back the Results Using Expand By.
-
Select your Search Results Display Preference value from the following drop-down selection options.
-
Standard (default): By default, search results will be displayed and rendered in Oracle E-Business Suite.
-
Advanced: If 'Advanced' is selected, without logging out from Oracle E-Business Suite, the results will be displayed and rendered directly in the Oracle SES user interface if Single Sign On has been configured and the search results page in Oracle SES has been customized with your desired result display.
Click Go to execute your search and have the results displayed based on your selected display value.
-
Viewing the Search Results
Oracle E-Business Suite Secure Enterprise Search provides a flexible search result display mechanism allowing you to view the results either within the Oracle E-Business Suite or directly from the Oracle SES user interface based on your selected search results display value.
Viewing the Search Results in Oracle E-Business Suite
By default, 'Standard' Oracle E-Business Suite is the default value in the Search Results Display Preference field. This lets you view the search results in the Results region within the Oracle E-Business Suite.
The search result details include the last crawled time for your selected search object or group, current page number and results displayed, total number of estimated hits, time taken by search engine in performing the search, and the search results for each element.
Note: The total number of estimated hits is just a rough estimate. To have a more accurate estimate, Oracle SES allows administrators to set a parameter in global setting to report an exact count of search results. However, this option impacts query response time. See Oracle Secure Enterprise Search Administrator's Guide for details.
Each search result page contains a list of result elements that match the search criteria. The result can be displayed in the following different formats:
-
Classic Style: All result elements are displayed in the classic style if the search is on a searchable category.
-
Tabular Style: If a search is on a searchable object selected in the Narrow By region, the Result Style drop-down field appears letting you change the display from the default classic style to tabular format. The tabular style displays the search results in a table or spreadsheet like format, while the classic style displays the results in an Internet like format.
To easily navigate to each result element contained in the page and make the search result more user-friendly, the following information can be shown as part of the result display for each element:
-
Relevance Ranking: A percentage value (or called 'Score') is displayed in a parenthesis as part of the result element title link indicating the relevance of the result element is to your search criteria. For example, a result element with a score value of 78 percentage indicating a high relevance to the search criteria compared to an element with a score value of 40 percentage. A result element with the greater percentage value will be shown higher in the result list.
Click the title link of a result element lets you drill down the element details. For example, click on a job title 'Accounting Manager' (with a score or relevance percentage value) link to view the Accounting Manager job details.
-
Score: It describes the source object name to which searchable object that each result element belongs.
This feature is particularly useful if a searchable group has multiple searchable objects or in case of "All" category search. This helps you easily identify the source of hit.
If the result is displayed in the classic style, you might find the following links available (if these attributes are identified and associated with the object you search on):
-
Actionable Links: This lets you visit external URLs.
-
Related Search: If a relation exists between the object searched on and other objects. This lets you perform a search on related object.
The related search content is secured by authorization. Only users with appropriate access privileges can execute search on the related objects. Otherwise, an unauthorized access message appears indicating that you do not have the access privileges.
For example, 'Customer Invoices' might be displayed as a related object while searching for 'Customer Relation'. Clicking on the 'Customer Invoices' object link will execute another search on the related object only if you have the access privileges. Otherwise, an unauthorized access message appears.
Note: For better query time performance, the search result will display related objects along with other search hits even though you do not have the access privileges to some of the objects.
Sorting Search Results
To have the search results displayed in your desired order, Oracle E-Business Suite Secure Enterprise Search provides the sorting option allowing you to sort the entire set of search results based on your selected value from the Sort By drop-down list.
The drop-down list will be available in both classic and tabular display format. The sorting criteria in the drop-down list will contain all the displayed attributes on which the sorting can be performed. Initially, the result will be sorted in ascending order. You can optionally change the sorting order by clicking on the Down Arrow icon next to the Sort By drop-down list to sort the result in descending order.
Exporting Tabular-based Search Results
If a search result is displayed in the tabular format, the Export button is available in the search results region. Clicking the Export button lets you export the tabular-based search result content directly from the search results region to Microsoft Excel. You can save the exported data to a designated directory to use later.
Note: The program that is launched while saving exported data is dependent on your computer setting. To launch a .csv file in Microsoft Excel, the .csv file type needs to be mapped to open with Microsoft Excel. If it is not mapped, Microsoft Windows will ask you to choose a program with which to open the file.
This export feature is only available for the search results displayed in the tabular format, but not for the classic display.
The exported data can be served as an offline report which is particularly useful in several business functions.
For example, you can search inventory items by part number, specification, lot number, location or by stock levels or any other indicator as needed. After the search, you can export the results to Microsoft Excel and use the data for reconciliation with physical inventory. Additionally, you can search for any outstanding invoices for a particular customer by giving a date range (age bracket). Export the search results displayed in the tabular format and then perform offline activities such as reconciliation of accounts or following up with the customers on the invoices.
Viewing the Search Results in Oracle SES
Instead of rendering the search results region within Oracle E-Business Suite, you can view the search results directly in Oracle SES user interface if 'Advanced' is selected as the Search Results Display Preference value.
Oracle SES UI provides rich functionality in searching and grouping as well as the flexibility to customize the search results display for various business needs. This feature allows you to directly invoke and view the search results in Oracle SES UI without logging out from Oracle E-Business Suite if the Single Sign On has been configured and you have the search results page in Oracle SES UI customized with your desired result display.
If you want to refine your search, click the Advanced Search link to open the Advanced Search page where you can enter more search criteria or attributes for your search.
How to perform search in Oracle SES user interface and customize the search results, see Oracle Secure Enterprise Search Administrator's Guide.
Narrowing Down the Search Results Using Narrow By
Use the Narrow By region to narrow down the search results by selecting the following search components from a tree:
-
Searchable Group
A business category is comprised of searchable groups and objects. A searchable group is preceded with the "check" icon when displayed in the tree. By selecting a searchable group link from the tree, all other searchable groups or objects contained in the selected group are displayed as a child node. If you select a searchable group from the child node, the selected group becomes a parent node in the tree, and the selected group name is added to the Expand By region allowing you to trace back the original search result. If a selected child node is a searchable object, then this object becomes a parent node and all the fields underneath become a child node.
Note that if a search is on a searchable group, the result is displayed in classic format only, and the Result Style field is not visible.
-
Searchable Object
A searchable object node is preceded with the "object" icon in the tree. When refining your search on a searchable object, the selected object name becomes a parent node in the tree, and all the fields underneath become a child node. These field-based child nodes allow you to further narrow down the search results by applying filters. See: Using Filters on Searchable Objects.
Tracing Back the Results Using Expand By
Use the Expand By region to roll back to the original search result after you modify the search in the Narrow By region. The Expand By region displays all the search criteria you used for a search including the text entered in the Search region, group names, object names, or any filters. Clicking on any links in the Expand By region will bring the result back to the point from where you came. For example, clicking on the 'Oracle' filter link removes the filter from a search and expands the search result without being restricted by the filter, 'Oracle'.
Using Filters on Searchable Objects
Use the Filter region to narrow down your search on a selected object. When you select a searchable object in the Narrow By region, the Filter region appears allowing you to apply filters on the selected object. By entering filter text and clicking Search With Filter, a search with filter criteria is executed.
Note: To search on an exact phrase through filters, use quotation marks (") around the phrase. For example, enter "contract imported" as the filter text to find the exact phrase from the search result. Without the quotation marks, you will find either 'contract' or 'imported' from the result.
Please note that filters do not consider words "to", "the" and "other". If any of those words are entered as filter text, you will find that search results not containing above values are also displayed. This is because those words are considered as stopwords in Oracle SES. Hence, they are removed from queries.
See: Narrowing Down the Search Results Using Narrow By.
Querying and Viewing Data
Pages that allow you to search for data display a Search panel that generally includes a search region and a results region. Many search panels contain an Advanced Search button that allows more detailed searches using additional criteria.
When you enter characters in a search field, a wildcard is implicitly added to the end of the string.
The results region displays search results in a table. Columns that are sortable have a highlighted heading. The currently-sorted column displays an arrow icon to indicate whether the sort is ascending or descending.
Click the column heading of a sortable column to sort by that column. Click it again to toggle between ascending and descending order.
Many pages allow you to save searches and personalize the display tables. See Personalizations.
Using a Hierarchical Grid (HGrid)
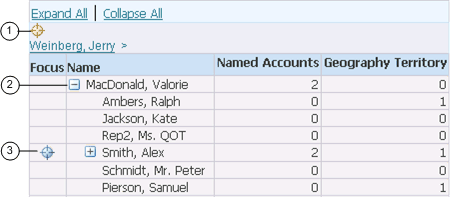
-
Locator links define the position of the displayed grid in the navigation hierarchy.
-
Use the Hide/Show icon to expand and collapse the branches of the tree.
-
Use the Focus icon to display only a specific branch in the tree.
Using Pop-up Windows
Pop-up windows provide additional information on top of the current page. They appear when you hover over an item or click on it with the left mouse button. Pop-up windows are available on some components of these types:
-
Text
-
Image
-
Link
-
Button
Note: This feature must be enabled by your system administrator through a profile option.
Entering Data
Entering Data in a List of Values (LOV) Field
If you know the value for a field, enter it and press the Tab key. If you know the beginning of the value, begin typing in characters into the LOV field and matching values will be displayed inline (look-ahead capability). Choose your desired value or wait for the Search and Select page to launch.
Navigate the look-ahead poplist using:
-
Tab - Highlights the next record.
-
Up Arrow - Highlights the previous record.
-
Down Arrow - Highlights the first record if no records are currently highlighted, or highlights the next record if a record is already highlighted.
-
Left-click with mouse - Selects the highlighted record as the value for the LOV field.
-
Escape - Dismisses the look ahead poplist without selecting a record.
Note: The look-ahead capability must be enabled by your system administrator through a profile option.
If you do not know the value, choose the List of Values icon to launch the Search and Select page. Entering a partial value before launching the Search and Select page limits the results. If the partial value matches only a single value, the field autofills and the Search and Select page does not launch.
Some Search and Select pages support alternate search criteria. Use the Search by pulldown list to select a different search field. Enter the search string and select the Go button. Select the value from the Results region and choose the Select button.
LOV Choice List
When a field has a long list of possible values from which a small subset is commonly used, you may see an LOV choice list. The LOV choice list displays the most commonly-used values for easier selection and includes a More... option. Choosing More... launches the LOV Search and Select page.
When you choose a value that is not in the LOV choice list, it is added to the list.
Personalizing an LOV Choice List
An LOV choice list may allow you to customize the list with the values that you use most frequently.
To personalize an LOV choice list
-
Select the Personalize button next to the LOV choice list to open the Personalize page.
-
To add a value, select it and choose the Add button.
-
To delete a value, select the icon in the Delete column.
Note: Some values cannot be deleted.
-
To reorder the list, select the Reorder button. In the Reorder page, select a value you want to move and use the Move icons to position it in the list. When finished, select the Apply button.
Entering Dates
Enter a date directly in a field using the format defined in your Preferences. Alternatively, select the calendar icon to launch the Date Picker pop-up window. When you select a date, the window closes and inserts the date into the field.
Using Hot Keys
The following hot keys are supported in HTML-based applications. To perform the action, press the Alt key + the key listed in the table:
| Action | Key |
|---|---|
| Apply | p |
| Back | k |
| Cancel | l |
| Continue | c |
| Finish | i |
| Next | x |
| No | n |
| Save | s |
| Search | r |
| Submit | m |
| Yes | y |
| Right Subtab | > |
| Left Subtab | < |
Scheduling Requests and Request Sets
For information on how to schedule a request or request set, see Running Reports and Programs.
Monitoring Requests
The Monitor Requests pages provide a summary of requests and details of each request.
Select the Search button to specify your search criteria.
Related Topics
Monitoring Requests in Forms-Based Applications
Using Attachments
Use the Attachments feature to link text or other files to a record.
If the Attachments feature is available, the page will display either the Attachment List link or the Attachments icon.
The method to initiate an Attachments flow will vary, depending on how the feature is implemented on your page.
To add a new attachment
-
Display the Add Attachments page.
-
Using the Add poplist, select how you want to add the attachment:
From a Desktop File/Text/URL
-
Select a Category from the list of values. The Category defines the purpose of an attachment, and controls which forms or pages can access it.
-
Select the attachment Type:
-
File - Specify a file name to upload. Enter the file location, or use the Browse button to locate the file.
-
URL - Enter the URL for a Web page.
-
Text - Enter text that is less than 2000 characters. If the text you want to attach is more than 2000 characters, upload it in a file.
-
From the Document Catalog
-
Use the Search regions to query existing documents.
-
Select the Document Name link to view a document before attaching it.
-
Select the document(s) to attach.
-
Select the Apply button.
-
Save your work in the application page from which you launched the attachments flow. The attachments are not added until you save your work in the parent region.
To view an attached document
In the Attachments page or Attachments table, select the File Name link.
-
If the attachment is a URL, the Web page will launch.
-
If the attachment is a file, a dialog box prompts you to open or save the file.
-
If the attachment is text, the View Attachment page displays the text content.
To edit an attachment
-
Display the Attachments page or Attachments table.
-
Select the Update icon.
-
In the Update Attachment page, edit only the information as it pertains to the attachment. For example, you can update the URL for a Web page attachment, but you cannot change it to a File attachment.
-
Select the Apply button.
-
Return to the application page from which you launched the attachments flow and save your work.
Tip: Attachment updates must be saved in the associated parent region.
To delete a record's attachment
In the Attachments page or Attachments table, select the Delete icon.
Inline Attachments
With the inline attachments feature, if you hover over the Add icon or the Attachments icon, an inline window appears and allows you to add or view attachments without navigating to the separate Attachments page. Text attachments can be edited inline.
Note: The inline attachments feature is enabled by your system administrator through a profile option.
Note: Inline attachments can be enabled only if accessibility features are disabled.
Personalizations
Some tables allow you to save queries and personalize the presentation of data. If a table can be personalized, you see the Views panel or the Save Search button.
Note: Pages can have predefined personalizations available from the View list. Some pages with no personalizations saved do not show the Views panel until a search has been saved.
Personalizing Tables
To create a personalized view
-
Use the search panel to query for results in the table.
-
Select the Save Search button or the Views button.
-
The Save Search button launches the Create View page.
-
The Views button displays the Views panel. Select the Personalize button to launch the Personalize Views page. This page displays existing views. Select the Create View button to launch the Create View page.
-
-
On the Create View page, enter a View Name.
-
Specify the number of rows to display in the table.
-
Choose the Set as Default check box to make this view the default when you navigate to this page.
-
Personalize other available options.
Note: Personalizable options vary by table. Some tables allow you only to save the search criteria. Others allow you to change more options, such as columns displayed, column order, sort order, and headings.
-
Select the Apply button.
To duplicate, update, or delete a personalized view
-
Select the Personalize button to launch the Personalize Views page.
-
Select the view from the list.
-
Select Update to update the options for this view.
-
Select Delete to delete the view.
-
Select the Duplicate button to create a duplicate of the selected view. Enter a new View Name. Make other modifications as desired and select Apply.
-