Using Change Management
This chapter covers the following topics:
- Change Management Overview
- Searching for Ideas, Issues, and Changes
- Creating Issues
- Creating Ideas
- Creating Change Requests
- Creating Change Notifications
- Creating Change Orders
- Performing Actions
- Managing the Action Log
- Creating Change Revisions
- Managing Change Header Attachments
- Managing People and Roles
- Managing Issue and Change Request Lines
- Managing Change Order Revised Items
- Managing Change Tasks
- Creating Relationships
- Managing Workflows
- Importing Changes
- Importing Changes Using the Engineering Change Order Open Interfaces
- Using the Import Workbench to Import Change Objects
- Engineering Change Order Open Interface Tables
- Managing Reports
Change Management Overview
Change Management enables you to centrally set up, track and manage the changes that occur within and outside of your organization.
Change Management provides a workflow-based, collaborative change management system that enables you to track, manage, and resolve various product and process issues, Change Requests, and Change Orders across your organization. You can also use Change Management to manage changes to documents.
Change Management also enables you to manage changes externally, with suppliers and customers. Using Change Management you can capture and track ideas, investigate them with issues, evaluate changes for them on engineering Change Requests, and then implement the desired changes with a change order.
Once submitted, a change tracked through Change Management is visible throughout the lifecycle of the product or document. For example, a product change approved by Engineering will be visible through the item’s entire lifecycle. Because of this long-term visibility, during the maintenance phase of the item, even field service representatives can review the change that occurred earlier in the item’s lifecycle.
Searching for Ideas, Issues, and Changes
You can search for ideas, issues, change requests, and change orders using either a simple or advanced search. Simple search enables you to search for ideas, issues, change requests, and change orders using a keyword search, wildcard search, search excluding keywords, fuzzy search, and stemming search.
-
Click on the Change Simple Search link in the Change Management section of the Applications tree menu.
-
On the Simple Search page, select a change category, then search using one or more of the following options:
Keyword Search
Enter a partial or whole value for the change object's number, name, or description in the Search field. You can narrow your search results by entering as many keywords as possible.
-
Select “Match all word(s) (AND)” to search for change objects that contain all the keywords entered as search criteria. This is the default value.
-
Select “Match any word(s) (OR)” to search for change objects containing any one of the keywords entered.
Wildcard Search
Use "%", also known as the wildcard character, to enter partial searches as part of your search criteria. For example, you can search for all change requests that have "Engine" and "Overheating" in the name as follows: %Engine%Overheating.
Search Excluding Keywords
Refine your queries by excluding certain keywords from your search. For example, you can search for issues containing the keyword DEF-3% and exclude issues that contain the keyword DEF-32%.
Fuzzy Search
Enter '?' before the keywords to perform a fuzzy search. Use keywords that sound similar to the word you are searching for. For example, enter “?Clik” to search for an issue containing the word “click.”
Stemming Search
Enter '$' before the keywords to perform a stemming search on the name, number, description, line name, or line description of the change category selected. Stemming Search allows you to search for words whose spelling is derived, or stems from the keyword. For example, a search on the keyword "$contract" could return: "contract," "contracts," "contracted," and "contracting."
-
-
Click Search. Simple search returns all matching results for the search criteria entered. You can view these search results using different results formats. For details about how you can personalize and create result formats see Managing Display Formats, Oracle Product Information Management Implementation Guide.
-
Click on the Change Advanced Search link in the Change Management section of the Applications tree menu.
-
On the Advanced Search page, select the change category (such as issue, change request, or change order) from the list of categories and click Go.
-
Choose a search criteria template from the list to select predefined search criteria fields for your search, then click Go.
For details about how to define and personalize criteria templates, see Managing Search Criteria, Oracle Product Information Management Implementation Guide.
-
Optionally, you can change the search criteria for only this search by using the following buttons:
-
Clear
Clears the value fields of the selected attributes.
-
Delete
Deletes the selected attribute from the list of search criteria.
-
Duplicate
Duplicates the selected attributes. You can now search on different values for the same attribute. For example, if you duplicate the Status attribute, you can search for change requests with either a status of Hold or Cancelled.
To change the search criteria, select one or more attributes, then click one of the above buttons.
-
-
To add search criteria to only this search, click Add Criteria.
In the Add Criteria page, if you simply wish to locate a single attribute, enter its name and click Find. To search for attributes by attribute group, select the attribute group and click Go.
Move search criteria back and forth from the Available Criteria list to the Selected Criteria list using the Move, Move All, Remove, and Remove All shuttles. When finished, click Apply.
-
Enter values for one or more search criteria.
-
Select a display format, then click Go.
The display format enables you to switch between different views of the search results. The view in the Display Format region shows the columns that will appear in the Results page. For information about defining and personalizing display formats, see Managing Display Formats, Oracle Product Information Management Implementation Guide.
-
Click Search to perform the search.
In the Results page, you can switch between display formats to view different attributes.
To perform actions on changes in the Results page
You can select changes and perform the following actions:
-
add the change to a new or existing change order
-
change the priority of the selected change records
-
demote the selected change records to the previous status
-
link to an existing change order
-
link to an existing enhancement request
-
generate a report
-
promote the selected change records to the next status
-
reassign to a different user
-
request a comment from certain people
-
export all change records selected to a spreadsheet
-
Complete the steps in To perform a simple item search or To perform an advanced search above, then select one or more change records.
To export all results to a spreadsheet
-
Click Export to export all change records in the Results page to a spreadsheet.
-
In the Export page, select an export template and an output format. Click Export.
For more information about export (report) templates, see Defining Change Category Reports, Oracle Product Information Management Implementation Guide.
To perform all other actions
-
In the Select Change (Object): field, select an action, then click Go.
For more information, see: Performing Actions.
Creating Issues
The system provides a workflow-based collaborative issue management system that enables you to track, manage, and resolve various product/process related issues across your enterprise as well as with suppliers and customers. The system issue management helps to speed identification, communication, and resolution of quality problems or design changes to your product.
Your system administrator has configured the issue creation process so that it is optimized for your enterprise. For example, in a company that designs or manufactures computer motherboards, you may have the issue types: Design, Defect, Documentation, and Implementation. Depending on the issue type selected, the workflow processes for each status may already be defined by default, thereby ensuring that all new issues are captured and managed in a way that is consistent with your company’s product development processes.
You can link issues to new change requests and change orders, effectively copying required information from the issue to the new change request or change order.
To create an issue
-
On the Create Issue: Select Issue Type page, select the appropriate Issue Type and click Continue.
User-defined issue types enable your enterprise to build categorizations for different types of issues so that you can apply consistent review and approval processes to different categories of issues. For example, for each issue type, there is a specialized workflow that best suits the review and resolution process required by the particular type of issue. Issue types best suited for your enterprise's product development processes are listed in the Issue Type field. For details about your enterprise's issue types, contact your system administrator.
-
On the Create Issue page, provide the required primary attribute information, as well as any required user-defined attribute information. Depending on the configuration of the issue type selected, you can specify a subject for the issue. Following are the possible subjects of an issue:
-
Item Number
-
Item Revision
-
Component
-
None
The person or group in the Assigned To field is defaulted based on the item or component role specified in the assignment rule for the issue type. If no item or component is selected, you can enter a valid assignee name.
Note: You are not required to select a subject for the issue. If you prefer not to assign a subject to the issue, select the blank or empty value. If no item or component is selected, then your (the requestor's) name becomes the default value in the Assigned To field.
-
-
Depending on the configuration of the issue type selected, you may be required to provide data in any of the following sections (in addition to any user-defined sections or pages) when creating an issue:
-
Lines
Issue Lines capture all the details that comprise an issue--lines make up a "to do" list for a particular issue. Just as there are types of issues, you have types of issue lines. These issue line types have been configured by your system administrator to best serve the needs of your business. Optionally, click Add Line Subjects to create multiple lines for the selected line type. In the Search and Select: Add Line Subjects page, you can select multiple line subjects at once to add to the issue. Start After and Complete Before fields on the line enable you to manage the line based on header statuses. If you are using a line workflow, these fields enable you to manage the line workflow initiation automatically. The line workflow starts once the header enters the Start After status specified on the line.
-
Dependencies
The resolution of an issue may depend upon a particular Idea, New Item Request, Change Request, or Change Order being approved. An issue may also be required by or implemented by a change request, or change order. To ensure this relationship is captured in a new issue, specify what the issue is related to (for example, a change request or change order), and then specify the nature of the dependency.
-
References
You can specify that the issue references an item. A reference to an item may also include the item revision.
-
Workflow Approval
Workflow Routings or Approvals may be defined for any status of the issue based on the issue type. The issue type selected determines the workflow process steps defaulted in for each status. A workflow process may include steps to request approval, request comment, FYI, or a custom workflow process. For some steps you may be required to select an assignee and specify whether the assignee is mandatory or optional. You can add additional workflow process steps and update a step to add Assignees if a workflow is associated with the status; however, you cannot delete any assignees or steps that were defaulted in based on the issue type. You can remove any Steps or Assignees that you add.
-
Attached Documents
You can attach documents from your desktop or Oracle Files Online. You can also attach text or URL documents. When you attach a document you can specify an Attachment Category to classify the document. The valid Attachment Categories are created by your system administrator.
Note: During issue creation you cannot attach folders from Oracle Files Online. However, after the issue has been created, you can attach folders (from Oracle Files Online) to it.
After providing the required information you can Submit the new issue, which starts the Workflow for the first status and notifies the assignee. If you have not completed adding all the information, click Save for Later. You or anyone with the appropriate role can update the issue later on.
-
-
After submitting and creating an issue, you can view and update the following information:
-
People
You can directly add people to an issue and assign them a role. Depending on how the issue type was configured, a number of people may inherit a role on the issue (based on the issue type). You cannot delete inherited people or modify their roles. If you specify an item as the subject of the issue, all people with a role on that item may also inherit a role on the issue if their item role has been mapped to an issue role; to change the role or delete any of these people from the issue, their roles must be changed or deleted at the item level.
-
Action Log
The Action Log displays all actions (and associated comments) executed against or posted to the issue in a threaded discussion format. You can respond to requested comments or reply to specific comments, thereby creating a threaded discussion within the context of the issue.
-
Workflow
Issues are managed through their statuses and associated workflow processes. Each status can have one workflow associated with it, and that workflow is automatically launched when issues achieve a particular status. You can explicitly promote or demote an issue to its different statuses (defined by the issue type). Issues may automatically be promoted (or demoted) to the next status after the completion of the workflow in a specific status (as defined by the issue type).
If you abort an issue, that issue's status is changed to Not Submitted for Approval, and all dates are reset. You can reset and restart a workflow; if an aborted or reset workflow is restarted, a new instance of the workflow begins with the first step.
If you add or remove people from a step in the workflow, be sure to Refresh Assignees--doing so ensures all new assignees are added to steps in the workflow before it is submitted.
-
To perform an action
See: Performing Actions
To create a relationship
To add an attachment to an issue line
See: To add an attachment to a change line:
To create a change order from an issue
See: To create a change order from a change request/issue/idea
Creating Ideas
Ideas capture suggestions for improving products or processes. Ideas can also capture suggestions, innovations, and improvements.
The system provides a workflow-based collaborative idea management system that enables you to track, manage, and implement ideas across the enterprise, as well as with suppliers and customers.
Your system administrator has configured the idea creation process so that it is optimized for your enterprise.
To create an idea
-
On the Create Idea: Select Idea Type page, select the appropriate Idea Type and click Continue.
User-defined idea types enable your enterprise to build categorizations for different types of issues so that you can apply consistent review and approval processes to different categories of issues. For example, for each idea type, there is a specialized workflow that best suits the review and implementation process required by the particular type of idea. For details about your enterprise's idea types, contact your system administrator.
-
On the Create Idea page, provide the required primary attribute information, as well as any required user-defined attribute information. Depending on the of the idea type selected, you can specify a subject for the idea.
The person or group in the Assigned To field is defaulted based the idea type.
Note: You are not required to select a subject for the idea. If you prefer not to assign a subject to the idea, select the blank or empty value. If no item or component is selected, then your (the requestor's) name becomes the default value in the Assigned To field.
-
Depending on the configuration of the idea type selected, you might be required to provide the following data related to the idea:
-
Lines
Lines capture all the details that comprise an idea--lines make up a "to do" list for a particular idea. Just as there are types of ideas, you have types of idea lines. These idea line types have been configured by your system administrator to best serve the needs of your business. Optionally, click Add Line Subjects to create multiple lines for the selected line type. In the Search and Select: Add Line Subjects page, you can select multiple line subjects at once to add to the idea. Start After and Complete Before fields on the line enable you to manage the line based on header statuses. If you are using a line workflow, these fields enable you to manage the line workflow initiation automatically. The line workflow starts once the header enters the Start After status specified on the line.
-
Dependencies
The resolution of an idea may depend upon a particular issue, New Item Request, Change Request, or Change Order being approved. An idea might also originate from a change request or change order. To ensure this relationship is captured in a new idea, specify what the idea is related to (for example, a change request or change order), and then specify the nature of the dependency.
-
References
You can specify whether the idea references an item. A reference to an item might also include the item revision.
-
Workflow Approval
Workflow Routings or Approvals can be defined for any status of the idea. The idea type selected determines the default workflow process steps. A workflow process might include steps to request approval, request comment, FYI, or a custom workflow process. For some steps you might be required to select an assignee and specify whether the assignee is mandatory or optional. You can add additional workflow process steps and update a step to add Assignees if a workflow is associated with the status; however, you cannot delete any assignees or steps that were defaulted in based on the idea type. You can remove any Steps or Assignees that you add.
-
Attached Documents
You can attach documents from your desktop or Oracle Files Online. You can also attach text or URL documents. When you attach a document, you can specify an Attachment Category to classify the document. The valid Attachment Categories are created by your system administrator.
Note: During idea creation you cannot attach folders from Oracle Files Online. However, after the idea has been created, you can attach folders (from Oracle Files Online) to it.
-
Strategic Impact
After providing the required information you can Submit the new idea, which starts the Workflow for the first status and notifies the assignee. If you have not completed adding all the information, click Save for Later. You or anyone with the appropriate role can update the idea later..
-
-
After submitting and creating an idea, you can view and update the following information:
-
People
You can directly add people to an idea and assign them a role. Depending on how the idea type was configured, a number of people night inherit a role on the idea (based on the idea type). You cannot delete inherited people or modify their roles. If you specify an item as the subject of the idea, all people with a role on that item can also inherit a role on the idea if their item role has been mapped to an idea role; to change the role or delete any of these people from the idea, their roles must be changed or deleted at the item level.
-
Action Log
The Action Log displays all actions (and associated comments) executed against or posted to the idea in a threaded discussion format. You can respond to requested comments or reply to specific comments, thereby creating a threaded discussion within the context of the idea.
-
Workflow
Ideas are managed through their statuses and associated workflow processes. Each status can have one workflow associated with it, and that workflow is automatically launched when ideas achieve a particular status. You can explicitly promote or demote an idea to its different statuses (defined by the idea type). Ideas may automatically be promoted (or demoted) to the next status after the completion of the workflow in a specific status (as defined by the idea type).
If you abort an idea, that idea's status is changed to Not Submitted for Approval, and all dates are reset. You can reset and restart a workflow; if an aborted or reset workflow is restarted, a new instance of the workflow begins with the first step.
If you add or remove people from a step in the workflow, be sure to Refresh Assignees--doing so ensures all new assignees are added to steps in the workflow before it is submitted.
-
To perform an action
See: Performing Actions
To create a relationship
To add an attachment to an idea line
See: To add an attachment to a change line:
To create a change order from an idea
See: To create a change order from a change request/issue/idea
Creating Change Requests
The system provides a workflow-based collaborative change request management system that enables you to track, manage, and analyze solutions to various product/process related issues within your enterprise. After an issue is closed, appropriate parties can analyze proposed solutions via change requests; analysis can be conducted and proposals routed to relevant parties for review and approval.
You can link issues to new change orders, effectively copying required information from the change request to the new change order.
To create a change request
-
On the Create Change Request: Select Change Request Type page, select the appropriate Change Request Type and click Continue.
User-defined change request types enable your enterprise to build categorizations for different types of change requests so that you can apply consistent review and approval processes to different categories of change requests. For example, for each change request type, there is a specialized workflow that best suits the review and resolution process required by the particular type of change request. Change request types best suited for your enterprise's product development processes are listed in the Change Request Type field. For details about your enterprise's change request types, contact your system administrator.
-
On the Create Change Request page, provide the required primary attribute information, as well as any required user-defined attribute information. Depending on the configuration of the change request type selected, you can specify a subject for the change request. Following are the possible subjects of a change request:
-
Item Number
-
Item Revision
-
Component
-
None
The person or group in the Assigned To field is defaulted based on the item or component role specified in the assignment rule for the change request type. If no item or component is selected, you can enter a valid assignee name.
Note: You are not required to select a subject for the change request. If you prefer not to assign a subject to the change request, select the null or empty value. If no item or component is selected, then your (the requestor's) name becomes the default value in the Assigned To field.
-
-
Depending on the configuration of the change request type selected, you may be required to provide data in any of the following sections (in addition to any user-defined sections or pages) when creating a change request:
-
Lines
Change Request Lines capture all the details that comprise a change request--lines make up a "to do" list for a particular change request. Just as there are types of change requests, you have types of change request lines. These change request line types have been configured by your system administrator to best serve the needs of your business. Optionally, click Add Line Subjects to create multiple lines for the selected line type. In the Search and Select: Add Line Subjects page, you can select multiple line subjects at once to add to the change request. Start After and Complete Before fields on the line enable you to manage the line based on header statuses. If you are using a line workflow, these fields enable you to manage the line workflow initiation automatically. The line workflow starts once the header enters the Start After status specified on the line.
-
Dependencies
The final approval or resolution of a change request may depend upon a particular Issue, Idea, New Item Request, or Change Order being approved. A change request may also be required by or implemented by another change object. To ensure this relationship is captured in a new change request, specify what the change request is related to (for example, another change object), and then specify the nature of the dependency.
-
References
You can specify that the change request references an item. A reference to an item may also include the item revision.
-
Workflow Approval
Workflow Routings or Approvals may be defined for any status of the change request based on the change request type. The change request type selected determines the workflow process steps defaulted in for each status. A workflow process may include steps to request approval, request comment, FYI, or a custom workflow process. For some steps you may be required to select an assignee and specify whether the assignee is mandatory or optional. You can add additional workflow process steps and update a step to add Assignees if a workflow is associated with the status; however, you cannot delete any assignees or steps that were defaulted in based on the change request type. You can remove any Steps or Assignees that you add.
-
Attached Documents
You can attach documents from your desktop or Oracle Files Online. You can also attach text or URL documents. When you attach a document you can specify an Attachment Category to classify the document. The valid Attachment Categories are created by your system administrator.
Note: During the creation of a change request you cannot attach folders from Oracle Files Online. However, after the change request has been created, you can attach folders (from Oracle Files Online) to it.
After providing the required information you can Submit the new change request, which starts the Workflow for the first status and notifies the assignee. If you have not completed adding all the information, click Save for Later. You or anyone with the appropriate role can update the change request later on.
-
-
After submitting and creating a change request, you can view and update the following information:
-
People
You can directly add people to a change request and assign them a role. Depending on how the change request type was configured, a number of people may inherit a role on the change request (based on the change request type). You cannot delete inherited people or modify their roles. If you specify an item as the subject of the change request, all people with a role on that item may also inherit a role on the change request if their item role has been mapped to a change request role; to change the role or delete any of these people from the change request, their roles must be changed or deleted at the item level.
-
Action Log
The Action Log displays all actions (and associated comments) executed against or posted to the change request in a threaded discussion format. You can respond to requested comments or reply to specific comments, thereby creating a threaded discussion within the context of the change request.
-
Workflow
A change request is managed via its statuses and associated workflow processes. Each status can have one workflow associated with it, and that workflow is automatically launched when a change request enters into the status. You can explicitly promote or demote a change request to its different statuses (defined by the change request type). Change requests may automatically be promoted (or demoted) to the next status after the completion of the workflow with a specific status (as defined by the change request type).
If you abort a change request, that change request's status is changed to Not Submitted for Approval, and all dates are reset. You can reset and restart a workflow; if an aborted or reset workflow is restarted, a new instance of the workflow begins with the first step.
If you add or remove people from a step in the workflow, be sure to Refresh Assignees--doing so ensures all new assignees are added to steps in the workflow before it is submitted.
To perform an action
See: Performing Actions
-
To create a change order from a change request/issue/idea
The system provides a workflow-based collaborative change management system that enables you to track, manage, and resolve various product/process related issues, change requests and change orders, across your enterprise as well as with suppliers and customers. The system change management helps to speed identification, communication, and resolution of quality problems or design changes to your product.
A simple change cycle includes the following:
-
Customers log issues against a product and/or new ideas related to the product are collected from all stakeholders
-
The issues and ideas are consolidated and analyzed
-
A change request is created to request changes to the product design to address the ideas and issue
-
Based on the change request, a change order is created to implement the design changes.
The system provides the ability to copy information from source change objects (like issues and ideas in the above cycle) and default them on to appropriate destination change objects like change requests and change orders. Thus new change objects can be quickly created with minimal data entry and with appropriate relationships established with the source change objects.
The following copy actions are allowed:
-
Add a change request/Issue/Idea to a change order
-
Add a change order to another change order
-
Add a change request/Issue/Idea to another change request
-
Add an issue/idea to another issue
-
Add an idea to another idea
-
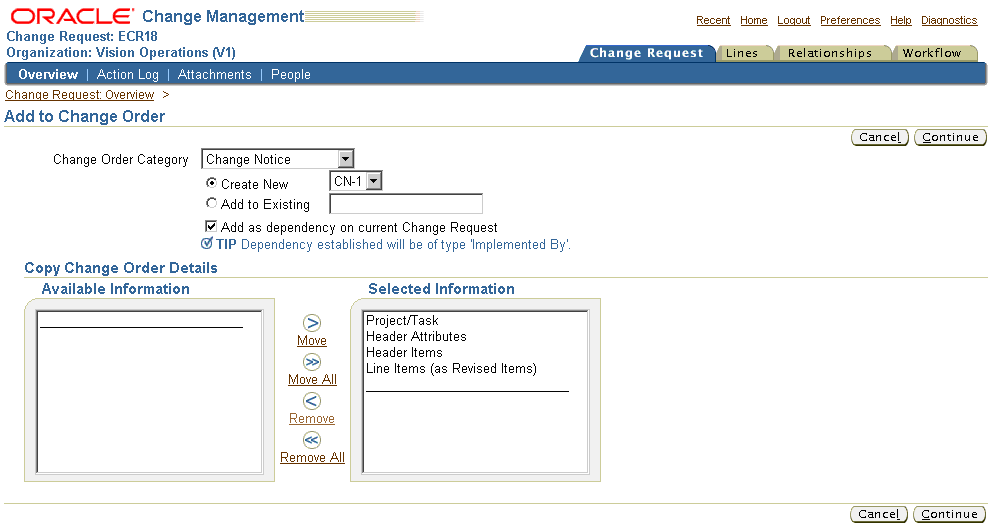
To add a change request detail page, select the action, Add to Change Order, and then choose the Go button.
-
On the Add to Change Order page
-
Select the change order category
You can add the change request information to a change order belonging to either the seeded change order category or any user defined change order categories.
-
You can choose to add the change request information to a new change order or append relevant information to an existing change order.
If you are adding the change request information to a new change order, then highlight the ‘Create New’ radio button and select the change order type.
User-defined change order types enable your enterprise to build categorizations for different types of change orders so that you can improve the accuracy of change orders with review and approval workflows, and automatically implement changes on a scheduled effective date. For example, for each change order type, there is a specialized workflow that best suits the review and resolution process required by the particular type of change order. Change order types best suited for your enterprise's product development processes are listed in the Change Order Type pop list.
If you are adding the change request information to an existing change order, then highlight the ‘Add to Existing’ radio button, search and select the appropriate change order.
Note: You can add to an existing change order only if the change order is in ‘Draft’ or ‘Open’ status
-
By default, a dependency of type ‘Implemented By’ would be created on the change request. A complementary dependency of type ‘Implements’ would be created on the change order. You can choose not to create any dependency by unchecking the dependency check box
-
Specify what attribute values should be copied over from the source change request to the destination change order and click Continue
If you are copying the change request to a new change order, then the following attributes are available for selection
-
Header Attributes
The attributes entered for the change request header will be copied to the change order. These attributes include: Name, Description, Source Type, Source Name, Priority, Need By Date, Reason and Assigned To. You can overwrite these attribute values on the change order.
Note: If the change order type is configured such that some of the attribute values entered on the change request are not valid for the change order, then the appropriate attribute value which has the lowest sequence number is defaulted on the change order. For eg: If the priority of a change request is ‘High’ and this value is not defined as a valid value for the change order type, then the priority value with the lowest sequence number defined for the change order type is defaulted on the change order.
-
Header Item
The header item number, item description, and revision entered on the change request are copied over to the change order
Note: If the subject selection criteria of the change request is ‘Item and Component’, then the component information is ignored when adding to a change order. Also, if the header item entered on the change request does not satisfy the subject selection criteria specified for the change order type, then you cannot copy the item to the change order.
-
Line Items (as Revised Items)
Items specified as subjects on the open change request lines are copied to the change order as revised items.
Change order revised items list changes to specific items. For each revised item you can specify changes to item attributes, attachments, AMLs, and structures. The revised item changes are implemented when the change order is implemented either manually or on the scheduled effective date. You can optionally schedule item changes at the revised item level. Revised items can be promoted or demoted on an individual basis.
Note: If the item entered as a subject on the change request line does not satisfy the subject selection criteria specified for the change order type, then you cannot copy the line item as a revised item on the change order.
If you are copying the change request to an existing change order, then only the ‘LineItems (as Revised Items) is available for selection. The other attribute values are not copied from the change request. Instead, the existing attribute values of the change order are preserved.
-
-
On the ‘Create Change Order’ page enter/modify data in any of the sections. For details about creating change orders refer ‘Creating Change Orders’
-
Similarly, you can add an issue or an idea to a change order:
The process is similar to adding a change request to a change order, except for the following differences:
-
revised items in the source change order, which are in open status, are copied to the destination change order.
Note: A change order cannot have lines
-
A dependency of type ‘Composed of’ is created on the change order. A complementary dependency of type ‘Composes’ is created on the destination change order.
To add an issue/idea/change request to another change request:
-
The issue lines in the source issue, which are in open status, are copied to the destination change request, provided the same line types are defined for both the change categories.
Note: An Issue, Change Request or an Idea cannot have revised items.
-
A dependency of type ‘Resolved By’ is created on the issue. A complementary dependeny of type ‘Resolves’ is created on the destination change request.
-
You can copy the following additional header item information:
-
Structure
-
Component
Note: The issue and change request types should be appropriately configured to include these attributes
-
To add an issue/idea to another issue:
The process is similar to adding a change request to a change order.
-
The issue lines in the source issue, which are in open status, are copied to the destination issue, provided the same line types are defined for both the change categories.
-
A dependency of type ‘Resolved By’ is created on the issue. A complementary dependeny of type ‘Resolves’ is created on the destination change request.
-
You can copy the following additional header item information:
-
Structure
-
Component
Note: The issue and change request types should be appropriately configured to include these attributes
-
-
Similarly, you can copy an idea to an issue.
To add an idea to another idea:
The process is similar to adding a change request to a change order.
-
The idea lines in the source idea, which are in open status, are copied to the destination idea.
-
A dependency of type Required By is created on the source idea. A complementary dependency of type Requires is created on the destination idea.
-
You can copy the following additional header item information:
-
Structure
-
Component
Note: The source and destination idea types should be appropriately configured to include these.
-
-
Creating Change Notifications
Change Notification enables users to distribute documents and files to multiple recipients and track their response. The creation steps for notifications are similar to those for change requests. The documents or files to be distributed are added to the change lines.
See: Document Change Management and Distribution, Oracle Product Lifecycle Management Implementation Guide for details.
Creating Change Orders
You can use change orders to specify and implement changes for item attributes, attachments, AMLs, and structures. For a specific change order you can specify changes for several items, route the change order for approval, schedule the effective date, and automatically implement the changes on the scheduled effective date. A change order also can be propagated to many organizations within your company; depending on how your company's organization policy is defined, a change order can be automatically propagated to other organizations in your company hierarchy whenever it reaches a particular status.
To create a change order
-
On the Create Change Order: Select Change Order Type page, select the appropriate Change Order Type and click Continue.
User-defined change order types enable your enterprise to build categorizations for different types of change orders so that you can improve the accuracy of change orders with review and approval workflows, and automatically implement changes on a scheduled effective date. For example, for each change order type, there is a specialized workflow that best suits the review and resolution process required by the particular type of change order. Change order types best suited for your enterprise's product development processes are listed in the Change Order Type field. For details about your enterprise's change order types, contact your system administrator.
-
On the Create Change Order page, provide the required primary attribute information, as well as any required user-defined attribute information. Depending on the configuration of the change order type selected, you can specify a subject for the change order. Following are the possible subjects:
-
Item
-
Item Revision
-
None
The person or group in the Assigned To field is defaulted based on the item role specified in the assignment rule for the change order type, or it can be explicitly entered. If no item is selected, you can enter a valid assignee name.
Note: You are not required to select a subject for the change order. If you prefer not to assign a subject to the change order, select the null or empty value. If no item is selected, then your (the requestor's) name becomes the default value in the Assigned To field.
-
-
Depending on the configuration of the change order type selected, you may be required to provide data in any of the following sections (in addition to any user-defined sections or pages) when creating a change order:
-
Revised Items
Change order revised items list changes to specific items. For each revised item you can specify changes to item attributes (both operational and user-defined), attachments, AMLs, and structures. The revised item changes are implemented when the change order is implemented either manually or on the scheduled effective date. You can optionally schedule item changes at the revised item level. You can specify revised item details such as Use-up item, WIP details, and corresponding dates. You can also create new item revisions within the change order and define changes for those revisions, as well as schedule changes by providing a scheduled date. Revised items can be promoted or demoted on an individual basis.
-
Change Tasks
Change tasks help ensure that mandatory work is completed before a change order is implemented or promoted to the next status. You can use change tasks to create and assign work to individuals or groups. Each change task must be started after and completed before specific statuses. Before you promote a change order through its various statuses, its Mandatory change tasks must be completed. If a task is listed, but is not Mandatory, the change order can be promoted to the next status without completion of the task.
-
Dependencies
The final approval or implementation of a change order may depend upon a particular Issue, Idea, New Item Request, or another Change Order being approved. A change order may also be required by or implemented by another change object. To ensure this relationship is captured in a new change order, specify what the change order is related to (for example, another change order or item), and then specify the nature of the dependency.
-
References
You can specify that the change order references an item. A reference to an item may also include the item revision.
-
Workflow Approvals
Workflow Routings or Approvals may be defined for any status of the change order based on the change order type. The change order type selected determines the workflow process steps defaulted in for each status. A workflow process may include steps to request approval, request comment, or FYI. For some steps you may be required to select an assignee. You can add additional workflow process steps and update a step to add Assignees if a workflow is associated with the status; however, you cannot delete any assignees or steps that were defaulted in based on the change order type. You can remove any Steps or Assignees that you add.
-
Attached Documents
You can attach documents from your desktop or Oracle Files Online. You can also attach text or URL documents. When you attach a document you can specify an Attachment Category to classify the document. The valid Attachment Categories are created by your system administrator.
Note: During the creation of a change order you cannot attach folders from Oracle Files Online. However, after the change order has been created, you can attach folders (from Oracle Files Online) to it.
After providing the required information you can Submit the new change order, which starts the Workflow for the first status and notifies the assignee. If you have not completed adding all the information, click Save and Continue. You can then add revised items and save the change order in Draft status. You or anyone with the appropriate role can submit the change order later on.
-
Organization Hierarchy
Depending on how the change order type is defined, you may view and select from a list of valid organization hierarchies. If you select an organization hierarchy from this list, the change order can be propagated to all of the organizations within that hierarchy. Again, depending how the change order type is defined, a change order may also automatically be propagated through an organization hierarchy when it reaches a certain status. To view the organizations to which a change order can be propagated, click the Organizations tab on the change order's detail page.
-
-
After creating a change order, you can view and update the following information:
-
People
You can directly add people to a change order and assign them a role. Depending on how the change order type was configured, a number of people may inherit a role on the change order (based on the change order type). You cannot delete inherited people or modify their roles. If you specify an item as the subject of the change order, all people with a role on that item may also inherit a role on the change order if the item role has been mapped to a change order role; to change the role or delete any of these people from the change order, their roles must be changed or deleted at the item level.
-
Action Log
The Action Log displays all actions (and associated comments) executed against or posted to the change order in a threaded discussion format. You can respond to requested comments or reply to specific comments, thereby creating a threaded discussion within the context of the change order.
-
Workflow
A change order is managed through its workflow with statuses and associated workflow processes. Each status can have one workflow associated with it, and that workflow is automatically launched when a change order enters into the status. You can explicitly promote or demote a change order to its different statuses (defined by the change order type). Change orders may automatically be promoted (or demoted) to the next status after the completion of the workflow in a specific status(as defined by the change order type).
If you abort a change order, that change order's status is changed to Not Submitted for Approval, and all dates are reset. You can update and restart a workflow; if an aborted or updated workflow is restarted, a new instance of the workflow begins with the first step.
If you add or remove people from a step in the workflow, be sure to Refresh Assignees--doing so ensures all new assignees are added to steps in the workflow before it is submitted.
-
To perform an action:
See: Performing Actions
To create a relationship:
Performing Actions
You can manage the workflow of a an issue, change request, or change order using change management actions. Change management actions can be executed from change detail pages, item change lists, and change management search results lists.
Typically, actions are used to update, reassign, or change the priority or status of an issue, change request, or change order. Some actions, such as schedule, release, and implement, are only available to issues, change requests, or change orders with revised items enabled. All actions are recorded in the action log.
The following actions are available to all change categories:
Submit
Submits an issue, change request, or change order to an assigned person or group.
Submit for Approval
Submits a change object for approval.
Update
Updates the primary attributes of an issue, change request, or change order.
Reassign
Reassigns an issue, change request, or change order to a person or group.
Change Priority
Changes the priority of the issue, change request, or change order.
Change Status
Changes the status of the issue, change request, or change order.
Request/Post Comment
Requests a comment from one or more people.
The following actions are available to change categories with revised items enabled:
Release
Releases all revised item changes for implementation. The status is changed to Released.
Schedule
Schedules implementation based on the effective date. The status is changed to Scheduled.
Put On Hold
Places the issue, change request, or change order on hold. The status is changed to On Hold.
Cancel
Cancels all changes. The status is changed to Cancelled. Alternatively, you can cancel individual change lines during the Approval status if the change type definition has Allow Updates selected.
Implement
Implements the revised item changes. The status is changed to Implemented.
Reschedule
The issue, change request, or change order is rescheduled for implementation based on the effective date.
Change Effectivity Date
Changes the effective date for all revised items. Propagate ECO propagates the ECO to other organizations. Reopen changes the status to Open.
Generate Report
Generate report creates a report with specified issue or change information. You can choose to generate a report by selecting report templates defining the change information the report will contain and a report output format such as pdf, html, rtf, xls, and xml.
You can also generate a change report from change search results page.
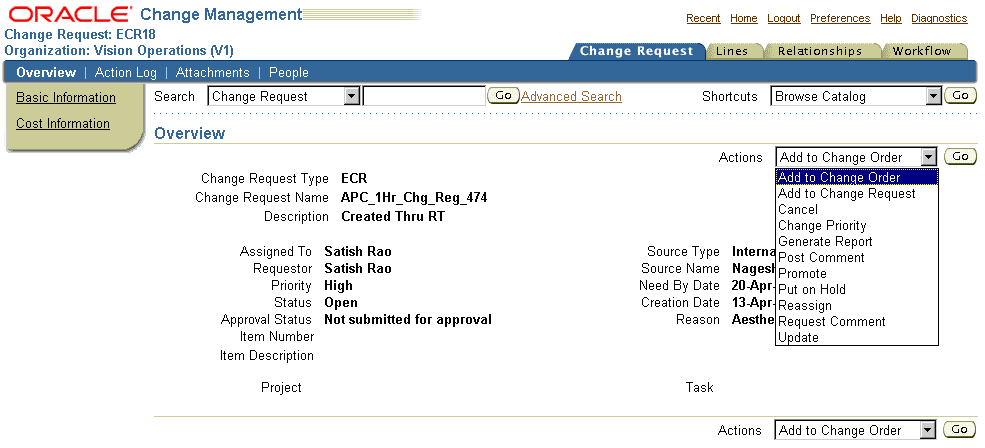
Add to Change Order
Add the issue or idea to a change order.
Add to Change Request
Associate the issue or idea with a change request
Promote
Change the issue or idea's status. For example from Review to Approval.
The following action is available for only Change Issues and Change Ideas:
Add to Issue
Associate the issue or idea with another issue.
To perform an action
-
On an issue, change request, or change order detail page, select an Action and click Go.
-
Enter information in the required fields.
-
Optionally, enter a comment and click Apply.
Managing the Action Log
For tracing and auditing efficiency, you can maintain a complete history of all actions and comments related to a change object. All actions such as reassignments, status and priority changes, along with comments and responses to requests, are posted in the action log. The name of the action, who performed the action, a date/time stamp, and all comments are recorded in the action log.
You can filter and sort the action log to show only certain actions such as approval requests, status and priority changes, comments from specific people, and reassignments.
To view the action log
-
On an issue, change request, or change order detail page, click the Workflow tab, then click Action Log.
-
Expand or collapse any or all entries in the action log to view responses, replies to requests, and comments.
To request a comment
-
On an issue, change request, or change order detail page, select Request Comment and click Go.
-
Enter a person's or group's name.
-
Enter a subject and click Apply.
To post a comment in the action log
-
On an issue, change request, or change order detail page, click the Workflow tab, then click Action Log.
-
Click Post Comment.
-
Enter a comment then click Apply.
To post a reply in the action log
-
On an issue, change request, or change order detail page, click the Workflow tab, then click Action Log.
-
Click the Reply icon in the Action Log row to which you would like to reply.
-
Enter a comment then click Apply.
Creating Change Revisions
You can create revisions for issues, change requests, or change orders to track and audit modifications. When you create a new revision the approval status is reset to Not Submitted for Approval, thereby enabling you to make additional edits to the change object.
To create a revision for an issue, change request or change order
-
On an issue, change request or change order detail page, click the Revisions tab.
-
On the Revisions page, click Create.
-
On the Create Revision page, enter a Revision and a Start Date. Optionally, enter Comments describing the purpose for the new revision.
-
Click Apply.
To update a revision for an issue, change request or change order
-
On an issue, change request or change order detail page, click the Revisions tab.
-
On the Revisions page, click the Update icon.
-
Update the comments for the revision.
-
Click Apply.
To delete a revision for an issue, change request or change order
-
On an issue, change request or change order detail page, click the Revisions tab.
-
On the Revisions page, select the revision you wish to delete and click the Delete icon.
Note: You can only delete future effective revisions.
Managing Change Header Attachments
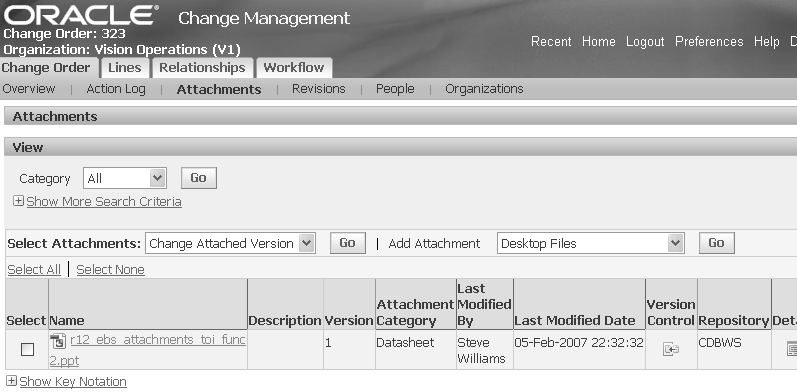
An attachment is unstructured information related to a change object. For example, unstructured information attached to a change object could be a marked up CAD drawing, test results, a specification sheet, or a URL. You can add attachments to an issue, change request, or change order from your desktop or a repository (such as Oracle Universal Content Management (UCM)). You can also attach folders, text, or URLs. When you add an attachment, you can specify an attachment category to classify the attachment. The valid attachment categories are created by your system administrator. Folders can only be attached from an Oracle repository such as UCM; files within such folders are not attached.
To manage attachments to a change header
-
On an issue, change request, or change order's Overview page, click the Attachments tab.
This brings you to the Attachments page.
-
In the Attachments page, you can perform all of the actions described below. Please note that some tasks vary, depending on the content repository used.
-
Managing Attachments, which includes:
-
viewing the contents of an attachment
-
searching for attachments
-
requesting review or approval of an attachment
-
updating attachment attributes
-
changing the attached version of a file
-
checking files in and out of the repository
-
managing all file versions (version history)
-
granting access to attached folders in Oracle Content DB
-
viewing all objects associated with the attachment
-
detaching attachments from an object
-
Related Topics
Using E-Business Suite Attachments
Setting Up E-Business Suite Attachments, Oracle Product Information Management Implementation Guide
Managing People and Roles
Change management enables you to secure issues, change request, and change orders through role-based data level security. You can grant roles explicitly or implicitly to people and groups associated with an issue, change request, or change order. A change management role determines whether or not you can simply view an issue, change request, or change order, or view and edit it.
You can grant all people within an organization a role for all issue, change request, or change orders within a specific change category. You can map item roles to change roles. For example, if the Design Engineer item role is mapped to the Change Manager change role for change orders, you will be granted a Change Manager role on all change orders related to an item for which you have a Design Engineer role. The creator, requestor, and assignee of an issue, change request, or change order are always granted a role on it. These scenarios are "implicit role grants" added by the system.
Of course you can always grant an explicit change role to a person or group for any issue, change request, or change order. For example, you may grant a Change Reviewer role to a supplier engineer on a specific change order.
To view people who have access to an issue, change request, or change order
-
On an issue, change request, or change order detail page, click the People tab.
-
On the People page, in the Direct Change Roles section you can view people and groups explicitly granted a role by a user on the issue, change request, or change order. In the Inherited Change Roles section you can view people and groups implicitly granted a role by the system on the issue, change request, or change order. For example, the system automatically grants a role to the creator, assignee, and requestor.
Note: You can view each person's or group's role on the issue, change request, or change order, the start and end date of their assigned role, and their company.
To provide a person or group access to an issue, change request, or change order
-
On an issue, change request, or change order detail page, click the People tab.
-
On the People page, click Update, then click Add People. When the page refreshes, select a role, people type (such as person or group), and then choose a person or group.
Enter a start date and optionally, an end date, specifying when the role for the person or group is to be effective.
-
Click Apply.
Note: People can also be implicitly granted a role by the system. For more information on roles granted to people by the system see Types and Adding People and Roles.
To delete a person or group from an issue, change request, or change order
-
On an issue, change request, or change order detail page, click the People tab.
-
On the People page, select one or more people and click Delete.
Note: You cannot delete people or groups added by the system.
Managing Issue and Change Request Lines
You can add lines to any issue or change request that has line types configured for the change category. Lines are useful for specifying details and assigning responsibility for completion of tasks related to an issue or change request. For example, you can assign a line to an engineer to investigate and report on the cost of a change.
You can add a line of any valid line type to an issue or change request. You can edit a line as long as the approval status is not 'Submitted for approval' or 'Approved.' If you are assigned a line you automatically get a Reviewer role on the issue or change request, which enables you to view the details and edit the assigned line. Notifications are sent to inform assignees of their line assignments.
When you add or edit a line for an issue or change request you can specify a name, description, item number, assigned to, need by date, and estimated completion date. You can also attach files and folders to a line. The assignee may be defaulted in based on line type rules set up by a system administrator (for example, a specific item role).
To add an attachment to a change line
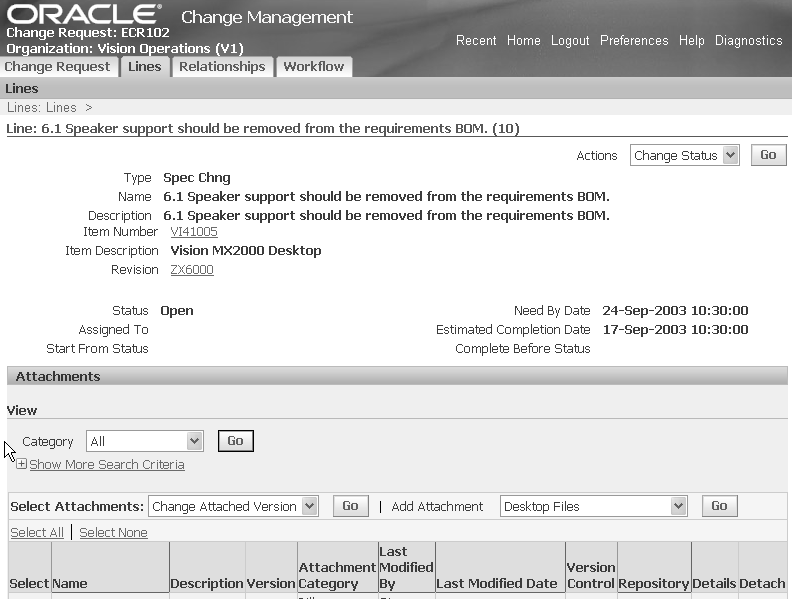
On the idea, issue, change request or change notification Overview page, click the Lines tab.
-
Select a line, then drill into the Line page using one of the following methods:
-
Select Update in the Select Line field, then click Go.
-
Click the line's Name link.
-
-
In the Attachments region, in the Add Attachment field, select the source of the attachment you want to add, then click Go.
Attachment Sources
-
Desktop Files
-
Repository Files and Folders
-
New Folder
-
URL
-
Text
-
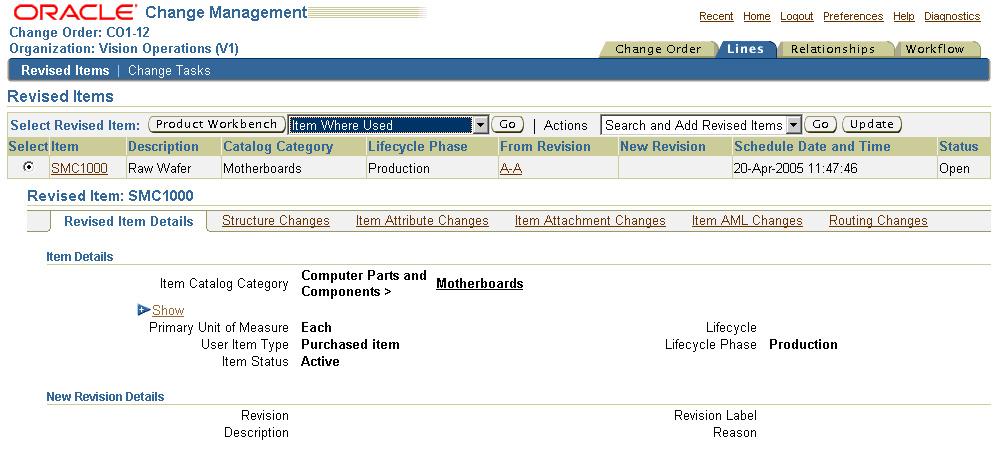
Managing Change Order Revised Items
Change order revised items list changes to specific items. For each revised item you can specify changes to item attributes, attachments, AMLs, and structures. The revised item changes are implemented when the change order is implemented either manually or on the scheduled effective date. You can optionally schedule item changes at the revised item level.
To manage change order revised items
-
On the change order's Overview page, click the Lines tab. On the Revised Items page you can view, edit, and add revised items depending on the role you are assigned on the change order. Optionally, you can add revised items from a spreadsheet. You can view and edit the following information for each revised item:
-
Revised Item Details
You can view the Use Up Details, Work in Progress information, and the Cancel Details.
-
Structure Changes
You can view the structure changes for the change order revised item in this context, but to perform any updates on a structure, you must click Update in Forms or Launch Product Workbench. The following structure changes can be authored:
-
Creation of New Structure
-
Component changes including adding new component, changing primary attributes of the component and disabling the component.
-
Reference Designator and Substitute component changes
-
Changes to component attributes on a common structure. The component attributes that you can change are:
-
WIP Supply Type
-
Supply Sub inventory
-
Supply Locator
-
Operation Sequence
-
Include in cost rollup
-
-
-
Attribute Changes
All changes to operational and user-defined attribute groups associated with an item are listed here. You can update both single and multi-row attributes.
-
Attachment Changes
You can specify attachment changes by adding and removing attachments to the revised item.
-
AML Changes
You can specify to add, remove or update approved manufacturers. Only valid or approved manufacturers appear in the list of Manufacturer Names.
-
To upload revised items to a change order
Upload a text file containing revised item information directly to the ENG_REVISED_ITEMS_INTERFACE table. The text file must contain the ENG_REVISED_ITEMS_INTERFACE table column values separated by commas. For example, a text file contains the following information for a revised item row:
IBQCH382,,,,,,,,,,,,,,,,,,,,,,,,,,,,,,,,,2004-02-28 01:10:00,,,,,,,,,,,,,,,,,,,,,,,,,V1,Engine10414-PLM,,,,,CREATE,,,,,,,,,,,
For information about the ENG_REVISED_ITEMS_INTERFACE table columns, refer to the Oracle eBusiness Suite Electronic Technical Reference Manual, located in My Oracle Support, http://www.metalink.oracle.com. Search on ENG_REVISED_ITEMS_INTERFACE
Important: Before beginning the upload process, you must create the text file.
-
Navigate to the Revised Items page.
-
Select Upload Revised Items from the Actions field, then click Go.
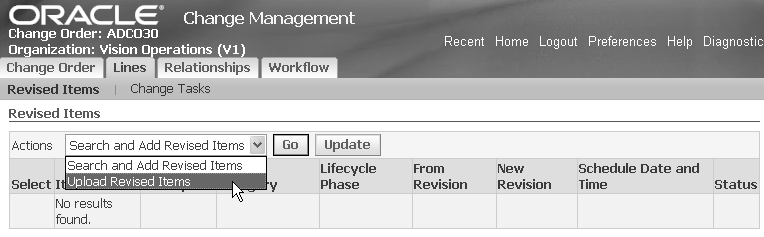
-
In the Upload Revised Items field, use the Browse button to find or enter the text file name and location.
-
Click Apply.
To add revised items to a change order based on a Where-Used search
Change order revised items list changes to specific items. For each revised item you can specify changes to item attributes, attachments, AMLs, and structures. The revised item changes are implemented when the change order is implemented either manually or on the scheduled effective date.
Based on the changes to a revised item, the assemblies or sub-assemblies in which the revised item is used, may also need to be revised to accommodate the changes proposed for the context revised item. Change Management provides the ability to quickly identify such parent assemblies and sub-assemblies from within the context of a change order and add them as new revised items on the same change order. Thus the changes to the context revised item and its parent assemblies or sub-assemblies can be managed through the same change order.
-
On the change order's Overview page, click the Lines tab
Change Management Lines Tab
-
On the Revised Items page, select Item Where Used from the tableaction drop-down list, and the click the Go button.
Items Where Used Example
The Revised Item Where Used page appears.
Revised Items Where Used Page
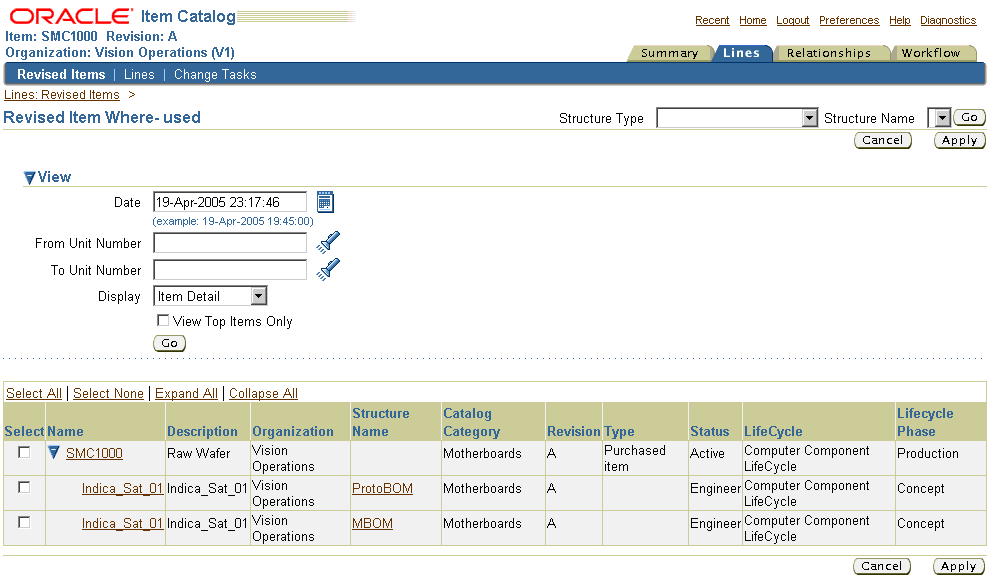
On the Revised Item Where Used page, you can do the following:
-
You can select a Structure Type and an appropriate Structure Name to narrow the where used search of the context revised item.
Specifying a structure name returns all the structures with this name in which the context revised item appears as a component. The search can be further narrowed down by specifying criteria which are listed below.
Note: A structure type may have a number of structure names associated with it. When the structure type is selected in the pop list, only those structure names which are associated with the structure type are listed in the structure name pop list.
-
You can specify a date in the Date field. A where used search is launched on the basis of this date. All the assemblies/sub-assemblies in which the revised item is effective (as a component) on this date are returned in the where used search. By default, the system date and time is displayed in this field.
-
You can specify a range of unit numbers in whose bill the revised item appears as a component
-
You can choose a format to display the where used search results through the ‘Display’ pop list. The seeded formats available are: Item Detail and Structure Detail.
-
You can choose to display only the top most items in the where used search results by checking the ‘View Top Items Only’ check box
Assume a sample bill as below: K0 (Level 0)->K1(Level 1)->K2 (Level 2)->K3(Level 3). A where used search for K3 with 'Top Items Only' set to 'Yes' would return only item#K0. The intermediate assemblies K2 and K1 will not be listed
-
Clicking ‘Go’ returns the appropriate assemblies and sub-assemblies based on the criteria specified earlier.
Note: Only those items on which the user has a ‘View’ privilege are listed in the search results. Also, only assemblies/sub-assemblies in the current org are listed in the search results
-
You can select any set of items returned in the where used search and add them as a revised item to the change order by clicking ‘Apply’.
On the Update Revised Items page, you can specify other details of the newly added revised item.
Note: The date specified in the ‘Date’ field is defaulted as the Scheduled date for the new revised item. If this date is in the past, then the system date is defaulted as the scheduled date for the new revised item
Update Revised Items Page
For detailing and managing the changes to the newly added revised item, see Managing Change Order Revised Items.
-
To access the Product Workbench
-
Create a change order.
-
Click on the change order number link.
-
You can view the workbench of the change order.
-
Click on the Lines tab.
-
Update and add a revised item.
Note: Once a revised item is added, a Product Workbench button appears.
Managing Change Tasks
Change tasks help ensure that mandatory work is completed before a change order is implemented or promoted to the next status. You can use change tasks to create and assign work to individuals or groups. Each change task must be started after and completed before specific statuses. Before you promote a change order through its various statuses, its Mandatory change tasks must be completed. If a task is listed, but is not Mandatory, the change order can be promoted to the next status without the task being completed.
You can change the status of an existing change task, reassign it, update it, or delete it.
To manage change tasks
-
On the change order's Overview page, click the Lines tab. Then, on the Revised Items page, click the Change Tasks tab.
-
On the Lines: Change Tasks page, select the change task whose status you wish to edit, reassign, update, or delete.
Creating Relationships
You can link one or more change objects (such as an issue, change request, or change order) to each other as dependencies. You can specify the type of dependency to describe how the linked change objects are related to each other. For example, a dependency can show the number, name, and status of change order that implements a change request, or it can show an issue that is required by a change order.
Following are the Dependency Types:
Implemented By
A change object is implemented by the dependent change object.
Implements
A change object implements the dependent change object.
Required By
A change object that is required by the dependent change object.
Requires
A change object that requires the dependent change object.
Resolved By
An issue is resolved by a change request or change order.
Resolves
A change request or change order resolves an issue
To view a change object's dependencies, navigate to a change object's detail page, click the Relationships tab, then click Dependencies.
To link a dependency to a change object
-
On a change object's detail page, click the Relationships tab, then click Dependencies.
-
Select a Change Category and click Go.
-
Select a Relationship Type.
-
Enter a change object number.
-
Click Apply.
To add a reporting reference to an issue, change request, or change order
You can add one or more reporting references to an issue, change request, or change order. Reporting references show items that are related to an issue, change request, or change order in context. For example, a change order may implement several component item changes. In such a case, the assembly item may be listed as a reporting reference to provide convenient access to the item.
To view an issue, change request, or change order's reporting references, navigate to an issue, change request, or change order detail page, click the Relationships tab, then click Reporting References.
-
On an issue, change request, or change order detail page, click the Relationships tab, then click References.
-
Select an object to reference, such as an item, and click Go.
-
Enter information in the required fields.
-
Click Apply.
Managing Workflows
In the Setup Workbench you can associate multiple workflow templates with a given change type. You associate multiple workflow templates with a workflow status at the header level of a idea, issue, change request, change notification, or change order. You can also add ad-hoc step assignees to the workflow based on role, group, and person filters. This enables a user to abort the workflow within a status, and to choose a different template for that status.
Once these associations are made, when creating an individual change object within that type, you can select various workflow options. This enables you to select a specialized workflow to reach those people who need to approve specific changes different from those who would approve changes.
You can set up workflow templates to use when requesting approval or review of an issue, change request, or change order. This enables reviewers and approvers to select the template with the steps that best meets their needs and specific people, based on role, group, and person filters. You can have multiple templates at any status.
An issue, change request, or change order can only be approved through the successful completion of an approval routing. When you create an issue, change request, or change order, an approval routing is created automatically based on a template, or manually by any user granted an edit privilege on the issue, change request, or change order.
An approval routing consists of one or more approval steps. Each approval step specifies a workflow process and to whom it is assigned. For example, you can create steps to request approval, request comment, or send an FYI notification. You can create custom activities using Oracle Workflow Builder.
The approval status of an issue, change request, or change order reports the progress of the approval. For example, when you submit a change object for approval, the approval status changes to Submitted for Approval, and then Approved or Rejected, depending on the outcome of the approval routing workflow. Every time a new revision is created for an issue, change request, or change order, the approval status is reset to Not Submitted for Approval. You cannot edit an issue, change request, or change order's attributes, lines, or attachments after it has been approved. However, you can perform actions (such as reassign, change status, change priority, and request comment) to manage the workflow of the issue, change request, or change order.
Notifications are sent to each of the assignees of a step when the step is started. Each assignee is requested to respond by the Date Required. If an assignee does not respond by the Date Required, then they will receive a reminder notification every N days, where N is the value specified for Response Required in N Days. The Date Required for a step is calculated to be the date/time the step is submitted, plus the Response Required in N Days. You can respond either through the email notification or directly from the workflow notification. When the issue, change request, or change order is approved or rejected, a notification is sent to the Creator, Requestor, and Assignee. If the approval routing workflow is aborted, then a notification is sent to all people in the approval routing that were previously notified regarding an assigned workflow process in a step.
A workflow consists of one or more steps. Each step specifies a workflow process and to whom it is assigned. For example, you can create steps to request approval, request comment, or send an FYI notification. Notifications are sent to each of the assignees of a step when the step is started.
To edit a step in an approval routing
-
On an issue, change request, or change order's detail page, click the Workflow tab, then click Approval.
-
On the Approval page, click the Update icon for the approval process you wish to edit.
-
On the Update Step page, make updates to any of the following fields:
Response Required From
Selecting all means all assignees must respond. Selecting One means only one of the assignees must respond.
Response Required in N Days
A response is required D days from the date the workflow is submitted.
Instructions
Provide any instructions you have for assignees.
Add Assignee
Select and add assignees to include in the approval workflow. You can add assignees through a group, role, or person. When using a group or role, you can add individual assignees.
-
Click Apply.
Note: You can edit steps that have not yet begun in an approval routing, even after the workflow is started. For steps derived from the approval routing template, you cannot change the Workflow Process or Response Required From, nor can you delete the derived Assignees.
To insert a step in an approval routing
-
On an issue, change request, or change order's detail page, click the Workflow tab, then click Approval.
-
On the Approval page, click Add Step.
-
On the Add Step page, provide the following information:
Step Number
The step number determines the order in which steps are executed in the approval routing.
Workflow Process
Select a workflow process (such as Request Approval, Request Comment, or FYI).
Response Required From
If the workflow process is Request Approval or Request Comment, then choose whether responses are required from all or one of the assignees.
Response required in N Days
Enter the number of days, from the time the step is submitted, that all responses are required.
Instructions
Enter any instructions to be included in the notifications sent to assignees.
Add Assignee
Click Add to add an assignee. You can add assignees through group, role, or person. When using a group or role, you can add individual assignees.
-
Click Apply.
Note: Steps must be inserted after the last completed step or step that is currently in process.
To delete a step in an approval routing
-
On an issue, change request, or change order's detail page, click the Workflow tab, then click Approval.
-
On the Approval page, click the Update icon for the step you wish to delete.
-
On the Update Step page select all assignees you wish to delete and click Delete, then click Apply.
-
On the Approval page, click the Delete icon for the step you wish to delete.
Note: You must delete all assignees for a step before you can delete the step.
-
On an issue, change request, or change order's Overview page, click the Workflow tab, then select the Approval status.
-
In the Status: Approval region of the Statuses page, click Start Approval to start the approval workflow.
-
If the approval workflow is running, click Abort Approval to stop the workflow.
Note: If the status of an issue, change request, or change order is Draft, then you cannot start the approval process. Also, it is recommended that you click Refresh Assignees before starting the approval process (in case there have been any changes in item or change role assignments).
To view the progress of an approval
-
On an issue, change request, or change order's detail page, click the Workflow tab, then click Approval.
-
On the Approval page, you can view all the steps in the approval routing, the date required to respond, and the response outcome for each workflow process assigned in the step.
Click the Show link to view the date the step was submitted on, the date of the response, instructions, and response comments.
Note: The Date Required of a step is based on the date the step is started plus the number of days a response is required.
You can set up workflow templates to use when requesting approval or review of an issue, change request, or change order. This enables reviewers and approvers to select the template with the steps that best meets their needs. You can also assign steps in the workflow to certain people, based on role, group, and person filters.
Within Setup Workbench, you can associate multiple workflow templates to a given change type. Once these associations are made, when creating an individual change object within that type, the system picks up the default template automatically. Optionally, the system provides a drop-down list where you can select from various workflow options.
-
On an issue, change request, or change order's detail page, click the Workflow tab, then click Approval.
-
On the Approval page, click Switch Template.
-
On the Switch Template page, select the approval routing template to associate with the change type. The currently applied template does not appear in the list of templates.
-
Click Apply.
Note: When you switch templates, all current steps/assignees--whether derived from the previous template or added after creation (ad-hoc)--are deleted.
To switch templates before moving to the Approval status
-
Navigate to Change Simple Search.
-
Search for a Change Request.
-
Select the Number link for a particular change request.
-
In the Change Request Summary page, click the Change Request Number link.
-
Select the Workflow tab.
-
Select the Approval status. This change request is not yet at this status. Previously, we set up some default workflow templates for change requests at this status
-
In the Status: Approval region, click Switch Template.
-
In the Workflow field, select a different template using the drop-down list. The workflow steps for the selected template are shown below.
-
Click Apply.
To switch templates when the Approval status is in process
You should have adequate permissions to abort the workflow within a status to choose a different template. After applying the new template, it can be used for the approval staus for the particular change object.
Note: To use the new template, restart the Workflow and the change object will flow through the steps for this template for the Approval Status. At this point, you can designate new assignees based on the newly selected workflow template.
-
From the Workflow tab, Statuses page, click Abort Workflow.
-
Click Switch Template.
-
In the Workflow field, select a different template using the drop-down list. The workflow steps for the selected template are shown below.
-
Click Apply.
-
Click Start Workflow.
You can submit an issue, change request, or change order for approval multiple times. The approval history lists a summary of all past and present approval workflows. The approval history displays for each approval workflow the issue, change request, or change order revision at the time the approval was submitted, who submitted the approval, the date submitted and completed, and the final result of the approval workflow. The result of a workflow may be Approved, Rejected, or Aborted.
-
On an issue, change request, or change order detail page click the Workflow tab, then click Approval History.
-
On the Approval page, click the Details icon to view the complete approval routing for a specific approval workflow.
To transfer workflow notifications
If you are one of the step assignees, then you can transfer these notifications to another user (transferee) who you feel is more qualified to take the decision. The transferee receives a notification requesting approval or comment. Thus, the onus for approving a change or commenting on it, is shifted to the transferee.
-
To transfer a notification, you must access the Notifications list from the Home page and launch the notification detail page of the relevant notification
-
Choose the Transfer button to transfer this notification to another user.
Note: The transfer button is available only for To Do notifications, such as Request Comment or Request Approval notifications.
-
On the Transfer Notification page, select a person to transfer the notification to. You can optionally enter comments and then choose the Submit button to transfer the notification.
The person, to whom the notification is transferred to, automatically gets an appropriate role on the change object. If the original notification is an approval notification, the original assignee no longer has the privilege to approve the change object after the notification is transferred.
Transfer Notifcation
Note: You cannot transfer notifications to a group or to a role. You can notifications only to other individuals.
On transfer, the transferee gets an approval or request comment notification. A new workflow step assignee record with the same step number is inserted in the workflow table on the notification details page in order to capture the response from the transferee.
After transfer, the ‘to do’ notifications related to the change object in the original assignees worklist, no longer remain in the open status.
Change Order - Approval Request
When the notification is transferred, the action is recorded in the Action Log.
Change Order - Action Log
You can set vacation rules to redirect or auto-respond to workflow notifications. You set vacation rules using the Worklist page.
-
On the Worklist page, select the Vacation Rules link.
-
Create a vacation rule on the Vacation Rules page.
-
By selecting an Item Type, you can specify the type of notification that will activate this rule.
-
Select a notification format to activate this rule.
-
Specify a message, set the validity period of the rule, and specify who the appropriate notifications should be transferred to.
Note: The functional rule governing the transfer of notifications are listed in the Transfer Workflow Notifications section.
How to Set the Digital Signing Option
Digital Certificates provide a means of proving your identity in electronic transactions. With a Digital Certificate, you can assure other stakeholders that the electronic information they receive from you are authentic.
The most widely accepted format for Digital Certificates is defined by the CCITT X.509 international standard; thus certificates can be read or written by any application complying with X.509.
The system enables users to set up digital signature options for a change type. Thus, a response to any approval or request comment notifications for a change object belonging to this change type, would require a certificate-based signature from the stakeholder.
-
To set this option, you have to navigate to the Status Property page of a status associated with a change type
Note: Navigation: Setup Workbench -> ‘Change Management’ tab -> ‘Categories’ sub-tab -> Highlight a change category -> click on ‘Types’ -> Click on any change type link -> click on ‘Workflow’ link in the bin -> click on ‘Update Properties’ icon for any Status)
Status Properties Page
Status Properties
-
Select one of the three options from the Enable Digital Signature drop-down list.
-
Empty - Digital Signature is not enabled if ‘Enable Digital Signature’ field is empty
-
Password Based Signature - The user needs to respond to a notfication with his passowrd
-
Certificate Based Signature - The user needs to respond to a notification with a certificate-based signature
Note: The default value is Empty.
If you enable the digital signature for a change type, then all the request comment and approval notifications for changes belonging to this change type will need to be commented on or approved with a certificate based digital signature
-
How to Use Digital Certificates for Signing
-
Navigate to the Worklist page, and select any Request Comment or Request Approval notification.
Workflow Worklist Page
-
On the notification detail page, choose the Approve/Reject/Reply/Transfer button (whichever is appropriate).
Notifications Detail Page
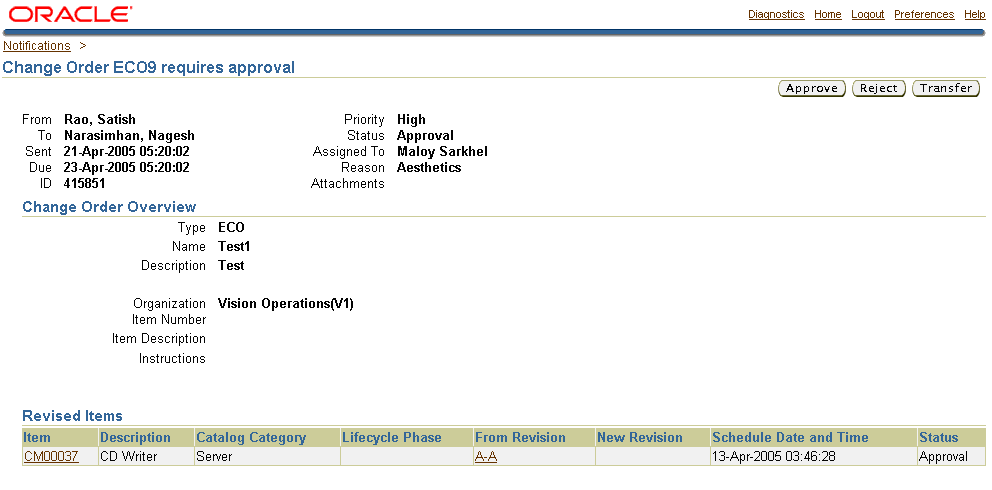
The notification signing page appears
-
Choose the Sign button.
-
Select the appropriate certificate in the Certificates window, and then choose the OK button.
Certificates Window
After the signing process, the system automatically returns to the Worklist page.
Importing Changes
You can import issues, change requests and change orders using the Engineering Change Order Open Interface, or through the Import Workbench.
You can also import people and user attributes for issues, change requests and change orders.
Importing Changes Using the Engineering Change Order Open Interfaces
Instead of requiring you to enter cryptic ID and system-specific values, the ECO Business Object Interface enables you to enter only the necessary business information that defines your changes. The Open Interface program validates all data before importing it into the production tables.
To import issues, change requests and change orders
-
Load the Engineering Open Interface tables with the data you want to import. For detailed help on loading the Open Interface tables, refer to the Oracle Manufacturing Open Interfaces and APIs Manual or the Oracle Integration Repository.
-
Navigate to the Engineering Responsibility in Oracle Applications.
-
Navigate to the Submit a New Request window by selecting Other from the Requests menu.
-
Click Submit New Request.
-
Select the request option to submit a single request, or submit a predefined group of requests by selecting Request Set.
-
Click OK.
-
Select Import Changes for the name of the request.
Note: A parameters window automatically appears if you select a request that requires parameter values.
-
After entering the values in the required parameter fields, click OK.
-
Click Submit.
To import user attributes for changes
-
Load the Engineering Open Interface table (ENG_CHG_USR_ATR_INTERFACE Column Details) with the data you want to import. For detailed help on loading the Open Interface tables, refer to the Oracle Manufacturing Open Interfaces and APIs Manual or the Oracle Integration Repository.
-
Navigate to the Engineering Responsibility in Oracle Applications.
-
Navigate to the Submit a New Request window by selecting Other in the Requests menu.
-
Click Submit New Request.
-
Select the request option to submit a single request, or submit a predefined group of requests by selecting Request Set.
-
Click OK.
-
Select Change User Attributes Import for the name of the request.
Note: A parameters window automatically appears if you select a request that requires parameter values.
-
After entering the values in the required parameter fields, click OK.
-
Click Submit.
-
Load the Engineering Open Interface table (ENG_CHANGE_PEOPLE_INTF) with the data you want to import. For detailed help on loading the Open Interface tables, refer to the Oracle Manufacturing Open Interfaces and APIs Manual or the Oracle Integration Repository.
-
Navigate to the Engineering Responsibility in Oracle Applications.
-
Navigate to the Submit a New Request window by selecting Other in the Requests menu.
-
Click Submit New Request.
-
Select the request option to submit a single request, or submit a predefined group of requests by selecting Request Set.
-
Click OK.
-
Select Change People Import for the name of the request.
Note: A parameters window automatically appears if you select a request that requires parameter values.
-
After entering the values in the required parameter fields, click OK.
-
Click Submit.
-
Load the Engineering Open Interface table (ENG_CHANGE_LINES_INTERFACE) with the data you want to import. For detailed help on loading the Open Interface tables, refer to the Oracle Manufacturing Open Interfaces and APIs Manual or the Oracle Integration Repository.
-
Navigate to the Engineering Responsibility in Oracle Applications.
-
Navigate to the Submit a New Request window by selecting Other from the Requests menu.
-
Click Submit New Request.
-
Select the request option to submit a single request, or submit a predefined group of requests by selecting Request Set.
-
Click OK.
-
Select Import Changes for the name of the request.
Note: A parameters window automatically appears if you select a request that requires parameter values.
-
After entering the values in the required parameter fields, click OK.
-
Click Submit.
Using the Import Workbench to Import Change Objects
Using the Import Workbench, you have the option to create change orders or add existing change orders when importing items or structures.
Oracle Product Information Managementcentralizes product data from disparate systems across an enterprise within a master repository. By combining data from numerous systems and content providers, the enterprise creates a superset of product data within its hub.
Item import management uses configurable match rules to identify equivalent products and to take the different versions of a particular product record, and blend them into a single enterprise version. Data quality tools ensure that equivalent or duplicate parts are identified, quality is verified, and source system cross-references are maintained as data enters the hub.
When a match is identified, and the source system item attribute and structure details are denoted, the item is defined as the source of truth (SST). This information is used to update the SST record to maintain a best-of-breed, blended product record. If the change policy of the SST item demands a change order, one is automatically created on import. This change order can then be routed for approval, before the changes are applied to the SST item. Similarly, if a record is identified as a new item and the catalog category requires a new item request, one is automatically created on import. The new item request can then be routed for further definition and approval, before the new item is created.
For more information about how to use the Import Workbench see: Overview of Inbound Product Data Synchronization and Data Quality Management
Engineering Change Order Open Interface Tables
ENG_CHG_USR_ATR_INTERFACE
The following table shows the columns in the ENG_CHG_USR_ATR_INTERFACE database table. For more details about the columns in ENG_CHG_USR_ATR_INTERFACE, see ENG_CHG_USR_ATR_INTERFACE Details.
| Column Name | Data Type | Required? |
|---|---|---|
| TRANSACTION_ID | NUMBER(15) | Yes |
| PROCESS_STATUS | NUMBER(9) | Yes |
| DATA_SET_ID | NUMBER(15) | Yes |
| ORGANIZATION_CODE | VARCHAR2(3) | Yes |
| CHANGE_NUMBER | VARCHAR2(10) | Yes |
| CHANGE_MGMT_TYPE_CODE | VARCHAR2(30) | Yes |
| CHANGE_LINE_NAME | VARCHAR2(240) | |
| ROW_IDENTIFIER | NUMBER(38) | Yes |
| ATTR_GROUP_INT_NAME | VARCHAR2(30) | Yes |
| ATTR_INT_NAME | VARCHAR2(30) | Yes |
| ATTR_VALUE_STR | VARCHAR2(150) | |
| ATTR_VALUE_NUM | NUMBER(38) | |
| ATTR_VALUE_DATE | DATE | |
| ATTR_DISP_VALUE | VARCHAR2(150) | |
| TRANSACTION_TYPE | VARCHAR2(10) | Yes |
| ORGANIZATION_ID | NUMBER(15) | |
| CHANGE_ID | NUMBER(15) | |
| CHANGE_TYPE_ID | NUMBER(15) | |
| REVISION_ID | NUMBER | |
| ATTR_GROUP_ID | NUMBER(15) | |
| REQUEST_ID | NUMBER(15) | |
| PROGRAM_APPLICATION_ID | NUMBER(15) | |
| PROGRAM_ID | NUMBER(15) | |
| PROGRAM_UPDATE_DATE | Date | |
| CREATED_BY | NUMBER(15) | Yes |
| CREATION_DATE | DATE | Yes |
| LAST_UPDATED_BY | NUMBER(15) | Yes |
| LAST_UPDATE_DATE | DATE | Yes |
| LAST_UPDATE_LOGIN | NUMBER(15) | |
| CHANGE_LINE_ID | NUMBER | |
| CHANGE_LINE_SEQUENCE_NUMBER | NUMBER (15) |
ENG_CHG_USR_ATR_INTERFACE Column Details
The primary key for this table; its value should be generated from the sequence ENG_CUA_TRANSACTION_ID_S.
PROCESS_STATUS
Whether this row has yet to be processed, is currently being processed, encountered an error, or was successfully processed. The value of this column should correspond to the following constants in EGO_CHANGE_USER_ATTRS_PUB:
-
G_PS_TO_BE_PROCESSED (actual value = 1)
-
G_PS_IN_PROCESS (actual value = 2)
-
G_PS_ERROR (actual value = 3)
-
G_PS_SUCCESS (actual value = 4)
DATA_SET_ID
The data set identifier. Identifies a group of rows to be processed together; all rows being processed as part of a single request must share the same DATA_SET_ID, whose value must be generated from the sequence ENG_CUA_DATA_SET_ID_S.
ORGANIZATION_CODE
The organization to which the change belongs.
CHANGE_NUMBER
The engineering change number/notice.
CHANGE_MGMT_TYPE_CODE
The internal category name of the engineering change.
CHANGE_LINE_SEQUENCE_NUMBER
If the change line name is provided along with the change number and organization information, then the program will identify that this particular row needs to be processed for change line user attributes import. Both change and change line user attributes are supported through this interface table.
Because the user-defined attributes framework is so flexible, its structure must be flattened out for this interface table. To understand this flattening it is useful to first define a logical attribute group row. For single-row attribute groups, the logical attribute group row is just the collection of attributes in the attribute group, but for multi-row attribute groups, each row in the attribute group is a logical attribute group row. For example, the single-row attribute group "Dimensions," with Attributes "Width" and "Height" has only one logical attribute group row, but multi-row attribute group "Orders," with attributes "Date" and "Price" has as many logical attribute group rows as there are separate orders to be recorded.
Every interface table row contains data for one attribute in a logical attribute group row, and a logical attribute group row spans as many interface table rows as there are attributes in the logical attribute group row. To keep these flattened-out logical attribute group rows in order, there is the ROW_IDENTIFIER column, which uniquely identifies each logical attribute group row (for example, all attributes with the same ROW_IDENTIFIER value will belong to the same logical attribute group row). Thus, if a multi-row attribute group has ten attributes and three rows of values (for example, three logical attribute group rows), then there will be thirty interface table rows for the attribute group and three distinct ROW_IDENTIFIER values in those thirty rows.
ROW_IDENTIFIER
The grouping identifier for a logical attribute group row; its value must be the same for all interface table rows in the logical attribute group row, and no two logical attribute group rows in the same data set may share the same ROW_IDENTIFIER value.
ATTR_GROUP_INT_NAME
The internal name of the attribute group to which the current interface table row's attribute belongs.
ATTR_INT_NAME
The internal name of the attribute for which the current interface table row holds a value.
ATTR_VALUE_STR
If its data type is string, the value of the current interface table row's attribute.
ATTR_VALUE_NUM
If its data type is number, the value of the current interface table row's attribute.
ATTR_VALUE_DATE
If its data type is date, the value of the current interface table row's attribute. Values are converted to and from date data types using the format specified in EGO_USER_ATTRS_DATA_PVT.G_DATE_FORMAT.
ATTR_DISP_VALUE
The value of the current interface table row's attribute (as a string, regardless of its data type) if the attribute has a value set with separate display and internal values (for example, value sets with validation type of independent or table). In all other cases, use the preceding three columns.
TRANSACTION_TYPE
The mode of processing for a logical attribute group row; its value should correspond to the following constants in EGO_USER_ATTRS_DATA_PVT:
-
G_DELETE_MODE (DELETE)
-
G_UPDATE_MODE (UPDATE)
-
G_SYNC_MODE (which either creates or updates, as appropriate) (SYNC)
-
G_CREATE_MODE (CREATE)
Note that rows will be processed in the order they were just presented (for example, deletion first, followed by updates and synchronization, with creation last), in accordance to Oracle Applications standards.
ORGANIZATION_ID
This column is for internal use; any user-entered values are ignored.
CHANGE_ID
This column is also for internal use, but you may enter the CHANGE_ID if it is known. If the change ID is passed for a given change number, then it may save on conversion time. It is validated using CHANGE_NUMBER and ORGANIZATION_ID.
CHANGE_TYPE_ID
This column is for internal use; any user-entered values are ignored.
ATTR_GROUP_ID
This column is provided in case you know the attribute group ID for this interface table row's attribute group. If left blank, the attribute group internal name is used to identify the attribute group.
CHANGE_LINE_ID
The change line identifier. Calculation is based on the CHANGE_LINE_NAME, CHANGE_NUMBER, and ORGANIZATION_ID.
CHANGE_LINE_SEQUENCE_NUMBER
The change line sequence number uniquely identifies the change line for a change header. It is validated using CHANGE_NUMBER and ORGANIZATION_ID.
REQUEST_ID
This column is for internal use (to record the concurrent program request that ordered the processing of this row).
PROGRAM_APPLICATION_ID
This column is for internal use (to record the application ID of the concurrent program that processed this row).
PROGRAM_ID
This column is for internal use (to record the ID of the concurrent program that processed this row).
PROGRAM_UPDATE_DATE
This column is for internal use (to record the time the concurrent program processed this row).
CREATED_BY
A standard "Who" column whose value must be entered when you load the interface table.
CREATION_DATE
A standard "Who" column whose value must be entered when you load the interface table.
LAST_UPDATED_BY
A standard "Who" column whose value must be entered when you load the interface table.
LAST_UPDATE_DATE
A standard "Who" column whose value must be entered when you load the interface table.
LAST_UPDATE_LOGIN
A standard "Who" column whose value must be entered when you load the interface table.
ENG_CHANGE_PEOPLE_INF
The following table shows the columns in the ENG_CHANGE_PEOPLE_INTF database table. For more details about the columns in ENG_CHANGE_PEOPLE_INTF, see ENG_CHANGE_PEOPLE_INTF Details.
| Column Name | Data Type | Required? |
|---|---|---|
| CHANGE_ID | NUMBER(15) | |
| CHANGE_NOTICE | VARCHAR2(10) | Yes |
| CHANGE_MGMT_TYPE_CODE | VARCHAR2(30) | Yes |
| ORGANIZATION_ID | NUMBER(15) | |
| GRANTEE_PARTY_ID | NUMBER(15) | |
| INTERNAL_ROLE_ID | NUMBER(15) | |
| INTERNAL_ROLE_NAME | VARCHAR2(30) | |
| LAST_UPDATE_DATE | DATE | |
| LAST_UPDATED_BY | NUMBER(15) | |
| CREATION_DATE | DATE | |
| CREATED_BY | NUMBER(15) | |
| LAST_UPDATE_LOGIN | NUMBER(15) | |
| REQUEST_ID | NUMBER(15) | |
| PROGRAM_APPLICATION_ID | NUMBER(15) | |
| PROGRAM_ID | NUMBER(15) | |
| PROGRAM_UPDATE_DATE | DATE | |
| ORGANIZATION_CODE | VARCHAR2(3) | Yes |
| DISPLAY_ROLE_NAME | VARCHAR2(80) | Yes |
| GRANTEE_TYPE | VARCHAR2(8) | Yes |
| GRANTEE_NAME | VARCHAR2(360) | Yes |
| START_DATE | DATE | Yes |
| END_DATE | DATE | |
| TRANSACTION_TYPE | VARCHAR2(10) | Yes |
| TRANSACTION_ID | NUMBER(15) | Yes |
| PROCESS_STATUS | NUMBER(15) | Yes |
| DATA_SET_ID | NUMBER(15) | Yes |
ENG_CHANGE_PEOPLE_INTF Column Details
The change identifier. The import program populates the CHANGE_ID for the corresponding CHANGE_NOTICE.
CHANGE_NOTICE
The engineering change notice. CHANGE_NOTICE must be valid (in other words, it has already been created).
CHANGE_MGMT_TYPE_CODE
The internal category name of the engineering change. This column should be a valid entry in the ENG_CHANGE_MGMT_TYPES table.
ORGANIZATION_ID
The organization identifier. The import program populates this column for the corresponding organization code.
GRANTEE_PARTY_ID
The party identifier of the grantee. Populated by the import program.
INTERNAL_ROLE_ID
The internal role identifier. Populated by the import program. INTERNAL_ROLE_NAME The internal role name. Populated by the import program.
LAST_UPDATE_DATE
A standard "Who" column.
LAST_UPDATED_BY
A standard "Who" column.
CREATION_DATE
A standard "Who" column.
CREATED_BY
A standard "Who" column.
LAST_UPDATE_LOGIN
A standard "Who" column.
REQUEST_ID
A concurrent "Who" column.
PROGRAM_APPLICATION_ID
A concurrent "Who" column.
PROGRAM_ID
A concurrent "Who" column.
PROGRAM_UPDATE_DATE
A concurrent "Who" column.
ORGANIZATION_CODE
The organization code.
DISPLAY_ROLE_NAME
The display name of the role.
GRANTEE_TYPE
The type of grantee. Valid values are: USER, GROUP, COMPANY, or GLOBAL.
GRANTEE_NAME
The name of the grantee. Value will be the name of the user/group/company.
START_DATE
The start date of the grant to user/group/company/global.
END_DATE
The end date of the grant to user/group/company/global.
TRANSACTION_TYPE
The type of action. Valid values are: SYNC, CREATE, UPDATE or DELETE. SYNC will create grants if not existent; otherwise, it will update grants.
TRANSACTION_ID
The transaction identifier.
PROCESS_STATUS
The row status as input by the user. Valid values are 1, 2, 3, and 4. Records with the value 1 are processed by the import program. The value of this column will be updated to 2, 3 or 4 by the import program as follows:
-
2 - In process. This is the status when the record has a valid user name, item name, organization code and role name.
-
3 - Error. The given record is invalid.
-
4 - Success. After inserting the record, the grant is successful.
DATA_SET_ID
The identifier of the data set.
ENG_CHANGE_LINES_INTERFACE
The following table shows the columns in the ENG_CHANGE_LINES_INTERFACE database table. For more details about the columns in ENG_CHANGE_LINES_INTERFACE, see ENG_CHANGE_LINES_INTERFACE Details.
| Column Name | Data Type | Required? |
|---|---|---|
| ECO_NAME | VARCHAR2(10) | |
| ORGANIZATION_CODE | VARCHAR2(3) | |
| CHANGE_TYPE_CODE | VARCHAR2(10) | |
| NAME | VARCHAR2(240) | |
| DESCRIPTION | VARCHAR2(2000) | |
| SEQUENCE_NUMBER | NUMBER | |
| ORIGINAL_SYSTEM_REFERENCE | VARCHAR2(50) | |
| RETURN_STATUS | VARCHAR2(1) | |
| TRANSACTION_TYPE | VARCHAR2(30) | |
| TRANSACTION_ID | NUMBER | |
| CHANGE_MGMT_TYPE_NAME | VARCHAR2(45) | |
| ORGANIZATION_ID | NUMBER | |
| ENG_CHANGES_IFCE_KEY | VARCHAR2(30) | |
| PROCESS_FLAG | NUMBER | |
| STATUS_NAME | VARCHAR2(80) | |
| OBJECT_DISPLAY_NAME | VARCHAR2(240) | |
| PK1_NAME | VARCHAR2(240) | |
| PK2_NAME | VARCHAR2(240) | |
| PK3_NAME | VARCHAR2(240) | |
| PK4_NAME | VARCHAR2(240) | |
| PK5_NAME | VARCHAR2(240) | |
| ASSIGNEE_NAME | VARCHAR2(360) | |
| NEED_BY_DATE | DATE | |
| SCHEDULED_DATE | DATE | |
| IMPLEMENTATION_DATE | DATE | |
| CANCELATION_DATE | VARCHAR2(240) | |
| COMPLETE_BEFORE_ STATUS_CODE | NUMBER | |
| START_AFTER_STATUS_ CODE | NUMBER | |
| TYPE_CLASSIFICATION | VARCHAR2(30) |
ENG_CHANGE_LINES_INTERFACE_Column Details
The Change notice. A not-null value is required.
ORGANIZATION_CODE
The 3-character Organization code. A not-null value is required.
CHANGE_TYPE_CODE
The Change Type of this Change Line. A not-null value is required.
NAME
The Name of this Change Line. A not-null value is required.
DESCRIPTION
A Description of this Change Line. May be null.
SEQUENCE_NUMBER
Sequence Number of this Change Line (typically 10, 20, 30, ...). A not-null value is required.
ORIGINAL_SYSTEM_REFERENCE
In case this information comes from a migration from a different system, the identifier of this Change Line in the previous system. May be null.
RETURN_STATUS
The result of importing this Change Line into the system; only used internally, a user provided value will be ignored.
TRANSACTION_TYPE
The mode of processing this Change Line; its value should correspond to the following constants in ENG_ECO_PVT: G_DELETE_MODE, G_UPDATE_MODE, G_SYNC_MODE (which either creates or updates, as appropriate), and G_CREATE_MODE. Note that rows will be processed in the order they were just presented (for example, deletion first, followed by updates and synchronization, with creation last), in accordance with Oracle Applications standards. A not-null value is required.
TRANSACTION_ID
The Primary Key for this table; its value should be generated from the sequence MTL_SYSTEM_ITEMS_B_S. A not-null value is required.
CHANGE_MGMT_TYPE_NAME
The Change Category to which the Change belongs. A not-null value is required.
Note: A null value is required if submitting the import request directly from Oracle Engineering instead of from Oracle Product Lifecycle Management. Change categories do not exist in Oracle Engineering.
ORGANIZATION_ID
This column is for internal use, and any user-entered values are ignored.
ENG_CHANGES_IFCE_KEY
If this Change Line is imported at the same time as its Change Header, the value in this column must match the sequence-generated value of the ENG_CHANGES_IFCE_KEY in the ENG_ENG_CHANGES_INTERFACE table. A not-null value is required.
PROCESS_FLAG
Whether this row has yet to be processed, is currently being processed, encountered an error, or was successfully processed; its value should correspond to the following constants in EGO_CHANGE_USER_ATTRS_PUB: G_PS_TO_BE_PROCESSED, G_PS_IN_PROCESS, G_PS_ERROR, and G_PS_SUCCESS.
STATUS_NAME
The Status Name of this Change Line. A not-null value is required.
OBJECT_DISPLAY_NAME
The Display Name of the Type of subject: Item, Document. May be null if there is no subject for this Change Line.
PK1_NAME
The first part of the identifier for the subject of this Change Line. May be null if there is no subject for this Change Line.
PK2_NAME
The second part of the identifier for the subject of this Change Line. May be null.
PK3_NAME
The third part of the identifier for the subject of this Change Line. May be null.
PK4_NAME
The fourth part of the identifier for the subject of this Change Line. May be null.
PK5_NAME
The fifth part of the identifier for the subject of this Change Line. May be null.
ASSIGNEE_NAME
The User Name of the person to whom this Change Line is assigned. A not-null value is required.
NEED_BY_DATE
The Date by which this Change Line has to be completed. A not-null value is required.
SCHEDULED_DATE
The Date by which this Change Line is expected to be completed. A not-null value is required.
IMPLEMENTATION_DATE
The Date on which this Change Line was implemented. A not-null value is required.
CANCELATION_DATE
The Date on which this Change Line was cancelled. A not-null value is required.
COMPLETE_BEFORE_STATUS_CODE
Column not supported.
START_AFTER_STATUS_CODE
Column not supported.
TYPE_CLASSIFICATION
Column not supported.
Managing Reports
Change management reports are basically search results that you can save, browse, email, or print. You can create reports for any change management category (issues, change requests, and change orders). You can browse a report sequentially or using a summary view. Browsing a report sequentially enables you to step through the contents of a report in page layout format. A summary view displays the report in tabular column format. You can send a report to other users including registered suppliers and customers. You can export change management and issue reports to Adobe Acrobat or XML using custom report formats. Design your report formats using familiar desktop tools such as Adobe Acrobat and Microsoft Word.
Creating a report from your most common or frequent searches saves you the time of selecting a change category, criteria template and results format and repeating the same search over and over again. You can give reports meaningful names as well. For example, a search for all open change orders may yield dozens of change orders, each identified by change order name and number. You can simply name the report "Open Change Orders."
Report security is consistent with search security: you can only access change objects on which you have the required role.
Before creating a report, you must have a Display Format defined for the change categories in which you intend to generate reports.
-
In the Applications tree menu, click the "Change Reports" link.
-
On the Reports page, click Create Report.
-
On the Create Report page, select the change category in which the report will be generated and click Go. Any search criteria or display formats that exist in the selected change category will appear in the Search Criteria and Display Format pulldowns.
-
When the Create Report page refreshes, provide the following:
Name
Provide a name for the Report.
Description
Optionally, provide a description of the Report.
Criteria
Select the criteria to be used in the search. You can use an existing search criteria template (if one exists for the change category selected), or add criteria here by clicking Add Criteria.
Format
Select a format for the report. You can use an existing display format by selecting it from the Display Format pulldown and clicking Go.
Optionally, select the Preview mode for the report and click Go. It is recommended that you preview the report before it is actually created to make sure it contains all the information you want in the format that you want it. Previewing a report sequentially enables you to step through the contents of a report in page layout format. A summary view displays the report in tabular column format.
You can also create reports based on search results or item change management lists.
-
In the Export Format section, you can optionally select an export template and output format, such as .pdf or .xml, in which you want to generate the report.
-
Click Apply.
You have the option of browsing your reports in either Inline or Sequential format.
-
In the Applications tree menu, click the "Change Reports" link.
-
On the Reports page, select the report you want to browse:
Inline View
Click the Inline View icon to browse the report in tabular column format.
Browse Sequentially
The Browse Sequentially option enables you to browse a report sequentially by scrolling through the contents of a report in page layout format. You can scroll through and view each change order in a report as you would on a Summary page.
Export File
If the Export File icon is enabled, you have the option to create an Export File for the report. The Export File icon is only enabled if an export template and output format are specified for the report.
You can send a report to any registered user.
-
In the Applications tree menu, click the "Change Reports" link.
-
On the Reports page, select the report you wish to send, select the Send action, and then click Go.
-
On the Send Report page, provide the following:
Name
Enter the name(s) of the people or groups to which you wish to send the report. If you wish to send the report to more people than listed in the fields provided, click Add People.
Subject
The default Subject for the email is the report name--you are free to edit it.
Browse
Select the Browse mode you wish the report to appear in.
Message
The message that you enter here precedes the report when delivered to recipients.
-
Click Send.
As time and business dictates, you may want to revise the criteria or results for a report.
-
In the Applications tree menu, click the "Change Reports" link.
-
On the Reports page, select the report you wish to update, select the Update action, and click Go.
-
On the Update Report page, update the criteria or the display format. You can add additional criteria attributes, update criteria operators or values, and select different results formats.
-
After completing your revisions, click Apply.
Note: Only the administrator can update reports created by the administrator.
-
In the Applications tree menu, click the "Change Reports" link.
-
On the Reports page, select the report you want to export, select the Export action, and then click Go.
-
On the Export page, select an export template and an output format for the report.
-
Click Export.
-
In the Applications tree menu, click the "Change Reports" link.
-
On the Reports page, select the report you want to print, select the Inline View or Browse Sequential action, and then click Go.
-
On the Report page, click Printable Page to display the report in a printer-friendly format. Print the report from your web browser.
-
In the Applications tree menu, click the "Change Reports" link.
-
On the Reports page, select the report you wish to delete, select the Delete action, and click Go.
The Reports page allows you to create personalized report lists. These lists are displayed in the View pulldown on the Reports page. You can add or remove reports that you have added to the lists.
-
In the Applications tree menu, click the "Change Reports" link.
-
On the Reports page, click Personalize.
-
On the Report Lists page, click Create List.
-
On the Create Report List page, provide the following:
Name
Enter a name for the report list. This will be displayed in the View pulldown on the Reports page.
Description
Enter a description for the report list.
-
Click Add Reports to add existing reports to the report list.
-
On the Add Reports page, select the reports you want to add to the list.
-
Click Apply.
-
In the Applications tree menu, click the "Change Reports" link.
-
On the Reports page, click Personalize.
-
On the Report Lists page, click the Update action corresponding to the report list you want to update.
-
On the Update Report List page, make the necessary changes and click Apply.
-
In the Applications tree menu, click the "Change Reports" link.
-
On the Reports page, click Personalize.
-
On the Report Lists page, click the Delete action corresponding to the report list you want to delete.