E-Business Suite Attachments
This chapter covers the following topics:
- Using E-Business Suite Attachments
- Adding Attachments
- Managing Attachments
- Logging On to Repositories
- Troubleshooting Attachments
Using E-Business Suite Attachments
In HTML-based applications, the Attachments feature gives users the ability to associate files, folders, URLs, and text with business objects. Such files, folders, URLs, and text are referred to as attachments. Attachments are saved in storage systems called repositories.
Integrate the Oracle E-Business Suite (EBS) with the Oracle content repository Oracle Universal Content Management (UCM). UCM is an embedded file system within the Oracle Database. UCM is certified for use as a content repository in three EBS applications - Oracle Projects, Oracle Internal Controls Manager, and Oracle Product Information Management.
Terms
-
Attachment: An attachment is any piece of non-structured data that is linked to more structured application data in order to illustrate or clarify the application data. For example, text files, images, word processing documents, spreadsheets, videos, and Web pages can all be used as attachments.
-
Attachment category: Attachment categories enable you to classify attachments for organizational purposes. Use them to improve search results and to enforce business processes. The definitions of attachment categories are based on the common characteristics that a class of attachments can have. For example, you can use the attachment category "mechanical specifications" for attachments that are related to mechanical specifications.
-
Business object: A business object is an entity in Oracle Applications that has unique characteristics and processes. For example, inventory items, change requests, and purchase orders are all business objects.
-
Repository: A repository is a storage system that holds files and any other non-structured data.
Managing Attachments with Oracle Universal Content Management
The Oracle Universal Content Management product is part of Oracle Middleware. It offers advanced file management features, such as:
-
Folders and workspaces for file management
-
Content updates with file versioning
-
Moving and copying files
-
Drag-and-drop capability between a user's Windows desktop and the file server
-
Searching for content or attributes
-
Workspace management features for collaboration among groups of users
-
Security based on the item role and single sign-on support
-
Content collaboration using Oracle Workflow, including review and approvals
-
High availability and scalability
Working in the Attachments pages
You can perform the following tasks in the Attachments pages. Please note that some tasks vary, depending on the content repository used:
-
Managing Attachments, which includes:
-
viewing the contents of an attachment
-
searching for attachments
-
requesting review or approval of an attachment
-
updating attachment attributes
-
changing the attached version of a file
-
file check in and out of the repository
-
managing all file versions (version history)
-
granting access to attached folders in Oracle Content DB
-
viewing all objects associated with the attachment
-
detaching attachments from an object
-
Related Topics
Setting Up a Content Management Repository, Oracle Product Information Management Implementation Guide
Attachments, Oracle E-Business Suite Developer's Guide
Adding Attachments
You can attach files from your desktop or attach files and folders from a configured repository to a business object. Attachments can be any type of file, folder, notes (text), or URL links.
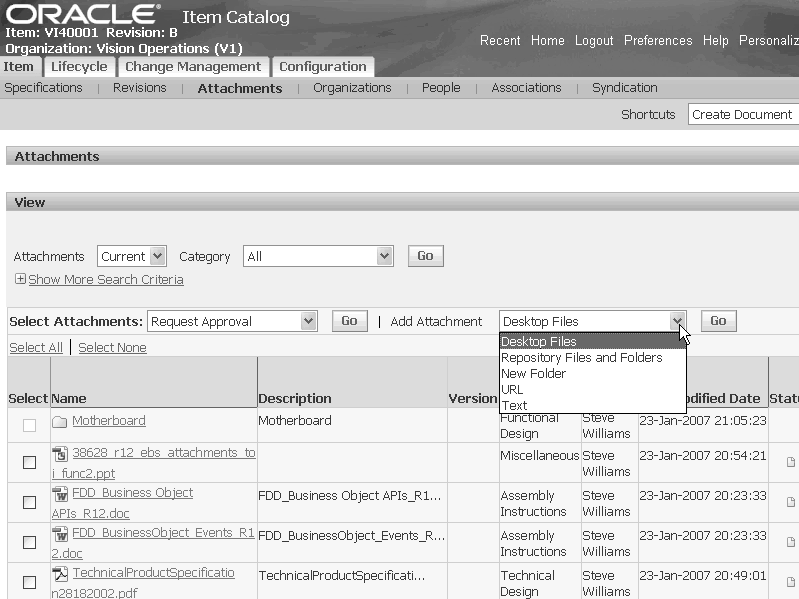
Use the Add Attachment dropdown list to add an attachment. Adding an attachment can be done in one of several ways, including:
-
Upload Desktop Files to a configured repository
-
Add Repository Files and Folders from a configured repository
-
Add a New Folder to a configured repository
-
Attach a URL
-
Attach a Text file
You can add an attachment to any record for which attachments are enabled, such as an item, supplier definition, or order line.
Navigate to the Attachments page. Select Desktop Files from the Add Attachment dropdown list, then click Go.
Important: For items, you can add an attachment for a specific revision or for the item in general. In the Item Revision field, select a specific revision for Item Revision attachments or None for Item Level attachments from the dropdown list, then click Go.
If you want to view the attachment in other applications, such as Oracle Inventory or Oracle Purchasing, that do not support revisions, you must select None from the Item Revision dropdown list.
-
In the Folder Option field, select the repository location where you want to store the desktop file. Choose from the following two options:
-
Default Folder - if you have a default folder defined, the Repository and Folder Location fields display the default folder's location.
-
Select Folder - if you choose this option, use the Repository field dropdown list to select a repository, then search for a folder location within the repository.
Note: This step is only necessary when using OCD as the content repository.
-
-
In the File field, browse for the file on your desktop to upload.
-
In the Attachment Category field, use the dropdown list to select an appropriate category for the file.
If you do not select an attachment category, the attachment category defaults to the first attachment category in the list.
Note: Attachment Categories are created by your system administrator. See: Defining Item Attachment Categories, Oracle Product Information Management Implementation Guide.
-
Optionally, in the Name field, specify the name of the file as you want it to appear in the repository.
If you leave this field blank, the name defaults to the original name of the file uploaded from the desktop.
-
Optionally, enter a description of the file in the Description field.
-
Enter the file version.
You can choose your own version names. Examples of successive version names include 1, 2, 3 or A, B, C.
Note: You can only specify a file version if storing the file in UCM or Oracle Content DB integrated with WebServices. See: Setting Up a Content Management Repository, Oracle Product Information Management Implementation Guide.
-
Click Apply.
To attach a repository file or folder
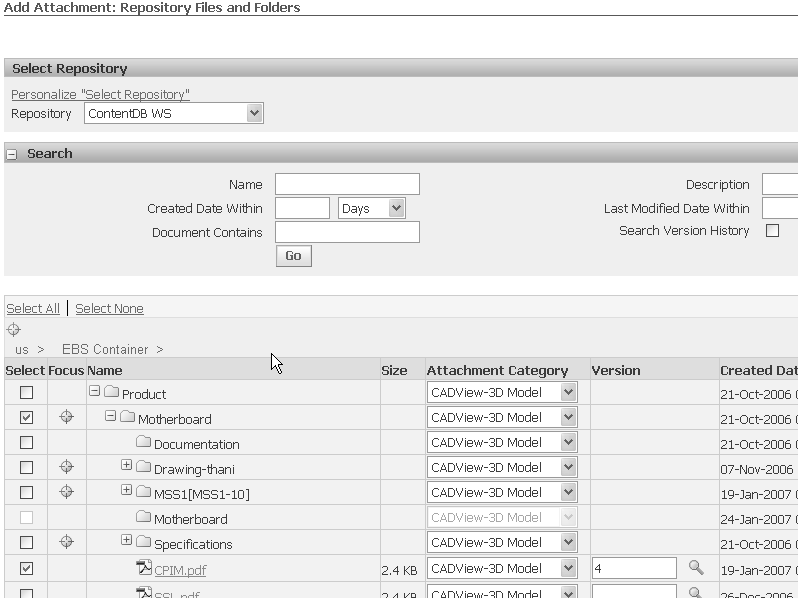
Navigate to the Attachments page. Select Repository Files and Folders from the Add Attachment dropdown list, then click Go.
Important: For items, you can add an attachment for a specific revision or for the item in general. In the Item Revision field, select a specific revision or None from the dropdown list, then click Go.
If you want to view the attachment in other applications, such as Oracle Inventory or Oracle Purchasing, that do not support revisions, you must select None from the Item Revision dropdown list.
-
In the Repository field, select the repository from the dropdown list.
The files and folders at the top level of the repository appear.
-
Locate the file or folder that you want to attach.
Browse through the folders and sub-folders by clicking the plus icon next to a folder name.
Optionally, click the plus icon next to the Search region to search for a file or folder using the following criteria:
-
Name - file or folder name
-
Created Date Within - enter the number of days, weeks, months, or years within which the file or folder was created
-
Document Contains - enter a text string contained within the file.
-
Description - file or folder description
-
Last Modified Date Within - enter the number of days, weeks, months, or years within which the file or folder was modified
-
Search Version History - check this box to search all file versions. If you leave this box unchecked, the system only searched the latest version of each file.
Tip: To shorten the list of folders, click on the focus icon in the Focus column next to the folder. This action brings the folder to the top of the list, focusing only on that folder and all files and sub-folders contained within it.
Note: The above advanced file and folder search capabilities are only available in a UCM or an Oracle Content DB repository integrated with WebServices. See: Setting Up a Content Management Repository, Oracle Product Information Management Implementation Guide.
-
-
In the Select column, check the files or folders that you want to attach.
-
In the Attachment Category column, select the attachment category for each file and folder selected.
-
Optionally, in the Version column, when selecting a file, select the file version to attach.
Choose whether to attach a specific file version or leave the field blank to maintain an attachment to the latest version.
Note: You can only specify a file version if storing the file in UCM or Oracle Content DB integrated with WebServices. See: Setting Up a Content Management Repository, Oracle Product Information Management Implementation Guide.
-
Click Apply.
-
Navigate to the Attachments page. Select New Folder from the Add Attachment dropdown list, then click Go.
Important: For items, you can add an attachment for a specific revision or for the item in general. In the Item Revision field, select a specific revision or None from the dropdown list, then click Go.
If you want to view the attachment in other applications, such as Oracle Inventory or Oracle Purchasing, that do not support revisions, you must select None from the Item Revision dropdown list.
-
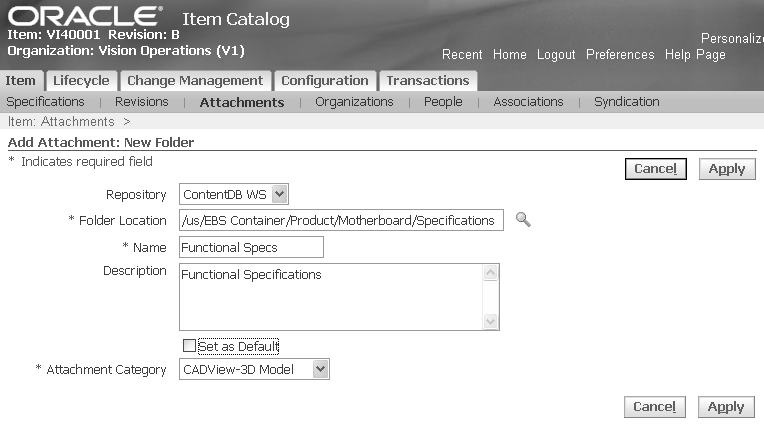
Specify the new folder location using the following fields:
-
Repository - Select the repository from the dropdown list.
Note: You can only create a new folder and attach it in a UCM or an Oracle Content DB repository integrated with WebServices. See: Setting Up a Content Management Repository, Oracle Product Information Management Implementation Guide.
-
Folder Location - Manually type in the location using a forward slash (/) to separate sub-folder names or use the magnifying glass icon to search and select a folder.
If you have defined a default folder for the repository, then that folder location automatically appears.
-
Name - Enter the name of the new folder.
-
Description - Optionally, enter a description of the new folder.
-
Set as Default - Check this box to make this the default folder for the object.
-
Attachment Category - Select the attachment category of the new folder.
-
-
Click Apply.
-
Navigate to the Attachments page. Select URL from the Add Attachment dropdown list, then click Go.
Important: For items, you can add an attachment for a specific revision or for the item in general. In the Item Revision field, select a specific revision or None from the dropdown list, then click Go.
If you want to view the attachment in other applications, such as Oracle Inventory or Oracle Purchasing, that do not support revisions, you must select None from the Item Revision dropdown list.
-
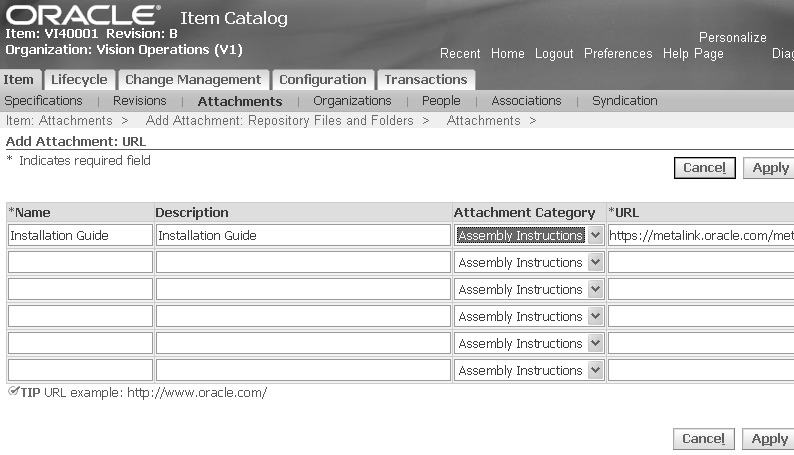
Enter the following URL information.
-
Name- enter a name for the URL
-
Description
-
Attachment Category - select an attachment category from the dropdown list
-
URL
-
-
Click Apply.
-
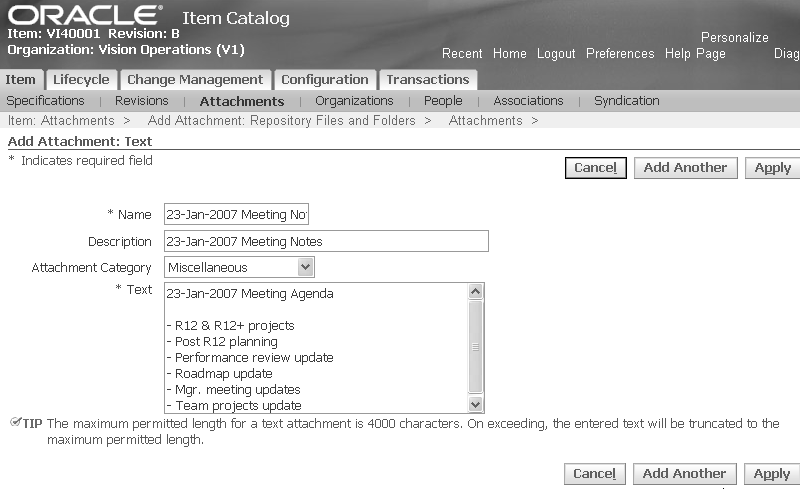
Navigate to the Attachments page. Select Text from the Add Attachment dropdown list, then click Go.
Important: For items, you can add an attachment for a specific revision or for the item in general. In the Item Revision field, select a specific revision or None from the dropdown list, then click Go.
If you want to view the attachment in other applications, such as Oracle Inventory or Oracle Purchasing, that do not support revisions, you must select None from the Item Revision dropdown list.
-
Enter the following text information.
-
Name- enter a name for the text entry
-
Description
-
Attachment Category - select an attachment category from the dropdown list
-
Text
-
-
Click Add Another to add additional text. Otherwise, click Apply.
Related Topics
Using E-Business Suite Attachments
Setting Up E-Business Suite Attachments, Oracle Product Information Management Implementation Guide
Defining Item Attachment Categories, Oracle Product Information Management User's Guide
Managing Attachments
From the Attachments page, you can perform various actions on different types of attachments based on your role on the business object.
For a specified business object, view attachments from the Attachments tab. You can choose to sort the list by Attachment Category.
Example: Attachments for Item VI40001, Revision B
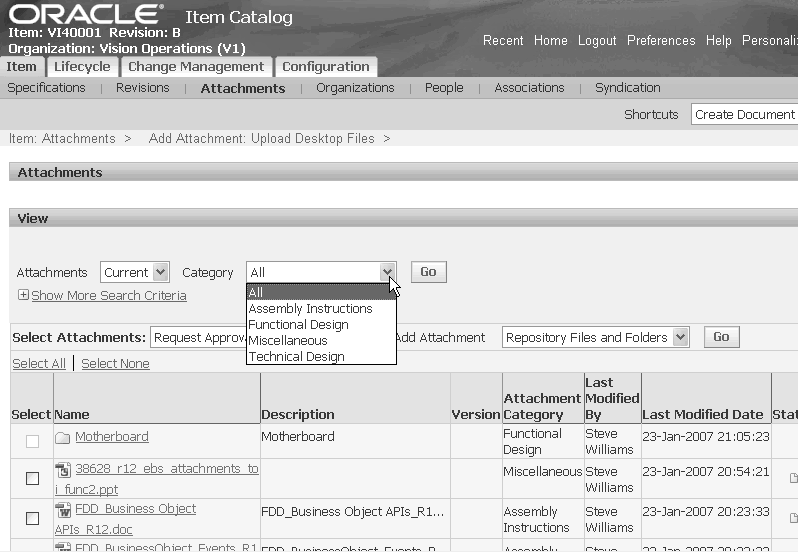
The following information, where applicable, is listed for each attachment.
-
Name: The name of the file, folder, URL, or text attached to the object. You can click an attachment name to view the attachment. See: To view the contents of an attachment.
-
Description: The description of the file entered in the repository. If no description is entered in the repository, then this field is blank.
-
Version: Version of the file.
This field is blank if versions are not supported for this type of attachment. For example, folders do not have versions. The following types of values can appear in this column:
-
the version value, for example: A, B, or C.
-
the latest version value, for example: latest (C). This indicates that the latest version (version C) is attached.
-
no value. This type of attachment does not have a version. For example, a folder.
-
-
Attachment Category: Attachment categories are defined at the Oracle E-Business Suite level, but their implementation is product-specific. Therefore, the attachment categories that are available to you depend on how the product you are using has implemented them. See: Defining Item Attachment Categories, Oracle Product Information Management Implementation Guide.
-
Last Modified By
-
Last Modified Date
-
Status: Indicates the current status of the file. A file can have a status of Draft, Submitted for Review, Reviewed, Submitted for Approval, Approved, or Rejected. The same status is reflected everywhere the file is attached.
-
Version Control: Indicates whether the file is checked in or out. Click the icon to initiate the checkin or checkout process. See: To check files in and out of the repository.
-
Repository: The abbreviated name (shortname) of the attachment's repository. Note that EBS refers to the native E-Business Suite repository.
-
Details: Click on the Details icon to view details on the attachment.
-
Detach: A paperclip icon which you can click to detach an attachment. See: To detach attachments from an object.
File, URL, and Text Attachment Actions
-
View the attachment
-
Search for attachments
-
Request approval (for item attachments only)
-
Request review (for item attachments only)
-
Change the attached version (files only)
-
Check files in and out
-
Access the attachment details page to:
-
View all file versions (Version History tab)
-
See a list of all objects where the attachment is attached (Where Attached tab)
-
View the approval, review, and change order status of the file (item attachments only in the Approvals, Reviews, and Changes tabs)
-
-
Detach from the object
-
Create a change order (see: Creating Change Orders)
Folder Attachment Actions
-
Access the attachment details page to:
-
Grant users access to the folder (Membership tab)
-
See a list of all objects where the folder is attached (Where Attached tab)
-
View the change orders created for the folder (Changes tab)
-
-
Detach from the object
-
Create a change order (see: Creating Change Orders)
To view the contents of an attachment
The Attachments page lists all attachments for the object. You can use the View region to narrow the list of attachments by category, name, description, last modified by, last modified date, attachment status, and repository.
-
From the Attachments page, click the name of the attachment you want to view.
If the attachment is a file, then depending on your browser plug-ins and the type of the file, the attachment either opens in the browser or you are given the option to open or download it.
If the attachment is a folder, then the Browse: (folder name) page opens. You can perform the following actions on an attached folder:
-
Browse the folder by expanding subfolders and by using search criteria to search for files within the folder and subfolders
-
Upload desktop files to a selected folder
-
Add a subfolder to a selected folder
-
Copy a file or folder to another folder location
-
Move a file or folder to another folder location
-
Delete a file or folder
-
When you navigate to the Attachments page from an object, all of the object's attachments are listed in the page. If the list is long, you can narrow the list by specifying certain search criteria.
-
In the Attachments page, View region, select a category if you know the category of the attachment you are searching for.
-
In the View region of the Attachments page, click Show More Search Criteria.
-
Enter one or more of the following search criteria:
-
Name - the attachment name
-
Description - the attachment description
-
Last Modified By - the user name of the last person to modify the attachment.
-
Last Modified Date
-
Status - the status of files, URLs, or text
-
Repository
-
-
Click Go.
To use Advanced Search for an attachment
If you need to narrow your search even further, use the Advanced Search button.
-
In the Attachments page, View region, click Advanced Search.
-
In the Advanced Search page, select the search criteria you want to use.
The system provides attributes that you can search on and you have the option to add more attributes using the Add 5 Rows button.
Tip: Use the attribute Contains to search the contents of files.
-
Enter the operator and value of any search criteria attributes selected.
For more information about defining search criteria, see: Managing Search Criteria, Oracle Product Information Management Implementation Guide.
-
Click Search.
To change the attached version of a file
-
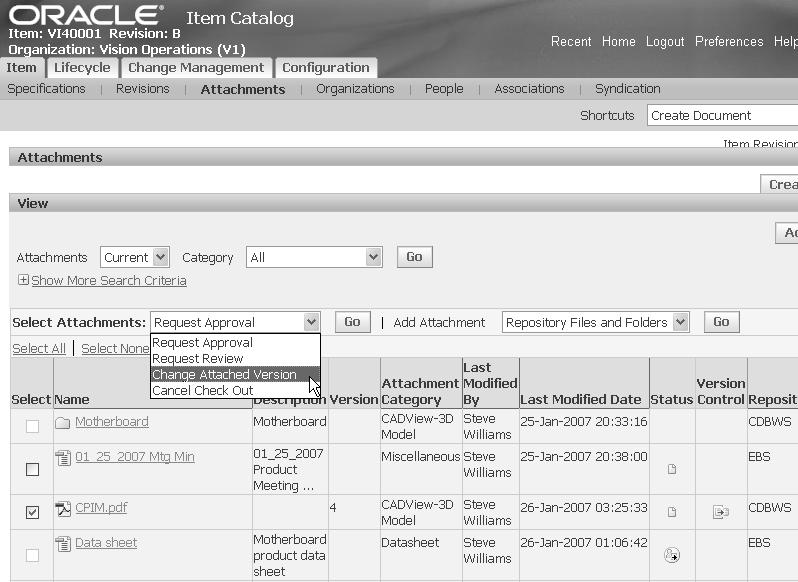
In the Attachments page, select the file whose version you want to change.
-
In the Select Attachments field dropdown list, select Change Attached Version and click Go.
-
In the Attach Repository Files Version page, enter the new version in the To Version field.
Enter one of the following three options:
-
the latest version
-
an older version
-
no version. If you do not specify a version, the system automatically ensures that the latest version is always attached.
-
-
Click Apply.
To check files in and out of the repository
Only one user can check out a file at any given time. You can only check out the latest version of the file, even if you have an older version attached to an object. During checkout, you have the option to download the latest version of the file.
When you check in the file, you must upload the modified content from your desktop. If no changes have been made and there is no need to upload a file from your desktop, you can cancel the checkout.
The system maintains a version history, displaying a list of all previous versions of the file as well as indicating the attached version. You can open an earlier version to access discarded information or use the earlier version as a basis for creating a new version. See: To manage all file versions (version history)
-
In the Attachments page, click the Check Out icon in the Version Control column in the row of the attachment you want to check out.
A message appears, informing you of the version and file that you are checking out.
Tip: Alternatively, you can check in and out a file from the Details page. From the Attachments page, click the Attachment Details icon in the Details column for a particular attachment. Click Check Out. After you have checked out the attachment, you can check it back in from the same page.
-
Optional. In the Information page, click Download to download the latest version of the file.
A file download box appears, giving you the option to either open the file or save it to your desktop.
-
Click Done to end the check out process and return to the Attachments page.
To check a file in
-
In the Attachments page, click the Check In icon in the Version Control column in the row of the attachment you want to check in.
-
In the Document Checkin page, enter the following:
-
Upload File - Required field. Use the Browse button to located the file to upload on your desktop.
-
Version - Required field. Enter an alphanumeric version.
The latest version number checked out is displayed below the fields on this page.
-
Description - Optional field.
-
-
Click Apply.
The system returns you to the Attachments page.
To detach attachments from an object
When you detach an attachment, you remove the association between an object and an attachment. Attachments residing in a UCM or an Oracle Content DB repository continue to exist in the file system, but E-Business Suite attachments are deleted.
-
In the Attachments page, click the Detach icon in the Detach column for a file, folder, URL, or text.
The ability to detach an attachment depends on:
-
how the application product you are using implements the current attachment category
-
the review or approval status of the attachment
-
-
In the Warning page, confirm whether or not you want to detach the attachment.
The system returns you to the Attachment page.
To update attachment attributes
You can update the following attachment attributes:
-
Name
-
Description
-
Attachment category
-
From the Attachments page, click the Attachment Details icon in the Details column for a particular attachment.
-
From the Details page, click Update.
-
Change the following fields as needed:
-
Name
-
Description
-
Attachment category
Note: You can update one additional field for attached folders in this page. Check the Set As Default box if you want to use this folder as the repository's default folder.
-
-
Click Apply.
To access UCM or Oracle Content DB
-
From the Attachments page, click the Attachment Details icon in the Details column for a particular attachment.
-
Click on the Folder Location link.
UCM or Oracle Content DB opens in a new page at the particular folder location.
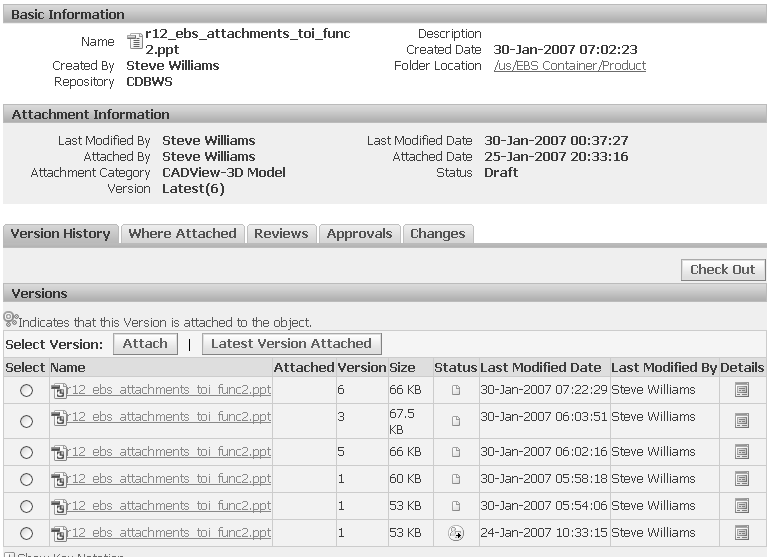
To manage all file versions (version history)
-
In the Attachments page, click the Attachment Details icon in the Details column for a particular attachment.
The Details page appears.
-
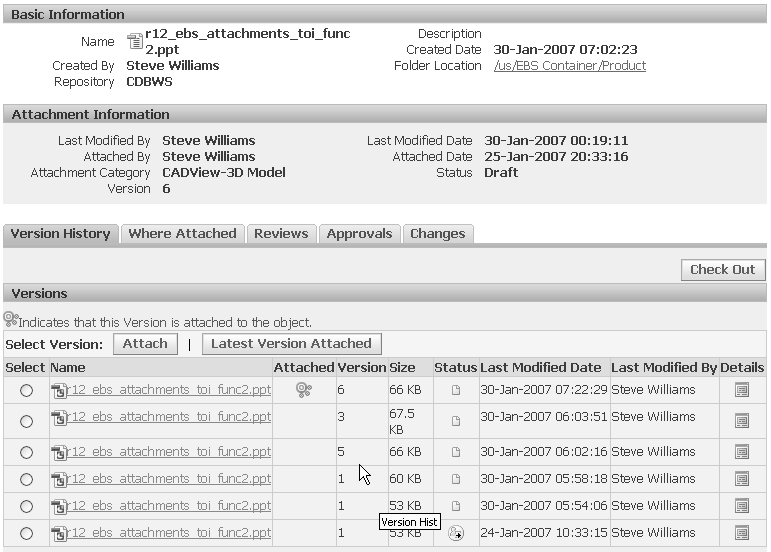
In the Details page, Version History tab, all versions of the attachment are shown.
The Attached Version icon in the Attached column indicates which version is attached to the object. If no Attached Version icon appears, then the latest version is always attached to the object.
The Status column indicates the status of each particular version. If you sent out a particular version for review or approval, The review or approval status displays here.

To change the attached version
-
Select the version of the file that you want to attach.
-
Click Attach.
To attach the latest version of the file
-
Click Latest Version Attached.
The Attached Version icon in the Attached column no longer appears next to any version. This implies that the attachment always refers to the latest version.
To view the content of a file version
-
Click on the name of a version to view it.
To update the version descriptor or file version description
-
Click Update.
-
In the Update Version Details page, you have the option to enter the following:
-
Version - a new version descriptor
-
Description
-
To view all objects associated with the attachment
From the Attachments page, you can navigate to the Where Attached tab, which lists every object that the attachment is attached to.
-
From the Attachments page, click the Attachment Details icon for a particular attachment.
-
In the Details page, click the Where Attached tab.
You can view all objects where the attachment is attached.
To grant access to an attached folder in UCM or Oracle Content DB
Users are granted access to folders in UCM or Oracle Content DB in one or more of the following ways:
-
directly, in UCM or Oracle Content DB
-
by inheriting access from a parent folder in UCM or Oracle Content DB
-
by mapping the user's role on the business object to the attached folder in the Details page, Membership tab (for more information about roles, see: Managing and Viewing Roles, Oracle Product Information Management Implementation Guide)
-
by granting the user access to the attached folder in the Details page, Membership tab
Navigate from the Attachments page to the Details page, Membership tab, to manually grant access to users directly or to manually grant access to users and groups of users based on the attached business object's role.
-
From the Attachments page, click the Attachment Details icon in the Details column for a particular folder.
This opens the Details page.
-
Click the Membership tab.
This tab lists the names of each user or group with access to the folder and the type of access, such as Author or Administrator.
-
Click Update Membership.
From Update Membership, you can update the members' current folder access level, add members, remove members, or update role access.
To update folder access
This task enables you to change the access level of a user or group for a particular folder. For example, you can change the access of a user from Reviewer to Approver.
-
In the Folder Access field for a particular user or group, select the appropriate access level from the pull-down list.
To remove members
-
Select the particular names you want to remove in the Select column.
-
Click Remove.
To add one user or group at a time
-
Click Add Another Row.
The system adds one row to the end of the membership list.
-
Enter a new user or group name in the new row and select the appropriate folder access from the dropdown list.
To add multiple users or groups at the same time
-
Click Add Members, then search for the users. From the search results, select one or more users or groups for which to give access to the folder.
-
Enter a new user or group name and select the appropriate folder access from the dropdown list in each row.
To update role access
To quickly grant all users of the business object access to the folder, use the Update Role Access functionality. Update Role Access enables you to give a role on the business object access to the folder. All users with the specific role are granted folder access.
-
Click Update Role Access.
-
In the Folder Access column for the business object roles, select a new folder access.
When you click apply, all users with those roles on the business object are granted the specified folder access.
To view the review, approval, or change status of an attachment
You can request a review or approval of an item attachment or create a change order for an item attachment. View the status of the attachment in the Attachment Details page Reviews, Approvals, or Changes tabs. For more information, see: Managing Item Attachments.
Related Topics
Using E-Business Suite Attachments
Setting Up Content Management Repositories, Oracle Product Information Management Implementation Guide
Setting Up E-Business Suite Attachments, Oracle Product Information Management Implementation Guide
Defining Item Attachment Categories, Oracle Product Information Management User's Guide
Logging On to Repositories
As you work with attachments, you may be prompted to log in to repositories which require their own user authentications. Use the user name and password that corresponds to the repository that you are trying to access, not the user name and password that applies to your current Oracle Applications session.
If you use Oracle Universal Content Management (UCM) or Oracle Content DB as the repository, there is no need to sign on if you are already signed on to the EBS Applications. Users log in to Oracle E-Business Suite (EBS) Applications, UCM, and Oracle Content DB (OCD) using a single sign-on integration built using the Oracle Internet Directory, which holds user information in a common location. You can also use the same user name and password to independently log on to EBS Applications, UCM, or OCD. See: Setting Up a Content Management Repository, Oracle Product Information Management Implementation Guide
Related Topics
Troubleshooting Attachments
This section explains how to resolve some of the problems that you might encounter as you work with attachments.
When Logging On to a Repository
-
I get the error "WebDAV connection failed. Please try again later or contact the Administrator."
The system was unable to establish a connection with the repository selected. The repository system may be unavailable. Please try your request later or contact your system administrator.
-
I am unable to log in to Oracle Files.
Please use your Oracle Files user name and password and try again. If you are still unable to log in, please contact your system administrator.
When Uploading Repository Files
-
While trying to upload a file from my local directory, I get the error "There is no file to upload. Please verify the file path(s) and try again."
The file specified doesn't exist in the directory specified. Please check the file path(s) and try again.
-
I try to upload a file into an Oracle Content DB folder and get a warning that the file already exists in the Oracle Content DB folder.
The file you are trying to upload already exists in the folder specified. If you want to overwrite this file, then check out the existing file in the Oracle Content DB folder, upload your version from your desktop to replace it, then check it in. You can also use Add Attachment: Repository Files and Folders to attach the existing repository file.
-
I am unable to upload files into the Oracle Content DB Repository. I get the error "Upload failed, please check folder permission and ensure that versioning is not set to manual for this folder."
The system was unable to upload the file. Ensure that sure you have permission to write in the destination folder. You cannot upload a file into the destination folder if you do not have write permission in it.
-
I am unable to attach a file or folder from "My Private Workspace". Files cannot be loaded from "My Private Workspace" or any folder within it.
Move the file or folder to a workspace or folder that is not in "My Private Workspace" and try again.
When Viewing a File or Folder
-
I am unable to view an attachment. I get a "file not found" error.
The file or folder may be in a UCM or Oracle Content DB workspace that you don't have access to. The file or folder may have been moved or deleted. Please check your access to the file or folder and verify in UCM or Oracle Content DB that it exists.
-
I am unable to view a file or folder in a new window. I get a "Page not found" error when using the menu option from right-clicking the mouse.
This functionality is not yet supported. Please click the file or folder name to view its contents.
-
I do not see the complete list of attachments for my business object.
You may have used the Simple Search feature to search within the list of attachments. Click the Go button in the Simple Search without entering any search criteria. You should see the complete list of attachments. If you still have problems, please contact your system administrator.
Tip: For files and folders stored in a UCM or WebServices-based Content DB Repository, you can only see those files and folders in the Attachments list for which you have view access.