Advanced Supply Chain Planning Business Flows
This chapter covers the following topics:
- Business Flows
- Planning Cycle
- Specify Sources of Demand
- Run Collections
- Create a Plan
- Launch the Plan
- Review Key Performance Indicators (KPIs)
- Review Exceptions
- Review Workflow Notifications
- View Pegged Supply and Demand
- Modify the Plan Environment
- Run Net Change
- Release or Firm Orders
Business Flows
This section describes the flows of information between the components of the Oracle Advanced Planning Suite and provides an overview of how these components are to be used together in order to accomplish several key business flows.
Topics covered in this section include the following:
-
APS Information Flows
-
The Demand-to-Make / Demand-to-Buy Business Flow
-
The Inquiry-to-Order Business Flow
APS Information Flows
The major information flows between the components of the Oracle Advanced Planning Suite and the rest of Oracle Applications are shown in the figure below.
APS Information Flow
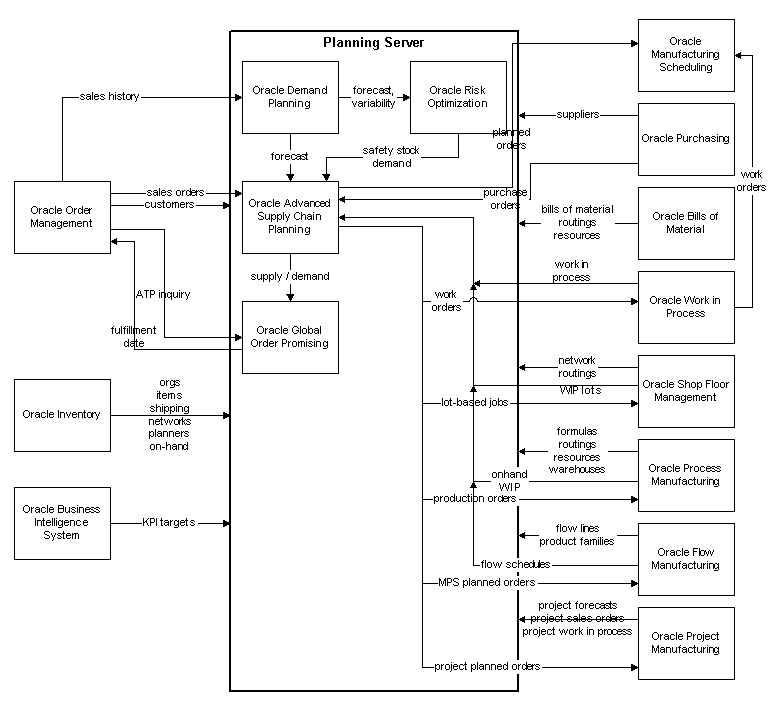
The Demand-to-Make / Demand-to-Buy Business Flow
The demand-to-make /demand-to-buy business flow begins with the establishment of independent demands that will drive the activities of the supply chain.
On the basis of sales history from Oracle Order Management, Oracle Demand Planning generates statistical demand forecasts. After adjustment by planners, these forecasts and their variability as estimated by Oracle Demand Planning are then input into Oracle Inventory Optimization.
Using user-supplied information about the variability of this forecast demand and the variability of supplier lead-times, Oracle Inventory Optimization generates an optimal time-phased safety stock plan.
Oracle Advanced Supply Chain Planning (hereafter, Oracle ASCP) considers three streams of independent demand: the safety stock planned demand from Oracle Inventory Optimization, forecasts from Oracle Demand Planning, and sales order demand from Oracle Order Management. Oracle ASCP outputs a time-phased supply plan (planned orders) that can then be released directly to the appropriate execution systems: Oracle Purchasing, Oracle Work in Process (for discrete manufacturing), Oracle Process Manufacturing, Oracle Flow Manufacturing, Oracle Project Manufacturing, or Oracle Shop Floor Management (for semiconductor manufacturing).
The Inquiry-to-Order Business Flow
The demand/supply picture output by Oracle ASCP serves as the basis for the order promising results calculated by Oracle Global Order Promising. Oracle Global Order Promising can be called either from a customer-facing order capture application such as a web store or from Oracle Order Management.
In the inquiry-to-order business flow, an inquiry for a potential order is sent from Oracle Order Management to Oracle Global Order Promising. The fulfillment date returned by Global Order Promising, if later than the original request date, is populated as the new request date of the order. This request date validation process is called scheduling. Once an order is successfully scheduled, then it can be booked and made visible to Oracle ASCP for supply planning purposes.
Planning Cycle
This section describes an end-to-end planning flow that a planner might perform during the course of a planning cycle. The flow demonstrates the key features of Oracle ASCP that a typical planner would use in the course of their work.
The general flow that occurs during a planning cycle is shown in the figure below.
A Day in the Life of a Planner

Specify Sources of Demand
-
Sales order demand
-
Forecast demand
-
A combination: In this case, the sales order demand reduces (consumes) the forecast demand to avoid over-demanding.
The forecast demand comes from:
-
Oracle Master Scheduling/MRP on the source instances.
-
Oracle Demand Planning
-
Oracle Demantra
-
Your own system
Demand from Oracle Master Scheduling/MRP
Create a new or use an existing master demand schedule
Use the master demand schedule source list to associate individual forecasts with your MDS
Load the adjusted (unconstrained) forecasts into a master demand schedule. You can load individual forecasts, for example, for customers and sales regions, into a single master demand schedule and plan them all at once.
See Oracle Master Scheduling/MRP User's Guide .
Run collections.
Demand from Oracle Demand Planning
You do not have to run collections.
See Oracle Demand Planning Implementation and User's Guide
Forecast Demand from Oracle Demantra
You use an interface process to move the forecasts to Oracle Advanced Supply Chain Planning
See Oracle Demantra Demand Management User's Guide.
Demand from Your Own System
See Overview of Running Collections. You may use the legacy collections process
Run Collections
Run collections to bring planning data from the source instance to the planning server, where the data will be accessible to Oracle ASCP. See Running Collections for more information.
Create a Plan
After an MDS has been defined, a Production, Manufacturing, or Distribution plan/schedule can be created.
To create a plan
-
Choose Supply Chain Plan > Names to create a new plan/schedule or modify an existing plan/schedule.
-
Select Plan Options to specify plan options.
-
Save your work.
See Defining Plans for more information.
Launch the Plan
After you have created your MRP, MPS, or MPP plan/schedule and saved it, choose the plan from [Production, Manufacturing, or Distribution Plan] > Names and select Launch Plan.
You can view the run status of your plan by choosing Other > Requests.
Review Key Performance Indicators (KPIs)
Once your new plan has completed running, you can evaluate the performance of the plan by comparing it to Key Performance Indicators (KPIs). Evaluating a plan based on its impact to KPIs is a good way to see the high level impact of the plan without doing offline analysis and looking at plan details to see which demand is fulfilled on time and which is not.
The Key Indicators compare actual plan values to target values defined in the Target Repository. Evaluating plans against KPIs lets you select the plan which best meets organizational objectives that you have defined.
You can drill down to the trend over time using the right-mouse menu.
To review KPIs for a plan
-
Navigate to the Planner Workbench.
-
Choose either the Organizations tab or the Items tab in the left pane.
-
Select the Key Performance Indicators tab in the right pane.
-
In the left panel, select the plan to evaluate or the plans to compare.
-
View the results on the graphs in the right panel.
SeePlanner Workbench and Key Performance Indicators for more information.
Review Exceptions
After you have evaluated your plan(s) based on KPIs, you can evaluate a plan based on the number and types of exceptions it generates. Reviewing the exceptions generated by a plan lets you evaluate a plan's performance in more detail than a KPI comparison provides. For each exception type displayed in the Planner Workbench, you can click and drill down on an exception to get more detailed information about the nature of the exception.
Oracle ASCP provides a range of exception messages for all plans. You can easily manage your plan by displaying only those items and orders that require your attention, and you can further narrow your search using other criteria such as by buyer or by line. By saving the exception messages each time you replan simulations, you can compare different versions of the same plan or analyze the strengths and weaknesses of a single plan.
For guidelines on evaluating and interpreting the exceptions generated by your plan, see Exception Messages.
To review exceptions for a plan
-
Navigate to the Planner Workbench.
-
Choose the Organizations or Items tab in the Navigator and select the plan(s) for which you want to view exceptions.
-
Select [right-click] > Exceptions > Details. Exceptions are displayed by exception type on the top portion of the window. Exception counts can be viewed graphically at the bottom of the window.
-
Double click on an exception to drill down to detail.
Refer to Exception Messages for more information.
Review Workflow Notifications
Oracle ASCP's powerful collaboration features enable you to automate and streamline your interactions with customers and suppliers.
You can automate the processing of exceptions which lets you take corrective action more quickly and efficiently, driving overhead costs out of your process.
You can define the process that a Workflow Notification should follow which includes the routing for the exception notifications, actions available to the recipient of the notifications, and the approval steps. The messages can be viewed either in Applications (see Review Exceptions) or via E-mail. Certain response actions may be required.
This table shows the standard workflow processes which generate various types of exceptions.
See the Oracle Workflow Guide for more information on creating notifications and building new workflows.
View Pegged Supply and Demand
You can easily analyze the impact of changing a supply or demand order at any level of your bill of material using the powerful graphical pegging feature. Full pegging traces supply information for an item to its corresponding end demand details. Full pegging can also link a demand order to all corresponding supply. You can trace a purchased item or subassembly shortage to the sales order that would be affected. You can use this information to prioritize critical material and capacity resources.
To use graphical pegging you must select Pegging in the Plan Options window. You must also have the Pegging item attribute (in Oracle Inventory) set to one of the pegging options.
For more information on pegging, see Supply/Demand Window. Also, please refer to Item Attribute Controls in the Oracle Inventory User's Guide for more information.
Modify the Plan Environment
Modify Objectives
If you are unsatisfied with the results of your plan, you may wish to change your optimization objectives to improve the plan's performance against KPIs or reduce the number of exceptions.
Available Supply Chain Optimization objectives are:
-
Maximize Inventory Turns
-
Maximize Plan Profit
-
Maximize On-time Delivery
To run an optimized plan
Choose Supply Chain Plan > Options > Optimization tab to check the Optimization check box and adjust optimization objectives or associated penalty costs.
Once you have changed objectives, you can run a new, separate plan, or you can run a simulation in net change mode to view only the differences between the baseline plan and the simulated plan.
See Overview of Optimization and Overview of Simulations for additional information.
Alternatively, you may evaluate your plan or check feasibility based on available material and resources by running an unconstrained plan.
To run an unconstrained plan
-
Choose Supply Chain Plan > Options.
-
Choose the Constraints tab and check Constrained Plan and Enforce Demand Due Dates.
-
Select No for the material and resource constraint settings.
-
In the Optimization tab, uncheck Optimize.
Once you have made the change you can run a new, separate plan, or you can run a simulation in net change model to view only the differences between the baseline plan and the simulated plan.
See Overview of Optimization and Overview of Simulations for additional information.
Modify Supply/Demand
After you have run additional plans or simulations based on changes to your optimization objectives, you may still be unsatisfied with the results of your plans.
At this point, you may wish to consider the impact to changing demand and supply levels. You can quickly and easily simulate the impact of changes in inventory, purchase order schedules, and product demand. Changes to demand can be performed directly in your MDS or to individual forecasts associated with your MDS. Changes to supply may consist of changes to material availability (for example, supplier capacity) or to resource availability. You can make changes to either capacity or materials and see the effects of these changes on your plan.
To modify demand/supply
-
Navigate to the Planner Workbench.
-
Choose Tools > Supply/Demand.
-
Select the Supply/Demand you want to change from the list of values.
-
Make the desired changes and close the window.
Modify Resources
To increase available supply, you may wish to modify resource availability.
There are a number of ways in which to modify resources:
-
Add additional production resources (for example, add shifts).
-
Define alternate resources available for producing particular items.
-
Change the resource consumption for an item (for example, change the amount of an item that can be produced in a given amount of time).
To modify resources
-
Navigate to the Planner Workbench.
-
Choose Tools > Resources.
-
Make the desired changes and close the window.
Modify Supplier Parameters
At this point you might choose to modify supply parameters such as Supplier Capacity, Supplier Order Modifier, and Supplier Tolerance Fence. For more information see Supply Chain Modeling.
Run Net Change
After you have changed optimization objectives, demand, supply or resources, you can run simulated plans in net change mode to view only the differences of the simulated plan compared to a baseline plan.
Net change is used for changes to:
-
Item supply and demand, resource availability
-
Your objectives
-
Demand priority rules
-
Sourcing
-
BOM/Routing effectivity
See Running Net Change Replan Simulations for more information.
Review a Constrained Forecast that Results from Net Change Planning
The forecast or MDS that is loaded into a Supply Chain Plan is generally a prediction of total customer demand, regardless of your company's ability to produce the demand.
After a Supply Chain Plan has been run based on an unconstrained forecast/MDS as an input, the resulting plan that has been constrained by material and resource availability is a demand plan constrained by production capabilities.
The easiest way to view the differences between an unconstrained demand plan and a constrained demand plan is to view the exceptions that occur after the Supply Chain Plan is run with material and resource constraints set to Yes in plan options.
The exception message Late forecast for customer demand will show all demand that could not be met due to material and resource limitations.
An alternate way to compare an unconstrained demand plan to a constrained plan is to run your Supply Chain Plan once with material and resource constraints set to No in plan options and run a second plan with material and resource constraints set to Yes. The two plans can then be compared side by side via KPI comparisons or exception comparisons.
Release or Firm Orders
To release or firm orders
-
From the Planner Workbench, choose Tools > Supply/Demand.
-
In the Order tab, choose an organization and an item then choose to release or firm orders for that organization or item.
You can also redefine release properties for the organization or item.
.