Other Deal Items
Other Deal Items
This section contains general information on how to manage your deals.
Quick Deals
A quick deal is a short term money or foreign exchange deal that is not yet complete. You can use quick deals to enter principal details for several short term money or foreign exchange deals at the same time. You can also use quick deals to collect quotes for these types of deals.
To make such deals eligible for settlement and accounting, you must return to your quick deals at a later time and complete the deal entry.
You can enter quick deals only for short term money or foreign exchange deals.
Entering Quick Deals
Use the Quick Deals window to enter short term money or foreign exchange deals or to collect quotes for those types of deals. You can enter one or more quick deals for the same company and deal type.
To enter a quick deal
-
In the Quick Deals window, select a company and deal type for the quick deals.
Note: All the quick deals you enter must be for the company and deal type combination you select.
-
In the Value Date, Portfolio tabbed region, select a deal subtype.
-
Select the counterparty with whom you are entering into the quick deal. Data automatically appears in the Value Date, Product, and Portfolio fields.
-
In the Currency, Amount tabbed region, select a currency.
-
In the Reference Amount field, enter the amount of the quick deal.
-
In the Maturity Date, Interest tabbed region, enter a maturity date.
-
If the interest on this deal is to be paid on the deal start date, enable the Prepaid Interest check box. You must enter a maturity date to enable this option. When you accept the deal, Treasury includes prepaid interest in the cash flows on the start date of the transaction.
-
Select the day count basis that you want to use to calculate interest on the deal in the Day Count Basis field.
-
Choose the rounding rule that you want to use to calculate interest in the Interest Rounding field. The possible choices are: Nearest, Round Up, or Round Down.
-
Choose the day that you want to include when you calculate interest on the deal in the Interest Includes field. The possible choices are: First Day, Last Day, or Both Days.
Note: If you select Both Days for Interest Includes, you cannot use the 30/360, 30E/360, or 30+/360 day count basis.
-
In the Rate, Deal Number tabbed region, enter a rate.
-
If you are acting as a broker for a client, select the client.
-
In the Dealer, Deal Date tabbed region, select the dealer.
-
Save your work.
-
If you want to accept a quick deal quote and change it into a deal, in the Status field of the Value Date, Portfolio tabbed region, select Accepted. Save your work.
Entering Multiple Quick Deal Quotes
To enter multiple quotes for the same deal, use the Counterparty Deal Quotes window.
For short term money deals, you must complete the Deal Type, Deal Subtype, Product, Currency, Date, and Reference Amount fields in the Quick Deals window before you enter quotes.
For foreign exchange deals, you must complete the Deal Type, Deal Subtype, Value Date, Currency, Sell Currency, and Reference Amount fields before you enter quotes.
To enter multiple quotes
-
In the Quick Deals window, complete the Deal Type, Deal Subtype, Product, Buy Currency, Date, and Reference Amount fields.
-
Choose the Enter Quotes button. The Counterparty Deal Quotes window appears.
-
Select a counterparty for the quote.
-
In the Trans Rate field, enter the rate the counterparty quoted.
-
Repeat steps 3 and 4 for each quote you receive.
-
Save your work.
-
If you want to accept a quote, check the Accepted check box next to the quote you want to accept. The quote is converted into a deal and is checked against the appropriate deal limit and counterparty limit.
Completing Quick Deals
If you enter a quick deal, you must return to that quick deal to complete the details at a later time. Typically users make this part of their daily routine by completing their quick deals at the end of the day when they are less busy.
Prerequisite
-
For short term money deals, define the common deal details for the deal in the Short Term Money window. See: Common Details for Short Term Money Deals.
To complete the deal details for a quick deal
-
In the Quick Deals window, query the quick deal you want to complete. A list of deals that match your criteria appears.
-
Select the deal you want to complete.
-
In the Status field of the Value Date, Portfolio tabbed region, select Accepted.
-
Choose the Complete Details button. If it is a foreign exchange quick deal, the Foreign Exchange Spot/Forwards window appears. If it is a short term money quick deal, the Short Term Money window appears.
-
Complete the deal details. For information on completing a foreign exchange deal, see: Entering Foreign Exchange Spot or Forward Deals. For information on completing a short term money deal, see: Completing Short Term Money Quick Deals.
Viewing Quick Deals
Use the View Quick Deals window to view the details of a quick deal.
To view a quick deal
-
In the View Quick Deals window, select the company and the deal type for the quick deals you want to view.
-
Insert your cursor in the tabbed region of the window and query the quick deal you want to view.
Exposure Transactions
An exposure is any transaction that affects your cash position but does not originate in Treasury. Your company payroll, for example, is an exposure. You can enter and monitor your exposures in the Exposure Transactions window or the Exposure Transactions Quick Input window.
Example - Anticipated End-of-Year Taxes Exposure
As your profits increase during the year, so will your end-of-year taxes. You can budget for an anticipated increase in taxes by recording the increase as an exposure in the Exposure Transactions Quick Input window. At the end of the year, when you determine the actual tax amount, you can also enter the actual amount in the Exposure Transactions window.
Use the Exposure Transactions window to enter actual or estimated amounts and dates for each transaction that creates an exposure. If you enter exposures transactions using this window, the values are included in your cash flow position reports.
Use the Exposure Transactions Quick Input window to enter estimated amounts and dates for each exposure transaction. The values of estimated exposure transactions are not included in your cash flow position reports.
Entering Exposure Transactions
Use the Exposure Transactions window to enter the details for your actual or estimated exposure transactions. For estimated exposures, you can classify your exposures as either firm or indicative.
Prerequisite
-
Set up exposure types. See: Exposure Types.
To enter an exposure transaction
-
In the Company field of the Exposure Transactions window, select the company for the exposure. The default portfolio and currency for the company are populated in the appropriate fields.
-
In the Exposure Type field, select an exposure type.
You can add an exposure type to the list of values by setting up a new exposure in the Exposure Types window. See: Exposure Types.
-
If you are entering an estimated exposure, in the Firm/Indicative field, indicate if the estimated exposure is firm or indicative. Select Firm if you are certain of the exposure date and amount. Select Indicative if you are uncertain about either the exposure amount or date.
-
In the Portfolio field, if you do not want the exposure accounted for in the default company portfolio, select a different portfolio for the exposure.
-
In the Action field, select Pay if the exposure is a payment; select Receive if the exposure is a deposit.
-
In the currency field If the currency of this exposure differs from your reporting currency, in the Currency field select the currency of the exposure. The current exchange rate between the selected currency and your reporting currency appears in the Exchange Rate field.
-
In the Company Account field, select the company bank account that the exposure is paid or deposited to.
-
If you are entering an indicative exposure, in the Estimate Amount and the Estimate Date field, enter the estimated amount and date of the exposure.
-
If you are entering a firm exposure, in the Actual Amount and the Actual Date field enter the amount and date for the exposure.
Note: If you are uncertain about either the date or the amount of the exposure, change the exposure type to Indicative and enter the values in the Estimated Date and Estimated Amount fields instead of the Actual Amount and the Actual Date fields.
-
If you are entering a Firm exposure, and you want to be able to settle the deal in Treasury, check the Treasury to Settle check box. When you select this check box, the settlement information for this exposure (dates and amounts) cannot be updated. If you want to update the settlement information, de-select the check box.
To settle exposure amounts, see: Settlements.
-
In the [ ] field, complete the descriptive flexfield as required.
-
If you are entering a Firm exposure, and you selected the Treasury to Settle check box, then in the Counterparty field, choose the counterparty that you want to settle the exposure with. In the Counterparty Account field, you can choose the counterparty settlement account that you want to use for settling the exposure.
-
In the Comments Internal and Comments External fields, enter any comments that you want to record for the deal. Note that external comments appear on any reports you generate for the exposure deal.
-
If you want to link the exposure to other deals, in the Link Code, choose a Deal Linking Code for the deal.
-
If you want to view a summary of all of the exposure transactions, choose the Summary button. The Exposure Transaction Summary window appears. See: Viewing a Summary of Exposure Transactions.
-
If you want to enter several exposure transactions at the same time, choose the Quick Input button. The Exposure Transactions Quick Input window appears. See: Entering Quick Input Exposure Transactions.
-
Save your work.
Entering Quick Input Exposure Transactions
Use the Exposure Transactions Quick Input window to enter multiple estimated exposure transactions at the same time.
Quick input exposure transactions are not included in your cash flow reports. You must complete the details for a quick input exposure transaction in the Exposure Transaction window before it is included in your cash flow reports.
To enter an exposure transaction using quick input
-
In the Exposure Transactions window, choose the Quick Input button.
-
Select a company for the exposure.
-
Select an exposure type.
-
In the Action field, select Pay if the exposure is a payment. Select Receive if it is a deposit.
-
If the currency of the exposure differs from your reporting currency, select a currency.
-
In the Company Account field, select an account from which the exposure is paid or deposited.
-
Select a portfolio for the exposure.
-
In a blank row, enter an estimated date and estimated amount for the exposure.
-
If you want to automatically create a payment for this exposure, select the Settle option. Then select the party to which you want to send the payment, and a settlement account.
-
In the Firm/Indicative field, select Firm if you know that the transaction will occur on the estimated date and for the estimated amount; select Indicative, if you are uncertain about either the exposure amount or date.
-
Repeat steps 8 to 10 for each exposure you want to enter.
-
Save your work.
Importing Exposure Transactions
If you need to enter exposure transactions frequently and the details are available in an electronic source such as a bank file or a third party application, you can use the XTR_DEALS_INTERFACE table and the Deal Interface Summary window to import the deal details into Treasury. For more information, see: Importing Deals into Treasury.
Viewing a Summary of Exposure Transactions
Use the Exposure Transaction Summary window to view the details of an exposure transaction.
To view a summary of exposure transactions
-
In the Exposure Transactions window, choose the Summary button.
-
In the Find Exposure Transactions window, complete the fields as needed to locate the exposure transactions you want to view.
-
Choose the Find button. The Exposure Transaction Summary window appears, listing all of the exposure transactions that meet your criteria.
Viewing Exposure Transactions
Use the View Exposure Transactions window to view the details of an exposure transaction.
To view an exposure transaction
-
In the View Exposure Transactions window, query the transaction you want to view.
-
To view a summary of your exposure transactions, choose the Summary button.
-
In the Find Exposure Transactions window, complete the fields as needed to locate the exposure transactions you want to view.
-
Choose the Find button. The View Exposure Transaction Summary window appears, listing all of the exposure transactions that meet your criteria.
Deal Orders
A deal order defines a deal and the market conditions upon which you want to execute that deal. You can use deal orders to place conditional deals with your dealers. The dealers execute the deal when and if the market reaches the conditions you specify in the deal order. You can also use deal orders to record the conditional deals that your subsidiaries or clients place with you. Your company must execute the deal if or when the market reaches the conditions specified by the deal order from your subsidiary or client.
Entering Deal Orders
Use the Deal Orders window to define a deal and the specific set of market conditions that you want met before you or a dealer can execute the deal.
To enter a deal order
-
In the Firm/Indicative field of the Deal Orders window, select Firm if you want to order a firm deal. Select Indicative if you want to order an indicative deal.
-
In the Company and Counterparty fields, select a company and a counterparty for the deal.
-
In the Company Dealer field select your company dealer for the deal. If the counterparty uses a dealer, in the Counterparty dealer field enter the name of the counterparty's dealer.
-
In the Placed On Date field, enter the date and time at which you place the deal order.
Note: Use 24-hour time format.
-
If you want the deal order to expire on a certain date, in the Valid Until field enter an expiration date for the deal order.
Note: Use 24-hour time format.
-
In the Current Mkt Rate field, enter the current market rate for the deal at the time you place the deal order.
-
In the Currency field, select a currency.
-
In the Order Rate field, select the rate at which you want to execute the deal.
-
In the When Market Rate Is field, select Above, if you want to execute the deal when the market rate is equal to or greater than the order rate. Select Below if you want to execute the deal when the market rate is equal to or less than the order rate.
-
In the Deal Type and Deal Subtype fields, select a deal type and subtype.
-
In the Product Type field, select a product type.
-
In the Order Details field, enter comments as needed.
-
Save your work.
-
If you execute a deal order and you receive confirmation of the deal from the counterparty dealer, you can record that the confirmation was received by doing the following:
-
Query the deal order.
-
In the Confirmed by Cparty Dealer field, enter the name of the person at the counterparty who confirmed the deal.
-
Save your work.
-
-
If you want to view a summary of deal orders, choose the Summary of Orders button. For more information, see: Viewing a Summary of Deal Orders.
Viewing a Summary of Deal Orders
Use the Order Summary window to view a summary of deal orders.
To view a summary of deal orders
-
In the Deal Orders window, select the Summary of Orders button. The Order Summary window appears.
-
Place your cursor in the window and execute a query to display a summary list of your deal orders.
-
To view the comments for a particular deal order, select the deal. The comments you entered in the Order Details field of the Deal Orders window appear in the Details field.
Viewing Deal Orders
Use the View Order Summary window to view the details for a deal order.
To view a deal order
-
In the View Order Summary window, query the deal order that you want to view.
Deal Linking Codes
Use deal linking codes to link your related deals into a deal group for reporting and reference purposes. For example, you can link deals that are of the same deal type, are for the same counterparty, or have some type of dependence on one another that you want to monitor.
Linking Deals
Use the Deal Linking Codes window to link your related deals.
To link related deals
-
To create a new deal group, in the Code field of the Deal Linking Codes window enter a code. Then, in the Description field, enter a description for the deal group. The code you enter appears in the list of values for deal linking codes throughout the system.
-
Save your work. You can link new deals to this code through the deal input forms.
Viewing Linked Deals
Use the View Deal Linking Codes window to view a list of transactions that are linked by a deal linking code.
To view linked deals
-
In the View Deal Linking Codes window, query the deal linking code that you want to view. A list of deals linked to this code appears in the Transactions Linked By Code region.
Inter-Account Transfers
You can perform inter-account transfers to transfer cash between your company accounts. Use inter-account transfers to concentrate your company cash in a single account, or to provide funds to an account for special circumstances.
If you set the Settlements: Automatically Authorize Interaccount Transfers parameter to Yes, the inter-account transactions are automatically authorized for settlement in the Settlements window. If you set the parameter to No, you must manually authorize the settlements in the Settlements window. For more information, see: System Parameters.
Entering Inter-Account Transfers
Use the Inter-Account Transfers window to transfer funds between two company accounts.
To transfer funds between two company accounts
-
In the Inter-Account Transfers window, select the dealer and the company, and enter the date for the transfer.
-
To transfer the actual cash flow balance from the Bank Account Balances window, select the Actual check box. To use the projected cash flow balance, select the Projected check box. The projected balance is the actual cash flow balance plus all cash flows that occur between the last statement date and the transfer date.
-
To a review the current transfers, choose the Review Transfers button.
-
Insert your cursor in the Account Balances region. The closing balances for each company account appears.
-
In the From Bank Code field, select the bank code for the account from which you want to transfer funds. The bank account name appears in the From Account Name field. If you have more than one account at the same bank, in the From Account Name select the bank account name.
-
In the Pay Amount field, enter the amount of funds you want to transfer.
-
Select a portfolio for the transfer.
-
Select a product type for the transfer.
-
In the To Bank Code field, select the bank code for the account to which you want to transfer funds. The name of the bank account that is held at the selected bank appears in the To Account Name field.
-
If you have more than one account at the same bank, in the To Account Name field select the name of the bank account to which you want to transfer funds.
-
Save your work.
Viewing Inter-Account Transfers
Use the Inter-Account Transfer Transactions window to view a list of your inter-account transfers.
To view an inter-account transfer
-
In the Transfer Date field of the Inter-Account Transfers window, enter a date for which you want to view your inter-account transfers.
-
Choose the Review Transfers button. The Inter-Account Transfer Transactions window appears, listing all inter-account transfers for the specified date.
Deal Data Import
If you are importing deals into Treasury, you can use the Deal Interface Summary window to view the data that is loaded in the XTR_DEALS_INTERFACE table, but that has not been imported into Treasury.
This section provides an overview of the deal import process, and describes how to view, import, and update import data.
Overview of the Deal Import Process
If you have external applications that contain treasury-related deals, you can import that information into Treasury and centralize your treasury management by using the deal import process.
To import deals into Treasury, you can use the Deal Interface Summary window or the Import Deal Data concurrent program. For more information, see: Importing Deals into Treasury, and Import Deal Data.
The following figure shows how the deal import process works.
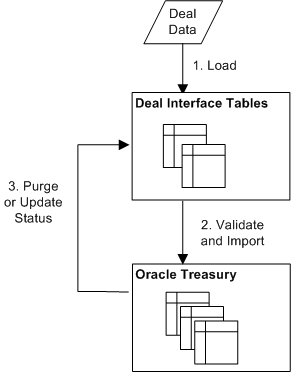
The deal import process works as follows
-
Deals are loaded from an external source into the XTR_DEALS_INTERFACE table using SQL*Loader or other data transfer method. Parcel information for Discounted Securities (NI) deals should be loaded into the XTR_TRANSACTIONS_INTERFACE table using the same transfer method. The deal status of the newly loaded deals is "New". For information on how to load deals into interface tables, see: Understanding Open Interface Tables.
-
The Import Deal Data concurrent program imports all deals from the XTR_DEALS_INTERFACE table into the appropriate Treasury table. When deals are in the process of being imported, the deal status is changed to "Submitted". During import, deals are given unique deal numbers, validated, and checked against any applicable limits.
-
If a deal was successfully imported into Treasury, the deal is purged from the XTR_DEALS_INTERFACE table. For Discounted Securities (NI) deals, parcel information is purged from the XTR_TRANSACTIONS_INTERFACE table.
If a deal was not successfully imported into Treasury, the status for the deal is changed to "Error", "Duplicate Deal Error", or "Invalid Deal Type Error" status. For more information on deal errors and how to fix them, see: Updating Deals for Import.
Note: Data resides in the XTR_DEALS_INTERFACE table if it has been loaded, but not imported and has the status "New", if it has been imported but generated an error and has one of the following statuses: "Error", "Duplicate Deal Error", or "Invalid Deal Type Error", or if it has generated an error, but the record has been updated either before import or after an error was generated and has the status "Updated".
To successfully import a deal into Treasury, the deal must pass several levels of validation:
-
Deal Type: The deal type must be supported for import. Only foreign exchange (FX), intercompany funding (IG), discounted securities (NI), or exposure (EXP) deals can be imported into Treasury. If you try to import a deal that is not an FX, IG, NI, or EXP deal, the import will fail and the deal's import status will be changed to Deal Type.
-
Deal ID: The external deal ID must be unique. If the external deal ID is not unique, then the import will fail and the deal import status will be changed to Duplicate Deal. In addition, intercompany funding deals must have a unique combination of company code, intercompany party, currency, transfer date, action, principal adjust, company account, and party account, or the import will fail. For more information on validating intercompany funding deals, see: Validating Intercompany Funding Deals During Import.
-
Additional Criteria by Deal Type: The deal data must be validated against any additional criteria for the deal type. For example, foreign exchange deals must have two currencies and intercompany funding deals must have two parties that belong to the same intercompany group. If the deal does not meet the additional criteria for the deal type, the import will fail and the deal's import status will be changed to Error. For more information on the specific validations required for each deal type, see: XTR_DEALS_INTERFACE.
-
Validating Intercompany Funding Deals During Import
If you import a company to company intercompany funding deal, Treasury assumes that you are importing only one side of the deal, and it automatically creates the other side of the deal. For example, if you import an intercompany funding deal where Company A pays $100 to Company B, then Treasury automatically generates the other side of the deal, where Company B receives $100 from Company A. To prevent the same deal from being imported twice, Treasury uses strict criteria for determining the uniqueness of an intercompany funding deal. Intercompany funding deals must have a unique deal ID and a unique combination of company code, intercompany party, currency, transfer date, action, principal adjust, company account, and party account. If the deal does not have a unique combination of these attributes, then the deal will not import successfully and the deal's import status will be changed to Duplicate Deal.
Deal Import Statuses
The import status for each deal is updated throughout the deal import process. The following table lists the possible deal import statuses, and what each status means.
| Deal Status | Description |
|---|---|
| New | Indicates that the deal was loaded into the interface table, but has not been imported. Any deal with New status is included in the next batch of deals being imported. If a deal with New status is not successfully imported, the deal's import status will change to Error, Deal Type, or Duplicate Deal. |
| Updated | Indicates that the deal was updated after it was loaded into the interface table. A deal can be updated before or after import. Any deal with Updated status is automatically included in the next batch of deals being imported. If a deal with Updated status is not successfully imported, the deal's import status will change to Error, Deal Type, or Duplicate Deal. |
| Error | Indicates that the deal was imported, but that the import failed because it did not meet one of the additional criteria required for the deal type (for example, the deal has an incorrect counterparty). To successfully import the deal, you must fix the errors by choosing the Update Details icon, and editing the deal details. |
| Duplicate Deal | Indicates that the deal was imported, but that the import failed because a duplicate deal exists. A deal can be a duplicate deal if a deal with the same external deal ID already exists or an intercompany funding deal already exists with the same combination of company code, intercompany party, currency, transfer date, action, principal adjust, company account, and party account. You cannot fix a duplicate deal error in Treasury. You must delete the deal from the interface table, change the deal ID in the external source application, and reload the deal into the interface table. |
| Deal Type Error | Indicates that the deal was imported, but that the import failed because the deal has an invalid deal type assigned to it or the deal type cannot be imported (the deal is not an FX, IG, NI, or EXP deal). To successfully import the deal, you must fix the errors by choosing the Update Details icon and editing the deal type. |
| Submitted | Indicates that the deal is in the process of being imported. Continue to refresh your browser to see if the import was successful (the deal is removed from the interface table), or a failure (the deal status changes to Error, Deal Type, or Duplicate Deal). |
Viewing Deals for Import
Once deals are loaded into the XTR_DEALS_INTERFACE table, you can use the Deal Interface Summary window to view the deals before import.
The table contains deals that have not yet been successfully imported into Treasury: deals that are newly loaded or that you attempted to import, but that failed due to an error. Once a deal is successfully imported into Treasury, it is immediately purged from the interface table. To view a summary report of deals that were successfully imported, see Import Deal Data Report.
Prerequisites
-
Load deals into the XTR_DEALS_INTERFACE table. See: XTR_DEALS_INTERFACE.
-
Load NI parcel data into the XTR_TRANSACTIONS_INTERFACE table. See: XTR_TRANSACTIONS_INTERFACE.
To view deals before import, do the following
-
Navigate to the Deal Interface Summary window.
-
Query the deals that you want to review.
Note: For more information on the complete set of validations required for each deal type, see: XTR_DEALS_INTERFACE.
-
If you want to import the deals, choose the Import button. For more information on how to import deals, see: Importing Deals into Treasury.
-
To update the deals, choose the Update Details icon. For more information on updating deals, see: Updating Deals for Import.
Importing Deals into Treasury
Once you have loaded deal data into the XTR_DEALS_INTERFACE table, you must import that data into Treasury. Only foreign exchange (FX), intercompany funding (IG), discounted securities (NI), or exposure (EXP) deals can be imported into Treasury.
Note: It is recommended that the first few times you load data into the interface table that you review it before importing it into Treasury. By reviewing your data, you can ensure that the data was loaded and will import properly.
Prerequisites
-
Load deals into the XTR_DEALS_INTERFACE table. See: XTR_DEALS_INTERFACE.
-
Load NI parcel data into the XTR_TRANSACTIONS_INTERFACE table. See: XTR_TRANSACTIONS_INTERFACE.
To import deals into Treasury, do the following
-
In the Deal Interface Summary window, choose the Import button, or from the concurrent program manager, run the Import Deal Data concurrent program.
The Import Deal Data concurrent program does the following:
-
Validates the deals and imports them into the appropriate destination tables.
-
Generates a report that summarizes which deals were successfully imported.
-
Purges any deals that were successfully imported from the interface table.
-
Changes the status of any deals that were not successfully imported. The deal status is changed from New or Updated to Error, Duplicate Deal, or Deal Type.
-
-
To view a summary report of deals that were successfully imported, see: Import Deal Data Report.
-
To see a list of the deals that were not successfully imported, go to the Deal Interface Summary window. For more information on how to update and re-import those deals, see: Updating Deals for Import.
Updating Deals for Import
If a deal was incorrectly loaded into the interface table, or if a deal generated an error during import, you must update the deal details before you can successfully import the deal. You can use the Update Deal Details window to update the details for any deal in the XTR_DEALS_INTERFACE table.
For example, if a deal is loaded with the wrong deal type, you can update the deal type before you import it. Also, if you tried to import a deal, but it generated an error, such as an invalid counterparty, you can update the deal and then re-import the deal.
Anytime you change the details of a deal, the deal status changes to Updated. Once a deal status is changed to Updated, Treasury will attempt to import that deal the next time you run the Import Deal Data concurrent process.
Note: If a deal has several errors, and you update the details for one of the errors, the deal status will change to Updated, even if you have not fixed all of the errors. Therefore, do not assume that all deals with Updated status will successfully import into Treasury. You must ensure that you have fixed all of the errors before you can successfully import the deal.
To update deals for import, do the following
-
In the Deal Interface Summary window, query the deal that you want to update.
-
If the deal status is New, Error, or Duplicate Deal ID Error, choose the Update Details button, or click on the error link in the Deal Status column. The Update Deal Details window appears.
If the deal status is Duplicate Deal ID Error, return to the deal's source application, change the deal ID to a unique number, and reload the deal into the XTR_DEALS_INTERFACE table. For more information on loading deals, see: XTR_DEALS_INTERFACE.
-
In the Update Deal Details window, update the deal details as required.
-
Save your work.
The deal status changes to Updated and the next time the Import Deal Data concurrent program runs, Treasury will attempt to import the deals.