Oracle Warehouse Management Inbound Logistics
This chapter covers the following topics:
- Inbound Logistics Overview
- Oracle Warehouse Management Inbound Features
- Describing Receiving Documents
- Describing Receiving Methods
- Explaining the Standard Receipt Process
- Explaining the Direct Receipt Process
- Explaining the Confirm Receipt Process
- Explaining the Express Receipt Process Using ASNs
- Explaining the Inspection Process
- Receiving Material for Clients (LSP Feature)
- How to Perform Receiving Transactions Using the Oracle Warehouse Management Mobile User Interface
- How to Perform an ASN Receipt
- How to Print the ASN Discrepancy Report
- Explaining the Express Receipt Process Using Internal Requisitions
- Explaining the Express Receipt Process Using Internal Shipments
- Receiving Common User Interface
- How to Perform Receipts Using the Receiving Common Interface
- Document Initiated Receipts
- Item Initiated Receipts
- Cross References for Vendor Items
- Describing the LPN Put Away Process
- Multi-Step Putaway and Replenishment
- Explaining LPN Based Returns
- LPN Transactions
- Explaining Pre-Generated Putaways
Inbound Logistics Overview
Oracle Warehouse Management inbound logistics refers to receiving, inspection, and put away processes within the warehouse. The major inbound features of Oracle Warehouse Management include the following:
-
Support for handling Advanced Shipment Notices (ASNs)
-
Functionality to receive material directly into unique license plate numbers (LPNs)
-
Features that enable you to specify and capture lot and serial information at receipt
-
Functionality to automate the matching of material received to expected material
-
System suggested put away locations
-
Opportunistic Cross Docking for backordered sales order lines
-
Support for Oracle Project Manufacturing organizations.
-
Support for Oracle Quality.
-
Support for N step material movement path
-
Receive material by zone
-
Support for Inbound operation plans
Supporting ASNs
The Oracle Warehouse Management system supports suppliers sending ASNs that might include item, quantity, lot, and serial information, project number and task (with Oracle Project Manufacturing,) as well as the LPNs into which the material is packed. You can receive ASNs through a standard ASN receipt, where LPN contents are verified by the receiver, or through an Express ASN receipt, where the LPN contents do not need to be verified.
Receiving Material Into LPNs
All material received through Oracle Warehouse Management is associated with a unique LPN. This enables material to be easily tracked and transacted throughout the warehouse, without scanning the item, quantities, lots, or serials.
Note: Oracle Warehouse Management requires that you receive items into an LPN.
Specifying and Capturing Lot and Serial Attributes at Receipt
With standard Oracle Purchasing, at the time of receipt, you are not allowed to enter lot and serial numbers. With Oracle Warehouse Management, however, you can enter lot and serial numbers immediately, at the time of receipt. You can also enter related material statues or attributes that might apply to the lot or to the serial just received.
Automatically Matching Material Received to Expected Material
Oracle Warehouse Management matches the item and quantity received to the document that the material was received against. This means that the receiver does not need to manually select lines or shipments individually. However, Oracle Warehouse Management does not show the expected quantity to be received, rather, the system requires the receiver to enter the actual quantity received, and then through a background process, the system matches the actual quantity against the expected quantity.
Instead of having to spend time reviewing the related purchasing documentation, a the time of receipt, automatically matching the received material also enables operators to efficiently process inbound material.
Note: Oracle requires that all Oracle Warehouse Management related receipts be made through the mobile device.
Advanced Task Framework
Advanced task framework enables you to streamline your inbound process. You can setup operation plans can be setup to move and process material. The system employs the flexibility of the rules engine to assign operation plans to material based on specific business needs. At execution time, the system directs the you to move and process material as defined in the operation plan. You can use zones, to augment the augment the flexibility of the advanced task framework. The framework streamlines material flow, minimizes travel time and increases operational efficiency via enhanced consolidation and deconsolidation capabilities in conjunction with multi-step material movement.
Related Topics
Setting Up Locator Zones, Oracle Warehouse Management Implementation Guide
Overview of Oracle Quality, Oracle Quality User's Guide
Overview of Project Manufacturing, Oracle Project Manufacturing User's Guide
Oracle Warehouse Management Inbound Features
Oracle Warehouse Management supports the following inbound features:
-
Optional inbound material inspections: The system supports an inbound inspection flow that includes a receipt step, an inspection step, and a put-away step. The system does not increment on-hand balances until the inspection and put away are complete. Inspections can be performed using standard Oracle Purchasing Inspection or using the optional module of Oracle Quality. Commingling of accepted and rejected material into the same LPN is not prevented by the system. It should be done operationally. If Oracle Warehouse Management is enabled in a Project Manufacturing organization, Oracle Quality can be set up to trigger collection plans based on project and task numbers.
Note: If selected for inspection, all quantities within an LPN must be inspected.
-
System assigned cost groups: At the time of receipt, the system will assign a cost group–providing that you have set them up–to the inbound material. Oracle Warehouse Management separates physical inventory accounting from standard cost group accounting. This enables you to assign split portions of an LPN different cost groups.
-
System suggested put-away locations: Using the Oracle Warehouse Management Rules Engine, the system will suggest an optimal put away location for inbound material.
Note: Put away suggestions are not enforced by the system and therefore, you can override them at the time of put away.
-
Workflow enabled discrepancy actions: If you override a put away suggestion at the time of put away, then you must provide a reason for the change. You can optionally build workflow notifications and corrective actions that are triggered on put away override reasons.
-
System suggested opportunistic cross-docking: If you enable cross docking for your warehouse, then before suggesting a put away location, the Oracle Warehouse Management will attempt to cross-dock inbound material directly to an outbound staging area to fulfill backordered sales order lines.
-
Monitor and track inbound material using receiving locators: The inbound area can be defined as a receiving subinventory and segmented into locators. The inbound material can be received in receiving locators in order to monitor and track movement within the inbound area. See: Defining Subinventories, Oracle Inventory User's Guide.
-
Inbound receiving for Oracle Project Manufacturing organizations: If Oracle Warehouse Management is enabled in a Project Manufacturing organization, you can decide how to receive PO lines. The three available options are:
-
Entering the project/task when receiving a PO/RMA/Internal Requisition/ASN.
The receiving quantity will be consumed across lines/shipments/distributions with the specific project/task.
-
Not entering the project when receiving a PO/RMA/Internal Requisition/ASN.
The receiving quantity will be cascaded across the lines/shipments/distributions with no specific consideration for project/task. It will cascade against multiple project lines including common lines.
-
Selecting No Project in the list of values (LOV).
The system will consume the quantity explicitly against lines/shipments/distributions with no project/tasks specified against them.
-
-
You can pack inbound material using the packing workbench packing station you enter determines the Transaction Source type. The transaction source types are Inbound and Outbound. If packing station resides in a sub-inventory of type “Receiving”, packing can be performed only for inbound material.
Related Topics
Entering Quality Results Directly, Oracle Quality User's Guide
Inspecting Received Items, Oracle Quality User's Guide
Describing Receiving Documents
Oracle Warehouse Management supports the following receiving documents:
-
Purchase orders, with or without ASNs
-
Return material authorizations (RMAs)
-
Inter-org intransit shipment documents
-
Internal requisitions
-
Blanket purchase orders
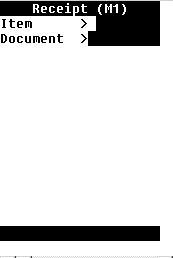
Oracle Warehouse Management supports two modes of receiving: Express and Confirm. To enter receipts using Express mode, you need only enter the document number, and optionally the LPN. For Confirm mode, you need to enter all of the information about the material being received. This includes the following information:
-
Document number
-
Project (with Oracle Project Manufacturing)
-
Task, if applicable (with Oracle Project Manufacturing)
-
LPN
-
Item
-
Quantity
-
UOM
-
Revision (if applicable)
-
Lot (if applicable)
-
Serial number (if applicable)
Note: Express mode is only supported for purchase orders with ASNs and inter-org shipments, intransit shipments and internal requisitions.
Describing Receiving Methods
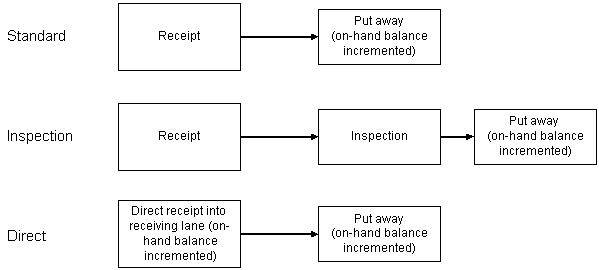
Oracle Warehouse Management supports receiving material according to the same three routings that are used in standard Oracle Purchasing: Standard Routing, Inspection Required, and Direct Delivery.
Note: With Advanced Task Framework, it is possible to carry out multi-stage planned movement of inbound material in the receiving area before storage in the warehouse. Advanced Task Framework functionally is applicable only for material with standard or inspection routing.
Standard Routing
Standard Routing
Standard routing includes the following steps:
-
Receiving the material
-
Later putting the material away
You should use this routing when the material needs to be received (checked-in) initially and then, at some later point, put away into an inventory storage location. You can assign receiving locators to items with a purchase order. Receiving locators have infinite capacity. You can enter a capacity, but it has no influence on putaway rules. With Standard Routing, the system does not increment the on-hand balance, until the put away task has been completed.
Inspection Required
Inspection Required includes the following steps:
-
Material receipt
-
Material inspection
-
Material put away
You should use Inspection Required when the material that you are receiving requires inspection. You can accept or reject material during the inspection, and put away to separate locations, based on the inspection result. The system does not increment the on-hand balance until the put away step task been completed. You can assign receiving locators to inspected items that have a purchase order. Receiving locators have infinite capacity. You can enter a capacity, but it has no influence on putaway rules.
Direct Delivery
This routing should be used when it is important that material show up in the on-hand balance immediately after it is received into the warehouse, or whenever the receiver will be receiving the material directly into its inventory storage location.
With Oracle Warehouse Management, you can receive material directly into an on-hand storage location. That material can optionally be put away from that storage location into a final storage location. Direct delivery can be effectively used to model a receiving staging lane, where material is initially received into the warehouse and it is important that on-hand balances are incremented at the time of receipt. Later, the material can be put away from the temporary staging lane to a final storage location.
Direct delivery includes the following steps:
-
Material receipt
-
Material put away (optional in this routing, because on-hand inventory has already been incremented)
The system also supports express receiving for Advanced Shipping Notices (ASNs).
Note: Put away task are always manually instigated. Thus, the system does not dispatch put away tasks.
The following figure summarizes the three types of receiving methods.
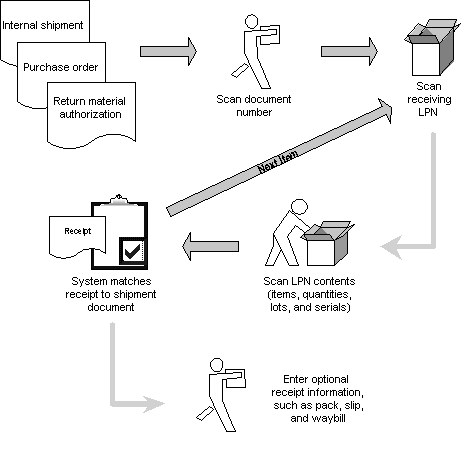
Explaining the Standard Receipt Process
The Standard receipt process includes the following steps:
-
The user scans the document number that is being received.
Note: In a Oracle Warehouse Management enabled Project Manufacturing organization, you can receive project material against a new LPN using [CTRL+G] to generate the LPN. Alternatively, you can receive the project material into an LPN that is associated with the project. The system will display all of the LPNs associated with the project, in inventory and in receiving, for that project and task combination.
-
The user scans the LPN material that is being received into. Optionally, the user can request a new system-generated LPN through a hot key on the mobile device.
Note: If you are receiving an intransit receipt that contains both loose items and an LPN, you must fully consume the LPN before you can receive the loose item. The intransit receipt should be processed as two transactions.7
-
In the Project field, enter, select, or scan the project associated with this document line. (Only visible in a Oracle Warehouse Management enabled Project Manufacturing organization.)
Note: If the project details are not entered in the purchase order, when you log into the mobile device for receipts, the system will not display the Project or Task details.
-
In the Task field, if applicable, select the task associated with the project. By default, the system selects the task associated with the project from the purchase order distribution line. If you need more than one PO distribution then it should have only one Project/Task combination. However there is an exception to this, you can have non-project distribution for purchase order lines. (Only visible in a Oracle Warehouse Management enabled Project Manufacturing organization.)
-
The received material is scanned, including the item numbers, quantities, lots, and serials.
-
The user can select the <Next Item> option to continue receiving again the same document, or he or she can select the <Done> option to proceed to the receipt header.
-
At this point, the system matches the material entered by the user to the shipment lines on the document, according to the Oracle Warehouse Management matching algorithm.
-
On the receipt header page, the user can enter optional information for the receipt, such as pack slip number, waybill, and so on, or can select <Done> to complete the receipt.
Note: As previously mentioned, the on-hand balance for standard receipts is not incremented until the put away step has been completed
The following figure illustrates the standard receipt process.
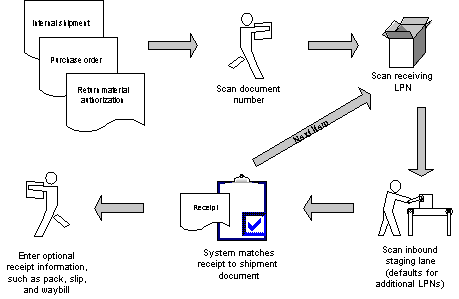
Explaining the Direct Receipt Process
The receiving process for a Direct routing is similar to the Standard routing process, and includes the following steps:
-
The user scans the document number that is being received against.
-
The user scans the LPN material that is being received into. Optionally, the user can request a new system-generated LPN through a hot key on the mobile device. You can receive nested LPNs for all types of documents.
-
The received material is scanned, including the item numbers, quantities, lots, and serials.
-
In the Project field, enter, select, or scan the project associated with this document line. (Only visible in a Oracle Warehouse Management enabled Project Manufacturing organization.)
-
In the Task field, if applicable, select the task associated with the project. By default, the system selects the task associated with the project from the purchase order distribution line. If you need more than one PO distribution then it should have only one Project/Task combination. However there is an exception to this, you can have non-project distribution for purchase order lines. (Only visible in a Oracle Warehouse Management enabled Project Manufacturing organization.)
-
The user scans the subinventory and locator in which the material is being received.
This is typically the inbound staging lane. This location defaults for additional LPNs that are received against the same document.
-
The user can then select <Next Item> to continue to receive against the same document, or select <Done> to proceed to the receipt header.
-
At this point, the system matches the material entered by the user to the shipment lines on the document, according to the Oracle Warehouse Management matching algorithm.
-
On the receipt header page, the user can enter optional information for the receipt, such as pack slip number, waybill, and so on, or can select <Done> to complete the receipt.
The following figure illustrates the Direct routing process.
Explaining the Confirm Receipt Process
The receiving process for standard ASNs is similar to the process of a Standard routing receipt. The following steps explain the ASN receipt process:
-
The user scans the ASN number that is being received against.
-
The user scans the receiving LPN. Optionally, the user can request a new system-generated LPN through a hot key on the mobile device.
-
In the Project field, enter, select, or scan the project associated with this document line. (Only visible in a Oracle Warehouse Management enabled Project Manufacturing organization.)
-
In the Task field, if applicable, select the task associated with the project. By default, the system selects the task associated with the project from the purchase order distribution line. If you need more than one PO distribution then it should have only one Project/Task combination. However there is an exception to this, you can have non-project distribution for purchase order lines. (Only visible in a Oracle Warehouse Management enabled Project Manufacturing organization.)
-
The received material is scanned, including the item numbers, quantities, lots, and serials.
-
The user can then select <Next Item> to continue to receive against the same document, or select <Done> to proceed to the receipt header.
-
At this point, the system matches the material entered by the user to the information contained on the ASN. If a discrepancy appears, the system provides immediate notification to the user.
-
On the receipt header page, the user can enter optional information for the receipt, such as pack slip number, waybill, and so on, or can select <Done> to complete the receipt.
If receipt header information was sent on the ASN, it will automatically default on the header page.
The following figure illustrates the ASN Confirm Receipt routing process.
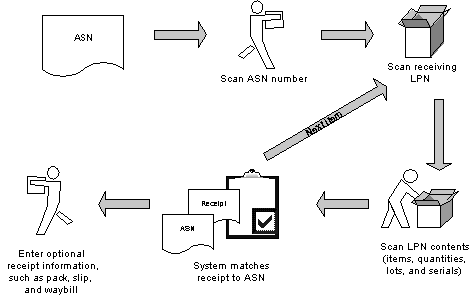
Explaining the Express Receipt Process Using ASNs
The receiving process for ASN express receipts is more streamlined than if an ASN is not used. You can use ASN receiving options regardless of the routing of the purchase order. However, instead of scanning the document number, you scan the ASN number. With ASN receipts, the system matches the received material against the ASN information. If a discrepancy appears, then the system sends you a notification. The following steps explain the ASN receipt process:
-
The ASN is sent by the supplier and processed by Oracle Warehouse Management.
LPNs are prepacked in the system. This means that although the material has not yet been received, all of the content information has been entered into the system.
-
The user scans the ASN being received.
If direct routing is used, then the user would also need to scan the receiving subinventory and locator. The LPN state at this point, is Resides at vendor site.
-
Enter, select, or scan the Project and Task details. (Only visible in a Oracle Warehouse Management enabled Project Manufacturing organizations.) By default, the system selects the task associated with the project from the purchase order distribution line. If more than one PO distribution is desired, then it should have only one Project/Task combination. However, there is an exception to this, you can have non-project distribution for purchase order lines.
Important: If the ASN contains any distribution with a project ID, then you must enter a value for the Project field on the Express ASN Receipt page.
-
The system receives all of the material sent on the ASN.
-
On the receipt header page, the user can enter optional information for the receipt, such as pack slip number, waybill, and so on, or can select <Done> to complete the receipt.
If receipt header information was sent on the ASN, it will automatically default on the header page.
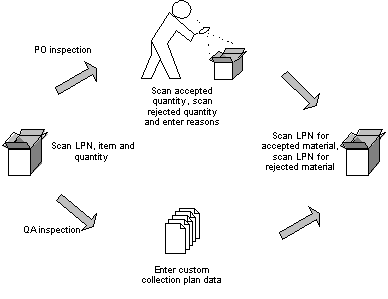
Explaining the Inspection Process
The following steps explain the LPN Inspection process.
-
To initiate the LPN Inspection process, the user scans the LPN to be inspected.
-
Next, the user scans the item and quantity.
If only one item is packed in the LPN, then you can press enter and the contents of the LPN will automatically default into the appropriate fields. You can receive nested LPNs for all document types.
-
Depending on the value of the system profile option, QA:PO Inspection, the system transfers the user to either Oracle Purchasing Inspection or Oracle Quality Inspection. If the profile option value is set to Oracle Quality, but not applicable quality plans are found, then the system defaults to Oracle Purchasing Inspection.
-
If the user is using Oracle Quality, then he or she should proceed to step 5. If the user is using Oracle Purchasing, then he or she should proceed to step 6.
-
Using Oracle Quality Inspection, the user enters information into a quality collection plan that has been previously set up to include customizable quality-related fields that must be captured during inbound inspection.
Note: Inspections can be performed using the optional module of Oracle Quality. If Oracle Warehouse Management is enabled in a Project Manufacturing organization, Oracle Quality can be set up to trigger collection plans based on project and task numbers. See: Entering Quality Results, Oracle Quality User's Guide.
-
Using Oracle Purchasing Inspection, the user enters the accepted quantity, rejected quantity, and a reason and quality code for both accepted and rejected material.
-
The user enters the accepted and rejected quantities.
-
In addition to capturing data in Oracle Quality Inspection, material statuses and lot or serial attributes can be assigned automatically, based on the results of a Quality Inspection and assignment rules that were previously set up.
-
After completing the inspection, the user must scan an LPN for the accepted quantity (this value defaults to the original LPN), and then must generate a different LPN for the rejected quantity.
At this point, the LPN inspection is complete.
The following figure provides and example of the LPN Inspection process.
Related Topics
Quality Results, Oracle Quality User's Guide
Defining Subinventories., Oracle Inventory User's guide
Overview of Manufacturing, Oracle Project Manufacturing User's Guide
Receiving Material for Clients (LSP Feature)
When operating in a third party logistics (LSP) environment, logistics service providers can receive material by client. When you receive a purchase order (PO), the system automatically appends the client code to the PO number and item number. This process helps to segment and identify information by client. If two or more clients have the same PO number or item number at receipt, the system prompts you to select the correct client from a list. After you select the proper client, then the system automatically appends this information to the PO number or item number. You can then proceed with the normal receiving process.
How to Perform Receiving Transactions Using the Oracle Warehouse Management Mobile User Interface
You use the mobile user interface to perform receiving transactions. However, before you can receive items into the warehouse, using either the standard, direct, or inspection methods, an approved purchase order or orders must already exist. Oracle Warehouse Management supports both non-stocked items (items that are not set up in inventory) and stocked items (items that are defined and set up in inventory), enabling you to receive against any purchase order lines through the mobile user interface.
This section explains how to perform the following receipt transactions, using the mobile user interface:
You can view the results of your receipt transactions, using the Material Workbench. Query on the subinventories into which you received items, or query the items being received.
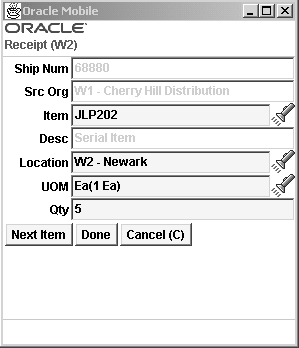
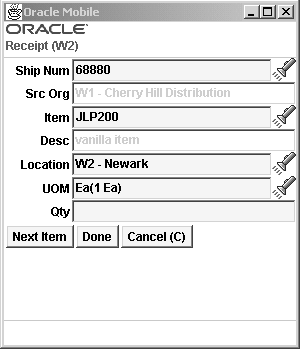
How to Perform a Standard Receipt
You use the mobile user interface to perform a standard receipt from a purchase order. After you receive the material, you must also perform a corresponding put away task to put away the received items into a subinventory and locator. Recall that with standard receiving, the on-hand inventory is not incremented until the item or items have been put away.
-
Log into the mobile user interface and navigate to the Receipt form.
-
In the PO Num field, enter or select the purchase order number that you want to receive against.
The system automatically displays the associated supplier.
-
In the Line Num field, enter or select the purchase order line number that is associated with this receipt.
-
The system automatically displays the associated item, item description, location, and UOM.
-
In the Project field, enter, select, or scan the project associated with this document line. (Only visible in a Oracle Warehouse Management enabled Project Manufacturing organization.)
-
In the Task field, if applicable, select the task associated with the project. (By default, the system selects the task associated with the project from the purchase order distribution line.) (Only visible in a Oracle Warehouse Management enabled Project Manufacturing organization.)
-
Enter the LPN in the LPN field.
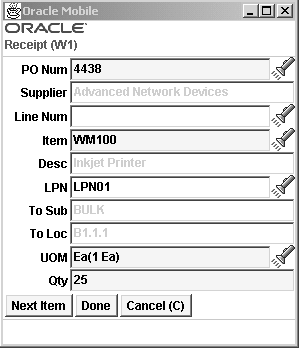
-
If you have set up receiving subinventories and locators, enter the subinventory and locators in the To Sub and To Loc fields. See: Defining Subinventories, Oracle Inventory User's Guide and Locator Alias
-
Enter the quantity you are receiving in the Qty field. If the item is under dual unit of measure control, the system may display the secondary unit of measure and secondary quantity. To display the Sec Uom and Sec Qty fields, you must set a form function parameter. If you set the form function parameter to display the Sec Uom and Sec Qty fields, then you can modify them based on the parameters you set on the Item Master. See, Inventory Attribute Group, Oracle Inventory User's Guide for more information.
-
If the item is lot, serial, or lot/serial controlled, you can enter, select a lot, or scan the first lot, and enter a quantity. If the item is under dual UOM control, then the secondary lot quantity defaults based on how you defined the item in the Item Master. Either the remaining quantity is displayed indicating the quantity yet to be received or the total quantity received to date, depending on the setting of the QTYTRG form function parameter. If the lot is under child lot control, you enter the parent lot, and the child lot appears automatically in the Lot field.
Note: If you set Lot Divisible to no on the Item Master, you must transact the entire lot.
To enter Lot attributes press enter in the Lot field. The Lot Attributes are as follows:
-
Lot
-
Status
-
Expiration Date
-
Grade
-
Expiration Action Date
-
Expiration Action
-
Retest Date
-
Hold Date
-
Mature Date
-
Supplier Lot.
For more information on Lot Attributes see, Inventory Attribute Group, Oracle Inventory User's Guide

-
-
Choose <Done> or <Cancel> to return to the Receipt page.
-
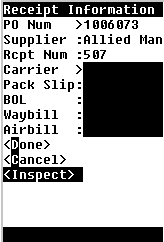
Select <Next Item> to receive more items, or select <Done>, which opens the Receipt Information page.
-
In the Receipt Information form, optionally enter the carrier, pack slip, bill of lading, waybill, and airbill numbers associated with the receipt.
-
Select <Done> to complete the standard receipt.
After you perform the standard receipt, you must perform a put away task to put the item away into the appropriate subinventory and locator. In the case of a Oracle Warehouse Management enable Project Manufacturing organization, the item would be put away into the subinventory and locator belonging to the project. .
Note: In the case of a Oracle Warehouse Management enabled Project Manufacturing organization, the Project and Task details are derived from the LPN. This will be the project and task on the purchase order distribution line. The fields cannot be edited. In the Locator fields, only the physical segments of the locator are displayed. You only enter the physical segments of the locator in the confirmation field. The system will append the project and task to this locator when posting the transaction to Oracle Inventory.
How to Perform a Direct Receipt
You use the mobile user interface to perform a direct receipt from a purchase order. With direct receiving, you receive the item or items directly into a receiving subinventory, and at the time of receipt, the on-hand inventory balance is automatically incremented.
-
Log into the mobile user interface and navigate to the Receipt form.
-
In the PO Num field, enter or select the purchase order number that you want to receive against.
The system automatically displays the associated supplier.
-
In the Line Num field, enter or select the purchase order line number that is associated with this receipt.
-
In the Project field, enter, select, or scan the project associated with this document line. (Only visible in a Oracle Warehouse Management enabled Project Manufacturing organization.)
-
In the Task field, if applicable, select the task associated with the project. (By default, the system selects the task associated with the project from the purchase order distribution line.) (Only visible in a Oracle Warehouse Management enabled Project Manufacturing organization.)
-
In the LPN field, enter or generate (by pressing [CTRL]+[G]) a LPN for this receipt. You can receive nested LPN.
The system automatically displays the associated item.
-
Press [Enter] to display the Deliver form.
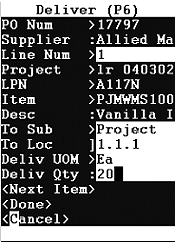
The system automatically displays the PO Number, Supplier, LPN, item, and the item description. In the case of a Oracle Warehouse Management enabled Project Manufacturing organization, the Project and Task fields would also be visible and populated.
-
In the To Sub field, enter or select the subinventory in which to receive this item.
When you enter a value for the To Sub field, the system displays the To Loc field.
-
In the To Loc field, enter the subinventory locator in which to receive the item.
-
Enter the quantity you are receiving in the Deliv Qty field. If the item is under dual unit of measure control, the system may display the secondary unit of measure and secondary quantity. To display the Sec Uom and Sec Qty fields, you must set a form function parameter. If you set the form function parameter to display the Sec Uom and Sec Qty fields, then you can modify them based on the parameters you set on the Item Master. See Inventory Attribute Group, Oracle Inventory User's Guide for more information.
-
If the item is lot, serial, or lot/serial controlled, you can enter, select a lot, or scan the first lot, and enter a quantity. If the item is under dual UOM control, then the secondary lot quantity defaults based on how you defined the item in the Item Master. Either the remaining quantity is displayed indicating the quantity yet to be received or the total quantity received to date, depending on the setting of the QTYTRG form function parameter. If the lot is under child lot control, you enter the Parent Lot, and the child lot appears automatically in the Lot field.
Note: If you set Lot Divisible to no on the Item Master, you must transact the entire lot.
To enter Lot attributes press enter in the Lot field. The Lot Attributes are as follows:
-
Lot
-
Status
-
Expiration Date
-
Grade
-
Expiration Action Date
-
Expiration Action
-
Retest Date
-
Hold Date
-
Mature Date
-
Supplier Lot.
For more information on Lot Attributes see, Inventory Attribute Group, Oracle Inventory User's Guide
-
-
In the Receipt Information form, optionally enter the carrier, pack slip, bill of lading, waybill, and airbill numbers associated with the receipt.
-
Select <Next Item> to enter more items, or select <Done>to complete the standard receipt.
Performing Inspection Receipts
You use the mobile user interface to perform an inspection receipt from a purchase order. With inspection receiving, you receive the item or items. See: Overview of Mobile Quality, Oracle Mobile Supply Chain Applications User's Guide for more information.
-
Log into the mobile user interface and navigate to the Receipt form.
-
In the PO Num field, enter or select the purchase order number to receive against.
The system automatically displays the associated supplier.
-
In the Line Num field, enter or select the purchase order line number that is associated with this receipt.
-
In the LPN field, enter or generate (by pressing [CTRL]+[G]) a LPN for this receipt. You can receive nested LPNs.
-
Enter the receiving subinventory and locator if applicable.
The system automatically displays the associated item.
-
Press [Enter] to display the Receipt form.
The system displays the item description, location, and UOM.
-
Enter the quantity you are receiving in the Qty field. If the item is under dual unit of measure control, the system may display the secondary unit of measure and secondary quantity. To display the Sec Uom and Sec Qty fields, you must set a form function parameter. If you set the form function parameter to display the Sec Uom and Sec Qty fields, then you can modify them based on the parameters you set on the item master. See, Inventory Attribute Group, Oracle Inventory User's Guide for more information.
-
If the item is lot, serial, or lot/serial controlled, you can enter, select a lot, or scan the first lot, and enter a quantity. Either the remaining quantity is displayed indicating the quantity yet to be received or the total quantity received to date, depending on the setting of the QTYTRG form function parameter. If the lot is under child lot control, you enter the Parent Lot, and the child lot appears automatically in the Lot field.
Note: If you set Lot Divisible to no on the Item Master, you must transact the entire lot.
To enter Lot attributes press enter in the Lot field. The Lot Attributes are as follows:
-
Lot
-
Status
-
Expiration Date
-
Grade
-
Expiration Action Date
-
Expiration Action
-
Retest Date
-
Hold Date
-
Mature Date
-
Supplier Lot.
For more information on Lot Attributes see, Inventory Attribute Group, Oracle Inventory User's Guide
-
-
To enter additional items, select <Next Item>; To complete this receipt and perform the required inspection, select <Done>.
The system displays the Receipt Information window.
-
Select <Done> or <Inspect> to perform the inspection.
-
Enter whether the item passed or failed the inspection.
-
Select <Done> to complete the transaction.
Inspecting Project and Task material if Oracle Quality is not Installed
The standard inspection process does not support project/task material within an Oracle Project Manufacturing organization. The Oracle Quality inspection process does support project/task material inspection. If Oracle Quality is not installed, the following procedure can be utilized to inspect project material:
-
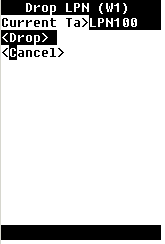
Navigate to the Putaway Drop form.
-
In the LPN field, enter the accepted LPN and select <Drop>
-
The system will display the item, project, task, subinventory, and locator details for the accepted LPN.
-
The system suggests the To Subinventory and To Locator details based on the put away rules defined for the Project and Task.
Related Topics
How to Perform an ASN Receipt
You can also use the mobile user interface to perform receipts from advanced shipping notices (ASNs).
-
Log into the mobile user interface, and navigate to the Express Receive form.
The system displays the ASN Receipt Express form.
-
In the ASN Num field, enter or select the ASN number, and then select <Done>.
You can optionally enter an LPN and purchase order number in the ASN Receipt Express form. The system automatically displays the ASN number, a receipt number, and other information, if supplied.
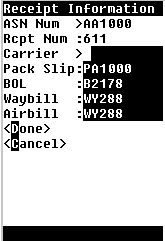
-
In the BOL field, enter the bill of lading number.
-
In the Waybill or Airbill fields, enter either the waybill or the airbill.
-
Select <Done> to save and complete the transaction.
Note: If you are using drop ship functionality within Oracle applications and you do not use the ASN or iSupplier portal to trigger automatic receipts into the receiving organization, perform these drop shipment receipts through the desktop receiving windows or receive the material into non LPN controlled subinventories. This is because the mobile user interface will receive the material into LPNs but the sales order issue transaction that is automatically created by Oracle Order Management will not reference any LPNs. Therefore the material must be loose (unpacked) prior to being issued out of inventory.
How to Print the ASN Discrepancy Report
The ASN discrepancy report enables users of Oracle Warehouse Management to generate a report that details any discrepancies between the material information that a supplier sent on their ASN, and the material information that was collected at the time of actual receipt. The ASN Discrepancy Report is only valid for material that was not received through an Express Receipt, but through a Confirmed Receipt instead.
At the time of Confirmed receipt, you can enter different LPNs, Items, Quantities, Lots and Serials than what was shipped on the ASN. This report enables you to see the difference between the expected information and the actual information. The report also enables you to specify what types of discrepancies to report on and other parameters to control the behavior of the report.
-
Log into the application and navigate to the Submit Request window.
-
In the Name field, enter, or select from the list of values, Oracle Warehouse Management ASN Discrepancy Report.
-
Populate the remaining fields. The remaining fields include:
-
Organization - The organization for which the Oracle Warehouse Management ASN Discrepancy Report will be executed
-
Shipment Num - The shipment number to query for ASN Confirm Receipts
-
Item - The item number to query for ASN Confirm Receipts
-
From Date - The earliest date ASN receipts should be searched for ASN Confirm Receipts
-
To Date - The latest date ASN receipts should be searched for ASN Confirm Receipts
-
Supplier - The supplier that should be searched for
-
Supplier Site - The supplier site that should be searched for
-
Check LPN - Include expected and received LPNs on the report
-
Check Revision - Include expected and received revisions on the report
-
Check Lot Number - Include expected and received lot numbers on the report
-
Check Serial Number - Include expected and received serial numbers on the report
-
Show Only Discrepancies - Display all ASN Confirm Receipts that met the selection criteria, or display only those that had discrepancies.
-
Explaining the Express Receipt Process Using Internal Requisitions
-
Navigate to the Express Receive Int Req page.
-
Scan or enter the internal requisition number. You can only have one shipment for per item on an internal requisition. You can receive multiple shipments each with different items, but not one item on multiple shipments.
-
Scan or enter the LPN. You can receive nested LPNs.
-
Optionally, enter or scan the subinventory and locator information. See Locator Alias.
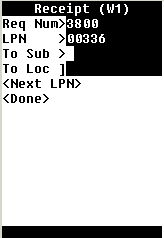
-
Choose <Next LPN> to enter another LPN against this requisition. Choose <Done> to complete the internal requistion. If you choose <Done> the Receipt Information page opens.
-
Optionally, enter the Carrier, Pack Slip, Bill of Lading, Waybill and Airbill.
-
Choose <Done> to complete the receipt, or choose <Cancel> to cancel the receipt.
Related Topics
Receiving for Different Routings
Receiving Material Sent for Outside Processing
Explaining the Express Receipt Process Using Internal Shipments
-
Navigate to the Express Receive Int Ship page.
-
Scan or enter the Shipment number.
-
Scan or enter the item number.
-
Scan or enter the LPN if applicable. LPNs may be nested.
-
Scan or enter the To Subinventory if applicable.
-
Scan or enter the To Locator if applicable. See Locator Alias.
-
Enter the quantity to receive in the Qty field.
-
Choose <Done> to process the receipt and open the Receipt Information page.
-
Optionally enter the Carrier, Pack Slip, Bill of lading, Waybill and Airbill.
-
Choose <Done> to complete the receipt, or choose <Cancel> to cancel the receipt.
Related Topics
Receiving for Different Routings
Receiving Material Sent for Outside Processing
Displaying Country Oracle Warehouse Management User's Guide Origin
Receiving Common User Interface
Businesses need to be able to perform receipts without knowing the document types they are receiving against. The single receiving common user interface allows receipts against all inbound document types. Document types include Purchase Orders, Return Material Authorizations, Intransit Shipments, ASN, and Internal Requisitions.
If your business does not need to use one common user interface to perform all the receipts, it is advisable to use the different menu entries for each of the types of receipts. This will increase the performance while validating the list of values.
Receiving for Different Routings
The common user interface changes based on the routing. The routing is determined based on the document number, document type, and the item.
-
If you are receiving against a direct routing, instead of the Location field, the Subinventory and the Locator fields display.
-
For a one-time item or an expense item, even if the routing is direct, the system will not ask for the To Subinventory and the To Locator because an expense item cannot be delivered to inventory.
-
For a direct receipt, the LPN is no longer required since you may want to receive in inventory as loose and also may be receiving in a non-LPN controlled subinventory.
Related Topics
Receiving Material Sent for Outside Processing
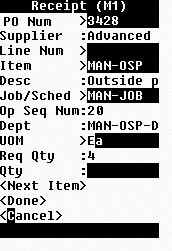
The common user interface changes if you perform a receipt against material sent for outside processing.
-
After you enter Document and Item, the system changes the user interface asking for the Job/Schedule.
-
After entering the Job/Schedule, the system displays the Sequence Num and Department the material should be delivered to complete the receipt. It also displays the Quantity to be delivered to complete that WIP operation.
Related Topics
Displaying Country Of Origin
The COUNTRY OF ORIGIN field can be viewed in the common user interface screen. Country of Origin is displayed depending on the form function parameter SHOW_COO. The default is No. To display Country of Origin, set the parameter to Yes. This field is shown immediately after the LPN field and is optional.
Related Topics
Displaying Routing Message
An Inspection Required routing message may be displayed in the common user interface, depending on the Inspection Routing of the document received. This provides you with the knowledge that some of the material needs to be routed to inspection. The message displays after you exist out of the LPN field.
Related Topics
How to Perform Receipts Using the Receiving Common Interface
-
Navigate to the Receipts screen by selecting All from the Receiving menu.
The Receipts screen displays the document field where you can enter the document number without knowing the document type you are receiving against.
-
The Document field is an LOV that includes all the open purchase orders, return material authorizations, intransit shipments, and internal requisitions against which the material can be received. Oracle Warehouse Management will determine the document type, displaying a list of values if there are multiple matches.
-
Based on the document type, once you exit the Document field, the user interface changes to look exactly as if you would have performed the receipt for that document type after initiating it directly from the menu.
For example, if the scanned document is a purchase order, the Supplier and Line Num fields would display on the user interface.
Also based on the document type selected, the prompt for the Document field changes. In this example it changes to an Int Shipment so you understand you are performing an Int Shipment.
Document Initiated Receipts
The common user interface behaves slightly different for different document types. For all the document types below, the FROM LPN field is optional. In the FROM LPN field, you can enter the license plate number for the Intransit Shipment, Requisition, or ASN. The LPN field is mandatory depending on the routing of the item/org/doc.
Purchase Order
For a PO receipt, after you enter a PO Number, the user interface will display the following fields:
-
PO Num (once it has been entered in the doc prompt)
-
Supplier
-
Line Num
-
Item
Return Material Authorization (RMA)
For a RMA receipt, after you enter a RMA Number, the user interface will display the following fields:
-
RMA Num (once it has been entered in the doc prompt)
-
Customer
-
Item
Intransit Shipments
For Intransit Shipments (non-express), after you enter an Intransit Shipment number, the user interface will open with the following fields:
-
Ship Num (once it has been entered in the doc prompt)
-
Src Org
-
Item
Internal Requisitions
For Internal Requisitions (non-express), after you enter an Internal Requisition number, the user interface will open with the following screen:
-
Req Num (once it has been entered in the doc prompt)
-
Src Org
-
From LPN
-
Item
Currently the functionality is limited to having one shipment for a item on an internal requisition. You can receive multiple shipments each with different items but not one item on multiple shipments.
ASN
For ASNs (non-express), after you enter an ASN number, the user interface will open with the following fields:
-
ASN Num (once it has been entered in the doc prompt)
-
Item
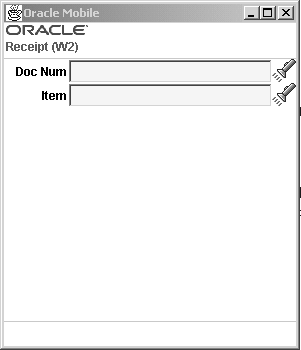
Item Initiated Receipts
In some cases you may want to scan the item number before scanning the document number. You can receive against any document by scanning the item first. The user interface is easily customized so the user interface displays the Item field first.
All the menu options have been seeded with an additional form function parameter ITEM_CONTROLLED. It has two values YES or NO. If it is set to YES the user interface will display the Item field first. By default the value seeded is NO.
Receiving Different Item Types
You can receive different types of items in the single receiving common user interface. Items include vendor, substitute, expense, and one-time items.
The vendor item can be defined either through Vendor Item Association or defined as a cross reference to an existing item in the system. If you scan the vendor item, the Item field is defaulted with the system item and the vendor item shows up as a non-editable field after the Item field.
Cross References for Vendor Items
You can define cross references for vendor items using both the desktop windows, and the mobile pages. If you receive a vendor item that is not cross referenced to a system item, the system will return a No results found message. To define references on the desktop see: Defining Cross Reference Types, Oracle Inventory User's Guide
How to Define Cross References for Vendor Items from the Mobile Device
-
Press Ctrl+G on the Item field.
The system will ask you to select the system item you are associating with the vendor item. This can be done from the list of values.
-
After you enter the system item, the Supplier Item field displays. This is defaulted from the item you scanned. You can change this association or you can leave the default.
When you save the receipt, the new association is created.
-
When you process the transaction by selecting <Done> or <Next Item>, the system creates a cross reference to this specific organization.
If the cross reference is applicable to all organizations, you need to use the desktop and update the record there. From the mobile device, you can only create an organization specific cross-reference.
Describing the LPN Put Away Process
In addition to supporting LPN put away from a Standard Routing, Oracle Warehouse Management enables you to initiate a put away by scanning an LPN anywhere in the warehouse.
After you scan an LPN, you have the option of loading that LPN onto your current equipment, or dropping the LPN immediately. If you load the LPN, you can scan additional LPNs onto their equipment then begin dropping LPNs whenever they are at the appropriate locations to be dropped.
Note: Putaway transactions must be carried out using the manual load, directed drop, drop an LPN, or manual drop pages.
Explaining Manual Loads
A manual load is a put away task that you create. You can use the Manual Load page to fully load the contents of one LPN into another LPN to put away the outer LPN. You can also transfer the contents of one LPN into another LPN in order to put away the second LPN. Finally, you can use the Manual Load page to select items from an LPN and put away only those items. For efficient warehouse operations, you sometimes need to put away individual contents of an LPN and then consolidate the content at various warehouse storage locations. To accomplish this, you load an entire LPN and then specify which items of the LPN to put away at the various storage locations. To perform a manual load, complete the following steps:
-
Navigate to the Manual Load Page.
-
Enter or scan the LPN to load.
-
Enter the Into LPN to nest the LPN.
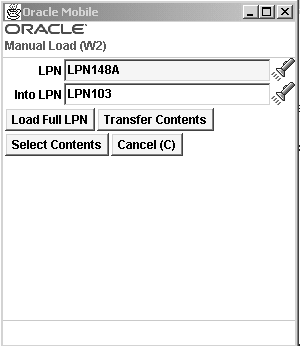
-
Select <Load Full LPN> to nest the loaded LPN in the to LPN, select <Transfer Contents> to transfer the contents from one LPN to another LPN, or choose <Select Contents> to open the Item Load page and select loose content from the loaded LPN.
If you select <Transfer Contents> or <Select Contents> you must enter an into LPN. The into LPN is used to transfer the contents of the original LPN, or individual items if you select <Select Contents>.
-
If you selected <Load Full LPN> or <Transfer Contents> repeat the previous steps to load or transfer additional LPNs. If you selected <Select Contents>, complete the following steps.
-
Enter the item number to load.
-
Enter the revision information if required.
-
Confirm the quantity to load in the Confirm field. If the item is under dual unit of measure control, the system displays the secondary unit of measure, and secondary quantity.
Note: You must set a form function parameter for the secondary quantity and unit of measure to appear.
Note: If you set Lot Divisible to No on the Item Master, then you can receive any quantity in to the locator as long as no reservation exists, and you receive the entire lot quantity in to the same locator. You can continue to receive the lot into an existing indivisible lot provided that it is in the same locator. If the lot exists in a locator then you cannot receive that lot into a different locator.
-
Enter and confirm the lot and serial number information if applicable. If the item is under dual UOM control, then the secondary lot quantity defaults based on how you defined the item in the Item Master.
-
Select <Load/Next>to load another item, select <Done> to complete the task, or select <Cancel> to cancel the task.
Explaining Directed Drops
Directed drops allow you to drop any LPN loaded by the manual load page and the pick load page. For a directed drop, the system selects the drop location using the Oracle Warehouse Management Rules Engine put away rules.
-
Navigate to the Drop Loaded LPNs page.
-
Enter or select the current task.
-
Choose <Drop> to drop the LPN, or Cancel to cancel the LPN drop. If you choose <Drop>, the drop LPN page opens.
Move any LPN
You can use Move any LPN to drop any loaded LPNs or perform an implicit load followed by a drop. This is applicable only to inbound LPNs.
-
Navigate to the Move Any LPN page.
-
Scan or enter the LPN in the LPN field.
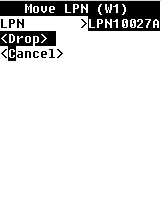
-
Choose <Drop> to drop the LPN, or Cancel to cancel the LPN drop. If you choose <Drop>, the drop LPN page opens. For information on dropping LPNs, see: How to Perform Receiving Transactions Using the Oracle Warehouse Management Mobile User Interface
Drop All LPNs
You can drop multiple loaded LPNs and the system directs you to drop the LPNs in the optimal drop sequence.
To drop all LPNs:
-
Navigate to the Drop All LPNs window.
-
The Drop LPN page opens. For information on dropping LPNs, see: How to Perform Receiving Transactions Using the Oracle Warehouse Management Mobile User Interface
Explaining Manual Drops
You can use the manual drop page to drop items loaded using the Manual Load. page.
-
Navigate to the Manual Drop page.
-
Enter or scan the LPN to drop.
-
Optionally, enter the to LPN, to nest the LPN.
-
Enter the subinventory and locator information. See Locator Alias.
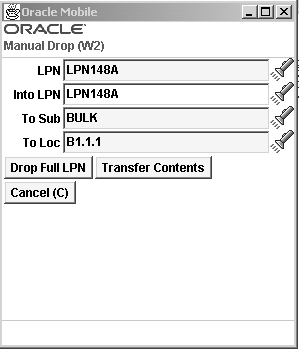
-
Choose <Drop Full LPN> to drop the entire LPN in to the subinventory and locator, choose <Transfer Contents> to transfer the contents of the LPN to the subinventory and locator, or choose <Cancel> to cancel the task.
Multi-Step Putaway and Replenishment
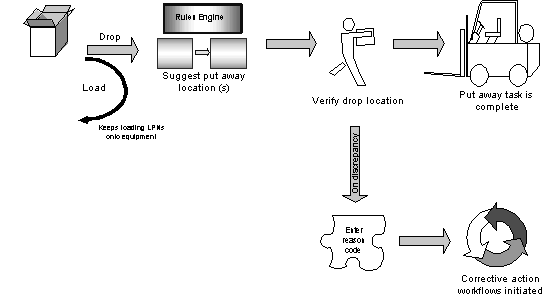
If the suggested put away location is not accessible, you can drop the LPN into a temporary' area for the suggested subinventory. Like any discrepancy of a suggested put away location, a reason code must be given. Based on that reason code the system can execute a workflow that assigns a task to the appropriate operator to put the LPN away to it's original suggested location. For example, the suggested put away location for a particular LPN is a VNA (Very Narrow Aisle) location that is serviced by a special fork truck. When you scan the LPN at the inbound lane, it tells you to put it away to the VNA locator. However, you can only bring it as far as the head of the VNA lane because you don't drive the fork. You put it away to the VNA lane 'temporary' area. When you do that, you give a reason, for example 'Multi-Step', that is attached to a workflow. The workflow creates a task for the fork driver to move the material from the VNA lane 'temporary' area into the VNA locator itself.
To set up multi-step put away and replenishment, you need to create a subinventory as your 'temporary' area or lane to temporarily drop the material into. A workflow must be created to assign a task to the operator that needs to put the material into the appropriate location. The multi-step put away and replenishment process can be repeated any number of times on an LPN.
Multistep replenishment doe not guaranty the original LPN dropped into an intermediate location, is carried forward to the final destination. It only ensures that the material is transferred from intermediate to the final location.
Multistep replenishment does not create any reservations The workflow background engine creates the replenishment task from the intermediate to the original destination. Once the replenishment suggestion is created, the material is automatically reserved from other processes using it. There is a time gap between the material originally getting dropped and workflow process creating the replenishment, during which that material would be available for other processes. You need to schedule the workflow background engine concurrent request appropriately and do not allow pickers to pick material from these subinventories for other processes.
The following figure illustrates the LPN put away process.
Explaining LPN Based Returns
Oracle Warehouse Management offers a one step or a two step process for returns. This option is determined by the WMS:Express Returns profile option. By enabling this option you can perform a two step return process where, for example, a manager can initiate the return (step 1) and a picker can retrieve the material and deliver it to shipping (step 2). Otherwise the return transaction is initiated and completed in one step.
Returns to suppliers can be based on the LPN that the material was put away into. Rather than searching for the material by supplier, or by subinventory, you can search by LPN which will direct you immediately to the needed material.
Note: When you create returns from the desktop, the system allows you to enter the lot number of the parent transaction. The lot number does not need to be in the selected LPN. However, when you submit, and confirm the transaction from the mobile device, the system validates the lot, and you cannot return a lot that does not reside in the LPN.
Note: When you set express returns to no, the system does not know to restrict LPNs because the previous transaction is not committed. If you commit the first transaction though the mobile and then try the return, the system does not suggest a new LPN.
-
To initiate the two step LPN based return, navigate to the Returns window.
-
Select the Transaction Details tab.
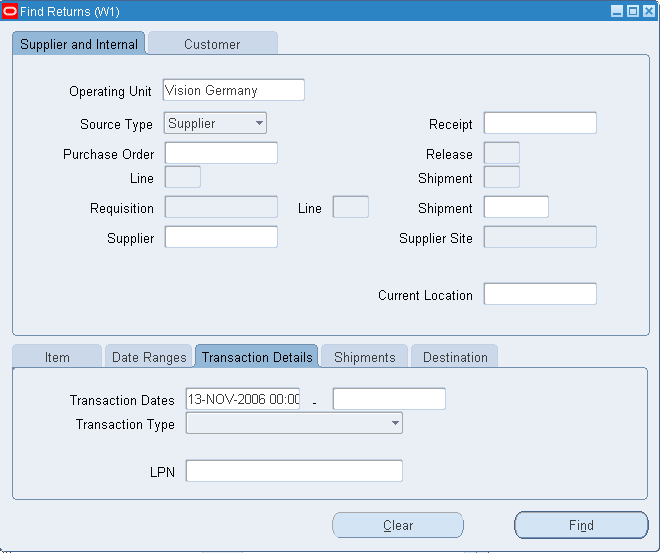
-
Enter the LPN to be returned and select Find.
-
In the Receiving Returns window, enter the quantity to be returned, where you want the material returned to (Supplier or Receiving) and any other applicable information, for example an RMA number.
-
Select the check box of the line that you are returning.
-
Save your work.
Step two, of the return process, takes place on the mobile device. After the return is initiated on the desktop, an operator with a hand held device scans the LPN to be returned and delivers the material to the appropriate location.
-
You begin the second step by navigating to the returns menu on the hand held device.
-
You can either scan the LPN or select the LPN from the list of values. Only those LPNs to be returned will be in the list of values.
-
The Item field will populate automatically. The UOM and the quantity to be returned will populate as well. You must confirm the quantity to be returned. If the item is under dual unit of measure control, the system may display the secondary unit of measure and secondary quantity. To display the Sec Uom and Sec Qty fields, you must set a form function parameter. If you set the form function parameter to display the Sec Uom and Sec Qty fields, then you can modify them based on the parameters you set on the Item Master.
Note: When the entire quantity in the LPN is being returned, you are not prompted to confirm the material. You only have to enter the LPN and select Done. Only when a partial quantity is being returned in the LPN are you prompted to confirm the item, lot, serial, and quantity information.
If the item is under dual UOM control, then the secondary lot quantity defaults based on how you defined the item in the Item Master. Either the remaining quantity is displayed indicating the quantity yet to be received or the total quantity received to date, depending on the setting of the QTYTRG form function parameter. If the lot is under child lot control, you enter the parent lot, and the child lot appears automatically in the Lot field.
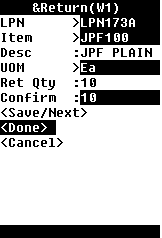
-
Select Save/Next to continue with another return, or select Done to complete the return process.
Related Topics
Quality Results, Oracle Quality User's Guide
Defining Subinventories., Oracle Inventory User's guide
Overview of Manufacturing, Oracle Project Manufacturing User's Guide
LPN Transactions
You can complete jobs, perform, work order-less completions and flow completions with License Plate Number (LPN) information. You can uniquely identify each container in the supply chain by the assigned LPNs to these containers. Also, you can commit the contents to inventory by initiating a move order in the Put Away Drop window. If the assembly is under lot and serial control, you are prompted to enter the lot and serial information.
There are three types of LPNs:
-
Pre Packed: Completing a quantity into an existing LPN.
-
Packing: Generating an LPN when entering the completion transaction. This is initiated using a hot key.
-
Pre-Generate: Submitting a concurrent request to generate the LPN in advance of completing the assembly
Note: To access and perform LPN transactions, you must have Oracle Warehouse Management System installed, be in a Oracle Warehouse Management enabled organization, and choose the Whse Management responsibility within the mobile application. You can perform LPN transactions only within a standard costing organization.
To complete jobs and assemblies for an LPN without drop:
-
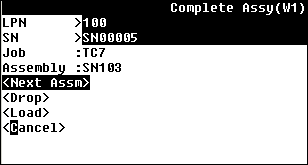
Navigate to the Assy Completion Page
-
Choose Assy Completion.
-
Enter the LPN in the LPN field, or select it from the list of values.
-
Enter the Job in the job field, or select it from the list of values.
The Assembly, UOM, Job Qty, Compl Qty, and Avail Qty fields populate automatically.
-
Enter the quantity to complete in the Qty field.
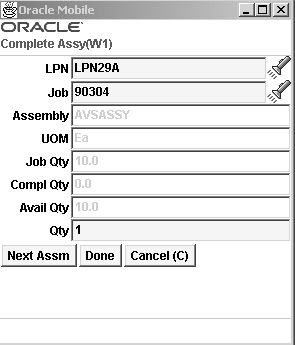
-
Choose <Next Assm> to enter another assembly, <Done> to complete the transaction, or <Cancel> to cancel the transaction.
To complete jobs and assemblies for LPN with directed drop:
Directed drops allow you to drop a completed assembly loaded into an LPN. For a directed drop, the system selects the drop location using the Oracle Warehouse Management Rules Engine.
-
Navigate to the Assy Completion Page.
-
Choose Assy Compl w/ Directed Drop.
-
Enter the LPN in the LPN field, or select it from the list of values.
-
Enter the Job in the job field, or select it from the list of values.
The default values display for the job, assembly number, unit of measure, job quantity, quantity previously completed, and quantity available to complete.
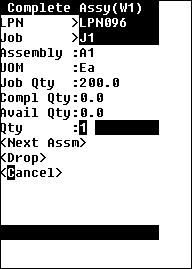
-
Enter the quantity completed in the QTY field.
-
Enter the Lot and Serial information if applicable.
-
Choose <Drop> to drop the assembly or <Cancel> to cancel the transaction.
When you select <Drop> the Drop page appears. See: Describing the LPN Put Away Process, Oracle Warehouse Management User's Guide.
To complete jobs and assemblies for LPN with manual load:
A Manual load is a pull task that you create. You can use the Manual Load page to fully load the contents of one LPN into another LPN as well as transfer the contents of an LPN to another LPN. You can also use the Manual Load page to perform item based loads. For efficient warehouse operation it is necessary to putaway individual contents of the LPN and consolidate them at various warehouse storage locators. The process used to putaway such LPNs into warehouse involves loading the mixed LPN and specifying the item for putaway.
-
Navigate to the Assy Completion Page.
-
Choose Assy Completion w / Load.
-
Enter the LPN in the LPN field.
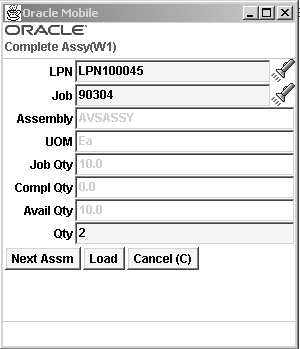
-
Enter the Job in the Job field. The Assembly, UOM, Compl Qty, and Avail Quantity fields populate automatically.
-
Enter the quantity completed in the QTY field.
-
Enter the Lot and Serial Information if applicable.
-
Choose <Load> to Load the assembly or <Cancel> to cancel the transaction.
When you select <Load> the Manual Load page appears. See: Describing the LPN Put Away Process, Oracle Warehouse Management User's Guide.
To complete jobs and assemblies for LPN with manual drop:
You can bypass the rules engine, and manually drop a loaded LPN.
-
Navigate to the Assy Completion Page.
-
Choose Assy Completion w / Manual Drop
-
Enter the LPN in the LPN field, or select it from the list of values.
-
Enter the Job in the job field, or select it from the list of values.
The default values display for the job, assembly number, unit of measure, job quantity, quantity previously completed, and quantity available to complete.
-
Enter the quantity completed in the QTY field.
-
Enter the Lot and Serial information if applicable.
-
Choose <Drop> to drop the assembly or <Cancel> to cancel the transaction.
When you select <Drop> the Manual Drop page appears. See: Describing the LPN Put Away Process, Oracle Warehouse Management User's Guide.
To perform work orderless completions without drop
-
Navigate to the Work Order-Less Page.
-
Choose WOL (Work Order-Less) Completion.
-
In the LPN field—enter or select from the list of values.
-
Enter the assembly number in the Assembly field.
The UOM field populates automatically.
-
If applicable enter the sales order number in the So Num field. If you enter a sales order the system creates a reservation as part of the mobile work orderless completion transaction, and transfer this reservation to inventory. Sales order number and sales order line fields are available, and when these fields are populated, the completed assemblies are reserved against the sales order and line specified.
-
Enter the quantity to complete in the Qty field.
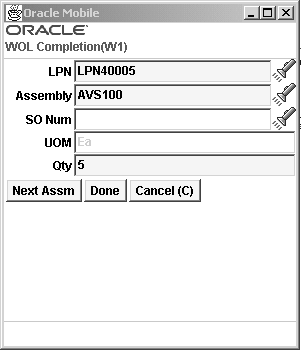
-
Choose <Next Assm> to enter another Assembly, <Done> if complete, or <Cancel> to cancel the transaction.
To perform work orderless completions for LPN with directed drop:
-
Navigate to the Work Order-Less Page.
-
Choose WOL Compl w/ Directed Drop
-
In the LPN field—enter or select from the list of values.
-
In the Assembly field—enter, select from the list of values, or scan the assembly.
The default value displays for the unit of measure.
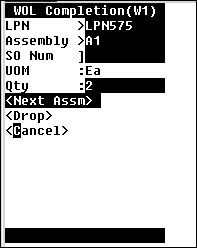
-
If applicable enter the sales order number in the So Num field. If you enter a sales order the system creates a reservation as part of the mobile work orderless completion transaction, and transfer this reservation to inventory. Sales order number and sales order line fields are available, and when these fields are populated, the completed assemblies are reserved against the sales order and line specified.
-
Enter the quantity completed in the QTY field.
-
Choose <Drop> to drop the assembly or <Cancel> to cancel the transaction.
When you select <Drop> the Drop page appears. See: Describing the LPN Put Away Process, Oracle Warehouse Management User's Guide.
To perform a work order-less completion with manual load:
-
Navigate to the Work Order-Less Page.
-
Choose WOL Compl w/ Directed Drop
-
In the LPN field—enter or select from the list of values.
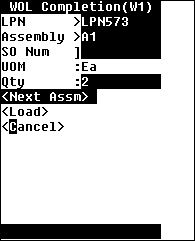
-
In the Assembly field—enter, select from the list of values, or scan the assembly.
The default value displays for the unit of measure.
-
If applicable enter the sales order number in the So Num field. If you enter a sales order the system creates a reservation as part of the mobile work orderless completion transaction, and transfer this reservation to inventory. Sales order number and sales order line fields are available, and when these fields are populated, the completed assemblies are reserved against the sales order and line specified.
-
Enter the quantity completed in the QTY field.
-
Choose <Load> to Load the assembly or <Cancel> to cancel the transaction.
When you select <Load> the Manual Load page appears. See: Describing the LPN Put Away Process, Oracle Warehouse Management User's Guide.
To perform work order-less completions with manual drop:
-
Navigate to the Work Order-Less Page.
-
Choose WOL Compl w/ Directed Drop
-
In the LPN field—enter or select from the list of values.
-
In the Assembly field—enter, select from the list of values, or scan the assembly.
The default value displays for the unit of measure.
-
If applicable enter the sales order number in the So Num field. If you enter a sales order the system creates a reservation as part of the mobile work orderless completion transaction, and transfer this reservation to inventory. Sales order number and sales order line fields are available, and when these fields are populated, the completed assemblies are reserved against the sales order and line specified.
-
Enter the quantity completed in the QTY field.
-
Choose <Drop> to drop the assembly or <Cancel> to cancel the transaction.
When you select <Drop> the Manual Drop page appears. See: Describing the LPN Put Away Process, Oracle Warehouse Management User's Guide.
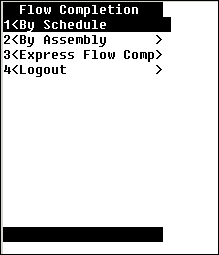
To perform a flow completion without drop:
-
Navigate to the Flow Completion Page.
-
Choose Flow Completion.
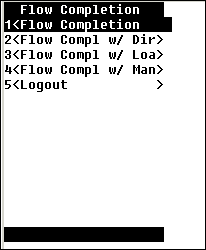
-
Choose the method to complete the flow schedule. The available choices are By Schedule, By Assembly, and Express Flow Compl (Express Flow Completion).
-
Enter or scan the LPN in the LPN field, or select it from the list of values.
-
Scan or select the Sched Num (Schedule Number) from the list of values. If you selected by Assembly from the Flow Completion page, enter the assembly number.
The Assembly field, or the Sched Num field populates automatically accordingly.
-
Enter the flow line in the Line field.
-
Enter the quantity to complete in the Qty field.
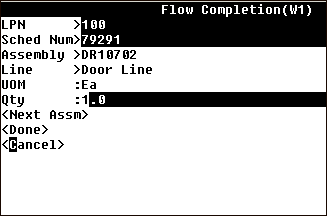
-
Choose <Next Assm> to enter another Assembly, <Done> if complete, or <Cancel> to cancel the transaction.
To perform express flow completions:
-
Navigate to the Flow Completion Page.
Note: You can only perform express flow completions without drops. If the assembly or any of the components are under lot or serial control, you cannot perform an express flow completion.
-
Choose Express Flow Compl
-
Enter, select or scan the LPN.
-
Enter the schedule number in the Sched Num field. You can continue to complete as many flow schedules into the same LPN as necessary.
To perform flow completions with directed drop:
-
Navigate to the Flow Completions Page
-
Choose Flow Compl w / Directed Drop
-
Choose the method to complete the flow schedule. The available choices are By Schedule or By Assembly.
-
Enter, Scan or select the LPN from the list of values.
-
Scan or select the Assembly from the list of values. If you selected By Schedule, enter the schedule number.
The Assembly field, or the Sched Num field populates accordingly.
-
Enter the flow line number in the Line field.
-
Enter the quantity to complete in the Qty field.
-
Choose <Drop> to drop the assembly or <Cancel> to cancel the transaction.
When you select <Drop> the Drop page appears. See: Describing the LPN Put Away Process, Oracle Warehouse Management User's Guide.
To perform flow completions with manual load:
-
Navigate to the Flow Completions Page
-
Choose Flow Compl w / Directed Drop
-
Choose the method to complete the flow schedule. The available choices are By Schedule or By Assembly.
-
Enter, Scan or select the LPN from the list of values.
-
Scan or select the Assembly from the list of values. If you selected By Schedule, enter the schedule number.
The Assembly field, or the Sched Num field populates accordingly.
-
Enter the flow line number in the Line field.
-
Enter the quantity to complete in the Qty field.
-
Choose <Load> to Load the assembly or <Cancel> to cancel the transaction.
When you select <Load> the Manual Load page appears. See: Describing the LPN Put Away Process, Oracle Warehouse Management User's Guide.
To perform flow completions with manual drop:
-
Navigate to the Flow Completions Page
-
Choose Flow Compl w / Directed Drop
-
Choose the method to complete the flow schedule. The available choices are By Schedule or By Assembly.
-
Enter, Scan or select the LPN from the list of values.
-
Scan or select the Assembly from the list of values. If you selected By Schedule, enter the schedule number.
The Assembly field, or the Sched Num field populates accordingly.
-
Enter the flow line number in the Line field.
-
Enter the quantity to complete in the Qty field.
-
Choose <Drop> to drop the assembly or <Cancel> to cancel the transaction.
When you select <Drop> the Manual Drop page appears. See: Describing the LPN Put Away Process, Oracle Warehouse Management User's Guide.
To perform serial completions without drop:
-
Navigate to the Serialized Assy Completion page:
-
Scan, Enter, or select the LPN.
-
Scan, enter, or select the serial number of the assembly in the SN field. The Job and Assembly fields populate automatically.
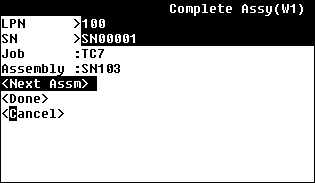
-
Choose <Next Assm> to enter another assembly, <Done> to complete the transaction, or <Cancel> to cancel the transaction.
To perform serial completions with directed drop:
-
Navigate to the Serialized Assy Completion w/Drop page.
-
Scan, enter, or select the LPN.
-
Scan, enter, or select the serial number of the assembly in the SN field. The Job and Assembly fields populate automatically.
-
Choose <Next Assm> to enter another assembly, <Drop> to open the drop the assembly, or <Cancel> to cancel the transaction.
-
When you select <Drop> the Drop page appears. See: Describing the LPN Put Away Process, Oracle Warehouse Management User's Guide.
To perform serial completions with manual load:
-
Navigate to the Serialized Assy Completion page:
-
Scan, Enter, or select the LPN.
-
Scan, enter, or select the serial number of the assembly in the SN field. The Job and Assembly fields populate automatically.
-
Choose <Next Assm> to enter another assembly, choose <Load> to open the manual load page and complete the transaction, or <Cancel> to cancel the transaction.
To perform serial completions with manual drop:
-
Navigate to the Serialized Assy Completion w/Drop page.
-
Scan, enter, or select the LPN.
-
Scan, enter, or select the serial number of the assembly in the SN field. The Job and Assembly fields populate automatically.
-
Choose <Next Assm> to enter another assembly, <Drop> to open the drop the assembly, or <Cancel> to cancel the transaction.
-
When you select <Drop> the Manual Drop page appears. See: Describing the LPN Put Away Process, Oracle Warehouse Management User's Guide.
Explaining Pre-Generated Putaways
Oracle Warehouse Management pre-generated put away functionality allows incoming material to have space allocated for the put away as a background process, immediately after the receipt has been completed. This enables a put away suggestion to be created before the operator requests to put the material away. Pre-generated suggestions can be given an expiration time. Oracle Warehouse Management will attempt to re-allocate expired suggestions if, for example, warehouse conditions have changed before the put away is requested. The pre-generated put away functionality is integrated with barcode label printing functionality enabling barcodes to be printed as soon as a put away allocation has been suggested.
Pre-generated put away is especially useful in two scenarios:
-
It offers potential performance gains by enabling the put away allocation process to run in the background
-
It enables the users to print labels containing the put away suggestion so that material can be routed to that location in order to expedite put away processing.