Oracle Warehouse Management Outbound Logistics
This chapter covers the following topics:
- Overview of the Material Picking Process
- Explaining Pick Task Grouping
- Describing Pick Methodologies
- Performing Picks
- Bulk Picking
- Setting Up Case Picking
- Explaining Over Picking
- Setting Up Over Allocation For Pick Release
- Under Picking Without Exception
- Lot Substitution During Picking
- Describing Task Loading and Dropping
- Pick Load Page Setup
- Express Load
- Express Picking
- Manifest Picking
- Pull Replenishment
- Push Replenishment
- Forward Pick Replenishment
- How to Perform Move Order Transactions
- Explaining Oracle Warehouse Management Picking for Manufacturing
- Dock Scheduling and Load Sequencing
Overview of the Material Picking Process
Pick release is the process of selecting orders for release to the warehouse for picking and shipping. After the orders are released, Oracle Warehouse Management uses the Rules Engine to determine the appropriate material allocations. After the system completes the allocations, the Task Type Assignment engine assigns the appropriate task types, and the system can then suggest packing configurations.
At this point, the task is now ready for dispatching to an operator. The operator can then log onto the system, optionally sign onto a material handling device, and accept pick tasks. Optionally, the operator can accept all pick tasks for a specific task grouping as a bundled set of tasks. Oracle Warehouse Management enables the operator to pick multiple partial LPNs, full LPNs, and loose picks for a single task. Loose material and material packed in an LPN can be picked in any sequence for a given task. Operators can continue to load material as long as there is capacity on the equipment. After the material is loaded, it can be dropped into staging lanes for further packing and labeling before shipment. This completes the material picking process. At this time, order lines are also split or merged based on equipment capacity defined for the equipment and pick methodology defined by pick slip grouping rules
Related Topics
Overview of Pick Release, Oracle Shipping Execution User's Guide
Explaining Pick Release
The pick release process selects sales order lines to release to the floor for picking and shipping. A pick release rule stores the criteria that will be used to select sales orders for release. If trips are not scheduled for dock doors, then the release rule also determines the staging lane to which the material should be delivered.
Related Topics
Release Sales Orders for Picking, Oracle Shipping Execution User's Guide
Explaining the Pick Allocation Process
After orders have been selected for release and prioritized for allocation, the rules engine makes the material allocations. Recall that material allocations might be based on characteristics such as, customer requirements, organization-wide business directives, stock rotation policies, item handling restrictions, item category, or by some other business attribute. The rules engine can also divide the allocations by pick unit of measure.
The output of the pick allocation is a task that includes the subinventory and locator from which to pick, and if applicable, the revision and lot to be picked.
After the system performs allocations, it must determine the task type so that the job to pick the allocated material can be dispatched to an appropriately trained user.
Explaining the Picking Process
Operators can accept a picking task, or a set of tasks, directly from the mobile device. The system dispatches tasks through the mobile user interface. Through this user interface, the picker can view the item, quantity, subinventory, and locator from which they can pick the load. If the item were revision or lot controlled, the system would also display those details.
The picking tasks assigned by the system to a user might include any of the following:
-
Pick loose items into an LPN
-
Pick whole LPNs
-
Pick multiple LPNs, for example, pick 5 boxes of 10 each to fulfill a task to pick 50
-
Pick from LPNs, for example, pick 5 items out of a box of 10
-
Pick multiple partial LPNs, full LPNs, and loose picks for a single task
-
Build larger LPNs
-
View cartonization suggestion
The user can confirm a pick by scanning one or more LPNs to load. If the material in the storage locator is not identified with an LPN, then the user must confirm the item, quantity, and the storage subinventory, and locator to confirm the pick.
The user can also unpack an LPN to fulfill the pick, however if the pick units of measure are appropriately established during system setup, unpacking an LPN to fulfil a pick, should not be necessary. The user can also pick the items or the whole LPN into another larger LPN (like a pallet or carton), thus building a package that can be shipped during the picking process. If Cartonization is enabled, the user will also see the container suggestion in his or her task queue.
Auto Pick Confirm
You can select Auto Pick Confirm in a Oracle Warehouse Management enabled organization. In this case, even if Oracle Warehouse Management Pick Rules specify LPN allocation, no LPNs will be picked. Only loose material will be moved to staging. It is imperative the inventory be available loose (not packed in LPNs). The system does not perform this check before running auto pick confirm. You must enforce that when using auto pick confirm, material is picked from Non LPN Controlled Subinventories.
Pick Confirmation Support for Process Manufacturing
If an item is under dual UOM control, and located in an LPN, you do not have to confirm the secondary quantity information. If the material is not associated with an LPN, you must comply with the following requirements:
-
You must manually confirm the primary and secondary quantities. The primary or secondary UOM may default when you confirm the partner quantity, or you can enter the partner quantity as long as the quantity is within the conversion deviation range.
-
The inventory profile option INV: Target Preferred Grade determines if you can allocated grade controlled inventory on a sales order line. If you set the profile option to no, then you can select any grade, and the system disregards the preferred grade on the sales order line. If you set the profile option to Yes, then you can only pick material that has the grade specified on the sales order line. If the sales order line does not specify a grade, then you can pick material of any grade.
Related Topics
Implementing Profile Options Summary, Oracle Inventory User's Guide
Explaining Pick Task Grouping
Oracle Warehouse Management enables users to perform all pick tasks, for a specific task grouping, as a bundled set of tasks. This functionality is only available through a mobile RF device and is not available through the desktop windows.
Upon Pick Release, pick tasks can be generated and grouped by a number of Pick Slip Grouping Rules, for example Order Picking. Typically, this grouping represents a discrete bundle of work to be performed by a single user.
All functionality of the pick task screen remains unchanged, except that when the task has been completed (either dropped or loaded), a determination will be made whether more tasks remain in the current grouping. If so, the Pick Load screen is presented for the next task in the grouping, with a message indicating that the pick has been completed. If no more tasks remain for the grouping, the Task Menu is presented, with a message indicating that the last pick for the grouping has been completed.
Related Topics
Defining Pick Slip Grouping Rules, Oracle Inventory User's Guide
Describing Pick Methodologies
Pick methodologies refer to the different ways in which you might select to perform picking tasks. For example, you might select to pick an order by itself, or to pick multiple orders at the same time. The type of picking methodology that a warehouse uses depends on the kinds of operations that they run. For example may opt to use cluster picking in order to pick multiple orders in one pass.
Oracle Warehouse Management supports the following pick methodologies:
-
Discrete picking: The system dispatches discrete groups of tasks, grouped by pick slip grouping rules.
-
Order picking: The system assigns picks for one order or job/schedule at a time to a user. Thus, when a user accepts a task for the first line of a job/schedule or sales order, all other picking tasks associated with that job/schedule or order are automatically assigned to the user as well, regardless of the task type or subinventory.
-
Wave picking: The system dispatches tasks line by line, regardless of the subinventories where those tasks are picked from, or to whom other lines on the order have been dispatched.
-
Pick and pass/label picking: LPNs are generated by the system during cartonization and the labels are printed prior to picking. To pick, the user scans the LPN and is dispatched the picking task associated with that LPN. The user can then "pass" the LPN to the next user or continue picking all material for the LPN and will not be prompted to drop the LPN in the staging lane, until all the lines have been picked.
Note: If you select order picking as the pick release methodology, and specify an order picking rule type at pick release, the system bypasses all bulk picking checks at the subinventory and the item and does not bulk pick any material as part of that pick release.
-
Bulk picking: The system groups tasks to pick the same items that are sourced from the same locator so you only see one task that might represent picks for several order lines. Deconsolidation of order lines occur at pick drop. Oracle Warehouse Management automatically splits bulk tasks based on equipment constraints during the pick release process. You can choose to bulk pick items at pick release via the pick slip grouping rules, or choose to use the concurrent program to bulk pick across pick waves after pick release. You can also bulk pick within a delivery or across deliveries. The following bulk pick exceptions apply:
-
The system does not allow bulk picking for cartonized items
-
The bulk picked item must be the same revision.
-
-
Case picking: The case labels printed at order release can be assigned to pick operators. The operator can perform case picks and either perform Pick to Belt or Pick to Pallet by scanning multiple case labels. This enables warehouse workers to simply scan a case already packed with items and move it directly onto a pallet or belt.
To streamline the data entry process, Oracle Warehouse Management will create a single task if multiple cases from a single location need to be picked to fulfill an order.
-
Paper-based picking: Users pick according to a paper pick slip that is printed at pick release. This enables a user to dispatch tasks to themselves when working in a paper-assisted environment.
-
Cluster picking: A specified number of clusters is dispatched to a single user at once. A cluster is defined as all the tasks related to a sales order delivery, or a manufacturing job or schedule. The number of clusters can be set for the organization, or controlled by each user individually. Cluster picking offers significant levels of optimization by enabling a user to pick multiple orders at a time by interleaving the pick tasks for various orders and sequencing them in ascending locator/optimal travel sequence. This enables the user to pick orders in its entirety before proceeding to pick more orders.
Cluster picking by labels: Enables you to pick directly into shipping cartons by picking into cartonized LPNs. The pick labels are generated at order release, and are manually assigned to pick operators. A cartonized LPN is also generated for each pick slip grouping (for example, by order, delivery, zone). The operator scans the LPN barcode in each assigned label and the tasks for the cartonized LPN are displayed just like the regular cluster pick.
-
Zone Picking: Zone picking enables you to utilize all of the picking methodologies but restricts to a specific subinventory. You designate the subinventory before you begin your picking tasks.
-
User-defined pick grouping: See: Defining Pick Slip Grouping Rules, Oracle Inventory User's Guide.
Note: Multiple device sign-on is only allowed for discrete and wave picking.
For more information on specifying the maximum number of clusters, see Warehouse Organization Setup, Oracle Warehouse Management Implementation Guide.
Example of Cluster Picking
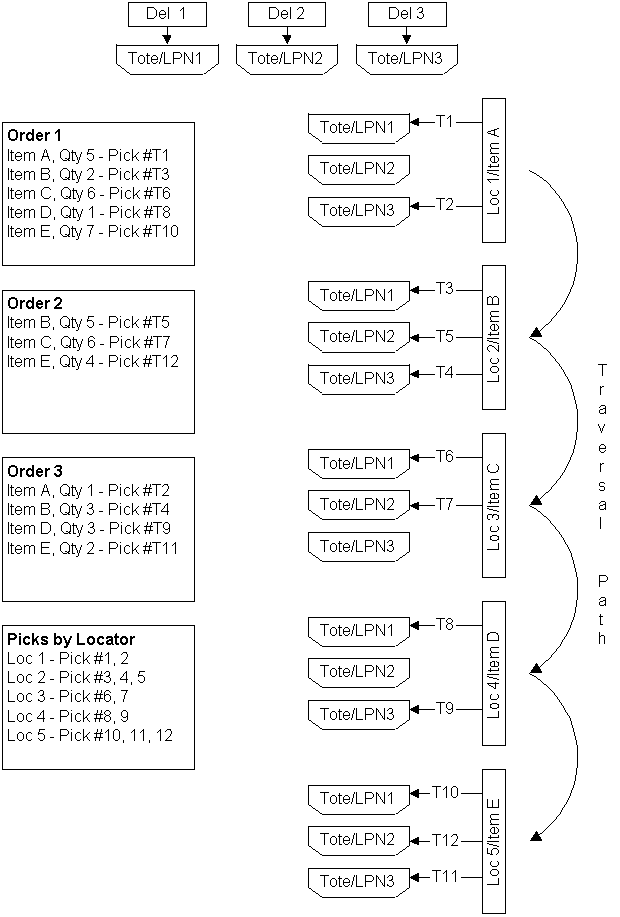
The following figure shows an example of cluster picking. There are three sales orders SO 1, SO 2, and SO 3 for items A,B,C,D, and E. All three sales orders are to be delivered against different deliveries: Del 1, Del 2, and Del 3.
Individual deliveries needs to be shipped against individual LPNs. Delivery 1 needs to be dispatched against Tote/LPN 1. Delivery 2 needs to be dispatched against Tote/LPN 2. Delivery 3 needs to be dispatched against Tote/LPN 3.
Oracle Warehouse Management will generate 5 tasks for SO 1, 3 tasks for SO 2, and 4 tasks for SO 3.
Tasks are sequenced as shown in the figure based on the minimal traverse path to collect material for SO 1, SO 2, and SO 3 from locations 1,2,3,4,5.
-
Pick Item A against SO 1: Task T1, Del 1, Tote/LPN1
-
Pick Item A against SO 3: Task T2, Del 3, Tote/LPN3
-
Pick Item B against SO 1: Task T3, Del 1, Tote/LPN1
Performing Picks
The following procedures lists the steps to perform the following pick types:
-
Cluster Picks
-
Discrete Picks
-
Order Picks
-
Wave Picks
-
Pick by label
To perform cluster picks
-
Log onto the mobile device.
-
Navigate to the Task menu.
-
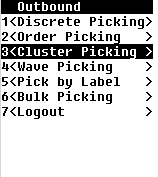
Select Cluster Pick from the Task menu.
-
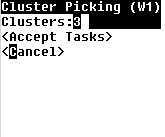
If you pre-specified the maximum number of clusters to pick in the warehouse parameters window, the number will default into the Cluster Picking page. The number of clusters cannot be updated.
If the number of clusters is not pre-specified, you will be required to enter a positive number that depicts the number of maximum clusters you will potentially pick.
-
Choose <Accept Tasks> to invoke the Pick Load page.
-
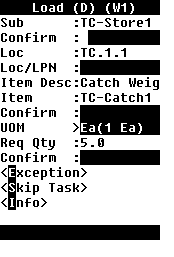
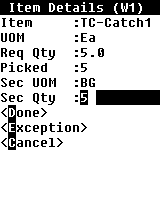
In the Pick Load page, you confirm the required fields setup during pick load setup. See: Explaining Pick Load Setup . After you confirm the necessary fields, the Item Information page appears.
-
Choose <Done> to open the Load page, <Exception> to log an exception, or <Cancel> to cancel the task.
-
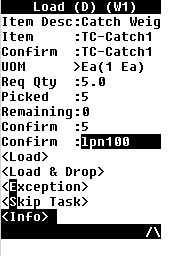
Confirm the necessary fields on the Load page, and choose <Load> to load the task, <Load & Drop> to load and drop the task <Exception> to enter and exception, <Skip Task> to skip the task, or <Info> to view the order information. If there is another task in the cluster, the system advances to the next text. If there are no more tasks, the cluster, the system returns to the Outbound task menu.
Note: For tasks with the attribute honor case pick enabled you must scan an LPN for each case. You can optionally scan the pallet LPN that contains the case LPNs. See Setting Up User Task Type Attributes for more information.
To Perform Discrete Picks
-
Navigate to the Outbound menu
-
Choose Discrete Picking
-
In the Pick Load page, you confirm the required fields setup during pick load setup. See: Explaining Pick Load Setup . After you confirm the necessary fields, the Item Information page appears.
-
Choose <Done> to open the Load Page, <Exception> to enter an exception, or <Cancel> to cancel the task.
-
Confirm the necessary fields on the Load page.
-
Choose <Load> to load the task, <Load & Drop> to load and drop the task, <Exception> to enter an exception, <Skip Task> to skip the task, or <Info> to view the order information.
-
If you choose <Load>, or <Load & Drop> the system completes the task, and advances to the next task.
To Perform Order Picks
-
Navigate to the Outbound menu
-
Choose Order Picking.
-
In the Pick Load page, you confirm the required fields setup during pick load setup. See: Explaining Pick Load Setup . After you confirm the necessary fields, the Item Details page appears.
-
Choose <Done> to open the Load Page, <Exception> to enter an exception, or <Cancel> to cancel the task.
-
Confirm the necessary fields on the Load page.
-
Choose <Load> to load the task, <Load & Drop> to load and drop the task, <Exception> to enter an exception, <Skip Task> to skip the task, or <Info> to view the order information.
-
If you choose <Load>, or <Load & Drop> the system completes the task, and advances to the next task.
To Perform Wave Picks
-
Navigate to the Outbound menu
-
Choose Wave Picking.
-
In the Pick Load page, you confirm the required fields setup during pick load setup. See: Explaining Pick Load Setup . After you confirm the necessary fields, the Item Details page appears.
-
Choose <Done> to open the Load Page, <Exception> to enter an exception, or <Cancel> to cancel the task.
-
Confirm the necessary fields on the Load page.
-
Choose <Load> to load the task, <Load & Drop> to load and drop the task, <Exception> to enter an exception, <Skip Task> to skip the task, or <Info> to view the order information.
-
If you choose <Load>, or <Load & Drop> the system completes the task, and advances to the next task.
To Pick by Label
-
Navigate to the Task Outbound menu
-
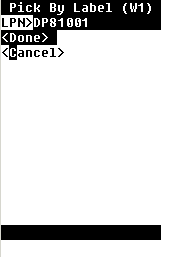
Choose Pick by Label.
-
Enter or select the LPN.
-
Choose <Done>.
Related Topics
Capturing Catch Weight Information
Defining Pick Slip Grouping Rules, Oracle Inventory User's Guide
Defining Pick Methodologies, Oracle Warehouse Management Implementation Guide
Bulk Picking
Bulk picking will reduce the number of times goods are processed and returned to a user. After pick release occurs for both outbound sales orders and internal orders, or for manufacturing component picks, Oracle Warehouse Management consolidates tasks of similar characteristics into a single bulk task. This process can be initiated either at the time of pick release, or through a concurrent program separate from the pick release process.
An advantage to bulk picking is that a typical warehouse operation will benefit from a reduced replenishment effort once bulk picking is employed. Replenishment is the process by which material from a packed or overstock bulk location refills the forward or fast picking area for high velocity items.
Order or Job Profile
Bulk picking only works effectively if the same item is picked repeatedly from the forward pick location causing frequent replenishments. You must perform analysis to determine how many times each item is picked from the forward stock location and the size of those picks per pick release batch. If in a single pick release the same item is ordered over 100 times, and the size of the entire forward pick face only holds 20 items, then bulk picking the item eliminates 5 replenishment transactions and numerous picks transactions depending on the quantity ordered per order or job.
Device Integration
If picking requires device integration, such as a carousel or ASRS, then the actual movement of the device is far more costly than the cost of deconsolidation. Bulk picking is an effective pick methodology to prevent the device performing the same operation repeatedly. For example, imagine that 101 customers each order 1 of the same item, and that the carousel takes approximately 30 seconds to arrive at a particular location. Then by bulk picking the entire 100 quantity at once, the picker has eliminated 100*0.5min = 50 minutes of unusable carousel travel time - time in which the worker cannot perform other tasks. While deconsolidating the bulk pick would require extra time, another person who is not dependent on the movement of the carousel can perform the deconsolidation.
Warehouse Layout
If the warehouse is very large, and requires pickers to travel long distances to take material from the forward pick locations to the outbound staging or manufacturing staging locations, then it is important to evaluate whether or not the deconsolidation of material can be delayed as late as possible in the movement flow. The advantage is that employees need not traverse the same lengthy path through the warehouse over and over when transporting the same item.
Value Added Services
If a particular business has value added services, such as repackaging or kitting, it makes sense to bring a large bulk quantity of material to the value added service work stations so each station does not have to travel far to pick the item. This way, the deconsolidation is done automatically and left to the packager or kitting employee.
Grouping Criteria
The bulk picking grouping criteria defines which tasks are candidates for bulking together. The following are hard rules of when bulking can occur. Anything outside this is not a candidate for bulk picking.
-
Same source subinventory
-
Same source locator
-
Same item
-
Same revision
All of the four above criteria must be satisfied in order for a particular task to be part of a bulk pick task. Thus if two different items need to be picked, the two corresponding tasks cannot be bulked together. Furthermore, any task that does not satisfy the following restrictions list is immediately excluded as a bulk picking candidate.
-
Item is not cartonized
-
Allocated tasks have the same operation plan
-
An LPN is not allocated for the pick
Once a task has satisfied the above criteria, the task is ready to be grouped with other tasks.
Setup Grouping Criteria
The Pick Slip Grouping Rules window enables a warehouse to setup bulk picking. The entire organization can have only a single bulk picking setup rule, and this rule is the default that is used throughout the warehouse. On the setup window, there are three values that the bulk picking setup can take: Bulk entire wave, Honor item/sub, and Disable bulk picking. For a given pick slip grouping rule, bulk picking can take on one of the three values above. If at time of pick release, you select Bulk entire wave, every line in a pick wave is a candidate for bulk picking. If you select Honor item / sub only items and subinventories that are bulk pick enabled are candidates. If you select disable bulk picking, bulk picking does not occur.
Delivery is the only criteria you can configure. If the box is checked, then bulking of tasks does not occur across deliveries. If the box is unchecked, then two tasks with the same item that occur in two different deliveries can be bulked together as one task.
If you select the grouping rule of order picking, bulk picking cannot be enabled. This ensures that material released with order picking as the pick slip grouping rule is not bulked with other tasks that are not part of the same order.
Material that is grouped together into a bulk pick task has a parent and child relationship. The associated lines that are grouped together are the "child" lines and the final bulk task is often referred to as the "parent" line.
When to Perform Bulk Picking
Bulk picking can be invoked via pick release or via a concurrent program independent of the pick release process. When run during pick release, the system first examines the configuration setup and thus determines which lines are candidates for bulk picking. These lines are then bulked and a new parent task is created. This parent task corresponds to the unit of work that needs to be performed
Pick Release Versus Concurrent Program
Oracle Warehouse Management allows the flexibility to support bulk picking at the time of pick release, or as a separate concurrent program that can be run independently from the pick release process. Bulk picking should be selected at the time of pick release if the release batch size is very large. The profile options INV Pick Slip Batch Size and INV Component Pick Batch Size determine the amount of order lines that are processed together. See: If the number is set very low, say 5 or 10, then only 5 or 10 lines will be considered together as candidates for bulk grouping. Thus, if the batch size is low, then the concurrent program should be used after all of pick release has run. However, if the batch size is fairly large, such as 10,000, then it is safe to bulk at the time of pick release because all 10,000 can be considered as candidates for bulking. Please note however that enabling bulk picking at the time of pick release will increase the time required for pick release to complete.
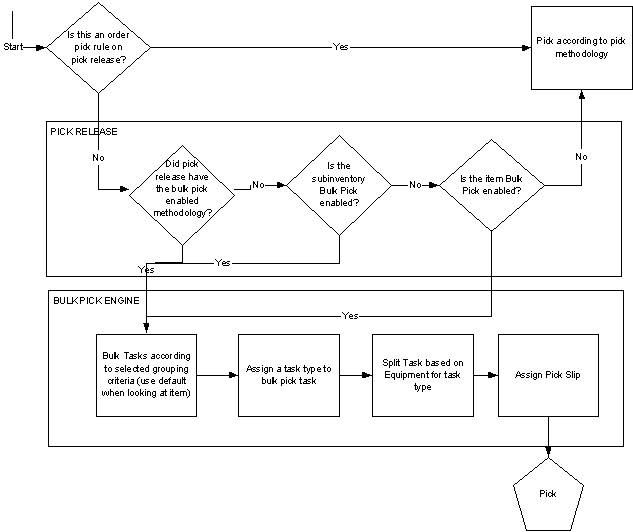
The following diagram depicts the pick release process and the picking process. If the bulk picking engine is run at the time of pick release, the above flow executes. If the bulk picking engine is run as a concurrent program after pick release has completed, then the bottom portion of the diagram will occur separately and will occur across pick release batches. Please note that if run separately, pick release still incurs a cost of assigning task types and pick slip numbers to all the children lines even if later they become merged together.
Item Level
An item can be bulk pick enabled, and thus the item is always a candidate for bulk picking. That does not imply that it will always be bulk picked, but it will always be considered. This is useful if a business has seasonal items where the cost of deconsolidation is less than the cost of travel and picking. Thus, these items should be bulk pick enabled during the peak season and disabled when velocity is low.
Subinventory Level
A subinventory can be bulk pick enabled, and thus all items that are present in that subinventory are candidates for bulk picking. Subinventories that are the source of replenishments to the forward pick should be candidates for bulk picking, and thereby reducing the necessity to replenish the forward pick zone.
Printing Pick Slips
There are instances where printing paper pick slips is still a desired form option, either to supplement the mobile screens or to facilitate user movement. In order to print the pick slip after pick release, the Move Order Pick Slip Report should be added to the pick release document set. For both bulk and non bulk pick tasks, the move order pick slip report will be printed. Please note that by performing bulk picking, a distribution center automatically forgoes the usage of the pick slip report as the packing slip report, primarily because bulk picking is most commonly used with bulking across delivery lines.
Related Topics
Oracle Warehouse Management Bulk Task Generation
Setting Up Case Picking
Case picking enables businesses to streamline the pick release process by labeling cases and pallets directly. Case picking enables you to assign case labels printed at order release to pick operators who can perform case picks such as Pick to Belt or Pick to Pallet by scanning multiple case labels. This enables warehouse workers to simply scan a case already packed with items and move it directly onto a pallet or belt.
To set up case picking
Complete the following steps to set up case picking. After the pick release process starts, if the Enable Case Picking check box is selected, then the labels will be printed and the mobile UI will be dynamically generated to capture the label information.
Set up the pick UOM
A different Pick UOM can be selected for different subinventories to allow customers to configure Oracle Warehouse Management to meet different needs for different warehouses.
-
Select either Case or Pallet as the Pick UOM.
-
Set up the Pick UOM for each sub-inventory where case picking should be enabled.
Set up the task type attributes
-
Navigate to the User Task Type Attributes page
-
Select the Honor Case Pick check box to enable case picking for the selected User Task Type. If the Honor Case Pick check box is selected, a label will be printed for each case or pallet. For example, assume the pick UOM is case and there are 10 each per case. If the operator is picking 50 each, five labels will be printed: one for each case of 10.
You can enable case picking for one or more task types. If you enter a value in the Pick Load Page type field, it overrides the form function parameter you set
To set up the pick load page
-
Navigate to the Pick Load Page Setup page.
-
Ensure that Pick Load Page Template is set up to capture LPN label information.
The mobile user interface will automatically render the appropriate fields. In a pick to pallet scenario, the pallet LPN field will be displayed so that the warehouse worker can capture the correct information.
Explaining Over Picking
Over picking enables you to over pick an item on a dispatched task as long as the item is within the same subinventory and locator. Over picking may be required to:
-
Compensate for shrinkage during shipment
-
Compensate for item damages
-
Compensate for imprecise measurements
-
Compensate for shipment quantity or UOM variance
-
Avoid scarcity of material
-
Minimize LPN breaks
Over Picking for Sales Orders
You can over pick sales orders as long as the over picked quantity falls within the over shipment tolerances for the order. Lot substitution is allowed, and you can over pick for lots other than those allocated to the task. You can choose to treat over picking as an exception and enter a reason code on the mobile pick load page, or configure the Pick Load Page to accept over picks without exception if the pick quantity is within tolerance. If you choose to configure the mobile pick load page to accept over picks within tolerance without exception, then the system considers the over pick as an exact match, and does not require you to confirm the quantity. If you want to change the confirmed quantity, you can select partial pick, and enter the new quantity.
Over Picking for Bulk Pick
You can over pick bulk pick items within the same subinventory and locator. Over picking of bulk items is based on the constraint percentage of the available quantity within subinventory and locator. When you perform over picking on a bulk task, the system creates an extra subinventory transfer for the over picked quantity, and the control board displays the number of child tasks with an increment of one. Once you load the task, the system deletes the subinventory transfer task, and the number of child tasks changes back to the original value.
The system examines any tolerance levels to perform the pick. This applies when you pick material for sales orders, internal orders, or wip picks. Therefore, if you pick material for any of those demand types, and over picking is enabled, then you can pick as much overage quantity as you want. This typically means picking a full pallet or a full case instead breaking the pallet or case at its source location. When you drop the material the system checks the tolerance levels. It is important that you return over picked material to either the source location or place it in an over pick bucket.
To use an over pick bucket model, create a non-LPN controlled over pick location next to the outbound staging lane or the manufacturing staging lane. When over pick quantity exists, the system suggests that you drop the material in the over pick location in which you deliver the necessary material for jobs and orders. You can then return the material in the over pick location to inventory.
Over Picking for Replenishment Move Orders
You can use a mobile device to over pick replenishment tasks if available quantity of the item exists, and resides in the same subinventory and locator. Lot substitution is not allowed. You can over pick only within the lot allocated to the task. You can also over pick serial controlled items.
Over Picking for Move Order Requisitions
You can use a mobile device to over pick for move order requisitions if available quantity of the item exists, and resides in the same subinventory and locator. Lot substitution is not allowed. You can over pick only within the lot allocated to the task. You can over pick serial controlled items. If you check Allocate Serials on the Organization Parameters window, then the system forces you to first pick the allocated serials before you can pick from additional serials located within the subinventory and locator. If you do not check Allocate Serials on the Organization Parameters window, you can select any available serials within the subinventory and locator.
Over Picking Components
You can over pick WIP components once they are pick released. No quantity constraint exists as long as the components reside within the same subinventory and locator. You can pick an entire LPN if the additional quantity within the LPN is not reserved or allocated for another order. Lot substitution is not allowed. You can over pick only for the lot allocated to the task.
Note: You can set over picking at the organization level for manufacturing replenishment and requisition move orders.
3.2.4 Over Picking from a Different Location with a Different Lot Number
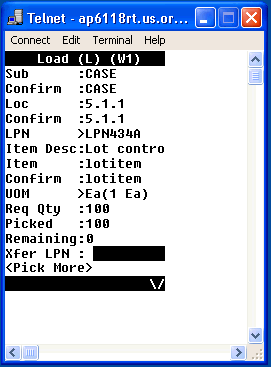
You can over-pick material from a different location with a different lot number. To pick a lot from a different LPN or location, you can raise an exception from the Advanced Pick Load page, and then click <Pick More> on the Pick Load page to select a new lot to pick from in a different location.
Explaining Oracle Warehouse Management Picking for Manufacturing
Overview of Inventory Transactions, Oracle Inventory User's Guide
Overview of Move Orders, Oracle Inventory User's Guide
Setting Up Over Allocation For Pick Release
Shipment tolerances govern the permissible amounts that can be over shipped or under shipped for a shipment:
-
Over shipment tolerance: Determines the amount of the shipment you can exceed at the time of ship confirmation.
-
Under shipment tolerance: Determines the amount of the shipment you can ship below at the time of ship confirmation. Governs when the original order line should be considered completely fulfilled from an order shipment instead of creating a backordered shipment.
Oracle Warehouse Management enables you to over allocate a quantity at pick release when the on-hand quantity is greater than the ordered quantity in the following situations:
-
The Over Ship Tolerance is set at the order line level on the Shipping tab.
-
The allocation mode for the picking rule is Allocate Entire LPN Only. (Allocation modes for a pick rule are set up in the WMS Rules window.)
The over allocation at pick release feature enables you to over allocate material booked on an order when it falls within shipments tolerances. (The tolerance limits are set at the order line level or on the Strategy Definition window.) The over allocation feature is useful because the system automatically allocates an entire LPN instead of backordering an order (the allocation method of Strict Pick UOM or Allocate Entire LPN must be selected for this feature). This reduces material handling and enables you to ship quantities in standard packs.
| Ordered Quantity | On-hand Quantity | Allocated Quantity |
|---|---|---|
| 45 + | 50 packed into an LPN | 50 allocated |
Prerequisites
- Define picking rules in the WMS Rules window and select an allocation method of either Strict Pick UOM or Allocate Entire LPN.
- Define the pick strategy in the WMS Strategies window.
- Select the over allocation mode for the strategy.
- Enable the strategy on the Rules Workbench window.
The system will not over allocate if you choose to use any other rules. You can use over allocation with any type of item except lot indivisible items. Lot indivisible items are governed by OPM allocation logic.
To set up over allocation for pick release
-
Navigate to the WMS Strategies window.
-
Define the pick strategy. Select the allocation settings:
-
None: No over tolerance (default value). The system does not over allocate material for this strategy, regardless of the allocation method selected.
-
Using Order Line Tolerance: The system uses the Order Line Tolerance that you set at the sales order line.
-
Using Constant Tolerance: Uses the percentage entered in the Tolerance Value field.
-
Tolerance Value: Enter a percentage value for the shipment tolerance. This field is enabled only if you selected Using Constant Tolerance in the Over Allocation Mode field.
-
Note: Applies only to rules with picking strategies defined with the allocation modes of Allocate Entire LPN or Strict Pick UOM (select allocation modes in the WMS Rules window). For picking rules defined with other allocation modes, the over tolerance is not used for determining the quantity to be allocated. If you have rules that use allocation methods other than Strict Pick UOM and Allocate Entire LPN within the strategy, then the system applies these rules, if they are the most appropriate to use, but does not over allocate material.
-
Under Picking Without Exception
Under picking without exception enables you to under pick an item on a dispatched task without raising an exception. To enable under picking without exception, you must set the pick load page level parameter Allow Under Pick Without Exception to Yes. Oracle Warehouse Management does not check the under tolerance during picking, but checks it at ship confirm. If the requested pick is from an LPN that contains only the requested item, the system treats this pick as an exact match, and you do not have to confirm the quantity. If you use Under pick without Exception, then system backorders the under picked quantity. If you do not enable under pick without exception, then you must press F4 to raise an exception and enter the picked quantity.
After you enter the pick, you select from one of the following options: pick partial to change the confirmed quantity, pick more to pick the remaining quantity, curtail pick to back order or reallocate the remaining quantity, or load or load & drop to complete the task. If you select curtail pick, load, or load then the system backorders the remaining quantity for sales order picks and WIP tasks. If the reason code you select for curtail pick is associated with a pre-seeded exception workflow, such as cycle count, then the system attempts to create an alternate pick suggestion instead of backordering the remaining quantity.
If the requested quantity is a loose pick, then you must confirm the picked quantity. After you confirm the picked quantity, you have the same options as LPN picks.
Related Topics
Lot Substitution During Picking
Lot substitution enables you to substitute allocated lots with available lots from the same SKU during a picking operation. This is useful when the allocated lot is placed at the back of the stocking locator and is difficult to pick. A user can substitute another lot for the SKU which resides in the same locator instead of selecting the allocated lot. If you change locators during the picking process, then when you substitute a lot, the new available lots are from the locator to which you changed for picking. You can select the new lot from either the unallocated or unreserved lot associated with the SKU. The system does not re-run picking rules during this operation.
Two types of lot substitutions are available in the system:
-
Lot substitution during picking with exception
-
Lot substitution without exception
If you select to perform lot substitution with exception, then you register an exception in the lot field during picking. After you raise the exception, you can then select an alternate lot. If you perform a lot substitution without exception, then you can enter a substitute lot in the lot field during the picking process.
Prerequisites
- Setting up Lot Substitution with Exception
- Setting up Lot Substitution without Exception
To set up lot substitution with exception, you must create an exception to use during the picking process. When you create the exception, you must use the Reason Type value = Load, and the Reason Context value = Change Lot Number.
See also, Task Exceptions.
To set up lot substitution without exception, you must enable the parameter Allow Lot substitution without exception on the Page Level tab of the Pick Load Page Setup window. If you enable this parameter when you create a pick load page template, then you can substitute lots during the picking process without entering an exception during the pick.
See also, Pick Load Page Setup.
To perform a lot substitution with exception
-
Navigate to the Load page.
-
Confirm the Subinventory, Locator, and Item information as necessary.
-
Click the Lot field.
-
Click the Exception button. When you select the exception you are able to enter an exception to the pick that allows you to select a new lot. You can title this exception anything you like, but it must be associated with the Reason Type value = Load and the Reason Context value = Change Lot Number.
-
Select the exception which enables you to perform a lot substitution.
-
Enter or select a substitute lot from the list of values.
Note: The system honors existing allocations and reservations when authorizing substitute lots.
-
Confirm the new lot and lot quantity.
-
Enter the desired LPN for the pick.
-
Proceed with the Load or the Load and Drop as normal.
To perform a lot substitution without exception
-
Navigate to the Load page.
-
Confirm the Subinventory, Locator, and Item information as necessary.
-
Click in the Lot field.
-
Enter a substitute lot or select a substitute lot from the list of values.
Note: The system honors existing allocations and reservations when authorizing substitute lots.
-
Confirm the new lot and lot quantity.
-
Enter the desired LPN for the pick.
-
Proceed with the Load or the Load and Drop as normal.
Describing Task Loading and Dropping
Task loading and dropping includes the following and completes the Oracle Warehouse Management picking task process.
-
Loading material onto equipment
-
Dropping material directly into a staging lane or consolidation locator
After the operator picks the load, they can either drop it directly into a staging lane, or load it on to their equipment. They can then proceed to the next pick location. The operator can view the current LPNs at any time, including information on the customer and the destination address, on the equipment that are waiting to be dropped.
When the operator is ready to drop the material into a staging lane, the system directs the operator to an appropriate staging lane (as determined by the dock appointment or pick release rule). The operator confirms the drop by scanning the staging lane.
If an LPN for the same delivery has already been dropped into the staging lane, the operator will be shown that LPN as a suggested drop LPN. The operator can select another LPN in that lane, if multiple LPNs have been staged for the same delivery. Alternatively, the operator can enter a new LPN to drop into, or drop without packing the LPN from the task into another LPN. The final pack can also be competed as a user-initiated packing transaction.
Task dropping completes the Oracle Warehouse Management picking task process.
Pick Load Page Setup
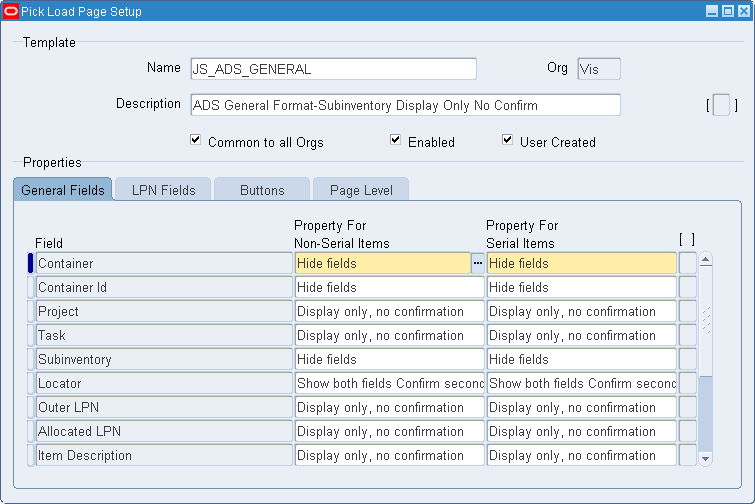
Use the Pick Load Page Setup window to create templates that define configurations for the mobile pick load pages. The parameters on the pick load template dictate the behavior of the fields and buttons on the mobile pick load pages. You can set different levels of control for each of the fields as well as tailor the page to a location or a user. You can set different display and confirmation control for serial controlled items and non-serial controlled items. This allows you to avoid unnecessary data confirmation. You can customize the order information page to display the information you need, and retrieve any fields from the database.
The Pick Load Setup Page window also contains default system templates. You may choose to use these templates, create your own templates, or modify existing templates. . The Pick Load Page Setup window contains the following default templates:
-
Express Load: Default express load configuration
-
Express Pick: Default express pick load and drop configuration
-
Default Configuration: Default pick load configuration
To create a new template
-
Navigate to the Pick Load Page Setup window.
-
Enter a name for the template in the Name field.
-
Enter a template description in the Description field.
-
Optionally, select Common to all Orgs to enable this template for all organizations.
-
Optionally, select Enabled to enable this template.
-
Select the display properties for the general fields. The available fields are as follows:
-
Display only, no confirmation: Displays the field on the page, but does not require you to confirm the field.
-
Hide fields: The field does not display on the page.
-
Show both fields Confirm second with no LOV: Displays both fields and requires you to confirm the second field, but does not have an associated LOV. An example of this is the Subinventory and the Subinventory Confirm field. If you choose this option the subinventory displays as well as the subinventory confirm field. You must confirm the subinventory, but you cannot select it from a list of values.
-
Show both fields Confirm second with LOV: Displays both fields and requires you to confirm the second field, but allows you to pick the confirmation value from the list and LOV. An example of this would is the locator field and locator confirm field. If you choose this option the locator displays as well as the locator confirm field. You may either enter the locator, or select it from the LOV.
-
Single line input with no LOV value default: Allows you to enter a single line of information, but does not have an associated LOV.
The following table lists the available configurations:
Configurations Field Display Only, no confirmation Hide Fields Show both fields Confirm second with no LOV Show both fields Confirm second with LOV Single line input with no LOV, value default Container Yes Yes No No No Container ID Yes Yes No No No Project Yes Yes No No No Task Yes Yes No No No Subinventory Yes Yes Yes No No Locator Yes No Yes No No Out LPN Yes Yes No No No Allocated LPN Yes Yes No No No Item Description Yes Yes No No No Item Yes No Yes No No Revision Yes No Yes No No UOM Yes No Yes Yes No Requested Quantity Yes No Yes No No Container No Yes No No Yes Lot Yes Serial only No Yes No -
-
Select the LPN Fields tab. The information you enter on the LPN Fields tab determines the way the system retrieve, transfers, nests, and transacts on the material on the Mobile Pick Load page. You can set different configurations for loose picks and fully consumable LPN scans. A fully consumable LPN is an LPN that is entirely consumable by a pick. Whereas, if an LPN is partially consumed, material remains in the LPN. The fields are as follows:
-
WMS_REM_LPN: The remaining LPN.
-
WMS_LAST_LPN: The last LPN.
-
Transfer LPN: Transfers the contents of the LPN to another LPN.
-
Into LPN: Nests the LPN within the into LPN.
-
PALLET_LPN: The outer LPN for all cases for which a task type with honor case pick enabled.
Note: The Transfer LPN field and the Into LPN field cannot be visible at the same time.
The following table lists the main fields, and the available choices.
Field Display only no confirmation Hide fields Show both fields Confirm second with no LOV Single line input with no LOV, value defaulted Transfer LPN Yes Yes Yes Yes Into LPN Yes Yes Yes Yes PALLET_LPN No Yes No Yes 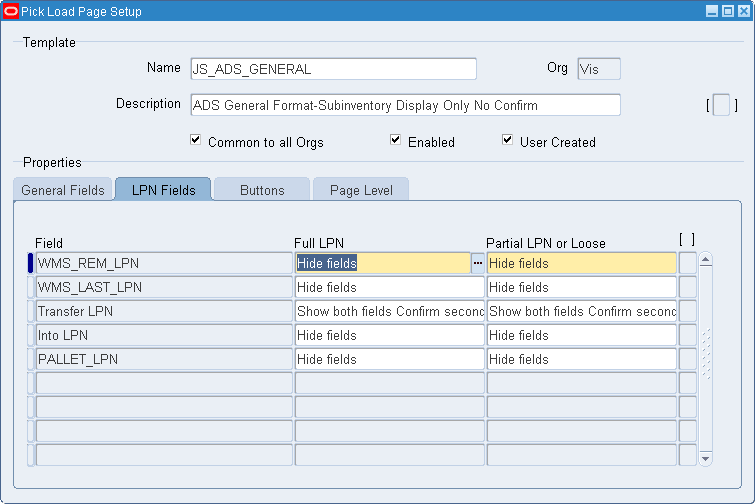
-
-
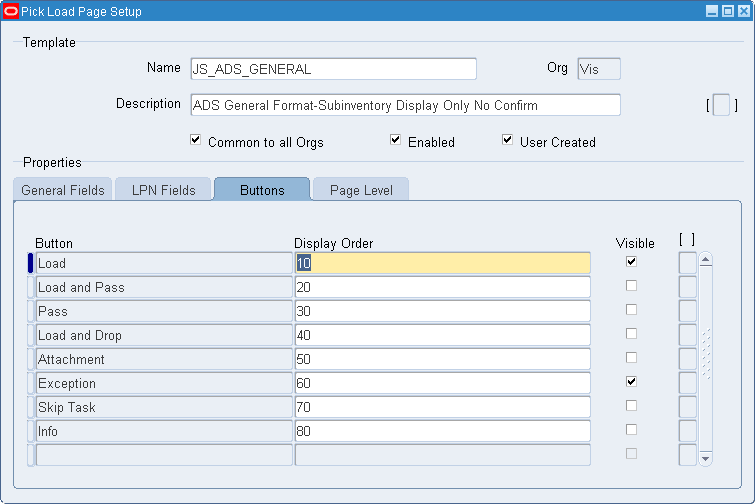
Select the Buttons tab. This tab enables you to define the button behavior on the mobile device. You can choose the button display order, as well as hide the buttons from view. The available choices are 10, 20, 30, 40, 50, 60, 70, and 80. The button with the lowest number appears first on the mobile device. Select the Visible check box if you want the button to appear on the mobile device. The available buttons are:
-
<Load>
-
<Load and Pass>
-
<Pass>
-
<Load and Drop>
-
<Attachment>
-
<Exception>
-
<Skip Task>
-
<Info>
-
-
Select the Page Level tab. This tab enables you to control the behavior of attachments, catch weight, and exceptions when picking partial lot quantities.
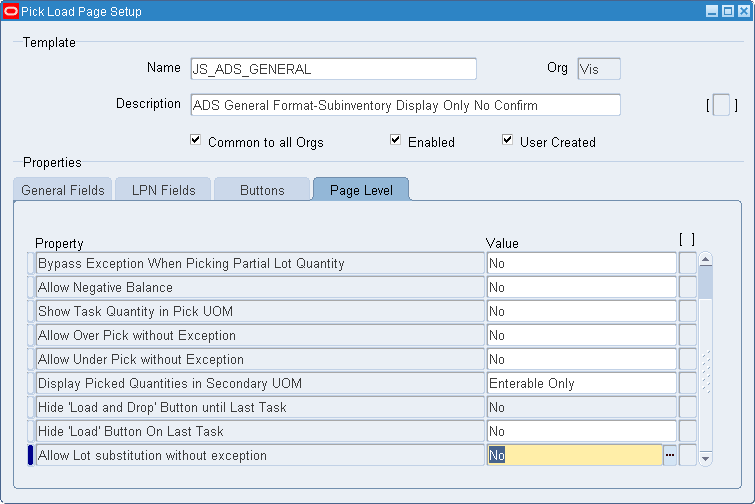
-
Select the Show Attachments display option. The available choices are:
-
Always: The attachment button always appears
-
By Request: The attachment button appears by request
-
Never: The attachment buttons never appears
-
-
Select the Catch Weight Entry and Field Behavior. The available choices are:
-
Hide: Catch weight entry is hidden
-
Mandatory: Catch weight entry is mandatory
-
Optional: Catch weight entry is optional
-
-
Select the Bypass Exception When Picking Partial Lot Quantity behavior. The available choices are:
-
No: Prompts for an exception when you try to pick a partial amount of the task, this facilitates picking lots out of order.
-
Yes: Does not prompt for the exception when you try to pick a partial amount of the task.
-
-
Select the Allow Negative Balance behavior. The available choices are:
-
No: Does not allow you to pick a quantity that is greater than the quantity that exists in the location.
-
Yes: Allows you to pick a quantity that is greater than the quantity that exists in the location.
-
-
Select the Show Task Quantity in Pick UOM behavior. The available choices are:
-
No: Displays the task quantity in the default item UOM. For example, if the default UOM is each and the task UOM is box, then the system displays the task quantity in eaches.
-
Yes: Displays the task quantity in the pick UOM. For example, if the default UOM is each and the task UOM is box, then the system displays the task quantity in boxes.
-
-
Select the Allow Over Pick without Exception behavior. The available choices are:
-
No: Requires you to enter a task exception when you pick more than the requested quantity of an item for a task that is within shipment tolerance.
-
Yes: Does not require you to enter a task exception when you pick more than the requested quantity of an item for a task that is within the shipment tolerance.
-
-
Select the Allow Under Pick without Exception behavior. The available choices are:
-
No: Requires you to enter a task exception when you pick less than the requested quantity of an item for a task that is within shipment tolerance.
-
Yes: Does not require you to enter a task exception when you pick less than the requested quantity of an item for a task that is within the shipment tolerance.
Note: Oracle Warehouse Management does not check shipment tolerances until ship confirm for items that you under pick.
-
-
Select the Display Picked Quantities in Secondary UOM. The available choices are:
-
Always: Always displays the picked quantities of an item in the secondary UOM if the item is dual UOM controlled.
-
Never: Does not display the picked quantities of an item in the secondary UOM.
-
Enterable Only: Enables you to enter the picked quantity of an item in the secondary UOM if the item is dual UOM controlled.
If you choose to display the secondary quantity, then the requested quantity field on the General Fields tab controls the behavior of secondary quantities as well. If the item is under dual UOM control, then the system retrieves the value of the Display Picked Quantities in Secondary UOM field. If the value is Always or Enterable, then the system checks the value of the requested quantity field. The Requested Quantity field determines whether you need to confirm the secondary quantity field, or whether the system displays it. If the item is tracked in the primary UOM and priced in the secondary UOM, then the catch weight fields control the display fields. If the item is tracked in both units of measure, then the Display Picked Quantities in Secondary UOM field takes precedence.
-
-
Select the Hide "Load and Drop" Button until Last Task behavior:
Note: You must enable the Load and Drop button to set values for this field.
-
Yes: The Load and Drop button will not be displayed until the last task of the picking group is complete.
-
No: The Load and Drop button appears for all picking tasks. (The default value is No.)
Note: You need to first enable the Load and Drop button before it can be hidden.
-
-
Select the Hide "Load" Button On Last Task behavior:
The Hide "Load" button on Last Task field shows the user that the last task for the picking group has been reached. This value works in tandem with the Hide Load and Drop Button until Last Task field and should be set accordingly.
-
Yes: The Load button will not appear on the mobile device if it is the last task of the pick grouping.
-
No: The Load button appears on the mobile device even if it is the last task of the pick grouping. (The default value is No.)
Note: You must enable the Load button to set values for this field.
-
-
Select the Allow Lot substitution without exception behavior:
-
Yes: You can enter a substitute lot during picking without raising an exception.
-
No: If you enter a substitute lot during picking, an exception is raised.
During picking, you can select an alternate lot for the item from a list of values. The system does not re-run the picking rules for this process. However, the system does honor existing allocations and reservations for lots. You cannot select a lot for which allocations and previous reservations exist.
-
-
Save your work.
To copy an existing pick load template
-
Navigate to the Pick Load Page Setup window.
-
Select Copy Template from the Tools menu.
-
Modify the template as needed.
-
Save your work.
-
Close the window when finished.
Related Topics
Explaining Oracle Warehouse Management Task Exceptions
Defining Transaction Reasons, Oracle Inventory User's Guide
Express Load
Express load is used for more efficient picking, or by more experienced pickers. Express load enables you to load material without confirming all fields. The express load page uses the EXP_LOAD default template on the Advanced Pick Load page. If you perform an express load the only field you need to confirm is the To LPN field.
Use the following instructions to perform an express load.
-
Navigate to the mobile interface Express Load form.
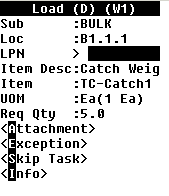
-
Optionally enter a from LPN in the LPN field. When you advance past the LPN field the Item Details page opens.
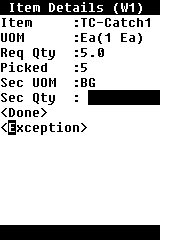
-
On the Item Details Page choose <Done> to invoke the Load page, or choose <Exception> to enter an exception.
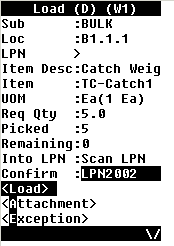
-
Choose <Load> to load the material, <Attachment> to view the attachments associated with the task, <Exception> to enter an exception reason, <Skip Task> to skip the task, or <Info> to view the item information.
Related Topics
Describing Task Loading and Dropping
Express Picking
Express picking is used by experienced pickers or for more efficient picking. Express pick enables you to load and drop material without confirming all fields. The express pick page uses the EXP_PICK default template on the Advanced Pick Load page. If you perform an express pick the only field you need to confirm is the To LPN field.
-
Log onto the mobile device.
-
Navigate to the mobile interface Express Pick form.
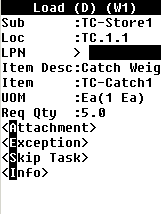
-
The Load page displays containing all of the information except the LPN.
-
Optionally, enter the LPN. After you enter the LPN the item details page displays.
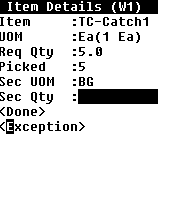
-
On the Item details page, choose <Done> to invoke the Load page, or choose <Exception> to enter a transaction exception.
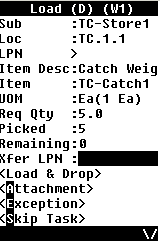
-
Enter the transfer LPN in the Xfer LPN field.
Note: After the XferLPN is scanned and nested into a pallet LPN, it is not available for nesting again. Even if the Honor Case Pick check box is active for the task (the Honor Case Pick check box is selected in the User Task Type Attributes page), you need to enter a new LPN or a LPN with a status of Defined but not used or Packing in the XferLPN field.
-
Select <Load & Drop> to load and drop the attachment, <Attachment> to view the attachments, <Exception> to enter a task exception, or <Skip Task> to skip the task.
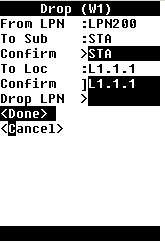
-
Confirm the required fields as necessary.
-
Choose <Done> to drop the task, or choose <Cancel> to cancel the drop.
Related Topics
Describing Task Loading and Dropping
Manifest Picking
You can use the Oracle Warehouse Management mobile user interface to perform manifest picking by scanning (or entering) a list of order numbers or a list of pick slip numbers.
Note: If multiple users simultaneously select the same sales order number (or the same pickslip number) when manifest picking, the tasks that are dispatched to the first user will not be dispatched to other users.
Prerequisites
- Labels must be assigned to a user prior to performing picking tasks.
- Dispatch picking tasks must be set up.
To use manifest picking to scan sales order or pick slip barcodes
-
Navigate to the Manifest Picking page.
-
Scan the sales order or pick slip barcode for each label. Either the Order Slip Picking page or Pick Slip Picking page appears depending on the type of pick slip you scanned:
-
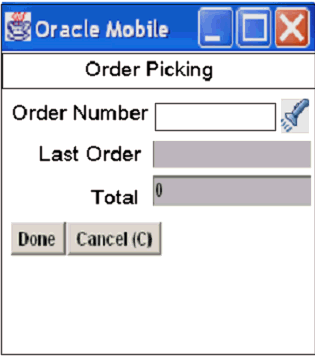
Order Picking page:
-
Order Number: Enter the order number (either by scanning or manually entering the number).
-
Last Order: Displays the last order scanned by the user.
-
Total: Displays the total number of orders scanned so far.
-
-
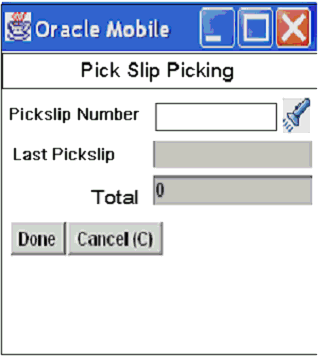
Pick Slip Picking page:
-
Pickslip Number: Enter the pick slip number (either by scanning or manually entering the number).
-
Last pickslip: Displays the last pick slip scanned by the user.
-
Total: Displays total number of pick slips scanned so far.
-
-
-
Choose one of the following actions:
-
Click the Done button to return to the Outbound Menu page.
Based on the order numbers or pick slip numbers scanned, all the eligible tasks (based on criteria such as task type, sub inventory, equipment and so on) from the sales order/pick slip numbers are selected then sorted in ascending order by locator and travel sequence.
Note: The current task displays as Active on the mobile device while other eligible tasks assigned to users display as Dispatched on the Warehouse Control Board window.
-
Click the Cancel button to exit the page without saving your changes.
Note: If you exit then return to the manifest picking page, all previously entered sales orders and pick slip numbers are cleared from the page so you can enter new sales order numbers or pick slip numbers.
-
Pull Replenishment
During pick release, pull replenishment is initiated when there is not enough on-hand quantity in the lower-level pick area to fulfill demand. If pull replenishment is enabled as the allocation mode, then the pick release allocation logic does not allocate material from the bulk or reserve area. Instead the system combines the remaining demand from all demand lines creates a replenishment task to replenish the pick area from the bulk area. If you enable the Pull Replenishment parameter then pick release automatically generates the replenishment task after pick release if a shortfall in the forward pick area is detected. The following diagram details the pull replenishment process.
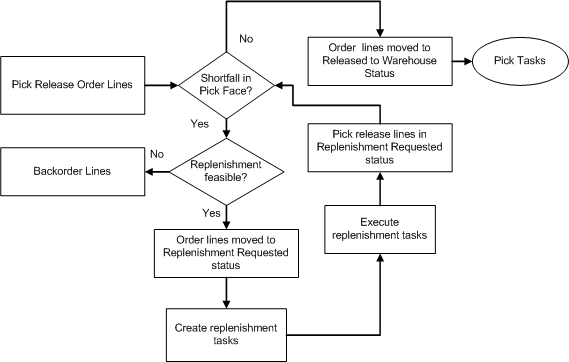
When you initiate pick release, the system checks to see if there is a demand shortage in the pick face. If a shortage exists, then it verifies if replenishment is feasible. If it can replenishment the pick face it changes the states of the deliver line to Replenishment Requested and creates a replenishment task. It collects the replenishment information as each order line is subjected to allocation and determines the answer to the following questions: Does the pick face have enough available quantity to fulfill this order line? If the pick face does not have enough available quantity to fulfill this order line, what is the replenishment demand and what is the destination subinventory? The system needs this information before it can generate the replenishment tasks.
The system automatically executes replenishment after pick release for items with replenishment setup at item-sub inventory level with the supply source subinventory. The replenishment demand is aggregated and netted off and with on-hand quantity. The system then uses min-max parameters to create a replenishment move order.
The total replenishment quantity = maximum quantity + sum (replenishment demand for all sales order lines) - on-hand quantity - sum (all replenishment move orders outstanding).
Pull Replenishment uses picking and putaway rules to allocate replenishment move orders. The rules engine determines the final pick and putaway locators for the replenishment move order.
Related Topics
Assigning Items to a Subinventory, Oracle Inventory User's Guide
Delivery Lines Statuses, Oracle Shipping Execution User's Guide
Push Replenishment
Push replenishment occurs prior to pick release and involves replenishing the forward pick area to meet anticipated demand. Push replenishment is used for items that have a high demand for a given period of item. To initiate push replenishment, run the concurrent request Push Replenishment. The system consolidates and replenishes the demand for all items specified in the replenishment parameters to the forward pick subinventory. It then changes the delivery line status to Replenishment Requested.
The system calculates the replenishment quantity as follows: replenishment quantity required = total demand using criteria - On-hand quantity - sum (all open replenishment move orders with destination subinventory as forward pick subinventory)
After the system executes all replenishment lines, you must manually pick release the replenishment lines. This will manually allocate the lines into pick tasks. You also need to ensure that the pick rules used to allocate the sales orders also allocate the items to the forward pick area. The following example illustrates push replenishment.
| Item | Sales Order | Quantity | Delivery Line Status |
|---|---|---|---|
| AAA | SO1 | 100 EA | Ready to Release |
| AAA | SO2 | 100 EA | Ready to Release |
| BBB | SO3 | 19 EA | Ready to Release |
| CCC | SO4 | 18 EA | Ready to Release |
| AAA | SO5 | 65 EA | Ready to Release |
| BBB | SO6 | 12 Ea | Ready to Release |
| DDD | SO7 | 10 EA | Ready to Release |
| Parameters | Value |
|---|---|
| Scheduled to Ship Date To | +3 |
| Forward Pick Subinventory | REPL |
| Replenishment UOM | PLT |
| Replenishment Lot Size | 1 PLT |
| Minimum Threshold for Replenishment | 2 PLT |
| Minimum Threshold for Order Lines | 2 |
| Item Limit | 3 |
| Sort Criteria | Total Demand |
| Auto Allocate | Yes |
| Plan Tasks | Yes |
The push replenishment program calculates the net demand as follows:
| Item | Net Demand in Replenishment UOM | UOMs |
| AAA | 265 EA (2.65 PLT) | PLT = 100 EA |
| BBB | 31 EA (3.1 PLT) | PLT= 10 EA |
| CCC | 18 EA (1.8 PLT) | PLT= 10 EA |
| DDD | 10 EA (0.5 (PLT) | PLT = 20 EA |
The net demand is sorted as:
| Item | Net Demand in Replenishment UOM | UOMs |
| BBB | 31 EA (3.1 PLT) | PLT= 10 EA |
| AAA | 265 EA (2.65 PLT) | PLT = 100 EA |
| CCC | 18 EA (1.8 PLT) | PLT= 10 EA |
| DDD | 10 EA (0.5 (PLT) | PLT = 20 EA |
The system considers items BBB, AAA, and CCC for replenishment because the replenishment criteria limits the number of items to three. Because the minimum replenishment threshold is 2 PLT item CCC is not considered for replenishment. The system also disregards item CCC because only on sales order line requested the item, and the minimum threshold for orders lines is 2.
The system generates the following move orders for the push replenishment area based on the replenishment lot size.
-
Item BBB 4 PLT (To Destination Sub REPL)
-
Item AAA 3 PLT (To Destation Sub REPL)
The system uses pick and putaway rules to determine the final source and destination locators for the items. The delivery lines for items AAA and BBB are changed to Replenishment Requested. You must then manually pick release the lines. This allocates the material for picking.
Forward Pick Replenishment
Forward pick replenishment is an important activity in a warehouse. By replenishing a forward pick area, a distribution center disaggregates material stored in a reserve or bulk area and moves it to a pick area that is optimized for unit picking. Replenishment to a forward pick area allows a distribution center to reap the benefits of bulk procurement and optimized storage in a reserve area as well as optimized picking for order profiles with smaller quantities. The following types of forward pick replenishment are available:
-
Pull Replenishment: A replenishment suggestion is auto-created as soon as a shortfall is detected during the order release process. This type of replenishment is useful for items with high uniform demand in forward pick areas.
-
Push Replenishment: Using push replenishment, the aggregated future demand for an item is replenished to a forward pick area for future picking activity. This type of replenishment is useful for items with irregular demand in a forward pick area.
-
Dynamic Execution: Dynamic execution orchestrates the warehouse tasks so that a pick task to a forward pick area will be dispatched only when replenishment has been completed. Similarly, a replenishment task will be dispatched only when a forward pick area has enough capacity to receive the replenished material.
Setting Up Forward Pick Replenishment
The following steps are required for forward pick replenishment:
To define the item-subinventory relationship:
To use push/pull replenishment, then complete the following steps:
-
For push replenishment, the Forward Pick subinventory must have the source subinventory defined for your item. If needed, you can specify Fixed Lot Multiplier and Maximum Item of min-max fields.
-
For pull replenishment, the forward picking subinventories must have a source subinventory defined for your item. (The rule engine ultimately determines which of these picking subinventories will get selected at the pick release time). If needed, you can specify Fixed Lot Multiplier and Maximum Item of min-max fields.
To define the pick UOM for the source subinventory for replenishment:
To use pull/push replenishment, select the Pick UOM on the Subinventory window.
How to Perform Move Order Transactions
Oracle Warehouse Management dispatches tasks associated with move orders, both move order transfers and move order issues, directly to the mobile user. Move order subinventory transfers utilize the unique system task type of MOXfer, while move order issues utilize the unique system task type of MOIssue.
Note: Transacting move orders must be done through mobile task dispatching. You cannot transact move orders in the mobile or desktop transact move order forms in Oracle Warehouse Management enabled organizations.
A move order task can be fulfilled with a different LPN than the one that was allocated, or via loose material. The allocated subinventory or locator can be overridden. The task can be under picked, which will leave the missing quantity on the move order line as unfulfilled; the missing quantity on the move order can be automatically picked up by the next Move Order Pick Slip report and re-allocated (and a new task created), or the move order line can be manually closed. The allocated lots, and if serial allocation is enabled, serials cannot be overridden. See, Task Management Setup, Oracle Warehouse Management Implementation Guide.
Note: Move orders are restricted to transactions within an organization.
Performing Move Order Subinventory Transfers
-
Log on to the mobile device.
-
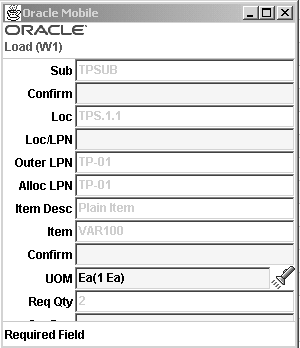
Navigate to the Tasks page. You can retrieve a move order task by either navigating to the Slotting page, or accepting the next task from the Interleaved Tasks menu. The Load page appears. This is the load page you configured using the Pick Load setup page. The fields that display on this page are determined by the pick load setup. See: Explaining Pick Load Setup
-
Scan or enter LPN if necessary.
-
Confirm the required fields
-
Enter the transfer LPN in the Xfer LPN field. You can enter an existing LPN, or generate a new LPN.
Note: After the XferLPN is scanned and nested into a pallet LPN, it is not available for nesting again. Even if the Honor Case Pick check box is active for the task (the Honor Case Pick check box is selected in the User Task Type Attributes page), you need to enter a new LPN or a LPN with a status of Defined but not used or Packing in the XferLPN field.
-
Choose <Load> to load the material, <Load and Drop> to load and drop the material, <Attachment> to view attachments to the move order, <Exception> to enter a task exception, <Skip Task> to skip the task, and move on to the next task, or <Info> to view the order information.
Note: Move order issues cannot be loaded, they must be dropped. Move order transfers can either be loaded or dropped.
When you select <Drop> the system displays the Drop page.
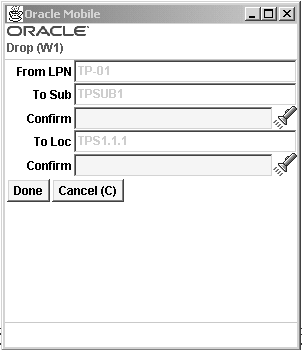
-
Confirm the drop subinventory and locator.
-
Select <Done>
If you choose <Load> the Task Menu displays.
In the case of a generated move order for an account issue, <Drop> is the only option after you confirm the necessary fields on the Pick Load page. The Drop page that displays for an account issues displays the Account Number. Select <Done> to complete the issue.
To transact reserved LPNs
During normal warehouse operations you may need to move an LPN (license plate number) from one subinventory to another because of space constraints or normal warehouse operations. Oracle Warehouse Management enables you to transact hard-reserved lot controlled items within an LPN. The reservation guarantees the supply for the order, while enabling you to move the LPN throughout the warehouse. The following steps describe the process for transacting reserved LPNs:
-
Reserve the lot-controlled item packed within an LPN.
-
Perform the transaction.
Note: No additional setup steps are required for this feature.
-
Navigate to the Sales Order window.
-
Create and book a sales order for the lot controlled item.
Note: You do not have to create a sales order to reserve an LPN.
-
Navigate to the Item Reservation window.
-
Create a hard-level reservation at the lot-level. The LPN will be associated automatically with the lot because the lot is packed within an LPN.
-
Process the transaction, for example, by using an Oracle Mobile device, to transfer the LPN to the desired subinventory. After the transaction occurs, the lot is still reserved, but the reservation is transferred to the desired subinventory. You can transfer the lot packed within an LPN anywhere within the organization, and the reservation remains intact.
Note: Oracle Warehouse Management interacts with the following applications for transacting reserved LPNS:
-
Oracle Order Management for entering and booking sales orders.
-
Oracle Inventory for creating and processing reservations.
-
Related Topics
Oracle Inventory User's Guide
Explaining Oracle Warehouse Management Picking for Manufacturing
Inventory will create move orders and allocations for material requirements on a job or a schedule. The component pick release process supports discrete jobs, repetitive schedules, lot-based jobs, and flow schedules.
-
Describing picking for manufacturing within Oracle Warehouse Management
-
Explaining manufacturing component pick release
-
Explaining manufacturing picking tasks
-
Explaining opportunistic crossdocking for manufacturing
-
Explaining manufacturing label printing
-
Explaining paper-assisted manufacturing picking
-
Explaining change management
Describing Picking for Manufacturing within Oracle Warehouse Management
Oracle Warehouse Management enables you to utilize the Rules Engine and the Task Dispatching Engine to pick component requirements for jobs and schedules. Four manufacturing modes are supported with this process:
-
WIP job
-
Repetitive schedule
-
Lot-based job
-
Flow schedule
Instead of using a paper-based report to direct operators to retrieve material for the job, picking for manufacturing enables operators to be sent directly to the best material for the job and for the picking transactions to be recorded directly on the mobile device. Manufacturing picking also supports opportunistic crossdocking and label printing.
The bill of material, routing, job, and schedule are set up as indicated in the respective users guides; no change in manufacturing setup is required to use these features. Instead, the component picking process is triggered by using a new desktop form, called Component Pick Release. Different forms for each of the four supported manufacturing modes are provided and described in the respective users guides.
Once a job or schedule has been pick released and material has been allocated, the allocated material cannot be used for any other transaction. The allocations can be viewed or updated on the Transact Move Orders form, and the tasks can be viewed or updated on the Warehouse Control Board.
Migration to task based picking for manufacturing is optional. The process is triggered by Component Pick Release of the job or schedule. If pick release is not performed, then an organization can continue to use the component picking process in place unchanged.
Explaining Manufacturing Component Pick Release
Selecting jobs and schedules to pick release in a warehouse-enabled organization is no different than the process in an inventory organization. However, once the process is triggered, different actions are taken by the system.
In a warehouse-enabled organization, component pick release uses the Oracle Warehouse Management Rules Engine to allocate the material required for the job. As part of the component pick release process, tasks are also created and assigned a task type for automatic dispatching at a later point. Backordered components are available for re-release, or can be crossdocked if crossdocking is enabled for the organization.
Explaining Manufacturing Picking Tasks
Once the push or pull allocation has been made via Component Pick Release, the Rules Engine is used again to determine the task type. These tasks are then dispatched to qualified operators who sign on with the required equipment, in the same way that replenishment and sales order tasks are dispatched. For a detailed description of the differences between how Push and Pull supply types are treated see: Defining Pick Slip Grouping Rules , Oracle Inventoy User's Guide
You can load the material to their equipment and then drop the task at a later point, or the task may be loaded and dropped in a single step. The load and drop process are identical to that for a sales order requirement, except that a push requirement is dropped to a job instead of a supply subinventory. You use the same methodologies to pick manufacturing tasks, as you do outbound tasks. You can perform a manufacturing task by selecting manufacturing tasks from the task menu, or by accepting any task from the Interleaved Tasks menu. For information on performing picking tasks see: Describing Pick Methodologies.
Explaining Opportunistic Crossdocking for Manufacturing
If crossdocking is enabled for the organization, then you can crossdock newly received material directly to backordered component requirements. The system considers supply from expected receipts such as purchased orders, internal requisitions, and LPN-based completion, and considers demand from both push and pull component requirements. The system crossdocks a push requirement directly to the job, and a pull requirement to the supply subinventory and locator. For more information on opportunistic crossdocking see, Opportunistic Crossdocking.
To configure crossdocking for manufacturing, you must define several parameters on the Organization Parameters window.
Explaining Manufacturing Label Printing
Oracle Warehouse Management can print labels during the picking process. Labels will be printed when the operator performs the pick load if label types have been assigned to the WIP Pick Load business flow. Similarly, labels can be printed during pick drop if label types have been assigned to WIP Pick Drop. Note that these are different business flows than those used for sales order label printing, because they can print different label types. Specifically, the WIP business flows can print the WIP Contents label, which includes details about the job, schedule, routing, operation, and department.
You can also use the Oracle Manufacturing Execution System (MES) to print labels for serialized and non-serialized jobs and automatically print labels as part of move or completion transactions.
Explaining Paper-Assisted Manufacturing Picking
A warehouse can use paper-directed picking if operators should not be automatically dispatched tasks by the system. The Move Order Pick Slip report includes a task id. Rather than navigating to “Accept Next Task” on the task menu, the operator can instead select “Manual Pick” and enter this task id. The specified task will then get dispatched directly to that operator, bypassing any restrictions via task type or required equipment, as well as any sequencing logic.
Explaining Change Management
If the job or schedule is cancelled, then all the pending and queued tasks are cancelled and the allocations are relieved. Tasks that have been loaded to an operators equipment can be unloaded or dropped if the components have supply type of pull, but must be unloaded if they have supply type of push. Tasks that have already been completed require user intervention to return the components from the job or schedule. Additional support is also provided when the component requirements on the job or schedule change due to a change in the quantity of final assemblies to produce, or a change in the material requirements for that particular job. Please refer to the Oracle Inventory User's Guide for additional details on this type of change management.
Dock Scheduling and Load Sequencing
Organizations with both Oracle Warehouse Management and Oracle Transportation Management (OTM) installed can schedule shipments to dock doors and sequence the loading of trailers at the doors based on the following criteria: time required, door availability, and stop sequence for drop-offs. You can synchronize the dock doors, dock door appointments, and load sequence with Oracle Warehouse Management. Oracle Warehouse Management uses the additional information to plan outbound activities such as:
-
Releasing shipments for pick execution based on dock door schedule.
-
Sequencing of drops in the staging area for multi-stop shipping itinerary.
-
Sequencing of tasks for picking when a multi-stop shipping itinerary is being used.
To set up data for Oracle Transportation Management Integration
This feature relies on the Oracle Shipping Execution – Oracle Transportation Management Integration for sales order and outbound integration flows; the related setup is described in the integration guide Integrating Oracle Transportation Management with Oracle E-Business Suite.
In addition, the following setup is required in the Oracle E-Business Suite:
-
Navigate to the Shipping Parameters window.
-
On the Delivery tab, select the Dock Appointment Scheduling check box to enable dock appointment scheduling.
-
Run the concurrent program Synchronize Dock Doors with Transportation Management. This program is a master reference data synchronization program that can be run either for an organization or for all organizations or for a given date range. This program synchronizes data with OTM and will be run every time the dock doors have been changed.
Troubleshooting the Synchronize Dock Doors with Transportation Management Feature
-
Concurrent Request Log: The concurrent request should complete normally. The parameters that are passed display in the log file and the BPEL Process instance ID is displayed in the log file. To view complete debugging information, set the Inventory Debug Profiles before launching the concurrent program.
-
BPEL Process WmsSendDockDoorToOTM: View the instance of the BPEL process created and the BPEL Console to debug any issues. The BPEL PM logs can be found at \integration\orabpel\domains\default\log. To debug any PL/SQL API calls, set the Inventory Debug Profiles at the Site Level and bounce the BPEL Process Manager for the new settings to take effect. The inventory debug log file is created in the directory defined in the Inventory Debug profile option. You can review this in conjunction with the BPEL process instance information to troubleshoot any issues.
-
Related Topics
See the Integrating Oracle Transportation Management with Oracle E-Business Suite integration guide.