Item Setup and Control
This chapter covers the following topics:
- Overview of Item Setup and Control
- Implementing the Item Master Organization
- Item Master Business Example
- Item Attribute Controls
- Control Level Dependencies
- Item Status Control
- Item-Defining Attributes
- Status Attributes and Item Status Control
- Relationships Between Attributes
- Interdependent Attributes
- Updatable Attributes
- Defining Item Attribute Controls
- Defining Container Types
- Defining Item Status Codes
- Defining and Viewing Pending Statuses
- Defining Picking Rules
- Defining Item Types
- Item Templates
- Defining Item Templates
- Copying Item Templates
- Defining Cross-Reference Types
- Assigning Cross-Reference Types
- Defining Commodity Codes
- Defining Customer Items
- Setting Customer Item Defaults
- Defining Customer Item Cross References
- Overview of Item Categories
- Item Category Flexfield Structures
- Defining Categories
- Defining Category Sets
- Cartonization
- Defining Default Category Sets
- Assigning Items to Categories
- Copying Items with Category Assignments
- Examples Overview
- Planning Example
- Purchasing Example
- Inventory Example
- Unlimited Additional Category Sets
- Specifying Recommended Categories
- Defining Category Accounts
- Overview of Item Cataloging
- Defining Item Catalog Groups
- Concatenated Item Descriptions
- Defining Descriptive Elements
- Defining Aliases
- Item Cataloging Examples
Overview of Item Setup and Control
You must set certain controls and reference options before defining items. These enable you to maintain, group, reference, query, and delete your items. Once you have defined items, you can set up other parameters, such as item cross references, to control the use of items.
Implementing the Item Master Organization
You define items in one organization. To distinguish it from others, we call it the Item Master organization. Other organizations (child organizations) refer to the Item Master for item definition. After you define an item in the Item Master, you can assign it to any number of other organizations.
There is no functional or technical difference between the Item Master organization and other organizations. However, for simplicity, Oracle recommends that you limit the Item Master to just an item definition organization.
Oracle also recommends that you do not define multiple item masters. This can make item definition and maintenance confusing. In addition, multiple item masters are distinct entities, with no relationship to each other. You cannot associate items in one item master organization with another item master organization. You cannot copy items across item master organizations.
-
Use the Organization window to create the organization you want to use as the Item Master. See: Creating an Organization, , Oracle Human Resource Management System User's Guide.
-
Use the Organization Parameters window to specify that organization as the Item Master. See: Defining Organization Parameters.
This is also where you assign child organizations to the Item Master. The item master organization uses itself as the Item Master.
Related Topics
Overview of Item Setup and Control.
Item Master Business Example
Suppose you have a distribution warehouse and a manufacturing factory. In the warehouse, the item has independent demand and is min-max planned. In the factory, the item is MRP planned and built.
Using an Item Master with a warehouse and a factory as the other organizations, you define the item just once-in the Item Master. Next, you assign the item to both the warehouse and the factory. Finally, you change the planning and build attributes in each organization to describe the different behavior of the items in those organizations. You do not have to change any other information about the item; in fact, because information such as unit of measure, description, and so on is maintained at the Master level, you know it is consistent in each organization.
Related Topics
Implementing the Item Master Organization
Item Attribute Controls
Item attributes are information about an item, such as order cost, lead time, and revision control.
One of the prerequisites for defining items (and assigning values to item attributes) is setting attribute controls.
Control Level
This attribute control type determines whether you have centralized (Master level) or decentralized (Organization level) control of item attributes.
Attributes maintained at the Master level have the same attribute values in each organization in which an item is assigned. For example, you maintain an item's primary unit of measure at the Master level.
Attributes maintained at the Organization level may have different attribute values in different organizations. For example, an item may be min-max planned in a distribution organization but material requirement planning (MRP) planned in a production organization.
| Attribute | Control Level |
|---|---|
| Append | Organization |
| Auto-expire ASN | Organization |
| Base Model | Master |
| BOM Item Type | Master |
| Consigned | Organization |
| Container | Master |
| Continuous Inter Organization Transfers | Organization |
| Convergent Supply Consumption Pattern | Organization |
| Cost of Goods Sold Account | Organization |
| Critical Component | Organization |
| Cumulative Total Lead Time | Organization |
| Cumulative Manufacturing Lead Time | Organization |
| Default Grade | Organization |
| Defaulting | Organization |
| Deviation Factor + | Organization |
| Deviation Factor - | Organization |
| Divergent Supply Feeding Pattern | Organization |
| Downloadable | Master |
| DRP Planned | Organization |
| Effectivity Control | Master |
| Electronic Format | Master |
| Encumbrance Account | Organization |
| Engineering Item | Master |
| Equipment | Organization |
| Event | Master |
| Expense Account | Organization |
| Expiration Action | Organization |
| Expiration Action Interval | Organization |
| Fixed Lead Time | Organization |
| Forecast Type for Average Daily Demand Calculation | Organization |
| Format Validation | Organization |
| Grade Controlled | Organization |
| Hold Days | Organization |
| Horizon for Average Daily Usage Calculation | Organization |
| Inventory Planning Method | Organization |
| Lot Divisible | Organization |
| Lot Starting Number | Organization |
| Maturity Days | Organization |
| Maximum Inventory Level Calculation Window | Organization |
| Maximum Inventory Level Days of Supply | Organization |
| Option Specific Sourcing | Master |
| Planner | Organization |
| Planning Exception Set | Organization |
| Postprocessing Lead Time | Organization |
| Prefix | Organization |
| Preprocessing Lead Time | Organization |
| Pricing | Organization |
| Primary Unit of Measure | Organization |
| Processing Lead Time | Organization |
| Release Authorization Required | Organization |
| Reorder Quantity Maximum Days of Supply | Organization |
| Reorder Quantity Maximum Quantity in UOM | Organization |
| Reorder Quantity Selection Fixed Order Quantity | Organization |
| Replenishment Point Selection Minimum Days of Supply | Organization |
| Replenishment Point Selection Minimum Quantity in UOM | Organization |
| Retest Interval | Organization |
| Sales Account | Organization |
| Secondary Unit of Measure | Organization |
| Source Organization | Organization |
| Source Subinventory | Organization |
| Target Inventory Level Calculation Window | Organization |
| Target Inventory Level Days of Supply | Organization |
| Tracking | Organization |
| Under Return Tolerance | Organization |
| Under Shipment Tolerance | Organization |
| Variable Lead Time | Organization |
| WIP Supply Subinventory | Organization |
| Encumbrance Account | Organization |
| Expense Account | Organization |
Control Level Dependencies
You can change the control level of some attributes in special cases, or in certain circumstances. The following table shows attributes with conditionally updateable control levels and the consequences of changing the attribute control level:
| Attribute | Updateable To | If | Consequences |
|---|---|---|---|
| Item Status | Master Level | No pending statuses exist in any child organization | All status attributes under status control or default control are updated |
| Inventory Asset Value or Costing Enabled | Master Level | Organization with WIP parameters defined uses itself as the Master Organization for costing. (Cannot point to a different organization for costing when WIP parameters are defined | NA |
| Inventory Asset or Costing Enabled | Master Level | Item costs are the same across all organizations | NA |
| Inventory Asset Value | Master or Organization Level | NA | Costing Enabled is updated to the same level |
| All Item Defining Attributes | Org Level | Default category set for the functional area is maintained at the organization level | NA |
| Source Organization | Current Organization | Item is MRP planned and source subinventory is non-nettable | NA |
Item Status Control
Status control describes whether certain status attributes have default values that appear when you assign a status code to an item, and whether status codes control those attribute values after the defaults are assigned to an item.
Note: Item Status Control differs from material status control. Item status control controls the action you can perform on an item, such as purchasing or stocking an item. Material Status controls the transactions you can perform on an item. See Overview of Material Status for more information about material status control.
The status attributes are:
-
BOM Allowed
-
Build in WIP
-
Customer Orders Enabled
-
Internal Orders Enabled
-
Invoice Enabled
-
Transactable
-
Purchasable
-
Stockable
-
Recipe Enabled
-
Process Execution Enabled
Related Topics
Status Attributes and Item Status Control
Defining Item Attribute Controls
Relationships Between Attributes
Item-Defining Attributes
An item-defining attribute identifies the nature of an item. What designates an item as an engineering item is the attribute Engineering Item, but what controls the functionality of the item is the collection of attributes that describe it. You can buy an engineering item if you want to; set Engineering Item, Purchased, and Purchasable to Yes.
The following table presents item defining attributes:
Item-Defining Attributes
| Functional Area | Item Defining Attribute |
|---|---|
| Oracle Inventory | Inventory Item |
| Oracle Purchasing | Purchased, or Internal Ordered Item |
| Oracle Master Scheduling/MRP and Oracle Supply Chain Planning | MRP Planning Method |
| Oracle Cost Management | Costing Enabled |
| Oracle Engineering | Engineering Item |
| Oracle Order Management | Customer Ordered Item |
| Oracle Service | Support Service, or Serviceable Product |
When you set an item defining attribute to Yesthe item is automatically assigned to the default category set of the corresponding functional area. For example, if you set Inventory Item to Yes the item is automatically assigned to the default category set for the Inventory functional area.
Related Topics
Defining Default Category Sets
Defining Item Attribute Controls
Status Attributes and Item Status Control
Status attributes enable and disable the functionality of an item over time. Each status attribute allows you to enable the item for a particular use. For example, if you set the status attribute Purchasableto Yes, you can put the item on a purchase order.
The status attributes are related to the item defining attributes. You cannot enable a status attribute if you do not set the corresponding item defining attribute to Yes.
The following table presents status attributes:
Status Attributes
| Status Attribute | Item Defining Attribute | Functional Area / Oracle Product | Functionality |
|---|---|---|---|
| Stockable | Inventory Item | Inventory | Enables you to store the item in an asset subinventory. |
| Transactable | Inventory Item | Inventory, Order Management, Purchasing, Work in Process | Enables you to transact the item in Oracle Inventory, Oracle Order Management, Oracle Purchasing and Oracle Work in Process. |
| Purchasable | Purchased | Purchasing | Enables you to place the item on a purchase order. |
| Build in WIP | NA | Work in Process | Enables you to build the item on a discrete job, a repetitive schedule, or both. |
| Customer Orders Enabled | Customer Ordered Item | Order Management | Enables you to place the item on a sales order. |
| Internal Orders Enabled | Internal Ordered Item | Inventory, Order Management, Purchasing | Enables you to create an internal sales order for the item |
| BOM Allowed | Inventory Item | Bills of Material | Enables you to create a bill of material for the item |
| Invoice enabled | Invoiceable Item | Receivables | Enables you to create an invoice for the item |
| Recipe Enabled | NA | Process Manufacturing | Enables you to create a recipe or formula for this item in process manufacturing. |
| Process Execution Enabled | Inventory Item | Process Manufacturing | Enables you to use the item in a production batch as an ingredient, product, or by-product. |
You set status control for a status attribute with the Item Attributes Control window.
Interdependencies for Status Attributes
Each status attribute is dependent on the value of at least one other attribute. For example, you cannot set Stockable to Yes if you set Inventory Item to No. The following table presents interdependencies for the status attributes:
Interdependencies for Status Attributes
| Attribute | Must be set to | If |
|---|---|---|
| Stockable | No Yes |
Inventory Item is set to No ASL is VMI enabled |
| Transactable | No Yes |
Stockable is set to No ASL is VMI enabled |
| Purchasable | No | Purchased is set to No |
| Build in WIP | No | Inventory Item is set to No OR BOM Item Type is NOT set to Standard |
| Customer Orders Enabled | No | Customer Ordered Item is set to No |
| Internal Orders Enabled | No | Internal Ordered Item is set to No |
| BOM Allowed | No | Inventory Item is set to No |
| Invoice Enabled | No | Invoiceable Item is set to No |
| Process Execution Enabled | No | Inventory Item or Recipe Enabled Flag is set to No |
Item Status Control
When defining an item, you can use the item attribute Item Status to control status attribute values. You determine the list of values for the Item Status attribute by defining Item Status codes. An Item Status code has a user-defined set of Yes and No values for the status attributes. The values are applied to the status attributes when you choose an Item Status code when defining an item. For example, assume that you define an Item Status named Prototype with all status attributes set to Yes except for Customer Orders Enabled. Next, you define another item status, Active, with all status attributes set to Yes. In the beginning of a product development cycle, assign the status code Prototype to an item so that you cannot place the item on a sales order. Later, assign the status code Active to allow all functions for the item. See: Defining Item Status Codes.
Use pending statuses to automatically update an item's status on a specified date. For each item, specify a list of pending statuses and the corresponding effective dates. See Defining and Viewing Pending Statuses.
Related Topics
Defining Item Attribute Controls
Relationships Between Attributes
When you define items, Oracle Inventory enforces particular relationships between some of the item attributes:
-
Required attributes: You must enter a value for the attribute based on the settings for other related attributes.
-
Interdependent attributes: You can enter only certain values depending on other attribute values.
-
Updatable attributes: You can update values under certain conditions.
-
Control level dependencies: You can update the control level of some attributes only under special conditions and with certain consequences.
Required Attribute Values
You must enter values for certain attributes if some related attributes have values as shown in the following table:
| Attribute | If |
|---|---|
| Contract Coverage Template | Contract Item Type is set to Service or Warranty |
| Contract Duration | Contract Item Type is set to Service or Warranty |
| Contract Duration Period | Contract Item Type is set to Service or Warranty |
| Demand Time Fence Days | Demand Time Fence is set to User-defined |
| Encumbrance Account | Reverse Encumbrance parameter is set to Yes |
| Expense Account | Inventory Asset Value is set to No and Inventory Item is set to Yes |
| Outside Processing Unit Type | Outside Processing Item is set to Yes |
| Planning Time Fence Days | Demand Time Fence is set to User-defined |
| Planning Time Fence Days | Planning Time Fence is set to User-defined |
| Release Time Fence Days | Release Time Fence is set to User-defined |
| Repetitive Planning | MRP Planning Method is set to MPS planning or MRP planning |
| Service Duration | Service Duration Period is not null |
| Shelf Life Days | Lot Expiration (Shelf Life) Control is set to Item shelf life days |
| Source Organization | Replenishment Source Type is set to Inventory or Subinventory. |
| Starting Lot Number | Lot Control is set to Full lot control, and Lot Generation Organization Parameter is set to Item Level |
| Starting Lot Prefix | Lot Control is set to Full lot control and Lot Generation organization parameter is set to Item Level |
| Starting Serial Number | Serial Number Control is set to Predefined serial numbers |
| Starting Serial Prefix | Serial Number Control is set to Predefined serial numbers |
| Substitution Window Days | Substitution Window is set to User Defined |
Interdependent Attributes
Certain attribute values depend on other attribute values. For example, Planning Method must be Not Planned if Pick Components is set to Yes. The attribute interdependencies are:
Interdependent Attributes
| Attribute | Must be | If |
|---|---|---|
| Activity Source | Null | Asset Item Type is set to anything other than Asset Activity |
| Assemble to Order | No | Pick Components is set to Yes or BOM Item Type is set to Planning |
| Assemble to Order or Pick Components | Yes | BOM Item Type is set to Model or Option Class |
| Asset Activity Cause | Null | Asset Item Type is set to anything other than Asset Activity |
| Asset Activity Notification | Null | Asset Item Type is set to anything other than Asset Activity |
| Asset Activity Shutdown Type | Null | Asset Item Type is set to anything other than Asset Activity |
| Asset Activity Source | Null | Asset Item Type is set to anything other than Asset Activity |
| Asset Activity Type | Null | Asset Item Type is anything other than Asset Activity |
| AutoCreated Configuration | Null | Base Model is Null |
| Base Model | Null | BOM Item Type does not equal Standard or Pick Components is set to Yes |
| BOM Allowed | No | If organization process manufacturing enabled, and tracking is set to primary and secondary. |
| ATP Components | None | Pick Components is set to No, and Assemble to Order is set to No, and WIP Supply Type is set to anything other than Phantom |
| Billing Type | Null | Contract Item Type is set to anything other than Subscription |
| Billing Type | Not Null | Enable Service Billing set to Yes |
| BOM Item Type | Standard | Effectivity Control is set to Model / Unit Number |
| BOM Item Type | Model | Configurator Model Type is set to container |
| BOM Model Type | No | If the organization is process manufacturing enabled, and tracking is set to primary and secondary. |
| Build in WIP | No | Inventory Item is set to No or BOM Item Type does not equal Standard |
| Check ATP | Null | Contract Item Type is set to anything other than Subscription |
| Check Material Shortage | No | Transactable is set to No |
| Container Type | Null | Container is set to No |
| Contract Coverage Template | Null | Contract Item Type is set to No |
| Contract Duration | Null | Contract Item Type is set to No |
| Contract Duration Period | Null | Contract Item Type is set to No |
| Contract Item Type | Null or Subscription | Inventory Item is set to Yes |
| Contract Item Type | Subscription | Subscription Dependency enabled is set to Yes |
| Create Configured Item, BOM | Null | If the item is not an ATO model. |
| Create Fixed Asset | Yes | Track in Install Base is set to Yes |
| Costing Enabled | Yes | Inventory Asset is set to Yes |
| Customer Ordered | No | BOM Item Type is set to Planning or Product Family |
| Customer Ordered | No | Contract Item Type is Warranty |
| Customer Orders Enabled | Yes | Configurator Model Type is set to container |
| Customer Orders Enabled | No | Customer Ordered is set to No |
| Customer Orders Enabled | Yes | Customer Ordered is set to Yes |
| Cycle Count Enabled | No | Contract Item Type is set to anything other than Subscription |
| Defaulting | Fixed, Default, or No Default | Tracking is Set to Primary & Secondary |
| Defaulting | Default or No Default | Tracking is set to Primary and Pricing is set to Secondary |
| Default Lot Status | Null | Lot Status Enabled is set to No |
| Default Serial Status | Null | Serial Status Enabled is set to No |
| Default SO Source Type | Internal | Ship Model Complete is set to Yes |
| Demand Time Fence Days | null | Demand Time Fence is not User-defined |
| Deviation Factor + | Null | UOM Dual Control is set to No Control |
| Deviation Factor - | Null | UOM Dual Control is set to No Control |
| Effectivity Control | Model / Unit Number | Asset Item Type is Asset Group |
| Expense Account | Yes | Inventory Asset Value is No and Inventory Item is Yes |
| Grade | N | If Lot Control is null |
| Height | Null | Dimensions UOM is Null |
| Inspection Required | No | Receipt Routing is set to anything other than Inspection |
| Installed Base Trackable | Yes | Serviceable is set to shelf Yes and Contract Item Type is set to Null or Subscription |
| Instance Class | Null | Contract Item Type is set to anything other than Subscription |
| Instance Class | Null | Install Base Trackable is set to No |
| Internal Ordered | No | BOM Item Type does not equal Standard |
| Internal Orders Enabled | No | Internal Ordered is set to No |
| Internal Volume | Null | Container, Vehicle, or Weight UOM are set to Null. |
| Inventory Item | No | Contract Item Type is set to anything other than Null or Subscription |
| Inventory Item | Yes | Asset Item Type, Default Receiving Subinventory, Default Move Orders Subinventory, Default Shipping Subinventory are set to anything other than Null; or BOM Item Type is set to Product Family, |
| Invoice Enabled | No | Invoiceable Item is set to No |
| Lead Time Lot Size | 1 | Repetitive Planning is set to Yes |
| Length | Null | Dimensions UOM is Null |
| Lot Status Enabled | No | Lot Control is set to No Control |
| Lot Split Enabled | No | Lot Control is set to No Control |
| Lot Merge Enabled | No | Lot Control is set to No Control |
| Lot Substitution Enabled | No | Lot Control is set to No Control |
| Lot Translation Enabled | No | Lot Control is set to No Control |
| Match Configuration | Null | If the item is not an ATO model |
| Maximum Load Weight | Null | Container, Vehicle, or Weight UOM is set to Null |
| Minimum Fill Percentage | Null | Container and Vehicle are both set to No |
| Move Order Receipts Subinventory | Null | Transactable is set to No |
| Orderable On Web | No | Customer Orders Enabled is set to No |
| Outside Processing Item | N | If Purchased is set to No or if ASL has VMI. |
| Outside Processing Unit | Y | Outside Processing Item is Yes |
| Pick Components | No | Assemble to Order is set to Yes or BOM Item Type is set to Planning or Planning Method does not equal Not planned |
| Pick Components | Yes | Ship Model Complete is set to Yes |
| Planning Time Fence Days | null | Planning Time Fence is not User-defined |
| Planning Method | Not Planned | Pick Components is set to Yes |
| Postprocessing lead time | 0 (Zero) | Make or Buy is set to Make |
| Purchasable | No | Purchasing Item is set to No or Contract Item Type is set to anything other than Subscription |
| Purchasable | Yes | Default SO Source Type is set to External |
| Purchasing Tax Code | Null | Taxable is set to Null |
| Recovered Part Disposition | Null | Billing Type is Labor |
| Release Time Fence Days | Null | Release Time Fence is not User-defined |
| Replenishment Point | Minimum Quantity | Either Maximum Quantity or Fixed Quantity Attributes isenabled. |
| Replenishment Point | Minimum Days of Supply | Either Maximum days of Supply of Fixed Quantity is enabled. |
| Restrict Locators | Locators not restricted to predefined list | Restrict Subinventories is set to Subinventories not restricted to predefined list or Stock Locator Control is set to Dynamic entry locator control |
| Restrict Subinventories | Subinventories restricted to predefined list | Restrict Locators is set to Locators restricted to predefined list |
| Returnable | No | Contract Item is set to anything other than Subscription |
| Safety Stock Method | Non-MRP Planned | MRP Planning Method is set to Not Planned |
| Secondary UOM | Null | UOM Dual Control is set to No Control, or Tracking and Pricing are both set to Primary |
| Serial Number Generation | At Receipt or Predefined | Equipment is set to Yes or Effectivity Control is set to Model / Unit Number |
| Serial Status Enabled | No | Serial Control is set to No Control |
| Service Request | Null. Disabled, or Inactive | Contract Item Type is Service, Warranty, or Usage |
| Service Importance Level | Null | Contract Item Type is set to Service |
| Serviceable Product | No | Support Service is set to Yes |
| Shippable | No | BOM Item Type is set to Planning or Contract Item Type is set to anything other than Subscription |
| Source Organization | Null | Inventory Planning Method is set to Vendor Managed |
| Source Type | Null | Inventory Planning Method is set to Vendor Managed |
| Stockable | No | Inventory Item is set to No |
| Stockable | No | Billing Type is Labor or Expense |
| Stockable | Yes | ASL is VMI |
| Stock Locator Control | No locator control or Pre- specified locator control | Restrict Locators is set to Locators restricted to predefined list |
| Support Service | No | Serviceable Product is set to Yes |
| Taxable | Yes | Tax Code is set to anything other than Null |
| Transactable | No | Stockable is set to No |
| Transactable | No | Billing Type is Labor or Expense |
| Transactable | Yes | ASL is VMI |
| Unit Volume | Null | Volume UOM is Null |
| Unit Weight | Null | Weight UOM is Null |
| Width | Null | Dimensions UOM is Null |
| WIP Overcompletion Tolerance Value | Null | Overcompletion Tolerance Type is set to Null |
| WIP Supply Locator | Null | On Organization Parameters window, Locator is set to None or Locator controls is Subinventory Level and Selected WIP Supply Subinventory has Locator Control as None or Locator controls is Subinventory Level, Selected WIP Supply Subinventory has Locator Control as Item Level, and Item Locator Control is None. |
| WIP Supply Type | Phantom | BOM Item Type is set to Option Class |
Updatable Attributes
You can change the values of some attributes in special cases. The following table shows updatable attributes and the conditions under which you can change their values:
Updatable Attributes
| Attribute | Updatable | If |
|---|---|---|
| Asset Item Type | yes | Approved Supplier list does not have the VMI flag enabled or the Consigned Inventory flag deselected. |
| ATP Components | from No to Yes | Assemble to Order equals Yes or Pick Components equals Yes or WIP Supply Type equals Phantom |
| BOM Item Type | No | Bill of Material exists or Exists as a component of a BOM or Exists as a substitute component of a standard BOM. Exception: Can change from Product Family for components and substitute components. |
| Costing Enabled | Yes | No on-hand quantity exists |
| Demand Time Fence Days | Yes | Demand Time Fence equals User-defined time fence |
| Effectivity Control | No | If on-hand quantity is greater than 0 or a BOM exists for the item. |
| Inventory Asset Value | Yes | No on-hand quantity exists |
| Locator Control | Yes | No on-hand quantity exists |
| Lot Control | Yes | No on-hand quantity exists |
| OM Indivisible | With a warning | OM Indivisible is set to No |
| OE Transactable | from Yes to No | No demand exists |
| Outside Processing Item | Yes | Approved Supplier list does not have the VMI flag enabled or the Consigned Inventory flag unchecked. |
| Outside Processing Unit | Yes | Purchasing Item equals Yes |
| Planning Time Fence Days | Yes | Planning Time Fence equals User-defined time fence |
| Release Time Fence Days | Yes | Release Time Fence equals User-defined time fence |
| Reservable | Yes | No reservations exist for the item |
| Repetitive Planning | Yes | Not scheduled by MRP |
| Reservation Control | Yes | No demand exists |
| Revision Control | Yes | No on-hand quantity exists |
| Serial Number Control | Yes | No on-hand quantity exists |
| Shelf Life Control | Yes | No on-hand quantity exists |
| Shippable | With a warning | If open sales order line exists with a value different from the new value |
| Stockable | Yes | Approved Supplier list does not have the VMI flag enabled or the Consigned Inventory flag deselected. |
| Transactable | Yes | Approved Supplier list does not have the VMI flag enabled or the Consigned Inventory flag deselected. |
Defining Item Attribute Controls
You can choose between centralized and decentralized control of item attributes. The control level you define for an attribute applies to all items. Defining attribute controls does not determine the value of an attribute, only the level at which it is controlled. You assign values to the attributes when you define an item.
Important: Oracle strongly recommends that you create only one Item Master organization. Assign all other organizations to this master. This allows you to associate the same item with a variety of assigned organizations-eliminating the need to replicate identical items between organizations. This documentation assumes you are using a single Item Master.
To define item attribute controls
-
Navigate to the Item Attribute Controls window.
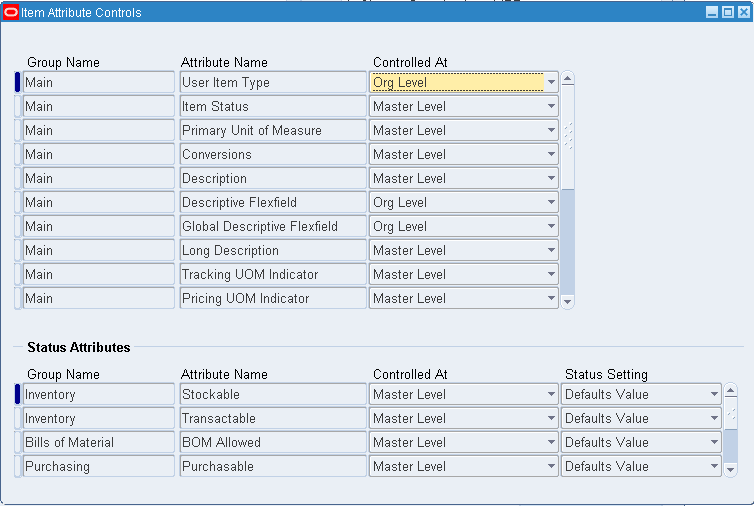
-
Scan the information displayed in the Group Name and Attribute Name fields to locate the desired attribute.
The Group Name field displays the name for a group of attributes. Attributes are grouped by function, such as Main, Inventory, and Receiving. When you define or update items, define templates, or view item attributes, you can display the attributes for a particular group. This makes it easier to locate a specific attribute.
-
Select a control level for the attribute.
Master Level: Define and maintain this attribute at the Master level. For the same item, the values of this attribute are identical across all organizations.
Org Level: Define and maintain this attribute at the Organization level. For the same item, each organization may define a different value for this attribute.
Important: Some attributes can only be set at a specific level. In these cases, you have only one option. See: Master Level vs. Organization Level.
-
Choose a status setting for each status attribute.
Defaults Value: Value of this attribute, as defined by the status code, defaults when you assign the status to an item. You can change this default value.
Not Used: Use neither default nor status control.
Sets Value: Value of this attribute, as defined by the status code, defaults when you assign the status to an item. Once assigned, you cannot change the default.
-
Save your work.
Related Topics
Defining Container Types
Container Types are used in defining physical attributes of items.
To define a container type
-
Navigate to the Container Types window from the menu.
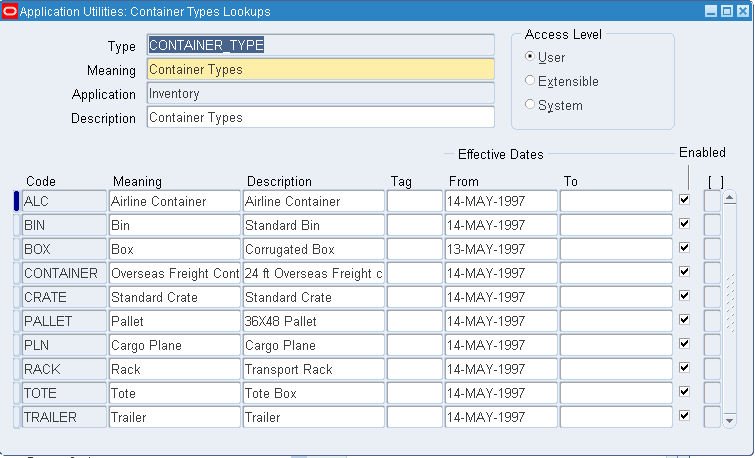
-
Enter a unique container type name.
-
Enter a description of the type.
-
Save your work.
To make a container type inactive
-
You can delete a container type if it has not been used in defining physical attributes for an item.
Related Topics
Defining Item Status Codes
You can use statuses to provide default values for certain item attributes to control the functionality of an item. When you update the values for a status, all items to which it is assigned are also updated.
Important: When your current organization is not the Item Master organization, the organization is temporarily changed to the Item Master organization until you exit this window. You can use the statuses created here in all defined organizations.
A status code controls certain item attributes designated as status attributes. The status attributes are:
-
BOM Allowed
-
Build in WIP
-
Customer Orders Enabled
-
Internal Orders Enabled
-
Invoice Enabled
-
Transactable
-
Purchasable
-
Stockable
-
Process Execution Enabled
-
Recipe Enabled
Associated with each status attribute is a Status Setting option. This option determines whether a status attribute value is set by the status code and is not updatable, defaulted and updatable, or not used when you define an item. You choose a Status Setting for a status attribute with the Item Attributes Controls window. You assign a status code to an item when you define the item. See: Status Attributes and Item Status Control.
To define an item status
-
Navigate to the Status window.

-
Enter a unique name for the status code.
-
For each attribute, use the Value option to indicate the functionality that is controlled by the status code.
-
Save your work.
To delete an item status
-
You can delete a status if it has not been used.
To make an item status inactive
-
Enter the date on which the item status becomes inactive.
As of this date, you can no longer assign this status to an item. The status remains valid for items to which it is already assigned.
Related Topics
Status Attributes and Item Status Control
Defining Item Attribute Controls
Defining and Viewing Pending Statuses
You can assign one or more pending statuses for an item, to be implemented on future dates. These statuses become effective on their assigned effective dates. You can also view the history of an item status.
To create a pending status
-
Navigate to the Master Items Summary window and select an item.
-
Choose Pending Status from the Tools menu to navigate to the Item Status History window.
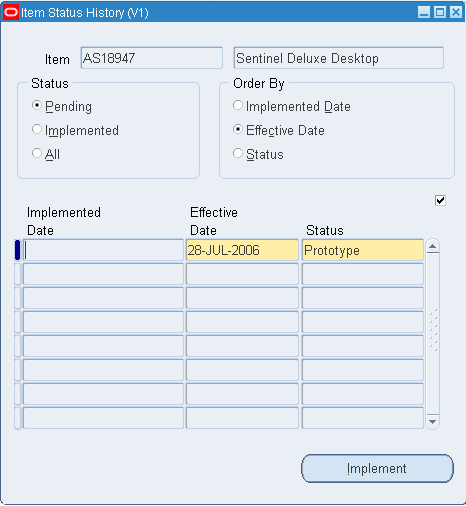
-
Enter the effective date. This is the date on which the pending status becomes effective for the item.
-
Enter the name of the status to be implemented on the effective date.
-
Save your work.
To update an item with a pending status
-
Navigate to the Master Items Summary window and select an item.
-
Choose Pending Status from the Tools menu to navigate to the Item Status History window.
-
Select a pending status.
-
Choose Implement to submit the process.
Note: You can also submit the request from the All Reports or Pending Status window by entering Update item statuses with pending statuses in Name field. Enter an item and organization (if necessary), and choose Submit.
To view status history
-
Navigate to the Master Items Summary window and select an item.
-
Choose Pending Status from the Tools menu to navigate to the Item Status History window.
-
View the information in the Implemented Date, Effective Date, and status Name fields.
Related Topics
Status Attributes and Item Status Control
Defining Picking Rules
You can create picking rules that enable you to sort picks based on criteria that you define for sales orders, process manufacturing batches, or work in process jobs. Oracle Inventory reviews the picking criteria order and the options for each criterion.
After you create a picking rule, you use the rules workbench to assign the rule to a particular item.
To define a picking rule:
-
Navigate to the Picking Rules window.
-
Enter a unique name and description for the rule.
-
Select the picking restriction. The available choices are sales order, process manufacturing, and work in process.
-
Enter the shelf life days if applicable. If you enter a value in this field, then the system allocates the material the number of days that you enter in the Shelf Life Days Item Master window field before the lot expires. For example, if an item is set to expire in ten days, and you enter four days in the Shelf Life Days field, then the system allocates the material at least four days before the material expires.
-
Select Single Lot Allocation, to allocate only a single lot for this rule. If you do not select this check box, the system may use this rule to allocate more than one lot.
-
Select Partial Allocation Allowed to accept a partial allocation of a lot. If you do not select this check box, then the system allocates only one lot when using this rule.
Note: Single lot allocation controls whether the system can allocate multiple lots for a particular demand. Partial lot allocation controls whether the system can allocate quantities of a lot less than the total lot quantity available.
-
Click Customer Spec Match to require quality specification matching.
-
Select the sort criteria for the rule. You can rank sort criteria to determine the importance level for that criterion. For example a criterion ranked 1 is higher in value than a criterion that is ranked 3. The sort criteria are:
-
Lot: You can sort by lot based on the following criteria:
-
Lot Number Asc: Sorts the lot by number in ascending order.
-
Lot Number Desc: Sorts the lot by number in descending order.
-
FIFO: Sorts the lot by first in first out.
-
FEFO: Sorts the lot by first expired first out.
-
-
Revision: You can sort by revision based on the following criteria:
-
Revision Asc: Sorts by revision in ascending order.
-
Revision Asc: Sorts by revision in descending order.
-
Effective Date Asc: Sorts by revision effective date in ascending order.
-
Effect Date Desc: Sorts by revision effective date in descending order.
-
-
Subinventory: You can sort by subinventory based on the following criteria:
-
Subinventory Asc: Sorts by subinventory in ascending order.
-
Subinventory: Desc: Sorts by subinventory in descending order.
-
Receipt Date Asc: Sorts by receipt date in ascending order.
-
Receipt Date: Desc: Sorts by receipt date in descending order.
-
-
Locator: You can choose to sort by locator based on the following criteria:
-
Locator Asc: Sorts by locator in ascending order.
-
Locator Desc: Sort by locator in descending order.
-
Receipt Date Asc: Sorts by receipt date in ascending order.
-
Receipt Date: Desc: Sorts by receipt date in descending order.
-
-
-
Save your work.
-
Click Enable to enable the rule.
-
Click Assignment to open the rules workbench.
To assign a picking rule:
You use the Rules Workbench to assign your picking rule. The rule that you created on the Inventory Picking Rules page appears on the Rules Workbench. The system automatically assigns a sequence number and return type to the rule. You can modify the sequence number, but you cannot modify the return type. You can assign your rule to any combination of criteria the Rules Workbench displays. For example, if you create a picking rule that allocates material by lot number in ascending order followed by locator in ascending order, you can assign it to an item in the Rules Workbench. This means for picking, the system allocates the lowest lot number of the item in the lowest locator number where the item resides.
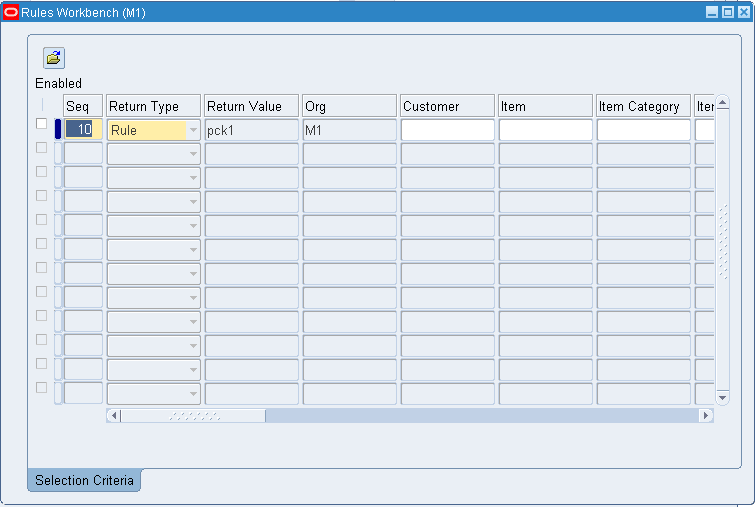
-
Enter values in any combination of the following fields. These values determine how the system allocates the material according to the rule that you created. For example if you created a rule that allocates lots based on FIFO, you can assign that rule to a particular customer, so that material you pick for that customer is allocated based on FIFO.
-
Customer
-
Item
-
Item Category
-
Item Type
-
Assignment Group
-
Source Subinventory
-
Supplier
-
Order Type
-
Freight Code
-
Project
-
Task
-
Transaction Action
-
Destination Subinventory
-
Transaction Reason
-
Transaction Source
-
Transaction Type
-
UOM Class
-
Date Type
-
Date From
-
Date To
-
-
Click Enabled to enable the rule for the given set of criteria.
Note: You can only modify disabled rules.
-
Save your work.
Related Topics
Overview of Item Setup and Control
Describing the Rules Workbench, Oracle Warehouse Management User's Guide
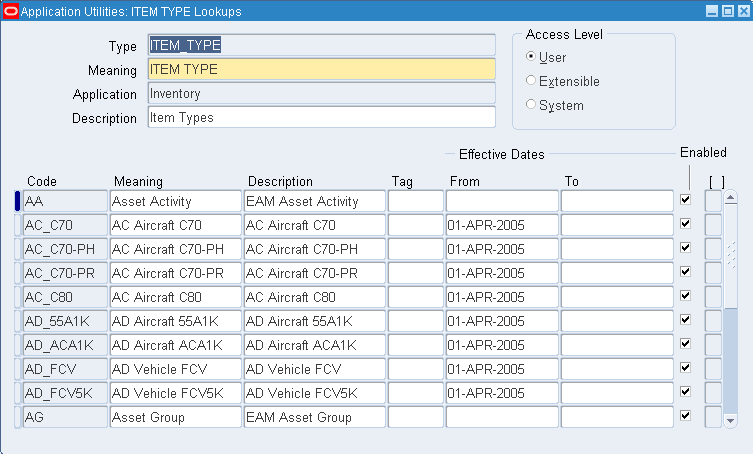
Defining Item Types
The User Item Type item attribute is a QuickCode you use when you define an item. You can use the types provided by Oracle Inventory or create your own.
To define your own item types
-
Navigate to the Item Type QuickCodes window. The User access level is selected indicating you can add or modify QuickCodes without restriction.
-
Enter a unique alphanumeric code describing the item type. You can define a maximum of 250 QuickCodes for a single QuickCode type.
You cannot change the values in this field after saving them. To remove an obsolete QuickCode you can either disable the code, enter an end date, or change the meaning and description to match a replacement code.
-
Enter the meaning of the item type. Inventory uses this value in the list of values for the User Item Type item attribute in the Items window.
-
Optionally, enter from and to effective dates.
If you enter an Effective From date you cannot use the item type before this date. If you leave this field blank, the item type is valid immediately.
If you enter an Effective To date you cannot use the item type after this date. Once an item type expires, you cannot define items using the item type, but can query items that already use the item type. If you do not enter an end date, your item type is valid indefinitely.
-
Indicate whether the item type is enabled. An item type must be enabled before you can define items using the item type. If you disable an item type you cannot use it to define items but can query items that already use this item type.
-
Save your work.
Related Topics
Overview of Item Setup and Control.
Application Utilities Lookups and Application Object Library Lookups , Oracle Applications User's Guide
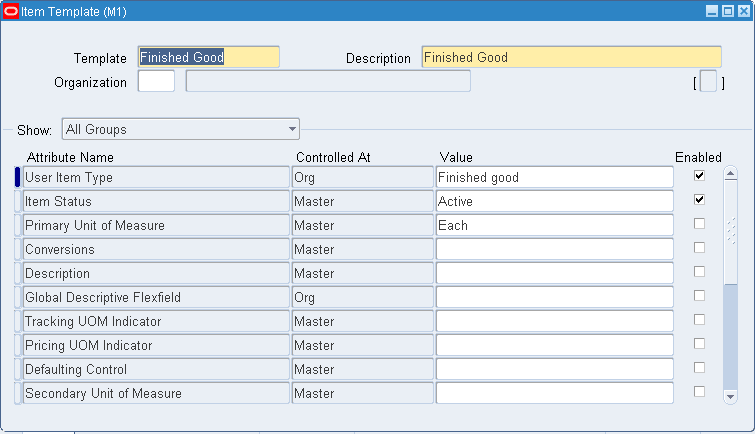
Item Templates
Templates are defined sets of attributes that you can use over and over to create many similar items. Templates make initial item definition easier. Oracle recommends that you use templates-either those Oracle provides or those you define-when you define your items.
Templates Shipped by Oracle
The following four tables describe the templates provided by Oracle. Each table shows a different set of templates.
Templates Table One
-
ATO Model
-
ATO Option Class
-
ATO Item
-
Finished Good
-
Kit
| Attribute | Model | Opt Class | Item | FG | Kit |
|---|---|---|---|---|---|
| Assemble to Order | Yes | Yes | Yes | No | No |
| BOM Item Type | Model | Option Class | Standard | Standard | Standard |
| BOM Allowed | Yes | Yes | Yes | Yes | Yes |
| Build in WIP | - | - | Yes | Yes | - |
| Costing Enabled | Yes | Yes | Yes | Yes | Yes |
| Customer Ordered Item | Yes | Yes | Yes | Yes | Yes |
| Customer Orders Enabled | Yes | Yes | Yes | Yes | Yes |
| Forecast Control | Consume and Derive | Consume and Derive | Consume and Derive | Consume and Derive | Consume and Derive |
| Include in Rollup | Yes | Yes | Yes | Yes | Yes |
| Inventory Asset Value | Yes | Yes | Yes | Yes | Yes |
| Inventory Item | Yes | Yes | Yes | Yes | Yes |
| Invoiceable Item | Yes | - | Yes | Yes | Yes |
| Invoice Enabled | Yes | - | Yes | Yes | Yes |
| MRP Planning Method | MPS Planning | MRP Planning | MRP Planning | MPS Planning | Not Planned |
| Make or Buy | Make | Make | Make | Make | Make |
| OE Transactable | Yes | Yes | Yes | Yes | Yes |
| Outside Processing Item | - | - | - | - | - |
| Pick Components | No | No | No | No | Yes |
| Purchased | No | No | No | No | No |
| Purchasable | - | - | - | - | - |
| Reservation Control | - | - | Reservable | Reservable | - |
| Rounding Control | - | - | Round order quantities | Round order quantities | - |
| Ship Model Complete | Yes | - | - | - | - |
| Shippable | - | - | Yes | Yes | - |
| Stockable | - | - | Yes | Yes | - |
| Transactable | - | - | Yes | Yes | - |
| User Item Type | ATO model | ATO option class | ATO Item | FG | K |
| WIP Supply Type | Assembly pull | Phantom | Push | Push | Assembly Pull |
Templates Table Two
-
Outside Processing Item
-
PTO Model
-
PTO Option Class
-
Phantom Item
-
Planning Item
| Attribute | Outside Processing Item | PTO Model | PTO op class | Phantom | Planning |
|---|---|---|---|---|---|
| Assemble to Order | No | No | No | No | No |
| BOM Item Type | Standard | Model | Option Class | Standard | Planning |
| BOM Allowed | - | Yes | Yes | Yes | Yes |
| Build in WIP | - | - | - | - | Yes |
| Costing Enabled | - | Yes | Yes | Yes | - |
| Customer Ordered Item | No | Yes | Yes | No | - |
| Customer Orders Enabled | - | Yes | Yes | - | - |
| Forecast Control | - | Consume and Derive | Consume and Derive | - | - |
| Include in Rollup | - | Yes | Yes | Yes | - |
| Inventory Asset Value | - | Yes | Yes | Yes | - Yes |
| Inventory Item | No | Yes | Yes | Yes | Yes |
| Invoiceable Item | - | Yes | - | - | - |
| Invoice Enabled | - | Yes | - | - | - |
| MRP Planning Method | MRP Planning | Not Planned | Not Planned | MRP Planning | Not Planned |
| Make or Buy | - | Make | Make | Make | - |
| OE Transactable | - | Yes | Yes | Yes | - |
| Outside Processing Item | Yes | - | - | - | - |
| Pick Components | No | Yes | Yes | No | No |
| Purchased | Yes | No | No | No | No |
| Purchasable | Yes | - | - | - | - |
| Reservation Control | - | - | - | - | - |
| Rounding Control | - | - | - | - | - |
| Ship Model Complete | - | Yes | - | - | - |
| Shippable | - | - | - | - | - |
| Stockable | - | - | - | - | - |
| Transactable | - | - | - | - | - |
| User Item Type | OP | PTO Model | PTO Optional Class | PH | PL |
| WIP Supply Type | Supplier | - | Phantom | Phantom | - |
Templates Table Three
-
Purchased
-
Reference Item
-
Subassembly
-
Supply Item
-
Freight
-
Product Family
| Attributes | Purchased Item | Reference Item | Sub | Supply Item | Freight | Product Family |
|---|---|---|---|---|---|---|
| Assemble to Order | No | No | No | No | - | No |
| ATP Components | - | - | - | - | - | No |
| BOM Item Type | Standard | Standard | Standard | Standard | - | Product Family |
| BOM Allowed | Yes | - | Yes | Yes | - | Yes |
| Build in WIP | - | - | Yes | - | - | No |
| Check ATP | - | - | - | - | - | None |
| Costing Enabled | Yes | - | Yes | - | - | Yes |
| Customer Ordered Item | Yes | Yes | No | No | No | No |
| Customer Orders Enabled | Yes | - | - | - | Yes | No |
| Cycle Count Enabled | - | - | - | - | - | No |
| Engineering Item | - | - | - | - | - | No |
| Forecast Control | Consume and Derive | - | Consume and Derive | - | - | - |
| Include in Rollup | Yes | - | Yes | - | - | No |
| Internal Ordered Item | - | - | - | - | - | No |
| Internal Orders Enabled | - | - | - | - | - | No |
| Inventory Asset Value | Yes | - | Yes | - | - | Yes |
| Inventory Item | Yes | No | Yes | Yes | - | Yes |
| Invoiceable Item | Yes | - | - | - | Yes | No |
| Invoice Enabled | Yes | - | Yes | - | Yes | No |
| Make or Buy | Buy | - | Make | Buy | - | Make |
| MRP Planning Method | MRP Planning | Not Planned | MRP Planning | Not Planned | - | Not Planned |
| OE Transactable | Yes | - | Yes | - | - | No |
| Outside Processing Item | - | - | - | - | - | No |
| Pick Components | No | No | No | NO | - | No |
| Primary UOM | - | - | - | - | - | Each |
| Purchasable | Yes | - | - | Yes | - | No |
| Purchased | Yes | No | No | Yes | - | No |
| Release Time Fence | - | - | - | - | - | Do not Autorelease |
| Reservation Control | Reservable | - | - | - | - | - |
| Rounding Control | Round order quantities | - | Round order quantities | - | - | - |
| Serviceable Product | - | - | - | - | - | No |
| Ship Model Complete | - | - | - | - | - | - |
| Shippable Item | Yes | - | - | - | Yes | No |
| Stockable | Yes | - | Yes | Yes | - | No |
| Support Service | - | - | - | - | - | No |
| Transactable | Yes | - | Yes | Yes | Yes | No |
| Use Approved Supplier | - | - | - | - | - | No |
| User Item Type | P | REF | SA | SI | Freight | Product Family |
| Warranty | - | - | - | - | - | No |
| WIP Supply Type | Assembly pull | - | Operation pull | Bulk | - | - |
Templates Table Four (Flow Finished Good Item Template)
| Attribute | Value | Control Level |
|---|---|---|
| Primary Unit of Measure | Each | Master |
| User Item Type | Subassembly | Organization |
| Item Status | Active | Master |
| Conversions | Both Standard and Item Specific | Master |
| Inventory Item | Enabled | Master |
| Stockable | Enabled | Master |
| Transactable | Enabled | Master |
| Revision Control | No | Master |
| Reservable | Enabled | Organization |
| Lot Control | No | Organization |
| Cycle Count Enabled | Yes | Organization |
| Negative Measurement Error | No | Master |
| Positive Measurement Error | No | Master |
| Serial Number Generation | User Defined | Organization |
| Starting Serial Prefix | User Defined | Organization |
| Locator Control | Dynamic Entry | Organization |
| Restrict Subinventories | No | Organization |
| Restrict Locators | No | Organization |
| BOM Allowed | Yes | Master |
| BOM Item Type | Standard | Master |
| Base Model | No | Master |
| Costing Enabled | Yes | Organization |
| Inventory Asset Value | No | Master |
| Include in Rollup | Yes | Organization |
| Cost of Goods Sold Account | No | Organization |
| Standard Lot Size | 1 | Organization |
| Purchased | Yes | Master |
| Purchasable | Yes | Master |
| Use Approved Supplier | No | Organization |
| Allow Description Update | Yes | Organization |
| RFQ Required | No | Organization |
| Outside Processing Item | No | Organization |
| Outside Processing Unit Type | No | Organization |
| Taxable | No | Organization |
| Receipt Required (Three-Way Invoice Matching) | Yes | Organization |
| Inspection Required (Four-Way Invoice Matching) | No | Organization |
| Default Buyer | NA | Organization |
| Unit of Issue | NA | Organization |
| Receipt Close Tolerance | User Defined | Organization |
| Invoice Close Tolerance | NA | Organization |
| UN Number | NA | Organization |
| Hazard Class | NA | Organization |
| List Price | NA | Organization |
| Market Price | NA | Organization |
| Price Tolerance | NA | Organization |
| Rounding Factor | NA | Master |
| Encumbrance Account | NA | Organization |
| Expense Account | NA | Organization |
| Receipt Date Action | NA | Organization |
| Days Early Receipt Allowed | NA | Organization |
| Days Late Receipt Allowed | NA | Organization |
| Over-Receipt Quantity Control Action | Warning | Organization |
| Over-Receipt Quantity Tolerance | NA | Organization |
| Allow Substitute Receipts | Yes | Master |
| Allow Unordered Receipts | Yes | Organization |
| Allow Express Transactions | Yes | Organization |
| Receipt Routing | Direct Delivery | Organization |
| Enforce Ship-to | Warning | Organization |
| Container | Yes | Master |
| Inventory Planning Method | Not Planned | Organization |
| Planner | NA | Organization |
| Make or Buy | Make | Organization |
| MRP Planning Method | MRP and DRP Planning | Organization |
| End Assembly Peggin | End Assembly / Soft Pegging | Organization |
| Calculate ATP | Yes | Organization |
| Planning Time Fence | Cumulative Total Lead Time | Organization |
| Demand Time Fence | Item Total Lead Time | Organization |
| Fixed | 0 | Organization |
| Variable | 0 | Organization |
| Lead Time Lot Size | Yes | Organization |
| Build in WIP | Yes | Organization |
| WIP Supply Type | Assembly Pull | Organization |
| Customer Ordered | Yes | Master |
| Customer Orders Enabled | Yes | Master |
| Internal Ordered | Yes | Master |
| Internal Orders Enabled | Yes | Master |
| Shippable | Yes | Master |
| OE Transactable | Yes | Master |
| Check ATP | None | Master |
| ATP Rule | Standard | Master |
| Returnable | Yes | Master |
| RMA Inspection Required | Yes | Master |
| Collateral Item | No | Master |
User-defined Templates
You can also define your own templates using the Item Templates window. Note that the window does not validate any of the template attributes. In other words, you can define a template with contradictory attributes. Only when you use a template to define an item does Inventory verify that the attributes are valid for a given item. If you cannot update an item attribute the value from the template is not applied. If a combination of attributes is invalid a warning appears when you save the item.
You can enable or disable the attribute value for each attribute in a template. When you use a template, it applies only the enabled attributes for that particular template.
Copying Templates
To make defining templates easier, you can use the Copy From function on the Tools menu in the Item Templates window. This opens the Copy Template modal window, where you can copy attributes from one or more attribute groups to a new template. You can also create a hybrid template by copying attributes from multiple templates. See: Copying Item Templates.
Using Templates
You specify the template to use when you define or update an item. All updatable attributes you assigned to the template appear in the current item definition. You can then change the attributes as appropriate for the item you are defining.
If you specify a template name for an existing item, the template overwrites existing attributes. You can apply as many templates as you want to an existing item. The more recent attribute values (from the last template applied) override previous values unless the previous value is not updatable (such as the Primary Unit of Measure, which is never updatable). For example, you define a new item and apply a template that has the Primary Unit of Measure = EACH and Cycle Count Enabled = YES. Then you apply a new template with Primary Unit of Measure = DOZ, Cycle Count Enabled = NO, and Carrying Cost Percent = 3. The attribute values are now: Primary Unit of Measure EACH, Cycle Count Enabled NO, and Carrying Cost Percent 3.
Also, a template does not update status attributes when the values are conflicting. For example, if an item is transactable and stockable, a template cannot change Transactable to Yes if it leaves Stockable equal to No.
Organization-Specific Templates
You can create templates that are specific to one organization. You can use an organization specific template only if you are in that particular organization. If the specific organization is not the Item Master organization, you may use that template only in the Organization Items window and only attributes controlled at the Organization level are updated.
For organization specific templates, some attributes, such as the planner, may be tied to the organization. For this reason, you cannot change the organization specified in the template once the template has been defined.
Related Topics
Overview of Item Setup and Control.
Product Families, Oracle Bills of Material User's Guide
Defining Item Templates
A template is a defined set of attribute values. When you apply a template to an item, you overlay or default in the set of attribute values to the item definition.
You can apply the same or different templates to an item multiple times. The more recent attribute values (from the last template applied) override previous values unless the previous value is not updatable (for example, the Primary Unit of Measure, which is never updatable).
For example, you define a new item and apply a template that has the Primary Unit of Measure = EACH and Cycle Count Enabled = YES. Next, you apply a new template with Primary Unit of Measure = DOZ, Cycle Count Enabled = NO, and Carrying Cost Percent = 3. The attribute values are now: Primary Unit of Measure EACH, Cycle Count Enabled NO, and Carrying Cost Percent 3.
To define item templates
-
Navigate to the Item Templates Summary folder window.
-
Choose New to navigate to the Item Template window.
-
Enter a unique name and description for the template.
-
Indicate whether the template is restricted to use by only one organization. If you leave the organization code blank, you can use the template in any organization.
Note: When you enter an organization code, some attributes, such as the planner, may be tied to the organization. For this reason, you cannot change the organization once the template has been defined.
-
Select an tabbed region to display attributes and values for an item attribute group.
-
Enter a value for those attribute you want to include in the template.
For non-mandatory item attributes, you can enter blanks (spaces) for the value or leave null. When you next apply this template to an item, the spaces overwrite any existing attribute value.
-
Indicate whether an attribute is enabled for this template.
Important: If you enable a status attribute, its value will not be applied to the item if the status attribute is under status control. See: Defining Item Status Codes.
-
Save your work.
Related Topics
Customizing the Presentation of Data in a Folder, Oracle Applications User's Guide
Copying Item Templates
Use the Copy Template window to copy attributes from existing templates to a new template.
Important: Templates created with this function are not validated until you apply them to an item.
To copy item templates
-
Enter a new template and description in the Item Templates window. Optionally select an organization; otherwise, you will be able to copy templates for all organizations.
-
Choose Copy From on the Tools menu to open the Copy Template modal window.
-
Select the template from which you want to copy attributes.
-
Select the copy mode:
Overwrite - All selected attribute values, including Null, are copied.
Append - Only attributes which are null in the target template are copied. This mode is applicable only when you have already copied attributes from one template.
Overwrite Not Null - All selected attribute values, excluding Null, are copied.
-
Deselect any attribute groups for which you do not want attributes copied.
-
Select Apply to copy the attributes. This leaves the Copy Template window open so that you can copy attributes from another template.
-
Select Done to close the Copy Template window when you have copied all desired attributes.
Related Topics
Defining Cross-Reference Types
Cross-reference types define relationships between items and entities such as old item numbers or supplier item numbers.
For example, you can create a cross-reference type Old to track the old item numbers, and a type Supplier to track supplier part numbers.
To define a cross-reference type
-
Navigate to the Cross-Reference Types window.
-
Enter a unique cross-reference type name.
-
Save your work.
To make a cross-reference type inactive
-
Enter the date on which the cross-reference type becomes inactive.
As of this date, you cannot assign this cross-reference type to an item.
To delete a cross-reference type:
-
You can delete a cross-reference if it has not been used by any item.
To assign a cross-reference type:
-
Choose the Assign button. See: Assigning Cross-Reference Types.
Related Topics
Assigning Cross-Reference Types
Overview of Item Setup and Control.
Assigning Cross-Reference Types
You can assign multiple cross-reference types to an item.
To assign cross-references types to items from the Cross-Reference Types window
-
Navigate to the Cross-Reference Types window.
-
Select the cross-reference you want to assign.
-
Choose Assign to navigate to the Assign Cross-References window.
-
Enter an item.
-
Indicate whether the cross-reference applies only in the specified organization or to all organizations to which the item is assigned.
-
You can optionally enter a unit of measure for the cross-referenced entity if the cross-reference type is Item GTIN Code. You can select any UOM that is permissible in a transaction.
-
Enter the name of the organization to which the cross-reference applies.
If you select Applicable To All Organizations, this field is skipped.
-
Enter a cross-reference value.
This value is the entity you cross-reference to the item, such as its old item number or supplier part number.
-
Save your work.
To assign cross-references types to items from the Master Items Summary window:
-
Navigate to the Master Items Summary window.
-
Select an item.
-
Choose Cross References from the Tools menu.
-
Enter the cross-reference type name.
-
Indicate whether the cross-reference applies only in the specified organization or to all organizations to which the item is assigned.
-
Enter the name of the organization to which the cross-reference applies.
If you select Applicable To All Organizations, this field is skipped.
-
Enter a cross-reference value.
This value is the entity you cross-reference to the item, such as its old item number or supplier part number.
-
Save your work.
Related Topics
Defining Cross-Reference Types
Overview of Item Setup and Control.
Defining Commodity Codes
Customer Item Commodity Codes are used to group customer items and can be entered during the definition of customer items.
To define a commodity code
-
Navigate to the Customer Item Commodity Codes window from the menu. When you open the window, Inventory displays the existing commodity codes.
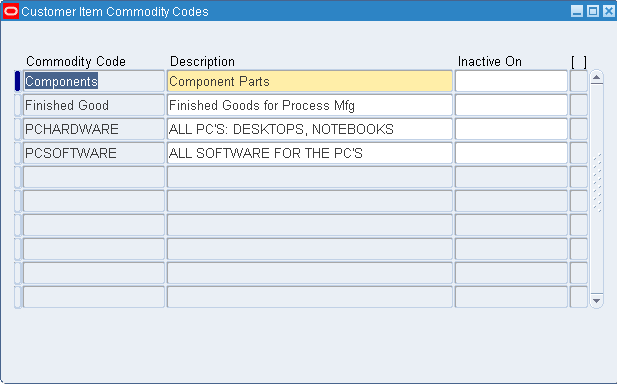
-
Enter a unique commodity code name.
-
Enter a description of the code.
-
Save your work.
To make a commodity code inactive
-
Enter the date on which the commodity code becomes inactive. As of this date, you cannot assign this code to a customer item.
-
You can delete a commodity code if it has not been used in a customer item.
Related Topics
Defining Customer Items
Use the Customer Items Summary and Customer Items Detail windows to define and update customer items. You can toggle between these windows with the Summary/Detail option in the Go option on the Toolbar. You can cross reference customer items to your Oracle Inventory items to support processing orders and shipments. See: Defining Customer Item Cross References.
To find customer items
-
Navigate to the Find Customer Items window by selecting Customer Items from the menu.
-
Enter selection criteria. Note that you can enter a specific Address Category or Address only if you have entered a customer.
-
Select the Find button to open the Customer Items Summary window.
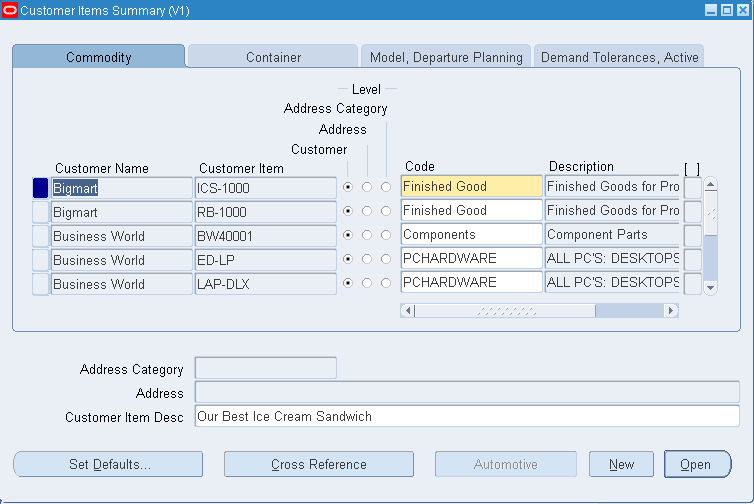
To define customer items
-
Enter the Customer Item number and description.
-
Select one of the existing Customer Names (in the Details window, you can use either Customer Name or Customer Number,). See: Creating a Customer, Oracle Receivables User's Guide.
-
Select the Definition Level: Customer, Address Category, or Address.
A customer item defined at the Customer level is recognized across all address and address categories for that customer. If you ship an item to multiple customer ship-to sites that have been grouped as an address category, you can define the customer item for that address category. You would define a customer item at the address level if you ship the item to only one ship-to site for that customer.
-
For the Address Category definition level, enter the address category. See: Creating an Account Site, Oracle Receivables User's Guide.
-
For the Customer Address definition level, enter the customer address.
-
In the Commodity tabbed region, you can assign the customer item to a Commodity Code. See: Defining Commodity Codes.
-
In the Container tabbed region, you can enter the default master and detail containers for this customer item as well as the minimum fill percent for the container. See: Defining Container Types.
-
In the Model, Departure Planning tabbed region, you can reference a customer item as when the item is a Customer Item that belongs to the same Customer and the BOM Item Type attribute is set to Model. See: Bills of Material Attribute Group.
You can also check Required to indicate that items must be departure planned before they released and Before Build to indicate that ATO items must be departure planned before they are built.
-
In the Demand Tolerances, Active tabbed region, you can enter positive and negative tolerance percentages and select or deselect the Active check box.
-
Save your work.
To open the Customer Items Details window
-
To facilitate information entry, you can select the Open button in the Customer Items Summary window to open the Customer Items Details window, where you can enter any of the information in the Customer Items Summary window.
To activate or deactivate customer items
-
Select or deselect the Active checkbox in the Customer Items Detail window or in the Demand Tolerances Active tabbed region in the Customer Items Summary window.
-
Choose the Set Defaults button to open the Customer Item Defaults window. See: Setting Customer Item Defaults.
To define a customer item cross reference:
-
Choose the Cross Reference button. See: Defining Customer Item Cross References.
Note: The profile is used to determine whether the customer item can be updated.
Related Topics
Overview of Item Setup and Control.
Setting Customer Item Defaults
Use the Customer Items Defaults window to set customer item defaults.
To set customer item defaults
-
Navigate to the Customer Items Defaults window by selecting Customer Items from the menu.
-
Enter the Customer Name.
-
Select the customer item Level. At the Address Category level, you can also set the Address Category. At the Address level, you can also set the Address
To use current values
-
Select the Current Value button to use the values of the current record in the Customer Items Summary window.
To clear information
-
Select the Clear button to clear all information but remain in this window.
To cancel default entry
-
Select the Cancel button to clear all information and return to the Customer Items Summary window.
To accept the entered defaults
-
Select the OK button to accept the entered defaults and return to the Customer Items Summary window.
Defining Customer Item Cross References
Use the Customer Item Cross References window to define and update cross references between your inventory items and the customer item numbers defined in the Customer Items Summary/Detail windows. See: Defining Customer Items.
To find customer item cross references
-
Navigate to the Find Customer Item Cross References window by selecting Customer Item Cross References on the menu.
-
Enter selection criteria to restrict the search. You can select the Clear button to clear all selection criteria.
-
Select the Find button.
To define customer item cross references
-
Navigate to the Customer Item Cross References window by selecting the New button in the Find Customer Item Cross References window.
You can also navigate to this window by selecting the Cross Reference button in the Customer Items Summary window. Inventory displays the existing cross references for the customer item on the current line in the Customer Items Summary window, and you can add new cross references by selecting a new row.
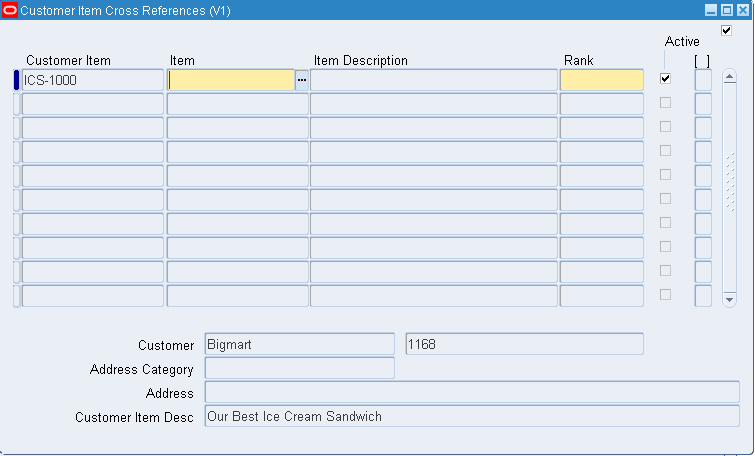
-
Enter the customer item number. The current customer is displayed if you navigated to this window from the Customer Items Summary window.
-
Enter the inventory item number for which you want to establish a cross reference to the customer item number.
-
Enter the Rank as a positive number. To permit alternate or substitute inventory items for a customer item, you can define multiple cross references to inventory items for a single customer item. In these cases, you must specify the Rank of the cross reference. The highest rank is 1.
-
Deselect Active to deactivate the cross reference.
-
Save your work.
To update customer item cross references
-
Navigate to the Customer Item Cross References window by selecting the Find button in the Find Customer Item Cross References window. Inventory displays all existing cross references that meet your selection criteria.
You can also navigate to this window by selecting the Cross Reference button in the Customer Items Summary window. Inventory displays the existing cross references for the customer item on the current line in the Customer Items Summary window.
-
You can update the Customer Item, Item, Rank, and Active checkbox.
To activate or deactivate a cross reference:
-
Select or deselect Active.
Related Topics
Overview of Item Categories
You can use categories and category sets to group your items for various reports and programs. A category is a logical classification of items that have similar characteristics. A category set is a distinct grouping scheme and consists of categories.
The flexibility of category sets allows you to report and inquire on items in a way that best suits your needs.
Related Topics
Copying Items with Category Assignments
Overview of Item Setup and Control
Item Category Flexfield Structures
You can define multiple segment structures for the Item Categories Flexfield. Each segment structure may have its own display prompts and fields.
When you install or upgrade Oracle Inventory or Oracle Purchasing, Oracle provides two category flexfield structures by default: Item Categories and PO Item Category.
Each segment structure can display prompts and fields that apply specifically to a particular naming convention. For example, you might want one of your category sets to use two segments for the names of categories. Another item grouping scheme might use just one segment for the names of categories. You choose a flexfield structure for every category set and category that you define.
Related Topics
Defining Key Flexfield Segments, Oracle Appilications Flexfields Guide
Defining Categories
You can define an unlimited number of categories and group subsets of your categories into category sets. A category can belong to multiple category sets. You can assign a category to a category set either at the time you define a category set or at the time you assign an item to the category.
To define a category
-
Navigate to the Categories window.
-
The Find Categories window appears. Choose New.
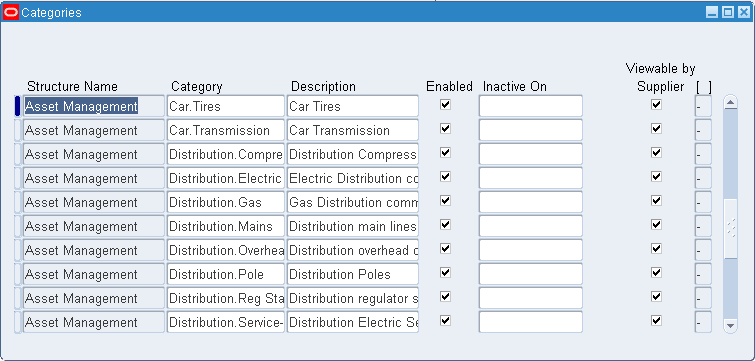
-
If you choose a multi-segment flexfield structure you can assign a specific meaning to each segment. For example, if you want to group items according to product line and product information then you can use the first segment to represent product line and the second segment to represent the product. See: Item Category Flexfield Structures.
Important: The categories assigned to a category set must have the same flexfield structure as the set itself. This is true even if you choose not to validate the category list.
-
If you have set up your flexfield segment as No Validation required, you can enter a unique category name.
-
Optionally, enter a category Description.
-
Select Enabled to enable the category.
-
Select Viewable by Supplier to allow suppliers to see the category in iSupplier Portal.
-
Save your work.
-
Enter the date on which the category becomes inactive.
As of this date, you can no longer assign the category:
-
as the default category of a new category set
-
as a valid category of a category set
-
to an item
-
as a valid category of an item catalog group
You cannot assign an inactive date to a category that is the default category for a mandatory category set.
-
Related Topics
Supplier Registration, Oracle Internet Supplier Portal Implementation Guide
Creating and Maintaining Local Content, Oracle iProcurement Implementation Guide
Defining Category Sets
You can use categories and category sets to group items for various reports and programs.
Note: Category sets may be used as a means to develop custom lists of items on which to report and sort. You can also create other category sets such as John's Priority or Jane's Priority, with categories like high, medium, and low.
The category set Inventory is seeded when you install Oracle Inventory. The category set Purchasing is seeded when you install Oracle Purchasing.
If you plan to use Order Management's group pricing functionality with item categories, you must add the categories to the Order Entry category set.
Important: You must use this window to define valid categories for each purchasing category set before you can use Oracle Purchasing.
To define a category set
-
Navigate to the Category Set window.
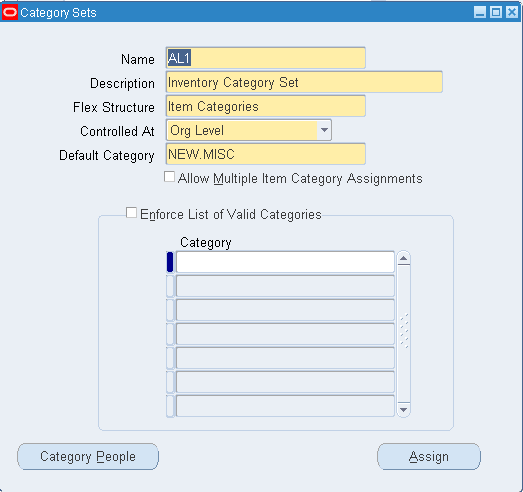
-
Enter a unique category set name.
-
Enter a description.
-
Note: The categories you assign to a category set must have the same flexfield structure as the set itself. This is true even if you choose not to validate the category list.
-
Master Level: Item assigned to this category set has the same category value in all organizations where it is assigned.
Org Level: Item assigned to this category set may have a different category value in each organization where it is assigned.
-
This is the default category used when assigning an item to the category set. For example, a category set may have a default category called New. After an item is assigned to New, you can override the default category and choose another relevant category for each item.
-
Indicate whether to enable an item to be assigned to multiple categories within this category set.
If you enable this feature, you can assign an item to multiple categories within a category set. For example, you may define a Hazard category set. In this case, an item may be assigned to both the Poison and Corrosive categories.
Note: Enable this feature to create cartonization groups. See: Cartonization
Note: For cost management purposes, Oracle recommends having a separate category set, with this feature disabled, for costing fixed assets. Costing functionality does not permit an item to be associated with multiple categories within a category set.
-
Indicate whether to enforce the list of valid categories.
If you do not enable this feature, you can assign an item to any category defined that uses the same flexfield structure as this category set.
If you enable this feature, you can assign an item only to those categories defined as valid categories for this category set.
If the enforce list of categories assignment checkbox is not checked, then all of the categories associated to the category set for purchasing are displayed in the LOV on the Enter PO window.
if the enforce list of categories assignment is checked, only the categories defined in the table are available in the category LOV on the enter PO window.
-
Select a list of valid categories.
The list of values here includes only categories that use the same flexfield structure as the category set you are defining.
-
Save your work.
To assign people to categories
The category people window is available to you if you have the edit category people privilege. Category people allows you to secure access to items that are assigned to a particular category. For example you can restrict who can view the sales reports for a particular set of items.
-
Select Category People from the Category Sets window.
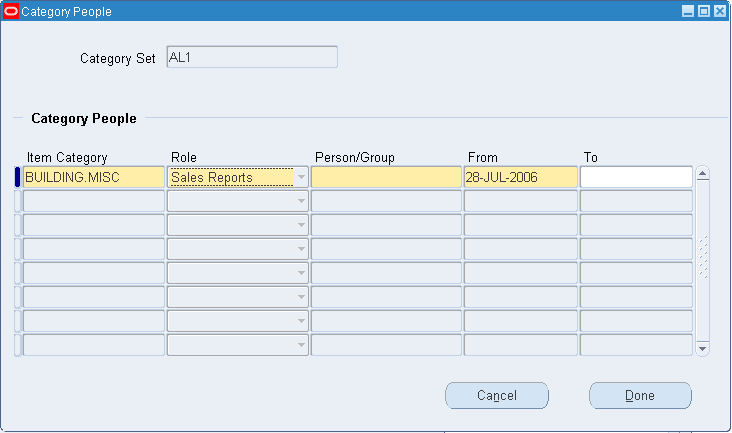
-
Select the desired Item Category from the list of values.
-
Select the desired Person/Group from the list of values.
-
Enter the desired From date, or accept the default system date.
-
Enter a To date if applicable.
-
Repeat steps 2-5 to assign more categories as needed.
-
Save your work.
-
Select Done.
To assign items to categories:
-
Choose the Assign button. See: Assigning Items to Categories.
Related Topics
Defining Default Category Sets
Cartonization
If you have Oracle Warehouse Management installed, and you have cartonization enabled for your organization (See: Defining Warehouse Parameters, Oracle Warehouse Management User's Guide), you can create a category set for grouping contained items and their allowable containers.
An item may be assigned to many cartonization groups. A cartonization group may contain many containers and many contained items. An item is assigned to a cartonization group as either a container or a contained item. See, Cartonization Setup Steps, Oracle Warehouse Management Implementation Guide.
Related Topics
Defining Default Category Sets
When you install Oracle Inventory, you must assign a default category set to each of the following functional areas: Inventory, Purchasing, Order Management, Costing, Engineering, and Planning. Product Line Accounting is seeded with the Inventory category set. Inventory makes the default category set mandatory for all items defined for use by a functional area. If your item is enabled for a particular functional area you cannot delete the item's corresponding default category set assignment. Default category sets are required so that each functional area has at least one category set that contains all items in that functional area.
You can enable an item for each functional area by using that functional area's item defining attribute. An item defining attribute identifies the nature of an item. For example, what designates an item as an “engineering item" is the attribute Engineering Item. If a functional area's item defining attribute is controlled at the Organization level, then that functional area may only have an Organization level default category set.
You set the item defining attribute when you define the item. The following table presents item defining attributes:
Item Defining Attributes
| Functional Area | Item Defining Attribute | Enabling Value |
|---|---|---|
| Inventory | Inventory Item | Yes |
| Purchasing | Purchased | Yes |
| Purchasing | Internal Ordered Item | Yes |
| Master Scheduling/ MRP | MRP Planning Method | MRP Planning, MPS Planning |
| Cost Management | Costing Enabled | Yes |
| Engineering | Engineering Item | Yes |
| Order Management | Customer Ordered Item | Yes |
| Service | Support Service, or | Yes |
| Service | Serviceable Product | Yes |
| Product Line Accounting | none | n/a |
When you enable an item for a certain functional area, Oracle Inventory automatically assigns the item to the default category set of that functional area and the default category of that set. For example, if you set Inventory Item to Yes, then Inventory automatically assigns the item to the Inventory functional area's default category set and default category.
You may change a functional area's default category set under certain conditions. You should ensure that every item within the functional area belongs to the new default category set (which replaces the existing default category set). If the item defining attribute of the functional area is controlled at the Organization level then the new default category set should also be controlled at the Organization level.
Prerequisites
- You must define at least one category set. See: Defining Category Sets.
To define a default category set
-
Navigate to the Default Category Sets window.

-
Select the category set to use as the default for the functional area.
Oracle Inventory also makes this category set mandatory for all items defined for use by the functional area.
You should not change the Purchasing category set after you have created requisition or purchase order lines using the categories.
Note: Product Line Accounting is enabled when you assign a default category set.
Note: The category set Product, is a seeded category set. It is the default category set for the Product Reporting functional area. The system automatically assigns this category to customer ordered or internal ordered items.
-
Save your work.
Related Topics
Assigning Items to Categories
- You must define default category sets for your functional areas. See: Defining Default Category Sets.
When you enable an item in a functional area, the item is assigned to the default (mandatory) category set and default category of the functional area. You can override the category set's default category. In addition, you can manually assign your item to an unlimited number of category sets. You may optionally assign an item to more than one category within a category set based on the category set definition. For more information see: Defining Category Sets
To assign an item to a category from the Category Set window
-
Navigate to the Category Set window. See: Defining Category Sets.
-
Enter a category set.
-
Choose Assign. The Item Assignment window appears.
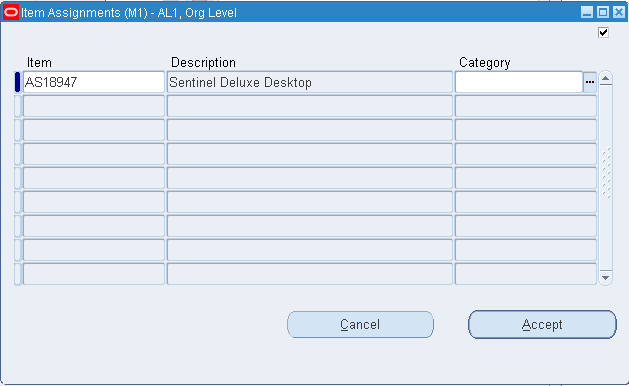
-
Select the item from the current organization to assign to the category.
-
Select a category.
The list of values contains categories with the same flexfield structure as the category set you selected in the Category Set window. If Enforce the list of valid categories is selected the list is limited to those categories.
-
Save your work.
To assign an item to a category from the Item windows
-
Navigate to the Master Items Summary or Organization Items Summary window.
-
Select an item.
-
Choose Categories from the Tools menu.
The item you selected appears at the top of the Category Assignment window.
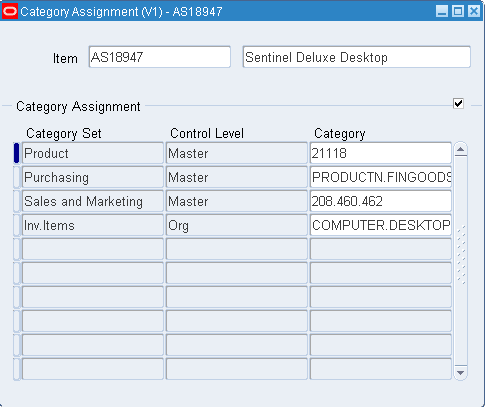
-
Select a category set
-
Select a category.
The list of values contains categories with the same flexfield structure as the category set you selected. If Enforce the list of valid categories is selected the list is limited to those categories.
-
Save your work.
Related Topics
Copying Items with Category Assignments
When you assign your item to another organization Oracle Inventory copies Master level category sets, Organization level default category sets, and the associated categories assigned in the Item Master organization. This means that if you manually assign an Organization level category set to the item in the Master organization, Inventory does not copy over that Organization level category set when you assign that item to another organization.
After assigning an item to another organization you can disable the item for one or more functional areas in the new organization. However, Inventory does not remove the corresponding functional area's default category set. For example, you may have set the value of the Purchased attribute to "Yes" when you defined the item in the item master organization. When you assign this item to another organization Inventory copies over the "Yes" value of the Purchased attribute and therefore assigns the default category set of the purchasing functional area. In the new organization you may decide to set the value of the Purchased attribute to "No." After you disable the item for the purchasing functional area in the new organization, the item still retains the purchasing default category set. You may manually delete the purchasing category set in the new organization.
If you copy an item from another item with category sets defined at the Organization level, Inventory assigns the new item the default categories of the mandatory category sets, even if the original item did not have the default categories. This is because Inventory copies the values of the item defining attributes and not the category sets and categories themselves.
Related Topics
Examples Overview
The following example from the computer manufacturing industry illustrates the use of category sets. The company makes personal computers by using manufactured and purchased components. The following tables show a bill of material for each of two computers that the company produces.
| Level | Item | Item Description | Source |
|---|---|---|---|
| 1 | CM2345 | Laptop Computer | Assembled |
| . 2 | CM2346 | Keyboard | Purchased |
| . 2 | CM2347 | 486 Processor | Purchased |
| . 2 | CM2348 | Active Matrix Screen | Assembled |
| . . 3 | CM2349 | Monitor Manual | Purchased |
| . 2 | CM2350 | DOS Operating System | Purchased |
| Level | Item | Item Description | Source |
|---|---|---|---|
| 1 | CM2351 | Desktop Computer | Assembled |
| . 2 | CM2352 | Desktop Keyboard | Purchased |
| . 2 | CM2353 | Pentium Processor | Purchased |
| . 2 | CM2354 | VGA Monitor | Assembled |
| . . 3 | CM2355 | Monitor Manual | Purchased |
| . 2 | CM2356 | UNIX Operating System | Purchased |
This computer manufacturing company has several functional areas including: planning, purchasing, and inventory. With Oracle Inventory's category sets, each functional area can use its own unique way of classifying items.
Related Topics
Unlimited Additional Category Sets
Planning Example
The planning department might want to group items according to product and product line. You can define a two segment structure for the item categories flexfield with the first segment representing the product and the second segment representing product line. You can use the two segment flexfield structure to define a category set called Planner's Set with categories like assembly-prod1, subassembly-prod2 and raw material-prod3. You can designate Planner's Set to be the default (mandatory) category set of the planning functional area.
In the bills of material shown in the Examples Overview, the top level items might be MPS planned items and the rest MRP planned items since this is a manufacturing company. When you define each item you can set the item defining attribute MRP Planning Method to be either MRP Planning or MPS Planning. Oracle Inventory automatically assigns the Planner's Set category set and the associated default category assembly-prod1 to each of these items. The following table shows category assignments within the Planning default category set.
| Item | Item Description | Planning Default (Mandatory) Category Set | Category |
|---|---|---|---|
| CM2345 | Laptop Computer | Planner's Set | assembly-prod1 |
| CM2346 | Keyboard | Planner's Set | subassembly-prod2 |
| CM2347 | 486 Processor | Planner's Set | subassembly-prod2 |
| CM2348 | Active Matrix Screen | Planner's Set | subassembly-prod2 |
| CM2349 | Monitor Manual | Planner's Set | subassembly-prod2 |
| CM2350 | DOS Operating System | Planner's Set | subassembly-prod2 |
| CM2351 | Desktop Computer | Planner's Set | assembly-prod1 |
| CM2352 | Desktop Keyboard | Planner's Set | subassembly-prod2 |
| CM2353 | Pentium Processor | Planner's Set | subassembly-prod2 |
| CM2354 | VGA Monitor | Planner's Set | subassembly-prod2 |
| CM2355 | Monitor Manual | Planner's Set | subassembly-prod2 |
| CM2356 | UNIX Operating System | Planner's Set | subassembly-prod2 |
In Oracle Master Scheduling/MRP and Oracle Supply Chain Planning you can compile a forecast for a range of categories within a category set. In addition you can use categories in the following reports:
-
Current Projected On Hand vs. Projected Available Graphical Report
-
Demand vs. Replenishment Graphical Report
-
Forecast Comparison Report
-
Forecast Detail Report
-
Late Order Report
-
Master Schedule Comparison Report
-
Master Schedule Detail Report
-
Master Schedule Status Report
-
Order Reschedule Report
-
Planned Order Report
-
Planning Detail Report
Related Topics
Item Category Examples Overview
Unlimited Additional Category Sets
Purchasing Example
The purchasing department might want to group all items by commodity codes. You can define a category set called Purchasing Class with categories that represent commodity codes such as OEM, IC, software and documentation. You can choose Purchasing Class to be the default (mandatory) category set of the purchasing functional area.
In the bills of material shown in the Examples Overview, the purchased items are CM2346, CM2347, CM2349, CM2350, CM2352, CM2353, CM2355 and CM2356. When you define your items you can set the Purchased attribute to "Yes" for each of these items. Inventory automatically assigns the Purchasing Class category set and the associated default category OEM to each of the purchased items. The following table shows category assignments within the purchasing default category set.
| Item | Item Description | Purchasing Default (Mandatory) Category Set | Category |
|---|---|---|---|
| CM2346 | Keyboard | Purchasing Class | OEM |
| CM2347 | 486 Processor | Purchasing Class | IC |
| CM2349 | Monitor Manual | Purchasing Class | documentation |
| CM2350 | DOS Operating System | Purchasing Class | software |
| CM2352 | Desktop Keyboard | Purchasing Class | OEM |
| CM2353 | Pentium Processor | Purchasing Class | IC |
| CM2355 | Monitor Manual | Purchasing Class | documentation |
| CM2356 | UNIX Operating System | Purchasing Class | software |
Oracle Purchasing does not allow you to choose between different category sets. Oracle Purchasing uses the default purchasing category set in all forms and reports that require or display categories. For example, if you choose a particular item in the Supplier Autosource Rules window you see the category (from the purchasing default category set) assigned to the item. In addition, Oracle Purchasing uses item categories in the following reports and forms:
-
Blanket and Planned PO Status Report
-
Buyer Listing
-
Buyer's Requisition Action Required Report
-
Expected Receipts Report
-
Item Detail Listing
-
Matching Holds Report by Buyer Report
-
Overdue Supplier Shipments Report
-
Purchase Agreement Audit Report
-
Purchase Order Commitment By Period Report
-
Purchase Order Detail Report
-
Purchase Order and Releases Detail Report
-
Purchase Price Variance Report
-
Purchase Summary Report By Category
-
Quotation Action Required Report
-
RFQ Action Required Report
-
Receipt Accruals - Period-End report
-
Receipt Traveler
-
Receiving Account Distribution Report
-
Receiving Transactions Register
-
Receiving Value Report by Destination Account
-
Requisitions on Cancelled Sales Order Report
-
Savings Analysis Report(by Category)
-
Uninvoiced Receipts Report
-
Supplier Price Performance Analysis Report
-
Supplier Quality Performance Analysis Report
-
Supplier Service Performance Analysis Report
-
Enter Purchase Orders
-
Enter Purchase Agreements
-
Enter Requisitions
-
Enter Express Requisitions
-
Enter ReqExpress Template
-
Enter RFQs
-
Enter Quotations
-
Enter Receipts
-
Enter Receiving Transactions
-
Enter Returns and Adjustments
-
Match Unordered Receipts
-
View Purchase Orders
-
View Price History
-
View Purchase History
-
View Requisitions
-
View Receiving Transactions
-
View Sourced Items
Related Topics
Item Category Examples Overview
Unlimited Additional Category Sets
Inventory Example
The inventory functional area may want to group items according to how the company stores each item. You can define a category set called Warehouse Set with categories such as Operating System, Hardware, CPU and Other. You can designate Warehouse Set to be the default (mandatory) category set of the inventory functional area.
In the bills of material shown in the Examples Overview, all of items would be the inventory items. When you define the items set the Inventory Item attribute to "Yes" for each item. Oracle Inventory automatically assigns the Warehouse Set and default category Other to all items for which the Inventory Item attribute equals "Yes." The following table shows category assignments within the Inventory functional area's default category set:
| Item | Item Description | Inventory Default (Mandatory) Category Set | Category |
|---|---|---|---|
| CM2345 | Laptop Computer | Warehouse Set | Hardware |
| CM2346 | Keyboard | Warehouse Set | Hardware |
| CM2347 | 486 Processor | Warehouse Set | CPU |
| CM2348 | Active Matrix Screen | Warehouse Set | Hardware |
| CM2349 | Monitor Manual | Warehouse Set | Other |
| CM2350 | DOS Operating System | Warehouse Set | Operating System |
| CM2351 | Desktop Computer | Warehouse Set | Hardware |
| CM2352 | Desktop Keyboard | Warehouse Set | Hardware |
| CM2353 | Pentium Processor | Warehouse Set | CPU |
| CM2354 | VGA Monitor | Warehouse Set | Hardware |
| CM2355 | Monitor Manual | Warehouse Set | Other |
| CM2356 | UNIX Operating System | Warehouse Set | Operating System |
Oracle Inventory uses category sets in numerous reports and forms. For example, you can summarize demand histories for a particular category of items. Oracle Inventory always displays the inventory default category set but you can run your reports and programs by choosing any category set. The following is a list of forms and reports where Oracle Inventory uses categories:
-
Inactive items report
-
Item reservations report
-
Lot transaction register
-
Material account distribution detail
-
Serial number transaction register
-
Transaction historical summary
-
Transaction register
-
Transaction source type summary
-
Expected Receipts Report
-
Inactive items report
-
Item categories report
-
Item cross-references listing
-
Item definition detail
-
Item definition summary
-
Item demand history report
-
Item relationships listing
-
Item reservations report
-
Item statuses report
-
Forecast Comparison Report
-
Forecast Detail Report
-
Physical inventory accuracy analysis
-
Physical inventory counts report
-
Transaction historical summary
-
Search Items
Related Topics
Item Category Examples Overview
Unlimited Additional Category Sets
Unlimited Additional Category Sets
In addition to the default category sets, the computer company in the Examples Overview could use an additional category set to group together a subset of the items that exist in the system. You can define a category set called Hot Items with categories such as Critical and Low Supply. When you define your items, you can assign the Hot Items category set and one category within that category set to some of your items. You do not have to assign every item in your system to this category set.
Related Topics
Specifying Recommended Categories
You can specify any number of recommended categories for an item catalog group. This is for information/reporting purposes only. You can print the list of categories and use the list as recommended categories when you define items.
To enter a list of recommended categories to use when assigning categories to the items in this catalog group
-
Navigate to the Item Catalog Groups window.
-
Select an item catalog group and choose Details. The Item Catalog Group window appears.
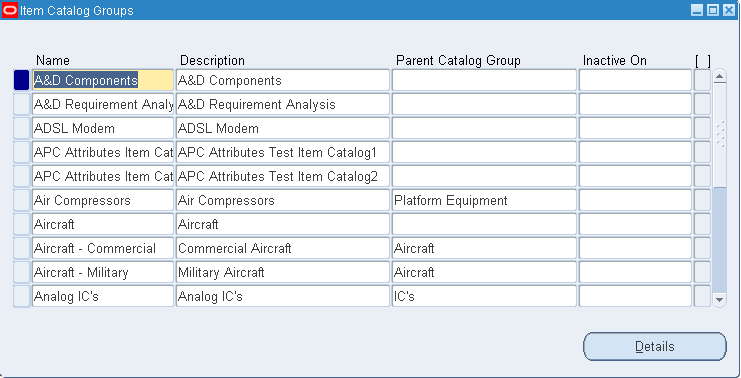
-
Select the Categories tabbed region.
-
Select a category set and category.
-
Save your work.
Defining Category Accounts
Warning: The category accounts defined in this window are only used if product line accounting has been implemented. If product line accounting is implemented, the category accounts, not the item subinventory accounts, are used when entering transactions.
You can use the Category Accounts Summary window to define, query, and update category valuation and expense accounts. If your current organization is a standard costing organization, you can define category accounts at the category and optionally subinventory level. If your current organization is an average costing organization you must define category accounts at the cost group/category level.
You can only define category accounts for categories that belong to the default category set for the product line functional area. See: Defining Category Sets and Defining Default Category Sets.
Account Update Restrictions
You cannot update category accounts if any of the restrictions explained in the following table exist:
| Condition Preventing Account Update | Standard Costing Organization | Average Costing Organization |
|---|---|---|
| On hand Quantity > 0 | Quantities exist in the subinventory. Note: If subinventory is null, all subinventories in the organization are considered. | Quantities exist in any locator associated with the cost group |
| Pending Transactions | Pending transactions associated with the subinventory and category exist | Pending transactions associated with the project and cost group exist |
| Uncosted Transactions | Uncosted transactions associated with the subinventory and category exist | Unclosed transactions associated with the cost group exist |
To define or change category accounts in a standard costing organization
-
Navigate to the Category Accounts window. The Find Category Accounts window appears.
-
If you are defining a new category account, choose the New button. If you are changing an existing category account, select a category, or subinventory, or both, and choose the Find button. In both instances, the Category Accounts Summary window appears.
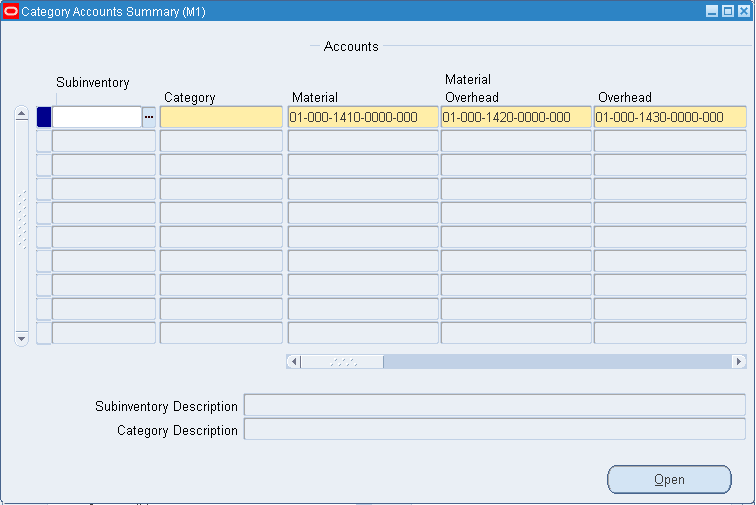
-
Optionally, select a Subinventory.
If a subinventory is not selected, you can define accounts that are specific to the category. Once you define a category account with a null subinventory, the accounts that are associated with that category are defaulted each time you define a new category/subinventory combination for that category.
For example, if you select a category, override the defaulted organization level accounts, then save your work, the next time you select this category in this window, the new accounts not the organizational level accounts are defaulted. These default accounts can be overridden. Categories with null subinventories can be used as templates when you need to create several category/subinventory combinations.
-
Select a Category.
When you select a category, accounts are defaulted from the organization level. You can change these accounts.
-
Select account numbers for the following:
Important: All subinventories that contain items belonging to the selected category set use these accounts for inventory valuation. You therefore cannot change an account if there is on-hand inventory in any of these subinventories.
Material: A default general ledger account to accumulate material costs for this category/subinventory combination. This is usually an asset account.
Outside Processing: A default general ledger account to accumulate outside processing costs for this category/subinventory combination. This is usually an asset account.
Material Overhead: A default general ledger account to accumulate material overhead or burden costs for this category/subinventory combination. This is usually an asset account.
Overhead: A default general ledger account to accumulate resource or department overhead costs for this for this category/subinventory combination. This is usually an asset account.
Resource: A default general ledger account to accumulate resource costs for this category/subinventory combination. This is usually an asset account.
Encumbrance: A default general ledger account to hold the value of encumbrances against subinventory items belonging to this category set.
Bridging: This account is optional.
You can also optionally enter an Analytical Invoice Price Variance, Analytical Purchase Mirror, Non-Invoiced Sales Order, Non-Invoiced Revenue, Analytical Revenue Mirror, Analytical Margins of Goods Sold, and Average Cost Variance account.
Analytical Invoice Price Variance:
Analytical Purchase Mirror:
Non-Invoiced Sales Order:
Non-Invoiced Revenue:
Analytical Revenue Mirror:
Analytical Margins of Goods Sold:
-
Save your work.
To define category accounts in an average costing organization
-
Select New to open the Category Accounts Summary window.
Important: You can also enter and update account information for a single category in the Category Accounts window, which you can access by selecting the Open button.
-
Select a Category.
When you select a category, accounts are defaulted from the organization level. You can change these accounts.
-
Select a Cost Group.
Cost groups are mandatory. If your current organization is not Project References Enabled, the organization's default cost group is used and cannot be update. If your organization is Project References Enabled, you can select any cost group. See: Defining Cost Groups, Oracle Cost Management User's Guide .
-
Select account numbers for the following:
Important: All subinventories that contain items belonging to the selected category set use these accounts for inventory valuation. You therefore cannot change an account if there is on-hand inventory in any of these subinventories.
Material: A default general ledger account to accumulate material costs for this category/cost group. This is usually an asset account.
Outside Processing: A default general ledger account to accumulate outside processing costs for this category/cost group combination. This is usually an asset account.
Material Overhead: A default general ledger account to accumulate material overhead or burden costs for this category/cost group combination. This is usually an asset account.
Overhead: A default general ledger account to accumulate resource or department overhead costs for this for this category/cost group combination. This is usually an asset account.
Resource: A default general ledger account to accumulate resource costs for this category/cost group combination. This is usually an asset account.
Encumbrance: A default general ledger account to hold the value of encumbrances against this category/cost group combination
Bridging: This account is optional.
You can also optionally enter an Analytical Invoice Price Variance, Analytical Purchase Mirror, Non-Invoiced Sales Order, Non-Invoiced Revenue, Analytical Revenue Mirror, Analytical Margins of Goods Sold, and Average Cost Variance account.
Analytical Invoice Price Variance:
Analytical Purchase Mirror:
Non-Invoiced Sales Order:
Non-Invoiced Revenue:
Analytical Revenue Mirror:
Analytical Margins of Goods Sold:
Average Cost Variance:
-
Save your work.
Overview of Item Cataloging
You can use item cataloging to add descriptive information to items and to partition your Item Master into groups of items that share common characteristics. You configure in advance what is required to uniquely define an item in each group. When you define your items, you assign them to an item catalog group.
To define your catalog, you set up as many distinct item catalog groups as you need to partition your Item Master. Each group has unique characteristics (called descriptive elements) that completely describe items belonging to the group.
When you assign an item to an item catalog group, you define values for the descriptive elements that apply to your item. For example, an item catalog group called Computer could have a descriptive element called Processing Speed. Possible values for Processing Speed might be 100MHZ, 133MHZ, and so on.
Benefits
Once the process of defining and cataloging items is complete, you can:
-
Provide standard language in referring to items, enabling companies in the same industry to communicate effectively without needing to name their items identically.
-
Store a detailed description of what an item is without having to embed that meaning in the item number.
-
Use descriptive elements as search criteria for items.
-
Update the item description with a concatenated value of the item catalog group information.
-
Find common existing parts when developing an engineering prototype.
Defining Item Catalog Groups
To define an item catalog group
-
Navigate to the Item Catalog Groups window.
-
Enter a unique name for the group.
-
Enter a description.
If you choose to build an item's description from the catalog, the description is built beginning with the information entered here. See: Concatenated Item Descriptions.
Note: You can choose to use the Catalog Name instead of the Description as the first element in a concatenated item catalog description. To do this change the INV:Use catalog name in the item description profile option to Yes. See: Oracle Inventory Profile Options.
-
Save your work.
To make an item catalog group inactive
-
Enter the date on which the catalog group becomes inactive.
As of this date you can no longer assign items to this group. You can use an inactive group in reports and searches.
To define descriptive elements for an item catalog group
-
Select an item catalog group and choose Details. See: Defining Descriptive Elements.
Related Topics
Specifying Recommended Categories
Concatenated Item Descriptions
When you define descriptive elements for an item catalog group, you specify whether the value of a particular descriptive element can be concatenated and used as an item's description.
When you assign an item to a catalog group, you choose descriptive elements that apply to the item, and assign values to the descriptive elements. You can then create a concatenated item description by choosing the Update Description button. If you choose Update Description, Oracle Inventory concatenates the item catalog group information and overwrites the item description with this new information.
Concatenated Item Description Structure
Oracle Inventory builds a concatenated item description by combining segments of catalog information. The first segment is either the catalog group Description or the Catalog Name. You can choose which to use by setting the INV:Use catalog name in the item description profile option. See: Oracle Inventory Profile Options.
Additional segments consist of the values for descriptive elements that have Description Default turned on.
The Item Catalog Flexfield separator is used as a delimiter between each segment of the combined description. See: Defining Key Flexfield Segments, Oracle Applicatons Flexfields Guide.
When the description is displayed, the delimiters appear even if data is missing for some of the descriptive elements. For example, an item catalog group called Computer with a description of Personal Computer, and descriptive elements of Speed (25 MHZ), Size ( ), and Monitor (color), would produce this description:
Personal Computer,25 MHZ,,color
Related Topics
Defining Descriptive Elements
You can define any number of descriptive elements for an item catalog group. You can also describe whether the descriptive element is required at item definition, and whether the descriptive element value is included by default in the item catalog description.
Description Default
Descriptive element values can be concatenated and used to create an item's description. You turn this feature off or on for each descriptive element in a catalog group. Turn Description Default on for any element you want included in a concatenated description. You create a concatenated description when assign an item to an item catalog group. See: Assigning Items to Catalogs.
To define descriptive elements for an item catalog group
-
Navigate to the Item Catalog Groups window.
-
Select an item catalog group and choose Details. The Item Catalog Group window appears.
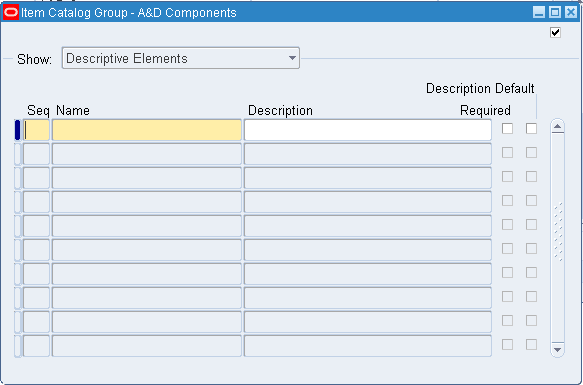
-
Select the Descriptive Elements tabbed region.
-
Enter a unique sequence number.
When you assign an item to a group, the descriptive elements are presented in the order you define here.
-
Enter the name of a new descriptive element.
Examples: Color, height, texture.
-
Determine whether the descriptive element is required for this catalog group.
When you assign an item to a catalog group, you must enter a value for required descriptive elements in order for the catalog to be considered complete. If an element is not required, entering a value is optional.
-
Determine whether the descriptive element is automatically used to create the catalog description (Description Default).
If you choose to concatenate the value of the descriptive element to create the catalog description, you can use this description to overwrite an existing item description.
-
Save your work.
Related Topics
Concatenated Item Descriptions
Defining Aliases
You can specify any number of aliases for items that belong to a catalog group. This is used for information and reporting purposes only.
To define an aliases for items in a catalog group
-
Navigate to the Item Catalog Groups window.
-
Select an item catalog group and Choose Details. The Item Catalog Group window appears.
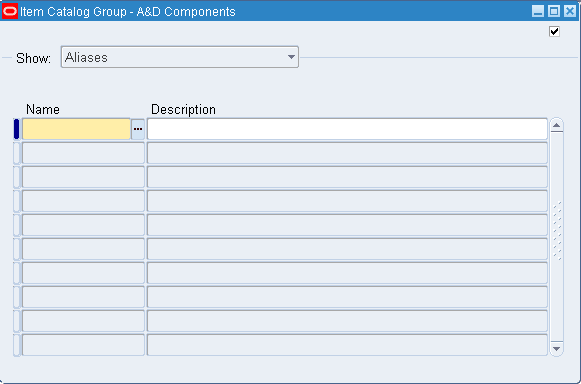
-
Select Aliases from the Show drop down list.
-
Enter a unique Name for the alias in the name field.
-
Enter a Description for the alias.
-
Save your work.
Item Cataloging Examples
Hospital Environment
In a hospital environment, item cataloging can help doctors identify precisely the drug they want from several that are nearly identical in composition, without extensive research. By defining groups, descriptive elements, and values that are increasingly specific, a doctor can search for the proper drug using the specifics of the chemical structure. The item cataloging feature is highly flexible in that you define your own groups, descriptive elements, and values to suit your own specific needs.
Clothing Retailer
A clothing retailer sells partly through mail order catalogs. Customers want to order apparel over the phone, but they do not always know the item number of what they want. Item cataloging allows an order entry clerk to find the right item based on a general description. This reduces order entry time and increases customer satisfaction.