Setting Up
This chapter covers the following topics:
Overview of Setting Up
This section contains an overview of each task that you need to complete to set up Oracle Inventory.
Before you set up Oracle Inventory, you should:
-
Set up an Oracle Applications System Administrator. For more information, see Oracle Applications System Administrator's Guide, Setting Up Oracle Applications System Administrator, Oracle Applications System Administrator's Guide.
-
Set up the Oracle Applications Ledger. For more information, see Oracle General Ledger User's Guide, Defining Ledgers, Oracle General Ledger User's Guide.
Setup Flowchart
Some of the steps outlined in this flowchart and setup checklist are Required and some are Optional. Required Step With Defaults means that the setup functionality comes with pre-seeded, default values in the database; however, you should review those defaults and decide whether to change them to suit your business needs. If you want or need to change them, you should perform that setup step. You need to perform Optional steps only if you plan to use the related feature or complete certain business functions.
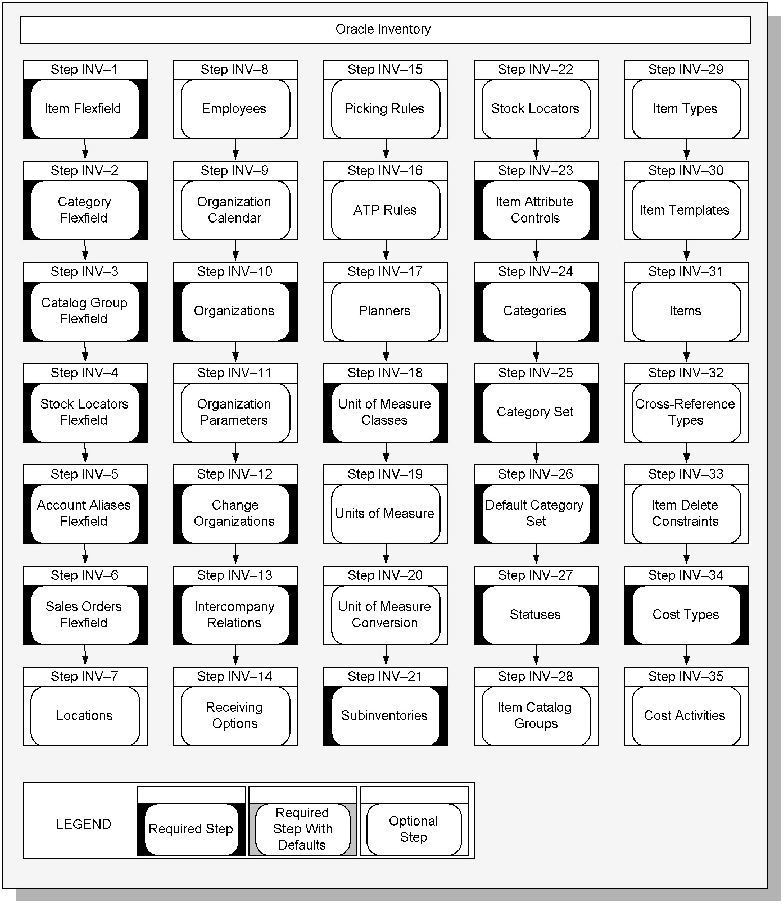
You may not need to perform some of the setup steps if you have already performed a common-application setup (setting up multiple Oracle Applications products).
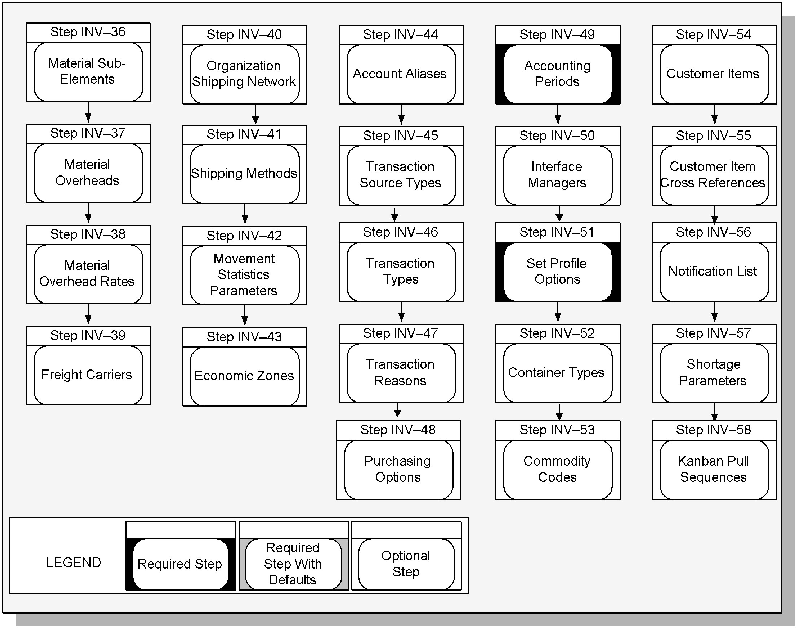
Setup Checklist
The following table lists setup steps and a reference to their location.
| Step No. | Required | Step Title | Application |
|---|---|---|---|
| Step 1 | Required | Define Items Flexfield | Common Applications |
| Step 2 | Required | Define Item Categories Flexfield | Common Applications |
| Step 3 | Required | Define Item Catalog Group Flexfield | Common Applications |
| Step 4 | Required | Define Stock Locators Flexfield | Common Applications |
| Step 5 | Required | Define Account Aliases Flexfield | Common Applications |
| Step 6 | Required | Define Sales Orders Flexfield | Common Distribution |
| Step 7 | Optional | Define Locations | Common Distribution |
| Step 8 | Optional | Define Employees | Common Applications |
| Step 9 | Optional | Define Organization Calendar | Common Applications |
| Step 10 | Required | Define Organizations | Common Applications |
| Step 11 | Optional | Define Organization Parameters | Common Applications |
| Step 12 | Required | Change Organizations | Common Applications |
| Step 13 | Required | Define Intercompany Relations | Common Distribution |
| Step 14 | Optional | Define Receiving Options | Common Distribution |
| Step 15 | Optional | Define Picking Rules | Common Applications |
| Step 16 | Optional | Define ATP Rules | Common Applications |
| Step 17 | Optional | Define Planners | Oracle Inventory |
| Step 18 | Required | Define Unit of Measure Classes | Common Applications |
| Step 19 | Optional | Define Unit of Measure | Common Applications |
| Step 20 | Optional | Define Unit of Measure Conversions | Common Applications |
| Step 21 | Required | Define Subinventories | Common Applications |
| Step 22 | Optional | Define Stock Locators | Oracle Inventory |
| Step 23 | Required | Define Item Attribute Controls | Oracle Inventory |
| Step 24 | Required | Define Categories | Oracle Inventory |
| Step 25 | Required | Define Category Set | Oracle Inventory |
| Step 26 | Required | Define Default Category Sets | Oracle Inventory |
| Step 27 | Required | Define Statuses | Common Applications |
| Step 28 | Optional | Define Item Catalog Groups | Oracle Inventory |
| Step 29 | Optional | Define Item Types | Oracle Inventory |
| Step 30 | Optional | Define Item Templates | Oracle Inventory |
| Step 31 | Optional | Define Items | Oracle Inventory |
| Step 32 | Optional | Define Cross-Reference Types | Oracle Inventory |
| Step 33 | Optional | Define Item Delete Constraints | Common Applications |
| Step 34 | Required | Define Cost Types | Common Applications |
| Step 35 | Optional | Define Cost Activities | Common Applications |
| Step 36 | Optional | Define Material Sub-Elements | Common Applications |
| Step 37 | Optional | Define Material Overheads | Common Applications |
| Step 38 | Optional | Define Default Material Overhead Rates | Common Applications |
| Step 39 | Optional | Define Freight Carriers | Common Applications |
| Step 40 | Optional | Define Organization Shipping Network | Oracle Inventory |
| Step 41 | Optional | Define Shipping Methods | Oracle Inventory |
| Step 42 | Optional | Define Movement Statistics Parameters | Oracle Inventory |
| Step 43 | Optional | Define Economic Zones | Oracle Inventory |
| Step 44 | Optional | Define Account Aliases | Oracle Inventory |
| Step 45 | Optional | Define Transaction Source Types | Common Applications |
| Step 46 | Optional | Define Transaction Types | Common Applications |
| Step 47 | Optional | Define Transaction Reasons | Common Applications |
| Step 48 | Optional | Define Purchasing Options | Common Applications |
| Step 49 | Required | Define Accounting Periods | Common Applications |
| Step 50 | Optional | Request Interface Managers | Common Applications |
| Step 51 | Required | Set Profile Options | Oracle Inventory |
| Step 52 | Optional | Define Container Types | Common Distribution |
| Step 53 | Optional | Define Commodity Codes | Common Distribution |
| Step 54 | Optional | Define Customer Items | Common Distribution |
| Step 55 | Optional | Define Customer Item Cross References | Common Distribution |
| Step 56 | Optional | Define Notification List | Oracle Inventory |
| Step 57 | Optional | Define Shortage Parameters | Oracle Inventory |
| Step 58 | Optional | Define Kanban Pull Sequences | Oracle Inventory |
Setup Steps
Step 1 Define Your System Items Flexfield (Required)
You must design and configure your System Items Flexfield before you can start defining items. You must indicate how many separate segments your flexfield has, how many characters each segment has, and whether you want to validate the values that you assign to the segments. Once you define the structure of your flexfield and any applicable value sets, you must freeze and compile your flexfield definition.
All Oracle Applications products that reference items share the System Items Flexfield and support multiple segment implementations. Therefore, if you have already configured this flexfield while setting up another product, you do not need to perform this step.
For this and the following five steps, see: Oracle Inventory Flexfields, Key Flexfield Segments, Oracle Flexfield User's Guide, Key Segment Values, Oracle Flexfield User's Guide, and Value Sets, Oracle Flexfield User's Guide.
Step 2 Define Your Item Categories Flexfield (Required)
You must design and configure your Item Categories Flexfield before you can start defining items since all items must be assigned to categories. You must indicate how many separate segments your flexfield has, how many characters each segment has, and whether you want to validate the values that you assign to the segments. Once you define the structure of your flexfield and any applicable value sets, you must freeze and compile your flexfield definition. Compiling the flexfield definition enables the Item Categories Flexfield pop-up window.
You can define multiple structures for your Item Categories Flexfield, each structure corresponding to a different category grouping scheme. You can then associate these structures with the categories and category sets you define.
Step 3 Define Your Item Catalog Group Flexfield (Required)
If you make entries for your items in a standard industry catalog or want to group your items according to certain descriptive elements, you need to configure your Item Catalog Group Flexfield. You must indicate how many separate segments your flexfield has, how many characters each segment has, and whether you want to validate the values that you assign to the segments. Once you define the structure of your flexfield and any applicable value sets, you must freeze and compile your flexfield definition. Compiling the flexfield definition enables the Item Catalog Group Flexfield pop-up window.
Even if you do not use item cataloging, you must enable at least one segment and compile this flexfield before you can define items.
Step 4 Define Your Stock Locators Flexfield (Required)
If you keep track of specific locators such as aisle, row, bin indicators for your items, you need to configure your Stock Locators Flexfield and implement locator control in your organization. You must indicate how many separate segments your flexfield has, how many characters each segment has, and whether you want to validate the values that you assign to the segments. Once you define the structure of your flexfield and any applicable value sets, you must freeze and compile your flexfield definition. Compiling the flexfield definition enables the Stock Locators Flexfield pop-up window.
Even if you do not implement locator control, you must still compile the Stock Locators Flexfield because all Oracle Inventory transaction and on-hand inquiries and reports require a frozen flexfield definition. However you do not need to configure the flexfield in a specific way.
Note: Whenever you recompile the stock locator field definition, you must run the concurrent program Generate Stock Locator Flexfield Definition for Mobile Transactions to recompile the flex definition used for mobile transactions.
Note: . If you use Mobile Supply Chain Applications or Warehouse Management, you need to bound the server to view the change.
Step 5 Define Your Account Aliases Flexfield (Required)
If you want to define logical references to frequently used account number combinations and use them as transaction source types, you need to configure your Account Aliases Flexfield and define account aliases. You must indicate how many separate segments your flexfield has, how many characters each segment has, and whether you want to validate the values that you assign to the segments. Once you define the structure of your flexfield and any applicable value sets, you must freeze and compile your flexfield definition. Compiling the flexfield definition enables the Account Aliases Flexfield pop-up window.
Even if you do not use account aliases, you must still compile the Account Aliases Flexfield because all Oracle Inventory transaction inquiries and reports require a frozen flexfield definition. However, you do not need to configure the flexfield in a specific way.
Step 6 Define Your Sales Orders Flexfield (Required)
If you want to ship items from inventory to meet customer demand as specified in a sales order, regardless of whether you are using Oracle Order Management, you must configure your Sales Orders Flexfield. You must indicate how many separate segments your flexfield has, how many characters each segment has, and whether you want to validate the values that you assign to the segments. Once you define the structure of your flexfield and any applicable value sets, you must freeze and compile your flexfield definition. Compiling the flexfield definition enables the Sales Orders Flexfield pop-up window.
Even if you do not ship items against sales orders, you must still compile the Sales Orders Flexfield because all Oracle Inventory transaction inquiries and reports require a frozen flexfield definition. However, you do not need to configure the flexfield in a specific way.
Step 7 Define Your Locations (Optional)
Define names and addresses for the locations you use within your organization as well as the location you use for the organization itself. Oracle Inventory and other Oracle Applications products use locations for requisitions, receiving, shipping, billing, and employee assignments. See: Setting Up Site Locations, Oracle Human Resource Management System User's Guide.
Step 8 Define Your Employees (Optional)
Enter the names, addresses, and other personal details of your employees. Oracle Inventory uses this information as the QuickPick source for employee fields in your application. Employee information is used primarily to record the employees who perform your cycle and physical inventory counts. See: Entering a New Person, Oracle Human Resource Management System User's Guide.
Step 9 Define Your Organization Calendar (Required)
If you perform inventory forecasting, reorder point planning, available to promise analysis, shortage messages or cycle counting, you must define your workday calendar. You can assign an exception set to denote holidays, scheduled maintenance, or extended downtime. When you complete defining your calendar, it is generated automatically. See: Creating a Workday Calendar, Oracle Bills of Material User's Guide.
Step 10 Define Your Organizations (Required)
Before you use Oracle Inventory, you need to define one or more organizations. Organizations describe distinct entities in your company and may include separate manufacturing facilities, warehouses, distribution centers, and branch offices. See: Creating an Organization, Oracle Human Resource Management System User's Guide
Since Oracle Inventory allows you to implement multiple ledgers with multiple organizations, you need to specify the ledger to which your organization is tied.
Caution: In a multi-organization install, when you are defining inventory organizations you MUST specify the Operating Unit even though the field is not required.
After you have set up Oracle Inventory, you must specify an organization whenever you access Oracle Inventory; all subsequent activity uses this organization as your current organization. You may change your current organization at any time with the Change Organization window.
Step 11 Define Your Organization Parameters (Required)
You must define the control options and account defaults for your organization before you can define items or perform any transactions. You can assign a unique short code to your organization and use this code to identify the organization with which you want to work. You must also specify the master organization and the costing organization for your organization. See: Organization Parameters Window.
Step 12 Change Organizations (Required)
Normally, when you log in to Oracle Inventory, you are asked to choose an organization from among those you have defined. But when you set up Oracle Inventory for this first time, no organizations exist. So for the first several setup steps, until you define an organization and set parameters, Oracle Inventory operates with no specific organization chosen.
However, from this point on in the setup process, you need to identify a specific organization as your current organization. Change to one of the organization you created above, using the Change Organization window. Or, you can log out and log back in to Oracle Inventory, and let Inventory choose the first organization for you. See Changing Your Organization, Oracle Master Scheduling / MRP and Oracle Supply Chain Planning User's Guide.
Step 13 Define Your Intercompany Relations (Required)
If you want intercompany relations between two operating units (typically the Shipping and Selling organizations) in a multi-organization environment, you must define the relationship in the Intercompany Relations window. See: Defining Intercompany Relations.
Oracle Inventory and Oracle Receivables must be installed before you can define intercompany relations. If Oracle Payables is not installed, the fields in the AP Invoicing for Selling region are not required.
Step 14 Define Your Receiving Options (Optional)
If you perform inter-organization shipments using intransit inventory, you must use the Receipts window to receive items sent to your organization. Before you can receive items, you must define the options that govern receipts in your system. You can override some of the options you define at the item level. See: Defining Receiving Options, Oracle Purchasing User's Guide.
If you use Oracle Purchasing in conjunction with Oracle Inventory, you can also use the receiving system for purchase order receipts. You can then override most of the options you define at the supplier, purchase order, and item level.
Step 15 Define Your Picking Rules (Optional)
If you use Oracle Inventory and Oracle Shipping Execution to ship items to customers against sales orders, you must define picking rules. You assign a picking rule to an item to define the priorities that Oracle Inventory uses to pick units of that item for a sales order. When you pick release a sales order, Order Shipping Execution submits requests to Oracle Inventory which uses the information you enter here to generate pick lists for sales orders. See: Defining Picking Rules.
Step 16 Define Your ATP Rules (Optional)
If you check item availability in the future based on supply and demand information and various accumulation and consumption criteria, you must define available to promise (ATP) rules. ATP rules define the options Oracle Inventory uses to calculate the available quantity of an item on a requested date and/or the first date on which a requested quantity of an item first becomes available. See Defining ATP Rules.
Step 17 Define Your Planners
If you keep track of the names of the parties responsible for planning certain items or groups of items, you need to define planners. You can then assign these planning entities or planners to items. See Defining Planners, Oracle Master Scheduling / MRP and Oracle Supply Chain Planning User's Guide.
Step 18 Define Your Unit of Measure Classes (Required)
You need to define unit of measure (UOM) classes and the base unit of measure for each class. UOM classes represent groups of units of measure with similar characteristics, such as Volume or Length. Oracle Inventory uses the base unit of measure to perform conversions between units of measure in each class and between two different UOM classes. See: Defining Unit of Measure Classes.
Step 19 Define Your Units of Measure (Required)
You need to define units of measure for tracking, moving, storing, and counting items. Each item that you define in Oracle Inventory must have a primary unit of measure and each transaction you perform in Oracle Inventory must have a unit of measure associated with the transaction quantity. See: Defining Units of Measure.
Step 20 Define Your Unit of Measure Conversions (Optional)
You need to define the conversion rates between the base unit of measure and other units of measure within a UOM class if you want to be able to transact an item in units of measure other than its primary unit of measure. Oracle Inventory uses these conversions to automatically convert transaction quantities to the primary unit of measure of the item being transacted. See: Defining Unit of Measure Conversions.
If you want to transact items in units of measure belonging to classes other than their primary UOM class, you must define conversions between the base units of measure in different UOM classes. Oracle Inventory uses this information to convert between units of measure belonging to different UOM classes. In other words, for a specific item, you can define conversion rates between unlike units of measure such as boxes and kilograms.
For example, you can specify that 1 EACH of item XYZ weighs 50 LB where item XYZ has EACH as its primary unit of measure. You can now transact item XYZ in LB, and Oracle Inventory converts the transaction quantity to EACH and stores and updates the item quantity accordingly.
Step 21 Define Your Subinventories (Required)
You need to define at least one subinventory for each organization. A subinventory is a physical or logical grouping of your inventory, such as raw material, finished goods, defective material, or freezer compartment. You must move each item into, out of, or within a subinventory whenever you perform an inventory transaction. The number of subinventories that you define depends on the way you structure your organization. See: Defining Subinventories.
Step 22 Define Your Stock Locators (Optional)
If you implement prespecified locator control in your whole organization or in a particular subinventory, you must define stock locators. Locators identify physical areas within subinventories where you store items, such as rack/bin or aisle/row/bin locations. If you enable locator control, you must move each item into or out of a subinventory and locator combination whenever you perform an inventory transaction. See: Defining Stock Locators.
Step 23 Define Your Item Attribute Controls (Required)
You need to specify the level at which Oracle Inventory maintains each item attribute: the item master level or the item/organization level. Item attributes are information about an item, such as order cost, lead time, item status, revision control, tax code, list price, asset category, primary unit of measure, and so on. If you choose the item master level for a particular attribute, Oracle Inventory maintains the value of the attribute in the item master, and the value will be the same in every organization that uses the item master, in which the item exists, and does not allow updates at the item/organization level. Conversely, Oracle Inventory allows updates at the item/organization level for item attributes that you maintain at the item/organization level. See: Defining Item Attribute Controls.
Step 24 Define Your Categories (Required)
You must define categories to group items that share similar characteristics. You must define the flexfield structure to be used for each category you define. The flexfield structure you select for a category will determine how it may be grouped with other categories. (Similar flexfield structures can be grouped.). See: Defining Categories.
Step 25 Define Your Category Set (Required)
You need to define category sets to create different category grouping schemes. Category sets group your categories into functional areas, such as inventory, cost, purchasing, order entry, and so on. You can associate different flexfield structures with each category set, thereby introducing different naming structures for your categories. You may only group categories with the same flexfield structure as the category set in a single category set. For example, the categories metal, rubber, and paper might be members of the Inventory category set, while taxable and non-taxable might be members of the Cost category set. You can also a create category set such as Priority, with members like high, medium, and low and use it as your personal item grouping mechanism for a report.
When you define items, you can assign one or more category sets to an item. Within a category set, you can assign multiple categories to an item. When you install or upgrade Oracle Inventory, Oracle provides the category set Inventory by default. When you upgrade Oracle Inventory from a previous version, your existing categories are assigned to this category set. See: Defining Category Sets.
Step 26 Define Your Default Category Sets (Required)
You need to define a default category set for each of the seven predefined functional areas. Oracle Inventory will automatically assign items defined for use by a particular functional area to the category set associated with the functional area. Oracle Inventory defaults the appropriate category set in all the category set fields in the products that correspond to the functional areas. You may choose the same category set for more than one functional area if you have identical ways of grouping your items across those functional areas. See: Defining Default Category Sets.
Step 27 Define Your Statuses (Required)
You need to define statuses that you can assign to items, denoting the level of activity you allow for them. A status is a set of Yes/No values for the status attributes. Status attributes are flags that exist for each functional area for which you enable an item: stockable, transactable, purchasable, build in WIP, customer orderable, internal orderable, BOM allowed, and invoice enabled. When you define an item, you can use statuses to control the values of or provide default values for the status attributes. See: Defining Item Status Codes.
Step 28 Define Your Item Catalog Groups (Optional)
If you make entries for your items in a standard industry catalog or if you want to group your items according to certain descriptive elements, you need to define item catalog groups. An item catalog group consists of descriptive elements to which you assign certain sets of values. When you assign an item to an item catalog group, you can choose descriptive elements from the group and define values for each descriptive element.. See: Defining Item Catalog Groups.
For example, you can define an item catalog group called bicycle. You assign descriptive elements of type, size, and color to the group. In the Master Items window, you assign an item XYZ123 to the group bicycle, and choose values for each of the descriptive elements such as racer, 20", red or mountain bike, 18", blue. Now, you can reference your item by both the unique item number (XYZ123) and by the entry in the bicycle catalog (racer, 20", red).
Step 29 Define Your Item Types (Optional)
If you want to use your own terminology to identify the types of items you define, you need to define your own item types. Oracle Inventory provides several predefined item types such as finished goods, option class, kit, purchased item, and so on. You can choose one of the predefined item types when you define an item, or choose one of your own. Oracle Inventory also provides several item templates to match the predefined item types. You then use these templates and any other user-defined ones in defining your items. See: Defining Item Types.
Step 30 Define Your item Templates (Optional)
If you define many items sharing the same values for a number of attributes, you may want to define item templates that help you avoid duplication of effort. An item template is a standard set of attribute values that you use to define or update items. When you apply a template to an item, you set the item attribute values to the template attribute values for those attributes you enable in the template. You can apply the same or different templates to an item any number of times. Each new template updates the item definition of those attributes that differ from the previous templates. If an attribute already exists for an item, the more recent value (from the last template applied) overrides the previous value. See: Defining Item Templates.
For example, you apply a template that has unit of measure EACH and cycle count enabled YES. Then you apply a new template with cycle count enabled NO and carrying cost $25.00. The item definition now has three attributes and values: unit of measure EACH, cycle count enabled NO, and carrying cost $25.00.
Step 31 Define Items (Optional)
Use this form to define and update items and the attributes associated with them, such as description, lead time, unit of measure, lot control, and so on. See: Defining Items.
Step 32 Define Your Cross-References Types (Optional)
If you maintain relationships between your item numbers and other entities such as old item numbers, you need to define cross-reference types. Using these cross-reference types, you can define cross-references to store additional information about inventory items.
For example, you can create a cross-reference type OLD to track the old item numbers, and a type SUPPLIER to track supplier part numbers. You can then create a list of cross-references using the Cross-Reference Types window, linking your item numbers to their corresponding old part numbers, and/or their corresponding supplier part numbers. Oracle Inventory provides a report that lists all items and their corresponding cross-references. See: Defining Cross-Reference Types.
Step 33 Define Your Item Delete Constraints (Optional)
If you want to enforce specific business rules and add custom checks that will be performed before Oracle Inventory allows the deletion of an item, you must define item delete constraints to supplement the standard item delete conditions. Oracle Inventory prevents you from deleting items if your data does not meet these conditions. Oracle Inventory predefines several standard delete constraints: you cannot delete an item if there is a job or a repetitive schedule for it; you cannot delete an item if a sales order or purchase order references it, and so on. See: Creating Custom Delete Constraints, Oracle Bills of Material User's Guide.
Step 34 Define Your Cost Types (Required)
You need to define cost types before you can start entering item costs. A cost type is a set of costs, used for historical, current and future costs, as well as for simulation purposes. You can create as many cost types as you need, but Oracle Inventory is installed with three predefined cost types: Frozen, Average, and Pending. These are costs currently in use for an item and include material and overhead charges. See: Defining Cost Types, Oracle Cost Management User's Guide.
If you are using standard costing in your organization, all transactions use the frozen cost at the time of the transaction. You can update your frozen costs by performing a standard cost update. If your cost method is average costing, Oracle Inventory uses the Average cost type and automatically updates your average costs after the appropriate transactions. You can also define cost types of your own for any purpose such as cost history or product cost simulation. You can then submit many cost reports based on these cost types.
Step 35 Define Your Cost Activities (Optional)
If you measure the cost and performance of the work performed in your organization, you need to define your cost activities. Activities are processes or procedures that consume costs and time. In addition to the cost element and cost code, all costs are associated with an activity. Your activities may be directly related to building your items, such as run time or setup time, or they may be indirect, such as PO generation or payroll. The goal of activity based cost accounting is to accurately identify your product costs, especially overhead costs. See: Defining Activities and Activity Costs, Oracle Cost Management User's Guide.
Step 36 Define Your Material Sub-Elements (Optional
If you need to have greater item cost visibility and flexibility, you may want to define material sub-elements. Sub-elements are a smaller classification of the cost elements. For every sub-element you define, you must enter the method of allocating the cost to the sub-element (basis type). See: Defining Material Sub-Elements, Oracle Cost Management User's Guide.
Step 37 Define Your Material Overheads (Optional)
If you keep track of overhead rates for your organization, you must define material overheads. You can define any number of material overheads, such as freight, customs, purchasing, and so on. Each overhead is charged when you receive items into inventory. You cannot use material overheads in organizations that use average costing. See: Defining Overhead, Oracle Cost Management User's Guide.
Step 38 Define Your Default Material Overhead Rates (Optional)
If you use material overheads, you may want to enter default rates at the organization or category level. When you define your items, Oracle Inventory automatically uses these defaults. See: Defining Material Overhead Defaults, Oracle Cost Management User's Guide.
Step 39 Define Your Freight Carriers
If you ship items from one inventory organization to another, and keep track of the names of and transportation costs charged by your carriers, you need to define freight carriers. Use these freight carriers whenever you perform direct inter-organization transfers or transfers via intransit inventory. Oracle Inventory automatically charges the freight costs to the freight carrier account you specify. See: Defining Freight Carriers, Oracle Order Management Immplementation Guide.
Step 40 Define Your Organization Shipping Network (Optional)
If you want to move items from one inventory organization to another, you must define your shipping network. Specify the organizations to which you can ship from the organization you are currently in, choose whether you want to transfer items directly or via intransit inventory, and enter the accounting information for shipments between the two organizations. See: Defining Inter-Organization Shipping Network.
Step 41 Define Your Shipping Methods (Optional)
The Shipping Method code defines specific shipping methods. For example: Ground, Express, or Air. You can associate shipping methods with lead times in the Inter-org Shipping Methods window. See: Defining Shipping Methods.
Step 42 Define Your Movement Statistics Parameters (Optional)
If you plan to use movement statistics reporting, you must use the Movement Statistics Parameters window to define the parameters for gathering movement statistics. Inventory uses this information to validate entry of statistical movement transactions and to properly report the information. See: Defining Movement Statistics Parameters.
Step 43 Define Economic Zones (Optional)
If you plan to use movement statistics reporting, you must use the Economic Zones window to define the economic zones for which to collect Movement Statistics. See: Defining Economic Zones.
Step 44 Define Your Account Aliases (Optional)
You may define one or more account aliases to use when you perform miscellaneous issue or receipt transactions. An account alias is a logical reference to a frequently used account number combination. It is also a transaction source type of its own, thereby allowing you to query and report transactions using your user-friendly references to particular account numbers. See: Defining Account Aliases.
Step 45 Define Your Transaction Source Types (Optional)
You may define your own transaction source types to use while performing transactions. Transaction source types enable you to classify transactions according to their origins, such as purchase order, sales order, account number, physical inventory, and so on. Oracle Inventory provides several predefined source types: purchase order, sales order, account, job or schedule, account alias, internal requisition, internal order, cycle count, physical inventory, standard cost update, RMA and inventory. You may use a user-defined source type when you define a transaction type.
If you want to associate a list of valid sources with your transaction source type, you can create a value set that contains the values to choose from when you use that particular transaction source type in a transaction. For example, you can create a transaction source type called Donation along with a list of account numbers in the value set. See: Defining and Updating Transaction Source Types.
Step 46 Define Your Transaction Types (Optional)
If you want to use your own terminology for certain kinds of transactions, you need to define your own transaction types. You create a transaction type by combining a transaction source type with a transaction action. A transaction action is a predefined method of changing the quantity and/or location and/or cost of an item. For example, if you create a transaction type with the transaction action "Issue from stores", you can use that transaction type to enter an issue transaction. You may use one of six predefined transaction actions: issue from stores, subinventory transfer, direct organization transfer, intransit shipment, cost update and receipt into stores.
For example, you can create a transaction source type called Donation along with a list of account numbers in the value set. You can then create a transaction type called Donation Receipt by combining the transaction action Receipt into stores and the transaction source type Donation. Now you can perform a receipt transaction by choosing the Donation Receipt transaction type and an account number from the value set associated with the Donation transaction source type. See: Defining and Updating Transaction Types.
Step 47 Define Your Transaction Reasons (Optional)
If you want to associate a predefined explanation with each transaction that you enter, you need to define transaction reason codes. When you enter an inventory transaction you can choose one of the reason codes that you defined. You may then use these reason codes to view and report transactions. See: Defining Transaction Reasons.
Step 48 Define Your Purchasing Options (Optional)
If you perform inter-organization shipments using intransit inventory, you must use the Receipts window to receive items sent to your organization. You need to define certain default control options in the Purchasing Options window to save you time when you create your receipts. If you use Oracle Purchasing in conjunction with Oracle Inventory, you must define your purchasing options as one of the first steps in your implementation of Oracle Purchasing. See: Defining Purchasing Options, Oracle Purchasing User's Guide.
Step 49 Open Your Accounting Periods (Required)
Before you can use Oracle Inventory to enter transactions, you need to open an accounting period. You must define your accounting periods in Oracle General Ledger, and open them for Oracle Inventory using the Inventory Accounting Periods window. Oracle Inventory allows you to have multiple periods open at any given time. See: Maintaining Accounting Periods.
Step 50 Request Your Interface Managers (Optional)
You must start your material transaction and material cost interface managers if you want to perform transactions in the background or concurrent processing modes, or if you use custom forms and data collection devices to enter transactions. If you prefer to perform all your transactions on-line, then you do not need to start any interface managers. See: Launching Transaction Managers.
Step 51 Set Profile Options (Required)
Profile options specify how Oracle Inventory controls access to and processes data. In general, profile options can be set at one or more of the following levels: site, application, responsibility, and user.
Oracle Inventory users use the Personal Profile Values window to set profile options only at the user level. System administrators use the System Profile Values window to set profile options at the site, application, responsibility, and user levels. See: Oracle Inventory Profile Options.
Step 52 Define Your Container Types
Container Types are used in defining physical attributes of items. See: Defining Container Types.
Section 53 Define Your Commodity Codes (Optional)
Customer Item Commodity Codes are used to group customer items and can be entered during the definition of customer items. See: Defining Commodity Codes.
Step 54 Define Your Customer Items (Optional)
If you need to track the item numbers used by your customers, you must define these items as customer items in Inventory. See: Defining Customer Items.
Step 55 (Define Your Customer Item Cross References (Optional)
If you want to relate customer items to your own item numbers, you must define customer item cross references. See: Defining Customer Item Cross References.
Step 56 Define Your Notification List (Optional)
If you want subinventory planners to be notified of approved move orders with material coming into or going out of their subinventories, you must define a list of individuals who will receive notification messages. See: Setting Up Move Orders.
Step 57 Define Shortage Parameters (Optional)
If you plan to use shortage messages, you must define demand sources and the individuals who will receive notification messages. See: Defining Shortage Parameters.
Step 58 Define Kanban Pull Sequences (Optional)
If you plan to use kanban functionality, you must define kanban pull sequences. Use the Kanban Pull Sequences window to define the source of replenishment for a kanban planned item in a kanban location. See: Defining Kanban Pull Sequences.
Inventory Profile Options
During implementation, you set a value for each user profile option to specify how Oracle Inventory controls access to and processes data.
Generally, the system administrator sets and updates profile values. See: Setting User Profile Options, Oracle System Administrator User's Guide.
Implementing Profile Options Summary
The table below indicates whether you (the User) can view or update the profile option and at which System Administrator levels the profile options can be updated: at the user, responsibility, application, or site levels. The second column, User, references the user, while the next four columns, User, Resp, App, and Site, reference the System Administrator. The last two columns, Required and Default Value, reference requirements.
A Required profile option requires you to provide a value. An Optional profile option already provides a default value, so you only need to change it if you don't want to accept the default.
Profile Option Settings
| Profile Option | User | User | Resp | App | Site | Required? | Default Value |
|---|---|---|---|---|---|---|---|
| Bom or Engineering | + | + | + | + | + | Yes | BOM |
| INV: Accounting Category Set | - | - | - | - | + | Yes | No default |
| INV: Advanced Pricing for Intercompany Invoice | - | - | - | - | + | Yes | No |
| INV: Advanced Pricing for Inter-Org Transfers | - | - | - | - | + | No | No Default |
| INV: Allow Expense to Asset Transfer | - | - | + | - | + | No | No Default |
| INV: Batch Size | - | - | - | - | Yes | No | Null |
| INV: Capable to Promise | _ | _ | _ | _ | + | Yes | No default |
| INV: CCEOI Commit Point | + | + | + | + | + | Yes | No Default |
| INV: CCEOI Workers | - | - | - | - | + | Yes | No Default |
| INV: Component Pick Batch Size | + | + | 0 | 0 | + | No | None |
| INV: Consigned Inventory Aging Enabled | - | - | - | - | + | No | Yes |
| INV: Cross Reference Type | 0 | 0 | 0 | 0 | + | No | Null |
| INV: Debug File (Including the complete path) | + | + | + | + | + | Yes | No Default |
| INV: Debug level | + | + | + | + | + | Yes | No Default |
| INV: Debug Trace | + | + | + | + | + | Yes | No Default |
| INV: Default Item Status | + | + | + | + | + | Yes | Active |
| INV: Default Primary Unit of Measure | + | + | + | + | + | Yes | Each |
| INV: Detect Truncation on UOM Conversion | - | - | - | - | + | Yes | No Default |
| INV: Dynamic Precision Option for Quantity on Reports | + | + | + | + | + | Yes | -9,999,999.00 |
| INV: External ATP | _ | _ | _ | _ | + | Yes | No Default |
| INV: FIFO for Original Receipt Date | + | + | + | + | + | Yes | No |
| INV: Fill & Kill Move Order | 0 | 0 | 0 | 0 | + | No | No |
| INV: Fill Kanban on Partial Move Order Receipt | - | - | - | - | + | No | No |
| INV: Genealogy Delimiter | + | + | + | + | + | Yes | - |
| INV: Genealogy Prefix or Suffix | + | + | + | + | + | No | Prefix |
| INV: GTIN Cross Reference Type | - | 0 | 0 | 0 | + | No | Null |
| INV: Inter-Organization Currency Conversion | + | + | + | + | + | Yes | Corporate |
| INV: Intercompany Currency Conversion | + | _ | + | + | + | Yes | Corporate |
| INV: Intercompany Invoice for Internal Orders | - | - | - | - | + | Yes | No |
| INV: Item Default Tab | + | + | + | + | + | No | Null |
| INV: Item Form Folder Category Set | + | + | + | + | + | Yes | Null |
| INV: Item Form Uses Master Set of Folders in the Org Items Form | + | + | 0 | 0 | 0 | No | Null |
| INV: Item Master Default Template | + | + | + | + | + | No | Null |
| INV: Item Master Flexfield | + | + | + | + | + | Yes | No Default |
| INV: Material Status Support | - | - | - | - | + | No | No Default |
| INV: Max # of Txn Purge Processes | + | + | - | - | + | No | Null |
| INV: Maximum Number of Quantity Trees | - | - | - | - | + | Yes | 500 |
| INV: MGD Maximum Number of Workers Permitted | + | + | + | + | + | Yes | No Default |
| INV: Minmax Reorder Approval | + | + | + | + | + | Yes | Approved |
| INV: Move Order Transact Form | + | + | + | + | + | Yes | Online Processing |
| INV: Multiple Serials Per Delivery Detail | 0 | 0 | 0 | 0 | 0 | Yes | None |
| INV: Override Neg for Backflush | + | + | + | + | + | Yes | Yes |
| INV: Override Reservation for Transactions | + | + | + | + | + | No | No Default |
| INV: Pick Slip Batch Size | + | + | 0 | 0 | + | No | None |
| INV: Product Family Item Template | - | + | + | + | + | Yes | Product Family |
| INV: Project Miscellaneous Transaction Expenditure Type | + | + | + | + | + | Yes | User Entered |
| INV: Purchasing by Revision | - | - | - | - | + | No | - |
| INV: Quantity Tree Timeout for Lock | - | - | - | - | + | Yes | No Default |
| INV: Replenishment Move Order Grouping | 0 | 0 | 0 | 0 | + | No | Null |
| INV: RC Line Failure | + | + | + | + | + | Yes | Continue Processing |
| INV: RC Requisition Approval | + | + | + | + | + | Yes | Approved |
| INV: Restrict Receipt of Serials | + | + | + | + | + | No | No |
| INV: RPC Timeout | + | + | + | + | + | Yes | 300 |
| INV: Round Reorder Qty | + | + | + | + | + | Yes | Yes |
| INV: Save Search Items | + | + | + | + | + | Yes | No |
| INV: Supplier Consigned Enabled | - | - | - | - | + | No | Yes |
| INV: Target Preferred Grade | + | + | + | + | + | No | No Default |
| INV: Transaction Date Validation | + | _ | + | + | + | Yes | Allow Date In Any Open Period |
| INV: Transaction Reasons Security | 0 | 0 | 0 | 0 | + | No | No |
| INV: Updateable Customer Item | + | + | + | + | + | Yes | No |
| INV: Updateable Item Name | + | + | + | + | + | Yes | No |
| INV: Use Backorder Caching | + | + | + | + | + | No | No Default |
| INV: Use Model & Options for Configuration Pricing | - | - | - | - | + | No | Yes |
| INV: Use catalog name in the item description | + | - | - | - | + | Yes | No |
| INV: Validate Returned Lot | - | - | - | - | + | No | No Default |
| INV: Validate Returned Serial | - | - | - | - | + | No | No Default |
| INV: View Item Category People | + | + | + | + | + | No | Null |
| INV: VMI Enabled | - | - | - | - | + | Yes | No |
| TP: INV Cycle Count Approvals form | + | + | + | + | + | Yes | Online Processing |
| TP: INV Cycle Count Entries form | + | + | + | + | + | Yes | Online Processing |
| TP: INV Enter Replenishment Count form | + | + | + | + | + | Yes | Concurrent Processing |
| TP: INV Inter-Organization Transfer form | + | + | + | + | + | Yes | Online Processing |
| TP: INV Miscellaneous Issue and Receipt form | + | + | + | + | + | Yes | Online Processing |
| TP: INV Transaction Processing Mode | + | + | + | + | + | Yes | Immediate Concurrent Processing |
| TP: INV Transfer Between Subinventories form | + | + | + | + | + | Yes | Online Processing |
| TP: INV Update Average Cost form | + | + | + | + | + | Yes | Online Processing |
| TP: Server Side Online Processing | + | + | + | + | + | Yes | Yes |
| + | You can update the profile option. |
| - | You can view the profile option value, but you cannot change it. |
| 0 | You cannot view or change the profile option value. |
Related Topics
Setting Transaction Processing Profile Options.
Setting Your Personal User Profile, Oracle Applications User's Guide
Common User Profile Options, Oracle Applications User's Guide
Profile Options in Oracle Application Object Library, Oracle Applications User's Guide
Profile Options
The following section describes the profile options.
Advanced Pricing for Inter-org Transfers
This profile option determines whether to use advanced pricing engine or customer price list for Inter-Org Transfers. The available values are Yes and No.
This profile option is updateable only at the Site level.
Used to hold the application context of BOM or Engineering. The available values for this profile option are BOM and Engineering. This profile option is updateable at all levels.
Indicates the default category set for defining category account. This profile option references the Product Line Accounting function area to retrieve the category set.
This profile option is updateable only at the Site level.
INV: Advanced Pricing for Intercompany Invoice
When you set this profile option to Yes, you can use the Advanced Pricing engine for Intercompany Invoicing. The default value is No.
This profile option is updateable only at site level.
INV: Allow Expense to Asset Transfer
Indicates whether you can transfer an item from an expensed subinventory to an asset location.
This profile option can be updated at the Site level and Responsibility level.
Indicates the number of order/delivery lines that will be placed in a single transaction_batch_id for Interfacing of records when Inventory Transaction Manager makes calls to Shipping API. The transaction_batch_id is used when Inventory Interface is deferred by the Shipping profile WSH: Defer Inventory Process Online. This profile option can hold any positive whole number.
Indicates whether to enable the CTP calculation.
This profile option has a predefined value of NULL (no predefined value) upon installation. This site level option determines how a promise data is derived. It can have the below values:
| 1 | Enable Product Family ATP and CTP |
| 2 | Enable Product Family ATP |
| 3 | Enable ATP |
| 4 | ATP / CTP Based on Planning Output |
| 5 | ATP Based on Collected Data |
This profile option is updateable only at the site level.
Indicates whether you want to commit the cycle count entries open interface records into the database.
This profile option is updateable at all levels.
Indicates the number of workers to be processed when running the cycle count entries open interface.
This profile option is updateable at the site level.
INV: Component Pick Batch Size
Determines the number of move orders lines allocated in one commit cycle for WIP component pick move orders.
INV: Consigned Inventory Aging Enabled
Use this profile option to determine whether the consigned inventory aging feature is present. This profile option is updateable only at site level.
This profile option communicates to the receiving pages of the Mobile device to use assignments for this particular cross-reference type to validate the items while performing a receipt.
This profile option is updateable only at site level.
INV: Debug File (Including the complete path)
This is the path and filename of the file where Oracle Inventory writes debug messages. You must configure the directory in the database within the v$parameter list for utl_file_dir. If you set the INV:Debug Trace profile option to Yes, Oracle Inventory attempts to update this file with debug messages. It is critical that you grant read/write access to the specified file. If Oracle Inventory cannot write to this file, transactions may fail.
This profile option is updateable at all levels.
Determines the amount of detail printed to the Oracle Inventory debugging log file. Level 10 is the highest level of logging supported.
This profile option is updateable at all levels.
This profile option specifies if Inventory and WMS transaction activities are logged to a debug file. You set the value to Yes to enable logging. You set the value to No to disable logging.
This profile option is updateable at all levels.
Indicates the default item status for new items you define.
This profile option is updateable at all levels.
INV: Default Primary Unit of Measure
Indicates the default primary unit of measure for new items you define.
This profile option is updateable at all levels.
INV: Detect Truncation on UOM Conversion
This profile option is not used in any Inventory procedures. It is used to provide uniform decimal precision across Oracle applications.
A transacted item quantity is converted from the transacted unit of measure to the primary unit of measure. If this profile option is set to 1, the whole number will have less than 10 digits in the primary unit of measure, and the fractional portion of the number will have less than nine digits.
This profile option is updateable at the Site level.
INV: Dynamic Precision Option for Quantity on Reports
Indicates the decimal precision for your unit costs. This controls how cost information is displayed on all cost reports. All reports display fourteen digits for unit costs, and display at least 16 digits for extended values.
Inventory predefines a value of -9,999,990.00 for this profile option for all levels upon installation.
This profile option is updateable at all levels.
Indicates whether non-Oracle ATP products can be integrated with Oracle.
If you select Global ATP, the system uses Oracle Global Order Promising. If you select None, the system uses the old ATP program. If you do not select a default value, the system assumes None.
This profile option is updateable only at the site level.
INV: FIFO for Original Receipt Date
This profile option is used to control how the system tracks receipt dates for on-hand records. A value of Yes indicates that the on-hand record from a material transfer should retain the original receipt date. A value of No indicates the receipt date of on-hand records created from material transfers should be reset to the transfer date.
This profile option is relevant if any inventory allocation rules use Receipt Date. Inventory redefines a value of No for this profile option upon installation.
This profile option is updateable at all levels.
This profile option enables you to close a partially allocated and transacted replenishment move order line. Available values are:
| No | Does not allow cancelling of replenishment move order lines. |
| Yes | Allows cancelling of move order lines. |
The default value is No.
This profile option is updateable at the Site level.
INV: Fill Kanban on Partial Move Order Receipt
This profile option determines whether or not a kanban card can be considered filled if the move order created to fill it was only partially transacted. If the card requested 10 and the move order only picked 7, if you set this profile option to yes, it considers the card full. This profile option is updateable only at site level.
Allows client to pick the character that appears between the item name and lot number in the genealogy tree. Any character can be used as a delimiter. You can change the delimiter profile at any time. The default value is "-".
INV: Genealogy Prefix or Suffix
You use this to determine if and how the item number is displayed on the Object Genealogy form. The following values are possible:
| Prefix | The Item number is a prefix to the lot or serial number |
| Suffix | ATP Based on Collected Data |
| None | ATP Based on Collected Data |
INV: GTIN Cross Reference Type
This profile option enables you to perform lookups of your GTIN item cross reference. This profile option is updateable only at site level.
INV: Inter-Organization Currency Conversion
Indicates the currency conversion for inter-organization transfers between organizations using different currencies. Available values are:
| Corporate | An exchange rate you define to standardize rates for your company. The corporate exchange rate is generally a standard market rate determined by senior financial management for use throughout the organization. |
| Spot | An exchange rate you enter to perform conversion based on the rate on a specific date. It applies to the immediate delivery of a currency. |
| User | An exchange rate you specify when you enter a foreign currency journal entry that does not have a daily exchange rate. |
Inventory predefines a value of Corporate for this profile option for all levels upon installation.
This profile option is updateable at all levels.
INV: Intercompany Currency Conversion
Indicates the currency conversion for intercompany invoices using different currencies. Available values are:
| Corporate | An exchange rate you define to standardize rates for your company. The corporate exchange rate is generally a standard market rate determined by senior financial management for use throughout the organization. |
| Spot | An exchange rate you enter to perform conversion based on the rate on a specific date. It applies to the immediate delivery of a currency. |
| User | An exchange rate you specify when you enter a foreign currency journal entry that does not have a daily exchange rate. |
Inventory predefines a value of Corporate for this profile option upon installation.
The profile option is updateable at the Site, Application, and Responsibility levels.
INV: Intercompany Invoice for Internal Orders
You use this profile option to enable creation of Intercompany Invoices for Internal Orders. This profile option is used in a concurrent program to create accounts payable, and accounts receivable to decide if Internal Order transactions should be invoiced. A Yes value enables creation of intercompany invoices. The default value is No.
This profile option is updateable only at site level.
INV: Intercompany Transfer Price Date
This profile option determines the order date as the sales order line pricing date for Shipping flow, and purchase order date for Procurement flow for Static Pricing and Advance Pricing. Available values are:
| Order Date | Shipping flow - Transfer Price is determined as per sales order line pricing date. Procurement flow -Transfer Price is determined as per purchase order approved date |
| Current Date | Sysdate |
This profile is updateable at the Site level only.
This profile option enables you to set a default template for all items you create. There will be a radio group called Copy From, with Template and Item as the radio choices. An editable field will display the current setting. To change the current setting, you simply change this field using the appropriate LOVs. No button is necessary here. By default, template will be selected. The default template can be set to null or a valid value. This default template will be applied to all the new items that are defined during this session. The default template will be defaulted from the value of the profile option.
INV: Item Form Folder Category Set
If the profile option has an assigned value, the Master Items form Folder tab displays an editable Category field. When you save an item, it is assigned to a category set defined in the profile options.
The default value is Null
This profile option is updateable at all levels.
INV: Item Form Uses Master Set of Folders in the Org Items Form
This profile option determines if the Organization Items window uses the same set of folders as the Master Items window. This profile option is updateable at the user level only. The available value are
| Yes | Uses the same set of folders as the Master Items window. |
| No | Stores a separate set of folders for the Organization Items window. |
Indicates which flexfield is used to define items in MTL_SYSTEM_ITEMS.
Inventory predefines a value of System Items for this profile option for all levels upon installation.
This profile option is updateable at all levels.
INV: Item Master Form Default Tab
This profile option enables you to choose the default folder that appears when you launch the master items window. If you do not set this attribute at the user level, the system derives the value from the responsibility and so forth. Available values are:
| Attributes | Displays the items attribute tab by default. |
| Folder | Displays the folder tab by default. |
This profile option is updateable at all levels.
This profile option determines whether material status is enforced. The available values are Yes and No. This profile option is updateable only at the site level. If your installation never uses material status, and you set this profile option to No, then system performance improves slightly.
INV: Max # of Txn Purge Processes
This is the maximum number of processes that will be purged. One worker will be started for each accounting period in the date range specified for the purge. However, if there are more accounting periods, than worked allowed by this profile option, then the number of workers will be determined by the ceiling of accounting periods to purge divided by this value. When more workers run in parallel, the purge process can be completed faster, but that also means more system resources are dedicated to purging transactions and thus are not available for other system activities. You would typically set this value to no more than 20, but may set it smaller based on your system resources.
INV: Maximum Number of Quantity Trees
Indicates the maximum number of memory data structures that will be used to capture on-hand quantity information.
Inventory predefines a value of 500 for this profile option upon installation.
This profile option is updateable at the Site level.
INV: MGD Maximum Number of Workers Permitted
This option is used for item attribute copy. This feature allows you to select a subset of an item's attributes to be mass copied to a number of items. The form submits a concurrent request. The profile option determines the maximum number of calls to item import that is processed to fulfill the copy request.
Approved or Incomplete indicates the status of requisitions created by the Minmax Planning Report.
Inventory predefines a value of Approved for this profile option for all levels upon installation. If you choose Incomplete, you can optionally load requisitions as unapproved and use the document approval functionality in Oracle Purchasing.
This profile option is updateable at all levels.
INV: Override Neg for Backflush
Indicates whether backflush transactions can drive the inventory negative even if the inventory organization parameter Allow Negative Balances is unchecked.
Inventory predefines a value of Yes for this profile option upon installation. A value of No does not allow backflush transactions to drive on-hand inventory negative even when the inventory organization parameter Allow Negative Balances is unchecked.
This profile option is updateable at all levels.
INV: Override Reservation for Transactions
Determines whether transactions processed through the transactions interface can override the existing reservations. To use this profile option, the organization must allow negative balances.
Note: This profile option is not intended for transaction sources such as sales orders, internal sales orders, and project/contract transfers.
When Oracle Inventory is installed, no default value is set for the profile option. To set the profile option, select the desired value of either Yes or No. This profile option can be set at the Site, Application, Responsibility, and User levels.
Determines the number of move order lines allocated during one commit cycle for replenishment move orders, and move order requisitions.
INV: Product Family Item Template
Indicates the template to be applied when you define a product family item.
Inventory predefines a value of Product Family for this profile option upon installation.
This profile option is updateable at all System Administrator levels.
INV: Project Miscellaneous Transaction Expenditure Type
Governs the entry of expenditure types for project miscellaneous transactions. Available values are:
| System Derived from Cost Elements | You cannot enter expenditure types for project miscellaneous transactions. The Cost Collector uses the expenditure types linked to the cost elements of the current weighted average unit cost of the item to post to Projects. |
| User Entered | You must enter expenditure types for project miscellaneous transactions. |
This profile option is updateable at all levels.
This profile option determines the purchasing interfaces tables that are populated with revision information from Oracle Inventory. If you set the profile option to Yes, the revision information passes to the purchasing interface tables whenever you create a requisition in Inventory for revision controlled items. If you set the profile option to No, it creates the requisition without revision control.
This profile option is updateable at the site level only.
INV: Quantity Tree Timeout for Lock
When an item is pick released the quantity tree for that item is locked so no other processes can allocate the same item. If the quantity tree is locked by a different pick release batch, pick release waits until the lock is released. This profile option determines how long the pick release process waits for the lock to be released. Once the time indicate is exceeded, the pick release batch errors out. This avoids deadlocks during the pick release process.
This profile option is updateable at the site level only.
INV: Replenishment Count Line Failure
Indicates the action taken when a failure is detected while processing a replenishment count line. Available values are:
| Continue processing | Other (successful) lines for the replenishment header are processed to requisition lines. |
| Halt processing | Do not process other (successful) lines for the replenishment header. |
Inventory predefines a value of Continue processing for this profile option for all levels upon installation.
This profile option is updateable at all levels.
INV: Replenishment Count Requisition Approval
Indicates the status of Subinventory Replenishment requisitions created by the replenishment processor. Available values are:
| Approved | Requisitions created by the replenishment processor are approved. |
| Unapproved | Requisitions created by the replenishment processor are not approved. |
Inventory predefines a value of Approved for this profile option for all levels upon installation. If you choose Unapproved, you can optionally load Subinventory Replenishment requisitions as unapproved and use the document approval functionality in Oracle Purchasing.
This profile option is updateable at all levels.
INV: Replenishment Move Order Grouping
This profile option enables you to create only one move order header per request, with each item having its own item. MinMax has been enhanced to permit the optional execution for all subinventories or for a group of subinventories. Available values are:
| Organization | The organization for which to run the report. |
| Destination Subinventory | The subinventory for which to run the report. |
INV: Restrict Receipt of Serials
Indicates whether the system performs two validation checks for serial numbers that Oracle Work in Process uses. This profile option also indicates if you can re-receive a serial number via an RMA receipt for an item with serial control set at sales order issue.
| Yes | You cannot receive a serialized component via purchase order receipt, miscellaneous receipt, or account alias receipt if you issued the same serial number to work in process. You cannot complete a serial number for a serialized end-assembly into inventory via a discrete job, repetitive schedule, flow schedule or work order-less completion if you issued the serial number out of stores. You cannot receive a serial number via an RMA for an item with serial control set at sales order issue. |
| No | No validations for serialized components and end-assemblies will be performed. You can receive a serial number via an RMA for an item with serial control set at sales order issue. |
This profile option is updateable at the Site and User levels.
Setting the profile at the User level enables you to track transactions made by a particular user. For example, if you found that a serial number had been re-used, you could review transactions by user profile to understand how the serial number was duplicated.
This profile option provides the min-max reporting process with rounding options for reorder quantity. INV_ROUND_REORDER_QUANTITY accepts either Yes or No as values. The default value is Yes which means the REORDER QUANTITY is rounding up. You need to set the value to No to round down.
Indicates the time in seconds the Item Supply / Demand form waits for a success message to be returned from a remote procedure call before it returns an error message. Use the Trx.Mngr. if processing is set to No. This timeout is also applicable for online transactions.
Inventory predefines a value of 300 at the site level for this profile option upon installation.
This profile option is updateable at all levels.
Indicates whether items returned by the Search Items window are saved on exit.
Inventory predefines a value of N for this profile option for all levels upon installation.
This profile option is updateable at all levels.
INV: Supplier Consigned Enabled
Use this profile option to determine whether the consigned inventory feature is present. This profile option is updateable only at site level.
Determines whether data for picking and reservations must be filtered to match the preferred grade that is defined on the order line. The available options are Yes and No. This profile option is updateable at all levels.
INV: Transaction Date Validation
This profile option controls the date that you can enter for the following transactions:
-
Sales order staging transfer
-
Move order issue
-
Move order subinventory transfer
-
Account receipt
-
Account alias issue
-
Account alias receipt
-
Internal order staging transfer
-
Cycle count adjustments
-
Physical inventory adjustment
-
Inventory subinventory transfer
-
Inventory direct organization transfer
-
Miscellaneous issue
-
Miscellaneous receipt
-
Project borrow
-
Project payback
-
Project transfer.
Available values are:
| Allow date in any open period | Allows entry of a past date if it is in an open period. |
| Do not allow past date | Does not allow entry of a date before the current date. |
| Do not allow date in past period | Allows entry of dates in the current period only. |
| Provide warning when date is in past period | Allows entry of dates in prior periods after a warning. |
Inventory predefines a value of Allow date in any open period for all levels upon installation.
Use the following table to identify which transaction types are controlled by the profile option INV: Transaction Date Validation:
| Transaction Type | Does the Profile Option INV: Transaction Date Validation Control This Transaction Type? |
|---|---|
| Purchase order receipt | No |
| Return to supplier from stores | No |
| Purchase order delivery adjustment | No |
| Sales order issue | No |
| Sales order staging transfer | Controls the transaction behavior. |
| Move order issue | Controls the transaction behavior. |
| Move order sub transfer | Controls the transaction behavior. |
| Account receipt | Controls the transaction behavior. |
| WIP assembly return | No |
| WIP cost update | No |
| WIP component issue | No |
| WIP component return | No |
| WIP assembly completion | No |
| WIP assembly scrap | No |
| Account alias issues | Controls the transaction behavior. |
| Account alias receipts | Controls the transaction behavior. |
| Internal requisition intransit receipt | No |
| Internal requisition delivery adjustment | No |
| Internal order issue | No |
| Internal order subinventory transfer | Controls the transaction behavior. |
| Internal order direct organization transfer | Controls the transaction behavior. |
| Creating an INTERNAL ORDER. | No |
| Internal order staging transfer | Controls the transaction behavior. |
| Cycle count adjustments | Controls the transaction behavior. |
| Physical inventory adjustment | Controls the transaction behavior. |
| Standard cost update | No |
| Receipt of customer return | No |
| Rejection of customer returns | No |
| Inventory subinventory transfer | Controls the transaction behavior. |
| Inventory direct organization transfer | Controls the transaction behavior. |
| Inventory intransit receipt | No |
| Inventory intransit shipment (if creating an Intrasit shipment through organization transfer) | Controls the transaction behavior. |
| Miscellaneous issue | Controls the transaction behavior. |
| Miscellaneous receipt | Controls the transaction behavior. |
| Inventory delivery adjustment | No |
| Update layer cost | No |
| Average cost update | No |
| WIP negative component issue | No |
| WIP negative component return | No |
| Interproject Borrow | Controls the transaction behavior. |
| Interproject Payback | Controls the transaction behavior. |
| Interproject Transfer | Controls the transaction behavior. |
The profile option is updateable at the site, application, and responsibility levels.
INV: Transaction Reasons Security
This profile option enables Transaction Reason Security. The available options are Yes and No. This profile option is updateable only at the site level.
This profile option controls whether the system enables you to change the customer item name after you save it. If you set the value to No prevents you from altering the customer item name after the initial save.
The default is No.
This profile option is updateable at all levels.
This profile option controls whether the system enables you to change the item name after you save it. Setting the value to No prevents you from altering the item name after the initial save.
Inventory predefines a value of No for this profile option for all levels upon installation.
This profile option is updateable at all levels.
This profile option improves performance during pick release by caching backordered items. Receipts that are performed during pick release will not be available for allocation. The available options are Yes and No. This profile option is updateable at all levels.
INV: Use Catalog Name in the Item Description
Indicates whether to use the catalog name or the catalog description as the first element of a concatenated item catalog description. Available values are:
| No | Catalog description |
| Yes | Catalog name |
Inventory predefines a value of No for this profile option for all levels upon installation.
This profile option is updateable only at the Site level.
INV: Use Model & Options for Configuration Pricing
This profile option determines the price for Model & Options or Configured Items. The available options are Yes and No. This profile option is updateable only at the site level.
This profile option determines whether a component lot that is returned from WIP should be validated against lots that are issued to the same job. The available options are Yes and No. This profile option is updateable only at site level.
This profile option determines whether component serials that are returned from WIP should be validated against serials that are issued to the same job. The available options are Yes and No. This profile option is updateable only at site level.
INV: View Item Category People
This profile option enables you to show only current organization employees in the People LOV of the Category Grants window. This profile is updateable at all levels. The available values are:
| All | All Employees listed in the system. |
| My Employees | Current organization employees. |
This profile option determines whether VMI is enabled.
The profile option is updateable at site level. You should update it manually only if the automatic changes fails to occur.
Multiple Serials Per Delivery Detail
This profile option determines the current patch level of Order Management on the instance. You cannot edit this profile option. It updates automatically when you apply a patch. Inventory uses this profile option to determine if serial numbers can be passed to Shipping in ranges or if they must be passed individually.
TP: INV Cycle Count Approvals form
Indicates processing control of cycle count approvals in the Cycle Count Approvals window. Available values are:
| Background processing | Upon commit, control returns immediately to you, allowing you to continue working. The cycle count transactions are executed on a periodic basis. Displays the concurrent request number representing the concurrent process executing the cycle count transactions. |
| On-line processing | Processes your cycle count transactions while you wait, and control is returned once transaction processing is completed. |
Inventory predefines a value of On-line processing for this profile option for all levels upon installation.
This profile option is updateable at all levels.
TP: INV Cycle Count Entries form
Indicates the processing control of cycle count entries in the Cycle Count Entries window. Available values are:
| Background processing | Upon commit, control returns immediately to you, allowing you to continue working. The cycle count transactions are executed on a periodic basis. Displays the concurrent request number representing the concurrent process executing the cycle count transactions. |
| On-line processing | Processes your cycle count transactions while you wait, and control is returned once transaction processing is completed. |
Inventory predefines a value of On-line processing for this profile option for all levels upon installation.
This profile option is updateable at all levels.
TP: INV Enter Replenishment Count form
Indicates processing control in the Enter Replenishment Count window. Available values are:
| Background processing | Upon commit, control returns immediately to you, allowing you to continue working. The replenishment count transactions are executed on a periodic basis. |
| Concurrent processing | Upon commit, Inventory spawns the concurrent process and returns control immediately to you, allowing you to continue working. Displays the concurrent request number representing the concurrent process executing the replenishment count transactions. |
Inventory predefines a value of Concurrent processing for this profile option for all levels upon installation.
This profile option is updateable at all levels.
TP: INV Inter-Organization Transfer form
Indicates the processing control of inter-organization transfers in the Inter-Organization Transfer window. Available values are:
| Background processing | Upon commit, control returns immediately to you, allowing you to continue working. The inter-organization transfer transactions are executed on a periodic basis. |
| Concurrent processing | Upon commit, Inventory spawns the concurrent process and returns control immediately to you, allowing you to continue working. Displays the concurrent request number representing the concurrent process executing the inter-organization transfer transactions. |
| On-line processing | Processes your inter-organization transfer transactions while you wait, and control is returned once transaction processing is completed. |
Inventory predefines a value of On-line processing for this profile option for all levels upon installation.
This profile option is updateable at all levels.
TP: INV Miscellaneous Issue and Receipt form
Indicates the processing control of miscellaneous issues and returns in the Miscellaneous Issue window. Available values are:
| Background processing | Upon commit, control returns immediately to you, allowing you to continue working. The miscellaneous issue and receipt transactions are executed on a periodic basis. |
| Concurrent processing | Upon commit, Inventory spawns the concurrent process and returns control immediately to you, allowing you to continue working. Displays the concurrent request number representing the concurrent process executing the miscellaneous issue and receipt transactions. |
| On-line processing | Processes your miscellaneous issue and receipt transactions while you wait, and control is returned once transaction processing is completed. |
Inventory predefines a value of On-line processing for this profile option for all levels upon installation.
This profile option is updateable at all levels.
| On-line processing | Processes your customer return transactions while you wait, and control is returned once transaction processing is completed. |
Inventory predefines a value of On-line processing for this profile option for all levels upon installation.
This profile option is updateable at all levels.
TP: INV Move Order Transact Form
Indicates the move order transaction mode. Available values are:
| Background processing | Upon commit, control returns immediately to you, allowing you to continue working. The move order transactions are executed on a periodic basis. |
| Concurrent processing | Upon commit, Inventory spawns the concurrent process and returns control immediately to you, allowing you to continue working. Displays the concurrent request number representing the concurrent process executing the move order transactions. |
| On-line processing | Processes your move order transactions while you wait, and control is returned once transaction processing is completed. |
Inventory predefines a value of On-line processing for this profile option for all levels upon installation.
This profile option is updateable at all levels.
TP: INV Transaction Processing Mode
Indicates the processing control for transacting items. Available values are:
| On-line processing | Processes transactions while you wait, and control is returned once transaction processing is completed. |
| Background processing | Upon commit, control returns immediately to you, allowing you to continue working. The transactions are executed on a periodic basis. |
| Immediate concurrent processing | Upon commit, Inventory spawns the concurrent process and returns control immediately to you, allowing you to continue working. Displays the concurrent request number of the concurrent process executing the transaction. |
| Form level processing | Processes transactions using the processing control option you choose for that particular type of transaction. You must also set the Inventory profile options for Inter-Organization Transfer, Miscellaneous Issue and Receipt, Receive Customer Return, Return to Customer, and Transfer Between Subinventories. If you are using Oracle Work-in-Process, you must set the WIP profile options Completion Material Processing, Completion Transaction Form, Material Transaction Form, Move Transaction, Operation Backflush Setup, and Shop Floor Processing. |
The value you choose for this profile option overrides values you set for individual transaction profiles unless you choose Form level processing.
Inventory predefines a value of Immediate concurrent processing for this profile option for all levels upon installation.
This profile option is updateable at all levels.
TP: INV Transfer Between Subinventories form
Indicates the processing control of transferring items between subinventories in the Subinventory Transfer window. Available values are:
| Background processing | Upon commit, control returns immediately to you, allowing you to continue working. The transfer between subinventories transactions are executed on a periodic basis. |
| Concurrent processing | Upon commit, Inventory spawns the concurrent process and returns control immediately to you, allowing you to continue working. Displays the concurrent request number representing the concurrent process executing the transfer between subinventories transactions. |
| On-line processing | Processes your transfer between subinventories transactions while you wait, and control is returned once transaction processing is completed. |
Inventory predefines a value of On-line processing for this profile option for all levels upon installation.
This profile option is updateable at all levels.
TP: INV Update Average Cost form
Indicates the processing control for updating average costs. Available values are:
| Background processing | Upon commit, control returns immediately to you, allowing you to continue working. The update average costs transactions are executed on a periodic basis. |
| Concurrent processing | Upon commit, Inventory spawns the concurrent process and returns control immediately to you, allowing you to continue working. Displays the concurrent request number representing the concurrent process executing the update average costs transactions. |
| On-line processing | Processes your update average costs transactions while you wait, and control is returned once transaction processing is completed. |
Inventory predefines a value of On-line processing for this profile option for all levels upon installation.
This profile option is updateable at all levels.
TP: Server Side Online Processing
Indicates whether Inventory and Work-in-Process transactions using on-line processing are processed on the server or client side.
Inventory predefines a value of Yes for this profile option for all levels upon installation.
This profile option is updateable at all levels.