Planning and Replenishment
This chapter covers the following topics:
- Overview of Inventory Planning and Replenishment
- Summarizing Demand History
- Requesting the Summarize Demand Histories Report
- Defining a Forecast Rule
- Generate a Forecast
- Order Modifiers
- Min-Max Planning
- Requesting the Min-Max Planning Report
- Entering and Reloading Item Safety Stocks
- Reorder Point Planning
- Requesting the Reorder Point Planning Report
- Overview of Kanban Replenishment
- Defining Kanban Pull Sequences
- Generating Kanban Cards
- Defining Kanban Cards
- Printing Kanban Cards
- Replenishing Kanban Cards
- Replenishment Counting
- Entering and Processing Replenishment Counts
- Purging Replenishment Counts
Overview of Inventory Planning and Replenishment
Oracle Inventory lets you manage your inventory levels using any combination of the system's planning and replenishment features, including min-max planning, reorder point planning, kanban replenishment, and a replenishment system for generating orders.
Inventory planning involves answering two questions:
-
When should you place a new order?
-
How much should you order?
Available Features
-
Plan any item by establishing minimum and maximum on-hand plus on-order quantity targets. See: Defining Items, Inventory Attribute Group, and Requesting the Min-Max Planning Report.
-
Plan any item using reorder points and safety stock levels. See: Requesting the Reorder Point Planning Report.
-
Calculate safety stock levels for reorder point planning. See: Entering and Reloading Item Safety Stocks.
-
Define non-tracked inventory locations and periodically enter replenishment counts. See: Entering and Processing Replenishment Counts.
-
Generate requisitions for any item requiring replenishment. See: Entering and Processing Replenishment Counts, Requesting the Min-Max Planning Report, Requesting the Reorder Point Planning Report, Overview of Kanban Replenishment.
-
Generate move orders for any item requiring replenishment. See: Overview of Move Orders.
-
Generate a job/schedule for any item requiring replenishment. See: Overview of Kanban Replenishment
-
Define kanban cards and pull sequences. See: Defining Kanban Cards and Defining Kanban Pull Sequences.
-
Summarize demand history for a specific inventory item. See: Summarizing Demand History and Requesting the Summarize Demand Histories Report.
-
Purge replenishment information including the count name, counting methods, and quantities. See: Purging Replenishment Counts.
Summarizing Demand History
You can summarize demand histories for all items, items within a category, or a specific item.
To specify the parameters by which demand history is summarized
-
Navigate to the Demand History Items window. The Find Demand History Items window appears.
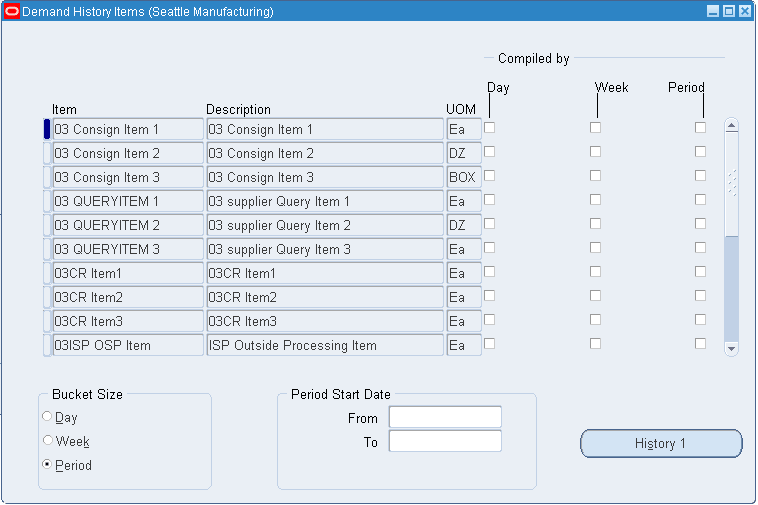
-
Enter search criteria to query the items for which you want to summarize demand. Choose Find to start the search and display the information in the Demand History Items window.
Note: If you do not enter search criteria, when you choose Find the search is made for all items.
-
Determine the bucket size for demand history summarization. If you want demand history by day and by week and by monthly period, you must compile each bucket type.
Day: Use workday periods. Compiles the transaction history back for the previous 260 daily periods.
Week: Use weekly periods. Compiles the transaction history for the previous 260 weekly periods.
Period: Use manufacturing calendar periods. Compiles transaction history for the previous 260 monthly periods. The type of period is determined by the organization calendar you defined in the Define Calendar form.
If Oracle Inventory finds that the bucket type has already been compiled, the process attempts to save processing time. Oracle Inventory checks to see if the accounting period has been closed, and does not recompile any transactions from a closed period. No new transactions can be entered in a closed period. Therefore, it is not necessary to recompile those transactions.
-
Optionally, enter period start and end dates. Either or both may be left blank.
To view demand history results
-
Select items for which to display history information.
-
Choose the History button. Results display in the Demand History window.
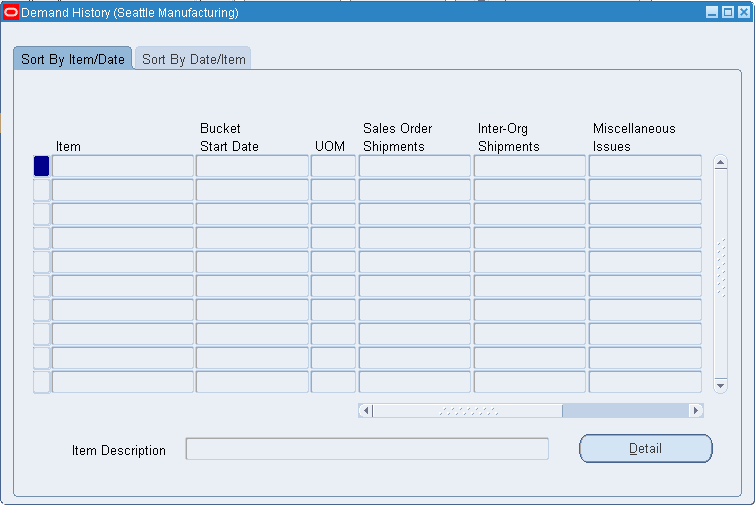
-
Use the tabbed regions to view the information sorted by item and then date or by date and then item.
-
Review information for the following:
-
sales order shipments
-
inter-organization shipments
-
miscellaneous issues
-
issues to WIP
-
total issues
-
-
To view transaction detail for a specific item
-
From the Demand History window select an item.
-
Choose the Detail button. See: Viewing Material Transactions.
Requesting the Summarize Demand Histories Report
You can print a report to view demand history information. The information in the report is the same information you see when you choose History on the Demand History Items window.
To launch the report to view demand history for items
-
Navigate to the Summarize Demand History or All Reports window.
-
Enter Summarize demand histories in the Name field. The Parameters window appears.
-
Choose a period type option:
Days: Use daily periods.
Weeks: Use weekly periods.
Periods: Use manufacturing calendar periods.
-
Select the scope of the summarization. You can summarize demand history for All inventory items, a Specific inventory item, or for items in a Specific category.
-
If you choose Specific inventory item, enter an item.
-
If you choose Specific category, enter a category set and category.
-
Choose submit to launch the process.
Related Topics
Submitting a Request, Oracle Applications User's Guide
Defining a Forecast Rule
You can define forecast rules to use when loading forecasts. Defining forecast rules includes choosing forecast source options, entering statistical forecast parameters, and entering and adjusting initial seasonality indices.
To define a forecast rule
-
Navigate to the Forecast Rules window.
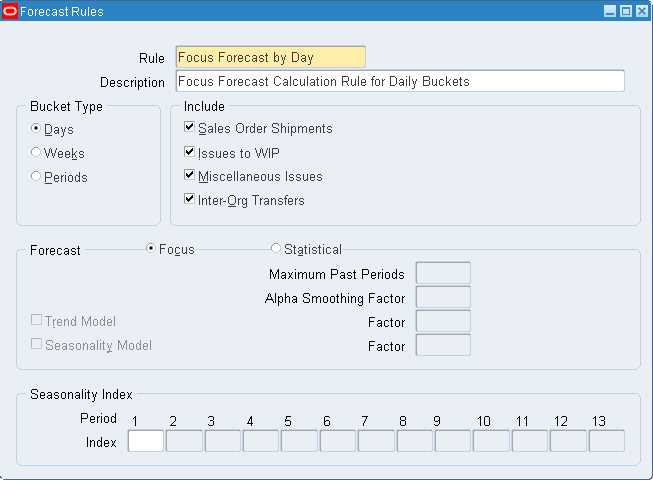
-
Enter a unique name for the rule.
-
Indicate whether the bucket type is days, weeks, or periods.
-
Determine the transaction types to use as demand sources. The quantities associated with each source are used when calculating historical usage:
Sales Order Shipments: Includes sales order issue quantities.
Issues to WIP: Includes WIP issue quantities.
Miscellaneous Issues: Includes quantities issued with user-defined transaction sources, account numbers, and account aliases.
Inter-Org Transfers: Includes quantities issued to other organizations.
-
Indicate the forecast method to use:
Focus: Uses focus forecasting algorithms to forecast demand for the item. This procedure tests the selected items against a number of forecasting techniques and chooses the best one, based on history, as the technique to forecast future demand.
Statistical: Uses exponential smoothing, trend, and seasonality algorithms to forecast demand for the item
If you choose statistical forecasting, continue with the following steps
-
Enter the maximum number of past periods upon which to base the forecast
-
Enter the factor by which to smooth demand for each successive period in the forecast. This levels demand throughout the forecast, reducing dramatic upward or downward fluctuations.
You can enter values from 0 to 1. Values closer to 0 give more weight to past demand; values closer to 1 give more weight to current demand.
-
Indicate whether to base the forecast on a trend model.
Turning this option on performs smoothing on the upward or downward trend in demand.
-
Enter the factor by which to smooth the trend change in demand from period to period. This produces a more linear rise or fall in demand from period to period over the course of the forecast.
You can enter values from 0 to 1. Values closer to 1 give more weight to recent changes and trends. Values closer to 0 give more weight to historical trend.
-
Indicate whether to base the forecast on a seasonality model.
Turning this option on bases the forecast on a seasonal adjustments you define for the forecast rule.
-
Enter the factor by which to smooth the seasonality indices you define by period for this forecast rule. This produces a more even pattern of seasonal demand from period to period over the course of the forecast.
You can enter values from 0 to 1. Values closer to 0 give more weight to past seasonal indices; values closer to 1 give more weight to current seasonal indices.
-
Enter an index that describes the seasonal influence on the period. For example, 2 indicates that you expect the forecast to double in that period because of seasonal factors.
-
Save your work.
-
You can delete a forecast rule if there are no references to it.
Generate a Forecast
To generate a focus or statistical forecast
-
Navigate to the Generate Forecast Window.
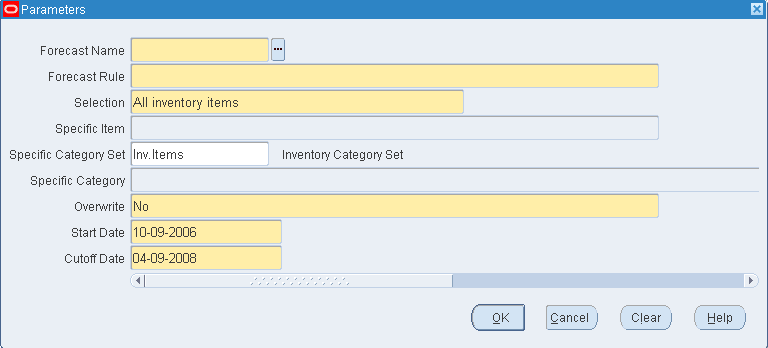
-
In the Parameters window, select a forecast name and forecast rule.
-
Pick a range of items to forecast for: all items, a specific item, a category, or all items in a category set.
-
Select an overwrite option:
-
All Entries: Deletes everything on the forecast before loading new information.
-
No: Deletes nothing and adds new entries to existing entries during the load. Schedule entries are not combined. You can get multiple forecast entries for the same item on the same day.
-
Same Source Only: Deletes the entries that have the same source as those you load. You can replace entries on the forecast that were previously loaded from the same source without affecting entries on the forecast.
-
-
Enter a star date and cutoff date.
-
Click OK.
-
Click Submit in the Generate Forecast window.
Order Modifiers
When you define an item or an item-subinventory relationship, you can specify attributes that modify your order quantities. You can use them to model supplier constraints that restrict the size of an order or mandate a specific lot size. You can specify minimum and maximum order quantities and fixed lot size modifiers. For replenishing subinventories, these same order modifiers can be set by item at the subinventory level.
If an order is smaller than the minimum order quantity, Inventory modifies the order upward to the minimum order quantity. Likewise, if the order is larger than the maximum order quantity, it modifies it downward to the maximum order quantity.
An order must be a multiple of the fixed lot size multiplier. If it is not, it is revised upward so that the order is such a multiple.
Related Topics
General Planning Attribute Group
Min-Max Planning
You can use min-max planning to maintain inventory levels for all of your items or selected items. With min-max planning, you specify minimum and maximum inventory levels for your items. When the inventory level for an item (on-hand quantities plus quantities on order) drops below the minimum, Oracle Inventory suggests a new purchase requisition, internal requisition, move order, or job to bring the balance back up to the maximum. The Min-Max planning report does not initiate the Requisition Import process. The system writes requisition information into the Requisition Interface table, but you must run the Requisition Import report to create requisitions.
Oracle Inventory performs min-max planning for your items at either the organization level or the subinventory level. When you min-max plan at the organization level, you can optionally include the following transactions as demand in the min-max planning calculation: unreserved sales orders, reserved sales orders, account issue move orders, and work in process component requirements. Purchase requisitions and internal requisitions for buy items and WIP unreleased jobs for make items for the suggested replenishment quantities can be optionally created. You can then turn these requisitions into purchase orders or internal orders and the unreleased jobs into jobs for the required items.
Note: The INV: Purchasing by Revision profile option controls whether item revisions can be specified on purchase requisitions generated by min-max planning (purchasing by revision can be used for both non-revision controlled items and revision-controlled items). Item revisions may be defined and used when purchasing material, although the item may not be revision controlled in inventory. The latest revision will default onto the purchase requisition.
When you min-max plan at the subinventory level, you can optionally include only unreserved sales orders, reserved sales orders, account issue move orders, and subinventory transfer move orders as demand in the min-max planning calculation. Purchase requisitions, internal requisitions, or pre-approved move orders for the suggested replenishment quantities can be optionally created. You can then turn requisitions into purchase orders or internal orders for the required items. See: Overview of Move Orders.
Note: Subinventory level planning cannot generate jobs and does not consider WIP jobs as supply or WIP components as demand.
Organization Level Min-Max Planning
When you min-max plan at the organization level, Oracle Inventory looks at inventory balances, purchase requisitions, internal requisitions, internal sales orders, process batches, and WIP jobs as supply. It looks at sales orders, WIP job component requirements, process batches, and account issue move orders as demand.
To use min-max planning at the organization level, you must set the item attributes used by min-max planning. You can start by setting the Inventory Planning Method item attribute to Min-max planning. You establish your minimum and maximum levels used in the calculation using the Min-Max Minimum Quantity and the Min-Max Maximum Quantity item attributes. You can optionally set the order quantity modifier item attributes (Minimum Order Quantity, Maximum Order Quantity, and Fixed Lot Size Multiplier) to further control the suggested order quantities generated by min-max planning. Set the Make or Buy flag to Make to optionally generate unreleased jobs and to Buy to optionally generate requisitions. For buy items, set the List Price for the item to automatically generate requisitions. See: General Planning Attribute Group.
For repetitive items, since you cannot generate repetitive plans, you have the option of generating requisitions, unplanned jobs, or a report only.
Min-max planning is performed by running the Min-max planning report. By selecting organization level planning, you run min-max planning for your organization. In addition to the planning level option, Oracle Inventory offers the options to Net Reserved Orders, Net Unreserved Orders, Net WIP Demand, and Include Non-nettable Inventory Quantities when calculating availability. You also specify a Demand Cutoff Date and a Supply Cutoff Date. If you choose No to all the net demand options, Oracle Inventory performs the following calculation:
-
Nettable Quantity on Hand + On Order = Total Available, in which:
-
Nettable Quantity on Hand is the sum of the quantities on hand for the item across all the nettable subinventories within your organization. Non-nettable quantities may optionally be included.
-
On Order is the sum of open purchase orders, purchase requisitions, internal requisitions, internal orders, and work in process jobs scheduled for receipt on or before the supply cutoff date.
-
-
If Total Available < Minimum Quantity, suggest a new order, in which:
-
Minimum Quantity is the value for the Min-Max Minimum Quantity item attribute.
-
-
Order Quantity = Maximum Quantity - Total Available, adjusted for order quantity modifiers:
-
Oracle Inventory revises the order quantity if necessary for the quantity to be a multiple of the fixed lot size multiplier.
-
The order quantity must be greater than or equal to the minimum quantity, or Oracle Inventory revises the quantity upward to the minimum.
If you choose Yes to any of the net demand options, Oracle Inventory performs the following calculation:
-
-
Nettable Quantity on Hand + On Order - Open Demand = Total Available, in which
-
Nettable Quantity on Hand is the sum of the quantities on hand for the item across all the nettable subinventories within your organization. Non-nettable quantities may optionally be included.
-
On Order is the sum of open purchase orders, requisitions, internal orders, and work in process jobs scheduled for receipt on or before the supply cutoff date.
-
Open Demand is the sum of unreserved sales orders, inventory reservations, including reserved sales orders, account issue move orders, and WIP component demand scheduled for issue on or before the demand cutoff date.
-
-
If Total Available < Minimum Quantity, suggest a new order, in which
-
Minimum Quantity is the value for the Min-Max Minimum Quantity item attribute.
-
-
Order Quantity = Maximum Quantity - Total Available, adjusted for order quantity modifiers:
-
Oracle Inventory revises the order quantity if necessary for the quantity to be a multiple of the fixed lot size multiplier.
-
The order quantity must be greater than or equal to the minimum quantity, or Oracle Inventory revises the quantity upward to the minimum.
-
The order quantity must be less than or equal to the maximum quantity, or Oracle Inventory revises the quantity down to the maximum.
When you run the Min-Max Planning report, you can have Oracle Inventory create requisitions for buy items and unreleased jobs for make items by answering Yes to Restock. You must also specify a location to serve as the default deliver to location on the requisitions. Oracle Inventory creates purchase requisitions for Buy items when the item attribute Replenishment Source Type is set to Supplier. Oracle Inventory creates internal requisitions for internal sales orders for Buy items when the item attribute Replenishment Source Type is set to Inventory. For internal requisitions, Oracle Inventory uses the item attribute Source Organization to determine the organization from which the internal requisition sources the item. For Repetitive Items you optionally create requisitions or unreleased jobs. See: Min-max planning report.
-
The following example shows you how Oracle Inventory performs min-max planning. Assume an item has the following quantity values and item attribute settings:
-
Nettable quantity on hand = 25
-
Open supply quantity = 50
-
Open reserved sales order quantity = 90
-
Inventory planning method = Min-max planning
-
Min-max minimum quantity = 100
-
Min-max maximum quantity = 500
If you run the Min-max planning report, and specify No to Net Reserved Orders, Oracle Inventory performs the following calculations:
-
Total Available: 25 + 50 = 75
-
We assume that all the supply is within the supply cutoff date, for a supply total of 50.
-
Total available quantity is 75.
-
-
Below min check: 75 < 100
-
The total available quantity is less than the min-max minimum quantity, so Oracle Inventory plans a new order.
-
-
Max quantity less total available: 500 - 75 = 425
-
To bring the quantity available back to the min-max maximum, Oracle Inventory will plan an order for 425.
If you run the Min-max planning report, and specify Yes to Net Reserved Orders, Oracle Inventory performs the following calculations:
-
-
Total Available: (25 + 50) - 90 = (-15)
-
We assume that all the supply is within the supply cutoff date, for a supply total of 50.
-
We assume that all the demand is within the demand cutoff date, so open reserved orders total to 90.
-
Total available quantity is (-15).
-
-
Below min check: (-15) < 100
-
The total available quantity is less than the min-max minimum quantity, so Oracle Inventory plans a new order.
-
-
Max quantity less total available: 500 - (-15) = 515
-
To bring the quantity available back to the min-max maximum, Oracle Inventory will plan an order for 515.
Note: To include inventory reservations from an external order management system in the min-max calculation, create the sales order in the MTL_SALES_ORDER table using the Sales Order API, and then load the reservation using the Create/Update/Delete reservation interface or the Reservation APIs.
-
Work Orders and Oracle Shop Floor Management
In Oracle Inventory, you can run the Min-max planning report at the Organization level to create work orders for Oracle Shop Floor Management (OSFM). When the Min-max report is run at the Organization level (and the network routing is present for the item and the OSFM version is 11510 or later), then the following actions occur:
-
For lot-controlled items, the lot-based jobs are created in the OSFM interface table and then processed into the job by a OSFM user.
-
For non lot-controlled items, discrete job details are inserted into the Oracle Work in Process (WIP) interface table and then processed into the job by the WIP mass load process.
Note: If neither of the preceding situations apply, then the job details are inserted into the WIP interface table and then processed into the job by the WIP mass load program.
Subinventory Level Min-Max Planning
When you min-max plan at the subinventory level, Oracle Inventory looks at inventory balances, purchase requisitions, internal requisitions, VMI stock and move orders as supply. In addition, rather than using item attribute planning modifiers, Oracle Inventory uses values and parameters set at the item/subinventory level.
To perform min-max planning at the subinventory level, you establish the following values at the subinventory level using either the Subinventory Items or the Item Subinventories windows:
-
Min-max minimum quantity
-
Min-max maximum quantity
-
Planning method set to Min-max planning
-
Fixed lot multiple (optional)
-
Maximum order quantity
-
Minimum order quantity
-
Item sourcing details
-
Sourcing type (supplier or inventory)
-
Sourcing organization (if type is inventory)
-
Sourcing subinventory (if type is subinventory or inventory) (optional for Inventory source type)
-
-
Lead times (optional)
Min-max planning is performed by running the Min-max planning report. By selecting the subinventory level planning and specifying a subinventory, you run min-max planning for a single subinventory only. In addition to the planning level option (organization or subinventory), Oracle Inventory offers the option to Net Reserved Demand and to Net Unreserved Demand when calculating availability. You also specify a Demand Cutoff Date and a Supply Cutoff Date. If you choose No to the Net Demand options, Inventory performs the following calculation:
-
Quantity on Hand + On Order = Total Available, in which:
-
Quantity on Hand is the quantity in the subinventory you specified in the Min-max planning report.
-
On Order is the sum of open purchase orders, purchase requisitions, internal requisitions, internal sales orders, and subinventory transfer move orders scheduled for receipt to the specified subinventory on or before the supply cutoff date. Note that supply orders referencing a different subinventory, or with no subinventory specified, are not included.
-
-
If Total Available < Minimum Quantity, suggest a new order, in which:
-
Minimum Quantity is the value for the Min-Max Minimum Quantity set at the item/subinventory level.
-
-
Order Quantity = Maximum Quantity - Total Available, adjusted for item/subinventory order quantity modifiers:
-
Oracle Inventory revises the order quantity if necessary for the quantity to be a multiple of the fixed lot size multiplier.
-
The order quantity must be greater than or equal to the minimum quantity, or Oracle Inventory revises the quantity upward to the minimum.
-
The order quantity must be less than or equal to the maximum quantity, or Oracle Inventory revises the quantity down to the maximum.
If you choose Yes to the Net Reserved Demand and/or the Net Unreserved Demand option, Oracle Inventory performs the following calculation:
-
-
Quantity on Hand + On Order - Open Demand = Total Available, where
-
Quantity on Hand is the quantity in the subinventory specified in the Min-max planning report.
-
On Order is the sum of open purchase orders, purchase requisitions, internal requisitions, internal sales orders, and subinventory transfer move orders scheduled for receipt to the specified subinventory on or before the supply cutoff date. Note that supply orders referencing a different subinventory, or with no subinventory specified, are not included.
-
Open Demand is the sum of inventory reservations (including reserved sales orders), account issue move orders, and subinventory transfer move orders scheduled to ship from this subinventory on or before the demand cutoff date. Note that inventory reservations referencing a different subinventory, or with no subinventory specified, are not included
-
-
If Total Available < Minimum Quantity, suggest a new order, where:
-
Minimum Quantity is the value for the Min-Max Minimum Quantity specified at the item/subinventory level.
-
-
Order Quantity = Maximum Quantity - Total Available, adjusted for order quantity modifiers specified at the item/subinventory level:
-
Oracle Inventory revises the order quantity if necessary for the quantity to be a multiple of the fixed lot size multiplier.
-
The order quantity must be greater than or equal to the minimum quantity, or Oracle Inventory revises the quantity upward to the minimum.
-
The order quantity must be less than or equal to the maximum quantity, or Oracle Inventory revises the quantity down to the maximum.
When you run the Min-max report, you can have Oracle Inventory create requisitions or move orders by answering Yes to Restock. You must also specify a location to serve as the deliver to location on the requisitions. If you set the Sourcing Details type to Supplier, the Min-Max report populates the Req Interface tables, and you must run the Req Import program to import the orders into purchasing. Inventory creates internal requisitions for internal sales orders for items with the item/ subinventory Sourcing Details Type set to Inventory. Oracle Inventory creates pre-approved move orders for items with the item/subinventory Sourcing Details Type set to Subinventory. For move orders, Inventory uses the item/subinventory Sourcing Details Subinventory to determine the subinventory from which the move order sources the item. For internal order requisitions, Inventory uses the item/ subinventory Sourcing Details Organization to determine the organization from which the internal requisition sources the item. See: Requesting the Min-Max Planning Report.
-
The following example shows you how Oracle Inventory performs min-max planning. Assume an item has the following quantity values and item attribute settings:
-
Quantity on hand for specified subinventory = 25
-
Open supply quantity for specified subinventory = 50
-
Open sales order quantity placed against specified subinventory= 90
-
Inventory planning method at item/subinventory level = Min-max planning
-
Min-max minimum quantity specified at the subinventory level = 100
-
Min-max maximum quantity specified at the subinventory level = 500
If you run the min-max planning report, and specify No to the Net Demand options, Inventory performs the following calculations:
-
Total Available: 25 + 50 = 75
-
The quantity on hand for the specified subinventory is 25.
-
We assume that all the supply is within the supply cutoff date, and is destined for our specified subinventory, for a supply total of 50.
-
Total available quantity is 75.
-
-
Below min check: 75 < 100
-
The total available quantity is less than the min-max minimum quantity, so Oracle Inventory plans a new order.
-
-
Max quantity less total available: 500 - 75 = 425
-
To bring the quantity available back to the min-max maximum, Oracle Inventory will plan an order for 425.
If you run the min-max planning report, and specify Yes to the Net Demand option, Oracle Inventory performs the following calculations:
-
-
Total Available: (25 + 50) - 90 = (-15)
-
The quantity on hand for the specified subinventory is 25.
-
We assume that all the supply is within the supply cutoff date, and is destined for our specified subinventory, for a supply total of 50.
-
We assume that all the demand is within the demand cutoff date, and the sales orders are against our specified subinventory, so open sales orders total to 90.
-
Total available quantity is (-15)
-
-
Below min check: (-15) < 100
-
The total available quantity is less than the min-max minimum quantity, so Oracle Inventory plans a new order.
-
-
Max quantity less total available: 500 - (-15) = 515
-
To bring the quantity available back to the min-max maximum, Oracle Inventory will plan an order for 515.
Note: To include unreserved sales orders from an external order management system in the min-max planning calculation, modify the definition of MTL_DEMAND_OM_VIEW to include the sales order line table from the external system.
Note: To include inventory reservations from an external order management system in the min-max calculation, create the sales order in the MTL_SALES_ORDER table using the sales order API, and then load the reservation using the Create/Update/Delete reservation interface or the Reservation APIs.
-
Related Topics
Assigning Subinventories to an Item
Assigning Items to a Subinventory
Requesting the Min-Max Planning Report
Requesting the Min-Max Planning Report
To request a min-max planning report you define parameters for min-max planning calculation, choose the sorting criterion for the report, and choose whether to create internal requisitions.
The INV:Minmax Reorder Approval profile option governs the approval status of internal requisitions created by the Min-Max Planning Report. (Move Orders are automatically approved.) See: Oracle Inventory Profile Options.
Use the Min-Max Planning Report to show planning information for all items, or items with on-hand balances either below or above their assigned minimum or maximum on-hand quantities. You also have the option to generate internal or purchase requisitions for Buy items and WIP unreleased jobs for Make items for all items for which the on-hand quantity plus the on-order quantity is less than the min-max minimum amount.
Note: Use the Item/Subinventory Information and Subinventory/Item windows to specify subinventory level min-max planning details. See: Assigning Subinventories to an Item and Assigning Items to a Subinventory.
You can define a default item source at the organization, subinventory, or item levels. Oracle Inventory uses the information from the lowest level to determine the source from which to requisition the item. The ascending hierarchy is: 1) Item in a subinventory, 2) Source in a subinventory, 3) Item in an organization, 4) Source in an organization.
To request the min-max planning report
-
Navigate to the Min-Max Planning window.
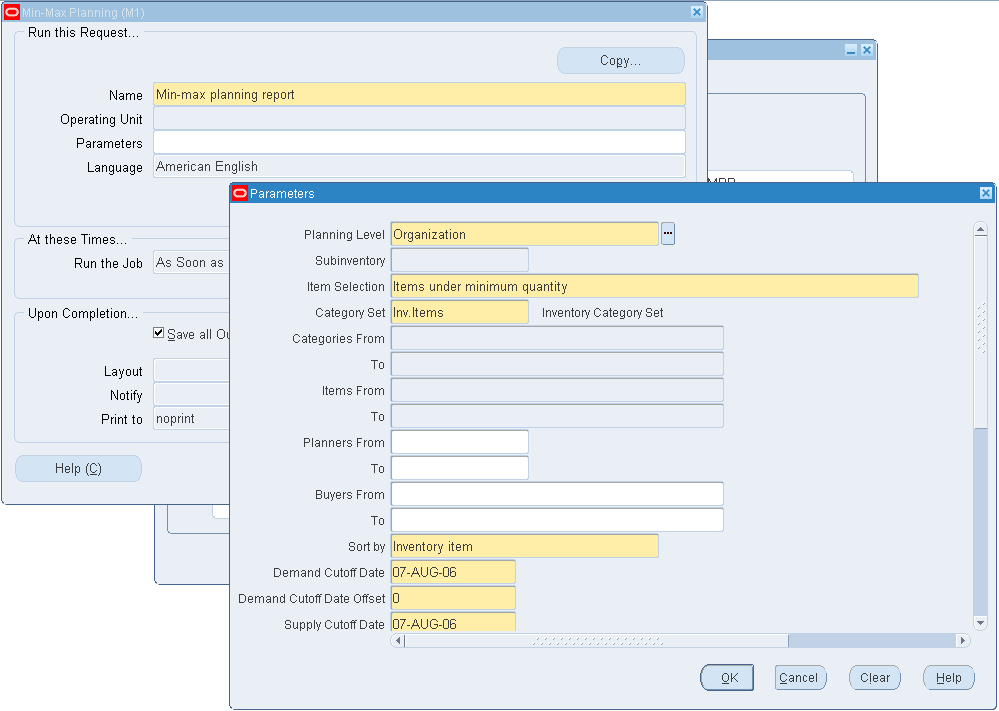
-
Enter Request in the Type field.
-
Enter Min-max planning report in the Name field.
-
Navigate to the Parameters field. The Parameters window appears.
-
Indicate whether the planning level is set for the entire organization or a specific subinventory. At the subinventory level, the report cannot generate jobs and does not consider WIP jobs as supply or WIP components as demand. If you select Subinventory, enter the name of the subinventory.
If you choose subinventory, as the planning level, the report includes VMI stock. If you choose organization as the planning level, the report does not include VMI stock.
-
Indicate the type of item to include on the report. You can report on items under the minimum quantity, items over the maximum quantity, or all min-max planned items.
-
Enter the category set for the report.
-
You can optionally restrict the report to a range of categories, item, planners, or buyers.
-
Enter the sorting criterion for the report. You can choose to sort by inventory item, category, planner, or buyer. If you choose Category, enter the category set.
-
Enter the demand cutoff date and, optionally, the demand cutoff date offset. The report includes demand on or before this date. If you do not check Net Demand this calculation is for display purposes only.
-
Enter the supply cutoff date and, optionally the supply cutoff date offset. The calculation includes open supply orders on or before this date.
-
Enter Yes or No to indicate whether to restock. If you have set the Planning Level to Organization, the report generates requisitions or jobs according to the item's Make/Buy flag. If you have set the Planning Level to Subinventory, the report generates only requisitions.
-
If you are using the Organization Planning Level, choose one of the following For Repetitive Item options: Create Requisitions for items under minimum quantity, Create Discrete Jobs for items under minimum quantity or run the Report Only without creating jobs or requisitions.
-
Enter the default delivery location.
-
Indicate whether to net reserved and unreserved orders.
-
Indicate whether to Net WIP Demand in the available quantity calculation. Net demand is the unshipped sales quantity for the selected organization or subinventory. You cannot set this to Yes if you are using subinventory level planning.
-
Indicate whether to include PO, WIP, and Interface supply and non-nettable subinventories.
-
Choose one of the following Display Format options: Display All Information, Don't Display Supply/Demand Details (The report does not display the Minimum Order Quantity, Maximum Order Quantity, and Multiple Order Quantity columns.), or Don't Display Order Constraints (The report does not display the On Hand Quantity column).
-
Indicate whether to to Display Item Information.
-
Choose the Submit button to launch the report.
Related Topics
Submitting a Request, Oracle Applications User's Guide.
Entering and Reloading Item Safety Stocks
Oracle Inventory uses item safety stocks in the reorder point planning process. Safety stock is a floor or base level of inventory from which Oracle Inventory performs all planning. In other words, the item is planned as if the safety stock quantity for the period is the zero inventory balance of the item. This ensures that the safety stock quantity remains in inventory to cover any fluctuations in demand.
In businesses such as aerospace and defense manufacturing, or construction, it is normal to segrate supplies and demands by inventory ownership. Safety stock definition in such environments can be project specific.
You can enter your own safety stock quantities or let Oracle Inventory calculate them based on an existing forecast for the item.
To define your own safety stock quantities or modify quantities Oracle Inventory generated for you
-
Navigate to the Enter Item Safety Stocks window. The Find Item Safety Stocks window appears.
-
Choose New to display the Enter Item Safety Stocks window. The Safety Stock Method field displays User-defined quantity.
-
Enter the inventory item for safety stock specification. You can use the Find window to locate items by effective date, forecast, category set, and category.
Optionally, you can enter a default item. This is useful if you are entering multiple safety stock values and effective dates for the same item. See: .
-
Enter the Project if applicable.
You can enter a project only if the organization is classified as a project manufacturing organization. The list of projects includes only those that have been enabled in Project Parameters for that organization. See Defining a Project, Oracle Project Manufacturing User's Guide.
-
Enter the Task if applicable.
If you want to maintain the safety stock at the task level, you must define the task and associate it with the project you selected in the previous step. See Project Manufacturing Parameters, Oracle Project Manufacturing User's Guide.
-
Enter a safety stock effective date.
-
Enter the safety stock quantity.
To have Oracle Inventory calculate safety stock based on an existing forecast for the item
-
Navigate to the Safety Stock Update window or choose Reload from the Tools menu in the Enter Item Safety Stocks window.
-
The Parameters window opens automatically. In the Selection field determine whether to reload safety stock for all inventory items, a specific inventory item, or items in a specific category.
-
If you choose Specific inventory item in the Selection field, enter the item.
-
Select the method for loading the safety stock:
Mean absolute deviation (MAD): Calculates demand using the mean-absolute deviation method. You must enter the service level percentage and forecast information.
User-defined percentage: Calculates safety stock based on a user-defined percentage of a demand in specified forecast.
-
Enter the forecast to use in the safety stock calculation.
-
Optionally, enter the category set and category of items for safety stock specification.
-
If you chose User-defined percentage in the Method field, enter the safety stock percentage of demand.
-
If you chose Mean absolute deviation (MAD) in the Method field, enter the service level percentage. This is the desired level of customer service in satisfying the product demand immediately out of inventory. The higher this value is, the more safety stock quantity should be carried to provide protection against irregularities or uncertainties in the demand or the supply of an item.
Enter a value between 50 and 100 as the service level. This represents the probability that you can fill an order from available inventory. A 90% service level means that on average you can fill an order immediately 90% of the time.
-
Enter the starting date on or after which the existing safety stock quantities are replaced by the results from the safety stock calculation.
-
When all parameter information is complete choose the Submit button to launch the process.
Related Topics
Submitting a Request, Oracle Applications User's Guide.
Searching for Information, Oracle Applications User's Guide
Reorder Point Planning
Reorder point planning uses demand forecasts to decide when to order a new quantity to avoid dipping into safety stock. Reorder point planning suggests a new order for an item when the available quantity-on-hand quantity plus planned receipts drops below the item's safety stock level plus forecast demand for the item during its replenishment lead time. The suggested order quantity is an economic order quantity that minimizes the total cost of ordering and carrying inventory. Oracle Inventory can automatically generate requisitions to inform your purchasing department that a replenishment order is required to supply your organization.
Order lead time is the total of the item's processing, preprocessing, and postprocessing lead times.
If the forecast is correct and the order arrives on time, the inventory level should be right at the safety stock level at the time of receipt. In cases where the desired safety stock level changes during the order lead time, Oracle Inventory uses the largest safety stock quantity during the lead time.
When an order is triggered, the economic order quantity is the size of the triggered order. Economic order quantity (EOQ) is a fixed order quantity calculated to minimize the combined costs of acquiring and carrying inventory. The formula for EOQ is:
The EOQ increases as demand increases, since the cost of carrying a larger order is smaller because the inventory is not carried as long. EOQ also increases when the cost of preparing an order increases. This is to avoid making too many orders and thus incurring this cost more often than necessary. On the other hand, the more it costs to carry inventory, the smaller the EOQ since it costs more to carry the excess inventory.
Oracle Inventory calculates annual demand as the current demand rate annualized by multiplying the current period demand forecast by the number of periods per year (12 or 13).
Safety Stock Levels
Oracle Inventory can help calculate the safety stock levels required by reorder point planning by providing the following two methods:
-
percentage of forecast demand
-
mean absolute deviation
You can always enter your own safety stock quantities if you have your own method. Or, if you have Oracle Master Scheduling/MRP and Oracle Supply Chain Planning installed, you can use it to calculate your safety stocks levels. See: Entering and Reloading Item Safety Stocks.
Safety Stock as a Percentage of Forecast Demand
To calculate safety stock as a percentage of forecast demand, enter a forecast name and safety stock percent. Oracle Inventory calculates the safety stock quantity for each forecasting time bucket by multiplying the two. For instance, if the forecast demand for a particular period is 120 units and you specify a 10% safety stock buffer, the safety stock level is set at 120 ? 10% = 12 units.
Safety Stock Using Mean Absolute Deviation and Service Level
If there is sufficient demand and forecast history available, you can use the mean absolute deviation method. This method compares the forecast to actual demand to determine forecast accuracy and, therefore, how much safety stock is required to prevent stock-outs. If the forecast has been very accurate in the past, only a small safety stock is required. The formula for safety stock using this method is:
MAD is the mean absolute deviation of the historic forecasts from the actual demand. Z is the number from the normal distribution probabilities corresponding to the service level specified by the user.
Planning Levels
You perform reorder point planning at the organization level. You place an item under reorder point planning by specifying the inventory planning method (located in the General Planning attribute group in the Items window) as Reorder point planning when you define the item. You can also specify the item's processing, preprocessing, and postprocessing lead times, order cost, and carrying cost percent in this form. See: General Planning Attribute Group.
Likewise, item safety stock levels may only be made at the organization level. Oracle Inventory only calculates safety stock levels for non-MRP safety stock planned items. If you specified a safety stock percent when defining the item, this value is used as a default when calculating safety stock as a percentage of forecast demand. See: Entering and Reloading Item Safety Stocks.
Reorder Point Planning Report
To run reorder point planning, use the Reorder Point Planning Report. One of the options when you run this report is to create requisitions. If you request this option, Oracle Inventory runs the report and places requisitions for items requiring replenishment. See: Requesting the Reorder Point Planning Report.
Requesting the Reorder Point Planning Report
To request a reorder point planning report, you define selection parameters for the items to include on the report. Reorder point planning triggers a new order when the available quantity drops below the item's safety stock level plus forecast demand during lead time. When you run the reorder point planning report you can have Oracle Inventory create either internal or purchase requisitions for these orders, depending on the sourcing options.
To request the reorder point planning report
-
Navigate to the Reorder Point Planning window.
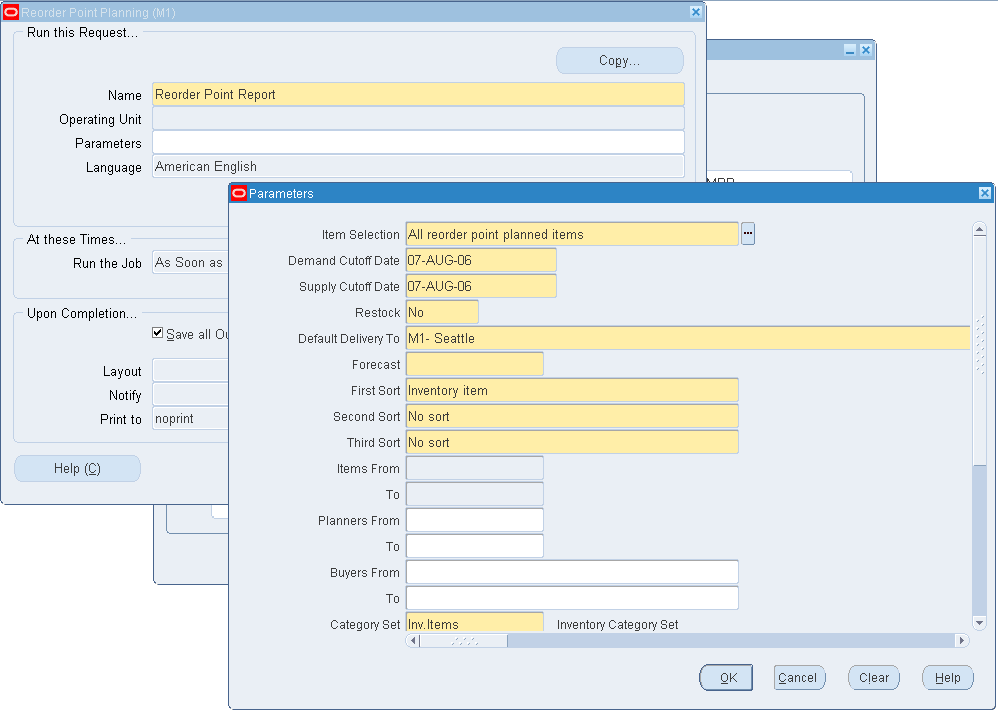
-
Enter Reorder Point Report in the Name field.
Enter report parameters
-
Indicate whether to report all items that are identified as reorder point planned or only items with on-hand balances and on-order balances that fall below their reorder point. Displaying all reorder point planned items (regardless of their balances) enables you to see where item balances are in relation to the specified order point.
-
Enter the demand cutoff date. The report includes demand on or before this date.
-
Enter the supply cutoff date. The calculation includes open supply orders with expected receipt dates on or before this date.
-
Enter Yes or No to indicate whether to restock. If you have set the Planning Level to Organization, the report generates requisitions or jobs according to the item's Make/Buy flag.
Note: Oracle Shop Floor Management work orders: When restock is selected and the Reorder Point Report is run, you can create work orders for Oracle Shop Floor Management.
If you have set the Planning Level to Subinventory, the report generates only requisitions.
-
Indicate the delivery location to appear on the requisition, if different then current organization, in the Default Delivery Location To field.
-
Enter the forecast designator. Oracle Inventory uses this forecast to determine the demand to be used in the reorder point calculation.
-
Enter the sorting criterion for the report. You can choose to sort by inventory item, category, planner, or buyer. If you choose Category, enter the category set from which Oracle Inventory chooses items for the report.
-
Indicate whether to prepare a full or partial report. If you choose Partial, specify the range of items, categories, planners, or buyers you want to include.
-
Click the OK button to launch the report.
Overview of Kanban Replenishment
Kanban is a means of supporting pull-based replenishment in manufacturing systems. A Kanban system is a self-regulating pull system that leads to shorter lead times and reduced inventory. Kanban systems are typically applied to items that have relatively constant demand and medium-to-high production volume.
Kanbans represent replenishment signals that are usually manual and highly visible, such as a color-coded card that moves with the material, a light that goes on when replenishment is required, or an empty bin that is moved to the supply location to trigger replenishment.
The system includes an API that can be called by external systems, such as bar code readers, to trigger replenishment signals.
Kanbans can be replenished from an external supplier or an internal organization. The four types of kanbans available in the system trigger transactions that pull material from different replenishment sources.
| Inter Org | Creates internal requisitions |
| Intra Org | Triggers material movement from a subinventory in the same organization |
| Production | Creates or releases a production job (discrete job, repetitive schedule, or flow schedule) |
| Supplier | Creates a purchase requisition |
Kanbans are generally replenishable and cycle through the system from full to empty, remaining active until they are withdrawn. One-time signals, called non-replenishable kanbans, are used primarily to manage sudden spikes in demand.
Major Features
Pull Sequences
A pull sequence is a group of information that defines a kanban location, source information, and planning parameters for an item. In order to replenish an item using kanbans, you must define a pull sequence for each item. An item can have multiple pull sequences that make up a replenishment chain. Pull sequences are used to calculate the number or quantity in each kanban container at that location. A kanban location can be a subinventory or an inventory locator. The replenishment source for a kanban location can be another kanban location, a production line, or an external source (either another organization or an outside supplier).
You can define kanban pull sequences using inventory locators to represent kanban locations, compute kanban quantities by locator, and then track by subinventory in order to reduce the number of inventory transactions. See: Defining Kanban Pull Sequences
Pull Sequence Terms
| Planning Only | Choose Planning Only if you want the program to perform the kanban calculations for you, but you will use a manual system to execute the kanbans. You will be able to calculate kanban sizes but will not be able to generate and print kanban cards or execute the replenishment cycle. |
| Kanban Size and Number of Kanban Cards | You will choose what you want the program to calculate: kanban size or kanban cards. The product of kanban size and number of kanban cards (or containers) will satisfy the demand at capacity for the planning horizon. Kanban size refers to the number of items in each kanban container. Each kanban container has one kanban card, so the number of kanban cards is the same as the number of kanbans for each item. |
| Enter Minimum Order Quantity (Optional) | Minimum Order Quantity represents the minimum number of units per kanban container. It is used when calculating kanban size or during the kanban execution process to aggregate kanbans smaller than the minimum order quantity. This field defaults from the Item Master window but can also be overridden. |
| Replenishment Lead Time | The Replenishment Lead Time must be expressed in days. This is how long it will take to physically replenish the kanban. For example, if you enter two days, the Kanban Planner will size the kanban to two times the average daily demand. If you leave the field blank, the program will assume replenishment is one day when calculating kanban sizes. |
Note: Production kanbans use the replenishment lead time to calculate the size of the kanban but use the Lead Times on the Item Master window to determine when to schedule jobs created by replenishing the production kanban. This allows you to add lead time on the pull sequence of the production item for transportation, or desired "queue time."
Supplier and inter-org kanbans use the replenishment lead time to calculate the size of the kanban and to schedule the "need date" for the purchase requisition. However, if you leave this field blank, the program will use one day to size the kanban and will use the lead time defined in the Item Master window for the "need date" on the requisition. (Need date = sysdate + pre-processing + processing + post processing time if the replenishment lead time on the pull sequence is left blank.)
| Allocation Percent (Optional) | The allocation percent represents the percent of independent demand for the kanban item that is to be supplied from this pull sequence. |
| Lot Multiplier (Optional) | When kanban planning sizes the containers at the location, it will size in multiples of this quantity. For example, if the supplier sells wire in a roll of 500 feet, then a multiplier of 500 would result in bin sizes of multiples of 500 feet. If demand called for 510 feet, the kanban planner would size the kanban for 1000 feet (500 + 500). |
| Safety Stock Days (Optional) | Safety Stock Days is the number of days demand that will be added to the kanban for safety stock. Kanban planning sizes kanbans to the average daily demand of the forecasted period. |
Kanban Chain
For every kanban planned item, you can define a kanban chain, which is a series of pull sequences that model the replenishment network on the shop floor, for example, line stock to stores and stores to supplier.
Card Definition
Kanban cards are created for an item, subinventory, and locator (optional). They are uniquely identified by a kanban number. For cards generated from a kanban pull sequence, the number is automatically generated. For manually defined cards, both replenishable and non-replenishable, you can enter an unused kanban number or let the system create the number. See: Generating Kanban Cards and Defining Kanban Cards.
Replenishable Cards
You can use the Generate Kanban Cards window to generate cards automatically from the following pull sequence information: item, kanban location, quantity, and source. You can also create these cards manually in the Kanban Cards window.
You cannot override the quantity for generated cards, but you can add additional cards or delete existing cards from the pull sequence to control the inventory in the replenishment chain. Function security is provided for this feature.
A supply source is defaulted from the source type of the pull sequence.
Non-Replenishable Cards
You can manually define non-replenishable cards by entering the item, location, supply source, and quantity in the Kanban Cards window. Non-replenishable cards do not have to be associated with a pull sequence.
Source Type
You can create kanban cards with the following source types:
| Inter Org | Replenished by another organization |
| Intra Org | Replenished from another subinventory in the same organization |
| Production | Replenished by a production line |
| Supplier | Replenished by an external supplier |
Card Status
Kanban cards are generated with a default Card Status of Active. When you define a card manually, you can initially give it either Active or Hold status.
If the Supply Status is Full, you can temporarily pull a card out of the replenishment chain by changing the Card Status to Hold. You can later change the status back to Active.
You can terminate use of a card by changing the Card Status to Canceled, but you cannot reverse this change. Only Canceled cards can be deleted.
Supply Status
All the following Supply Status codes can be set either manually or automatically.
| New | The kanban has just been created and is not yet part of the replenishment chain. |
| Empty | The kanban is empty and a replenishment signal has been generated (available only for Inter Org and Supplier source types). |
| Full | The kanban has been replenished. |
| Wait | The kanban is waiting until the minimum order quantity has been met by the aggregation of cards. |
| In-Process | For the Supplier source type, the purchase order has been approved. For the Inter Org source type, the internal requisition has been approved. |
All cards are generated with a status of New. You can switch this status to Empty to trigger a kanban replenishment signal. During initial setup, you can switch the status to Full if you are starting out with a full bin. When you are defining a card manually, you can create a card with a status of Empty, Full, or New.
Card Printing
You can print Kanban cards for a replenishment plan or a replenishment chain when you generate the cards. You can also print cards individually if the card information is complete.
You can print duplicate cards only if the original is lost or voided. You are given a warning message before you can print duplicates.
Related Topics
Overview of Item Setup and Control.
Defining Kanban Pull Sequences
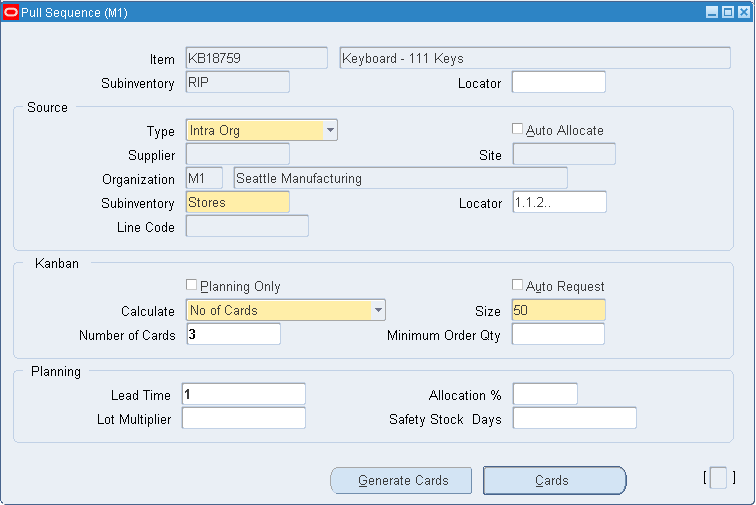
Use the Pull Sequences window to view, update, and define the source of replenishment for a kanban planned item in a kanban location.
To define pull sequences
-
Navigate to the Pull Sequence Summary window. The Find Pull Sequences window appears.
-
Select New to open a new line.
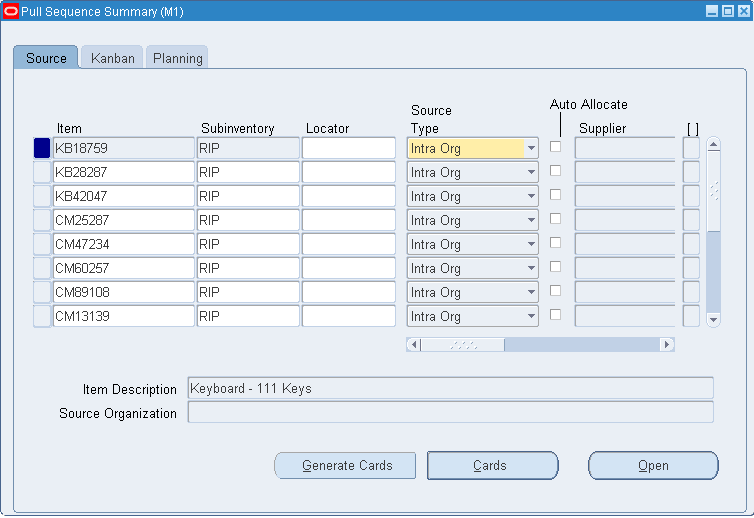
-
Select the item and the subinventory. If the subinventory or item is under locator control, you must also enter a stock locator.
Note: If the subinventory and item is not locator controlled, entering a locator will allow you to specify a specific location (row, rack, bin) for organizing purposes without forcing you to transact at the locator level.
-
In the Source tabbed region, select the source type: Inter Org, Intra Org, Production, or Supplier.
For the Inter Org source type, you must select the source organization and the subinventory. If the organization, subinventory, or item is under locator control, you must also enter a stock locator.
For the Intra Org source type, you must select the source subinventory. You can optionally enter a source stock locator. You can also optionally select the auto allocate check box to automatically allocate the move order.
For the Production source type, you can optionally enter the line code.
For the Supplier source type, you can optionally select the supplier and supplier site. If you do not select a supplier, Oracle Purchasing will choose the supplier based on sourcing rules when it creates a purchase order/blanket release.
-
In the Kanban tabbed region, select the calculate method and enter the parameters as follows:
Select the Auto-Request check box enable auto requests for the pull sequence. This calls the Auto Replenishment for manufacturing concurrent request, which picks up the pull sequences and generates non-replenishable kanban cards for the pull sequences.
If you select Do Not Calculate: Enter a value in the Size and Number of Cards fields.
If you select Kanban Size: Enter a value in the Number of Cards field and optionally enter a value in the Minimum Order Qty field.
If you select Number of Cards: Enter a value in the Size field, and optionally enter a value in the Minimum Order Qty field.
The minimum order quantity is defaulted from the item, but you can override this default.
-
In the Planning tabbed region, enter the lead time for this location, and optionally enter allocation percent, lot multiplier, and number of safety stock days.
-
Save your work.
Note: Pull sequences cannot be used with Model/Unit Number effective controlled items. Model/Unit items are used in a project manufacturing environment, while pull sequences are normally used in flow manufacturing environments. See Bills of Material Attribute Group.
-
Navigate to the Find Pull Sequences window by selecting Pull Sequences from the menu.
-
Enter selection criteria. You can restrict the search by item, subinventory, locator range, source type, supplier, supplier site, source organization, source subinventory, source locator, and line code.
-
Select the Find button to display the search result in the Pull Sequence Summary window.
-
In the Pull Sequence Summary window, you can update the following fields:
In the Source tabbed region: Source Type.
For the Inter Org source type: Org, Subinventory, and Locator.
For the Intra Org source type: Subinventory and Locator.
For the Production source type: Line Code.
For the Supplier source type: Supplier and Supplier Site.
In the Kanban tabbed region: all fields.
In the Planning tabbed region: all fields.
-
Save your work.
To open the details window
-
To make entering and viewing information easier, you can select the Open button in the Pull Sequences Summary window to open the Pull Sequences window for the current line. In this window, you can enter any of the information in the tabbed regions of the summary window.
-
See Calculation Formula, Oracle Master Scheduling / MRP and Oracle Supply Chain Planning User's Guide.
To view or define kanban cards for a selected pull sequence:
-
Select the pull sequence and click Cards to open the Kanban Cards Summary window. See Defining Kanban Cards.
To generate kanban cards automatically for a selected pull sequence:
-
Click Generate Cards to automatically generate kanban cards for the selected line.
Generating Kanban Cards
Use the Generate Kanban Cards process to automatically generate kanban cards. You can generate cards for individual pull sequences in the Pull Sequences Summary and Pull Sequences windows. See: Defining Kanban Pull Sequences.
To generate kanban cards
-
Select Generate Kanban Cards from the menu to display the Parameters window.
-
To restrict the cards to a range of items, select the beginning and ending items.
-
Select a subinventory to restrict the cards to a specific subinventory.
-
To restrict the cards to a range of locators, enter the beginning and ending locators.
-
Select a source type to restrict the cards to a specific type.
-
Select a supplier to restrict the cards to a specific supplier. If you select a supplier, you can also select a supplier site.
-
Select a source organization to restrict the cards to a specific organization. If you select a source organization, you can also select a source subinventory. If you select a source subinventory, you can also select a source location.
-
Select the initial status that you want for the created cards: New, Full, or Wait.
-
Select Yes or No to indicate whether you want the cards to be created and printed in one step.
-
Select the OK button to complete parameter selection.
-
Select the Submit Request button in the Generate Kanban Cards window.
-
For Pull Sequences with a Source Type of Supplier, set the List Price for the item to automatically generate requisitions.
Related Topics
Submitting a Request, Oracle Applications User's Guide
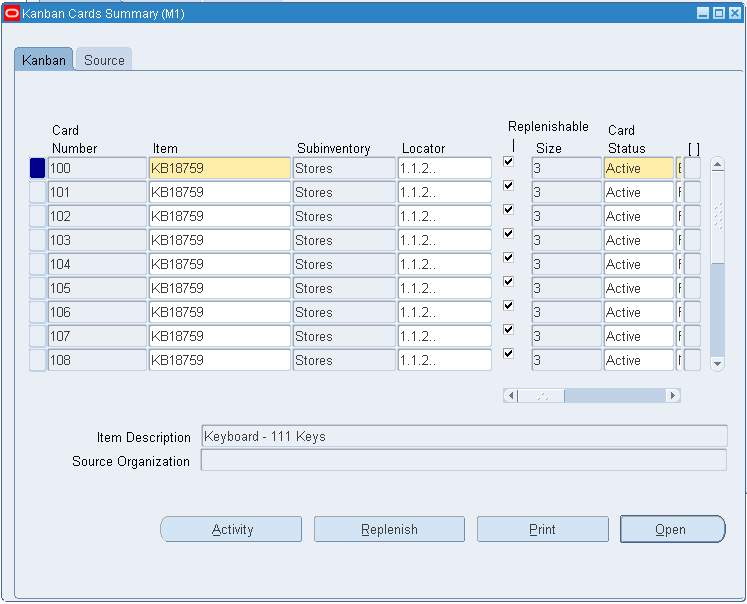
Defining Kanban Cards
Use the Kanban Cards Summary window to view, define, and update kanban cards. You can also automatically generate kanban cards with the Generate Kanban Cards process. See: Generating Kanban Cards.
To define kanban cards
-
Navigate to the Kanban Cards Summary window by selecting the Cards button in the Pull Sequence Summary or Pull Sequences window. You can also navigate to the Kanban Cards Summary window by selecting the New button in the Find Kanban Cards window.
Optionally, enter a card number. Otherwise, a number will be generated when you save your work.
-
Select the item number.
-
Select the subinventory and optionally the locator.
-
In the Kanban tabbed region, check Replenishable if you want to define a replenishable card.
-
In the Size field, enter the quantity of items in each kanban.
-
Select the card status: Hold or Active
-
Select the supply status: Empty, Full, or New. If you create a card with a card status of Hold, you cannot select a supply status of Empty.
-
In the Source tabbed region, select the source type: Supplier or Inter Org
For the Supplier source type, you can select a supplier and supplier site.
For the Inter Org source type, you can select the organization, subinventory, and locator.
For the Intra Org source type, you can select the subinventory and locator.
For the Production source type, you can select the line code.
-
Save your work.
To view kanban cards
-
Navigate to the Find Kanban Cards window by selecting Kanban Cards from the menu.
-
Enter selection criteria. You can restrict the search by card number range, item, subinventory, locator, source type, supplier, supplier site, source organization, source subinventory, source locator, and line code.
-
Select the Find button to display the search results in the Kanban Cards Summary window.
-
In the Kanban Cards Summary window, you can update the following fields:
In the Kanban tabbed region: Card Status and Supply Status.
In the Source tabbed region: all fields.
-
Save your work.
To open the details window
-
To make viewing and entering information easier, you can select the Open button in the Kanban Cards Summary window to open the Kanban Cards window for the current line. In this window, you can enter any of the information in the tabbed regions of the summary window.
To display kanban card activity:
-
Select the Activity button to open the Card Activity window for the selected kanban card. For each replenishment cycle, this window displays a variety of activity information.
-
Select the Print button to send a print request to the concurrent manager for cards for the selected line.
Related Topics
Printing Kanban Cards
Use the Print Kanban Cards process to batch print kanban cards with card status Active and Hold. You can print cards individually in the Kanban Cards window. See: Defining Kanban Cards.
To print kanban cards
-
Select Print Kanban Cards from the menu to display the Parameters window.
-
To restrict the cards to a range of creation dates, enter the beginning and ending dates.
-
To restrict the cards to a range of card numbers, enter the beginning and ending numbers.
-
To restrict the cards to a range of items, select the beginning and ending items.
-
Select a subinventory to restrict the cards to a specific subinventory.
-
To restrict the cards to a range of locators, enter the beginning and ending locators.
-
Select a source type to restrict the cards to a specific type.
-
Select a card type to restrict the cards to replenishable or non-replenishable.
-
Select a source organization to restrict the cards to a specific organization. If you select a source organization, you can also select a source subinventory. If you select a source subinventory, you can also select a source location.
-
Select the sorting criteria. You can sort by:
Kanban Card Number
Subinventory
Subinventory and then Locator
Supplier and then Supplier Site
Source Organization and then Source Subinventory and then Source Locator.
-
Select the OK button to complete parameter selection.
-
Select the Submit Request button in the Print Kanban Cards window.
Replenishing Kanban Cards
When a kanban is empty, you can replenish it systematically. This will change the card status to empty and will trigger the necessary transactions to refill the kanban.
-
The supply type for the Kanban pull sequence equals production.
-
The item is lot controlled.
-
The primary routing for the kanban Item is network routing.
To replenish kanban cards
-
Navigate to the Kanban Cards Summary window. The Find Kanban Cards window appears.
-
Enter search criteria and choose Find to locate the kanban card you want to replenish.
-
Choose Replenish.
Note: If this item pertains to a lot based job complete the following steps.
-
Enter the starting Lot number. The LOV shows all available inventory lots.
-
Choose Replenish.
To replenish kanban cards using a bar code reader or RF terminal
-
See: Support of External Devices To Trigger Replenishment/Fill Kanbans, Flow Manufacturing Implementation Manual.
Related Topics
Overview of Network Routings, Oracle Shop Floor Management User's Guide
Creating a Network Routing, Oracle Shop Floor Management User's Guide
Replenishment Counting
Oracle Inventory provides additional methods for planning and replenishing inventories. Even if you are not maintaining perpetual on-hand balances-in non-tracked subinventories, for example-you can use the replenishment counting system to plan your inventories. This may be ideal for replenishing free stock items that you store on the production floor, or office supplies kept in departmental cabinets. Oracle Inventory even provides an open interface for loading replenishment count data collected electronically, such as with a hand held bar code reader.
Replenishment Counting Tracked Subinventories
In some situations, you may want to do your own planning and use Oracle Inventory to create your internal requisitions. When using the replenishment system in this manner, you provide the system with one of the following pieces of information (in addition to the item and subinventory):
-
Order quantity. You specify the quantity that is to be ordered.
-
Order maximum quantity. Oracle Inventory orders the min-max maximum quantity.
You can enter this information in the Replenishment Counts window or through an external interface, using the replenishment interface tables. See: Entering and Processing Replenishment Counts.
You must select a subinventory that has associated items to create the replenishment count.
Replenishment Counting Non-Tracked Subinventories
Planning and replenishment of non-quantity-tracked subinventories is different because Oracle Inventory cannot use perpetual system quantities. As you issue items from a subinventory without formal issuing procedures, it is necessary to take inventory of non-tracked subinventories to record item usage and determine reorder necessity.
In order to determine when and how much to replenish, you periodically physically count the items in non-tracked subinventories. You enter the count details either through the Replenishment Counts window, or via a batch load transaction such as a bar code reader. Oracle Inventory permits on-hand quantity as an additional replenishment information type for non-tracked subinventories. If an on-hand quantity is entered, Oracle Inventory uses min-max planning to determine whether an order should be placed.
Processing Replenishment Counts
To process the replenishment counts and create requisitions for items that need to be ordered or move orders for items to be replenished from a subinventory, you run the Process Replenishment Counts program. See: Entering and Processing Replenishment Counts.
Planning Levels
You can only use the replenishment counting system at the subinventory level. To use replenishment counting, you must set up item-subinventory relationships using the Item Subinventories or Subinventory Items windows.
External Interface
Oracle Inventory provides an external interface for loading replenishment count data collected electronically, such as by a bar code reader. Once you have populated the replenishment interface tables, you can run the Validate Replenishment Interface program to validate the counts and put the information into the appropriate tables.
Replenishment Count Validations
When you assign an item to a subinventory or locator, it automatically assigns the item to a replenishment count header. Before you process a replenishment count the system performs validations to check if you made changes to the item setup subsequent to the creation of the replenishment count header. The system checks the following parameters:
-
Changes in subinventory.
-
Changes in item-subinventory relationship.
-
Changes in item-locator relationship.
-
Changes to min-max planning item attribute for an item that is planned at the item-subinventory level. This restricts the count type you can perform for an item.
-
Changes in minimum and maximum levels.
-
Changes in item sourcing.
PAR Replenishment Counts
Periodic Automated Replenishment (PAR) Level Counting enables facilities such as hospitals that do not store perpetual inventory to conduct locator level replenishment. PAR level counting enables you to perform locator level stock counting in non quantity tracked subinventories. The system generates the appropriate replenishment document based on the item sourcing for the subinventory if the stock level falls below the target on hand for the locator.
For Example, if you wanted to count the items in the non-tracked subinventory Pediatrics B Wing you could count the items as follows:
| Locator | Item | Description | Par Level | Par UOM | Source | Warehouse Stock Locator |
|---|---|---|---|---|---|---|
| 1.1.1 | A100 | Gloves | 5 | PR | Subinventory | 6.3.2 |
| 1.1.2 | B200 | Bandage | 10 | Box | Supplier | N/A |
| 1.1.3 | VF928 | Band-Aid | 50 | Ea | Inventory | N/A |
| 1.2.1 | SD342 | Mask | 15 | Ea | Supplier | N/A |
-
Locator- The locator within the Pediatrics B Wing Subinventory.
-
Item-The tracked item within the Pediatrics B Wing Subinventory.
-
Description- Description of the item.
-
Par Level-The target number of items in the locator. If the Par Level falls below this number, the system automatically reorders the item.
-
PAR UOM- The PAR Unit of Measure.
-
Source- The item reorder source.
-
Warehouse Stock Locator- If the item reorder source is the warehouse, the stock locator of the item within the warehouse.
Related Topics
Entering and Processing Replenishment Counts
Assigning Subinventories to an Item
Sources of Replenishment
Oracle Inventory automatically generates external requisitions, internal requisitions, or move orders to replenish inventory levels using the orders suggested by min-max planning, reorder point planning, kanban planning, and replenishment counting. You determine the replenishment source by defining item sourcing rules at the item-subinventory, subinventory, item, or organization levels.
External requisitions request stock from an outside supplier. Internal requisitions request stock from another inventory organization. Move orders request stock from another subinventory within the same organization.
All items, subinventories, and organizations can have item sourcing information specified for them. At each level, you can choose whether items are replenished from another inventory organization or subinventory, or purchased from a supplier. In case of a conflict between the levels, Oracle Inventory uses the following order of precedence:
-
Sourcing information specified in the item-subinventory relationship
-
Sourcing information specified in the subinventory definition
-
Sourcing information specified in the item definition
-
Sourcing information specified in the organization parameters
If you specify an item to be replenished from inventory, you must specify a source organization (source subinventory is optional). When an order is placed for this item, Oracle Inventory creates an internal requisition for the item from the source location. This is true when using organization or subinventory level min-max planning, replenishment counting, reorder point planning, and kanban planning.
If the item source is a supplier, Oracle Inventory creates a purchase requisition to order the items from an outside supplier when reorder is necessary. This is true when using organization or subinventory level min-max planning, replenishment counting, reorder point planning, and kanban planning.
If an item source is subinventory, Oracle Inventory creates a pre-approved replenishment move order to replenish supply when reorder is necessary. This is true when using subinventory level min-max planning, replenishment counting, and kanban planning. An item source of subinventory should only be used with subinventory level inventory replenishment.
Entering and Processing Replenishment Counts
You can enter counts to replenish subinventories. After entering the counts you can:
-
run the replenishment processor
-
launch the Item Replenishment Count Report
-
save the counts for future processing
You specify how the subinventories are replenished by determining how requisitions are generated.
To enter replenishment count header information
-
Navigate to the Replenishment Count Headers window. The Find Replenishment Count Headers window appears.
-
Choose New to display the Replenishment Count Headers window.
To display existing count headers, enter search criteria and choose Find.
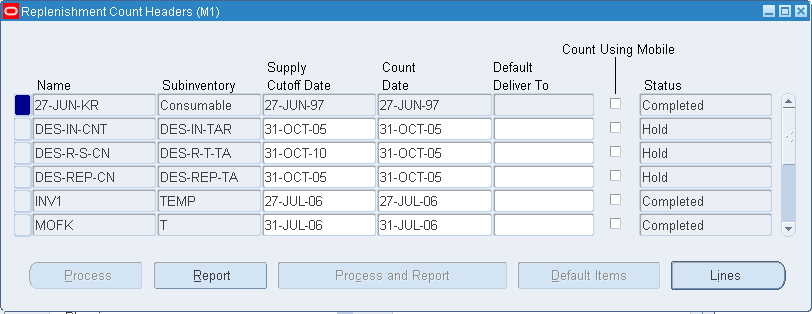
-
Enter a unique name for the replenishment count.
-
Enter the subinventory to replenish.
-
Enter the supply cutoff date.
Oracle Inventory may need on-hand quantity and supply information to verify whether to create replenishment requests. The replenishment count process considers only purchase orders and internal requisitions with receipt dates earlier than or equal to the supply cutoff date.
-
Enter the count date.
-
Optionally, enter a default delivery location to include on the requisition created by the replenishment processor.
-
Optionally check the Count Using Mobile checkbox. If you choose this checkbox you cannot enter count information from the desktop, you must enter it from the mobile device. You can view the counts from the desktop window, but the fields are not editable. If you do not select the checkbox, the counts are not visible in the mobile.
If you select the checkbox, you can still enter replenishment count lines from either the desktop or the mobile, but you must perform the count on the mobile.
If you choose Order Max or Order PAR on the subinventory window, and you select Count Using Mobile on the replenishment count header, you receive a warning: Count using Mobile cannot be sued with default count type of Order Max or Order PAR. The system changes the default count type to order quantity.
To enter replenishment options and counts:
-
Choose the Lines button or the Default Items button. The Replenishment Count Lines window appears.
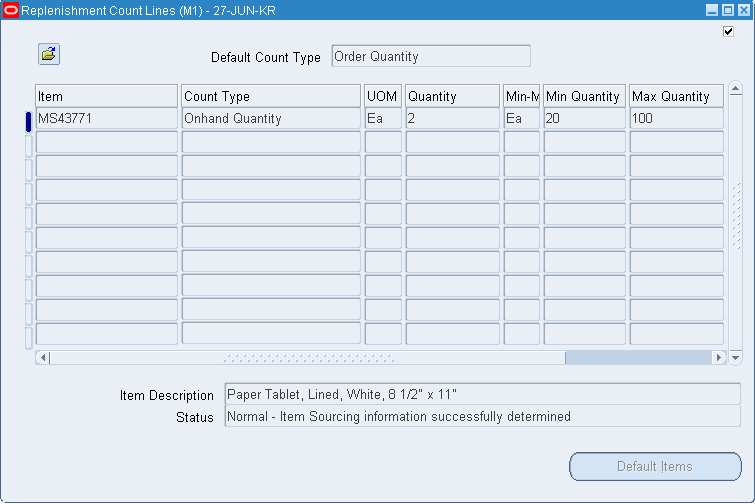
-
Enter the locator information in the locator field.
-
Enter the item to count in the item field.
-
Select a default count type for how subinventories are replenished.
On-Hand Quantity: Use the quantity you enter as on-hand quantity to perform min-max comparison, calculate reorder quantity, and generate requisitions. This option does not display for tracked subinventories.
Order Maximum: Generate a replenishment requisition to automatically order the min-max maximum quantity as defined by the min-max planning information specific to that item and subinventory. You cannot enter a value in the Quantity field if you choose this option.
Order Quantity: Generate a replenishment requisition to order the quantity that you enter.
Order Par: Generate a replenishment count for the reorder quantity that you enter.
-
Determine whether to default all items for processing. If you do not default all items you can choose specific items to include for processing. To default all items choose the Default Items button.
-
Enter the item to be counted.
-
Optionally, select a count type different from the one you selected as the default count type.
-
Enter the unit of measure of the item. You cannot enter a value in this field if you chose Order Maximum as the count type.
-
Enter the count quantity if you chose On-Hand Quantity for the count type, or enter the order quantity if you chose Order Quantity as the count type. You cannot enter a value in this field if you chose Order Maximum as the count type.
-
Optionally, enter a reference note.
-
Save your work.
To process and report the count information:
-
Return to the Replenishment Count Headers window.
-
Choose an activity:
Save: You can save your changes but not run the replenishment processor. You can run the processor later.
Process: Choose the Process button to run the replenishment processor. After processing all the counts, the replenishment processor creates requisition information and saves it for reporting.
Report: Choose the Report button to run the Item Replenishment Count Report, or the PAR Replenishment Worksheet.
Process and Report: Choose the Process and Report button to run the replenishment processor. After processing all the counts, the replenishment processor creates requisition information and immediately runs the Item Replenishment Count Report, or the PAR Replenishment worksheet, depending the subinventory setup.
To process count information you saved for future processing:
-
Navigate to the Process Replenishment Counts window. The Parameters window appears.
-
Select either a concurrent or background processing mode.
-
Enter the name of the replenishment count to process.
-
Choose Submit.
To copy replenishment count headers
-
Select the replenishment count header to copy.
-
Select Copy From from the Tools menu.
-
Enter or select the replenishment count to copy in the Copy From field..
-
Enter a new replenishment count in the Copy to field.
-
Choose Copy to copy the replenishment count, or choose Cancel to cancel.
Purging Replenishment Counts
You can purge replenishment information including the count name, counting methods, and quantities.
To purge replenishment count information
-
Navigate to the Purge Replenishment Count window.
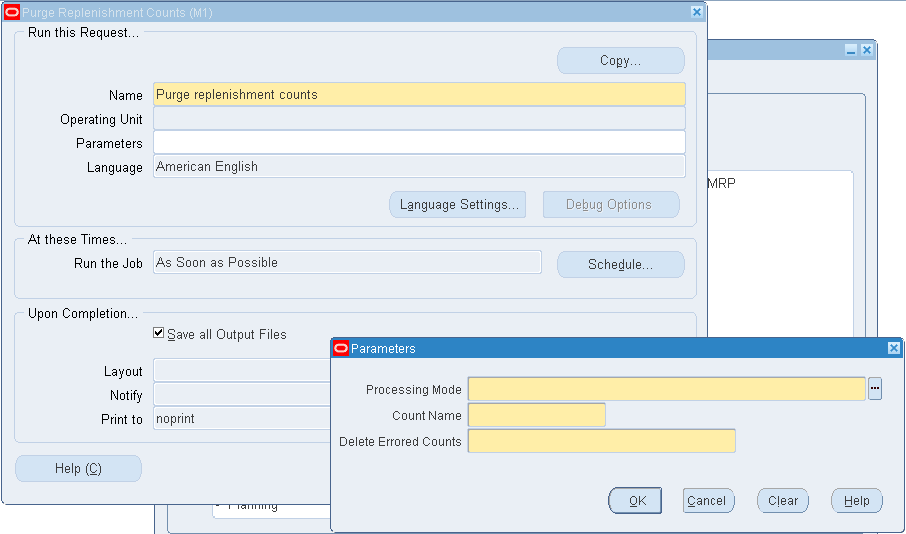
-
Enter Purge replenishment count in the Name field. The Parameters window appears.
-
Enter the count name to be purged.
-
Indicate whether to purge counts processed using a particular processing mode:
Concurrent processing: Purge count names processed by the concurrent processor.
Background processing: Purge all count names processed by background processing.
-
Indicate whether you want to purge a count name even if an error occurred in the count. No indicates that you want to purge only count names that processed successfully without errors.
-
Choose Submit to launch the process.
Related Topics