Move Orders
This chapter covers the following topics:
- Overview of Move Orders
- Defining Pick Slip Grouping Rules
- Setting Up Move Orders
- Generating Move Order Requisitions
- Generating Replenishment Move Orders
- Allocating and Transacting Move Orders
- Manual Move Order Allocation
- Configuring the Material Pick Wave Process
- Exception Management
- Manually Allocating and Transacting Pick Wave Move Orders
- Express Pick Release
- Reservation Details
Overview of Move Orders
Move orders are requests for the movement of material within a single organization. They allow planners and facility managers to request the movement of material within a warehouse or facility for purposes like replenishment, material storage relocations, and quality handling. You can generate move orders either manually or automatically depending on the source type you use.
Note: Move orders are restricted to transactions within an organization. If you are transferring material between organizations you must use the internal requisition process. See: Overview of Internal Requisitions, Oracle Purchasing User's Guide.
Managed Material Flow in a Facility
Move orders allow you to distinguish between inventory management processes and the actual material transaction process. This provides for the following:
| Quick response | You can request a transaction and forward the request to a picker for transaction execution. The request is tracked in Oracle Inventory, which allows you to avoid manual systems, thus eliminating inaccurate transfer of information. Also, Oracle Inventory replenishment functionality can automatically generate move orders without the intervention of an item planner. This results in faster inventory replenishment, with minimal human intervention. |
| Warehouse visibility | Move orders use inventory picking rules to determine where to source material for a subinventory or account transfer. This ensures that the same mechanisms created to rotate material properly for deliveries can be used to rotate material within the facility. |
| Tracking | Move orders can be transacted through APIs. This allows you to transact material using mobile devices, giving you better material visibility and accuracy. Move orders can also be created to cross dock material to staging locations. |
Oracle provides three types of move orders: 1) Move order requisitions, 2) Replenishment move orders, and 3) Pick wave move orders. The move order type refers to the entity that created the move order. For all move orders, the final result is one of the two supported transactions: subinventory transfer or account issue.
Move Order Requisitions
A move order requisition is a manually generated request for a move order. It is available for subinventory transfers and account transfers. Once a requisition has been approved, it becomes a move order. These requests can optionally go through a workflow-based approval process before they become move orders ready to be sourced and transacted. See: Generating Move Order Requisitions.
Replenishment Move Orders
You can automatically create pre-approved move orders using the following planning and replenishment functions. These processes generate move orders if the material is sourced from another inventory location within the organization.
| Min-Max Planning: | When a minimum quantity for a specific item is reached in inventory, you can use a move order to replenish the supply. |
| Replenishment Counting | If a system that uses replenishment counting triggers an item for replenishment, you can use move orders to replenish the supply. |
| Kanban Replenishment | When a kanban card signals the need to release an item into a subinventory, you can generate a move order to handle the release. |
For min-max planning and replenishment counting, you can set the subinventory source type at the following levels:
-
Master/Organization Items
-
Subinventory
-
Item Subinventory
For kanban pull sequence or cards, you set the subinventory source type at the Pull Sequence level. See: Generating Replenishment Move Orders.
Pick Wave Move Orders
Pick wave move orders are pre-approved requests for subinventory transfers to bring material from a source location in the warehouse to a staging subinventory. These move orders are generated automatically by the Oracle Shipping Execution pick release process. See: Overview of Material Pick Waves.
A move order comprises the following:
| Move order header | Oracle Inventory uses the move order header to store the move order source type. This refers to the entity that created the move order. The header also stores the default source and destination (if known), the order number, and the requested date. |
| Move order lines | Move order lines are the requests on a move order. They store the item, requested quantity, completed quantity (if the move order has been partially fulfilled), and source and destination (if known). The move order lines also include any project and task references if the organization is Oracle Project Manufacturing enabled. You can also request specific serial and lot numbers on the move order line. |
| Move order line allocations | The line allocations are the transactions that occur to fulfill a particular move order line. You can set up your system to have Oracle Inventory's picking engine automatically fill in the allocations, or you can manually fill in the line details and edit them before you transact. If the material is locator, lot, or serial controlled, the system fills in this information at the line detail level. |
The move order process follows the following steps:
-
Create a move order for required material. You can manually create a move order requisition or set up your system to automatically generate replenishment or pick wave move orders.
-
Approve the move order lines. If the move order requisitions require approval, the item planner must approve the move order lines.
-
Allocate the move order. Once the move order is approved, you can allocate it, or cancel it. Allocating is the process that uses Oracle Inventory picking rules to determine where to source the material to fulfill a request line. The allocating process fills in the move order line details with the actual transactions to be performed and allocates the material to the move order.
You can also cancel partially allocated move order requisitions and replenishment move orders. Oracle Inventory provides a profile option INV: Kill Move Order which allows the system to cancel partially allocated and transacted move orders. See: Inventory Profile Options.
-
Print a pick slip. Before you transact the move order, you can print a pick slip or push the move order line allocations to mobile devices for transaction through the move order APIs.
-
Transact move order lines. You can either transact all the move order lines at once or transact one allocation line at a time as the items are moved. If you transact less than the requested quantity, the move order stays open until the total quantity is transacted or until the order is closed or cancelled. You can cancel partially allocated and transacted Move Order Requisitions and Replenishment Move Order lines.
Move orders use Inventory picking rules to suggest source location, lot numbers, and revisions for the material to be picked. You can choose to view and update the suggested source allocations before printing a pick slip or committing the transaction. See: Defining Picking Rules.
Note: Allocating creates a pending transaction the will be executed when you transact the line. It therefore decrements the available quantity.
Workflow for Move Order Approval Process
If you require planner approval for move order requisitions, you can use the move order approval process, which forwards move order lines to the designated item planner for approval. Oracle Inventory manages the approval process through Oracle Workflow.
To govern the move order approval process, you set two inventory organization parameters: Move Order Timeout Period and Move Order Timeout Action. The Move Order Timeout Period attribute determines the number of days the order can wait for approval. After one time out period, if the recipient has not approved or rejected the order, a reminder notice is sent. After a second time out period, the order is automatically approved or rejected, depending on the Move Order Timeout Action attribute you set. Upon approval, additional notifications can be sent to specified individuals.
The item planner is an item attribute. If no planner is specified on the item, the requisition line will be automatically approved.
Once the order line is approved, notices are sent to a notification list that is attached to the source and destination subinventories to let the subinventory planners know that material will be moved to or from their areas.
Note: Replenishment and pick wave move orders are pre-approved
Print Move Order Pick Slips
You can print move order pick slips before or after the move order transaction is committed. The Move Order Pick Slip report generates pick slips for move order requisitions and replenishment move orders. See: Move Order Pick Slip Report.
To generate a pick slip for pick wave move orders, you submit the Oracle Shipping Execution Pick Slip report.
Related Topics
Overview of Kanban Replenishment
Overview of Material Pick Waves
Defining Pick Slip Grouping Rules
You can create grouping rules to organize how picking lines for released sales orders and manufacturing tasks are grouped on pick slips. For example, if you select Delivery as a grouping criteria, all picking lines for the same delivery are grouped together on a pick slip.
You can also select additional grouping attributes for your grouping rules. For example if you select Delivery and Carrier as grouping criteria, picking lines for the same delivery and carrier are grouped together on a pick slip.
To define pick slip grouping rules
-
Navigate to the Pick Slip Grouping Rules window.

-
Select a pick methodology For more information see, Defining Pick Methodologies, Oracle Warehouse Management Implementation Guide.
-
Enter a unique name in the Rule Name field.
-
Enter a rule Description if desired.
-
Enter an Effective Date range for the rule.
The start date field populates automatically with the current date, you can change this if necessary. You can also enter an expiration date for the picking rule, however the expiration date must be after the start effective date.
-
In the Group By alternative region, select the following applicable parameters:
-
Order Number: Items assigned to this order number are assigned to the same pick slip number.
-
Customer: Orders for this customer are assigned to the same pick slip number.
-
Ship To: Orders addressed to the ship to address are assigned to the same pick slip number.
-
Carrier: Orders for a particular freight carrier are assigned the same pick slip number.
-
Trip Stop: Orders within a shipping group of deliveries are assigned to the same pick slip number.
-
Delivery: Orders within a particular delivery are assigned to the same pick slip number.
-
Shipment Priority: Orders with the same shipment priority are assigned to the same pick slip number.
-
Source Subinventory: Items with the same source subinventory are assigned to the same pick slip number.
-
Source Locator: Items with the same source locator are assigned to the same pick slip number.
-
Item: Items with the same part number are assigned to the same pick slip number.
-
Revision: Items with the same revision number are assigned to the same pick slip number.
-
Destination Subinventory: Items with the same destination subinventory are assigned to the same pick slip number.
-
Destination Locator: Items with the same destination locator are assigned to the same pick slip number.
-
Project: When project manufacturing is enabled, all items assigned to a project are assigned the same pick slip number.
-
Task: When project manufacturing is enabled, all items assigned to the same task are assigned to the same pick slip number.
-
Job / Schedule: All tasks you create for a job or schedule are assigned the same pick slip number.
-
Operation: All tasks you create for the same operation are assigned the same pick slip number.
-
Department: All tasks from the same department are assigned the same task type regardless of whether or not you select Job / Schedule.
-
Push versus Pull: All push tasks are assigned the same pick slip number, and all pull tasks are assigned the same pick slip number regardless of whether or not you select Job / Schedule.
Note: This is the supply subinventory defined on the Bill of Material.
This applies only to manufacturing tasks with supply type of pull, and push components that specify a supply subinventory and locator. Enabling Supply Subinventory also groups push and pull tasks separately, because pull tasks are assigned to a subinventory, and push tasks are not assigned to a subinventory.
This is more specific than enabling Push versus Pull because tasks that have different supply subinventories are grouped separately only if you include Supply Subinventory in the grouping criteria.
-
-
Select the desired Perform Bulk Picking option from the drop down list. The available choices are as follows:
-
For entire wave: At pick release, every item in a pick wave is a candidate for bulk picking.
-
Honor item/sub flag: At pick release, only bulk picked enabled items and subinventories are candidates for bulk picking.
-
No: Disables bulk picking.
-
Related Topics
Component Picking, Oracle Work in Process User's Guide
Setting Up Move Orders
-
Define the subinventory source type.
To automatically create move orders using min-max planning and replenishment counting, you must define the subinventory source type at once of the following levels:
-
Subinventory see Defining Subinventories
-
Item subinventory see Assigning Subinventories to an Item and Assigning Items to a Subinventory
To automatically create move orders using the kanban system, you must define the subinventory source type at the pull sequence level. See Defining Kanban Pull Sequences.
-
-
Define approval process parameters.
To require planner approval for move order requisitions, you must define two parameters at the organization level: Move Order Timeout Period and Move Order Timeout Action. See Defining Default Inventory Parameters.
If you want to bypass the move order approval process and automatically approve move order requisitions, enter 0 days for the Move Order Timeout Period and select Automatically Approve for the Move Order Timeout Action.
You must also assign the planner who approves move order lines to the item or the organization. See Defining Items, and Updating Organization Level Items.
You can also specify individuals to be notified if a shortage occurs. Defining Shortage Parameters.
Note: If the requested item does not have an assigned planner, the approval process is not enabled.
-
Define item transaction defaults.
If you want to populate move order line allocations with item transaction defaults for the destination locator, you must first define the item transaction defaults. Defining Item Transaction Defaults.
Note: You do not need to perform this step if you specify the locator at the time you create or allocate the move order lines.
-
Define lot level UOM conversions.
If you define a lot level conversion for a specific lot the move order quantity reflects the lot quantity to transact. See Lot Specific Unit of Measure Conversions for more information.
-
Setup Material Status
You can transact only material that permits move order transactions. You must that verify you can transact the material before you perform move orders. See Overview of Material Status for more information.
Generating Move Order Requisitions
Use the Move Orders window to generate move order requisitions.
Prerequisites
- Define approval process parameters
To require planner approval for move order requisitions, you must define two parameters at the organization level: Move Order Timeout Period and Move Order Timeout Action. You must also assign the planner who approves move order lines to the item or organization. See: Setting Up Move Orders. This step is required only if you wish to require planner approval for move order requisitions.
To generate move order requisitions
-
Navigate to the Move Orders window.
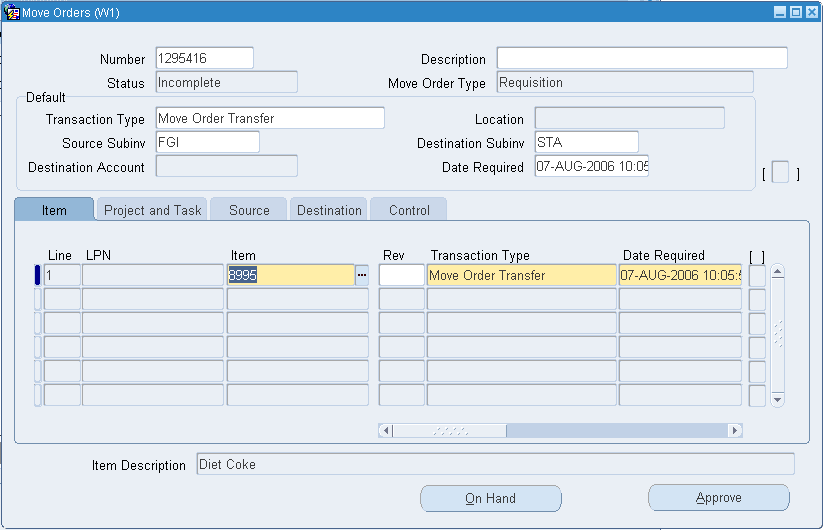
-
Optionally, enter a move order number. To have the system automatically generate a number, tab to the Description field.
-
Optionally, enter a description.
The Status field displays Incomplete until the move order is approved.
-
Information in the Header block defaults to the tabbed regions. These fields can be overridden at the move order line level. Enter or select the following:
Transaction type: The transaction type.
Account transfer: Transfer items from a subinventory to a destination account (account issue).
Subinventory transfer: Transfer items from one subinventory to another within the same inventory organization.
Move order issue: Issues items to a designated location.
Issue to project: Issues items to a designated project.
Location: If the transaction type is move order issue or issue to project, you can enter the ship to organization. If you select the Location Required parameter on the Transaction Types window, then this field is mandatory.
Source Subinventory: The source subinventory.
Destination Subinventory: The destination subinventory for subinventory transfers.
Destination Account: The destination account number for account transfers.
Date Required: The date the items are required to be transferred.
-
In the Item tabbed region, enter or update the following information:
Line: The line number.
LPN: The LPN to transfer if applicable. This field appears if you have Oracle Warehouse Management installed, and you are working with a warehouse management enabled organization. See Defining Default Inventory Parameters and Explaining License Plate Management, Oracle Warehouse Management User's Guide.
Item: The item number for which you want to perform a move order.
Rev: Revision control number (if the item is under revision control).
Primary Quantity: The quantity to be moved in the primary unit of measure.
UOM: The primary unit of measure.
Secondary Quantity: The quantity to be moved in the secondary unit of measure. You can update this field only if the item is under dual unit of measure control. See Main Attribute Group for more information.
UOM: The secondary unit of measure. You can update this field only if the item is under dual unit of measure control.
Date Required: The date the items are required to be in the destination subinventory.
-
Grade: The lot grade of the item that you want to transact. If the item is under grade control, you can specify the grade to move. See Inventory Attribute Group for more information.
-
In the Project and Task tabbed region, optionally select the following (these options are available only if Oracle Project Manufacturing is installed).
LPN: The LPN to transfer if applicable. This field appears if you have Oracle Warehouse Management installed, and you are working with a warehouse management enabled organization. See Defining Default Inventory Parameters and Explaining License Plate Management, Oracle Warehouse Management User's Guide.
Project: The project number associated with this item.
Task: The task associated with this item.
-
In the Source tabbed region, optionally enter or update the following:
LPN: This is the transfer LPN if applicable. This field appears if you have Oracle Warehouse Management installed, and you are working with a warehouse management enabled organization. See Defining Default Inventory Parameters and Explaining License Plate Management, Oracle Warehouse Management User's Guide.
Subinventory: The source subinventory for this item.
Locator: The source locator.
Lot Number: The lot number (if the item is under lot control). If you set the lot divisible flag to No on the lot master, you cannot transact a partial lot quantity. You must transact the entire lot. See Inventory Attribute Group for more information.
Serial From: The beginning serial number (if the item is under serial number control).
Serial To: The ending serial number (if the item is under serial control).
-
In the Destination tabbed region if the transaction type is Subinventory Transfer enter or update the following information:
LPN: This is the transfer LPN if applicable. This field appears if you have Oracle Warehouse Management installed, and you are working with a warehouse management enabled organization. See Defining Default Inventory Parameters and Explaining License Plate Management, Oracle Warehouse Management User's Guide.
Subinventory: The destination subinventory.
If the transaction type is Account Transfer, enter or update:
Account: The destination account.
Optionally, enter or update:
Locator: The destination locator.
When you create a move order transfer, you can specify the destination locator, or leave it blank. If you leave it blank, Oracle Inventory selects a default locator for the item in the destination subinventory you specified on the move order line. If you did not define a default locator for the item in the subinventory, you receive the error Failed to Generate Allocations. Cannot suggest a destination locator because there is no default destination locator for this item. To avoid this problem, you must either define a locator for the item, or provide the specified destination locator to which the move order should be allocated when created.
-
Location: If the transaction type is move order issue or issue to project, you can enter the ship to organization. If you select the Location Required parameter on the Transaction Types window, then this field is mandatory.
-
In the Control tabbed region, optionally enter or update the following:
LPN: This is the transfer LPN if applicable. This field displays if you have Oracle Warehouse Management installed, and you are working with a warehouse management enabled organization. See Defining Default Inventory Parameters and Explaining License Plate Management, Oracle Warehouse Management User's Guide.
Transaction Type: The transaction source type.
Reason: The transaction reason.
The window automatically displays:
Reference: Reference information about the item.
Source Type: The source type.
Source: The source entity.
Source ID: The identification number of the source entity.
Status Date: The date the status was last updated.
Status: The status of the move order line: Incomplete, Preapproved, Approved, Rejected, Cancelled, or Closed.
Created By: The name of the person creating the move order requisition.
-
Click Approve to submit the move order requisition for approval.
To view on-hand quantities
-
Optionally, click On Hand to view on-hand quantities for items. The on-hand quantities may help you to determine an appropriate source subinventory.
To cancel a move order
-
Find the move order to cancel.
-
Select Cancel Order from the tools menu.
To close a move order
-
Find the move order to close.
-
Select Close Order from the tools menu.
Note: You can close move order headers in all status except for incomplete, and if the header status in pending approval, not approved, partially approved.
To cancel a move order requisition line
-
Find the move order from which you want to cancel a move order line.
-
Select the move order line to cancel.
-
Select Cancel Line from the tools menu.
To close a move order requisition line
-
Find the move order from which you want to close a move order line.
-
Select the move order line to close.
-
Select Close Line from the tools menu.
Note: You can close move order lines only if they reside in one of the following statuses:
-
Approved
-
Pre-Approved
-
Not Approved
-
Cancelled
-
Cancelled by Source
Note: You can close a move order line independently of a move order header.
-
Related Topics
Generating Replenishment Move Orders
You can automatically create pre-approved move orders using min-max planning, replenishment counting, and kanban replenishment. These processes generate move orders based on the subinventory source type.
Prerequisites
- Define the subinventory source type. See: Setting Up Move Orders.
To automatically create move orders using min-max planning:
-
If an item is below its minimum value in a subinventory and it is sourced from another subinventory, a move order will be created when you request the min-max planning report. See: Requesting the Min-Max Planning Report.
To automatically create move orders using replenishment counting
-
Run the Process Replenishment Counts program. See: Entering and Processing Replenishment Counts.
To automatically create move orders using kanban replenishment:
-
Generate kanban cards. See: Generating Kanban Cards.
Allocating and Transacting Move Orders
After a move order has been approved, you must allocate the move order lines and then transact the move order, to complete the transfer of items to the destination subinventory or account.
A move order can have multiple move order lines. Each move order line is a single request for the movement of material.
You can either transact all the move order lines at once or transact one detail line at a time as the items are moved. You can only query approved move order in the Transact Move Orders window. See: Overview of Move Orders.
You can cancel move order lines that have no allocations. You can select an individual move order line, or multiple move order lines. It does not matter if the move order lines belong to different move orders.
Note: You can cancel move order lines only for move order requisitions and replenishment move orders.
When you transact a quantity smaller than allocated for a pick wave move order, you can enter the missing quantity. There are two types of quantities for move orders.
-
Confirmed Quantity: The quantity to transact.
-
Missing Quantity: The missing quantity for the move order.
When there is a missing quantity, you select the type of missing quantity when you update the move order allocation.
-
Navigate to the Transact Move Orders window. The Find Move Order Lines window appears.
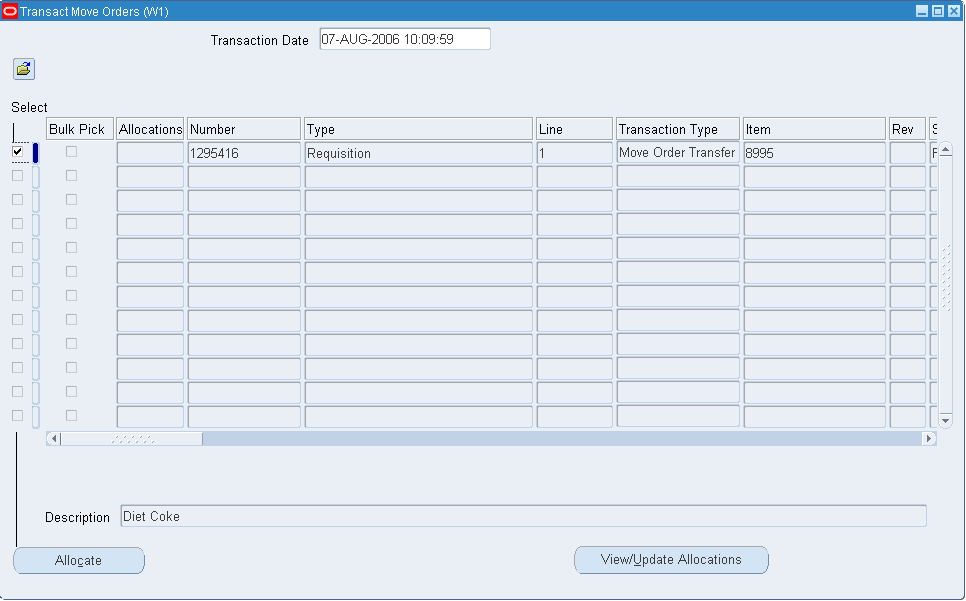
-
Enter search criteria and click Find to locate the move order lines you want to transact.
The Transact Move Orders window displays move order lines returned by your search criteria.
To allocate move order lines
-
Select the move order lines you want to allocate.
-
Click Allocations. This populates detailed suggestions into move order line allocations with specific source locations.
-
Save your work.
-
You can choose to view or update details (see procedure below) or exit the window to print a pick slip before transaction.
To view or update move order line allocations
-
In the Transact Move Orders window, choose the Select box for the move order lines you want to view or update.
-
Choose View/Update Allocations. The Transact Move Order Line Allocations window displays the move order line details.
You can view and update the following:
UOM: The unit of measure.
Requested Quantity: The quantity listed on the move order line in the primary unit of measure.
Quantity: The quantity you want to transact. You can enter 0 as the transaction quantity for pick wave move orders without any missing quantity. If you enter 0, the system deletes the allocations and the Move order line remains released to warehouse. This provides redirecting material for other sales orders at the time of Pick confirmation with out backordering and repicking the line
Allocated Quantity: Quantity allocated for the move order in the primary unit of measure.
Secondary UOM: The secondary unit of measure if the item is under dual unit of measure control.
Secondary Requested Quantity: The requested quantity that is listed on the move order line in the secondary unit of measure.
Secondary Quantity: The quantity that you want to transact in the secondary unit of measure.
Secondary Allocated Quantity: The quantity allocated in the secondary unit of measure.
Reason: The transaction reason.
Reference: Reference information about the move order line.
Missing Quantity Action: The action to perform on the missing quantity. This field is required if the quantity confirmed does not match the allocated quantity.
-
Optionally, to view and update lot and serial numbers, click Lot/Serial.
-
Optionally, click Select Available Inventory to manually select the inventory to transact. See. Manual Move Order Allocation for more information.
-
Click Update to save information in the above fields (this will not transact the lines).
-
Select the move order lines for which you want to cancel the allocations.
-
Select Cancel Allocations from the Tools menu.
To transact move orders
-
In the Transact Move Orders window choose the Select box for the move order lines you want to transact.
-
Click Transact.
You can also transact move order lines at the line detail level by selecting the lines you want to transact and then choosing Transact.
To cancel or close move order lines:
-
Select the move order lines to cancel or close.
-
Select Cancel / Close Line from the tools menu.
Related Topics
Manually Allocating and Transacting Pick Wave Move Orders
Manual Move Order Allocation
The Select Available Inventory window displays available inventory that meets the demand the move order requires. It displays only material that satisfies the picking rules that are in effect, and presents the material in order of the sort criteria on the picking rules. You can then manually select the material to allocate against the move order, and the system creates the allocations.
You can modify or delete existing allocations, as well as create new allocations. If you choose to create new allocations, the system checks whether the new allocation criteria drives the lot balances negative or whether the lot is indivisible. The system honors lot-specific conversions, process manufacturing quality matches, material status, and preferred grade if you set the profile option INV: Target Preferred Grade to Yes. The information that appears on this page is available according to the picking rules you define, and sorted in the order defined on the allocation rules. The window contains four alternative regions: Document Information, Requested, Selected, and Available Inventory Details.
Document Information
The Document Information alternative region contains the following information that is supplied automatically from the move order line:
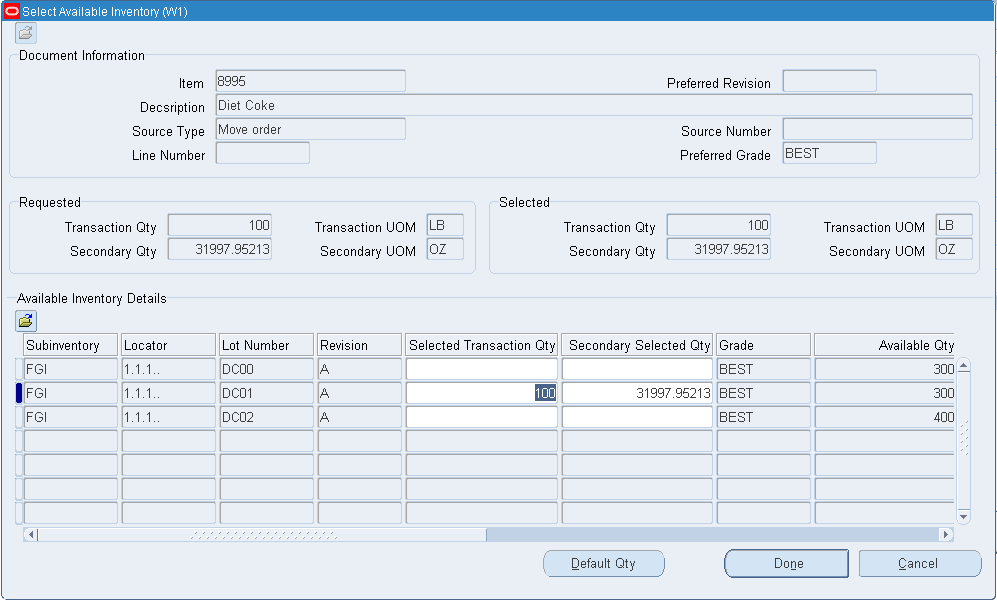
-
Item: The item number
-
Description: Item description
-
Requested Revision: Desired revision of the item
-
Source Type: WIP or transaction source type
-
Source Number: Source type number
-
Line Number: Move order line number
-
Preferred Grade: Preferred grade that is listed on the move order
Requested and Selected Transaction Quantities
The Requested and Selected alternative regions contain the requested and selected quantity information that is listed on the move order line as well as the transaction units of measure. If the item is under dual unit of measure control, the system displays the secondary unit of measure information.
Available Inventory Details
The Available Inventory Details alternative region displays the information about the currently allocated material. All of the fields except for the Selected Transaction Quantity fields and the Transaction Reason field are display-only. You can modify these fields as necessary. To delete an allocation, enter 0 in the Selected Transaction quantity fields. The Available Inventory Details alternative region contains the following information:
-
Subinventory: Subinventory from which to transact the material
-
Locator: Locator from which to transact the material
-
Lot Number: Available lot to transact
-
Revision: Revision of item to transact
-
Selected Transaction Quantity: The quantity to transact in the primary unit of measure. You can modify this field if necessary. You can click Default Qty to enter the default move order quantity in this field.
-
Secondary Selected Quantity: The quantity to transact in the secondary unit of measure if the item is under dual unit of measure control. If you modify the selected transaction quantity, this field is updated automatically. If you modify this field, then the Selected Transaction Quantity field updates automatically.
-
Grade: The grade of the lot to allocate
-
Primary Available Quantity: The total available quantity of the item to transact in the primary unit of measure.
-
Secondary Available Quantity: The total available quantity of the item to transact in the secondary unit of measure.
-
Reason Code: The reason for the transfer. See Defining Transaction Reasons for more information.
-
Quality Match: Indicates whether the material quality matches customer specifications.
Available Actions
When you finish modifying the inventory allocations you can click Default Qty to allocate according to the lot available and requested quantity. If the lot is indivisible, then the system allocates the entire lot quantity. You can click Done to accept the quantity changes that you made, or Cancel to cancel the changes.
You can also use the Tools menu to review quality specifications and results.
Related Topics
Generating Move Order Requisitions
Allocating and Transacting Move Orders
Configuring the Material Pick Wave Process
The Material Pickwave process includes the following steps:
-
Pick Release (Oracle Shipping Execution procedure
For information about Oracle Shipping Execution's pick release procedure, see: Overview of Pick Release and Releasing Sales Orders for Picking in Oracle Shipping Execution User's Guide.
-
Move Order Line Allocation
Oracle Shipping Execution's pick release procedure creates move order lines. In order to release those lines to the warehouse and print pick slips, the lines must be allocated. The process by which the Oracle Inventory picking engine generates transaction line suggestions is called allocation. The allocation process for a pick wave move order line also creates a high-level (organization-wide) reservation on the material if no reservations previously existed.
You can choose to have the system automatically allocate move order lines, or you can postpone this step and manually allocate the move order lines at a later time. In either case, pick release creates move orders in an approved status, so that no additional approval process is required in order to transact them. Postponing the allocating process can be useful to organizations that pick release across multiple warehouses but prefer to allow each warehouse to determine when to release its order lines to the floor. You use a shipping parameter in Oracle Shipping Execution to specify whether the allocating process is automatic or manual. See: Setting Up Shipping Parameters, Oracle Shipping Execution User's Guide.
You can override this default parameter at each pick release. See: Releasing Sales Orders for Picking, , Oracle Shipping Exeuctoin User's Guide.
If you choose to postpone the allocation process and perform these steps manually, you use an Oracle Inventory procedure. However you postpone the allocation, the inventory allocation rules are still used when the moved order is allocated in the Transact Move Order from. for Pick Wave Move Orders, you cannot manually enter all the allocation details, but you can update certain attributes of the allocation that the system provides. See: Manually Allocating Pick Wave Move Orders.
Note: If the item and source subinventory are reservable and no reservation existed for the sales order prior to pick release, the allocation process will create a high-level (organization level) reservation on the material to be picked.
-
Move Order Line Pick Confirmation
The move order line allocations (transaction lines) created by the allocation process must be transacted to confirm the material drop-off in staging. This process is called pick confirmation. Pick confirmation executes the subinventory transfer that moves the material from its source location in the warehouse into the staging location. Pick confirmation automatically transfers any existing reservation to an allocated reservation (including lots, revision, subinventory, and locators) in the staging location. At pick confirmation, you can report a missing quantity or change the transaction line if the picker chooses to use material from a different lot, serial, locator, or subinventory. If an organization's picks rarely deviate from the suggested picking lines and the overhead of requiring a pick confirmation is unmanageable, the pick confirm transactions can occur automatically, immediately after the lines are allocated.
You use an Oracle Inventory parameter to specify whether pick confirmation occurs automatically or whether you want your picker to pick confirm move order lines manually. See: Defining ATP, Pick, Item-Sourcing Parameters.
You can override this default parameter at each pick release. See: Releasing Sales Orders for Picking, , Oracle Shipping Execution User's Guide.
Note: If the organization is enabled for Oracle Warehouse Management, then move orders cannot be transacted on the desktop Transact Move Orders form. Rather, the move orders are transacted as tasks on mobile devices. However, the Transact Move Order from can be use to view the allocations, so long as LPNs have not been allocated. The allocations can still be manually updated from this form, but the Transact button is not available for move orders in a WMS enabled organization.
To pick confirm move order lines manually, you use Oracle Inventory's Transact Move Orders window. You use the same procedure as you do to transact move order requisitions and replenishment move orders. The manual pick confirm option allows you to transact each move order line or move order line allocation individually. This allows you to confirm the transaction of each pick. When you manually pick confirm (transact), you can update any pick details that were different from the suggestions generated by the system, including lot, serial number, and locator information. See: Transacting Move Orders.
Move orders can be over pick confirmed, within the shipping tolerances for the customer, in an Inventory organization. The operator can transact more than the requested quantity, adding additional lots and or serials as required.
If you use the automatic pick confirm process, the material is only transacted to the staging subinventory and reserved. You can still manage any discrepancies found by deleting the reservation and transacting the material back to its original subinventory. If you use mobile devices such as bar code scanners to perform inventory transactions, it is suggested that you use manual pick confirmation for greatest inventory accuracy and control. If you used the automatic pick confirm process, the the move order is not visible in the Transact Move Order form.
Note: Non-reservable items are always automatically pick confirmed, regardless of whether pick confirmation is required for the batch. If the item should be manually pick confirmed, then make the item reservable.
-
Ship Confirmation (Oracle Shipping Execution Procedure
You can customize the process by deciding when you want to allocate and pick confirm move order lines. See: Overview of Ship Confirm, Oracle Shipping Execution User's Guide.
Exception Management
Shortages
If the allocation process is unable to locate enough material to fulfill the move order line, a shortage situation exists. The move order line stores both the requested quantity and the quantity that has been sourced by the allocation process. If the requested quantity exceeds the sourced quantity, a potential shortage exists. You can view these shortages in Oracle Inventory's View Potential Shortages window or in the Shortages Summary report. A short move order line can be re-allocated using the Move Order Transaction form. See Shortage Alerts and Shortage Notifications
Reporting Missing Quantities
An inventory inaccuracy in a warehouse can result in a shortage condition that Oracle Inventory does not recognize at allocation. In this event, a picker will be unable to pick the complete quantity. If the picker was not able to pick the line as suggested, the picker can enter the quantity he or she was unable to locate in the Missing Qty field on the Transact Move Order Line Allocations window. Entering a missing quantity will change the allocated quantity on the move order line so that a potential shortage will exist. The move order line can be re-allocated in the same form, allowing the system to direct the picker to another location in inventory to find more material.
When a missing quantity is reported through the Transact Move Order Line Details window, Oracle Inventory transfers the reservation that exists for the missing quantity to a cycle count reservation. This will not create a cycle count header, but the reservation will ensure that future detailing processes do not direct pickers to the material that is reported as missing. A cycle count performed on that item in that location will consume the reservation. If automatic pick confirmation is used, a picker cannot report a missing quantity in the Transact Move Order Line Details window. A cycle count quantity can still be entered at ship confirm. A cycle count reservation will still be created, but it will now be for the item in the staging location. See: Defining Shipping Transactions, Oracle Shipping Execution User's Guide.
Opportunistic Cross Docking
You can set up your system to send a shortage alert if a shortage is encountered during the receiving process. See: Shortage Alerts and Shortage Notifications. The shortage alert notifies you of a cross docking opportunity, and you can transfer the material to a staging location instead of to a storage location. You can then re-allocate and transact the move order line. The system automatically updates the reservations to include the new items. You can also reprint a pick slip to include the new material.
Backordering to Address
You can also backorder sales order lines that have been allocated in the Transact Move Orders form. This cancels the allocations, making the allocated material available for other transactions, and set the delivery detail line status to backordered so that it can be pick released in future batches.
To Backorder Sales Order Lines
-
Query the move order lines you which to backorder.
-
Select the check boxes next to one or move move orders.
-
Select Backorder from the Tools menu. The allocations are cancelled and move order lines deleted.
Related Topics
Manually Allocating and Transacting Pick Wave Move Orders
Pick wave move orders are created by Oracle Shipping Execution's pick release process. You can use the Transact Move Orders window to perform manual allocations of the pick wave move order.
Allocation is the process that uses Oracle Inventory picking rules to determine where to source the material to fulfill a request line. The allocation process populates the move order line allocations with the actual transactions to be performed and allocates the material to the move order.
Manual allocation allows you to determine when to release the pick to the floor. This option is used with global order management with distributed warehouse management and shipping. With manual allocation, you can release orders to your regional warehouses from the central order management location in advance, allowing individual warehouses to schedule their picks closer to the actual ship date. See: Overview of Material Pick Wave Process.
Prerequisites
- Define shipping parameters.
To allocate pick wave move orders using the Transact Move Orders window, you must define shipping parameters in Oracle Shipping Execution. See: Defining Pick Release Parameters, Oracle Shipping Execution User's Guide.
To manually allocate pick wave move orders
-
Navigate to the Transact Move Orders window. The Find Move Order Lines window appears.
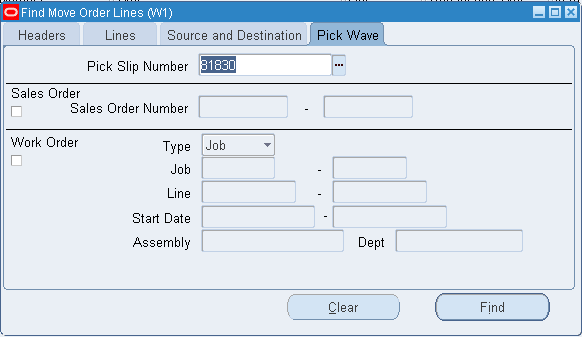
-
Select the Pick Wave tabbed region.
-
Enter search criteria and choose Find to locate the move order lines you want to allocate.
-
Select the move order lines you want to allocate.
-
Choose Location Details. This populates detailed suggestions into move order line allocations with specific source locations.
-
Save your work.
You can now print pick slips. See: Pick Slip Report, Oracle Shipping Execution User's Guide .
To transact move order lines
-
Select the lines you want to transact and choose Transact.
Related Topics
Allocating and Transacting Move Orders
Express Pick Release
Customers who use Oracle Inventory primarily for financial purposes as opposed to operational purposes can user express pick release to enhance pick release performance. The overall process for this method is as follows:
-
Create detailed reservations.
-
Pick release order.
-
Populate reservations in shipping delivery details.
-
Ship confirm order.
Express pick release makes the following assumptions:
-
There are no locators in the warehouse.
-
The same subinventory is used for storing and staging shipped material.
-
Detail level reservations are created before you run pick release, or during order or after order import.
-
For plain and serial controlled items, the reservation must specify the subinventory.
-
For lot-controlled items, the reservation must specify the subinventory and lot number.
-
For revision controlled items, the reservation must specify the revision.
If the above conditions are met, the logic in pick release is set to bypass creating of move order lines, quantity tree and reservations, and pick confirm.
-
-
The following are not supported for express pick release:
Pick slip reported is not created
Ship model complete is not supported
Related Topics
Implementing Profile Options Summary
Overview of Material Pick Waves
Reservation Details
There are different series that can occur based on reservation details. Some of the scenarios are as follows:
All Reservations Complement Detailed
If the reservation quantity in the detailed reservations is equal to or greater then the quantity on the delivery detail, update the reservations as staged and updated the delivery as staged.
Some Reservations Completely Detailed
If the reservation quantity in the detailed reservations is less than the quantity on the delivery detail, then update the reservation as staged and split the delivery. The system updates the delivery for the detailed reservations that exist as staged. The system also marks the reminding delivery details as Ready to Release. You can then process these delivery details in a pick release where the Express Pick Release profile is not set to Yes.
No Reservations Completely Detailed
If the reservation quantity in the detailed reservations is zero, the system marks the delivery detail as Ready to Release. These deliver details can be process in a pick release where the express pick profile is not set to Yes.
Serial Items
The system finds and marks the serial numbers then creates serial number records in MTL_SERIAL_NUMBERS_TEMP (MSNT) and updates shipping with transaction_temp_id associated with MSNT records.
Related Topics