On-hand and Availability
This chapter covers the following topics:
- Overview of On-hand and Availability
- Material Workbench
- Material Workbench Information
- Material Workbench Transactions
- Viewing Inventory Positions
- Requesting the Multi-Organization Quantity Report
- Viewing Item Supply and Demand Information
- Item Reservations
- Creating Reservations
- Viewing Reservation Interface Activity
- Reservations Interface Folder Window Available Fields
- On-hand Availability Reports
Overview of On-hand and Availability
Oracle Inventory enables you to view on-hand quantities, reservations, and supply and demand information.
Features
-
View material quantities and locations. See: Material Workbench.
-
Request a report of item quantities across multiple organizations. See: Requesting the Multi-Organization Quantity Report.
-
View item supply and demand. See: Viewing Item Supply/Demand Information.
Material Workbench
The Material Workbench enables you to view material in receiving, on-hand quantities, and intransit material. You can also view material across organizations. In addition, you can create and save queries, create move orders, and request cycle counts, as well as change material statuses.
Viewing On-Hand Quantities
-
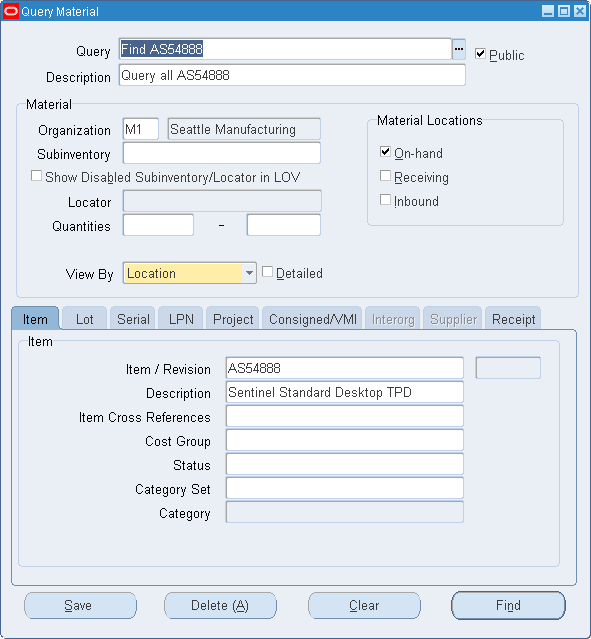
Navigate to the Query Material window.
-
Optionally, enter a query name to create a new query, or select a query from the list of values to use an existing query.
Note: The Public Query check box indicates whether all users can use the query. If the query is not public, then only the user who created the query can use it.
-
Modify the search organization if necessary. You can clear the search organization to view item quantity across organizations. You can view only material in organizations to which you have access. If you do not enter an organization, you must enter an item.
-
Optionally, enter a material location. The available choices are:
-
On-hand: This material currently resides in a storage subinventory.
-
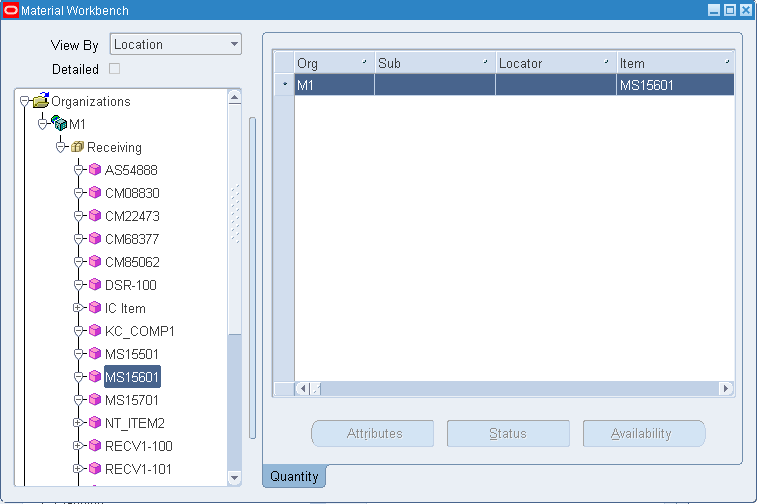
Receiving: This material resides in a receiving subinventory.
-
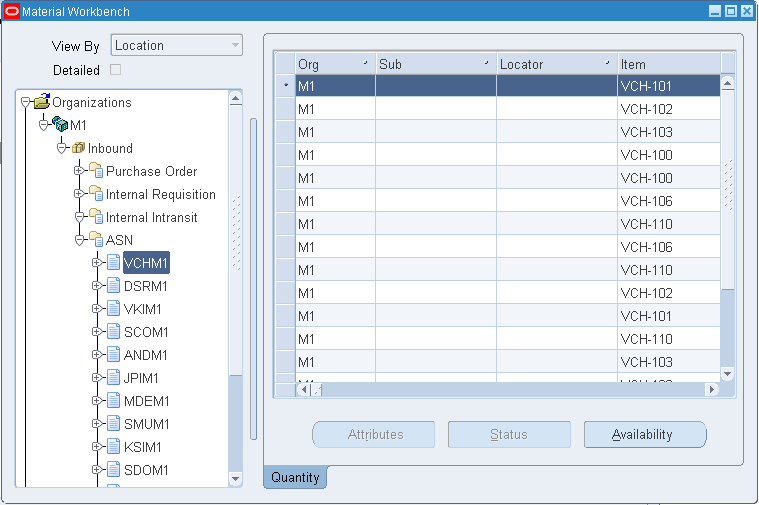
Inbound: This material is en route to the warehouse.
Note: If you select Inbound as the material location, you can view by location only.
For more information about subinventory types see, Defining Subinventories .
You can select any combination of material locations. The following table shows the search restrictions that apply.
Tab On-hand Receiving Inbound Item Yes Yes Yes Lot Yes Yes Yes Serial Yes Yes Yes LPN (License Plate Number) Yes Yes Yes Project Yes No No Consigned / VMI Yes No No Interorg No No Yes Supplier No No Yes -
-
Optionally, enter the subinventory to search if you selected Receiving or On-hand as the material location type. If you select both Receiving and On-hand, then you cannot enter a subinventory.
-
If you entered a subinventory to search, enter a locator if desired.
-
Optionally, enter the range of quantities.
-
Select how to view the query results. The available choices are:
-
Location
-
Item
-
Cost Group
-
Status
-
LPN (This option is available if you are in an Oracle Warehouse Management enabled organization)
-
Serial
-
Lot
-
Grade
Note: The lot information the system displays in the Material Workbench depends on the information that you enter in the query window. If you do not enter item or lot information in the Query window, then the lot information the system displays shows only fields from the global context. If you enter the lot information, but not item information, the Material Workbench displays the global context as well as the inventory context. If you enter the lot controlled item and the lot information in the Query window, then the system displays the global context, the inventory context, and the Oracle Warehouse Management context if you are in a warehouse enabled organization.
-
-
Optionally, enter more search criteria under the following tabs:
-
Item
-
Item / Revision: This is the item and revision number.
Note: If you select multiple material locations, then you must enter an item.
-
Description: This is the item description that you enter on the Item Master. This field is populated automatically when you enter the item number.
-
Item Cross References: This is the item cross-reference designation.
-
Cost Group: This is the cost group that is associated with the material. You can enter cost-group information only if you are in an Oracle Warehouse Management enabled organization.
-
Client: Query by a particular client name.
Note: This field appears only when the profile option WMS: Deployment Mode is set to LSP Mode.
-
Status: This is the item material status.
-
Category Set / Category: Define your query for items within a category set. Optionally, you can select a category within the selected category set to restrict your query further.
-
-
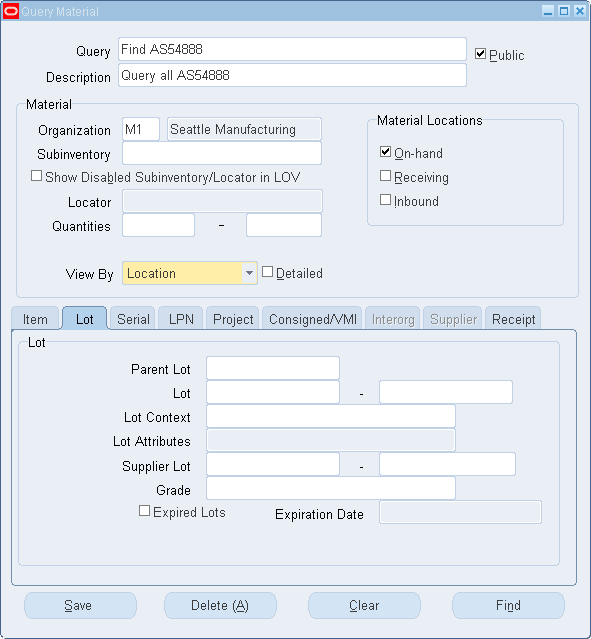
Lot
-
Parent Lot: Query by parent lot to return all sublot numbers associated with the parent lot. You can then select the lots associated with the parent and then perform a status update or mass move (options that are available from the Tools menu).
-
Lot: Enter a range for the lot numbers to be included in the search. In the first field, enter the starting lot range for the query (for example, 10), and in the second field, enter the end of the range (for example, 40).
Note: If you entered a parent lot, then you can select only the child lots of the parent lot in the Lot field.
-
Lot Context: This is the lot context on which you want to search. Lot contexts are item flexfields that you define. You can search on lot context only if you are in an Oracle Warehouse Management enabled organization.
-
Lot Attributes: This is the attribute of the lot on which you want to search, for example, lot expiration action.
-
Grade: This is the lot grade on which you want to search for example, good, poor, or average.
-
Expired Lots: Select this check box to search for all lots that have expired as of the date that you specify in the adjacent Expiration Date field. When you select the Expired Lots check box, the system date appears by default in the Expiration Date field. You can modify this default as necessary.
-
-
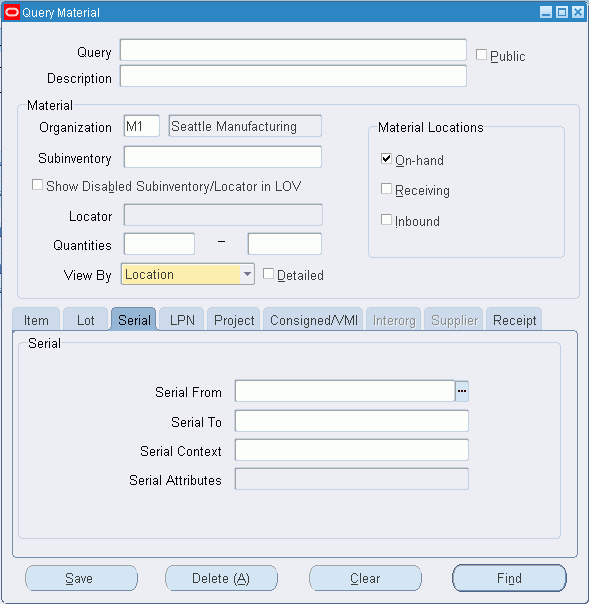
Serial
-
Serial From / Serial To: These fields determine the range of serial numbers on which you want to search.
-
Serial Context: This is the serial context on which you want to search. Serial contexts are item flexfields that you define. You can search on serial context only if you are in an Oracle Warehouse Management enabled organization.
-
Serial Attributes: These are the attributes of the serial number on which you want to search.
-
-
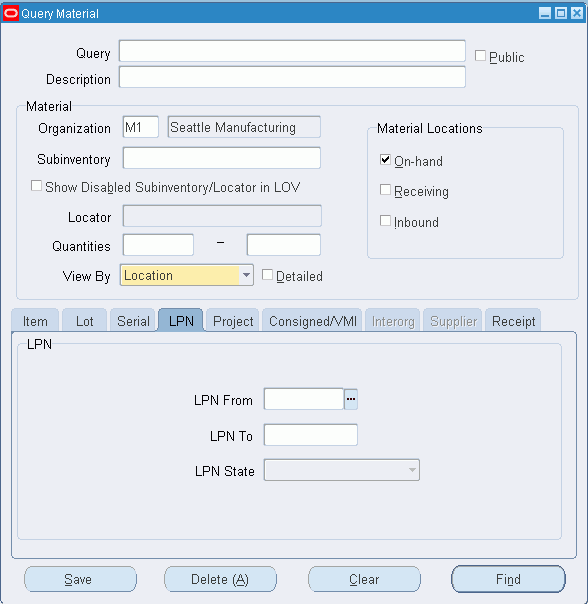
LPN
-
LPN From / LPN To: These fields determine the range of LPNs on which you want to search
-
LPN State: This is the current state of the LPN on which you want to search. Examples include Resides in Inventory and Loaded for Shipment. See, LPN Contexts, Oracle Warehouse Management Implementation Guide.
-
-
Project
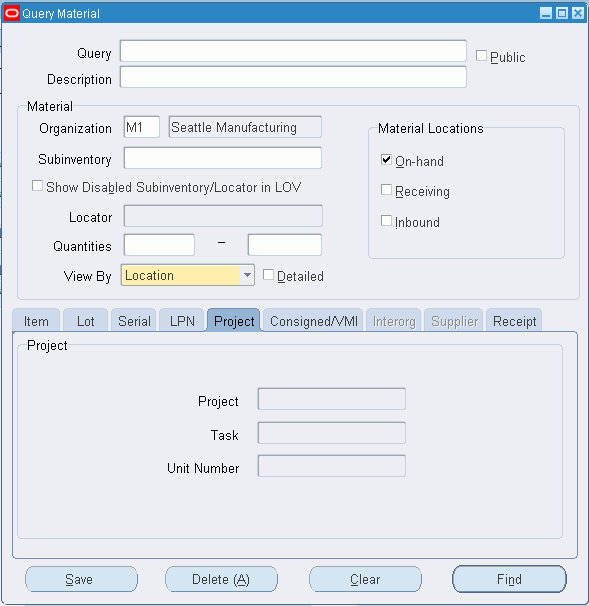
-
Project: The project for which you want to find material.
-
Task: The task for which you want to find material.
-
-
Consigned / VMI
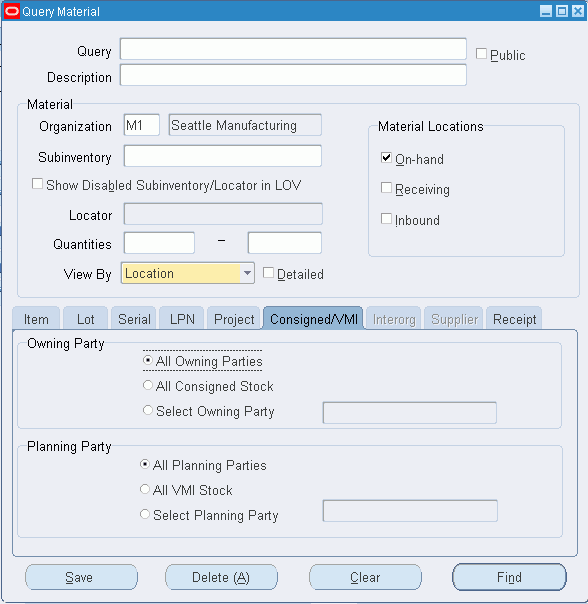
-
Owning Party: Optionally, select from the following owning party options.
-
All Owning Parties: This option enables you to search for material for all owning parties.
-
All Consigned Stock: This option enables you to search for all consigned stock.
-
Select Owning Party: This option enables you to specify an owning party, and searches only for material the owning party owns.
-
-
Planning Party: Optionally, select from the following planning party options.
-
All Planning Parties: This option enables you to search for material for all planning parties.
-
All VMI Stock: This option enables you to search for all VMI stock.
-
Select Planning Party: This option enables you to specify a planning party, and searches only for material that is associated with that planning party.
-
-
-
Interorg
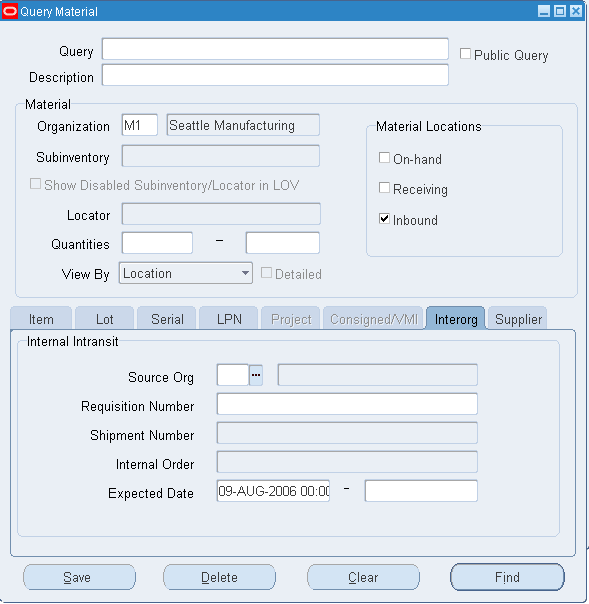
-
Source Org: This is the shipping organization. The system considers the current organization the destination organization.
-
Requisition Number: This field displays the internal requisition number. The list of values displays all requisitions for the destination organization. If you enter a source organization, then the list of values displays only requisitions that match the source organization that you entered, and the current organization.
-
Shipment Number: This field displays the shipment number for the inter-organization transfer. You cannot enter a shipment number if you do not enter a source organization.
-
Internal Order: This field displays the internal order number. You cannot enter an internal order number if you do not enter a source organization.
-
Expected Receipt Date: This field displays the expected receipt date for the purchase order, ASN, inter-organization shipment, or requisition.
-
-
Supplier
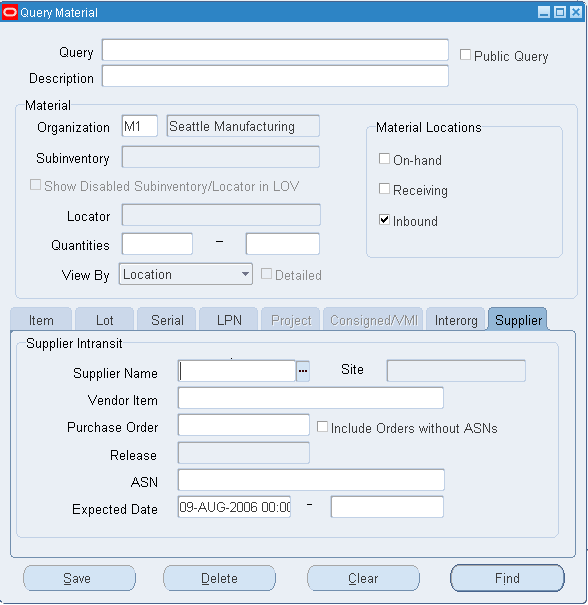
-
Supplier Name: The name of the supplier from which you receive the material.
-
Site: The supplier location that shipped the material.
-
Purchase Order: The purchase order number.
-
Include Orders without ASNs: If you select this check box, then the system includes orders for which you did not receive ASNs in the inbound material query. The system uses the promise date to determine the arrival of the inbound material. If you do not select this check box, then the system includes only ASNs in the inbound material query.
-
Release Number: The blanket purchase agreement release number. You can enter a value in this field only if you entered a PO number in the Purchase Order field.
-
ASN: The ASN number you received that indicates an inbound shipment is intransit to the warehouse.
-
Vendor Item: This is the supplier internal item number.
-
Expected Date: This field displays the expected receipt date for the purchase order, ASN, inter-org shipment, or requisition.
-
-
Receipt

-
Receipt: Query on-hand balances by the receipt number for the delivery transaction.
-
-
-
Click Find.
Material Workbench Display Options
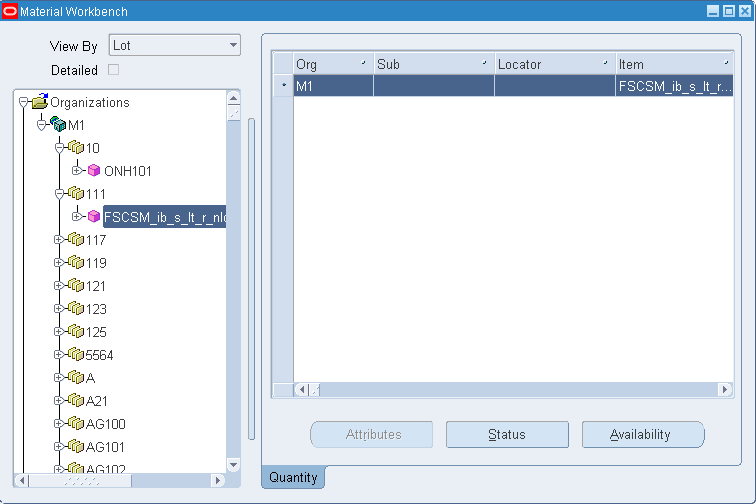
The viewing option that you select dictates the information the Material Workbench displays. The viewing options are:
-
Location: Location information includes the subinventory and associated locators. You can also view subinventory quantities, including the packed and unpacked quantities. This is the only view by option that you can use if the material location type is Inbound.
-
Item: Item information includes the organization, item number, UOM, available quantity, lot, and serial number. You can use this option only if the material location type is On-hand.
-
Cost Group: Cost Group information that is assigned to the item. You can use this option only if the material location type is On-hand.
-
Status: Status information that includes the statuses assigned to subinventories, locators, lots, and serials. You can use this option only if the material location type is On-hand.
-
LPN: If you are in an Oracle Warehouse Management enabled organization, you can view LPN information for the item. You can use this option if the material location type is On-hand, Receiving, or both.
-
Serial: Serial information lists the serial numbers that are generated for an organization, and the items that are associated with the serial numbers. You can use this option only if the material location type is On-hand.
-
Lot: The system lists the lot numbers that are generated for an organization and the items that are associated with the lot numbers. You can use this option only if the material location type is On-hand.
-
Grade: The system lists the grade and the items that have a particular lot grade. You can use this option only if the material location type is On-hand.
Material Workbench Information
The Material Workbench contains two panes the View by pane, and the Quantity pane. You determine the information that appears on the view by pane when you select a view option on the Find Query window. The material location option that you select dictates which viewing options the information the Material Workbench displays. The following table shows the view by restrictions.
| View By | On-hand | Receiving | Inbound |
|---|---|---|---|
| Location | Yes | Yes | Yes |
| Item | Yes | No | No |
| Cost Group | Yes | No | No |
| Status | Yes | No | No |
| LPN | Yes | Yes | No |
| Serial | Yes | No | No |
| Lot | Yes | No | No |
| Grade | Yes | No | No |
Material Workbench View by Information
The Material Workbench tree shows the different types of inventory. The Material Workbench lists each type of material location (on-hand, receiving, and inbound) as a different node under an organization. The information under each material location type differs. The on-hand and receiving material location types enable you to view material in on-hand and receiving subinventories. The document type node enables you to view incoming material. You can view information about purchase orders, intransit shipments, and internal orders.
As you navigate through the tree structure, the information the quantity pane displays changes. The quantity pane summarizes the material information at the next lower level from the current tree node. For example, if you select the top-level Organizations node, then the quantity pane summarizes information for each organization. If you select a particular organization on the tree structure, then the quantity pane displays information for the subinventories of the organization.
Material Workbench Quantity Information
The following information is available on the Quantity pane of the Material Workbench:
-
Organization: The current organization where the material resides.
-
Item: The item number.
-
Primary UOM: The item base unit of measure.
-
On-hand: The on-hand availability of an item in the primary UOM.
-
Receiving: The amount of material that resides in a receiving subinventory in the primary UOM.
-
Inbound: The expected inbound amount in the primary UOM.
-
Unpacked: Indicates the number of unpacked items in the subinventory in the primary UOM.
Note: You cannot view this field if you select LPN as the display option.
-
Packed: Indicates the packed quantity in the primary UOM.
-
Secondary UOM: The secondary UOM. This field is hidden by default.
-
Secondary On-hand: The on-hand availability of an item in the secondary UOM. This field is hidden by default.
-
Secondary Receiving: The amount of material that resides in Receiving in the secondary UOM. This field is hidden by default.
-
Secondary Inbound: The expected inbound amount in the secondary UOM. This field is hidden by default.
-
Secondary Unpacked: The number of unpacked items in the subinventory in the secondary UOM. This field is hidden by default.
Note: You cannot view this field if you select LPN as the display option.
-
Secondary Packed: The packed quantity in the secondary UOM. This field is hidden by default.
-
Cost Group: The item cost group.
Note: You cannot view this field if you select Item as the display option.
-
Planning Party: The vendor that manages the inventory.
-
Owning Party: The third-party owner of the inventory.
-
Subinventory: The subinventory where the item resides.
Note: You cannot view this field if you select Item, Location, or Cost Group as the display option.
-
Revision: The item revision number.
Note: You cannot view this field if you select Cost Group or Status as the display option.
-
Locator: The row, rack, and bin location of the item within a subinventory.
Note: You cannot view this field if you select Cost Group, Item, or Lot as the display option.
-
Lot: The lot that is associated with the item.
Note: You cannot view this field if you select Cost Group as the display option.
-
Lot Expiration Date: The lot expiration date for the item.
Note: You cannot view this field if you select Cost Group or item as the display option.
-
Serial: The item serial number.
Note: You cannot view this field if you select Cost Group as the display option.
-
Unit Number: The item unit number, if applicable.
Note: You cannot view this field if you select Cost Group, Item, or Lot as the display option.
-
LPN: The LPN where the item resides
Note: This field appears only if you are currently in a Warehouse Management enabled organization, and you select LPN or Location as the display type.
-
Loaded: Indicates whether the item is loaded on to equipment.
Note: This field appears only if you select LPN or Location as the display type.
-
LPN State: The state in which the inventory resides. An example of an LPN state is, resides in inventory.
Note: This field appears only if you are currently in an Oracle Warehouse Management enabled organization, and you select LPN as the display type.
-
Lot Expiry Date: This is the date the lot expires if the item is under lot control. This field is hidden by default.
-
Grade: The lot grade if the item is under lot and grade control. This field is hidden by default.
-
Origination Type: This is how the system created the lot. For example, you can create a lot in the lot master (lot master) or during a miscellaneous receipt (inventory). This field is hidden by default.
-
Origination Date: The lot creation date. This field is hidden by default.
-
Action Date: The date to perform the lot expiration action. This field is hidden by default.
-
Action Code: If the item is under lot control, this is the action to take when the lot expires. This field is hidden by default.
-
Retest Date: The date to retest the lot if applicable. This field is hidden by default.
-
Parent Lot: If the lot is under parent-child lot control, this is the parent lot number. This field is hidden by default.
-
Maturity Date: The date when the lot reaches full maturity. This field is hidden by default.
-
Hold Date: The date on which you can release the lot. This field is hidden by default.
-
Supplier Lot: The supplier lot number. This field is hidden by default.
-
Document Type: The document type for inbound material. The available values are purchase order, internal order, RMA, and intransit shipment.
-
Document Number: The document number for the inbound receipt, for example, the purchase order number.
-
Document Line Number: The line number on the document number, for example the purchase order line number.
-
Release Number: The release number for a blanket purchase order.
-
Shipment Number: The shipment number for an intransit shipment.
-
ASN: The advanced shipment notice number.
-
Trading Partner: The trading partner for the intransit material.
-
Trading Partner Site: The supplier site for the intransit material.
-
From Organization: The shipping organization for interorg transfers.
-
To Organization: The receiving organization for interorg transfers.
-
Expected Receipt Date: The expected receipt date for inbound material.
-
Shipped Date: The date the material was shipped.
-
Owning Organization: The owning organization for interorg transfers.
-
Status: Indicates the on- hand material status.
Related Topics
Viewing Item Availability
You can use the Material Workbench to view item availability. The system can calculate item availability for a given item at the subinventory, locator, lot, serial, or revision level.
On-hand Availability:
-
Select the item you want to view. If you are viewing receiving material locations, you cannot view item availability.
-
Click Availability.
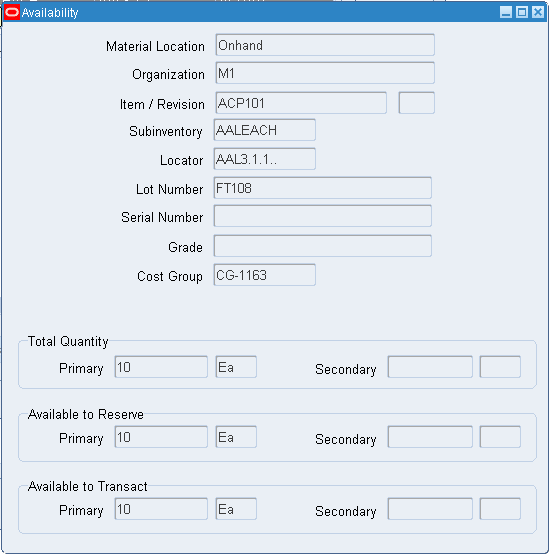
You can view the following information in the Availability window:
-
Material Location:The item material location.
-
Organization: The organization where the item resides.
-
Item / Revision: The item and revision number.
-
Subinventory: The subinventory within the organization where an item resides.
-
Locator: The row, rack, and bin where the item resides.
-
Lot Number: The item lot number if the item is under lot control.
-
Serial Number: The item serial number if the item is under serial control.
-
Grade: The lot grade if the item is under lot and grade control.
-
Cost Group: The item cost group.
-
Primary On-hand: The number of items that are available in the subinventory in the primary UOM.
-
Secondary On-hand: The number of items that are available in the subinventory in the secondary UOM.
-
Primary Available to Reserve: The available quantity of an item that you can reserve across an organization in the primary UOM.
-
Secondary Available to Reserve: The available quantity reserve across the organization in the secondary UOM.
-
Primary Available to Transact: The available quantity of an item that you can transact across an organization in the primary UOM.
-
Secondary Available to Transact: The available quantity of an item that you can transact in the secondary UOM.
-
Innermost LPN: The LPN within a subinventory where an item resides.
Note: This field appears only if you are in a warehouse management enabled organization.
-
-
Close the Availability window.
Inbound Availability
If you are viewing inbound material, you can view availability information for items that you expect to receive.
-
Select an item for which you want to view availability information.
-
Click Availability.
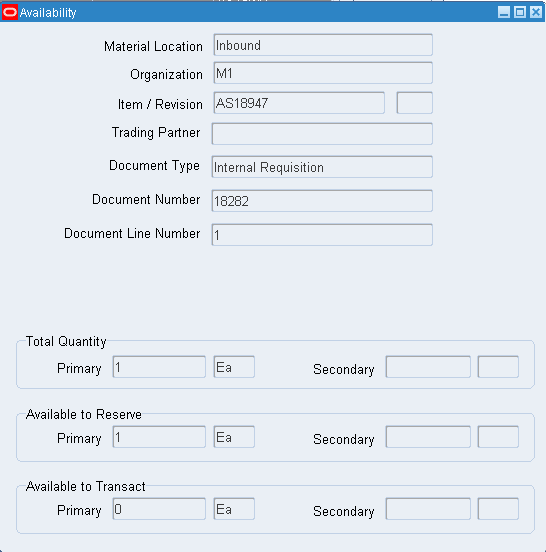
You can view the following information in the Inbound Availability window:
-
Material Location: The item material location.
-
Item / Revision: The item and revision number.
-
Organization: The receiving organization.
-
Trading Partner: The trading partner from which you receive the material. This value is either a supplier or another organization.
-
Document Type:The document type. The available values are purchase order, internal order, or intransit shipment.
-
Document Number: The document number that is associated with the document type.
-
-
Close the Availability window.
Viewing Item Status Information
You can use the Material Workbench to view material status information. You can view the subinventory, locator, lot, or serial status. You can also see the allowed and disallowed transaction types for the item.
To view status information:
-
Select the desired item.
Note: If you selected Cost Group as the display option, you cannot view status information.
-
Click Status.
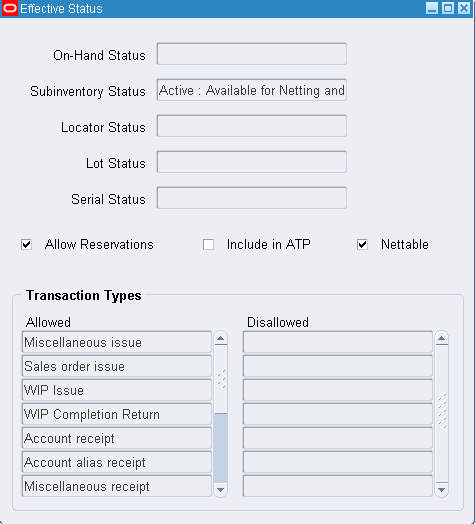
You can view the following information in the effective status window:
-
On- Hand Status:The on-hand status. This field is blank if the material status is not tracked at the on-hand level in the organization.
-
Subinventory Status: The subinventory status.
-
Locator Status: The locator status. This field is blank if the item is not locator controlled.
-
Lot Status: The lot status. This field is blank if the item is not lot controlled.
-
Serial Status: The serial status. This field is blank if the item is not serial controlled.
-
Allow Reservations: This check box shows if the effective status of this material allows reservations
-
Include in ATP: This check box shows if you can include the material in ATP.
-
Nettable: This check box shows if the subinventory or locator is nettable.
-
Transaction Types: The transaction types alternative region displays the allowed and disallowed transaction types for the item.
-
Viewing Attribute Information
You can view the attributes of a particular lot, serial, or LPN (Warehouse Management only) from the Material Workbench. For lots or serials, the system displays the item attributes and categories. For LPNs the system displays the weight and volume of the selected LPN.
To view attribute information:
-
Click Attributes.
Note: If you selected Cost Group, Location, or Status as the display option, you cannot click Attributes.
Note: If you select Items, Serial, or Lot as the display type, you can view only items that are under serial or lot control. If you select LPN (available only in an Oracle Warehouse Management enabled organization) as the display type, you can view only the LPN attributes.

-
Close the window when finished viewing the attributes.
Material Workbench Transactions
You can use the Material Workbench Tools menu to perform the following transactions:
-
Mass Move: Moves the selected items to a new subinventory.
-
Mass Issue: Enables you to mass issue an item.
-
Status Update: Enables you to change status information.
-
Cost Group Transfer: Enables you to transfer the item to another cost group.
-
Cycle Counting: Enables you to initiate a cycle count for the selected subinventory.
-
Grade Update: Enables you to update a lot grade.
To perform a mass move
-
Select the item to move in the Material Workbench.
-
Select Mass Move from the Tools menu.
-
Enter the destination subinventory.
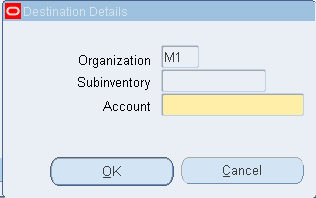
-
Click OK.
To perform a mass issue
-
Select the item to issue in the Material Workbench.
-
Select Mass Issue from the Tools menu.
-
Enter the destination account.
-
Click OK.

To perform a status update
-
Select the item to update in the Material Workbench.
-
Select Status Update from the Tools menu.
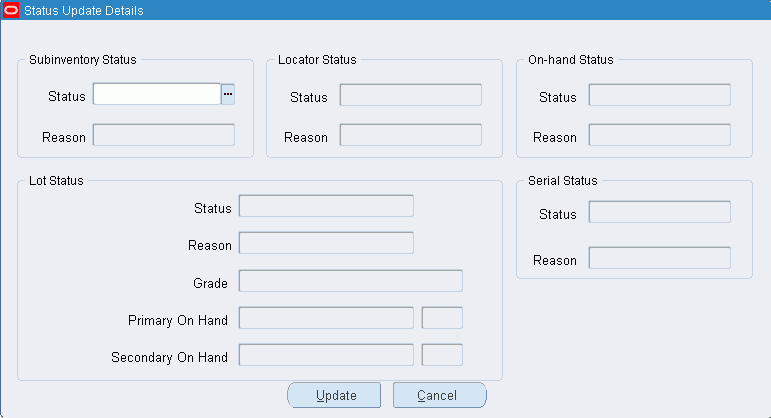
Note: The system administrator can restrict access to fields and status levels on the Status Update Details window by setting security parameters on the Form Functions window. For more information, see To set up security parameters for the Status Update Details window (Material Workbench).
-
Enter the applicable status changes.
Note: If you do not set an inventory control for the item, you cannot update that status. For example, if the item is not lot controlled, you cannot update the lot status.
-
Enter the applicable reason changes.
Note: If you do not set an inventory control for the organization, you cannot update that status reason.
To perform a cost group transfer
-
Select the item in the Material Workbench.
-
Select Cost Group Update from the Tools menu.
-
Enter the new cost group in the Transfer Cost Group field.
Note: You must be in a warehouse management enabled organization to change cost groups.
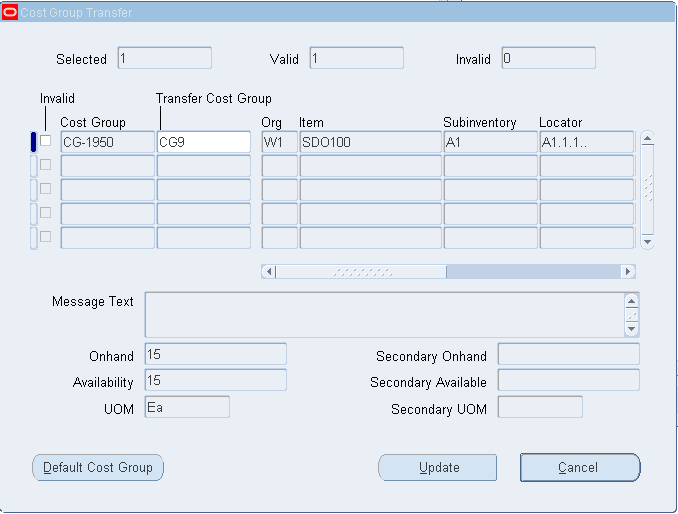
-
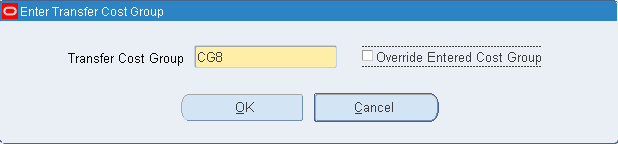
Optionally, enter a default cost group.
-
Enter the new cost group in the Transfer Cost Group field.
-
Select Override Entered Cost Group to override any cost group that is entered in the Transfer Cost Group window.
-
Click OK.
-
Click Update.
To create a cycle count
-
Select the item in the Material Workbench.
-
Select Cycle Counting from the Tools menu.
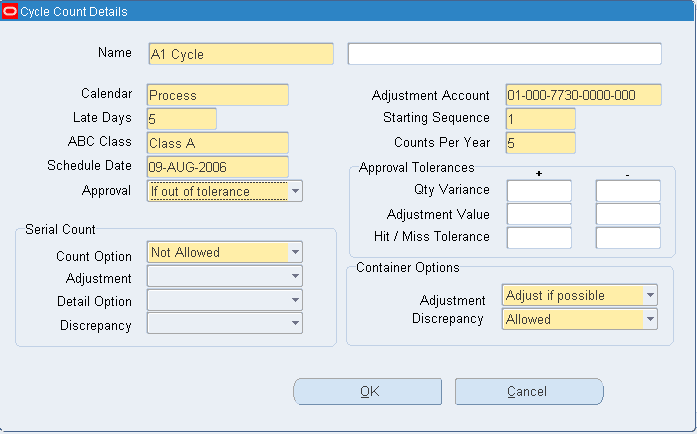
-
Enter the cycle count details. For more information, see Cycle Count Items, Defining Cycle Count Items andCycle Count Scheduling .
-
Click OK.
To perform a grade update
-
Select the item in the Material Workbench.
Important: You must view the on-hand quantity by grade in the Material Workbench window to perform a grade upgrade. To view the quantity by grade, select Grade from the View By list in the Material Workbench window.
-
Select Update Grade from the Tools menu. The Grade Update Details window displays the From Grade, Reason, Primary On-hand, and Secondary On-hand information.
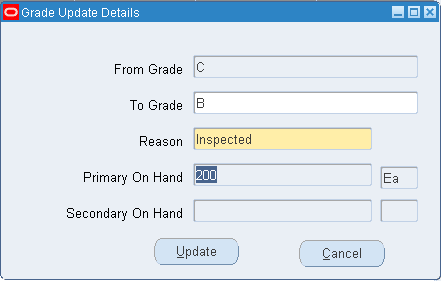
-
Enter the new grade in the To Grade field.
-
Enter the reason for the update.
-
Click Update to change the grade, or Cancel to cancel the transaction.
Viewing Inventory Positions
You can view inventory on-hand quantities of an item or a group of items across multiple organizations. In particular, you can view the inventory position of a given organization hierarchy origin as the sum of the inventory positions of all subordinate organizations to that hierarchy origin.
You can inquire on inventory quantity information, such as the quantity on-hand, the quantity received in a particular time period, and the quantity issued in the same time period for a particular item across multiple levels of a specified organization hierarchy.
Complete the following tasks in order to view you inventory position across multiple inventory organizations:
-
Define Query Criteria
-
Display Inventory Positions
-
Purge Unused Data
To define query criteria
In order to view inventory positions you need to specify query criteria.
-
Navigate to the Build Inventory Positions form.
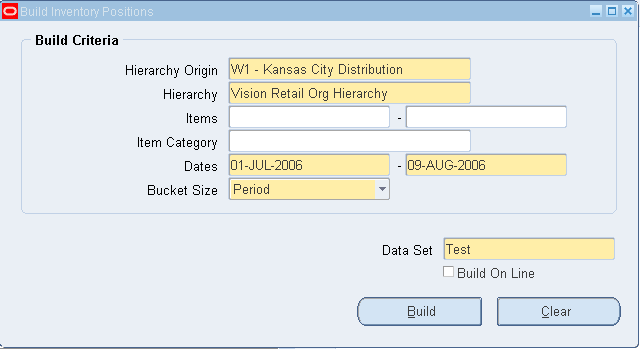
To narrow the focus of information that you want to view, enter search criteria for the following fields:
-
Hierarchy Origin: Enter a hierarchy origin (organization) for which you would like to define query criteria. This organization may have subordinate organizations.
-
Hierarchy: Enter a valid organization hierarchy name from the list of values. You can choose any organization hierarchy in which the current organization is a member, and view inventory positions for all subordinate organizations, inclusive of the hierarchy origin. You can choose any hierarchy in which all organizations subordinate to the hierarchy origin share the same item master.
-
Items: Optionally, enter the range of item numbers that you would like to view. If you do not enter an item number range, you must enter item category information.
-
Item Category: Enter the category set name. You will be prompted to enter family and class information for the category.
-
Dates: Enter a date range.
-
Bucket Size: Specify the different time bucket sizes. Possible values are Period, Week, Day and Hour.
-
Data Set: Enter a name of the data set.
-
Build On Line: You can run the Inventory Position Processor program on line or a concurrent request later. If the program is run on line, it invokes the Inventory Position Display form, which is otherwise called independently.
-
-
Press the Build button.
The Inventory Position Processor concurrent program populates a temporary table with the inventory position data.
To display inventory positions
You can display a graphical tree representation of position information for each organization and for each organization hierarchy level.
-
Navigate to the Display Inventory Positions form.
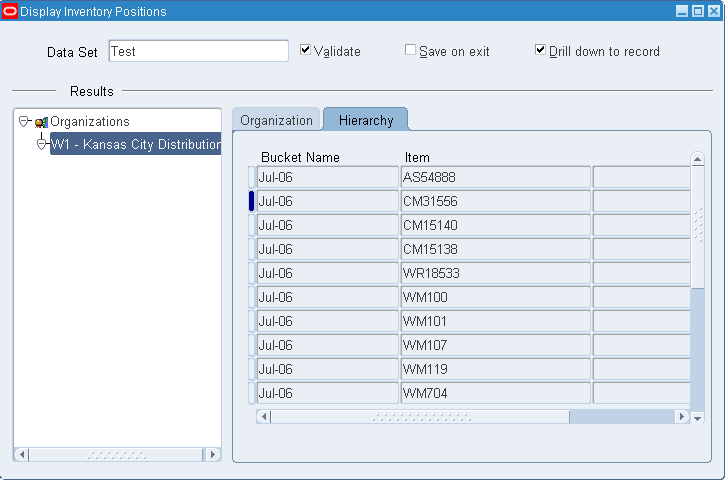
-
Drill down from the Hierarchy Origin Organization to base level organizations using a graphical tree representation of your hierarchy. The tree represents the organization hierarchy that was chosen when the data set was built.
In the Organizations tab, you can examine quantity received, quantity issued and ending quantity on hand for any organization in the hierarchy, arranged into time buckets.
In the Hierarchy tab, you can see the aggregate ending on hand balances for the hierarchy level you have chosen. By selecting the top level organization and entering the Hierarchies tab, you can see the total ending on hand balances for the entire hierarchy.
-
Save your work.
To purge unused data
You can delete unused data sets using flexible criteria.
-
Use the Request Reports or Submit Requests window and enter Inventory Position Purge in the name field to submit the report.
-
Enter the following parameters:
Data Set: Enter the Data Set Name that you would like to purge.
Created By: Enter the appropriate profile information.
Created Before: Enter a date. All data older than this date will purge.
-
Submit your request.
Important: You can export data sets that you built and viewed by accessing the data in the same table used for on line view.
To view Quality results
-
If Oracle Quality is installed and if there are quality results for the current line, you can select the Quality button to open the View Quality Results window.
Related Topics
Customizing the Presentation of Data in a Folder, Oracle Applications User's Guide
Creating Organization Hierarchies, Using Oracle HRMS- The Fundamentals
Requesting the Multi-Organization Quantity Report
Use the Multiple Organization Inventory Report to show the inventory quantity on hand for items in more than one organization. The report has no limitations on the number of organizations you can enter. The report is sorted by inventory item for all of the organizations. You can include quantities that are in transit. If you have revision control items, you can report on the revision quantities individually (for each revision) or summed for the item. You can run the report for all items, or you can specify a range of items.
To request the Multi-Organization Quantity Report
-
Navigate to the Run Multi-Organization Quantity Report window.
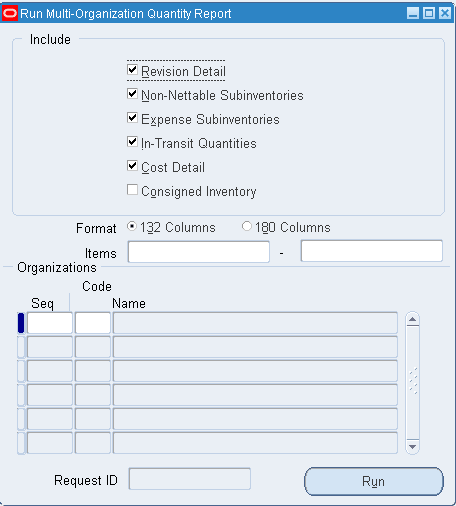
-
Indicate whether to report items in intransit inventory.
-
Indicate whether to report the revision level of items.
-
Enter the range of items to include in the report. If you leave this field blank, the report contains all inventory items.
-
Enter the organization codes for the organizations you want to include in the report. If you leave this field blank, the report will run for all organizations. The Seq field displays a number indicating the order in which the organization appears on the report.
-
Choose Run to submit the report.
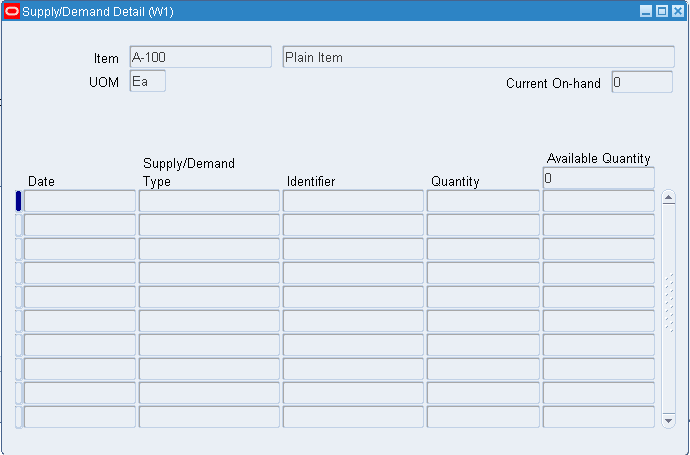
Viewing Item Supply and Demand Information
You can view supply/demand information, and the current and projected available quantities of an item.
To choose the item for which you want to view supply/demand information
-
Navigate to the Find Supply Demand Item window.
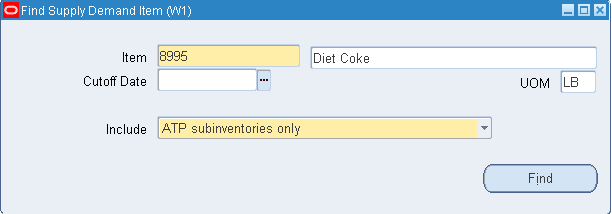
-
Enter the item for which to review supply and demand history.
-
Optionally, enter a cutoff date. Supply and demand scheduled beyond the cutoff date are not displayed in the Supply/Demand Detail window.
-
Select the on-hand source. Choose from ATP subinventories only, Net subinventories only, or All subinventories.
-
Click Find. The results display in the Supply/Demand Detail window.
-
View information for:
Supply/Demand Type: The supply source or demand source type, such asAccount number, Purchase order, Sales order, and WIP discrete job.
Identifier: The identifier for the supply source or demand source, such as the purchase order number or work in process discrete job number.
UOM: The primary unit of measure for the item.
Quantity: The scheduled supply quantity or demand quantity for the item. Demand quantities are displayed as negative numbers. Supply quantities are displayed as positive numbers.
Available Quantity: The projected on-hand quantity of the item, defined as Current Available + all future sources of supply and - all future sources of demand.
Secondary UOM: The item secondary UOM if applicable.
Secondary Quantity: The scheduled supply quantity or demand quantity for the item in the secondary UOM. Demand quantities are displayed as negative numbers. Supply quantities are displayed as positive numbers.
Secondary Available Quantity: The projected on-hand quantity of the item defined as Current Available + All future sources of supply - all future sources of demand in the secondary UOM.
Important: Oracle Inventory does not deduct a reservation from this value as it already deducted reservations from Current On-hand to calculate Current Available.
Related Topics
Searching for Information, Oracle Applications User's Guide
Item Reservations
A reservation is a link between a supply source and a demand source. A reservation creates a permanent data link between a supply source and a demand source, and represents a guaranteed allotment of material to a specified demand source. Item reservations prevent the allocation of material you previously set aside for a sales order, account, account alias, inventory allotment, user-defined source, process batch components or, Oracle Complex Maintenance and Repair Overhaul work order components. You can also create reservations for different types of supplies such as on hand inventory, purchase orders, internal requisitions, discrete jobs, shop floor jobs, and process manufacturing batches. In addition you can create reservations for ASNs and material in receiving for Warehouse Management enabled organizations.
For on hand inventory supply, there are two types of reservations, high level reservations, and low level reservations. High level reservations contain information about the item and the organization. Low level reservations contain more detailed information about the item such as revision, lot, subinventory, serial, and locator. You use the Item Reservations window to create, view, update, transfer, and delete reservation requests.
Crossdocking and Reservations
If you are in a Warehouse Management enabled organization, and use crossdocking for fulfilling sales order demand, then the system uses planned crossdocking to create a reservation between incoming supply and sales order existing demand. At supply receipt, the system directs you to move the material to appropriate staging lane instead of to a storage location.
Material Status and Reservations
You cannot create reservations against items with a non-reservable material status. You also cannot create a reservation that causes on hand quantity to be negative. Though you can create reservations against individual serial items, you may not be able to reserve items because of material status. This also applies to subinventory and locator level reservations. If you cannot reserve material in a locator, it may prevent you from creating a subinventory level reservation.
Reservations of Lot Indivisible Items
If you set an item as lot indivisible, then you must reserve the entire lot quantity. A lot level reservation must reserve the full lot quantity, or disregard the entire lot. If an indivisible lot exceeds the required lot quantity, you cannot select the lot, if it surpasses the order tolerance.
Inventory does not automatically create high level reservations for lot indivisible items. If a reservation is required at sales order scheduling, you must use the Reservations window to manually create a low level reservation.
When you manually create a low level reservation, you must enter the organization, item, lot demand information, quantity, UOM, and need-by date. The system prompts you to enter the lot, subinventory, locator, and LPN if applicable. The system also ensures the full lot is reserved. If a single lot resides in multiple locations, then the system requires you to create multiple reservations to wholly reserve the lot.
When you manually create a reservation, the system ensures the on hand quantity of the lot equals the available to reserve quantity. If the on hand quantity and the available to reserve quantity do not match, then you cannot create a reservation for that lot. The system does however allow you to over reserve a lot as long as it is within shipment tolerances.
Assemble-to-Order Completions for Lot Indivisible Items
You can complete an assemble-to-order (ATO) item into an existing reserved lot only if the lot is not reserved to a different demand source. WIP validates that you can create the new reservation without violating lot indivisibility. If the new reservation violates lot indivisibility, then the completion transaction generates an error.
Complex Maintenance Repair and Overhaul Reservations
You can create reservations for material based on scheduled demand for a Complex Maintenance Repair and Overhaul work order. If the material does not exist in on hand inventory you can create a reservation against a purchase order or any other supply source.
Reservations Change Management for Supply Sources
If you make changes to supply sources, then the system behaves as follows for the different supply types:
-
Purchase Requisition: If you reduce the quantity of, or cancel a purchase requisition that is reserved against a demand, then the system reduces or the cancels corresponding reservation.
-
Purchase Order: If you reduce the quantity of, or cancel a purchase order, that is reserved against a demand, then the system modifies or cancels the corresponding reservation. Any other changes to the purchase order that affect the expected quantity also trigger changes to the associated reservation. Such changes include, changing the organization, or item, or closing the order line.
-
Internal Requisition: You cannot modify an approved internal requisition. You can however, modify the associated internal sales order. When you modify an internal sales order, the system updates the supply data. If you modify the quantity of an internal sales order, then the system also modifies corresponding reservations against the internal requisition.
-
Advance Shipment Notice: If you cancel a reserved ASN then the reservations engine checks to see if a reservation against the PO existed before the system transferred it to the ASN. If a previous reservation exists, then the system transfers the reservation back to the PO. If a previous reservation against the PO does not exist, then the system cancels any reservations associated with the ASN.
-
Process Production Batches and Shop Floor Jobs: If you make a change to a process production batch or a shop floor job, then the system updates the corresponding reservations.
Reservations Change Management for Demand Sources
-
Sales Orders: If you make changes such as canceling or reducing the quantity of a sales order, then order management modifies corresponding reservations.
-
Work Order Components: If you reserve components for a work order against inventory or a purchase order, and you modify the demand source, then the system modifies the corresponding reservations.
Subinventory Transfers with Reserved Serials
You can use the mobile device to perform serial triggered subinventory transfers for reserved serialized items. When you transfer the serial to another subinventory and locator, the system automatically transfers the corresponding reservation.
Note: You cannot perform a subinventory transfer transaction for staged serials.
Pick Release Allocation
If you reserve serials against a demand line, then pick release honors the reservations and allocates material at the serial level for reserved quantity regardless of the organization parameter that determines serial allocation. The system checks the status availability of the reserved serials and allocates them against the demand line without performing the other rules engine checks. If the serials are reserved, but fail the status availability check, then the system backorders the unavailable quantity. If a line is partially reserved at serial level, then pick release allocates the reserved serials against that line, and uses the organization level parameter to determine allocation for the remaining quantity.
LPN Reservations
If you are in a Warehouse Management enabled organization, you can create reservations against LPNs. You can reserve an entire LPN against a sales order if the LPN quantity does not exceed the unreserved quantity for the sales order line. If the LPN quantity exceeds the sales order line you cannot reserve the entire LPN. You also cannot create a new reservation for an LPN that is partially that reserved against a different demand source. You can reserve an LPN with multiple lots with a quantity less than or equal to order line quantity. The system creates separate reservations for each lot. You can perform a subinventory transfer for a reserved LPN. The system transfers the LPN and the corresponding reservations automatically.
Creating Reservations
-
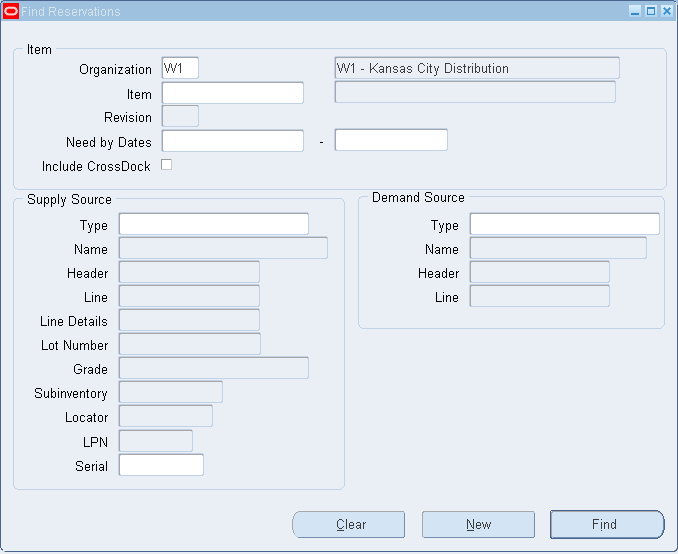
Navigate to the Item Reservation window. The Find Reservations window appears.
-
Choose New.

-
In the Demand Source region, select from one of the following system default options, or select one of the transaction types you previously defined. To define transaction source types, see Defining and Updating Transaction Source Types, Oracle Inventory User's Guide .
Sales Order: Demand source is a sales order. If you select this option, enter a sales order number and a line number that identifies the item quantity to reserve. The system deletes the reservation when it ship-confirms the order.
Inventory: Demand name is an inventory. If you select this option, enter the name against which you want to make the reservation.
Account: Demand source is an account. If you select this option, enter the organization code and account number.
Account Alias: Demand source is an account alias. If you select this option, enter the organization code and account number.
Internal Order: Demand source is an internal order. If you select this option, enter an internal order number, and a line number that identifies the item quality to reserve. This reservation is deleted when the order is ship confirmed.
Cycle Count: Demand source is a cycle count. Shipping Execution and Inventory create cycle count reservations when material is missing during picking or shipping. You use this reservation type to ensure no one else tries to use or allocate the material. Oracle deletes this reservation when you perform a cycle count of the item in the specified location.
Job or Schedule: Demand source is a process execution or maintenance job. You can create reservations for material based on schedule demand to a work order. If the material does not exist in inventory, you can create a reservation against a purchase order, or any other supply type.
Important: The Item Reservations window will not support creating reservations with WIP discrete jobs as demand source.
-
In the Demand tabbed region, enter or select the following:
-
Organization: Organization code for the organization with demand.
-
Item: Item number for the item in demand.
-
Type: Demand source type, such as Sales Order, Inventory, Account, or Account Alias.
-
Name: User-defined name to reference the reservation.
-
Header Number: Code number associated with the demand source, for example, the sales order number.
-
Crossdock: If you are in a Warehouse Management enabled organization, the system automatically creates a reservation against incoming demand sources for approved planned crossdocks. This field defaults automatically for the reservation to either Y or N. You cannot make modifications to this field. You cannot create or modify a crossdock reservation from the reservations window. You can however, use the reservations window to delete a crossdock reservation until you receive the supply.
-
Line Number: Line number that identifies the item quantity to reserve, for example, the sales order line.
-
Need By Date: Date you expect to use the material. This cannot be a past date.
-
UOM: Unit of measure for the item you want to reserve.
-
Quantity: Quantity of the specified item to reserve. This value must be greater than zero and equal to or less than the available quantity. If the item is under dual unit of measure control, the secondary quantity populates automatically. The system bases the reservation on the quantity in the demand document.
-
-
In the Supply tabbed region, enter or select the following:
-
Serial: Enter the serial number information. You can enter the specific serial number in the Serial field, or click Serial to reserve multiple serials.
Note: You can only enter a serial for the supply type Inventory using the reservations form.
If you enter a serial number in the serial column, and the item is uniquely identified in the system, then the quantity and reserved serial quantity fields default to one, and all other applicable fields such as item, lot, and LPN default as well. If the item is not uniquely identified, then you must enter the item number. Once you enter the item number the rest of the information populates automatically.
If you reserve multiple serials, then the column Reserved Serial Quantity displays the amount of serials you reserved. Though this value can differ from the quantity column, it cannot exceed the quantity column.
-
Type: Supply source type. This can be on a purchase orders, Internal requisition, discrete job, shop floor job, process execution batch, or on hand inventory. If the organization is Warehouse Management enabled, then you can create reservations for ASNs and material in receiving.
-
Name: User-defined name to reference the reservation.
-
Revision: Revision for the item. You can enter a value here only if the item is under revision control. You establish revision control on the Item Master. See, Defining Item Revisions for more information.
-
Lot: Lot number of the item to reserve. You can enter a value here only if you establish lot control for the item. See, Setting up Lot Control for more information. If a lot-level conversion exists for the item, this conversion takes precedence over intra-class, or inter class lot conversions. See, Lot Specific Unit of Measure Conversions for more information.
If a lot is under grade control, the grade of the lot appears as well as the preferred grade if applicable. A lot can have only one grade at any given moment, and grades can change over time. See, Setting up Grade Control for more information on lot grades.
-
Subinventory: Subinventory from which to reserve the item.
-
Locator: Locator to which to reserve the item if it is under locator control.
-
LPN: License plates to be reserved and allocated for move order lines. You must be in a Warehouse Management enabled organization to use this functionality. See: Overview of the WMS Rules Engine, Oracle Warehouse Management User's Guide for more information.
-
-
Save your work.
To reserve multiple serial numbers
-
Click Serials.
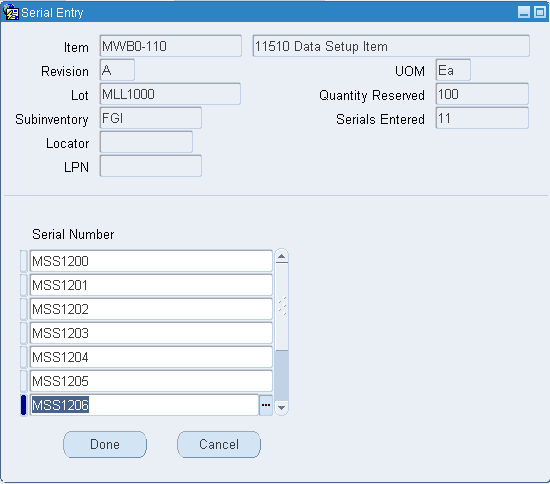
-
Enter a serial number in the Serial field.
-
Repeat step two for the remaining serial numbers.
-
Click Done.
To view current item availability information
-
Review the following fields:
Available Quantity: The Available Quantity field displays the quantity available to reserve. This is equal to the on hand quantity minus the reserved quantity (including the reserved quantity of other lines in the current reservation) and minus pending transactions
Note: Allocating move order lines for reservable items creates a reservation. If the item on a pick wave move order line is reservable, when you allocate the move order, the system creates a reservation and detailed suggestion. If the item on a pick wave move order line is not reservable, when you allocate the move order the system only creates a detailed suggestion.
Note: Material contained in a non-reservable subinventory is not included in the available-to-reserve quantity.
On Hand Quantity: The On Hand Quantity field displays the total quantity for the item that is specific to your current organization, and the revision level, lot number, subinventory, and locator you define for the item.
To transfer supply
-
Select the item reservation.
-
Choose Transfer Supply from the Tools menu. The Transfer Supply window appears.
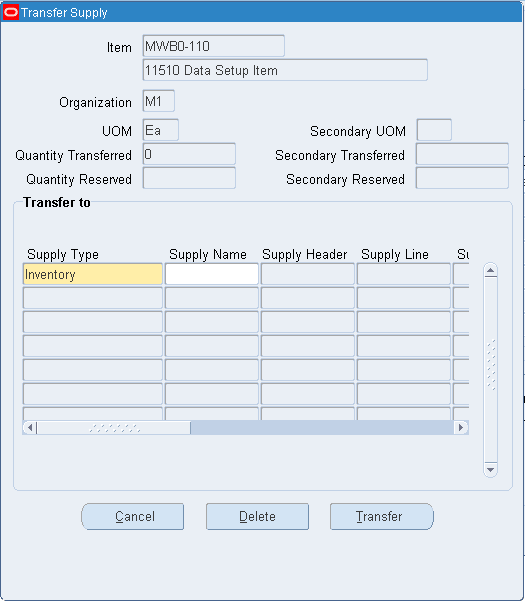
-
Enter or select the following:
Supply Type: Supply source type.
Revision: Revision for the item. You can enter a value here only if you establish revision quantity control for the item.
Lot Number: Lot number for the item. You can enter a value here only if you establish lot control for the item.
Subinventory: Subinventory from which to reserve the item.
Locator: Locator to which to reserve the item if it is under locator control.
Transfer Quantity: Quantity of the specified item to transfer. If the item is under dual UOM control, then the system displays the secondary quantity.
-
Choose Transfer.
To transfer demand
-
Select the item reservation.
-
Choose Transfer Demand from the Tools menu. The Transfer Demand window appears.
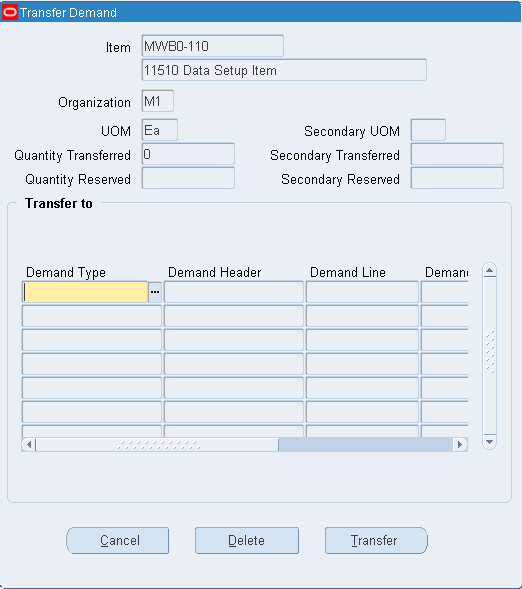
-
Enter or select the following:
Demand Type: Demand source type.
Demand Header: Demand header identification number.
Demand Name: User-defined name to reference the demand.
Transfer Quantity: Quantity of the specified item to transfer.
-
Choose Transfer.
To delete a record in the Transfer Supply or Transfer Demand windows
-
Select the record you want to delete.
-
Choose Delete.
Related Topics
Customizing the Presentation of Data in a Folder, Oracle Applications User's Guide
Viewing Reservation Interface Activity
Use the Reservations Interface window to view, process, and delete reservation requests. These include processed requests that have errored out and unprocessed requests. (Requests that are successfully processed disappear from the interface table and form.) You can also submit and resubmit reservation requests to the reservations interface manager for processing.
To view reservations requests
-
Navigate to the Reservations Interface folder window. The Find Reservations Interface Requests window appears.
-
Enter search criteria for the reservation requests you want to view.
-
Choose Find to start the search. The results display in the Reservations Interface window.
-
Select a tabbed region to display a type of information:
Error: Interface reservations error information.
Demand: Interface reservations demand information.
Supply: Interface reservations supply information.
Controls: Interface reservations control information.
Note: For a list of the available fields in each tabbed region see: Reservations Interface Folder Window Available Fields.
To submit and resubmit reservation requests for background processing
-
Check the Submit option next to the reservations you want to submit or resubmit or choose Resubmit All from the Tools menu.
If you have many reservations to resubmit, use the Resubmit All option to select all reservations for processing and then selectively deselect individual reservations you do not want to resubmit.
-
Save your work to submit the reservations for processing.
The reservations interface manager will process these requests the next time it runs.
To submit and resubmit reservation requests for online processing
-
Check the Submit option next to the reservations you want to submit or resubmit or choose Resubmit All from the Tools menu.
If you have many reservations to resubmit, use the Resubmit All option to select all reservations for processing and then selectively deselect individual reservations you do not want to resubmit.
-
Choose Process Batch to process a batch of reservations requests at a time or choose Process Line to process reservations requests one line at a time.
To delete reservation requests
-
Check the Submit option next to the reservation record you want to delete.
-
Choose Delete from the Tools menu.
Related Topics
Customizing the Presentation of Data in a Folder, Oracle Applications User's Guide
Reservations Interface Folder Window Available Fields
The Reservations Interface folder window allows you to view reservation requests. Using folder options, you can display certain fields for each tabbed region. See: Viewing Reservations Interface Activity.
Fields Shared by All Tabbed Regions
| Batch ID | Batch identification number. |
| Interface ID | Interface identification number. |
| Organization | Code for the organization in which the item resides. |
| Item | Inventory item referenced by the line item. |
Error Tabbed Region
| Error Explanation | Explanation of the error that occurred when attempting to process the line item. |
| Status | Status of the reservation request. |
| Mode | Transaction processing mode, such as background or online processing. |
| Partial Quantities | Whether the available quantity should be reserved when the available quantity is less than the reservation quantity. |
Demand Tabbed Region
| Type | Demand source type for the line item. |
| Source | Source of the demand for the line item, such as an account number. |
Supply Tabbed Region
| Type | Supply source type of the line item to be reserved. |
| Source | Source of the supply of the line item to be reserved. |
| To Type | Updated supply source type for the line item. |
| To Source | Updated source of the supply for the line item. |
Controls Tabbed Region
| Revision | Inventory item revision of the line item to be reserved. |
| Lot | Source lot number of the line item to be reserved. |
| Subinventory | Source subinventory of the line item to be reserved. |
| Locator | Source lot number of the line item to be reserved. |
| To Revision | Updated inventory item revision of the line item. |
| To Lot | Updated source lot number of the line item. |
| To Subinventory | Updated source subinventory of the line item. |
| To Locator | Updated source locator of the line item. |
| To: LPN | Updated license plates to be reserved and allocated for move order lines. You must be in a WMS enabled organization to use this functionality. See: Overview of the WMS Rules Engine, Oracle Warehouse Management User's Guide |
Related Topics
Customizing the Presentation of Data in a Folder, Oracle Applications User's Guide
On-hand Availability Reports
Item Quantities Summary Report
Use the Item Quantities Summary Report to report just the item and the quantity. The report is useful to provide a fast list of the items in the inventory.
Locator Quantities Report
Use the Locator Quantities Report to identify items and their quantities stored in the specified locators. You can transact item quantities to locators and track the movements of items at the locator level. If the locator has zero on-hand quantity, the locator does not print. Items within the locator print only if they have on-hand quantity.
Subinventory Quantities Report
Use the Subinventory Quantities Report to show inventory item quantities by subinventory.
VMI Onhand by Supplier Report
Use the VMI Onhand by Supplier Report to view onhand inventory by supplier across organizations.
Related Topics
Item Quantities Summary Report