Physical Inventory
This chapter covers the following topics:
- Overview of Physical Inventory
- Defining a Physical Inventory
- Taking a Snapshot of Inventory Quantities
- Physical Inventory Tags Overview
- Generating Physical Inventory Tags
- Physical Inventory Counts
- Entering and Voiding Physical Inventory Tag Counts
- Voiding Physical Inventory Tags
- Approval Tolerances
- Approving Physical Inventory Adjustments
- Processing Physical Inventory Adjustments
- Purging Physical Inventory Information
- Physical Inventory Reports
Overview of Physical Inventory
Oracle Inventory provides a fully automated physical inventory feature that you can use to reconcile system-maintained item on-hand balances with actual counts of inventory. Accurate system on-hand quantities are essential for managing supply and demand, maintaining high service levels, and planning production. You can:
Defining a Physical Inventory
You can define and maintain an unlimited number of physical inventories in Oracle Inventory. A physical inventory is identified by a unique name you assign. You use this name to identify any activity, such as adjustments, pertaining to this physical inventory.
You can define multiple physical inventories to count selected portions of your inventory, or you can count your total inventory. For example, if your warehouse has two large stockrooms, each represented by a subinventory, you can define two physical inventories, one for each subinventory. You can then perform your physical inventory of the first stockroom, independent of the second.
To define a physical inventory
-
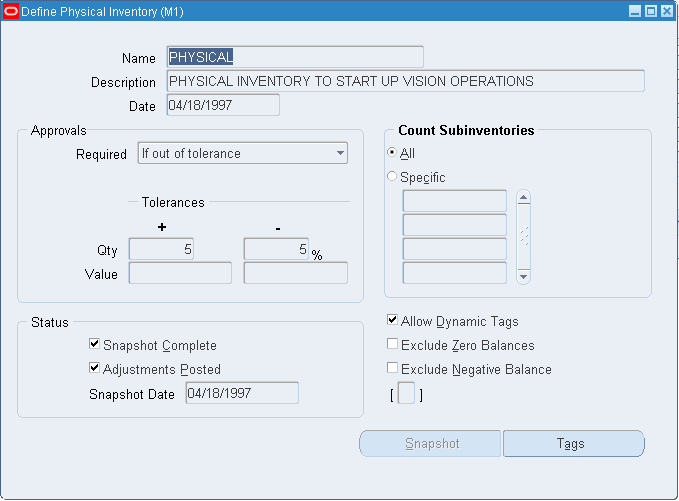
Navigate to the Physical Inventories Summary folder window and choose New. The Define Physical Inventory window appears.
-
Enter a unique physical inventory name.
-
Select approval requirements for adjustments.
Always: Require approval of all physical inventory adjustments.
If out of tolerance: Hold for approval those counts that are outside the limits of the positive and negative quantity variance or value tolerances.
Never: Allow any adjustment to post without approval.
-
Enter positive and negative approval tolerances (see: Approval Tolerances).
If approval is required for adjustments out of tolerance you must enter a value in at least one of these fields. You cannot update these values after you perform physical inventory adjustments.
Qty: Enter acceptable Positive and Negative limits (expressed as a percentage) for the difference between the system-tracked on-hand quantity and the actual tag count quantity.
Value: Enter acceptable Positive and Negative limits for the total value of a physical inventory adjustment.
-
Select the scope of the physical inventory.
Determines whether the physical inventory is for all subinventories or for one or more specific subinventories. Only enter a quantity tracked subinventory.
-
Indicate whether to allow dynamic entry of tags.
Determines whether you can dynamically enter tags you manually created. If you choose not to allow dynamic tag entry all tags must generated before use. See: Generating Physical Inventory Tags.
If you do not want to allow dynamic tag entry but you need blank tags, you can generate numbered blank tags for counting miscellaneous items. See: Physical Inventory Tags.
-
Select Exclude Zero Balances to exclude items with zero quantity from the snapshot.
-
Select Exclude Negative Balances to exclude items with a negative quantity from the snapshot.
-
Save your work.
To take a snapshot of the system on-hand quantities:
-
This step must be completed before you can generate tags. After taking a snapshot you can no longer update header information for this physical inventory. See: Taking a Snapshot of Inventory Quantities.
The Status fields are display only. If the Snapshot is complete, details are listed here and all other fields cannot be updated.
Related Topics
Overview of Physical Inventory
Generating Physical Inventory Tags
Taking a Snapshot of Inventory Quantities
Before you can generate tags for a physical inventory, you must take a snapshot of all system on-hand quantities for your items. The snapshot saves all current item on-hand quantities and costs. Oracle Inventory uses this information as the basis for all physical inventory adjustments. All tag counts you enter for this physical inventory are compared with these static quantities. This allows you to resume normal inventory operations after you have entered your counts but before you have authorized all final physical inventory adjustments. You can perform your recounts or investigate certain results without holding up transaction processing.
Important: Oracle Inventory does not stop inventory processing during a physical inventory. Therefore, you must procedurally coordinate the snapshot of your physical inventory with your actual counting, and ensure that no transaction activity occurs in a particular location until after you have performed your adjustments.
Important: It is recommended to clear the Pending Transactions and Transactions Open Interface, before taking a snapshot of inventory quantities.
For example, suppose that at the start of your physical inventory the system on-hand quantity for item WIDGET in a particular bin is 30. Oracle Inventory saves this information with the physical inventory snapshot. During the warehouse count, you count a total of 25 units of item WIDGET in the same bin. Before you approve your counts and perform your adjustments, you resume normal transaction operations, and consequently, item WIDGET reaches a system on-hand quantity of 45. At this point, you perform your physical inventory adjustments. Oracle Inventory computes the adjustment as the difference between the tag count and the snapshot quantity, NOT the current system quantity of the item that has now reached 45. So in this case, the adjustment is 25 - 30 = -5 units. When the adjustment is posted, the new system on-hand quantity becomes 40 units.
To freeze the system on-hand quantities
-
Select the physical inventory you want to use.
-
Choose Perform snapshot from the Tools menu. This launches the snapshot concurrent process.
Note: You can also choose Snapshot from the Define Physical Inventory window. See: Defining a Physical Inventory.
-
When the concurrent process is finished, re-query the physical inventory to see the effects of the snapshot. The effects include:
Related Topics
Overview of Physical Inventory
Generating Physical Inventory Tags
Physical Inventory Tags Overview
Oracle Inventory can generate default or blank tags for your physical inventory. If you choose to generate default tags for each item, specify the starting tag number and the increment by which you want to increase each digit in the tag number. Your tag numbers may be alphanumeric, but you can increment only the numeric portion. The alphabetic characters in the tag number stay constant. Inventory then uses these tag numbers to generate a tag for every unique combination of item number, revision, subinventory, locator, lot, and serial number for which the system has an on-hand quantity not equal to zero.
If you want to have some empty tags handy to record counts for stock-keeping units for which Inventory has no on-hand quantity (and therefore does not generate default tags), you can generate blank tags. Inventory assigns tag numbers to blank tags, but does not include any item or location detail. You specify this information when you enter your tag counts. You can generate as many blank tags as you want.
You can also exclusively use blank tags to perform a physical inventory. If you need to perform a complete wall-to-wall physical inventory, you can go through your warehouse and attach blank tags to every item and/or location you see. As you perform the count, you record the item and stock-keeping unit information along with the actual on-hand quantity.
Related Topics
Overview of Physical Inventory
Generating Physical Inventory Tags
Generating Physical Inventory Tags
You use physical inventory tags to record the physical counts of inventory items. Physical inventory tags represent actual hard copy tags that some companies use to count inventory items. A tag contains the count for a group of a given item. Although you can record only one item on a tag, multiple tags can reference the same item, with each tag referring to a unique physical location for an item.
Prerequisites
- Define and freeze a physical inventory. See: Defining a Physical Inventory.
To generate tags
-
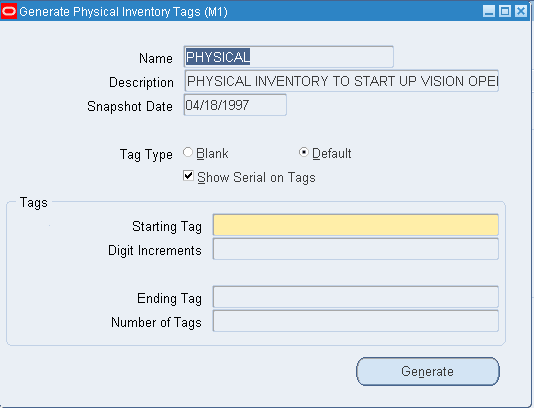
Navigate to the Generate Physical Inventory Tags window.
You can also choose a physical inventory from the Physical Inventories Summary window and choose Generate tags from the Tools menu or you can choose the Tags button from the Define Physical Inventory window.
-
Enter the name of the physical inventory.
-
Select the type of tag to create.
Blank tags contain no item information. Generating default tags creates a unique tag for every combination of item number, subinventory, revision, locator, lot, and serial number that exists in the subinventories for the selected physical inventory.
-
Indicate whether you want to show serial numbers on the physical inventory tags.
If you choose not to show serial numbers on the tags, you get a tag for each item but you have to match the serial numbers to the items manually.
You can enter a value in this field only if you selected Default tags in the Tag Type field.
-
Enter the starting tag number.
Tag numbers may be alphanumeric, but you can increment only the numeric portion.
Important: When entering a starting tag number be sure that it contains the total number of possible digits that a tag can have. For example, if your tag numbers can have up to five digits and you want the starting number to be 1, you would enter 00001.
-
Enter the amount by which each digit in the tag number can increase (Digit Increments).
For example, if the starting tag number is A001 and you enter 0112 in this field, then Inventory generates the following tag numbers: A001, A003. A005, A007, A009, A011, and so on, up to A999. If you enter 0111 in this field, Inventory generates tags A001, A002, A003, A004, A005, A006, A007, A008, A009, A010, A011, etc.
-
Enter the ending tag number.
Inventory calculates this value for you if you selected Default tags in the Tag Type field.
-
Enter the number of tags.
Inventory calculates this value for you if you selected Default tags in the Tag Type field.
-
Choose the Generate button to create the tag numbers and information. Note that this process does not physically print the tags.
-
Use the Physical Inventory Tags report to print tags you have generated. See: Physical Inventory Tags.
Related Topics
Physical Inventory Tags Overview
Overview of Physical Inventory
Physical Inventory Counts
Use the tags that you generated to record your physical counts. If you use default tags for your physical inventory, you can automatically query all tags and fill in the counts. You can also query a subset of your tags by any combination of tag number, item, revision, subinventory, locator, lot, and serial number. You would use this partial tag query feature if you prefer to enter your counts by location or item, or for a particular tag number range.
If you use any blank tags in your physical inventory, you can query up the tags by tag number. You can then enter the necessary item, revision, subinventory, locator, lot, and serial number information, as well as the actual count quantity and the name of the employee who performed the count.
If you enable dynamic tag entry for your physical inventory, you can enter counts for any item and stock-keeping unit combination without a pre-generated tag number.
Oracle Inventory uses the counts you enter for your tags to determine if your items need quantity adjustments; and if so, whether you need to approve them. If you set your approval option for your physical inventory to Not required for adjustments, you are ready to process your adjustments.
If you set your approval option to Required for adjustments out of tolerance, Oracle Inventory holds for approval all tags with counts that are outside the limits of the quantity variance or adjustment value tolerances.
If you set your approval option to Required for all adjustments, Oracle Inventory holds all counts for approval.
Void Tags
It is important for auditing purposes to track the status of each physical inventory tag. Therefore, if you do not use one or more of the tags Oracle Inventory generates, you should void them in the Physical Inventory Tag Counts window. A voided tag is not reported as a missing tag in the Physical Inventory Missing Tag Listing.
If you generated a certain number of blank tags at the beginning of your physical inventory, and ended up not using all of them, you would void the unused tags. When you run the Physical Inventory Missing Tag Listing for the whole range of tags you initially generated, the unused ones are accounted for and appear as missing tags.
If you void a default tag, (i.e. a tag that identifies a stock-keeping unit for which there is system on-hand quantity), Oracle Inventory adjusts the quantity in that location to zero. This indicates that you did not use the tag in question, presumably because the stock-keeping unit corresponding to the tag did not exist.
Related Topics
Overview of Physical Inventory
Entering and Voiding Physical Inventory Tag Counts
Entering and Voiding Physical Inventory Tag Counts
After recording your physical counts you must enter the quantity for each tag. You can query tags for easy data entry.
To display physical inventory tag information
-
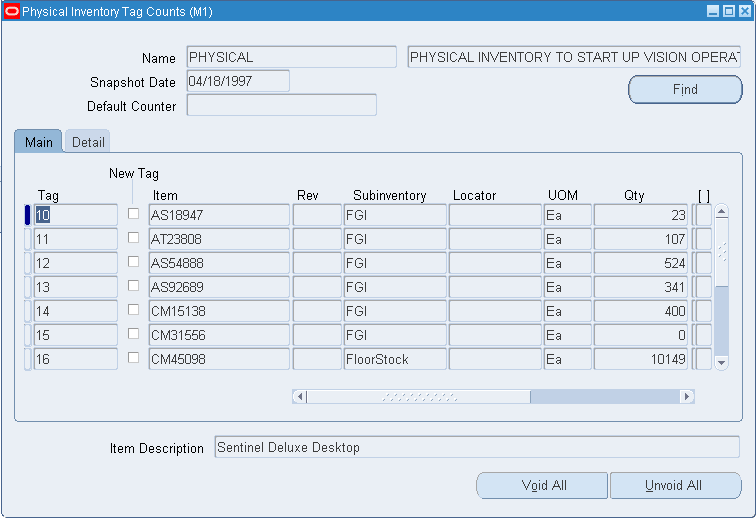
Navigate to the Physical Inventory Tag Counts window or choose the Counts button from the Physical Inventories Summary folder window.
-
Enter the physical inventory.
-
Enter the employee that performed the physical inventory in the Default Counter field.
Oracle Inventory uses this value as the default for the Counted By field of each tag.
-
Enter or query the tag numbers for which to enter counts using one of the following options:
-
Choose the Find button. Choose Yes or No to query all tags. If you choose No, you can either enter tag numbers individually or use the Find feature on the Query menu to query a subset of tags.
-
Enter tag numbers individually. You can enter existing tags individually. When you enter a tag number the item information for that tag appears.
-
Use the Find feature on the Query menu. You can query a subset of tags matching the search criteria you enter in the find window. You can search by any combination of tag number, item, revision, subinventory, locator, lot, serial number, or tag status. With tag status you can find voided or missing tags.
-
To enter counts for default tags
-
Follow the steps for displaying physical inventory tag information.
-
Enter count information.
Because you generated default tags the item, revision, subinventory, locator, lot, and serial number information for each item is displayed. You enter the count Quantity, unit of measure (UOM), and Counted By information. If the item is under dual UOM control, the secondary UOM and quantity appear.
-
Save your work.
To enter counts for blank or dynamic tags
-
Follow the steps for displaying physical inventory tag information, but in the Tag field enter a tag number.
-
Enter the item associated with the tag.
-
Enter the revision of the item.
You can enter a value here if the item is under revision quantity control.
-
Enter the subinventory in which you counted the item.
-
Enter the locator associated with the subinventory.
You can enter a value here if the item is under locator control.
-
If you have Oracle Warehouse Management installed, and you are working with a WMS enabled organization (See: Defining Default Inventory Parameters), you can view or enter the cost group of the material counted on this count entry.
-
If you have Oracle Warehouse Management installed, and you are working with a WMS enabled organization you can enter the parent LPN, which is the LPN in which the material counted resides. See: Explaining License Plate Management, Oracle Warehouse Management User's Guide.
-
Enter the count quantity (number counted) for the tag.
-
Enter the count unit of measure (UOM).
-
Enter the name of the employee who counted the item (Counted By).
-
Enter the lot number associated with the item.
This entry is required if the item is under lot number control.
-
Enter the serial number associated with the item.
This entry is required if the item is under serial number control.
-
Save your work.
If you have Oracle Warehouse Management installed, and you are working with a WMS enabled organization (See: Defining Default Inventory Parameters), the Container Details tab will display. View information for parent LPN (LPN in which counted material resides), outermost LPN (outermost LPN in which counted material resides), container item, revision, cost group, lot, and serial number. See: Explaining License Plate Management, Oracle Warehouse Management User's Guide.
Related Topics
Voiding Physical Inventory Tags
Voiding Physical Inventory Tags
You can void tags that you deliberately discarded during the physical inventory. Voiding tags allows you to account for all tags; thus, any tag numbers that appear on the missing tag report are actually missing.
To void or unvoid individual physical inventory tags
-
Follow the steps for displaying physical inventory tag information.
-
Select the physical inventory tag you want to void.
-
Check or uncheck the Void option.
-
Save your work.
To void or unvoid all displayed physical inventory tags
-
Follow the steps for displaying physical inventory tag information.
-
Choose the Void All or Unvoid All button.
Related Topics
Overview of Physical Inventory
Generating Physical Inventory Tags
Approving Physical Inventory Adjustments
Searching for Information, Oracle Applications User's Guide
Approval Tolerances
Oracle Inventory supports two types of physical inventory approval tolerances. For each type, you can specify a positive and a negative limit. When a particular physical inventory tag count entry results in an adjustment that exceeds any one of these limits, you have a physical inventory adjustment that exceeds approval tolerances. Based on the approval option you chose when you defined your physical inventory, this adjustment is or is not held for approval.
If you decide that approval is required for adjustments out of tolerance you must enter at least one positive or negative value for one type of approval tolerance.
The quantity variance tolerance is a user-defined limit for the difference between the system-tracked on-hand quantity and the actual tag count quantity. You express positive and negative quantity variance tolerances as percentages of the system on-hand quantity. You enter these percentages when defining your physical inventory.
The adjustment value tolerance is a user-defined limit for the total value of a physical inventory adjustment:
adj value = (system on-hand qty - actual count qty) x current cost, where:
-
Current cost is the cost at inventory snapshot.
You express positive and negative adjustment value tolerances as amounts in your ledger currency. You enter these tolerances when defining your physical inventory.
Related Topics
Overview of Physical Inventory
Approving Physical Inventory Adjustments
Approving Physical Inventory Adjustments
You can view, reject, or approve physical inventory adjustments pending approval. The adjustments you can view from this window are determined by the approval option you defined for your physical inventory. If you approve a particular adjustment, the Process Physical Inventory Adjustments program adjusts your inventory balance by that quantity. If you reject an adjustment, Oracle Inventory does not change the system on-hand quantity.
To select the physical inventory for which to approve adjustment
-
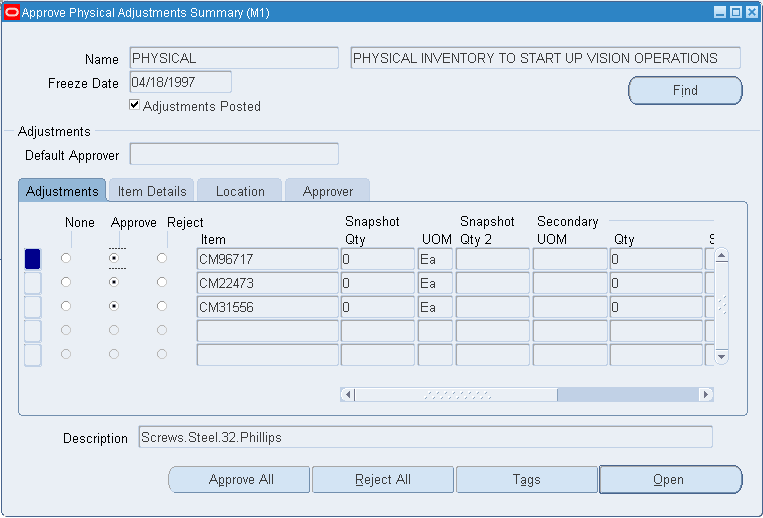
Navigate to the Approve Physical Adjustments Summary window. You can also navigate to the Physical Inventory Summaries folder window, select the physical inventory you want to use, and choose Approve.
-
Enter the name of the physical inventory.
-
Enter the name of the employee approving the adjustments.
To display the adjustments you want to approve
-
From the Item field choose Find from the Query menu. The Find Physical Adjustments window appears.
-
Enter search criteria. You can use any combination of tag numbers, item/location information, adjustment values. You can also display adjustments out of tolerance or those not requiring approval.
-
Choose Find to start the search. The results display in the Approve Physical Adjustments Summary window.
To view current item and adjustment summary information
-
Choose from the following tabbed regions:
-
Adjustment: View information for the unit of measure, adjustment quantity, adjustment value, variance percentage, and system quantity.
-
Location: View information for revision, subinventory, locator, primary and secondary units of measure, and primary and secondary adjustment quantity.
-
Item Details: View information for lot number, serial number, primary and secondary units of measure, and adjustment quantity.
-
Approver: View information for the approver.
-
To approve or reject adjustments
-
Select an adjustment to reject or approve and check the Approve or Reject option.
-
Optionally, choose the Approve All or Reject All button.
Important: You must either reject or approve all adjustments for a physical inventory before you can start processing your adjustments.
-
Save your work.
To view current item and adjustment line information
-
Select the desired line.
-
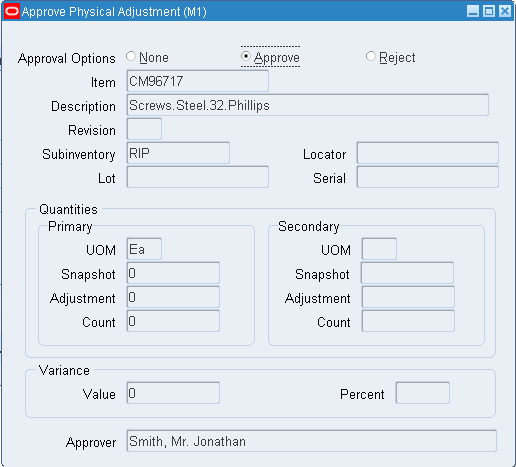
Click Open. The Approve Physical Adjustment window displays the following information:
-
Item number, Description, and if applicable revision.
-
Subinventory and if applicable locator.
-
Lot
-
Serial
-
Primary UOM
-
Snapshot quantity in the primary UOM
-
Adjustment quantity in the primary UOM
-
Count quantity in the primary UOM
-
Secondary UOM if applicable
-
Snapshot quantity in the secondary UOM, if applicable
-
Adjustment quantity in the secondary UOM, if applicable
-
Count quantity in the secondary UOM, if applicable
-
Variance Value and Percent
-
Approver
-
-
Click Approve to approve the adjustment, Reject to discard the adjustment, or None to do nothing.
-
Related Topics
Overview of Physical Inventory
Processing Physical Inventory Adjustments
Searching for Information, Oracle Applications User's Guide
Processing Physical Inventory Adjustments
After you finish entering all your tag counts and approving those adjustments that need approval, you can submit the process that automatically posts your physical inventory adjustments. Oracle Inventory automatically creates a material transaction adjusting the item quantity and debiting or crediting the adjustment account you specify for your physical inventory. If the count of an item matches the snapshot system on-hand quantity, there is no adjustment transaction posted.
Once you run the adjustment program for your physical inventory, Oracle Inventory does not allow new tag generation or any further updates of tag counts. You are no longer able to make any changes to that physical inventory. Due to the irreversible nature of this program, Oracle Inventory posts no physical inventory adjustments if you have any adjustments that are still pending approval. You must approve or reject all of your adjustments before you can process them.
You can preview your adjustments before actually posting them by running the Physical Inventory Adjustments Report. You can run the actual adjustment program after you have used the report to verify your tag quantities and the value impact of your adjustments.
Note: If your approval option for a particular physical inventory is Never, Oracle Inventory does not at any time prevent you from submitting the adjustment process. Since there will never be any adjustments pending approval, your adjustments are processed with no regard to whether you have generated tags at all, or whether you actually entered counts for all your tags. For any tag that has no count entered, Oracle Inventory assumes a count of zero and performs adjustment transactions accordingly. Therefore, you should make it a part of your physical inventory procedure to run the Physical Inventory Missing Tag Listing before you process adjustments.
To run the adjustment program
-
Navigate to the Physical Inventories Summary folder window.
-
Select the physical inventory you want to use.
-
Choose Launch adjustments from the Tools menu. The Launch Adjustments window appears.
-
Enter the Adjustment Account number against which adjustments should be charged.
-
Enter the adjustment date.
-
Choose the Launch Adjustments button to submit the concurrent request for adjustments.
Related Topics
Overview of Physical Inventory
Purging Physical Inventory Information
Use this form to purge a physical inventory definition from the database. Oracle Inventory deletes all information associated with the physical definition. However, the purge does not affect any adjustments or adjustment transactions made using the physical definition. Those adjustments are not changed. You can also purge just tags if you made a mistake and want to start over.
To run the purge program
-
Navigate to the Physical Inventories Summary folder window.
-
Select the physical inventory you want to use.
-
Choose Perform purge from the Tools menu.
-
Choose Yes to purge only tags in the physical inventory or No to purge the entire physical inventory.
Related Topics
Overview of Physical Inventory
Physical Inventory Reports
You can use a number of reports to help you during the process of performing a physical inventory and to analyze and report the results of physical inventory adjustment transactions.
Physical Inventory Tag Listing
This report lists all the default and blank tags that you generated and all the dynamic tags that you entered. The report shows the tag number, item, revision, subinventory, locator, lot, and serial number for each tag used in your physical inventory. You can use this report as the document you give to the employees performing the counts. You can also use this report as a complete count history after all counts have been completed.
Physical Inventory Counts Report
This report shows information on the tags you enter for a physical inventory, including the item, item controls, count location, count quantity, and count value.
Physical Inventory Missing Tag Listing
This report lists the tags that are missing from a user-specified range of tag numbers. The report also shows what information was printed on the tag, if any, to aid in the search. Oracle Inventory considers as missing those tags for which you have not entered counts. Void tags are not considered to be missing. Use this report before initiating physical adjustments to verify that you have accounted for all tags generated by the system. Otherwise, if you have not entered a count for a tag and approvals are not required, Oracle Inventory adjusts your on-hand balances down to zero quantity.
Physical Inventory Adjustments Report
This report shows all adjustments against unique combinations of item, revision, subinventory, locator, lot, and serial number for a user-specified physical inventory. You can run this report before processing your adjustments to get a preview of your adjustment quantities and values. You can then determine whether you are ready to process all final adjustments or whether you need to recount certain locations. This report is also automatically generated after the successful completion of the adjustment program as a record of what was actually adjusted.
Physical Inventory Accuracy Analysis
You can run the Physical Inventory Accuracy Analysis report many times during your physical inventory. If you run it after you take a snapshot of your on-hand balances, this report shows the system on-hand quantity and value for each item included in your physical inventory. If you run this report after entering your tag counts, it shows the actual count quantities and values, as well as the adjustment quantity, value and error percentage for each count you entered. You can also use this report as a historical accuracy analysis tool.
Physical Inventory Summary Report
This report provides a summary of your physical inventory adjustments by subinventory. You can see, in your ledger currency, the system on-hand value, the actual count value, and the resulting adjustment value, as well as the number of tags and adjustments performed for each subinventory. You can also use this report as a management tool to monitor the accuracy of your inventory as it also includes the error percentage of your original system on-hand quantities and values.
Physical Inventory Trend Report
This report compares past physical inventories so that you can see whether record accuracy has improved over time. It provides a summary of physical inventory adjustment values, by date and subinventory, as well as the number of tags and adjustments each subinventory required. You can view subtotals for each physical inventory as well as a grand total of all your physical inventory adjustments over time.