Sun Blade 6000 Disk Module
Service Manual 6000 Disk Module
Service Manual |
| C H A P T E R 3 |
This chapter contains information and procedures for replacing the Sun Blade 6000 disk module.
To Replace a Disk Blade When Its Paired Server Uses an LSI Host Bus Adapter and is Running Windows or Linux
To Replace a Disk Blade When Its Paired Server Uses an Adaptec Host Bus Adapter
If your Sun Blade 6000 Disk Module fails, it must be replaced. The procedures for replacing the disk module vary, depending on two things:
In every case, you must remove the disks from the old disk blade and insert them into the same slots in the new disk blade.
The SAS host bus adapters from LSI identify each disk in a disk blade using the unique “enclosure ID” of the disk blade (its World Wide Name, or WWN) and the number of the bay where the disk resides.
If you simply replace a disk blade, its enclosure ID changes. The SAS adapter may not recognize the new disk blade and may not be able to identify the disks as the same set, including the boot disk or boot volume.
For server blades running the Solaris OS, you must reconfigure the enclosure ID information in an LSI host bus adapter so that the disks can be correctly identified in a replacement disk blade. This procedure uses the lsiutil utility.
For server blades running Windows or Linux, you must reset the host bus adapter’s persistence mappings. This procedure also uses the lsiutil utility.
 | Caution - When using lsiutil you must follow the steps in the documented procedures exactly. An untrained individual using lsiutil can potentially place the system in an unrecoverable state. |
After you reconfigure the persistence mappings in the LSI host bus adapter, the adapter recognizes the new disk blade in the same way that it recognized the old one. Your system will operate the same as before the failure.
|
 | Caution - A SAS-NEM must be functioning in slot NEM 0 when you follow the procedure documented here. |
You must know the enclosure IDs (World Wide Names, or WWNs) of both disk blades: the old one (the one you are replacing) and the new one. The enclosure ID is a 16-bit hexadecimal digit that is printed on a yellow sticker on the main circuit board of the disk blade.
Remove the old disk blade from the chassis. Leave all the disks in it for the moment.
Insert a slot filler in the now-empty slot. Do not insert the replacement disk blade yet.
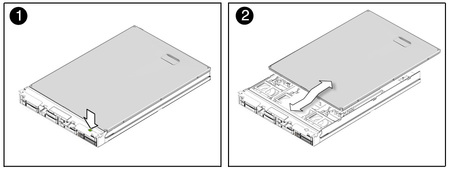
Open the old disk blade. Press the green button and remove the top cover (see FIGURE 3-1).

Record the old disk blade’s World Wide Name (WWN 128 ADDRESS), which is the 16 bit hex number that is printed on a yellow label on the main circuit board (see FIGURE 3-2).

Open the cover of the new (replacement) disk blade and record the WWN printed on its yellow sticker.
Close the cover of the new disk blade and set it aside for the moment.
Run the following procedure on the server blade that is paired with the replacement disk blade.
In a terminal window, change your current directory to the directory where lsiutil is installed. Type in the following command and press Enter.
lsiutil -p1 -a 6,oldEnclID,newEnclID,,0,0 15
 | Caution - This command must be typed exactly as shown. If this command is typed incorrectly or not entered before replacing the disk blade, you must use the recovery procedure described below (see To Recover From a Failed lsiutil Command When Replacing a Disk Blade ). |
Replace oldEnclID and newEnclID with the 16-digit hexadecimal numbers from the labels on the old and new disk blades respectively. Note that the second character in the -p1 argument is the digit ‘1’ and not the letter ‘l.’
Remove the disks from the old disk blade and insert them in the new disk blade in the exact same slots that they occupied in the old disk blade.
Remove the temporary slot filler and put the new disk blade into the chassis in the same slot as the old one.
If the replacement disk blade contains any RAID volumes, reboot the server blade that is paired with the replacement disk blade.
Run lsiutil in interactive mode.
To open the interactive lsiutil menus, you must be logged in as root.
Make and save a new persistence map for the server blade (running the Solaris OS) that is paired with the replacement disk blade, following the procedure out lined in To Save a Snapshot of Your Host Bus Adapter Persistent Mappings.
If there are any hardware RAID volumes spanning disks in the disk blade, reboot the server that is paired with the disk blade.
|
Reload the saved persistence map for the server blade that is paired with the replacement disk blade (see To Restore a Snapshot of Your Host Bus Adapter Persistent Mappings.)
Continue the preceding disk blade replacement procedure beginning with Step 7.
|
 | Caution - A SAS-NEM must be functioning in slot NEM 0 when you follow the procedure documented here. |
Remove the old disk blade from the chassis. Leave all the disks in it for the moment.
Insert a slot filler in the now-empty slot. Do not insert the replacement disk blade yet.
Remove the disks from the old disk blade and insert them in the new disk blade in the exact same slots that they occupied in the old disk blade.
Remove the temporary slot filler and put the new disk blade into the chassis in the same slot as the old one.
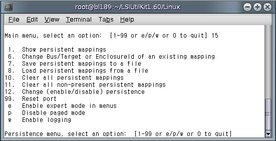
The basic interactive menu opens.
You cannot see all the commands in the menu, but you can enter any command number if you know what it is. In our case, we want to open the Persistence menu. This is done with command 15.

This clears any persistence map that is present in the host bus adapter.
Type and enter 0 (zero) three times to exit the lsiutil application.
The Adaptec host bus adapters do not rely on the enclosure ID of the disk blade to identify disks. This is true for any OS.
Therefore, if you are using an Adaptec adapter, you can simply change the disk module and continue to operate as before without any problems.
Copyright © 2009, Sun Microsystems, Inc. All rights reserved.