| C H A P T E R 4 |
|
Connecting Cables |
FIGURE 4-1 shows the DC version of the Netra 440 server back panel and identifies the DC power supply connectors and I/O ports. FIGURE 4-2 shows the AC version of the Netra 440 server back panel and identifies the AC power supply connectors and I/O ports.
|
In a telecommunications environment, use this port to connect to the central office alarming system. See the Netra 440 Server Product Overview for more information. |
|
|
This port provides standard serial functionality. Note that the system controller serial management port is not a standard serial port. See the Netra 440 Server Product Overview for more information. |
|
|
See the Netra 440 Server Product Overview for information about devices you can connect to these ports. |
|
|
You use these ports to connect to your Ethernet network. The left port is NET0, and the right port is NET1. |
|
|
See the Netra 440 Server Product Overview for information about the devices you can connect to this port. |
|
|
Use this, the default port, to attach the system console device. |
|
|
Use this port to access ALOM features by way of the network. |
|
|
DC power input cables connect to each DC connector. Do not connect the cord to a DC connector at this point. See Assembling and Connecting the DC Input Power Cable. |
|
|
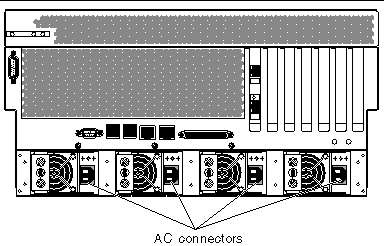
AC power cables connect to each AC connector. Do not connect the power cable to an AC connector at this point. See Connecting the AC Power Cables. |
Before installing any other cable, you should first attach the chassis ground cable to the server's chassis grounding studs. Refer to Chapter 1 for the site requirements for this section.
1. Obtain a chassis grounding cable from your site and two M5 nuts with lock washers from the ship kit.
2. Go to the back of the server and locate the two DC ground studs (see FIGURE 4-1).
3. Position and align the chassis grounding cable against the two ground studs at the rear of the chassis.
4. Tighten the two M5 nuts to secure the grounding cable to the two studs.
5. Secure the other end of the grounding cable to the earth ground in the building.
You can secure the grounding cable to a proper grounding point on the rack, as long as the rack is properly grounded to the earth ground in the building.

|
Caution - An electrical hazard is present if energized units are not properly grounded. |
When connecting the remaining cables to the ports at the rear of the Netra 440 server, keep the following points in mind:
See FIGURE 4-1 for the locations of these ports. The following sections give the pinouts for each of these connectors.
The alarm port uses a standard DB-15 connector. In a telecommunications environment, use this port to connect to the central office alarming system. FIGURE 4-3 shows the pin numbering of the alarm port, TABLE 4-2 and describes the pin signals.

|
ALARM0_NC[1] |
|||
The serial port connector (TTYB) uses a DB-9 connector. Use this port for general purpose serial data transfers.

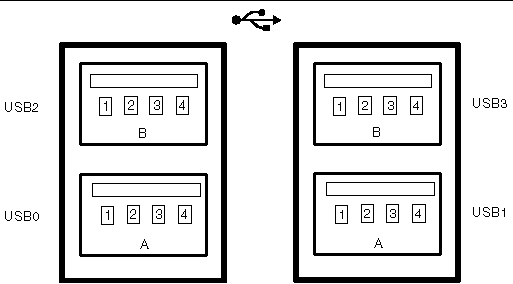
Four Universal Serial Bus (USB) ports are located on the motherboard in a double-stacked layout. The ports can be accessed from the back panel.
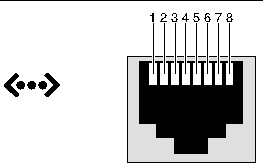
The Netra 440 server has two RJ-45 Gigabit Ethernet connectors (NET0, NET1). The Ethernet interfaces operate at 10 Mbps, 100 Mbps, and 1000 Mbps. The transfer rates for the Ethernet ports are given in TABLE 4-5.
The SCSI serial data connector is located on the motherboard and can be accessed from the back panel.

The serial management connector (labeled SERIAL MGT) is an RJ-45 connector located on the ALOM system controller card and can be accessed from the back panel. This port is the default connection to the system, and you should use this port only for server management.
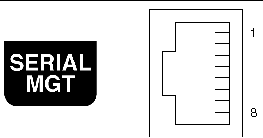
If you need to connect to the SERIAL MGT port using a cable with either a DB-9 or a DB-25 connector, use a supplied adapter to perform the crossovers given for each connector. The supplied RJ-45 to DB-9 and RJ-45 to DB-25 adapters are wired as described in TABLE 4-10 and TABLE 4-11.
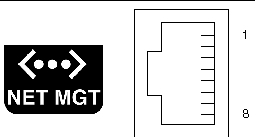
The network management connector (labeled NET MGT) is an RJ-45 connector located on the ALOM system controller card and can be accessed from the back panel. This port needs to be configured prior to use. For information on configuring this port for managing the server with ALOM, see the Advanced Lights Out Manager User Guide for the Netra 440 Server (817-5481-xx)
|
Note - This section describes how to connect DC power input cables to a DC-powered Netra 440 server. For AC-powered server instructions, see Connecting the AC Power Cables. |

|
Caution - Verify that your site meets the source site requirements given in DC Power Source Requirementsbefore proceeding with these instructions. |
The basic system configuration comes with four power supplies installed. The system will continue to operate even if a single power supply fails (known as a 3+1 configuration) or if two power supplies fail (known as a 2+2 configuration). A 2+2 configuration is possible because any two power supplies will satisfy the entire load of a fully-configured system.
|
|
Note - If you have already assembled the DC input power cables, skip to Connecting the DC Input Power Cable to the Server. |
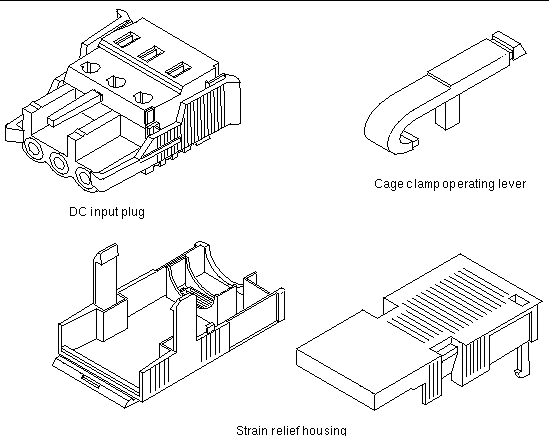
1. Identify the parts that you will use to assemble the DC input power cable (FIGURE 4-10).
The following DC connection parts are provided in this kit so that you can assemble one or more DC power input cables. These cables are used to connect the -48V DC input source(s) to the power supply units in the following components:
2. Turn off power from the DC power source through the circuit breakers.

|
Caution - Do notproceed with these instructions until you have turned off the power from the DC power source through the circuit breakers. |
3. Get a DC input plug from the ship kit.
4. Locate the three wires coming from the DC power source that will be used in the connection to your unit:
5. Strip 8 mm (5/16 inches) of insulation from each of the wires coming from the DC power source.
Do not strip more than 8 mm (5/16 inches) from each wire. Doing so will leave uninsulated wire exposed from the DC connector after the assembly is complete.

6. Open the cage clamp for a section of the DC input plug.
Perform one of the following actions:
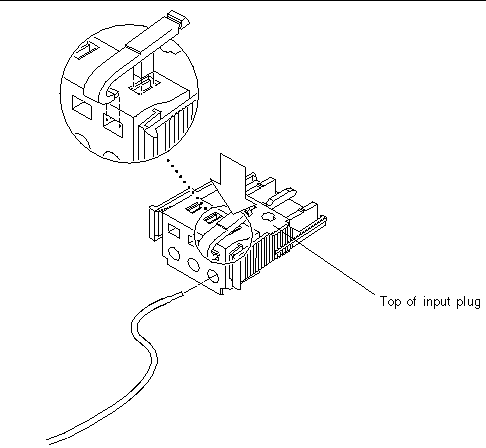
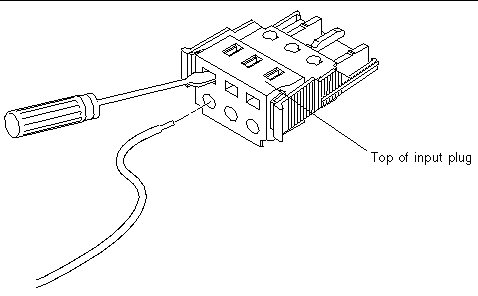
7. Feed the exposed section of the appropriate wire into the hole in the DC input plug described in Step 6.
FIGURE 4-14 shows which wires should be inserted into each hole in the DC input plug.

8. Repeat Step 6 and Step 7 for the other two wires to complete the assembly of the DC input power cable.
9. Repeat Step 4 through Step 8 to create as many DC input power cables as you need for your unit.
You need one DC input power cable for every power supply that you have in the Netra 440 server chassis.
If you need to remove a wire from the DC input plug, insert the cage clamp operating lever or a small screwdriver into the slot directly above the wire and press down (FIGURE 4-12 and FIGURE 4-13), then pull the wire from the DC input plug.
|
1. Take the DC input plug and insert the bottom portion of the strain relief housing into the notch on the DC input plug until it snaps into place.
Make sure the strain relief housing snaps into place on the DC input plug. You cannot complete the assembly correctly if the strain relief housing is not snapped into place.
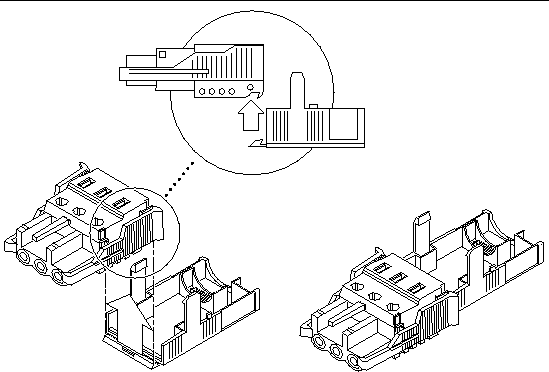
2. Route the three wires coming from the DC power source through the opening at the end of the bottom portion of the strain relief housing.
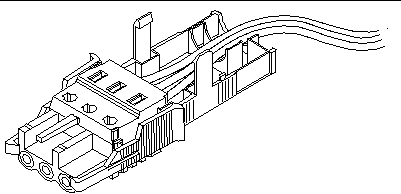
3. Insert the tie wrap into the bottom portion of the strain relief housing.
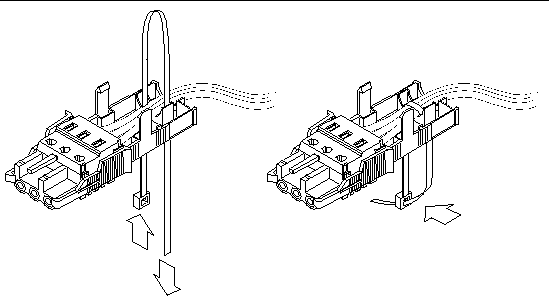
4. Loop the tie wrap over the wires and back out of the strain relief housing.
Tighten the tie wrap to secure the wires to the strain relief housing (FIGURE 4-17).
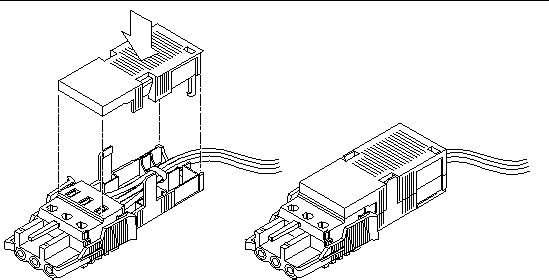
5. Lower the top portion of the strain relief housing so that the three prongs on the top portion insert into the openings in the DC input plug.
Push the top and bottom portions of the strain relief housing together until they snap into place.
|

|
Caution - An energy hazard is present when energized units are not properly grounded. |
1. Open the front system door.
Press in on the door release latches and lower the system door.
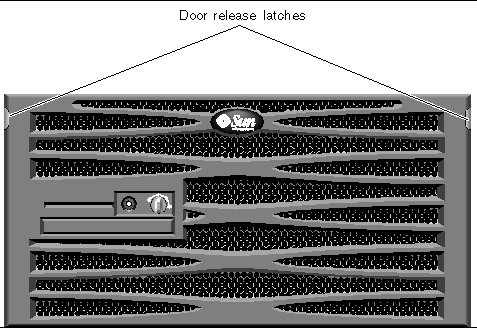
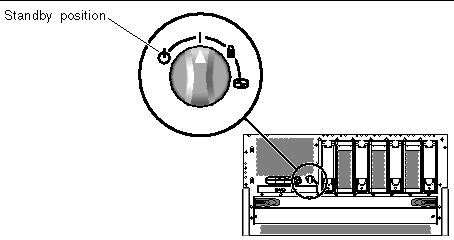
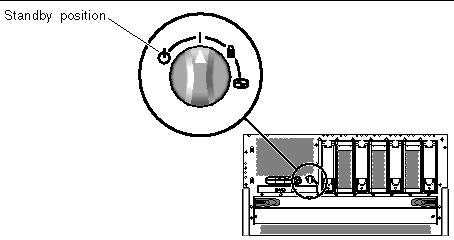
2. Turn the rotary switch to the Standby position (FIGURE 4-20).
3. Slide the server out of the rack far enough to give you convenient access to the back of the server.
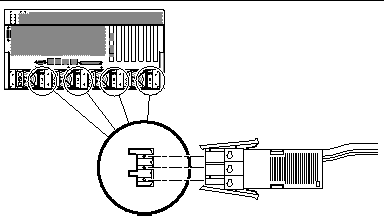
4. Connect the DC input power cables to the DC connector on each power supply.
Good practice is to connect each power supply to a separate DC circuit, which enables the system to remain operational if one of the DC circuits fails. Consult your local electrical codes for any additional requirements.
5. Turn on the circuit breakers to provide power to the servers.
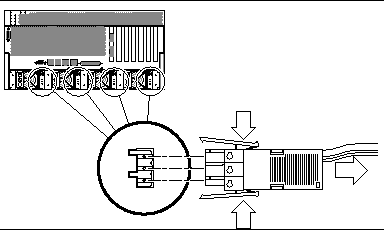
If you want to disconnect the DC input power cable from the DC connector at some point in the future, turn the circuit breakers off, then squeeze the two tabs on the sides of the DC input power cable and gently disconnect the DC input power cable from the DC power supply.

|
Caution - Do notattempt to disconnect the DC input power cable from the DC connector until you have turned off the power from the DC power source through the circuit breakers. |
|
Note - This section describes how to connect AC power cords to an AC-powered Netra 440 server. For DC-powered server instructions, see Assembling and Connecting the DC Input Power Cable. |
The basic system configuration comes with four power supplies installed. The system will continue to operate even if a single power supply fails (known as a 3+1 configuration) or if two power supplies fail (known as a 2+2 configuration). A 2+2 configuration is possible because any two power supplies will satisfy the entire load of a fully-configured system. Additionally, to ensure true AC line input redundancy for the server, you should use two separate AC power sources, and you should connect the power cables from any two AC power supplies in the server to each AC power source. You can also connect an uninterruptible power supply (UPS) between each AC power source and the server to increase the availability of the server.
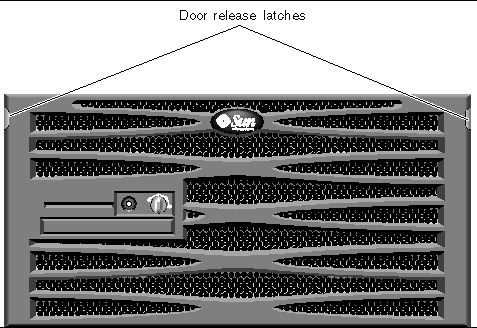
1. Open the front system door.
Press in on the door release latches and lower the system door.
2. Turn the rotary switch to the Standby position (FIGURE 4-24).
3. Get the supplied AC power cords from the server's shipment kit.
4. Slide the server out of the rack far enough to give you convenient access to the back of the server.
5. Connect one end of each AC power cord into the AC connectors located at the rear of the server.
See FIGURE 4-25 for the location of the AC connectors.
6. Connect the other ends of the power cords into AC wall outlets.
To ensure true AC line input redundancy for the server, you should use two separate AC power sources, and you should connect the power cables from any two AC power supplies in the server to each AC power source.
 When the system is in Standby mode.
 When the server is powered on and the operating system has not booted or has failed.
Copyright © 2006, Sun Microsystems, Inc. All Rights Reserved.