Message Checking and Selecting Session Type
After you successfully enter your username and password, the Workstation Information dialog box is displayed (see Figure 2-4). It provides status information and, if your account is configured for user-specified sessions, lets you a select a single- or multi-level session. Note that because this account is configured for multi-level operation, there is an option for restricting the session to a single level; this option is not available for single-level accounts.
Figure 2-4 Workstation Information Dialog Box

To Check Messages and Select Session Type
-
Check the date and time of the last login.
This field indicates when your system was last used. You should always check that there is nothing suspicious about the last login, such as an unusual time of day, and report such occurrences to your security administrator.
-
Read any messages in the Message of the Day field.
This field contains messages from your administrator. Since this message may contain warnings about scheduled maintenance or security problems, you should always read it.
-
Read any console messages since last logout.
Typically, these system messages contain messages concerning cron (batch) jobs, but you should check that there are no messages indicating suspicious activity or other problems.
-
Select Restrict Session To A Single Label if you intend to work at only one label in your session (not available in single-label configurations).
If you do not select this option, you are implicitly selecting a multi-level session and can view data at different labels. The range in which you can operate is bounded at the upper end by the session clearance that you select in the session clearance dialog box and at the lower end by the minimum label assigned to you by your administrator.
-
Click OK (or press Return).
-
If your account is configured for a single-level operation, the Trusted Solaris environment is displayed. You can proceed to "Leaving the Trusted Solaris Environment ".
-
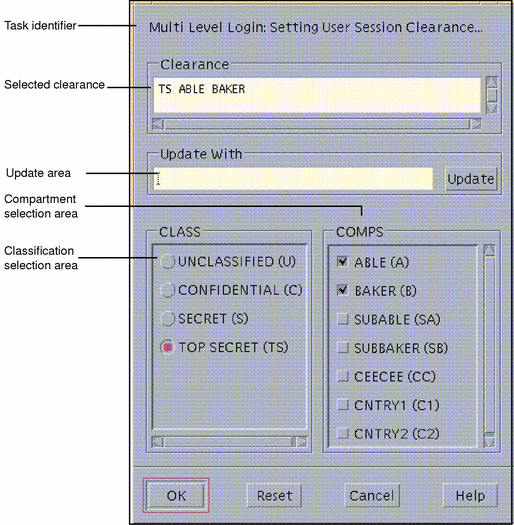
If your account is a multi-level configuration, a version of the Label Builder dialog box appears.
-
-
Set the session level.
Note -Workstations can be restricted to a limited range of session clearances and labels. For example, a workstation in a lobby might be limited to UNCLASSIFIED labels only. If the session clearance or label you enter is not accepted, check with an administrator to see if the workstation is restricted.
-
To accept the default value in the Clearance field (for multi-level configurations) or Label field (for a single-level session), click OK or press Return. The Trusted Solaris environment will be displayed.
-
To create a different label or clearance, continue with this procedure.
-
-
Select the desired classification in the Class list.
-
(Optional) Select the desired compartments in the Comps list.
-
Verify the clearance or label you have built.
-
If it is correct, click OK or press Return.
-
If you want to make changes, adjust the values you selected in the Class or Comps list.
-
Figure 2-5 Session Clearance Builder Dialog Box

- © 2010, Oracle Corporation and/or its affiliates
