Tour: Exploring the Basic Trusted Solaris Environment
This part of the tour looks at the basic elements of the Trusted Solaris environment before any applications are run or windows displayed. Note that this example environment is configured to display labels.
-
Examine the Trusted Solaris environment.
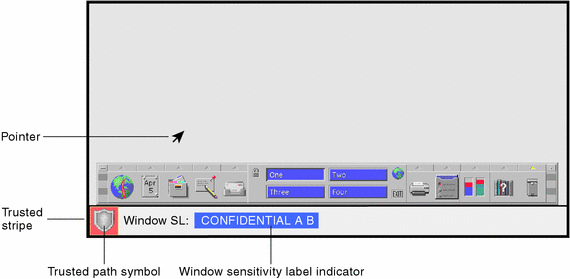
Figure 3-3 Basic Trusted Solaris Environment

The Trusted Solaris environment displays the trusted stripe at all times at the bottom of the screen and displays the trusted path symbol when you are interacting with the trusted computing base. (In this figure, the trusted path symbol appears because the pointer is in the Front Panel area and the Front Panel contains applications that can interact with the trusted computing base.) If the trusted stripe is missing from your window environment (other than when you lock your screen), notify your Trusted Solaris administrator at once; there is a serious problem with your system.
Note -The trusted stripe can be configured in different ways. This is explained in depth in "Label Displays in the Trusted Solaris Environment".
The trusted stripe (see Figure 3-3) potentially has two elements:
-
Trusted path symbol - is displayed when you perform any activity related to security.
-
Window Label indicator - displays the label of the active window (that is, the window that has the pointer focus). In this example, the initial Window label for this workspace is CONFIDENTIAL A B, which is the minimum label for this user. The window label indicator is optional and may not appear in your configuration.
-
-
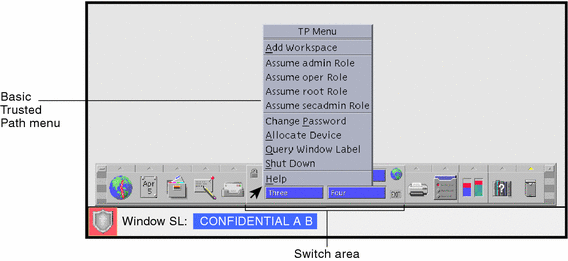
Hold down mouse button 3 with the pointer in the workspace switch area but not over a workspace button.
This displays the basic version of the Trusted Path menu.
Figure 3-4 Basic Trusted Path Menu

The Trusted Path menu is used primarily to perform general security-related tasks. Notice that the trusted path symbol is displayed when you display the Trusted Path menu or position the pointer over any part of the trusted stripe or Front Panel.
-
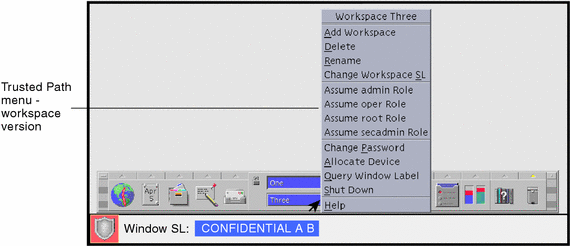
Hold down mouse button 3 with the pointer over the Workspace Three button.
This displays the workspace version of the Trusted Path menu, which contains options that can operate on that workspace. Note that the selections that appear in your menu depend on how your user account has been set up.
Figure 3-5 Trusted Path Menu - Workspace Version

- © 2010, Oracle Corporation and/or its affiliates
