Chapter 3 Tour of the Trusted Solaris Environment
This chapter takes you for a quick tour of the Trusted Solaris environment. If you have access to a Trusted Solaris system, you can perform the steps as you read them; or you can get a good idea of the environment simply by reading and following the diagrams. The user account in the example is cleared for multilabel operation and is configured to display labels. The chapter discusses these topics:
Tour: Logging In
As in the standard Solaris CDE environment, the Username dialog box is displayed when the system is waiting for logins (see figure below). To access the system, you have to identify yourself by your username and authenticate yourself by supplying your password.
-
In the username dialog box, type your username in the text field and click OK (or press Return).
This step causes the password dialog box to be displayed.
-
In the password dialog box, type your password and click OK (or press Return).
This step causes the Message of the Day dialog box to be displayed.
Tour: Setting the Session Type
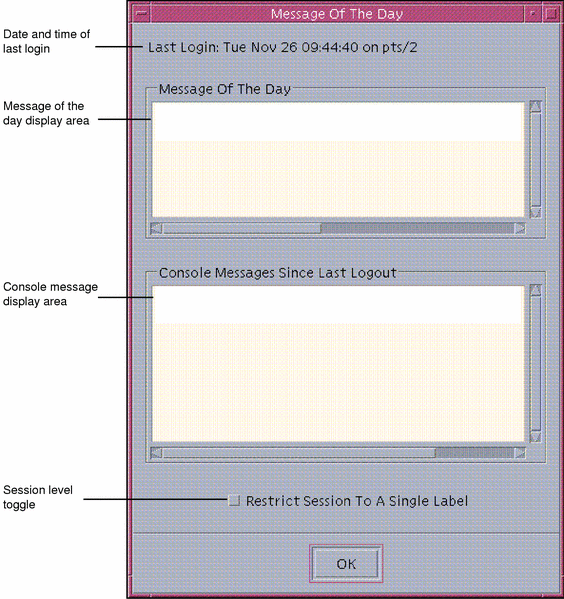
The Workstation Information dialog box (see the following figure) displays the date and time of the last login, the message of the day from your administrator, and console messages (which you should inspect for possible security breaches). It also lets you specify the type of session: single-level or multi-level.
Figure 3-1 Workstation Information Dialog Box
-
Examine the date and time of last login, the Message of the Day, and the console message area.
This is good practice for preventing security problems.
-
Check that the Restrict Session to a Single Label button is not pushed in and then click OK.
The Session Level button indicates whether you are selecting a single- or multi-level session. Clicking OK sets the session type and causes the Message of the Day dialog box to be replaced by the Session Clearance Builder dialog box.
Note -If your account is configured for single-label operation, you cannot conduct multi-level sessions and the Session Clearance Label Builder dialog box will not be displayed on your system. However, you can participate in the following sections of this tutorial: "Tour: Exploring the Basic Trusted Solaris Environment","Tour: Launching an Application", "Tour: Looking at Files with File Manager".
Tour: Using the Label Builder to Set a Session Clearance
The Session Clearance Builder dialog box (see figure below) is a typical label builder dialog box. Label builder dialog boxes are used throughout the Trusted Solaris environment whenever you have to enter a clearance or a label. Each label builder dialog box presents only those label combinations appropriate to your immediate situation and provides a default value in the selected value field.
Figure 3-2 Typical Label Builder Dialog Box
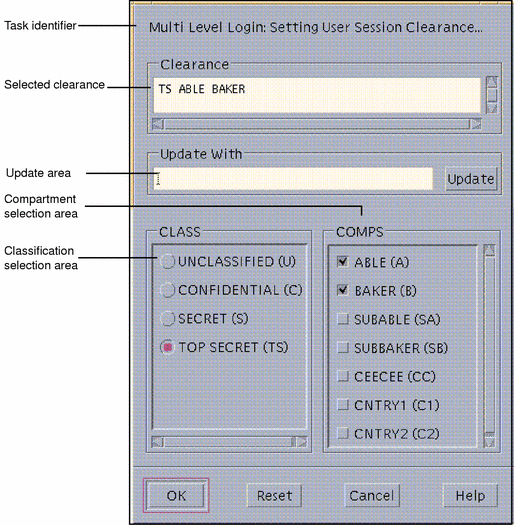
For the tour, you need to set a session clearance higher than your minimum label; this is necessary to demonstrate how multi-level sessions work.
Note -
In this example, the classification selection area is identified by the tag CLASS and the compartments area by the tag COMPS. These tags may be different in your configuration.
-
To use the default session clearance in the selected value field, click OK (or press Enter) and wait for the Trusted Solaris environment to be displayed. You can then proceed to the following section.
To build a different session clearance, go to the next step.
-
Click the desired classification in the classification selection area.
-
Click the desired compartments (if any) in the compartment selection area.
-
Check the session clearance you have built in the Clearance field. Click the OK button (or press Enter) if it is correct or select a new classification and compartment(s) to build a different session clearance.
After you close the Session Clearance dialog box, the Trusted Solaris environment is displayed.
Tour: Exploring the Basic Trusted Solaris Environment
This part of the tour looks at the basic elements of the Trusted Solaris environment before any applications are run or windows displayed. Note that this example environment is configured to display labels.
-
Examine the Trusted Solaris environment.
Figure 3-3 Basic Trusted Solaris Environment
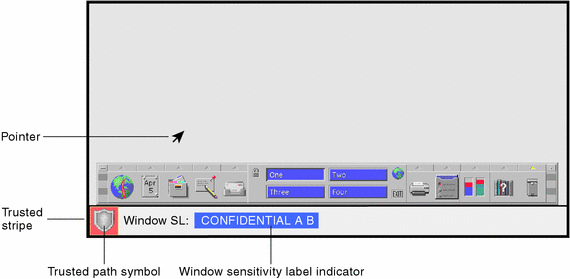
The Trusted Solaris environment displays the trusted stripe at all times at the bottom of the screen and displays the trusted path symbol when you are interacting with the trusted computing base. (In this figure, the trusted path symbol appears because the pointer is in the Front Panel area and the Front Panel contains applications that can interact with the trusted computing base.) If the trusted stripe is missing from your window environment (other than when you lock your screen), notify your Trusted Solaris administrator at once; there is a serious problem with your system.
Note -The trusted stripe can be configured in different ways. This is explained in depth in "Label Displays in the Trusted Solaris Environment".
The trusted stripe (see Figure 3-3) potentially has two elements:
-
Trusted path symbol - is displayed when you perform any activity related to security.
-
Window Label indicator - displays the label of the active window (that is, the window that has the pointer focus). In this example, the initial Window label for this workspace is CONFIDENTIAL A B, which is the minimum label for this user. The window label indicator is optional and may not appear in your configuration.
-
-
Hold down mouse button 3 with the pointer in the workspace switch area but not over a workspace button.
This displays the basic version of the Trusted Path menu.
Figure 3-4 Basic Trusted Path Menu
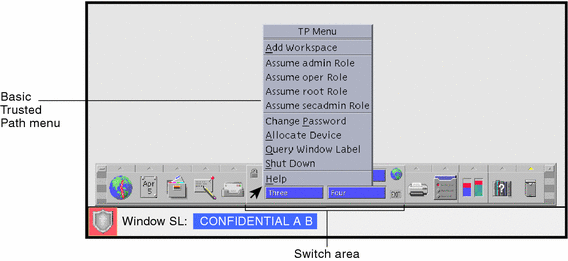
The Trusted Path menu is used primarily to perform general security-related tasks. Notice that the trusted path symbol is displayed when you display the Trusted Path menu or position the pointer over any part of the trusted stripe or Front Panel.
-
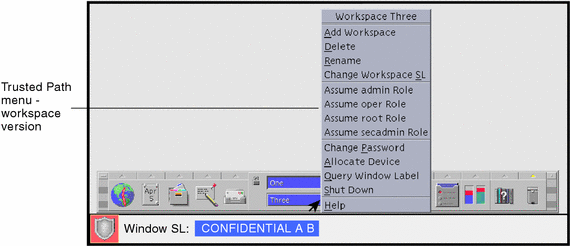
Hold down mouse button 3 with the pointer over the Workspace Three button.
This displays the workspace version of the Trusted Path menu, which contains options that can operate on that workspace. Note that the selections that appear in your menu depend on how your user account has been set up.
Figure 3-5 Trusted Path Menu - Workspace Version
Tour: Launching an Application
All applications in the Trusted Solaris environment have sensitivity. Applications are subjects in any data transactions and must dominate (have an equal or higher label than) the objects (usually files) they try to access. The label information for an application is displayed in the window label stripe both when the window is open and when it is minimized). An application's labels also appear in the trusted stripe when the pointer is in its window.
-
Click the Text Editor icon in the Front Panel to launch the Text Editor.
Figure 3-6 Running an Application
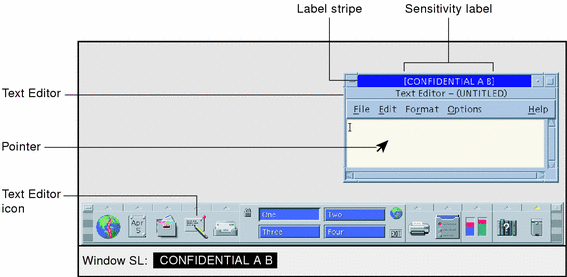
In the example, the Text Editor has CONFIDENTIAL A B as its label. All applications launched in this workspace, from either the graphical interface or from a shell window have the same label. The trusted path symbol does not appear in the trusted stripe since you are not accessing the trusted computing base.
-
Enter some text in the Text Editor and save the file (example shows textfile.1) using the Save option in the File menu.
Figure 3-7 Entering Data and Saving a File
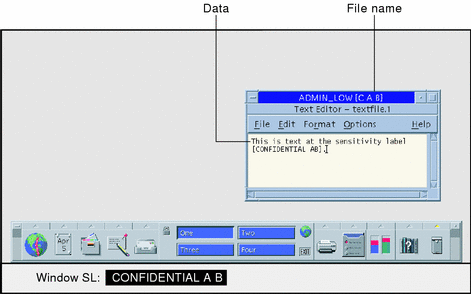
When you create a file in a Trusted Solaris session, the file takes on the label of the application that creates it, [CONFIDENTIAL A B] in the example.
Tour: Looking at Files with File Manager
Files are objects in data transactions in the Trusted Solaris environment and can only be accessed by applications whose labels dominate the files' labels. Files can only be viewed from workspaces or by File Managers that have the same label.
Click the File Manager icon to launch it.
Figure 3-8 Using File Manager
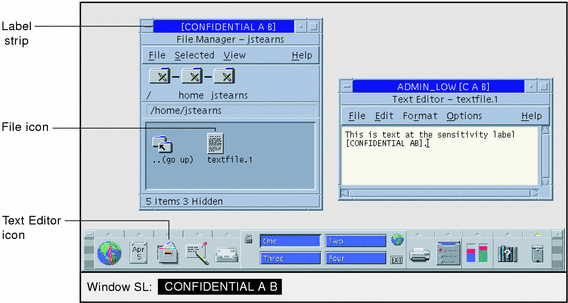
File Manager is an application and is launched with the same labels as the current workspace. It provides access to only those files that are at its label.
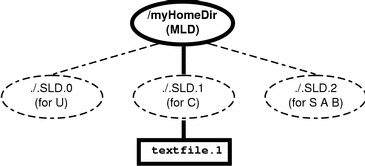
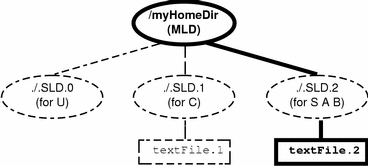
As discussed in "Storing Files in Separate Directories by Labels", the Trusted Solaris environment provides single-level directories (SLDs) and a multi-level directories (MLDs) to separate files and directories at different labels. Whenever you attempt to view or access files within a multi-level directory, you are effectively limited to the contents of the single-level directory at the current label. The following figure shows the contents of the home directory, which is textfile.1 at this stage of the example.
Figure 3-9 Visible and Hidden Files at CONFIDENTIAL Label
Tour: Changing to a Workspace at a Different Label
The ability to set workspace labels in the Trusted Solaris environment provides a safe and convenient means of working at different labels within the same session. To work at a different label you need to change the label on one of the available workspace buttons and then click that button to enter the workspace at the new label.
-
Hold down mouse button 3 while the pointer is over a different workspace button to display the Trusted Path menu and select Change Workspace Label.
This causes a label builder to be displayed in which you specify the new workspace label. The trusted path symbol reappears when you display the Trusted Path menu.
-
Enter a different label for the new workspace.
Do this by selecting a classification in the classification area and one or more compartments in the compartments area and then clicking OK.
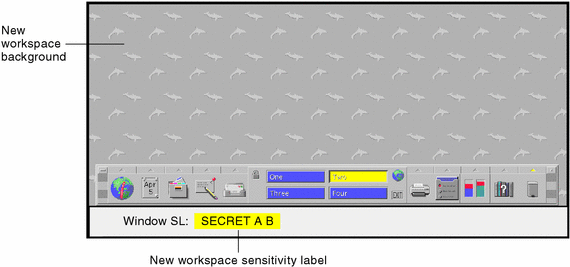
After you click OK (or press Return) in the Workspace Label Builder dialog box, the environment switches to the new workspace (see figure below). The new workspace may have a different background and will indicate the new label in the trusted stripe. In addition, your system may be configured to color-code different labels, that is, apply the label's color to the appropriate workspace button(s), the Window Label indicator, and label stripes.
Figure 3-10 Entering a Workspace with a New Label
Tour: Working in a Workspace at a Different Label
A very major difference to note on entering a workspace with a different label is that you have access to a different set of files and no longer have direct access to the files in the workspace you just left.
-
Click the File Manager icon to view the contents of your home directory.
Figure 3-11 Examining Home Directory Contents in a Workspace with a New Label
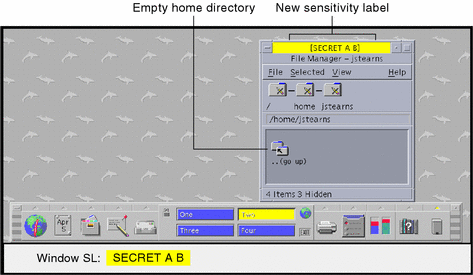
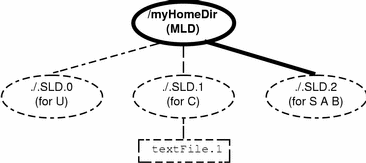
At this sensitivity level, the file you created previously, textfile.1, is not visible. As shown in the figure below, the file created at the previous label cannot be viewed from the workspace at the new label.
Figure 3-12 Visible and Hidden Files Initially at SECRET A B Label
-
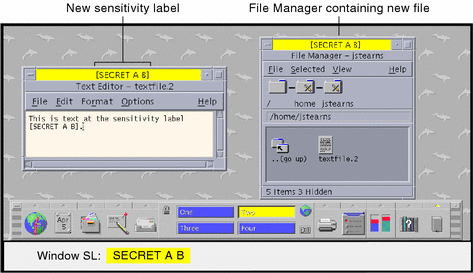
Create a new file (textfile.2 in example) using the Text Editor.
The new text file has a label of SECRET A B.
Figure 3-13 Creating a File in a Workspace with a New Label
-
Use File Manager to view the contents of the home directory now.
The new file created at SECRET A B (textFile.2) is visible and the file created at CONFIDENTIAL (textFile.1) cannot be viewed.
Figure 3-14 Visible and Hidden Files at SECRET A B Label After Creation of New File
Tour: Occupying Workspaces with Applications at Different Labels
Sometimes it is necessary to move an application at one label to a workspace at a different label. To do this, you need to open a workspace at a different label and then use the Occupy Workspace or Occupy All Workspaces command from a Window menu to place the window in another workspace.
Note -
The Occupy Workspace commands do not let you occupy administrative role workspaces from a normal user workspace.
-
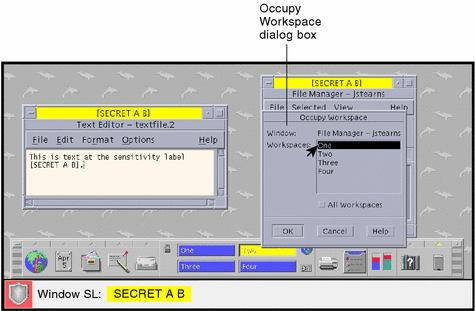
From the window menu in File Manager, select Occupy Workspace.
This causes the Occupy Workspace dialog box to be displayed (see below).
Figure 3-15 Selecting Occupy Workspace
-
Choose the workspace that you used at the beginning of the tour and click OK.
This moves File Manager running at the current label [S A B] to the previous workspace, which is set to [C]. Note that the trusted path symbol reappears when the pointer is in the Occupy Workspace dialog box, because occupying a workspace has a potential effect on the trusted computing base.
-
Repeat Step 1 and Step 2 for the Text Editor window.
This moves the Text Editor window containing the current file to the previous workspace.
-
Click the Workspace One button to return to the previous workspace.
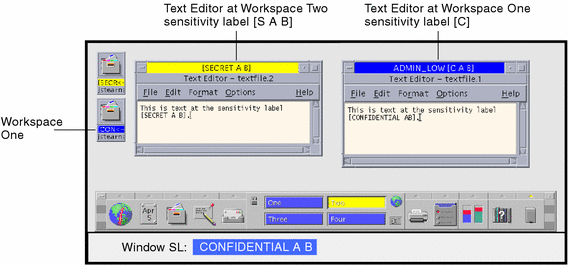
There should be four windows visible, the Text Editor and File Manager from Workspace One running at [CONFIDENTIAL A B] and the Text Editor and File Manager from Workspace Two running at [SECRET A B].
Tour: Moving Data Between Windows with Different Labels
As in standard Solaris, you can move data between windows in the Trusted Solaris environment. If you attempt to transfer information between windows with different labels or user UIDs, you are potentially upgrading or downgrading the label for that information. If your site's security policy permits this type of transfer and your account is authorized, a confirmation dialog box for confirming the transaction will be displayed; otherwise, the transfer will be prevented.
There are two methods for moving data between windows: (1) select it with the left mouse button and copy it with mouse button 2 or (2) Copy and Paste using menu commands, keyboard shortcuts, or function keys. Although you can move data across workspaces, it is much more convenient if both windows occupy the same workspace. Drag-and-drop operations do not work across windows with different labels.
-
Minimize the File Manager windows for the time being.
The two Text Editor windows should be visible as in the figure below.
Figure 3-16 Displaying Applications at Different Labels
-
Highlight the text in the [CONFIDENTIAL A B] Text Editor window and click mouse button 2 in the [SECRET A B] Text Editor window to paste the data.
If this transaction is completed, the label of the transferred data will be upgraded. Before the transfer occurs, the Selection Manager Confirmation dialog box shown below is displayed.
Figure 3-17 Selection Manager Confirmation Dialog Box
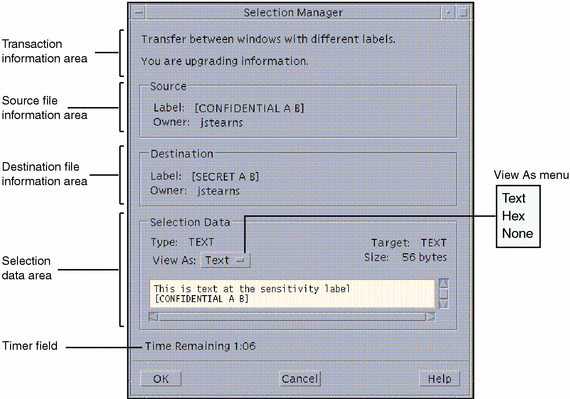
The Selection Manager Confirmation dialog box has these areas:
-
Transaction information area - describes why confirmation of the transaction is needed.
-
Source file information area - identifies the label and the owner of the source file.
-
Destination file information area - identifies the label and owner of the destination file.
-
Selection data area - identifies the type of data selected for transfer, the type of the target file, and its size in bytes. You can view the selected data in text or hexadecimal format in the scrollable display field or choose None and hide it altogether.
-
Timer field - reminds you of the time left to complete the transaction. The amount of time and the use of the timer depends on your site's configuration.
-
-
Click OK to complete the transfer of the data from the [CONFIDENTIAL A B] Text Editor window to the [SECRET A B] Text Editor window.
The transferred data is now in the text editor with the label [SECRET A B]. If you had decided against the transaction, you could have clicked the Cancel button to stop the transaction.
Tour: Moving Files Between File Managers with Different Labels
You can change a file's label, provided you have the proper authorizations and are permitted to work in multi-level sessions. To make a file available in a different workspace you need to (1) make sure it is not in use, (2) display both the source and destination File Managers with different labels in the same workspace, and (3) use drag-and-drop techniques.
-
Copying files - To copy a file, drag it from one File Manager to the other while pressing mouse button 1 and the Control key. This creates a new copy of the file in the second File Manager. Copying files is useful when you need files with the same name at different labels. For example, you could have an application that writes to a file with a specific name and you need to keep separate copies of the file.
-
Moving files - To move a file, drag it from the source File Manager to the destination File Manager with mouse button 1. The file will only be available in the destination File Manager. Moving files is useful when you need to change the label of a file.
-
Linking files - To link a file, drag it from the source File Manager to the destination File Manager while pressing mouse button 1, the Control key, and Shift keys. The file will be available in both File Managers but will use the label of the source File Manager. In general, you should link from a lower label to a higher label. A process at the higher label will be able to read the file but cannot write to it. Linking files is useful when you need to share a file that you access from different workspaces, for example the .dtprofile and .login files. Remember that you will have to work at the same label from which the file was originally linked to change that file.
-
Close both Text Editor windows and open the File Manager windows.
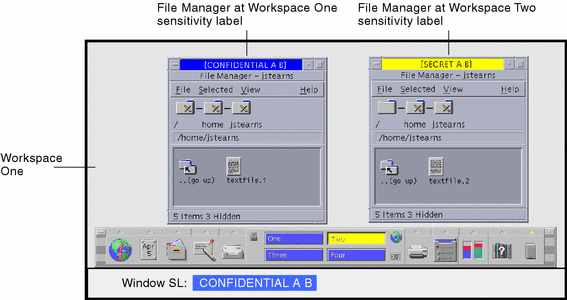
The file whose label is to be modified should be closed when you make the change--this is a good practice whenever you are changing a file's label. At this point, the workspace should appear as shown below.
Figure 3-18 Displaying File Managers at Different Labels
-
Select textfile.2 in File Manager at [SECRET A B], drag it to the File Manager at [CONFIDENTIAL A B], and drop it.
This causes the File Manager Confirmation dialog box in to be displayed (see figure below).
Note -If your system is not configured to permit upgrading or downgrading labels, a dialog box will be displayed stating that the transfer is not authorized.
Figure 3-19 File Manager Confirmation Dialog Box
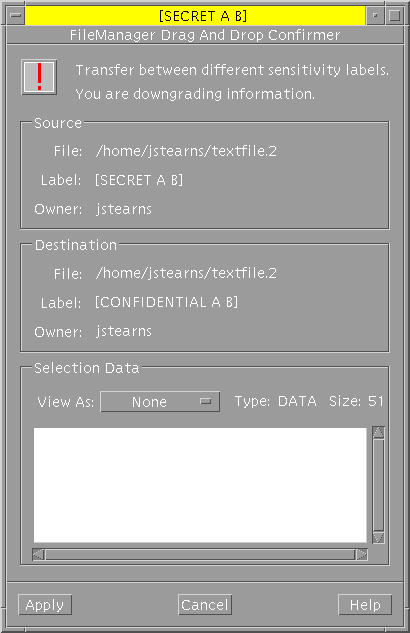
This dialog box is similar but not the same as the Selection Manager Confirmation dialog box. It has the following areas:
-
Window stripe - contains the label which dominates in a comparison of the destination File Manager and the transferred data (there is no window stripe on the Selection Manager Confirmation dialog box).
-
Transaction information area - describes why confirmation of the transaction is needed.
-
Source file information area - identifies the path to the file, label information, and the owner of the source file (the Selection Manager does not identify a source file).
-
Destination file information area - identifies the path to the file, the potential CMW label, and the owner of the destination file (the Selection Manager does not identify a destination file).
Note -Although the File Manager Confirmation dialog box does not display the single-level directory name in either the source or destination paths, the file will actually move from the single-level directory at the source label to the single-level directory at the destination label.
-
Selection data area - identifies the type of file selected for the label change, how you wish to view it, and its size in bytes. You can view the file's data in text or hexadecimal format in the scrollable display field or choose None and hide it altogether. Resetting the View As menu affects the displays of subsequent transfers. Choosing None is useful for selections that consist of unreadable data.
-
-
Click the Apply button in the File Manager Confirmation dialog box to confirm your choice and close the dialog box.
This is the end of the regular tour. See Chapter 4, Elements of the Trusted Solaris Environment, for detailed descriptions of the features in the Trusted Solaris environment.
- © 2010, Oracle Corporation and/or its affiliates
