Tour: Occupying Workspaces with Applications at Different Labels
Sometimes it is necessary to move an application at one label to a workspace at a different label. To do this, you need to open a workspace at a different label and then use the Occupy Workspace or Occupy All Workspaces command from a Window menu to place the window in another workspace.
Note -
The Occupy Workspace commands do not let you occupy administrative role workspaces from a normal user workspace.
-
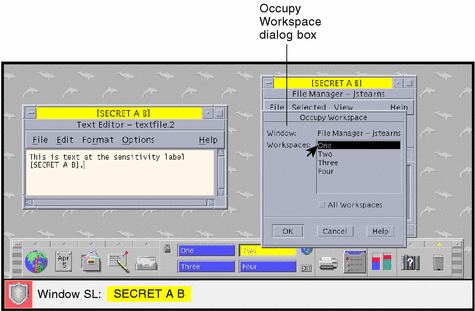
From the window menu in File Manager, select Occupy Workspace.
This causes the Occupy Workspace dialog box to be displayed (see below).
Figure 3-15 Selecting Occupy Workspace

-
Choose the workspace that you used at the beginning of the tour and click OK.
This moves File Manager running at the current label [S A B] to the previous workspace, which is set to [C]. Note that the trusted path symbol reappears when the pointer is in the Occupy Workspace dialog box, because occupying a workspace has a potential effect on the trusted computing base.
-
Repeat Step 1 and Step 2 for the Text Editor window.
This moves the Text Editor window containing the current file to the previous workspace.
-
Click the Workspace One button to return to the previous workspace.
There should be four windows visible, the Text Editor and File Manager from Workspace One running at [CONFIDENTIAL A B] and the Text Editor and File Manager from Workspace Two running at [SECRET A B].
- © 2010, Oracle Corporation and/or its affiliates
