| A P P E N D I X F |
|
Multiscreen Viewing |
This appendix describes how to genlock two graphics accelerators for viewing multiscreen applications (multiview).
Multiview across two Sun XVR-2500 graphics accelerators is done by genlocking the two graphics boards. In a single Sun Ultra 45 workstation, genlocking allows the two graphics boards to display synchronous multiscreen applications. The graphics boards are synchronized using a multiview genlock ribbon cable by connecting the multiview connector of one graphics board to the multiview connector of the second graphics board.
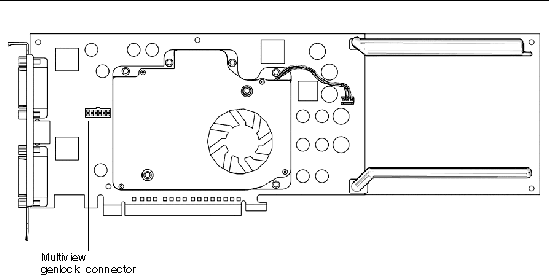
FIGURE F-1 shows the genlock ribbon cable connector pinout locations as you look at the connector end that plugs into the Sun XVR-2500 graphics accelerator multiview connector (FIGURE F-2). The internal multiview genlock ribbon cable is provided in the installation kit.

TABLE F-1 lists the genlock ribbon cable pinout descriptions used for multiviewing:
Multiview synchronization enables vertical retracing to occur simultaneously across each Sun XVR-2500 graphics accelerator in the system. This feature is typically used for stereo mode applications. Vertical retrace synchronization eliminates flicker between multiscreen displays.

|
Caution - Power off the system before connecting the genlock ribbon cable when configuring for multiview. |
1. Connect the multiview genlock ribbon cable between both graphics boards.
a. Connect the top of the genlock ribbon cable to the multiview connector of the first graphics board (FIGURE F-2).
b. Connect the other end of the genlock ribbon cable to the multiview connector of the second graphics board (FIGURE F-2).
|
Note - You can only configure for multiview after logging into the workstation desktop. Multiview settings are not retained, therefore, you need to configure for multiview each time you log in. |
2. Make sure that both Sun graphics accelerators are running identical video formats.
a. Check the resolution of each board by using the fbconfig command.
b. Change a resolution by using the fbconfig command.
You must configure each board separately (that is, for kfb0, kfb1, and so on).
host% fbconfig -dev kfb0 -res SUNW_STEREO_1280x1024x96 host% fbconfig -dev kfb1 -res SUNW_STEREO_1280x1024x96 |
c. Log out of the X window system, and then log back in for the resolutions to take effect.

3. From any desktop command window, configure both graphics boards for multiview mode.
To do this, use the fbconfig command.
Your system is now ready for synchronous multiscreen applications.
In order to reconfigure a graphics board from slave mode back to primary mode, do one of the following:
Log out of the X window system, and then log back in for the configuration to take effect.
Copyright © 2006, Sun Microsystems, Inc. All Rights Reserved.