|
|
| Sun ONE Meta-Directory 5.1 Configuration and Administration Guide |
Chapter 10 Configuring the NT Domain Connector
This chapter discusses configuration factors specific to the NT Domain Connector, which provides bi-directional synchronization of NT user and group data into its connector view.
The topics in this chapter are:
- Installing the Connector
- Configuring a Participating connector view
- Creating Users
- Configuring Connector Rules
- Configuring a Connector Instance
- Activating the Configuration
- Implementing the Configuration
- Monitoring the Connector
- Data Flow for User and Group Entries
- Running the Connector from a Non-PDC Host
- Configuration Example
Installing the Connector
The following components must be installed before you install the connector:
- iPlanet Directory Server 5.1, as described in the Installation and Deployment Guides. Restart the server after enabling the changelogs.
- Sun ONE Meta-Directory 5.1, as described in the Installation and Deployment Guides. Make sure to select NT Domain Connector in the Components screen when you install Meta-Directory.
To create an NT Domain Connector instance
You can set connector parameters during instance creation or from the configuration file. The configuration file contains an extra parameter for log file size.
To set connector parameters during instance creation
- From the Sun ONE Console window, right-click on Server Group. A context menu appears.
- Select Create Instance Of, then select Meta-Directory NT Domain Connector. The New Instance Creation dialog box appears.
- Provide input for the data fields. The dialog box for the NT Domain Connector contains the following additional fields:
To set connector parameters from the configuration file
- Locate the ntdc.conf configuration file in the following directory:
$Netsite_Root/ntdc-ViewName/config/ntdc.conf
$Netsite_Root is the installed path for Meta-Directory. The default is c:\SunONE\Servers. The ViewName is the name you provided in the New Instance Creation dialog box.
- Provide values for the file parameters. The file appears as shown in the following example:
[NT Domain Connector Task]
NT Domain Name=MyDomain
NT Domain Host Read=MyDomainBDC
NT Domain Host Write=MyDomainPDC
NT Domain Connector Loglevel=1
NT Domain Connector Logfilesize=4096
Record Size Limit=50NT User No Value Attributes=
NT Group No Value Attributes=
Most of the parameters correspond to those found in the New Instance Creation dialog box. However, the following parameters are specific to this file:
To add the instance as a participating view
- Right-click the Participating Views object. A context menu appears.
- Select Add Participating View. The Select View dialog box appears.
- Select the connector view you want to add or participate in a join/synchronization with the meta view.
- Click OK. The view is added to the Sun ONE Meta-Directory configuration tree.
To provide authorization
Provide authorization of created users for data server access. See "Setting Access Permissions" for the procedure.
Configuring a Participating connector view
If you have installed the join engine, you can configure a participating view for the NT Domain connector. Refer to the procedures in "Views in Meta-Directory."
Creating Users
The following procedures apply only to the meta view. If you have installed the join engine and want to create new entries, you should create them from the meta view. The connector view only reflects the contents of the external data source or meta view.
To create an NT Domain user in the meta view
- Click on the Contents of the NT Domain meta view.
From the menu bar, select Object > New > User. The Create New User dialog box appears.
- Provide input in the required fields. A default user ID is generated when you enter the first and last names. See "User Entries" for attribute conventions and restrictions.
- Click OK. The user name appears in the right pane of the Meta-Directory console.
You can also create NT Domain users in the meta view by using an LDIF file format within any LDAP client. The LDIF format should be similar to the structures of user entries and group entries, discussed on page 207 and page 212.
To modify an NT Domain user in the meta view
- Click on the Contents of the NT Domain meta view.
- Double-click on the NT Domain user you want to modify. The Edit Entry dialog box appears.
- Alter the fields as needed, then click OK.
Configuring Connector Rules
You can configure the following types of rules for the NT Domain connector:
- Attribute Flow
The connector uses attribute flow rules to specify which external data source attributes are mapped to which connector view attributes and vice versa. NT Domain provides the following preset configurations:
If you select one of the configurations, remove a few attributes, then save the configuration, you cannot revert to the original list of attributes by clicking Insert Defaults. Clicking this button populates the list box at the bottom of the window with default mappings that you can delete or change. If you do not select either configuration, the connector uses the default attribute flow.
- Default Attribute
The connector applies preconfigured attribute rules to an entry in the external data source if no value is assigned to the same attribute in its corresponding entry in the connector view, or vice versa. A default attribute rule may also be configured.
- Filter
The connector uses filtering rules to selectively exclude entries from the synchronization process.
To configure connector rules, see "Attribute Flow Rules", "Default Attribute Value Rules", and "Filter Rules".
Configuring a Connector Instance
Consider the following procedure an extension of the comprehensive configuration procedures in "Function of the Universal Connector" and "Configuring a Universal Connector Instance". You need to perform the following product-specific procedure for every NT Domain Connector.
- To automatically configure attribute flow, proceed to Step a below. To manually configure, go to Step 2.
Select the connector instance for which you want to provide attributes. The General window appears, as shown in .
From the drop-down lists, select the desired attribute flow, filter, and default value configurations. The values that appear are derived from the rules you configured for the connector in the section "Configure Connector Rules".
You can remove attributes from the complete set, if desired, before saving the configuration. The minimum configuration consists of the following attributes:
Application
Attributes
Users
cn
ntUserDomainId
objectclass
sn
uidLocal and Global Groups
cn
ntGroupDomainId
ntGroupType
objectclassSee Table 10-1 and Table 10-2 for the complete list of external attributes.
Click Save, then go to step 3.
- Optional: Manually configure the attribute flow by doing the following:
Select the NT Domain Connector, then select the Attribute Flow tab, as shown in .
Click New and enter a new attribute flow configuration name, then click OK.
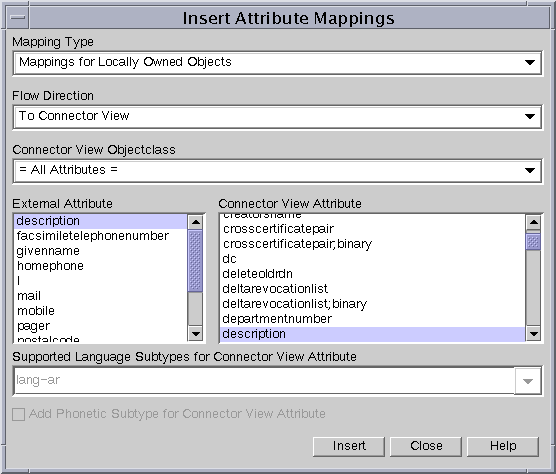
Click Insert. The Insert Attribute Mappings dialog box appears. For both mapping types (locally owned objects and connector view-owned objects), map each attribute to itself for both flow directions (to connector view and from connector view).
For example, the following figure shows the description attribute being mapped to itself for a flow direction to the connector view. This would also have to be repeated for a flow direction from the connector view.

Click Save, select View from the menu bar, then select Refresh.
Select the desired NT Domain Connector instance. The General window appears, as shown in .
From the Attribute Flow Configuration drop-down list, select the attribute flow configuration name you created (Step b) and click Save. The name becomes available in the list after refreshing (Step d).
Select the desired filters and default values from the drop-down lists.
Select the operation you want to perform and click Save.
- Configure the remaining windows for the connector instance. Begin with "To configure the schedule from and to connector views".
Activating the Configuration
You must restart the connector instance to activate your configuration. Both instance-specific and shared configurations will not become effective for a given instance until you have restarted the instance. If the entries you are saving preexist in an NT Domain connector view, see page 205 for advisory information.
- Stop the connector by right-clicking on the connector instance. A context menu appears.
- Click Yes to the prompt. A message appears stating that the stop command has been issued to the component.
- Start the connector by right-clicking on the connector instance. A context menu appears.
- Select Start Server. A message appears stating that the start command has been issued to the component.
Note To start the connector, you must be a member of the Administrators group on the primary domain controller.
Implementing the Configuration
After you start the join engine and enable the connector view, your data can flow to the meta view. The following sections provide procedures for doing these tasks.
Starting the Join Engine
Before you start the join engine, ensure that you have already enabled the changelog in the Directory Server configuration.
To start the join engine
- Select the join-engine object from the navigation tree and right-click. A context menu appears.
- Select Start Server. A message appears stating that the server has been started.
You can also start the server from the Sun ONE Console. To do this, select the Join Engine object and right-click. Select Start Server from the context menu.
Enabling the Connector View
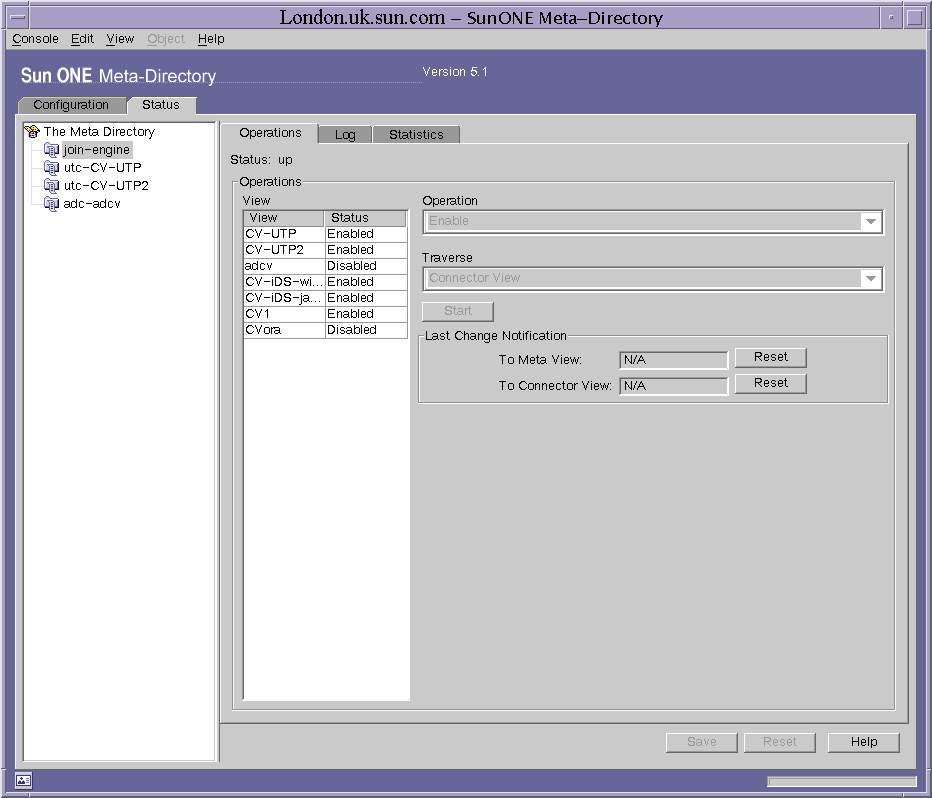
- From the Sun ONE Meta-Directory software window, click on the Status tab.
- Click on the Join Engine object. The Operations tab window appears.

- Select the participating view you want to enable.
- Select Enable from the Operation list menu, then click Submit Request.
This option disables the Traverse drop-down menu. You can only enable the participating view if the configuration for setting up the view is valid. Any error in the configuration automatically changes the view to a disable status.
- Select Refresh from the Operation List Window, then select either Meta View or Connector View from the Traverse menu list.
- Click Start.
Refreshing the View
You can optionally refresh the view if you want to observe updates immediately and bypass the regularly scheduled refresh synchronization. Note that after any type of refresh, you might see a "None" group in the meta view Contents or connector view Contents, particularly with non Primary Domain Controller systems. "None" is a valid group in Windows NT.
- From the Sun ONE Meta-Directory software window, click on the Status tab.
- Click on the NT Domain connector instance object. The Operations tab window appears. The only operation available is Refresh.

- In the "Updates to the" drop-down list, select either External Directory or Connector.
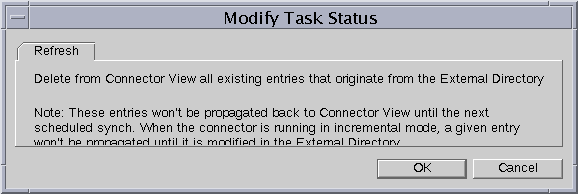
- Click Start. The Modify Task Status dialog box appears. If you are refreshing the connector view, the following version of the box appears:

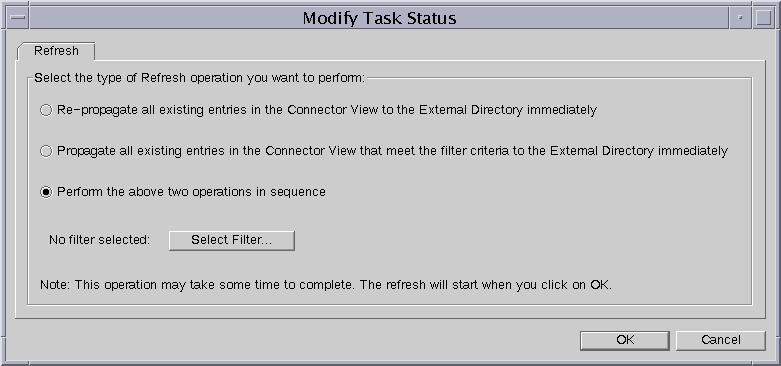
If you are refreshing the external directory, the following version of the box appears:

You must select a filter for the second and third options. Only filters configured for the "NoSubtreesExcept" option are displayed when you click Select Filter, not filters configured for the "AllSubtreesExcept" option.
Monitoring the Connector
The NT Domain Connector provides logs at the following locations that enable you to monitor connector status.
For example, a general connector log entry might appear as follows:
meta-20010405-01.log
Data Flow for User and Group Entries
Entries in the NT Domain connector view must adhere to certain conditions to flow from the connector view into NT SAM. Note the following restrictions and advisory information:
- To prevent duplicate user IDs from occurring in the same connector view, the NT Domain connector views must be separate entities. A connector view should not be nested as a subtree of another connector view. That is, the connector view should be a flat tree that does not contain any subentries.
- Entries that preexist in an NT Domain connector view will not flow to the NT SAM database after the connector starts. To flow these entries, the NT Domain connector view must be an enabled participating connector view in the Join Engine. Refreshing the Meta View operation from the Join Engine will trigger the preexisting entries from the NT Domain connector view to flow to the NT SAM database.
- The Windows NT 4.0 registry has a limit of 40,000 users per primary domain controller (PDC). While this is not a hard-coded limit, surpassing this number of users could result in negative consequences for your Windows NT setup. If you do overload the Windows NT registry, the registry will become "full" and you will not be able to modify its contents; you will not even be able to delete the offending users to return the registry to a normal size.
In this situation, the only choice is to reinstall the operating system since you will not be able to add or delete users, applications, and so forth. While Windows NT provides a registry editing tool, the tool is unable to delete records in the registry if it becomes overloaded. In addition, the Regedit tool is unsupported by Microsoft.
When setting up the Join Engine, you need to ensure that user and group entries meet the required criteria for NT Domain Connector views. The following sections discuss the requirements and list the available external attributes read from NT SAM for both user and group entries.
User Entries
You can create NT users in the connector view with any LDAP client by adhering to the attribute conventions shown in the following structure:
dn: uid=userid, cvroot_dn
uid: userid
cn: user_full_name
ntUserDomainId: domainname:uid
objectclass: top
objectclass: person
objectclass: organizationalPerson
objectclass: inetOrgPerson
objectclass: ntUser
sn: user_last_name
The following restrictions apply to user names:
- A user name cannot be identical to any other user or group name of the domain or computer being administered.
- NT user names cannot contain the following characters:
" / \ [ ] : ; | = , + * ? < >
- The username length of users added to NT SAM using the NT Domain Connector cannot exceed 20. The NTDC accessor does not check for username size when adding from the connector view to NT. You cannot delete invalid entries from the Administrator Tool, but you can delete them from the connector view and have the NT Domain Connector delete the invalid entries.
- The user name cannot consist solely of periods or spaces.
Table 10-1 shows the available external attributes for user entries.
Group Entries
The group entries in the connector view contain the list of member DNs. The connector view applies static group membership.
You can create NT groups in the connector view with any LDAP client by adhering to the attribute conventions shown in the following structure:
dn: cn=groupname, cvroot_dn
objectclass: top
objectclass: groupOfUniqueNames
objectclass: ntGroup
ntDomainGroupId: domainname:groupname
ntGroupType: grouptype (grouptype := "local" | "global")
The following restriction applies to group entries:
- When synchronizing local groups that contain members from a trusted domain, none of these entries are propagated to the connector view under the local groups.
- A local group name cannot be identical to any other group or user name of the domain or computer being administered. It can contain up to 256 uppercase or lowercase characters except for the backslash character (\).
- A global group name cannot be identical to any other user or group name of the domain or computer being administered. It can contain up to 20 uppercase or lowercase characters except for the following:
" / \ [ ] : ; | = , + * ? < >
- A global group name cannot consist solely of periods (.) and spaces.
Table 10-2 shows the available external attributes for group entries.
Running the Connector from a Non-PDC Host
NT services are run by default in a system account that has admin rights, but only to the local machine. It cannot read NT SAM from another machine. To enable the connector to access the SAM database remotely, you have to set the user account that runs the service to an account that has administrator rights in the domain. It is recommended that you create a new account that has appropriate rights to manage NT services on the local system and access the NT SAM database on the PDC (not local).
The following steps explain the configuration required to synchronize data from a PDC other than your machine, which is not in the PDC domain. Before you begin, when you create an instance of the connector, the domain name should be the PDC's domain name, and the hostread and hostwrite should be the machine name of the PDC.
- Enable trusted and trusting relationships.
Add a trusted domain to your local machine, then add the trusting domain to the PDC with the same password.
Add a trusted domain to the PDC, then add the trusting domain to your local machine with the same password.
If you establish the trust relationships correctly, you should see a successful confirmation message. If the trust relationships are not established correctly, data cannot be synchronized.
- Stop the NT Domain connector.
- From the desktop of the local machine where the connector is installed, go to Settings > Control Panel > Services.
- Select NT Domain Connector.
- Click the Startup ... button.
- Select "This Account" and specify your domain Sun ONE Administrator user name and password, then click OK.
- Start the NT Domain Connector. If you have difficulty starting it from the service panel, start it from the console.
Configuration Example
The following example is intended as a quick reference you can use as a checklist. For complete configuration information, refer back to the earlier portions of this chapter.
Install the Connector
- Ensure that iPlanet Directory Server 5.1, and Sun ONE Meta-Directory 5.1 are already installed.
- Create a connector instance.
During instance creation:
From the Sun ONE Console window, right-click on Server Group. A context menu appears.
Select Create Instance Of, then select Meta-Directory NT Domain Connector. The New Instance Creation dialog box appears.
Provide input for the data fields. For View Name, use NT. For View ID, use CV1. For View Base DN, use o=CV1. For Schema, use default. For the remaining fields, see page 194.
From the configuration file:
Locate the ntdc.conf configuration file in the following directory:
NetsiteRoot/ntdc-ViewName/config/ntdc.conf
Provide values for the file parameters. For details, see Step 2 on page 195.
- Add the instance as a participating view.
Right-click the Participating Views object. A context menu appears.
Select Add Participating View. The Select View dialog box appears.
Select NT and click OK. The view is added to the Sun ONE Meta-Directory tree.
- Provide authorization. See "Setting Access Permissions".
Configure Connector Rules
- Configure attribute flow.
Click on the NT Domain connector. The Attribute Flow tab window appears.
Select ntdc_minimal from the list of configurations.
In the Mapping Type drop-down list, select Mappings for connector view Owned objects.
Click Insert. The Insert Attribute Mappings dialog box appears. This displays a list of all available attributes from both the external data source and the connector view.
For Mapping Type, select Mapping for connector view Owned objects. For Flow Direction, select From connector view. For connector view Objectclass, select All Attributes.
For External Attribute, select homephone. For connector view Attribute, select telephonenumber.
Click Insert. The mapping for your configuration appears at the bottom of the Attribute Flow window.
Click Close, and then click Save from the Attribute Flow window.
- Configure default attribute rules.
Click on the Default Values tab. The Default Values window appears.
In the Name field, type in NTDefault. The name is echoed in the Configurations list box.
In the Attribute Destination drop-down list, select External Directory.
Click Add. Blank fields appear below the Attribute and Default Value fields.
Click within the blank Attribute field. A drop-down list appears. Select givenname from the list.
Double-click within the blank Default Value field and type in surname.
Click Save.
- Configure filters.
Click on the Filters tab. The Filters window appears.
Click New. The Filter Name dialog box appears.
Type in NTExclude and click OK. The new name appears in the Filter Name list box.
Filter excluded data:
Provide a list of subtrees to exclude by selecting All Subtrees Except, then clicking Add. The Sub-tree DN dialog box appears.
Specify a subtree to exclude, such as o=siroe,c=us, then click OK. The subtree appears in the list box.
With this filter, entries in all subtrees that are not specifically excluded are included, no matter how you set the associated entry-level filters.
Filter back entries from the excluded subtrees using entry-level filters. Select the subtree you just created, select All Entries Except, then click Add. The Entry RDN dialog box appears.
Specify an entry you want to include, such as cn=Fred Scofflaw, then click OK. The included entry appears in the list box.
The entry-level filters you apply affect only the entries found in the list of subtrees to include. The entries you specify here will filter through; all others are excluded.
From the menubar, select View > Refresh.
Configure a Connector Instance
- Select the ntdc-NT connector instance. The General window appears.
- Select the following from the drop-down lists:
For Attribute Flow Configuration, select ntdc_minimal.
For Filter Configuration, select NTExclude.
For Default Values Configuration, select NTDefault.
- For Operation, select "Only receive updates from the connector view."
- Click Save. Leave the current values for fields in the Schedule, Log, and Attributes windows.
Restart the Connector Instance
- Stop the connector by right-clicking on ntdc-NT. A context menu appears.
- Click Yes to the prompt. A message appears stating that the stop command has been issued to the component.
- Start the connector by right-clicking on ntdc-NT. A context menu appears.
- Select Start Server. A message appears stating that the start command has been issued to the component.