| C H A P T E R 4 |
|
Configuring, Managing and Maintaining the Server Using the Web GUI |
This chapter provides information about how to use a web browser and the Sun Fire X4150 server software to manage your server. The sections include:
This chapter addresses your local system. For information about how to redirect your commands to a remote system, see Chapter 5.
The Configuration submenu tabs enable you to configure the network operation and other important functions of the server. These functions are described in the following sections:
|
 From the main menu, click the Configuration tab.
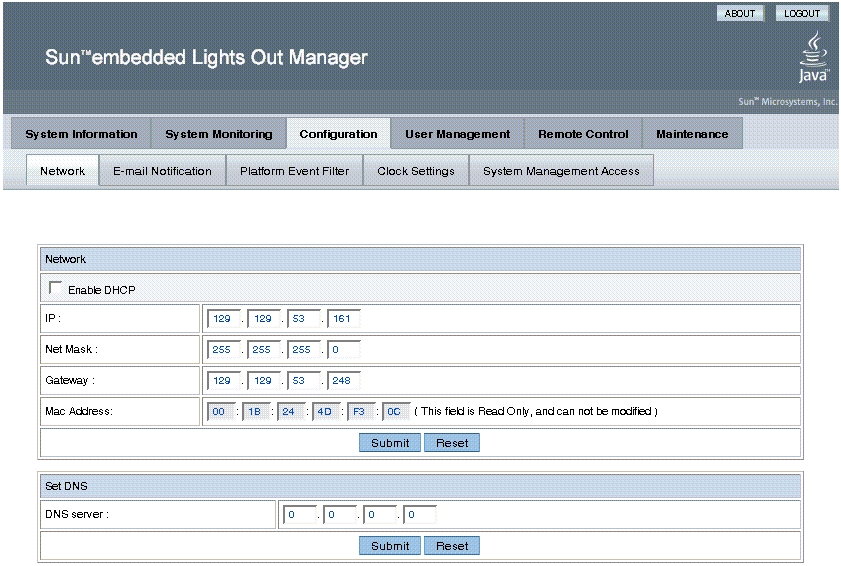
The Configuration tabs appear (see FIGURE 4-1). You are now able to access the Network, E-mail Notification, Platform Event Filter, Clock Settings, and System Management Access screens.
FIGURE 4-1 The Configuration Screen
|
 From the Configure submenu, click the Network tab.
The Network configuration screen appears (see FIGURE 4-1). Use this screen to enable or disable DHCP and set DNS. If you disable DHCP, you must manually supply the IP address, the netmask, and the gateway.
The E-mail Notification screen enables you to configure the e-mail recipients for any ELOM generated events. The system allows you to designate up to 10 recipients. e-mail notification is used in conjunction with Platform Event Filters (PEF). PEFs are event traps that allow you to associate an action, or a set of actions, with the occurrence of a specific event. One such action is mail notification. The Send Mail action is enabled in the Platform Event Filter screen and configured in the E-mail Notification screen.
|
 From the Configuration submenu, click the E-mail Notification tab.
The Enable E-mail Notification screen appears. You must supply the name of the SMTP server and the sender and designate the receiver e-mail addresses.
The Platform Event Filter option allows you to configure actions for system generated events. A system generated event is an alert that occurs when a threshold for a system sensor is reached. For example, the system uses the sensors to monitor various critical components. The components are most effective when operating within a specific range. The limits of that range are defined as thresholds. All components, such as fans, have an upper and lower critical threshold (see To Monitor Fans). When either critical threshold is crossed the system generates an alert. For example a fan failure would cause an alert for the lower critical threshold. You can configure an event filter to trigger off the alert and perform one or several actions. These actions include:
An event is configured in two parts: the event (or alert) and the response or action to be taken when that event occurs. You can configure up to six filters. You begin by determining what sort of event you want to trap.
|
1. From the Configuration submenu click Platform Event Filter tab.
The Platform Event Filter screen appears (see FIGURE 4-2). The PEF screen is divided into five sections:
FIGURE 4-2 The Platform Event Filter Screen
2. In the The Platform Event Filter section click the Enable PEF radio button.
To configure/create a filter, you must first enable PEF.
3. Type the address of the trap receiver in the Trap Receiver Destination Address section.
4. Enable all actions that you would like to be available for your filters by selecting the appropriate check box in the PEF Action Global Control section.
5. Select the sensor group for which you would like to filter alerts from the drop-down list in the Event Filter Configuration.
6. Select the action for the alerts by selecting the check boxes in the Event Action Configuration section.
If you are selecting a power control action, select the action from the drop-down list after selecting the Power Control check box.
In the example shown in FIGURE 4-2, the system is configured to enable all actions. A filter has been created to filter fan alerts. When an alert occurs, the system will cycle power, send an alert to the SEL, and send mail to the addresses listed in the E-mail Notification screen (see Configuring E-mail Notification).
7. Click Submit to create the filter.
You can configure up to six filters.
The System Management Access submenus allow you to set up the SSL certificate and SNMP. The SSL configuration is used for creating certificates required in the Certificate Signing Request (CSR). The certificate is required to enable encryption for when you use HTTPS for secure web browser access. HTTPS requires a digitally signed certificate to be installed at the applicant’s site. The SNMP screen allows the configuration of SNMP settings, communities, and users.
|
 From the Configuration submenu click the System Management Access tab.
The System Management Access submenu tabs appear.
|
1. From the System Management Access submenu, click the SSL Certificate tab.
The SSL Certificate screen appears.
2. Select either Certificate or CSR from the drop-down list.
3. Fill in the required fields in the SSL Configuration section.
4. Click Generate to create the certificate.
5. Click Upload to bring the certificate into view.
| Note - If no certificate has yet been assigned, follow the directions below to generate a new CSR. |
6. Follow the onscreen directions, and fill in the fields using the example as a guide.
The example in TABLE 4-1 represents the kind of information required.
7. Click Generate to create a new CSR.
A series of screens allow you to set port, requests, and SNMP permission parameters for the system you are logged in to.
| Note - The SNMP MIB file is located on the Tools and Drivers CD in the directory /SNMP/mib/. |
|
1. From the System Management submenu, click the SNMP tab.
2. Select SNMP settings from the drop-down list, and then click Select.
The SNMP Settings screen appears.
3. Select the Set Request check box to set one or more SNMP variables.
This check box acts as a global override for the user and community read/write permissions. For example, if you disable Set Requests, a member of the private community accessing your Sun server or stand-alone system via the SNMP interface cannot set sysContact despite having write permission.
4. Select the check box beside the preferred version of SNMP protocols to override the delivered system default.
5. Click Submit to save the configuration, or click Reset to clear your entries.
|
1. In the SNMP screen, select SNMP Communities from the drop-down list and click Select.
The SNMP Communities screen appears.
2. Select the radio button at the head of an unoccupied row.
3. Click Add to create a new community.
The Community Setting screen appears.
4. Type the name of the new community in the Community field.
5. Select a permission from the Permission drop-down list.
6. Click Submit to add the community.
|
1. In the SNMP screen, select SNMP Communities from the drop-down list, and then click Select.
The SNMP Communities screen appears.
1. Select the radio button at the head of the row for the community that you want to delete.
2. Click the Delete button to delete the community.
The system does not prompt for a confirmation.
|
1. In the SNMP screen, select SNMP Communities from the drop-down list, and then click Select.
The SNMP Communities screen appears.
2. To change permissions for an existing community, select the radio button at the head of the row for the community you would like to modify.
The displayed screen allows you to change file permissions for that community.
4. Select the permission from the Permission drop-down list.
The permission is either read-only (ro) or read/write (rw).
5. Click Submit to modify the community, or click Reset to clear your changes.
|
1. In the SNMP screen, select SNMP User Settings from the drop-down list, and then click Select.
The SNMP User Settings screen appears.
2. Select the radio button at the head of an unoccupied row.
3. Click Add to create a new user.
The User Setting screen appears.
4. Fill in the open fields for the new user in the User Setting screen.
The Authentication Protocol options are MD5 and SHA.
The Permission options are rw (read/write) and ro (read-only).
5. Click Submit to create the new user.
|
1. In the SNMP screen, select SNMP User Settings from the drop-down list, and then click Select.
The SNMP User Settings screen appears.
2. Select the radio button at the head of the row for the user that you want to delete.
3. Click the Delete button to delete the user.
The system does not prompt for a confirmation
|
1. In the SNMP screen, select SNMP User Settings from the drop-down list, and then click Select.
The SNMP User Settings screen appears. This screen allows you to add, delete, and edit users.
2. Select the radio button at the head of the row for the user setting that you would like to edit.
3. Click the Edit button in the same row.
The User Settings screen appears.
4. Edit the necessary user settings.
You cannot edit the user name. To change a user name, delete and re-create the user with a different name.
5. Click Submit to save your changes.
The ADS Configuration screen enables you to browse and upload a certificate from Active Directory Service (ADS) for a Microsoft Windows environment. Administrators can simplify their tasks by monitoring multiple machines in one node using ADS.
|
1. Install Windows 2003 and make it the Domain Controller in an Active Directory environment.
2. Create and configure the DNS server.
3. Add a new user and set privilege level (administrator or user) in AD server.
4. Use Control Panel to access Add or Remove Programs, and click Add/Remove Windows Components.
The Windows Components Wizard appears.
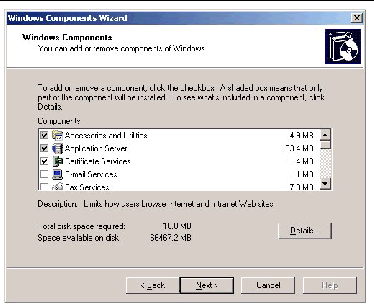
5. In the list of components, in the Windows Components screen, click the check box to enable Certificate Services (see FIGURE 4-3).
FIGURE 4-3 Windows Components Screen
6. Click Next to begin the Create CA Root Domain Certificate process.
This will requre IIS to be installed also.
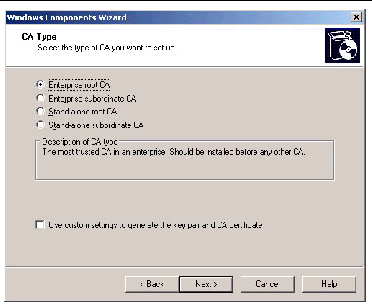
7. In the CA Type screen of the Windows Components Wizard, select the type of CA you want to set up (see FIGURE 4-4).
FIGURE 4-4 CA Type Windows Components Wizard Screen
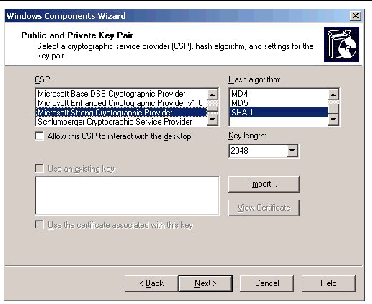
8. In the Public and Private Key Pair screen, select a cryptographic service provider (CSP), a hash algorithm, and settings for the key pair (see FIGURE 4-5).
FIGURE 4-5 Public and Private Key Pair Windows Components Wizard Screen
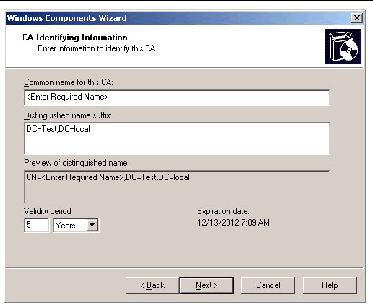
10. In the CA Identifying Information screen, enter the necessary information to indentify this CA (FIGURE 4-6), and click Next.
FIGURE 4-6 CA Identifying Information Windows Components Wizard Screen
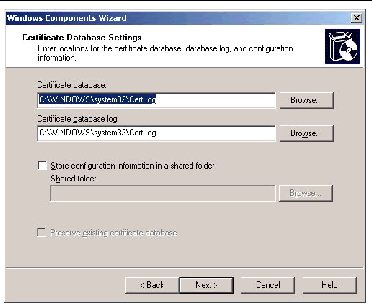
11. In the Certificate Database Settings screen, enter the locations for the certificate database, database log, and configuration information (see FIGURE 4-7).
FIGURE 4-7 Certificate Database Settings Windows Components Wizard Screen
12. To finish the Create CA Root Domain Certificate process, click Next.
13. To export the AD certificate, locate the net certificate for your Domain.
You will see a certificate called, C:/xxx.crt.
14. Double-click the Certificate.
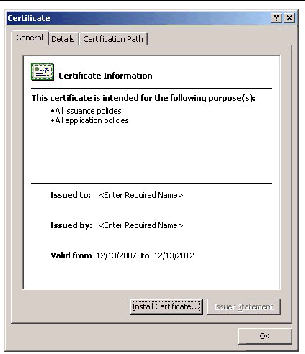
The certificate screen appears.
FIGURE 4-8 The Certificate Information Screen
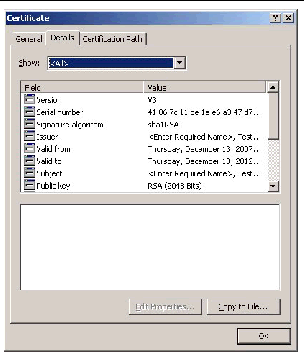
The Certificate Details screen appears (see FIGURE 4-9).
FIGURE 4-9 The Certificate Details Screen
16. Click the Copy to File... button.
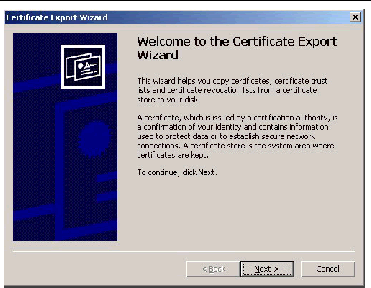
The Certificate Export Wizard screen appears (see FIGURE 4-10).
FIGURE 4-10 The Certificate Export Wizard Screen
The Export File Format screen appears.
FIGURE 4-11 The Export File Format
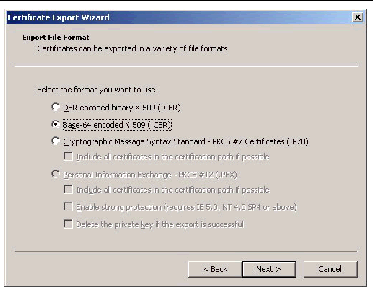
18. Under the heading Select the format that you want to use:, click the radio button for the second option, Base-64 Encoded X.509 (.CER).
The File to Export screen appears (see FIGURE 4-12)
FIGURE 4-12 The File to Export Screen
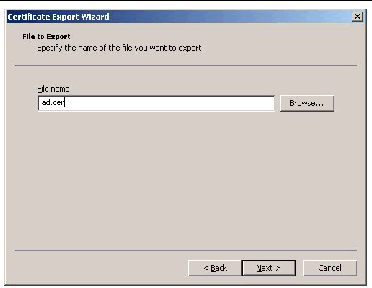
| Note - DNS resolution issues might occur if the filename is incorrect. |
Store this exported certificate in a shared folder of your choice.
The ad.cer file is exported to the shared folder.
22. To set the Certificate server to respond to the CA request automatically, open Default Domain Controller Security Settings.
23. Expand Public Key Policies, and in the Automatic Certificate Request Settings, create a new Computer entry from the supplied entry list.
24. Use a web browser to connect to an SP ELOM web GUI.
Enter the URL of the SP in the address bar.
25. Log in as root, or as a user with administrator privileges.
26. Click the User Management tab, and click the ADS Configuration submenu tab.
The ADS Configuration screen appears.
27. Upload the ad.cer file from the share network folder.
28. Enter the Primary, Secondary DNS and the Root Domain addresses.
29. Click Submit to save the configuration.
31. To test your configuration, log in as the new user created in the Active Directory structure.
The User Management, System Monitoring, Remote Control, Maintenance, and System Information submenus enable you to manage and maintain server-related functions. These functions are described in the following sections:
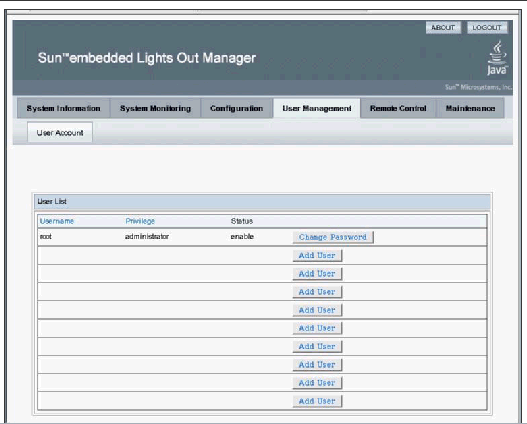
The User Management tab provides access to the User Account screen, which lists current users by privilege and status, and enables the administrator to add, delete, modify and enable/disable user accounts.
The ELOM supports up-to 10 user accounts. One of the user accounts is root, which is set by default and cannot be removed. Therefore, you can configure 9 additional accounts. Each user account consists of a user name, a password, and a permission.
| Note - User permissions extend to both the web GUI and the serial connection methods. |
The permissions that a user can be assigned include:
TABLE 4-2 shows the user permission levels and the access each level has to the ELOM menus and screens.
| Note - If the SP password has been changed and then lost, a BIOS option exists to reset the password back to the default changeme. See Resetting the Service Processor. |
|
1. From the User Management submenu, click the User Account tab.
2. Click any button labeled Add User.
The Manage User Account screen appears (see FIGURE 4-13).
If all 10 user account slots are configured, you must delete an existing user account before you can add a new user account. See To Delete a User Account.
FIGURE 4-13 The User Management Screen
3. Complete the following information.
a. Type a user name in the User Name field.
The user name must be at least 4 characters and no more than 20 characters. User names are case-sensitive and must start with an alphabetical character. You can use alphabetical characters, numerals, hyphens, and underscores. Do not include spaces in user names.
b. Type a password in the Password field.
The password must be at least 8 characters and no more than 16 characters. The password is case-sensitive. Use alphabetical, numeric, and special characters for better security. You can use any character except a colon. Do not include spaces in passwords.
c. Retype the password in the Confirm Password field to ensure that the password is correct.
d. Select either Administrator, Operator, User, or Callback for the user permission (see TABLE 4-2 for a listing of permission levels and access).
e. When you finish entering the new user’s information, click Add.
The User Accounts screen appears. The new user account and associated information is displayed on the User Accounts screen.
|
1. From the User Management submenu, click the User Account tab.
2. Click either the Change Password or Change Permission button for the user.
3. Change the password or privilege as needed.
4. After you have modified the user information, click Submit for your changes to take effect, or click Reset to return to the previous settings.
A confirmation screen verifies that the user account was modified successfully. To change the administrator password using the BIOS Setup Utility, see Changing the Administrator Password Using the BIOS Setup Utility.
|
1. From the User Management submenu, click the User Account tab.
2. Click the Delete button for the user that you would like to delete.
You do not receive a confirmation prompt.
|
Disabling a user makes the user account inactive. This might be preferable to deleting the account.
1. From the User Management submenu, click the User Account tab.
2. Click the Disable or Enable button for the appropriate user.
You do not receive a confirmation prompt.
The System Locator Indicator LED is located on the front and rear panel of the server. You can activate the Locator Indicator LED in the ELOM. By activating the Locator Indicator LED for a particular server, you can identify that server from the many other servers installed in a rack. You can manage the state of the System Locator Indicator LED from the ELOM Maintenance screens.
|
1. From the main menu, click the System Monitoring tab.
The System Monitoring submenu tabs appear.
2. Click the Locator Indicator tab.
The System Indicator LED screen appears.
3. Select the appropriate radio button to either turn the LED on or turn it off.
4. Click Submit to change the state of the LED, or click Reset to cancel.
Your server is equipped with six fault LEDS. Four of the LEDs are on the front panel, and two are located inside the server on the motherboard. Three of the front panel LEDs are located on the right front side of the server front panel, the Top Open (Check Fan Status) LED, the Power Supply (PS) LED, and the Overtemperature Warning LED. These LEDs alert you to problems specific to a particular subsystem. Use these LEDs in conjunction with the ELOM to troubleshoot down to the component level.
The Fault LED (Service Required LED) is located on the left side of the server front panel. This LED alerts you to an internal problem on the motherboard. Use the Fault LED in conjunction with the two internal on-board fault LEDs, the CPU LED and the DIMM LED to troubleshoot issues related to a specific CPU or DIMM.
You can monitor and manage the state of the Fault LEDs from the ELOM Maintenance screens. For more information about using the fault LEDs to troubleshoot server problems, see the server service manual.
|
1. In the main menu, click the System Monitoring tab.
The System Monitoring submenu tabs appear.
2. Click the Fault LED submenu tab.
The Fault LED Control screen appears (see FIGURE 4-14).
FIGURE 4-14 The Fault LED Screen
The Fault LED screen is divided into three sections, the Fault LED Control section, the Front Panel Fault LED Control, and the On-Board Fault LED Control. These sections allow you to monitor and change the status of each LED. If the current status of an LED is On, then you will have the option to turn it Off. Otherwise, the LED status is shown as Off. For example in FIGURE 4-14, the front panel Fault LED, the Overtemperature Warning LED and the internal on-board CPU LED and DIMM LED are On.
|
1. Select the appropriate radio button for the fault LED that you would like to turn off.
2. Click the appropriate Submit button for the particular section to turn the LED off.
You can control power to the server you are logged in to by using the Remote Power Control submenu screen to set the power control action.
|
1. From the Remote Control tab, click Remote Power Control.
The Power Control screen appears showing a drop-down list of various power-off and restart options: Force Power Off, Reset, Graceful Shutdown, Boot Option: BIOS Setup, Boot Option: PC Check, and NMI.
2. Select power option you want and click Save.
For example, select Boot Option: BIOS Setup to reboot the system and enter the BIOS.
3. When you have made your changes, click Submit to save the changes, or click Reset to clear the changes.
The baseboard management controller holds the original default settings of the service processor. In the event of system lock-up or panic you can reset the SP to its original state.
|
1. From the main menu click the Maintenance tab.
The Maintenance submenus appear.
2. Click the Reset SP submenu tab.
The following message appears:
There are several ways to update the SP firmware. Use one of the following procedures:
1. Updating the firmware using the Tools and Drivers CD.
2. Updating the Firmware Using a Web Browser.
3. Updating the firmware using TftpUpdate through the CLI. See To Update the Firmware.
4. Use CPLDUpdate through the CLI. See to To Update the Firmware.
5. Updating the Firmware Using a Web Browser.
|
1. Insert the latest version of the Tools and Drivers CD into the CD/DVD drive.
The system boots using the Tools and Drivers CD, and a menu with five options appears.
3. To update the firmware, select one of the following two options:
a. Flash System BIOS/Service Processor Firmware--Clear BIOS CMOS and load default settings (recommended).
b. Flash the System BIOS/Service Processor Firmware--Preserve BIOS CMOS settings (advanced use only).
| Note - Use the second option only if you have customized BIOS settings and would like to retain these settings. This option might require user intervention during the reboot. |
This section explains how to update firmware to a remote server. There are two options for updating firmware.
If the system BIOS has not been customized, select option #1: Clear CMOS. If the system BIOS has been customized, select option #2: Preserve CMOS.
| Note - Selecting option #2 might require user interaction during the reboot. |
|
| Note - The system must be powered off for you to perform an update. If the server is powered on, the SP warns the user to power off before continuing. The option to update firmware will not be available if the server is powered on. For information about how to power-off the server, see Setting Power Control. |
1. From the main menu, select the Maintenance tab.
The Maintenance submenu tabs appear.
2. Click the Firmware Update tab.
The Firmware Update screen appears.
3. Select the firmware file or CPLD file to update.
These files are located on the Tools and Drivers CD in the Remote_Firmware directory.
4. Choose whether to preserve the system BIOS CMOS and load optimized defaults.
| Note - A hardware procedure for clearing the NVRAM is available in the server service manual. |
5. Firmware will perform a check and ask the user to confirm the update by displaying current and proposed firmware revisions.
6. When the update is finished, after approximately five minutes, the SP resets and you are logged out.
The session timeout is an inactivity timer. If an open session enters a state of inactivity that exceeds the preset timer, the system closes (logs out) the session. This function prevents unauthorized access to the system by providing an automated logout function. The session timeout is enabled by default. It might be helpful to disable the session timeout when performing updates or remote sessions.
|
1. From the main menu, click the System Information tab.
The Versions, Session Time-Out, and Components submenu tabs appear.
2. Select the Session Time-Out tab.
The Session Time-Out screen appears.
3. Click the Enable Timeout radio button.
4. Select a session time from the Session Time drop-down list.
The options are 15 minutes (default), 30 minutes, 1-hour, and 2 hours.
5. Click the Submit button to set the session timeout.
|
1. From the main menu, click the System Information tab.
The Versions, Session Time-Out, and Components submenu tabs appear.
2. Select the Session Time-Out tab.
The Session Time-Out screen appears.
3. Click the Disable Time-Out radio button.
4. Click the Submit button to disable the session timeout.
The Configuration submenu tab allows you to set the correct time for the ELOM. Accurate time is important for tracking and troubleshooting occurrences reported in the system event log (SEL).
|
 From the Configuration submenu, click the Set Time tab.
The Set Time screen appears. Use the radio buttons to either manually input the date and time, or to use an NTP server. For the latter, you will have to input the IP address of the server.
You can change the administrator password using the BIOS Setup Utility. If you’ve changed the root password, but have not created an alternate account, and the new root password is lost or forgotten, you will have to reset the reset the SP to return the ELOM to its default settings. For information about how to rest the SP, seeResetting the Service Processor. Additionally, hardware options for resetting the BIOS password and the NVRAM are available in the product Service Manual.
|
1. Connect a KVM to the server.
2. Reboot the server, and watch the output.
A prompt appears at the bottom of the screen instructing you to press F2 to enter the BIOS settings.
The BIOS Setup Utility screen appears (for information about the BIOS Setup Utility, see the server service manual).
4. Use the right arrow key to navigate to the Security menu tab.
Highlight the Security menu tab so that the Security screen appears.
5. Use the down arrow key to highlight the Supervisor (administrator) password.
6. To change the administrator password, press enter.
Follow the BIOS prompts to change the password.
7. To save your change and exit the BIOS Setup Utility, press F10.
Should the SP (service processor) software become corrupted, you can reinstall the default image from the CD. You need a bootable USB flash device and a jumper cap. For procedures on recovering from a corrupt SP, see the product Service Manual.
Copyright © 2008, Sun Microsystems, Inc. All Rights Reserved.