| Sun Java System Connector for Microsoft Outlook Desktop Installation Guide |
Chapter 1
Installing and Configuring
the Software on Your Desktop
About the Setup ProcedureThe procedure to install the Sun Java System Connector for Microsoft Outlook on your desktop may follow any of several different paths, depending on your current system setup, the volume of data (if any) that you want to convert from the old Outlook format to the new format, and other factors. This Guide explains all of the screen displays that may appear to various users, but it's a rare case that any single user would see them all, and the ones that don't apply to you will be skipped.
System Requirements
The Sun Java System Connector for Microsoft Outlook requires:
If a Large PST File Conversion Is Interrupted
If the conversion of a large file is interrupted before its completion (by a power failure, for example), the Setup Wizard offers a Recovery feature that lets you complete a conversion in progress rather than having to start over from scratch. If this should happen to you, please see "If a Personal Folder (.pst) File Conversion Is Interrupted" in Chapter 2.
The Setup ProcedureThis section describes the steps to follow in order to install and configure Sun Java System Connector for Microsoft Outlook on your desktop.
Step 1: Start the Setup Wizard
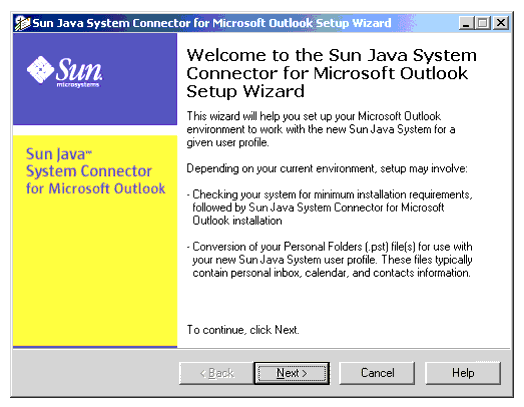
Your network administrator will tell you how to start your Sun Java System Connector for Microsoft Outlook Setup Wizard—most likely by finding the program name through your Start button, or by an icon on your desktop, or by browsing to a particular location in your network. But no matter how you start the Setup Wizard, the procedure begins with the display of the Welcome screen shown in Figure 1-1.
Figure 1-1 Setup Wizard: Welcome Screen
- Click the Next button on the Welcome screen.
The Setup Wizard then examines your system to verify that:
- Microsoft Outlook is designated as your default email client, and your version of Outlook is supported by this Connector software; and
- the Sun ONE Sync program — which is incompatible with this Connector software — is not installed.
If Outlook is not set as your default email client, or if the Sun ONE Sync program is installed, the Wizard notifies you and prompts you to acknowledge the notice and exit the program. (You will be able to rerun this Setup Wizard after you correct the problem.) To resolve either of these problems, see the information and instructions in Chapter 2 of this Guide, under these section titles:
Similarly, if your version of Outlook is not supported, the Wizard notifies you of the problem and prompts you to exit the program, and you may rerun the Setup Wizard when you upgrade to a supported version of Outlook.
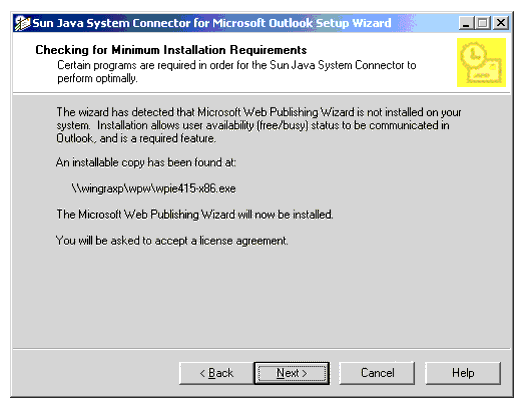
Otherwise, if a supported version of Outlook is set to be your default email client, and if the Sun ONE Sync program is not installed: The Setup Wizard copies the necessary files to your computer, and examines your system to see whether the Microsoft Web Publishing Wizard (WPW) is installed. The WPW is a component that lets you share your free/busy schedule with coworkers.
- Depending on whether Microsoft Web Publishing Wizard is already installed
- If WPW is already installed: The Wizard moves on to the next phase of this installation and setup process. Skip ahead to Step 3: Select an Outlook User Profile to Convert.
- If WPW is not installed: The Setup Wizard prompts you to install it now. Go on to Step 2: Install Microsoft Web Publishing Wizard.
Step 2: Install Microsoft Web Publishing Wizard
This screen will not appear (and you may skip this step 2) if the Setup Wizard finds the Microsoft Web Publishing Wizard (WPW) already installed on your computer. If, however, WPW is not installed on your computer, you should install it now.
Your system administrator has previously specified the file name and location (path) of an installable copy of WPW in your network, and the Setup Wizard displays that information here, as shown in Figure 1-2. To install WPW:
If you answer Yes: The installation kit installs WPW on your computer, and the Setup Wizard moves on to the next phase of the installation process. Go on to Step 3: Select an Outlook User Profile to Convert.
Figure 1-2 Setup Wizard: Checking for Minimum Installation Requirements
If you answer No: The installation kit does not install WPW on your computer, and the Setup Wizard aborts the entire Sun Java System Connector installation process. (The Setup Wizard will install WPW and proceed with the installation only if you accept the WPW License Agreement by clicking the Yes button.)
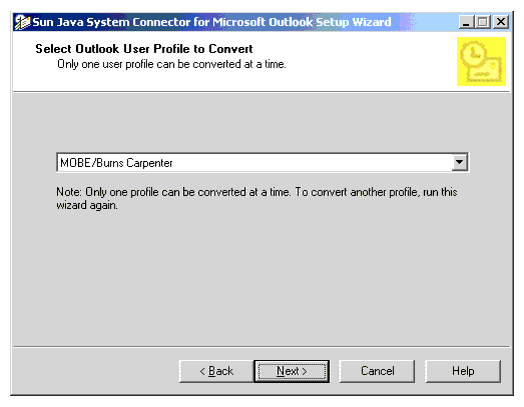
Step 3: Select an Outlook User Profile to Convert
The screen shown in Figure 1-3 appears and requires your attention only if your administrator has configured your Setup Wizard to convert an existing profile, and if the Setup Wizard:
An “eligible” profile is any Outlook profile that:
Ineligible profiles, such as profiles that point to POP3 servers, are ignored.
If the Wizard finds only one eligible user profile, and the profile is designated as your default profile, the Wizard will skip this screen on the assumption that you want to convert the one eligible profile for the new software. Skip ahead to Step 4: Select Personal Folders (.pst) Files to Convert.
Similarly, if the Wizard finds no eligible user profile to convert and your administrator has configured the Wizard to create a new user profile in that case, this step 3 does not apply to you — in fact, you can skip steps 4 and 5 too, and resume at Step 6: Enter New Sun Java System Account Login Information.
This screen prompts you to select a single Outlook user profile to convert for use with the new Sun Java System Connector software. It is very similar to the dialog box you likely see when you start Outlook.
To select a profile for conversion:
You may use the Setup Wizard to convert more than one profile, but only one at a time. You must run the Setup Wizard again for each profile you want to convert.
When you click Next, the Setup Wizard finds all of the Personal Folders (.pst) files associated with the user profile you have selected. Go on to Step 4: Select Personal Folders (.pst) Files to Convert.
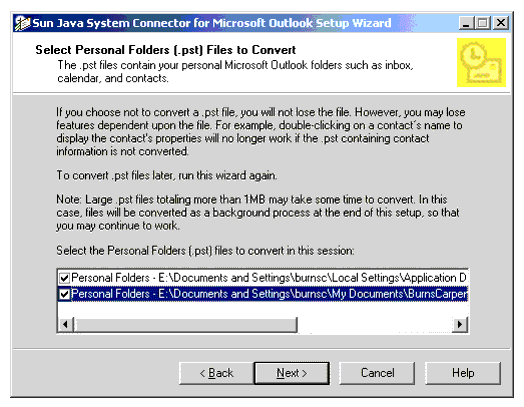
Step 4: Select Personal Folders (.pst) Files to Convert
The Setup Wizard can convert Exchange users’ Contacts, Journal and Notes data to local (desktop) Sun Java System Connector Personal Folders (.pst) files. This screen appears and requires your attention only if the Setup Wizard finds one or more Personal Folders (.pst) files whose file sizes exceed a limit specified by your network administrator. If none of your Personal Folders files is “large,” the Setup Wizard skips this step, and you may skip ahead to Step 5: Enter Exchange Account Login Information.
If the Wizard finds one or more “large” Personal Folders, it prompts you to specify which of the large files you want to convert at this time, as shown in Figure 1-4.
Figure 1-4 Setup Wizard: Select Personal Folders (.pst) Files to Convert
The Setup Wizard will convert only those files that are checkmarked in the boxes to the left of the corresponding file names. The displayed list may also include one or more smaller .pst files, automatically checkmarked for conversion and grayed out (so that you cannot unmark them).
The Wizard converts these files to make the mail addresses “live.” Unconverted email messages would still be readable, but you would be unable to reply to them because the unconverted addresses would be in a form that is unfamiliar to your new server. On the other hand, converting large volumes of old messages can take a long time, even several hours if your personal stores happen to run into gigabytes of data. The conversions can run in the background, freeing you and your computer for other work, but it may slow the performance of your other applications. For this reason, if you have some personal stores that are very old, so that the need for a future reply is highly unlikely although you'd like to be able to keep and read the data, you can elect to not convert it. Another option is simply to defer the conversion of larger files to a later time, such as during a lunch break or even overnight.
The Wizard then prompts you to provide your personal login information for your old Microsoft Exchange mailbox. Go on to Step 5: Enter Exchange Account Login Information.
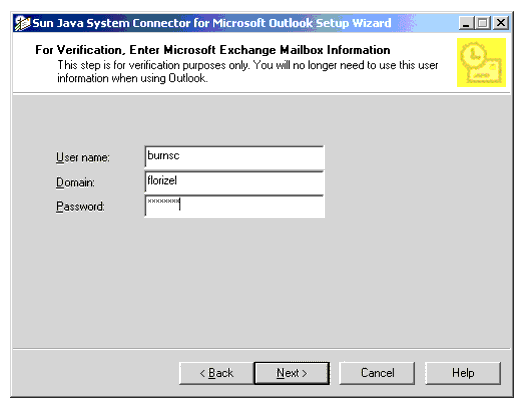
Step 5: Enter Exchange Account Login Information
The screen shown in Figure 1-5 appears and requires your attention only if you have previously used Outlook on this computer, and your system is configured to prompt you for this information when you login to use the selected user profile. If you are a new email user who does not have an existing account on the Exchange server, or if your system is configured to not require this information when you log in, this screen will not appear and you may skip ahead to Step 6: Enter New Sun Java System Account Login Information.
Figure 1-5 Setup Wizard: Enter Microsoft Exchange Mailbox Information
To enter the requested information for your old Microsoft Exchange mailbox:
The Setup Wizard then prompts you to provide your personal login information for your new Sun Java System account. Go on to Step 6: Enter New Sun Java System Account Login Information.
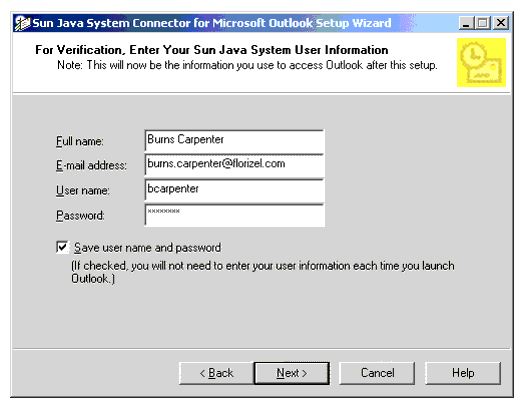
Step 6: Enter New Sun Java System Account Login Information
This screen, shown in Figure 1-6, appears as part of the Setup procedure for all users, to request your login credentials for the new Sun Java System server.
Figure 1-6 Setup Wizard: Enter Your Sun Java System User Information
Some of the fields in this screen may appear grayed out if your network administrator has already entered this information for you. Similarly, the Save user name and password checkbox will not appear if your administrator has pre-configured your software to always or never require this information upon login to Outlook.
To enter the requested information for your new Sun Java System account:
- Enter your Full name: the name that appears in the From field of your outgoing mail messages. This is the “friendly” name displayed to the recipients of your messages.
- Enter your E-mail address: your Internet email address.
- Enter your User name: your account name.
- Enter your Password: the password for your Sun Java System accounts.
- If the Save user name and password checkbox appears in this screen: Check or uncheck the option to indicate whether you want to be able to start Outlook without being prompted for this login information every time.
- Click the Next button.
The Setup Wizard then checks to see if any of the Personal Folders (.pst) files scheduled for conversion are password-protected. Go on to Step 7: Enter Password(s) for Protected Personal Folders (.pst) Files.
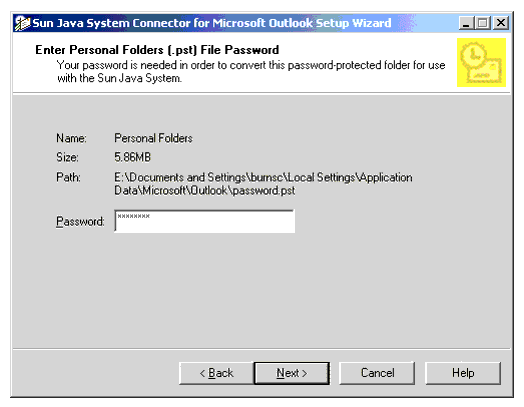
Step 7: Enter Password(s) for Protected Personal Folders (.pst) Files
The screen shown in Figure 1-7 appears in the Setup procedure if any of the Personal Folders (.pst) files you have selected for conversion are protected by a password, and the password is not saved in the password list. The screen reappears for each password-protected .pst file that is scheduled for conversion. If none of your .pst files is password-protected, or if all of the files' passwords are saved in the password list, the Setup Wizard simply begins converting the selected user profile and .pst file(s), and you may skip ahead to Step 8: Progress Meter(s).
Figure 1-7 Setup Wizard: Enter Personal Folders (.pst) File Password
The screen displays the name, size and location (path) of a password-protected Personal Folders file (.pst file), and prompts you for the password that is required to open the file.
When you have entered the password for the last .pst file that requires a password, the Setup Wizard then begins converting the user profile. Go on to Step 8: Progress Meter(s).
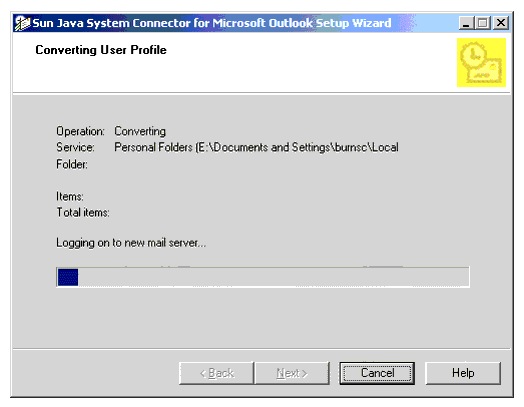
Step 8: Progress Meter(s)
The screen shown in Figure 1-8 illustrates the Wizard's progress as it converts the selected user profile and the “small” Personal Folders (.pst) files, and copies some data (Contacts, Notes and Journals) from your Exchange server to a local store, so you will have access to this data when you start using Outlook with your new Sun Java System server.
Figure 1-8 Setup Wizard: Converting User Profile (Progress Meter)
When these processes are complete:
- If no “large” Personal Folders (.pst) files are being converted: The Wizard simply displays a notification screen to let you know its work is finished. Go on to Step 9: Exit.
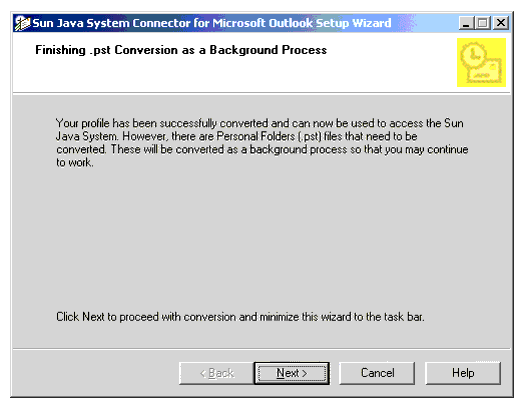
- If any “large” Personal Folders (.pst) files are being converted: The Wizard notifies you that the profile conversion is complete, and prompts you to begin converting the large Personal Folders files, as shown in Figure 1-9.
Figure 1-9 Setup Wizard: Finishing PST as a Background Process
To begin converting the large Personal Folders (.pst) files:
- Click Next.
The Setup Wizard then minimizes itself to your Task Bar, to run the conversion(s) in the background. Since the profile conversion is already complete, you may immediately begin using Outlook with the new Sun Java System server, even as the Wizard continues to convert your larger Personal Folders files. The large-file Personal Folders conversion(s) may proceed for several minutes, or even hours, depending on the size of the file(s) being converted.
- To view a progress meter showing the real-time progress of the conversion (optional): Restore the Setup Wizard from the Task Bar to its display window.
In either case, the Wizard automatically displays a notification screen when the conversion is finished. Go on to Step 9: Exit.
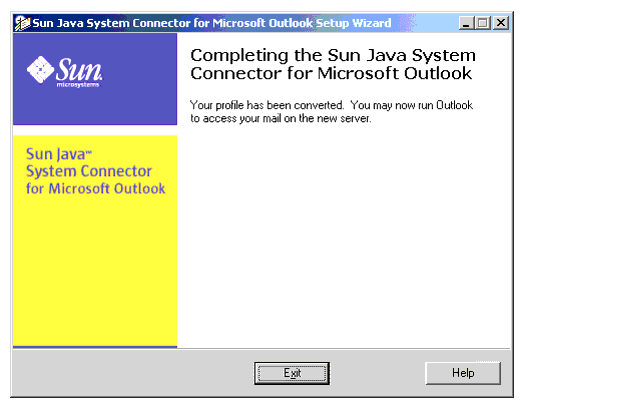
Step 9: Exit
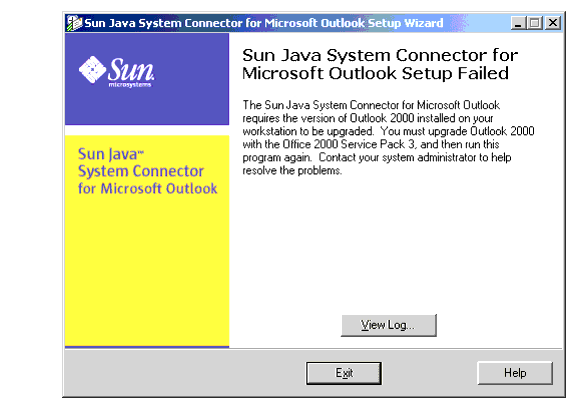
The contents of this Exit screen will vary depending on whether the Setup Wizard has successfully installed theSun Java System Connector for Microsoft Outlook. The title of the screen reports success or failure:
- Completing the Sun Java System Connector for Microsoft Outlook: This screen (e.g., Figure 1-10) simply reports the successful completion of the conversion(s) and of the overall Setup process. Just click the Exit button to clear this screen and close the Setup Wizard.
- Sun Java System Connector for Microsoft Outlook Setup Failed: The Setup Wizard has abandoned the installation process, and the text in this screen will explain why. When the Setup fails, this screen (Figure 1-11) offers a View Log button that will display the contents of the program’s log file, which may offer additional clues to help you diagnose a problem.
Figure 1-11 Setup Wizard: Setup Failed
A Setup failure will be due to one of these four problems:
- Microsoft Outlook is not set as your default email client. For more information and instructions to correct this problem, see If Microsoft Outlook Is Not Your Default E-mail Client.
- The Setup Wizard has detected the presence of an incompatible program, Sun ONE Sync, on your computer. For more information and instructions to correct this problem, see If the Sun ONE Sync Program Is Installed — and Must Be Removed.
- You are running a version of Microsoft Outlook or an associated Office Service Pack that is incompatible with the Connector software. For more information about this problem, see “System Requirements,” near the beginning of Chapter 1 in your Desktop Installation Guide.
- You have declined the License Agreement for Microsoft’s Web Publishing Wizard (WPW), which is a required accessory for the Sun Java System Connector for Microsoft Outlook. The Setup Wizard will not install the Connector software without the WPW, and it will not install the WPW without your acceptance of the License Agreement.
Regardless of whether the Setup Wizard successfully completed the installation: Click the Exit button to clear this screen and close the Setup Wizard.