|
| |
| Sun Java(TM) System Directory Server 5.2 2005Q1 Administration Guide | |
Chapter 8
Managing ReplicationReplication is the mechanism by which directory contents are automatically copied from a Directory Server to one or more others. Write operations of any kind—entry additions, modifications, or even deletions—are automatically mirrored to other Directory Servers. For a complete description of replication concepts, replication scenarios, and how to plan for replication in your directory deployment, see the Directory Server Deployment Planning Guide.
Directory Server 5.2 includes the following new replication features:
- Multi-master replication (MMR) over wide area networks (WANs) enables you to create replication agreements between geographically distant masters to distribute your data more effectively.
- MMR now supports four simultaneous, fully connected masters which provides additional failover protection.
- Binary copy can make the initialization of large replicas much faster.
- Fractional replication allows you to specify the set of attributes that will be replicated to distribute your data more efficiently.
- New command-line tools help you monitor replication activity.
This chapter describes the tasks to be performed to set up the various replication scenarios, and includes the following topics:
IntroductionConfiguring replication is a complex task. Before you begin, you should have a clear understanding of the way that replication will be deployed in your organization, for example, whether to use single-master, multi-master or cascading replication with hubs. The unit of replication is a suffix or a subsuffix: all the entries of that suffix are replicated together. In your intended deployment, you must identify each suffix as either a master, a hub, or a dedicated consumer for the data it contains.
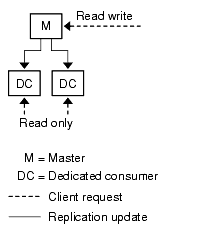
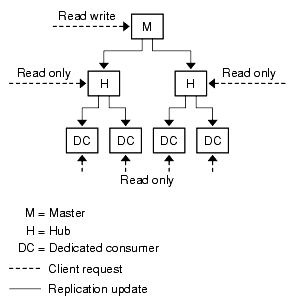
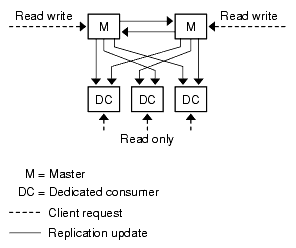
A replicated suffix on a server is called a replica. A master is the replica that accepts both read and write operations from clients. Hubs and dedicated consumers are read-only replicas which receive updates only through the replication mechanism. A hub receives updates either from a master or another hub and forwards them to another hub or a dedicated consumer. A dedicated consumer only receives updates from either a master or a hub.
The following three diagrams show the relationship between replicas in common replication scenarios.
Figure 8-1 Single Master Replication
Figure 8-2 Cascading Replication With Hubs
Figure 8-3 Multi-Master Replication
This document also uses the terms supplier and consumer to refer to the roles of two servers participating in a replication agreement. The supplier is the server that sends replication updates, and the consumer is the server that receives them. The diagram above demonstrates the following relationships:
Many replication settings apply to the replica in the supplier or consumer role of an agreement, regardless of its type.
Summary of Steps for Configuring ReplicationThe following steps assume you are replicating a single suffix. If you are replicating more than one suffix, you may configure them in parallel on each server. In other words, you may repeat each step to configure replication on multiple suffixes.
To configure any replication topology, proceed in the following order:
- Define a replication manager entry on all servers except single masters (or use the default replication manager on all servers.)
- On all servers containing a dedicated consumer replica:
- On all servers containing a hub replica, if applicable:
- On all servers containing a master replica:
- Configure the replication agreements on all supplier replicas, in the following order:
- Configure replication agreements between the hub replicas and their consumers.
- For multi-master replication, initialize all masters from the same master replica containing the original copy of the data. Initialize the hub and consumer replicas.
Choosing Replication ManagersA critical part of setting up replication is to choose the entry, referred to as the replication manager, that the suppliers will use to bind to a consumer server when sending replication updates. All servers that contain suffixes receiving updates must have at least one replication manager entry.
Directory Server has a default replication manager entry that you can use on every server. Its DN is cn=Replication Manager,cn=replication,cn=config.
It is recommended that you use the default replication manager for simple replication scenarios. The replication wizard automatically configures consumer replicas with this entry, thereby simplifying the deployment of replicas.
The replication wizard prompts you to set the password for the default replication manager if none is defined. To change the password at a later time:
- On the top-level Configuration tab of Directory Server Console, select the Data node, and then select the Replication tab in the right-hand panel.
- Type the new password in both text fields under the Replication Manager heading.
- Click Save once the password is confirmed. The Save button will not be active if the password does not match its confirmation.
If you do not use the default replication manager, you can create any new entry to act as a replication manager. For example, you may want several replication manager entries to have a different password for every replicated suffix. Another reason to create your own replication manager is to support a different authentication model for replication, for example using certificates over SSL.
The replication manager entry must contain the attributes required by the authentication method you choose when defining the replication agreement. For example, the default replication manager is a person object class that allows a userPassword attribute for simple authentication. See Replication Over SSL for details on using certificates to bind the replication manager.
The replication manager entry should not be located in a replicated suffix of the consumer server. A suitable location for defining replication managers is in cn=replication,cn=config.
If you create a new replication manager manually from the command line, you must specify the bind DN on the consumer by modifying the nsDS5ReplicaBindDN attribute of the replica configuration entry.
If you are using legacy replication, there are additional constraints on the replication manager entry. See To Configure Directory Server 5.2 as a Consumer of Directory Server 4.x for more information.
Once you have chosen the replication manager for each consumer:
- Write down or remember the replication manager DN that you chose or created. You will need this DN and its password later when creating the replication agreement with this consumer on its supplier.
- If you define a password expiration policy, you must remember to exclude the replication manager, otherwise replication will fail when the password expires. To disable password expiration on the replication manager entry, create a password policy in which passwords do not expire and assign it to the replication manager entry. For more information, see Managing Individual Password Policies.
Configuring a Dedicated ConsumerA dedicated consumer is a read-only copy of a replicated suffix. It receives updates from servers that bind as the Replication Manager to make changes. Configuring the consumer server consists of preparing an empty suffix to hold the replica and enabling replication on that suffix using the replication wizard. Optional advanced configuration includes choosing a different replication manager, setting referrals, or setting the purge delay.
The following sections give the steps for configuring one dedicated consumer replica on its server. Repeat all procedures on each server that will contain a dedicated consumer replica of a given suffix.
Creating the Suffix for the Consumer Replica
If it does not already exist, create an empty suffix on the consumer with the same DN as the intended master replica. For instructions, refer to Creating Suffixes.
If the suffix exists and is not empty, its contents will be lost when the replica is initialized from the master.
Enabling a Consumer Replica
The replication wizard simplifies the task of enabling a dedicated consumer replica:
- On the top-level Configuration tab of Directory Server Console, expand both the Data node and the node for the suffix you wish to be a consumer replica, then select the Replication node below the suffix.
The replica status information is displayed in the right-hand panel.
- Click the Enable replication button to begin the replication wizard.
- The Consumer Replica radio button is selected by default. Click Next to continue.
- If you have not already done so, you are prompted to enter and confirm a password for the default replication manager. Type the same password in each field and click Next to continue.
If the default replication manager already had a password defined, the wizard skips this step.
- The replication wizard displays a status message while updating the replication configuration. Click Close when it has completed.
The replication status now shows that the replica is ready to receive updates, and the icon in the left-hand pane changes to reflect this.
Advanced Consumer Configuration
By default, the wizard configures the replica to use the default replication manager. If you want to use a different replication manager entry, you must set the advanced configuration. You can also use this dialog to set referrals for modifications and the purge delay.
- On the top-level Configuration tab of Directory Server Console, expand both the Data node and the node for the suffix you want to configure, and then select the Replication node below the suffix.
- In the right-hand panel, click the Advanced button to display the Advanced Replica Settings dialog.
- On the Bind DN tab, use the Add and Delete buttons to create a list of DNs that are valid replication managers. A supplier can then use any one of these DNs in its agreement with this replica. You can add a new DN by typing its name or browsing the directory.
To configure replication using certificates over SSL, enter the DN of the certificate entry as one of the replication managers.
- Click OK when you are done or select the Optional tab for more advanced configuration.
- On the Optional tab of the Advanced Replica Settings dialog, the list of LDAP URLs specifies additional referrals for modification requests sent to this consumer. Use the Add or Delete buttons to create a list of LDAP URLs.
The replication mechanism automatically configures consumers to return referrals for all known masters in the replication topology. These default referrals assume that clients will use simple authentication over a regular connection. If you want to give clients the option of binding to masters using SSL for a secure connection, add referrals of the form ldaps://servername:port that use a secure port number. (If the masters are configured for secure connections only, the URLs will point to the secure ports by default.)
If you have added one or more LDAP URLs as referrals, selecting the checkbox below the list will force the consumer to send referrals exclusively for these LDAP URLs and not for the master replicas. For example, if you want clients to always be referred to the secure port on the master servers and not to the default port, create a list of LDAP URLs for these secure ports and select this checkbox. You may also use an exclusive referral if you want to designate a specific master or a Directory Server Proxy that should handle all updates.
- Also on the Optional tab, you can change the purge delay.
The consumer server stores internal information about updates to the replica contents, and the purge delay parameter specifies how long it must keep this information. It is related to the MaxAge parameter of the change log on its supplier server. The shorter of these two parameters determines the longest time that replication between the two servers may be disabled or down and still recover normally. The default value of 7 days is sufficient in most cases.
- Click OK to save the advanced replication configuration for this replica.
Configuring a HubHub replicas act as both consumers and masters to further distribute replicated data to a larger number of consumers. Hub replicas receive replication updates from their suppliers and send replication updates to their consumers. They do not accept modifications, but instead return referrals to the masters.
Configuring a hub server consists of preparing an empty suffix to hold the replica and enabling replication on that suffix using the replication wizard. Optional advanced configuration includes choosing a different replication manager, setting referrals, setting the purge delay, and setting the change log parameters.
The following sections give the steps for configuring one hub server. Repeat all procedures on each server that will contain a hub replica of a given suffix.
Creating the Suffix for the Hub Replica
If it does not already exist, create an empty suffix on the hub server with the same DN as the intended master replica. For instructions, refer to Creating Suffixes.
If the suffix exists and is not empty, its contents will be lost when the replica is initialized from the master.
Enabling a Hub Replica
The replication wizard simplifies the task of enabling a hub replica:
- On the top-level Configuration tab of Directory Server Console, expand both the Data node and the node for the suffix you wish to be a hub replica, and then select the Replication node below the suffix.
The replica status information is displayed in the right-hand panel.
- Click the Enable replication button to begin the replication wizard.
- Select the Hub Replica radio button and click Next to continue.
- If you have not already done so, you will be prompted to select the change log file. The default change log file is shown in the text field. If you do not wish to use the default, type in a filename for the change log or click Browse to display a file selector.
If the change log has already been enabled, the wizard will skip this step.
- Click Next. If you have not already done so, you will be prompted to enter and confirm a password for the default replication manager. Type the same password in each field and then click Next to continue.
If the default replication manager already had a password defined, the wizard will skip this step.
- The replication wizard will display a status message while updating the replication configuration. Click Close when it has completed.
The replication status now shows that the replica is ready to receive updates, and the icon in the left-hand pane changes to reflect this.
Advanced Hub Configuration
As a supplier, a hub server requires a change log, and the wizard configures the hub replica to use the default change log settings. To modify these settings:
- On the top-level Configuration tab of Directory Server Console, select the Data node and then the Replication tab in the right-hand panel.
- You might need to refresh the contents of this tab by checking the Enable Changelog checkbox and clicking the Reset button. You should then see the change log file that you chose in the replication wizard.
- You can change the name of the change log file and update the change log parameters:
- Max changelog records - Determines the total number of modifications to store for sending updates to consumers. By default it is unlimited. You may wish to limit the number of records to save disk space if your replica receives many large modifications.
- Max changelog age - Determines the time for which the hub will store updates it must send to consumers. By default it is unlimited. The max age parameter is the recommended way to limit the size of the change log.
The change log configuration attributes are described in detail in the Directory Server Administration Reference.
The replication wizard also uses the default replication manager. If you have created a different replication manager entry that you wish to use, you need to set the advanced configuration. You may also use this dialog to set referrals for modifications and the purge delay.
- On the top-level Configuration tab of Directory Server Console, expand both the Data node and the node for the suffix you wish to configure, and then select the Replication node below the suffix.
- In the right-hand panel, click the Advanced button to display the Advanced Replica Settings dialog.
- On the Bind DN tab, use the Add and Delete buttons to create a list of DNs that are valid replication managers. A supplier can then use any one of these DNs in its agreement with this replica. You can add a new DN by typing its name or browsing the directory.
To configure replication using certificates over SSL, enter the DN of the certificate entry as one of the replication managers.
- Click OK when you are done or select the Optional tab for more advanced configuration.
- On the Optional tab of the Advanced Replica Settings dialog, the list of LDAP URLs specifies additional referrals for modification requests sent to this hub. Use the Add or Delete buttons to create a list of LDAP URLs.
The replication mechanism automatically configures hubs to return referrals for all known masters in the replication topology. These default referrals assume that clients will use simple authentication over a regular connection. If you want to give clients the option of binding to masters using SSL for a secure connection, add referrals of the form ldaps://servername:port that use a secure port number.
If you have added one or more LDAP URLs as referrals, selecting the checkbox below the list will force the server to send referrals exclusively for these LDAP URLs and not for the master replicas. For example, if you want clients to always be referred to the secure port on the master servers and not to the default port, create a list of LDAP URLs for these secure ports and select this checkbox. You may also use an exclusive referral if you want to designate a specific master or a Directory Server Proxy that should handle all updates.
- Also on the Optional tab, you can change the purge delay.
The hub server stores internal information about updates to the replica contents, and the purge delay parameter specifies how long it must keep this information. It is related to the MaxAge parameter of the change log on the server that supplies updates (not of its own change log). The shorter of these two parameters determines the longest time that replication between the two servers may be disabled or down and still recover normally. The default value of 7 days is sufficient in most cases.
- Click OK to save the advanced replication configuration for this replica.
Configuring a Master ReplicaMaster replicas contain the master copy of the data and centralize all modifications before propagating updates to all other replicas. A master records all changes, checks the status of its consumers, and sends updates to them when necessary. In multi-master replication, master replicas also receive updates from other masters.
Configuring a master server consists of defining the suffix containing the master replica, enabling the master replica using the replication wizard, and configuring it for advanced replication if necessary.
The following sections give the steps for configuring one master server. Repeat all procedures on each server that will contain a master replica of a given suffix.
Defining the Suffix for the Master Replica
Choose or create a suffix on the master server that will contain the entries you wish to replicate. For instructions, refer to Creating Suffixes.
The suffix should contain all the initial data before you create replication agreements. This will allow you to initialize consumer replicas immediately from this data. To ensure correct multi-master configuration and initialization, only one of the masters should contain all of the initial data, and the suffix on the other masters should be empty.
Enabling a Master Replica
The replication wizard simplifies the task of enabling a master replica:
- On the top-level Configuration tab of Directory Server Console, expand both the Data node and the node for the suffix you wish to be a master replica, and then select the Replication node below the suffix.
The replica status information is displayed in the right-hand panel.
- Click the Enable replication button to begin the replication wizard.
- Select the Master Replica radio button and click Next to continue.
- Enter a Replica ID: choose a unique integer between 1 and 65534, inclusive.
The replica ID must be unique among all master replicas for a given suffix. Master replicas of different suffixes on the same server may use the same replica ID, as long as it is unique among each replica's other masters.
- Click Next. If you have not already done so, you will be prompted to select the change log file. The default change log file is shown in the text field. If you do not wish to use the default, type in a filename for the change log or click Browse to display a file selector.
If the change log has already been enabled, the wizard will skip this step.
- Click Next. If you have not already done so, you will be prompted to enter and confirm a password for the default replication manager. The replication manager is not used in the case of single-master replication, but you must still enter a password to proceed. Type the same password in each field and then click Next to continue.
If the default replication manager already had a password defined, the wizard will skip this step.
- The replication wizard will display a status message while updating the replication configuration. Click Close when it has completed.
The replication status now shows the replica ID of this master, and the icon in the left-hand pane changes to show that replication is active for this suffix.
Advanced Multi-Master Configuration
By default, the wizard configures the master replica to use the default change log settings. To modify the change log settings:
- On the top-level Configuration tab of Directory Server Console, select the Data node and then the Replication tab in the right-hand panel.
- You might need to refresh the contents of this tab by checking the Enable Changelog checkbox and clicking the Reset button. You should then see the change log file that you chose in the replication wizard.
- You may change the name of the change log file and update the change log parameters:
- Max changelog records - Determines the total number of modifications to store for sending updates to consumers. By default it is unlimited. You may wish to limit the number of records to save disk space if your replica receives many large modifications.
- Max changelog age - Determines the time for which the master will store updates it must send to consumers. By default it is unlimited. The max age parameter is the recommended way to limit the size of the change log.
The change log configuration attributes are described in detail in the Directory Server Administration Reference.
The replication wizard also uses the default replication manager. If you have created a different replication manager entry that you wish to use, you need to set the advanced configuration. You may also use this dialog to set referrals for modifications and the purge delay. If you are configuring a single master, you may skip this procedure.
- On the top-level Configuration tab of Directory Server Console, expand both the Data node and the node for the suffix you wish to configure, and then select the Replication node below the suffix.
- In the right-hand panel, click the Advanced button to display the Advanced Replica Settings dialog.
- On the Bind DN tab, use the Add and Delete buttons to create a list of DNs that are valid replication managers. A supplier can then use any one of these DNs in its agreement with this replica. You can add a new DN by typing its name or browsing the directory.
To configure replication using certificates over SSL, enter the DN of the certificate entry as one of the replication managers.
- Click OK when you are done or select the Optional tab for more advanced configuration.
- On the Optional tab of the Advanced Replica Settings dialog, the list of LDAP URLs specifies additional referrals for modification requests sent to this master. A master will automatically return referrals immediately after being initialized, as described in Convergence After Multi-Master Initialization. Use the Add or Delete buttons to create a list LDAP URLs.
The replication mechanism automatically configures hubs to return referrals for all known masters in the replication topology. These default referrals assume that clients will use simple authentication over a regular connection. If you want to give clients the option of binding to masters using SSL for a secure connection, add referrals of the form ldaps://servername:port that use a secure port number.
If you have added one or more LDAP URLs as referrals, selecting the checkbox below the list will force the server to send referrals exclusively for these LDAP URLs and not for the master replicas. For example, if you want clients to always be referred to the secure port on the master servers and not to the default port, create a list of LDAP URLs for these secure ports and select this checkbox.
- Also on the Optional tab, you may change the purge delay.
The master server must store internal information about updates to the replica contents, and the purge delay parameter specifies how long it must keep this information. It is related to the MaxAge parameter of the change log on a master server that supplies updates (not of its own change log). The shorter of these two parameters determines the longest time that replication between the two servers may be disabled or down and still recover normally. The default value of 7 days is sufficient in most cases.
- Click OK to save the advanced replication configuration for this replica.
Creating Replication AgreementsA replication agreement is a set of parameters on a supplier that configures and controls how updates are sent to a given consumer. The replication agreement must be created on the supplier replica that is sending updates to its consumer. You must create a replication agreement for every consumer that you wish to be updated.
Create replication agreements in the following order:
For example, in the multi-master replication topology with 2 masters and 3 dedicated consumers shown in Figure 8-3, you would create eight replication agreements in the following order:
To create a replication agreement:
- On the top-level Configuration tab of Directory Server Console, expand both the Data node and the node for the supplier suffix, and then select the Replication node below the suffix.
The replica status information is displayed in the right-hand panel.
- Click the New button beside the list of defined replication agreements.
- In the Replication Agreement dialog, select from the menu an existing server containing the consumer replica, or click the Other button to define one.
When you click the Other button, enter the fully qualified name of a consumer server as well as its LDAP port number. Check the box for a secure port if using SSL on this port to enable secure connections for replication updates.
- Enter the DN and password of the replication manager entry on the consumer server. By default, the DN is that of the default replication manager.
If you chose a consumer with a secure port, you can click the Options button to determine the meaning of the DN field. If you connect using a password, the supplier will use simple authentication and communication over an encrypted SSL connection. If you connect using a certificate, the DN field is the DN of the entry containing the certificate and no password is required.
- Optionally, type a description string for this agreement. The consumer server name and port number and the description string will appear in the list of replication agreements for this master replica.
- Click OK when done. A confirmation dialog is displayed asking if you wish to test the connection parameters you have just entered.
- Click Yes if you wish to test the connection to the given server and port number using the given replication manager and password. If the connection fails you will still have the choice of using this agreement, for example if the parameters are correct but the server is offline.
When you have finished, the agreement appears in the list of replication agreements for this master replica.
You can edit the replication agreement later to change the DN and password of the replication manager on the consumer server:
- Select the replication agreement from the list and click the Edit button.
- In the Replication Agreement dialog, select the Connection tab.
- Edit the replication manager DN or password for the consumer server.
- Optionally, edit the description string for the agreement.
- Click OK to save the new settings and begin using them immediately when sending updates to this consumer.
The configuration parameters in the other tabs are described in Enabling Fractional Replication and Replication Over a WAN.
- After creating each replication agreement, you may optionally configure fractional replication for this suffix and then immediately initialize the replica, as described in Initializing Replicas.
Configuring Fractional ReplicationBy default, replication copies entire entries in the replicated suffix to consumer replicas. With the fractional replication feature, you can specify the subset of attributes that is replicated or excluded during replication. Fractional replication is configured in the replication agreement, allowing you to define the attribute set for each consumer replica of a master. This allows you to control which data is distributed and use replication bandwidth and consumer resources more efficiently.
For example, if you wish to reduce replication bandwidth you may choose not to replicate attributes with typically large values such as photo, jpegPhoto, and audio. As a result, these attributes will not be available on consumers. As another example, you may choose to replicate only the uid and userpassword attributes to a consumer server that is dedicated to performing authentication.
Considerations for Fractional Replication
Enabling or modifying the fractional set of attributes requires you to reinitialize the consumer replica. Therefore, you should determine your fractional replication needs before deployment and define your attribute set before you initialize your replicas for the first time.
You should proceed with caution when replicating a small set of attributes, given the dependency of complex features such as ACIs, roles, and CoS on certain attributes. In addition, not replicating other attributes that are mentioned in specifiers or filters of the ACI, roles, or CoS mechanisms may compromise the security of the data or result in different sets of attributes being returned in searches. Managing a list of attributes to exclude is safer, and less prone to human error, than managing a list of attributes to include.
You should turn off schema checking in the consumer server if the attribute set that you replicate does not allow all replicated entries to follow the schema. Replication of non-conforming entries will not cause errors because the replication mechanism bypasses schema checking on the consumer. However, the consumer will contain non-conforming entries and should have schema checking turned off to expose a coherent state to its clients.
Fractional replication is configured in the replication agreement of master replicas with hubs and dedicated consumers. Configuration of fractional replication between two master replicas in a multi-master replication environment is not supported. Also, if several masters have replication agreements with the same replica, all these agreements must replicate the same set of attributes.
The fractional replication functionality provided in Directory Server 5.2 is not backward compatible with previous versions of Directory Server. When configuring a fractional replication agreement, both the master and consumer replicas must be on Directory Server instances version 5.2.
Defining the Attribute Set
An attribute set is a list of attributes that will be replicated, exclusive of all others, when fractional replication is enabled on a replica. You may define any number of attribute sets on the master server and then associate one of them with a replication agreement.
- On the top-level Configuration tab of Directory Server Console, select the Data node and then the Replication tab in the right-hand panel.
- Click the Manage Replicated Attribute Sets button at the bottom of the Replication tab. You may have to scroll down to see this button.
- Click Add to define a new attribute set or select an existing one from the list and click Edit to modify it. In the Attribute Set dialog box that is displayed, select or deselect the checkbox in the Replicate column to include or exclude the corresponding attribute from the set. A checked box next to an attribute name indicates that it will be replicated.
By default, all attributes are selected, and it is recommended that you deselect only those attributes you specifically do not wish to replicate. If you wish to start over with your selection, the Check All button will select all attributes again. When you deselect a number of attributes, the directory server will replicate all attributes except the ones which are deselected. If new attributes are later defined in the schema and used in replicated entries, those new attributes will be replicated unless you edit the attribute set to deselect them.
Clicking the Check None button will deselect all attributes and you may then select the attributes to include in your set. When you define your exact set of attributes after clicking on Check None, only the selected attributes will be replicated. If new attributes are later defined in the schema and used in replicated entries, those new attributes will not be replicated unless you edit the attribute set to select them.
- Optionally, enter or modify the description string for this attribute set. This is the text that will appear in the list of defined sets and when editing the replication agreement that will use this set. If no description is provided, the server will generate a description based on the attributes that are excluded or included.
- Click Save when you are finished.
Enabling Fractional Replication
Fractional replication can be enabled only on existing replication agreements:
- Create the replication agreement as described in Creating Replication Agreements or select a previously defined agreement to modify.
- Disable the replication agreement as described in Disabling a Replication Agreement. An agreement must be disabled to modify the fractional replication configuration.
- Select the disabled agreement and click Edit. Select the Replicated Attributes tab in the Replication Agreement dialog that appears.
- Select the "Replicate only a set of attributes" checkbox.
- Select an existing attribute set from the drop-down list or click New to define a new attribute set as described in Defining the Attribute Set. You may also click Manage Replicated Attribute Sets to view and modify existing set definitions.
Fractional replication allows only one attribute set to be associated with a replication agreement. That set should contain the exact list of attributes you wish to replicate.
- Click OK when you have chosen an attribute set. An informational message warns you that you have configured fractional replication and that you need to reinitialize the consumer replica. Click OK to dismiss the message.
- Click Enable to reactivate the replication agreement.
- Depending on the attributes that are replicated, you should consider disabling schema checking on the consumer server.
- If other masters also have replication agreements with this replica, you must repeat this procedure to enable fractional replication with the same attribute set on all of them.
- You must now initialize the consumer replica, or reinitialize it if it was already replicated. See Initializing Replicas" below.
Initializing ReplicasOnce you have created a replication agreement, you must initialize the consumer replica before replication will actually begin. During initialization, you physically copy data from the supplier replica to the consumer replica.
Certain error conditions or configuration changes require you to reinitialize replicas. When reinitializing, the contents of the replicated suffix are deleted on the consumer and replaced with the contents of the suffix on the master. This ensures that the replicas are in sync and replication updates may resume. Also, all of the initialization methods described here automatically rebuild the indexes of the consumer replica, so that the consumer is ready to respond optimally to client read requests.
When to Initialize
Replica initialization must be done after both replicas have been configured, and before any replication can occur. Once the data in the suffix has been entirely copied to the consumer, the supplier can begin replaying update operations to the consumer.
Under normal operations, the consumer should never have to be initialized again. However, if the data in a single master replica is restored from a backup for any reason, then you should reinitialize all of the replicas that it updates. With multi-master replication, consumers may not need to be reinitialized if they have been updated by the other masters.
You may either initialize the replica online using the console or manually using the command line. Online initialization using the console is convenient for initializing a small number of consumers. You may initialize a replica online directly from its replication agreement. However, since each replica is initialized in sequence, this method is not suited to initializing a large number of replicas. Manual initialization using the command line is a more effective method of initializing a large number of consumers simultaneously from a single LDIF file.
Finally, the binary copy feature can be used by experienced administrators to clone either master or consumer replicas. Certain restrictions on this feature make it practical and time efficient only for replicas with very large database files, for example replicas containing millions of entries.
Initializing Replicas in Multi-Master Replication
In the case of multi-master replication, you should initialize replicas in the following order:
- Ensure that one master has the complete set of data to replicate. Use this master to initialize the replica on each of the other masters.
- Initialize the consumer replicas from their masters (refer to Performing Online Replica Initialization) or from the LDIF file of any one of the masters (refer to Exporting a Replica to LDIF.)
Initializing Replicas in Cascading Replication
In the case of cascading replication, remember that you should always initialize replicas in the following order:
- If you also have multi-master replication, ensure that one master has the complete set of data to replicate. Use this master to initialize the replica on each of the other masters.
- Initialize the replicas on the first-level hub replicas from their master replicas.
- If you have several levels of hubs, initialize each level from the previously initialized level of hubs.
- From the last level of hub replicas, initialize the replicas on the dedicated consumers.
Convergence After Multi-Master Initialization
In the case of multi-master replication, other masters may process change operations while a given master is being initialized. Therefore, when initialization is complete, the new master must also receive new updates that were not included in the initialization data. Since initialization may take a significant amount of time, the number of pending updates may also be significant.
To allow convergence of these pending updates, newly-initialized masters are automatically set to read-only mode for client operations after initialization. (This is true only when initializing through an LDIF file from the command line or using a backup to perform a binary copy.) This behavior is new in Directory Server 5.2.
Therefore, after initialization, a master in a multi-master configuration will process replication updates and allow read operations, but it will return referrals for all write operations from clients. You may define the referrals as described in Advanced Multi-Master Configuration. A master will revert to read-write mode under the following conditions:
- Set the ds5BeginReplicaAcceptUpdates configuration attribute to start to explicitly allow update operations. You should verify that the new master replica has converged with the other masters before enabling updates. This may be done using either the replication configuration panel on the Directory Server console or through the command line (see the procedures below).
If you choose to set this attribute, you should determine a delay that is always sufficient to allow the master replica to converge with the other masters after initialization. This delay will depend on the size and length of expected initializations and the rate of changes occurring simultaneously on the other masters. A master that accepts update operations while still replicating changes after initialization may be the source of unexplained errors. See error references in the Directory Server Administration Reference if you encounter replication errors.
To Begin Accepting Updates Through the Console
Follow these steps to explicitly allow update operations after the initialization of a multi-master replica:
- On the top-level Configuration tab of Directory Server Console, expand both the Data node and the node for the replicated suffix, and select the Replication node below the suffix.
In the right panel, the console will display a message indicating that the replica has been initialized and is currently returning referrals for update operations. If this message indicates the automatic referral delay is enabled, you may still follow this procedure to override the delay.
- Use the insync tool to ensure that the replica has converged with all other masters. Replicas are in sync if the delay between modifications on all servers is zero or if the replica has never had any changes to replicate (delay of -1). For more information, see the Directory Server Administration Reference.
- Click the button to the right of the message to start accepting update operations immediately.
To Begin Accepting Updates Through the Command Line
The following commands may be used in scripts that automate the process of initializing a multi-master replica by checking for convergence and explicitly allowing update operations:
- Use the insync tool to ensure that the replica has converged with all other masters. Replicas are in sync if the delay between modifications on all servers is zero or if the replica has never had any changes to replicate (delay of -1). For more information, see the Directory Server Administration Reference.
- Modify the ds5BeginReplicaAcceptUpdates configuration attribute with the following command:
ldapmodify -h host -p port -D "cn=Directory Manager" -w password
dn: cn=replica, cn=suffixName, cn=mapping tree, cn=config
changetype: modify
add: ds5BeginReplicaAcceptUpdates
ds5BeginReplicaAcceptUpdates: start
^DWhen a replica is initialized, ds5BeginReplicaAcceptUpdates is automatically deleted so that update operations are again refused after the initialization.
To Set the Automatic Referral Delay
The ds5ReferralDelayAfterInit configuration attribute determines the number of seconds after any initialization for which a replica will return referrals. After this delay, the replica will automatically begin processing update operations from clients. This attribute is specific to each replica and should be set to a value according to the criteria described in Convergence After Multi-Master Initialization.
Changing the value of this attribute will dynamically affect the corresponding replica if it has been recently initialized and is still not accepting updates. You may lengthen or shorten the delay in progress by modifying this value. If the delay has already elapsed and the replica is accepting updates, setting this attribute will have no effect.
The default value of this attribute is -1, which means the replica will refuse update operations indefinitely. In this case, you may define a delay to automatically allow updates when the delay elapses, as measured since the initialization. Setting a delay that has already elapsed will cause the replica to begin accepting updates immediately.
Initializing a Replica Using the Console
Online replica initialization using the console is the easiest way to initialize or reinitialize a consumer. However, if you are initializing a large number of entries (more than 1-2 million), this process can be time consuming, and you may find manual consumer initialization using the command line to be a more efficient approach (refer to Initializing a Replica From the Command Line for more information).
When a consumer replica is being initialized using the console, all operations (including searches) on the suffix are referred to the master servers until the initialization process is completed.
Initializing a replica with fractional replication configured is transparent when using Directory Server Console. Only the selected attributes will be sent to the consumer during the initialization.
Performing Online Replica Initialization
To initialize or reinitialize a replica using the console:
- On the top-level Configuration tab of Directory Server Console, expand both the Data node and the node for the suffix of the master replica, and then select the Replication node below the suffix.
The replica status information is displayed in the right-hand panel.
- In the list of defined agreements, select the replication agreement corresponding to the consumer you wish to initialize and, and click Action>Initialize remote replica.
A confirmation message warns you that any information already stored in the replica on the consumer will be removed.
- Click Yes in the confirmation box.
Online consumer initialization begins immediately. The icon of the replication agreement shows a red gear to indicate the status of the initialization process.
- Click Refresh>Refresh Now or Refresh>Continuous Refresh to follow the status of the consumer initialization.
Any messages for the highlighted agreement will appear in the text box below the list.
For more information about monitoring replication and initialization status, see Monitoring Replication Status.
Initializing a Replica From the Command Line
Manual replica initialization using the command line is the fastest method of consumer initialization for deployments that are replicating large numbers of entries. Use the manual process if you find that the online process is inappropriate due to performance constraints. However, the manual consumer initialization process is more complex than the online consumer initialization process. Note that you must set up replication agreements before you initialize replicas.
To manually initialize or reinitialize a replica, first export the original copy of the suffix data to an LDIF file. If you are initializing a fractional replica, then you should filter the file to keep only the replicated attributes. Then you transfer that file to all of the consumer servers and import it. In a multi-master replication deployment, you can use the LDIF file exported from the original master to initialize both the other masters and any consumers. In a cascading replication environment, you can use the same file to initialize both the hub replicas and their consumers.
In all cases, you must start with an LDIF file that has been exported from a configured master replica. You cannot use an arbitrary LDIF to initialize all replicas because it does not contain replication data. You must first import your LDIF file into a master replica, and then export it with the following procedure.
Exporting a Replica to LDIF
You can store the replica contents in an LDIF file by using the db2ldif -r or db2ldif-task -r commands. For more information, see Exporting to LDIF From the Command Line. You must use the -r option to export a replica with these commands.
The following example will export the entire dc=example,dc=com replica to a file called example_master.ldif:
You can then filter the LDIF file if necessary and transfer it to the consumer hosts to initialize the consumer replicas.
Filtering an LDIF File for Fractional Replication
If you have configured fractional replication, you should filter out any unused attributes before copying the exported LDIF file to the consumer servers. Directory Server provides the fildif tool for this purpose. This tool filters the given LDIF file to keep only the attributes allowed by the attribute set defined in your replication agreement.
This tool will read the server's configuration to determine the attribute set definition. In order to read the configuration file, the fildif tool must be run as root, or as the user who owns the process and the files (specified by the nsslapd-localuser attribute.) For example, the following command filters the file exported from the dc=example,dc=com suffix in the previous example:
# CAMUS=/var/opt/mps/serverroot/slapd-camus
# /var/opt/mps/serverroot/shared/bin/fildif \
-i $CAMUS/ldif/example_master.ldif \
-o $CAMUS/ldif/filtered.ldif -c $CAMUS/config/dse.ldif \
-b "cn=rousseau.example.com:389, cn=replica, \
cn=\"dc=example,dc=com\", cn=mapping tree, cn=config"The -i and -o options are the input and output files, respectively. The -c option is the configuration file that contains the replication agreement and attribute set definitions. The dse.ldif file is where the server stores the contents of the cn=config entry, including the replication agreements and attribute sets.
The -b option is the DN of the replication agreement where fractional replication is defined. You can find this entry by browsing the cn=config suffix as Directory Manager in Directory Server Console. Select the entry under the cn=replica entry for your suffix and use the Edit>Copy DN menu item to copy this DN to the clipboard for using when typing your command.
For the full command-line syntax for the fildif tool, see the Directory Server Man Page Reference.
You may then use the filtered.ldif file produced by fildif to initialize the consumer in this replication agreement. Transfer the file to the consumer server and import it as described in the next section.
Importing the LDIF File to the Consumer Replica
You can import the LDIF file that contains the master replica contents to the consumer replica by using the import features in Directory Server Console, or by using either the directoryserver ldif2db or directoryserver ldif2db-task command. As with all import operations, these commands require the bind DN and password of the Directory Manager to perform the import. Both import methods are described in Importing LDIF From the Command Line.
The following example shows how to import an LDIF file to initialize the dc=example,dc=com consumer replica:
# /usr/sbin/directoryserver -s example stop
# /usr/sbin/directoryserver ldif2db -s "dc=example,dc=com" \
-i example_master.ldif
# /usr/sbin/directoryserver -s example start
Using ldif2db-taskdoes not require stopping the server beforehand. For more information, see the Directory Server Man Page Reference.
Initializing a Replica Using Binary Copy
The binary copy feature clones an entire server by using the binary backup files from one server to restore the identical directory contents on another server. This advanced feature interacts with the database files of the directory server and should only be used by experienced administrators.
Binary Copy Restrictions
Because the binary copy feature moves database files from one machine to another, the mechanism is subject to the following strict limitations:
- Both machines must use the same hardware and the same operating system, including any service packs or patches.
- Both machines must have the same version of Directory Server installed, including binary format (32 bits or 64 bits), service pack and patch level.
- Both servers must have the same directory tree divided into the same suffixes. The database files for all suffixes must be copied together, individual suffixes cannot be copied.
- Each suffix must have the same indexes configured on both servers, including VLV (virtual list view) indexes. The databases for the suffixes must have the same name.
- The Directory Server to be copied must not hold the o=NetscapeRoot suffix, which means it cannot be a configuration directory for Administration Server.
- Each server must have the same suffixes configured as replicas, and replicas must have the same role (master, hub, or consumer) on both servers. If fractional replication is configured, it must be configured identically on all servers.
- Attribute encryption must not be used on either server.
- The attribute value uniqueness plug-in must have the same configuration on both servers if enabled, and it must be reconfigured on the new copy, as explained in the procedures below.
Under the above conditions, you may then initialize or reinitialize either a master from the binary copy of another master server or a consumer from the binary copy of another consumer server. The following two procedures describe alternate ways of performing a binary copy, one that does not require stopping the server and one that uses the minimum amount of disk space.
Binary Copy Without Stopping the Server
The following procedure is recommended for performing a binary copy because it uses the normal backup functionality to create a copy of the server's database files. Performing a normal backup ensures all database files are in a coherent state without requiring you to stop the server.
However, this procedure has certain limitations that you should take into consideration. The backup and restore operations create copies of the database files on the same machine, thereby doubling the amount of disk space required by those files on each machine. Additionally, the actual copy operation on these files may take significant time if your directory contains gigabytes of data. See Binary Copy Using Minimum Disk Space if your disk space is limited or your database files are extremely large.
- Install Directory Server on the target machine for the new replica, create a new instance of the server if necessary, and then configure it according to the Binary Copy Restrictions.
- Create all replication agreements in your replication topology that involve this replica. This includes agreements from suppliers to this replica, and if it is not a dedicated consumer, from this replica to its consumers.
- Select a fully configured and initialized replica of the same type as you wish to initialize, either master, hub, or consumer, and perform a normal backup on it according to the procedure in Backing Up Your Server Using the Console.
- Copy or transfer the files from the backup directory to a directory on the target machine, for example using the ftp command.
- Load the files into the target server according to the procedures in Restoring Data from Backups.
- If you have initialized a new master in a multi-master replication scenario, follow the procedures in Convergence After Multi-Master Initialization to ensure the new replica will begin accepting update operations from clients.
Binary Copy Using Minimum Disk Space
The following procedure uses less disk space and takes less time because it does not make backup copies of the database files. However, it requires you to stop the server being cloned to ensure the database files are in a coherent state.
Caution
This procedure must not be used to reinitialize a master that has already participated in a multi-master replication scenario. It may only be used to reinitialize a consumer server or to initialize a new master server. To reinitialize an existing master replica, use online initialization, import an LDIF file, or follow the procedure for Binary Copy Without Stopping the Server.
- Install Directory Server on the target machine for the new replica, create a new instance of the server if necessary, and then configure it according to the Binary Copy Restrictions.
- Create all replication agreements in your replication topology that involve this replica. This includes agreements from suppliers to this replica, and if it is not a dedicated consumer, from this replica to its consumers.
- Stop the target server that will be initialized or reinitialized, as described in Starting and Stopping Directory Server.
- Select a fully configured and initialized replica of the same type that you wish to initialize, either master, hub, or consumer, and stop this server as well. If you are cloning a master replica in a multi-master configuration, you should ensure that it is fully up-to-date with all of the latest changes from the other masters before stopping it.
- Remove all database files from the target server, including transaction logs, changelogs, and region files (__db.xxx files.) Unless the files have been relocated, database files and transaction logs are located in the ServerRoot/slapd-serverID/db directory.
- Copy or transfer all database files including transaction logs from the source replica machine to the target machine, for example using the ftp command. Unless the files have been relocated, database files and transaction logs are located in the ServerRoot/slapd-serverID/db directory.
If you are initializing a master or hub replica, you must also copy all files in the change log, located in ServerRoot/slapd-serverID/changelog by default.
- Restart both the source and the target servers.
Enabling the Referential Integrity Plug-InIf you are using the referential integrity plug-in, you must enable it on all master servers. You do not need to enable it on hub or consumer servers. See Using Referential Integrity with Replication.
Replication Over SSLYou can configure Directory Servers involved in replication so that all replication operations occur over an SSL connection. To do so, complete the following steps:
- Configure both the supplier and consumer servers to use SSL.
Refer to Chapter 11, "Managing Authentication and Encryption" for details.
- If replication is not configured for the suffix on the consumer server, enable it as described in Enabling a Consumer Replica.
- Follow the procedure in Advanced Consumer Configuration, to define the DN of the certificate entry on the consumer as another replication manager.
- If replication is not configured for the suffix on the supplier server, enable it as described in Enabling a Hub Replica, or Enabling a Master Replica.
- On the supplier server, create a new replication agreement to send updates to the consumer on the secure SSL port. Follow the procedure in Creating Replication Agreements, for detailed instructions. Specify a secure port on the consumer server and select the SSL option of either using a password or a certificate. Enter a DN for the SSL option that you chose, either a replication manager or a certificate.
After you finish configuring the replication agreement, the supplier will send all replication update messages to the consumer over SSL and will use certificates if you chose that option. Customer initialization will also use a secure connection if performed through the console using an agreement configure for SSL.
Replication Over a WANDirectory Server 5.2 introduces the ability to perform all forms of replication including multi-master replication (MMR) between machines connected through a Wide Area Network (WAN). Internal improvements to the replication mechanism allow supplier servers to initialize and update consumers with reasonable delay over networks with higher latency and lower bandwidth.
Internal parameters of the replication mechanism are optimized by default for WANs. However, if you experience slow replication due to the factors mentioned above, you may wish to empirically adjust the window size and group size parameters. You may also be able to schedule your replication to avoid peak network times, thus improving your overall network usage. Finally, Directory Server supports the compression of replication data to optimize bandwidth usage.
Configuring Network Parameters
The following two parameters determine how the replication mechanism groups entries to send them more efficiently over the network. They affect how suppliers and consumers exchange replication update messages and acknowledgements.
It is more efficient to send many messages in quick succession instead of waiting for an acknowledgement after each one. Using the appropriate window size, you can eliminate the time replicas spend waiting for replication updates or acknowledgements to arrive.
If your consumer replica is lagging behind the supplier, increase the window size to a higher value than the default, such as 100, and check replication performance again before making further adjustments. When the replication update rate is high and the time between updates is therefore small, even replicas connected by a LAN can benefit from a higher window size.
If the network connection appears to be the bottleneck for replication, increase the group size to a higher value than the default, such as 10, and check replication performance again. When increasing group size, make sure that:
When group size is set higher than 1, the supplier does not wait to fill a group before sending updates to the supplier. If the list of updates to send is larger than the group size, however, the supplier groups what it can, aiming to send groups of independent modifications that the consumer can process in parallel.
Monitor the effects of any modifications you make and adjust accordingly. Refer to Monitoring Replication Status for instructions.
These two network parameters are configurable in every replication agreement. This allows you to tailor the replication performance according to the specific network conditions of each consumer.
You do not need to interrupt replication to modify the window and group size parameters:
- Select the Configuration tab on Directory Server Console, and expand both the Data node and the node for the replicated suffix.
- Select the Replication node below the suffix, and in the right pane, select the replication agreement you want to configure and click Edit.
- Select the Network tab of the Replication Agreement dialog and enter new values for the window size (in the range 1 to 1000) and for the group size (in the range 1 to 100). The group size must be less than or equal to the window size.
- Click OK to save the new values and close the Replication Agreement dialog.
The new parameter values take effect immediately with the next replication updates sent to the corresponding consumer.
Scheduling Replication Activity
If immediate synchronization between your replicas is not critical, one way to replicate data over a WAN is to schedule updates during periods of low network usage. Updates may perform significantly faster when the network is more available, and replication messages will not add further congestion to your network when it is already under high use.
You may schedule updates on a daily or weekly basis independently for every consumer through its replication agreement:
- On the top-level Configuration tab of Directory Server Console, expand both the Data node and the node for the replicated suffix.
- Select the Replication node below the suffix, and in the right pane, select the replication agreement you want to configure and click Edit.
- Select the Schedule tab of the Replication Agreement dialog and select the radio button beside the weekly schedule.
- Define your schedule:
- For a weekly update, select the checkbox beside the day or days on which you wish replication to occur. You may optionally enter a time range (using 24-hour notation) if you wish to further restrict replication on those days.
- For a daily update, click All to replicate every day and enter a time range (using 24-hour notation) when the replication should occur.
Note that time ranges may not straddle midnight.
- Click OK to save the new values and close the Replication Agreement dialog.
The new schedule will take effect immediately, causing the next replication updates for the corresponding consumer to be delayed until first allowed by the schedule.
Data Compression
To reduce the bandwidth used by replication, you may configure replication to compress the data that is sent when updating consumers. The replication mechanism uses the Zlib compression library. Both supplier and consumer must be running on a Solaris or Linux platform to enable compression.
The configuration of replication compression is only available by setting the ds5ReplicaTransportCompressionLevel attribute on the replication agreement entry in the master server. This attribute takes one of the following values:
0 - No compression is performed. This is the behavior by default when the
ds5ReplicaTransportCompressionLevel attribute is not defined.1 - Use the default compression level of the Zlib library.
2 - Use the best size compression level of the Zlib library.
3 - Use the best speed compression level of the Zlib library.
You should empirically test and select the compression level that gives you best results in your WAN environment for your expected replication usage. You should not set this parameter in a LAN (local area network) where network delay is insignificant, because the compression and decompression computations will slow down replication.
For example, to use the fastest compression when sending replication updates to the consumer on east.example.com, use the following ldapmodify command:
ldapmodify -h host -p port -D "cn=Directory Manager" -w password
dn: cn=east.example.com:389,cn=replica,cn="suffixDN",
cn=mapping tree,cn=config
changetype: modify
add: ds5ReplicaTransportCompressionLevel
ds5ReplicaTransportCompressionLevel: 3
^DFor more information on setting the compression level, see the Directory Server Administration Reference.
Modifying the Replication TopologyThis section contains procedures for managing an existing replication topology such as editing or removing replication agreements, promoting, demoting or disabling a replica, forcing updates to consumers, and managing the change log.
Managing Replication Agreements
From the replication panel for a master suffix, you can manage the replication agreements to change the authentication information in an agreement, interrupt replication to a specific consumer, or remove consumers from the topology.
Changing the Replication Manager
You can edit a replication agreement to change the replication manager identity used to bind to the consumer server. To avoid any interruption of the replication, you should define the new replication manager entry or certificate entry on the consumer before modifying the replication agreement. However, if replication is interrupted due to a bind failure, the replication mechanism will automatically send all the necessary updates when you correct the error, within the limits of the replication recovery settings (see Advanced Consumer Configuration).
To change the replication manager used to authenticate to a consumer:
- On the top-level Configuration tab on Directory Server Console, expand both the Data node and the node for the replicated suffix, and select the Replication node below the suffix.
- In the right panel, select the replication agreement you want to modify, and click Edit.
- In the Replication Agreement dialog, select the Connection tab.
The status line indicates the hostname and port number of the consumer server.
- Modify the DN and password field to contain either the DN and password of another replication manager entry or the DN of a certificate entry on the consumer server.
- If this replication agreement uses SSL over a secure port, you may also click the Options button to select the type of secure authentication. If you connect using a password, the supplier will use simple authentication with the given DN over an encrypted SSL connection. If you connect using a certificate, the DN field is the DN of the certificate entry and no password is required.
You cannot switch an existing replication agreement from non-secure to secure authentication, nor vice-versa. To enable replication with a different security setting, you must create another replication agreement.
- Click OK to save your changes.
Duplicating a Replication Agreement
Duplicating a replication agreement is a simple way to configure many consumers of a supplier replica in a large replication topology:
- On the top-level Configuration tab on Directory Server Console, expand both the Data node and the node for the replicated suffix, and select the Replication node below the suffix.
- From the list of replication agreements, select one that you wish to duplicate. If you wish to create a new agreement with a secure connection to the consumer, you must select an existing agreement that also uses a secure port. If you wish to create a new non-secure agreement, you must select a non-secure one.
Verify the configuration of this agreement by clicking Edit and browsing the tabs of the Replication Agreement dialog. The configurations on these tabs are described in the following sections:
- The Connection tab is described in Changing the Replication Manager.
- The Schedule and Network tabs are described in Replication Over a WAN.
- The Replicated Attributes tab is described in Configuring Fractional Replication.
- With the same replication agreement still selected, click the Duplicate button.
- Select the hostname and port number of the new consumer from the list, or click the Add Host button to use a different host and port. The list and the Add Host dialog will only allow you to select a consumer with the same type of security as the consumer agreement that is being duplicated.
- Make sure a hostname is selected in the list and click OK to create the new replication agreement for that consumer server.
- The new agreement duplicates all configuration information of the existing one. This implies that you must have exactly the same replication manager entry, using the same password, defined on the two servers. If you wish to modify the configuration of the new agreement, to change the replication manager DN for example, select it from the list and click Edit.
Disabling a Replication Agreement
When a replication agreement is disabled, the master stops sending updates to the designated consumer. Replication to that server is stopped, but all settings in the agreement are preserved. You may resume replication by re-enabling the agreement at a later time. See Enabling a Replication Agreement below for information about resuming the replication mechanism after an interruption.
To disable a replication agreement:
- On the top-level Configuration tab on Directory Server Console, expand both the Data node and the node for the replicated suffix, and select the Replication node below the suffix.
- In the right panel, select the replication agreement you want to disable.
- Select Action>Disable agreement in the box below the list of agreements.
- Click Yes to confirm that you want to disable the replication agreement.
The icon for the agreement in the list changes to show it is disabled.
Enabling a Replication Agreement
Enabling a replication agreement will resume replication with the designated consumer. However, if replication has been interrupted longer than the replication recovery settings will allow and the consumer was not updated by another supplier, you will have to reinitialize the consumer. The replication recovery settings are the maximum size and age of this supplier's change log and the purge delay of the consumer (see Advanced Consumer Configuration).
When the interruption is short and replication can recover, the master will update the consumer automatically when the agreement is re-enabled.
To enable a replication agreement:
- On the top-level Configuration tab on Directory Server Console, expand both the Data node and the node for the replicated suffix, and select the Replication node below the suffix.
- In the right panel, select the replication agreement you want to enable.
- Click the Enable button in the box below the list of agreements.
- Reinitialize the consumer replica if necessary.
Deleting a Replication Agreement
Deleting a replication agreement will stop the replication to the corresponding consumer and remove all configuration information about the agreement. If you wish to resume replication at a later date, disable the agreement instead, as described in Disabling a Replication Agreement.
To delete a replication agreement:
- On the top-level Configuration tab on Directory Server Console, expand both the Data node and the node for the replicated suffix, and select the Replication node below the suffix.
- In the right panel, select the replication agreement you want to delete.
- Click the Delete button to the right of the list of agreements.
- Click Yes to confirm that you want to delete the replication agreement.
Promoting or Demoting Replicas
Promoting or demoting a replica changes its role in the replication topology. Dedicated consumers may be promoted to hubs, and hubs may be promoted to masters. Masters may be demoted to hubs, and hubs may also be demoted to dedicated consumers. However, masters may not be demoted directly to consumers, just as consumers may not be promoted directly to masters.
The allowed promotions and demotions within the multi-master replication mechanism make the topology very flexible. A site that was formerly served by a consumer replica may grow and require a hub with several replicas to handle the load. If the load includes many modifications to the replica contents, the hub can become a master to allow faster local changes that can then be replicated to other masters at other sites.
To promote or demote a replica:
- On the top-level Configuration tab on Directory Server Console, expand both the Data node and the node for the replicated suffix, and select the Replication node below the suffix.
- In the right panel, select the Change>Promote-Demote Replica menu item.
- The replication wizard will only let you select a new role that is allowed and then step through the configuration procedure for the new replica role. You should be aware of the following effects:
- When demoting a master to a hub, the replica will become read-only and be configured for sending referrals to the remaining masters. The new hub will retain all of its consumers, whether hubs or dedicated consumers.
- Demoting a single master to a hub will create a topology without a master replica. The wizard will allow you to do this under the assumption that you will define a new master. However, it is better to add a new master as a multi-master and allow it to be initialized before demoting the other one.
- When demoting a hub to a consumer, all replication agreements will be deleted. If the hub's consumers were not updated by other hubs or masters, they will no longer be updated. You should create new agreements on the remaining hubs or masters to update these consumers.
- When promoting a consumer to a hub, its change log is enabled, and you may define new agreements with consumers.
- When promoting a hub to a master, the replica will accept modification requests and you may define new agreements with other masters, hubs, or dedicated consumers.
Disabling Replicas
Disabling a replica will remove it from the replication topology. It will no longer be updated or send updates, depending on its role as a master, hub or consumer. Disabling a supplier will delete all replication agreements, and they will have to be recreated if the replica is enabled again.
To disable a replica:
- On the top-level Configuration tab on Directory Server Console, expand both the Data node and the node for the replicated suffix, and select the Replication node below the suffix.
- In the right panel, select the Change>Disable Replication menu item.
- Click Yes in the confirmation dialog.
- Optionally, reset the write permissions and referrals for this suffix. These settings are left as is when the replica is disabled, for example, a disabled consumer still sends modification requests to its former master replica.
To modify the write permissions and referrals, select the node for this suffix on the Configuration tab and make modifications on the Settings tab in the right-hand panel. For more information, see Setting Access Permissions and Referrals.
Moving the Change Log
The change log is an internal record of all modifications on a given supplier replica that the server uses to replay modifications to the other replicas. The contents of the change log are managed automatically by the server and will be updated through multi-master updates even after the server is restarted.
In earlier versions of Directory Server, the change log was accessible over LDAP. Now, however, it is intended only for internal use by the server. If you have applications that need to read the change log, use the Retro Change Log Plug-in for backward compatibility. For more information, refer to Using the Retro Change Log Plug-In.
The only time administrators should modify the change log is when its files need to be moved to a different location, for example if the disk where it resides becomes full.
The change log is reinitialized when you disable it or move it to a new location. If there are changes that have not been replicated to other servers in the topology when the change log directory is changed, you will need to reinitialize all consumers in the topology. If all changes have been replicated before the change log is moved (that is, if all servers are in sync,) no reinitialization is required.
You must move the change log using Directory Server Console and never using the operating system rename or mv commands:
- On the top-level Configuration tab on Directory Server Console, select the Data node and choose the Replication tab in the right panel.
- Enter a new location in the text field. This is the new path and directory name where you wish to store the change log from now on. For example, move the change log from the default location ServerRoot/slapd-serverID/changelogdb to ServerRoot/slapd-serverID/newchangelog.
The existing change log will be deleted from the old location and a new one will be kept in the new location.
- Click Save in the Replication tab.
- Restart the Directory Server.
- Reinitialize your consumers as described in Initializing Replicas.
Keeping Replicas in Sync
After you stop a Directory Server involved in replication for regular maintenance, when it comes back online, you need to ensure that it gets updated through replication immediately. In the case of a master in a multi-master environment, the directory information needs to be updated by another master in the multi-master set. In other cases, after a hub replica or a dedicated consumer is taken offline for maintenance, when they come back online, they need to be updated by the master replica.
This section describes the replication retry algorithm, and how to force replication updates to occur without waiting for the next retry.
Note
The procedures described in this section can be used only when replication is already set up and consumers have been initialized.
Replication Retry Algorithm
When a supplier is unsuccessful in an attempt to replicate to a consumer, it retries periodically in incremental time intervals. The retry pattern is as follows: 10, 20, 40, 80, 160 seconds, then five times 300 seconds. The supplier repeats the same retry pattern continuously.
Note that even if you have configured replication agreements to always keep the supplier replica and the consumer replica in sync, this is not sufficient to bring back up-to-date immediately a replica that has been offline for over five minutes.
To ensure that directory information will be synchronized immediately when a server comes back online, you can use either Directory Server Console or a customizable script.
Forcing Replication Updates from the Console
To ensure that replication updates are sent immediately when a consumer, or a master in a multi-master replication configuration, comes back online after a period of time, you can perform these steps on the supplier that holds the most recent version of the directory data:
- On the top-level Configuration tab on Directory Server Console, expand both the Data node and the suffix node for the master replica, and select the Replication node below the suffix.
The replica status information is displayed in the right-hand panel.
- Select the replication agreement from the list that corresponds to the consumer you wish to update, and then click Action>Send updates now.
This initiates replication toward the replica that holds the information that needs to be updated.
Forcing Replication Updates from the Command Line
From the consumer that requires updating, the following script will prompts its supplier to send replication updates immediately. You can copy this example and give it a meaningful name, for example, replicate_now.sh. You must provide actual values for the variables listed in this example.
Note
The administrator must run this script because it cannot be configured to run automatically as soon as the server which was offline comes back online again.
#!/bin/sh
SUP_HOST=supplier_hostname
SUP_PORT=supplier_portnumber
SUP_MGRDN=supplier_directoryManagerDN
SUP_MGRPW=supplier_directoryManagerPassword
MY_HOST=consumer_hostname
MY_PORT=consumer_portnumber
ldapsearch -1 -h ${SUP_HOST} -p ${SUP_PORT} -D "${SUP_MGRDN}" \
-w ${SUP_MGRPW} -b "cn=mapping tree, cn=config" \
"(&(objectclass=nsds5replicationagreement) \
(nsDS5ReplicaHost=${MY_HOST}) \
(nsDS5ReplicaPort=${MY_PORT}))" \
dn nsds5ReplicaUpdateSchedule > /tmp/$$
cat /tmp/$$ |
awk '
BEGIN { s = 0 }
/^dn: / { print $0;
print "changetype: modify";
print "replace: nsds5ReplicaUpdateSchedule";
print "nsds5ReplicaUpdateSchedule: 0000-2359 0123456";
print "-";
print "";
print $0;
print "changetype: modify";
print "replace: nsds5ReplicaUpdateSchedule";
}
/^nsds5ReplicaUpdateSchedule: / { s = 1; print $0; }
/^$/ {
if ( $s == 1 )
{ print "-" ; print ""; }
else
{ print "nsds5ReplicaUpdateSchedule: 0000-2359 0123456";
print "-" ; print ""; };
s = 0; }
' > /tmp/ldif.$$
echo "Ldif is in /tmp/ldif.$$"
echo
ldapmodify -c -h ${SUP_HOST} -p ${SUP_PORT} -D "${SUP_MGRDN}" \
-w ${SUP_MGRPW} -f /tmp/ldif.$$If you want the update operation to occur over an SSL connection, you must modify the ldapmodify command in the script with the appropriate parameters and values. For more information, see Configuring LDAP Clients to Use Security.
Replication With Earlier ReleasesThis section provides information on how to configure replication with earlier releases of Directory Server.
Replicating Between Directory Server 5.2 and Directory Server 5.1
Directory Server 5.1 and 5.2 are fully compatible with regard to any replication configuration, with the following exceptions:
- Fractional replication must not be configured between master replicas running Directory Server 5.2 and consumer replicas running Directory Server 5.1.
- Before configuring an agreement between a 5.2 supplier and a 5.1 consumer, you must set nsslapd-schema-repl-useronly to on in cn=config. Otherwise the schema in 5.2 will create conflicts when replicated to 5.1. With this setting, only user-defined schema elements, those stored in the file 99user.ldif, will be replicated. See Replicating Schema Definitions.
- In Directory Server 5.2, the schema file 11rfc2307.ldif has been altered to conform to RFC 2307. You must update the corresponding file on your 5.1 server, as described in Updating Directory Server 5.1 Schema.
- A 5.2 master that has been demoted to a hub will still appear in the list of referrals on a 5.1 consumer. However, due to the internal mechanism for demotion, the port number for the demoted replica will be zero. This referral URL will not be usable, and most clients will automatically try the referrals to the other masters when they are not able to follow this one. However, you may need to increase the hop limit for referrals on clients that access these 5.1 replicas. A 5.2 consumer replica does not display nor return the unusable referral URL to a demoted master.
Replicating Between Directory Server 5.2 and Directory Server 4.x
Directory Server 5.2 can be involved in replication scenarios with 4.x releases of Directory Server, under the following conditions:
- Directory Server 5.2 is configured as a master but replicated only as a consumer to a Directory Server 4.x supplier.
- A consumer replica cannot be a consumer to both legacy 4.x suppliers and 5.2 suppliers. However, a 5.2 server may have different replicas, where one is supplied by a legacy Directory Server, and the other is supplied by a 5.2 Directory Server.
- A Directory Server 5.2 replica that has been configured as a consumer to a legacy 4.x supplier cannot act as a hub replica for this suffix in the topology.
The main advantage of being able to use Directory Server 5.2 as a consumer of a legacy Directory Server is to ease the migration of a replicated environment. For more information on the steps to follow to migrate a replicated environment, see the Directory Server Installation and Migration Guide.
To Configure Directory Server 5.2 as a Consumer of Directory Server 4.x
If you intend to use Directory Server 5.2 as a consumer of a 4.x release of Directory Server, you must configure it as follows:
- Enable the replica as a master replica, as described in Enabling a Master Replica. Even though the replica will be a consumer to the 4.x supplier, it must be configured as a master replica.
- On the top-level Configuration tab on Directory Server Console, expand both the Data node and the node for the replicated suffix, and select the Replication node below the suffix.
- In the right panel, select Change>Enable 4.x compatibility for this replica. Alternatively, select Enable 4.x compatibility from the Object menu.
- In the Enabling 4.x Compatibility window, specify a bind DN and password that the legacy supplier server will use to bind. The bind DN and password that you specify here must be used only for legacy replication. You must therefore not use an existing DN, or the default replication manager used in 5.x replication.
If you use the Replication Wizard to configure legacy replication, the bind DN and password you specify are stored correctly in the legacy replication configuration entry. If you configure legacy replication manually from the command line, you must specify the bind DN and password in the legacy replication configuration entry, using the nsslapd-legacy-updatedn and nsslapd-legacy-updatepw attributes.
Legacy replication works only with simple authentication, not with secure authentication using certificates.
- Click OK. This consumer replica is now ready to receive updates from a legacy supplier.
- Make sure that the schema on the 5.2 replica server defines all attributes and object classes used by the contents that will be replicated from the 4.x master.
- Initialize the 5.2 replica by importing an LDIF replica file created on the 4.x master. The first entry in this file contains the copiedfrom attribute required by the 4.x replication mechanism.
Enabling 4.x compatibility on a server configures the legacy replication plug-in that is installed by default. This plug-in processes updates from the legacy supplier and performs the updates on the contents of the replicated suffix.
To complete the legacy replication setup, you must now configure the legacy supplier to replicate to the 5.2 Directory Server. For instructions on configuring a replication agreement on a 4.x Directory Server, refer to the documentation provided with your legacy Directory Server.
Updating Directory Server 5.1 Schema
In Directory Server 5.2, the schema file 11rfc2307.ldif has been altered to conform to RFC 2307 (http://www.ietf.org/rfc/rfc2307.txt). Before you configure or enable replication between a 5.2 and 5.1 server, you must update the schema on the 5.1 server. On both versions of the server, the schema files are located in ServerRoot/slapd-serverID/config/schema/.
To Update Directory Server 5.1 Schema
- Copy the file 11rfc2307.ldif from the 5.2 server to the 5.1 server.
- The following schema files are affected by this change and must also be copied from the 5.2 server to overwrite the existing files on the 5.1 server:
- Restart the 5.1 server, then proceed with the configuration of replication and initialization of replicas. There may be some schema attributes that are replicated between servers as they synchronize other schema elements, but this is the normal behavior of the replication mechanism.
- You may need to update any applications which rely on the old version of the schema. The new 11rfc2307.ldif file includes the following modifications:
- The automount and automountInformation attributes were removed.
- The list of allowed attributes of the ipHost object class no longer includes o $ ou $ owner $ seeAlso $ serialNumber.
- The list of mandatory attributes of the ieee802Device object class no longer includes cn.
- The list of allowed attributes of the ieee802Device object class no longer includes description $ l $ o $ ou $ owner $ seeAlso $ serialNumber.
- The list of mandatory attributes for the bootableDevice object class no longer includes cn.
- The list of allowed attributes of the bootableDevice object class no longer includes description $ l $ o $ ou $ owner $ seeAlso $ serialNumber.
- The OID of the nisMap object class is now 1.3.6.1.1.1.2.9.
Using the Retro Change Log Plug-InDescription of the Retro Change Log Plug-In
Retro change log is a plug-in used by LDAP clients for maintaining application compatibility with Directory Server 4.x versions. The retro change log is stored in a separate database to the Directory Server change log, under the suffix cn=changelog.
A retro change log can be enabled on a standalone server or on each server in a replication topology. When the retro change log is enabled on a server, by default updates to all suffixes on that server are logged. The retro change log can be configured to log updates to specified suffixes only.
More Information About Retro Change Log
For information about using the retro change log in a replicated topology, and for information on restrictions on using the retro change log plug-in see "Replication and the Retro Change Log" in the Directory Server Deployment Planning Guide.
For information about the attributes of an entry in the retro change log, see the changeLogEntry in "Object Class Reference" in the Directory Server Administration Reference.
For information about the attributes of the retro change log, see "Attribute Reference" in the Directory Server Administration Reference.
Enabling the Retro Change Log Plug-In
The retro change log plug-in configuration information is stored in the cn=Retro Changelog Plugin,cn=plugins,cn=config entry in dse.ldif.
To Enable the Retro Change Log Plug-In by Using Directory Server Console
The following figure shows the retro change log plug-in configuration screen.
To Enable the Retro Change Log Plug-In by Using the Command Line
- Modify the retro change log plug-in configuration entry using the following command:
ldapmodify -h host -p port -D "cn=Directory Manager" -w password
dn: cn=Retro Changelog Plugin,cn=plugins,cn=config
changetype: modify
replace: nsslapd-pluginenabled
nsslapd-pluginenabled: on
^D- Restart the server. For information, see Starting and Stopping Directory Server.
Configuring Retro Change Log to Record Updates to Specified Suffixes
When the retro change log is enabled on a server, by default the retro change log records updates to all suffixes on the server. This section describes how to configure the retro change log to record updates to specified suffixes only.
To Configure Retro Change Log to Record Updates for Specified Suffixes by Using Directory Server Console
- Enable the retro change log plug in as described in To Enable the Retro Change Log Plug-In by Using Directory Server Console.
- In the right-hand of the screen, click on Add.
A new field called Argument appears.
- Enter the names of the suffixes that you want to log, using the following syntax:
suffixes="suffix1","suffix2"
- Click on Save.
- Restart the server as described in Starting and Stopping Directory Server.
To Configure Retro Change Log to Record Updates for Specified Suffixes by Using the Command Line
- Modify the retro change log plug-in configuration entry using the following command:
ldapmodify -h host -p port -D "cn=Directory Manager" -w password
dn: cn=Retro Changelog Plugin,cn=plugins,cn=config
changetype: modify
add: nsslapd-pluginarg2
nsslapd-pluginarg2: suffixes="suffix1","suffix2"
^D- Restart the server. For information, see Starting and Stopping Directory Server.
Configuring Retro Change Log to Record Attributes of a Deleted Entry
This section describes how to configure the retro change log to record specified attributes of an entry when that entry is deleted.
To Configure Retro Change Log to Record Attributes of a Deleted Entry by Using Directory Server Console
- Enable the retro change log plug in as described in To Enable the Retro Change Log Plug-In by Using Directory Server Console.
- In the right-hand of the screen, click on Add.
A new field called Argument appears.
- Enter the names of the attributes that you want to record, using the following syntax:
deletedentryattributes=description,givenname
- Click on Save.
- Restart the server as described in Starting and Stopping Directory Server.
To Configure Retro Change Log to Record Attributes of a Deleted Entry by Using the Command Line
- Modify the retro change log plug-in configuration entry by using the following command:
ldapmodify -h host -p port -D "cn=Directory Manager" -w password
dn: cn=Retro Changelog Plugin,cn=plugins,cn=config
changetype: modify
add: nsslapd-pluginarg3
nsslapd-pluginarg3: deletedEntryAttributes=attribute1,attribute2
^D- Restart the server. For information, see Starting and Stopping Directory Server.
Trimming the Retro Change Log
The entries in the change log can be removed automatically after a specified period of time. To configure the period of time after which entries are deleted automatically from the change log, you must set the nsslapd-changelogmaxage configuration attribute in the cn=Retro Changelog Plugin, cn=plugins, cn=config entry. This attribute can only be set from the command line, for example:
ldapmodify -h host -p port -D "cn=Directory Manager" -w password
dn: cn=Retro Changelog Plugin,cn=plugins,cn=config
changetype: modify
replace: nsslapd-changelogmaxage
nsslapd-changelogmaxage: IntegerTimeunit
^Dwhere Integer represents a number, and Timeunit can be one of the following: s for seconds, m for minutes, h for hours, d for days, or w for weeks. There should be no space between the Integer and Timeunit variables, for example:
nsslapd-changelogmaxage: 2d
The retro change log will be trimmed at the next operation on the change log.
Accessing the Retro Change Log
The change log supports search operations. It is optimized for searches that include filters of the form:
(&(changeNumber>=X)(changeNumber<=Y))
As a general rule, you should not perform add or modify operations on the retro change log entries, although you can delete entries to trim the size of the change log. The only time you will need to perform a modify operation on the retro change log is to modify the default access control policy.
When the retro change log is created, by default, the following access control rules apply:
You should not grant read access to anonymous users, because the change log entries can contain modifications to sensitive information, such as passwords. You may wish to further restrict access to the retro change log contents if even authenticated users should not be allowed to view its contents.
To modify the default access control policy that applies to the retro change log, you should modify the aci attribute of the cn=changelog entry. Refer to Chapter 6, "Managing Access Control," for more information about setting aci attributes.
Monitoring Replication StatusYou can monitor replication status by using the new command-line tools and using the Directory Server console.
Command-Line Tools
There are three new command-line tools for monitoring your replication deployment:
These tools are located in the following directory:
ServerRoot/shared/bin
The Directory Server Man Page Reference gives the full command-line syntax and usage examples for these tools.
Replication Status Tab
To view a summary of replication status in Directory Server Console:
- On the top-level Status tab on Directory Server Console, select the Replication node.
The right panel displays a table that contains information about each of the replication agreements configured for this server.
- If you wish to monitor the replication status, select the Continuous refresh checkbox. For example, you will see when a replica has finished initializing.
- Click the Pending Change Number button if you wish to determine the last modification on the master that has not yet been replicated to the consumer. You will be warned that this operation may take a long time and asked to confirm. Determining the pending change number requires downloading the consumer's record of updates and comparing it to the master's change log. If these logs are very large, this operation may take significant time and server resources.
- You can modify the layout of the table by clicking on the column headers and resizing them. You can also modify the contents of the table by clicking the View Options button and selection only those columns you wish to see. Table 8-1 describes the replication parameters you may select to display in the table for each agreement on this server.
Solving Common Replication ConflictsMulti-master replication uses a loose consistency replication model. This means that the same entries may be modified simultaneously on different servers. When updates are sent between the two servers, the conflicting changes need to be resolved. Mostly, resolution occurs automatically, based on the timestamp associated with the change on each server. The most recent change takes precedence.
However, there are some cases where change conflicts require manual intervention in order to reach a resolution. Entries that have a change conflict that cannot be resolved automatically by the replication process contain the operational attribute nsds5ReplConflict as a conflict marker.
Search for entries that contain this attribute periodically to find entries with conflicts. For example, you could use the following ldapsearch command:
% ldapsearch -h host -p port -D "cn=Directory Manager" -w password \
-b "dc=example,dc=com" "(nsds5ReplConflict=*)"Note that the nsds5ReplConflict attribute is indexed by default.
Solving Naming Conflicts
Entries with identical DNs may be created on separate masters if they are created before the servers replicate the changes to each other. Upon replication, the conflict resolution mechanism will automatically rename the second entry created.
An entry with a DN naming conflict is renamed by including its unique identifier, given by the operational attribute nsuniqueid, in its DN. For example, if the entry uid=bjensen,ou=People,dc=example,dc=com is created simultaneously on two masters, both will have the following two entries after replication:
The second entry needs to be renamed in such a way that it has a useful DN. You can delete the conflicting entry and add it again with a non-conflicting name. However, the surest way to keep the entry as it was created is to rename it. The renaming procedure depends on whether the naming attribute is single-valued or multi-valued. Each procedure is described below.
Renaming an Entry with a Multi-Valued Naming Attribute
To rename an conflicting entry that has a multi-valued naming attribute:
- Rename the entry while keeping the old RDN value. For example:
ldapmodify -h host -p port -D "cn=Directory Manager" -w password
dn: nsuniqueid=66446001-1dd211b2+uid=bjensen,dc=example,dc=com
changetype: modrdn
newrdn: uid=NewValue
deleteoldrdn: 0
^DYou cannot delete the old RDN value in this step because it also contains the nsuniqueid operational attribute which cannot be deleted.
- Remove the old RDN value of the naming attribute and the conflict marker attribute. For example:
ldapmodify -h host -p port -D "cn=Directory Manager" -w password
dn: uid=NewValue,dc=example,dc=com
changetype: modify
delete: uid
uid: bjensen
-
delete: nsds5ReplConflict
^DRenaming an Entry with a Single-Valued Naming Attribute
When the naming attribute is single-valued, for example dc (domain component), you cannot simply rename the entry to another value of the same attribute. Instead you must give it a temporary name.
- Rename the entry using a different naming attribute, and keep the old RDN. For example:
ldapmodify -h host -p port -D "cn=Directory Manager" -w password
dn: nsuniqueid=66446001-1dd211b2+dc=HR,dc=example,dc=com
changetype: modrdn
newrdn: o=TempName
deleteoldrdn: 0
^DYou cannot delete the old RDN value in this step because it also contains the nsuniqueid operational attribute which cannot be deleted.
- Change the desired naming attribute to a unique value and remove the conflict marker attribute. For example:
ldapmodify -h host -p port -D "cn=Directory Manager" -w password
dn: o=TempName,dc=example,dc=com
changetype: modify
replace: dc
dc: uniqueValue
-
delete: nsds5ReplConflict
^D- Rename the entry back to the intended naming attribute. For example:
ldapmodify -h host -p port -D "cn=Directory Manager" -w password
dn: o=TempName,dc=example,dc=com
changetype: modrdn
newrdn: dc=uniqueValue
deleteoldrdn: 1
^DBy setting the value of the deleteoldrdn attribute to 1, you delete the temporary attribute-value pair o=TempName. If you want to keep this attribute, you can set the value of the deleteoldrdn attribute to 0.
Solving Orphan Entry Conflicts
When a delete operation is replicated, and the consumer server finds that the entry to be deleted has child entries, the conflict resolution procedure creates a glue entry to avoid having orphaned entries in the directory.
In the same way, when an add operation is replicated, and the consumer server cannot find the parent entry, the conflict resolution procedure creates a glue entry representing the parent so that the new entry is not an orphan entry.
Glue entries are temporary entries that include the object classes glue and extensibleObject. Glue entries can be created in several ways:
Solving Potential Interoperability Problems
For reasons of interoperability with applications that rely on attribute uniqueness such as a mail server, you might need to restrict access to the entries that contain the nsds5ReplConflict attribute. If you do not restrict access to these entries, then the applications requiring one attribute only will pick up both the original entry and the conflict resolution entry containing the nsds5ReplConflict and operations will fail.
To restrict access you need to modify the default ACI that grants anonymous read access, using the following command:
ldapmodify -h host -p port -D "cn=Directory Manager" -w password
dn: dc=example,dc=com
changetype: modify
delete: aci
aci: (target ="ldap:///dc=example,dc=com")
(targetattr !="userPassword"
(version 3.0;acl "Anonymous read-search access";
allow (read, search, compare)(userdn = "ldap:///anyone");)
-
add: aci
aci: (target="ldap:///dc=example,dc=com")
(targetattr!="userPassword")
(targetfilter="(!(nsds5ReplConflict=*))")(version 3.0;acl
"Anonymous read-search access";allow (read, search, compare)
(userdn="ldap:///anyone");)
^DThe new ACI will keep entries that contain the nsds5ReplConflict attribute from being returned in search results.