JavaScript is required to for searching.
Skip Navigation Links
Exit Print View
Sun Blade Storage Module M2 Service Manual
search filter icon
search icon

Document Information

Preface

Product Information Web Site

Related Books

About This Documentation (PDF and HTML)

Documentation Comments

Change History

Introduction to the Sun Blade Storage Module M2

Terminology Used In This Document

Storage Module Features

Storage Module Components

Accessory Kit Contents

Maintaining the Sun Blade Storage Module M2

Options and Replaceable Components

Antistatic Procedures and Precautions

How to Use an Antistatic Mat

Replacing a Disk Drive (CRU)

How to Remove a Disk Drive

How to Install a Disk Drive

Replacing the Storage Module (FRU)

How to Remove the Storage Module

How to Install the Storage Module

Upgrading Storage Module Firmware

Diagnosing Storage Module Faults

Diagnosing Faults Using CMM ILOM

Diagnosing Faults Using MegaRAID Storage Manager Software

Diagnosing Faults With SunVTS Software

Diagnosing Faults With LEDs and Indicators

Specifications

Physical

Environmental and Electrical

Index

How to Remove a Disk Drive

Disk drives can be removed with the storage module in or out of the chassis.

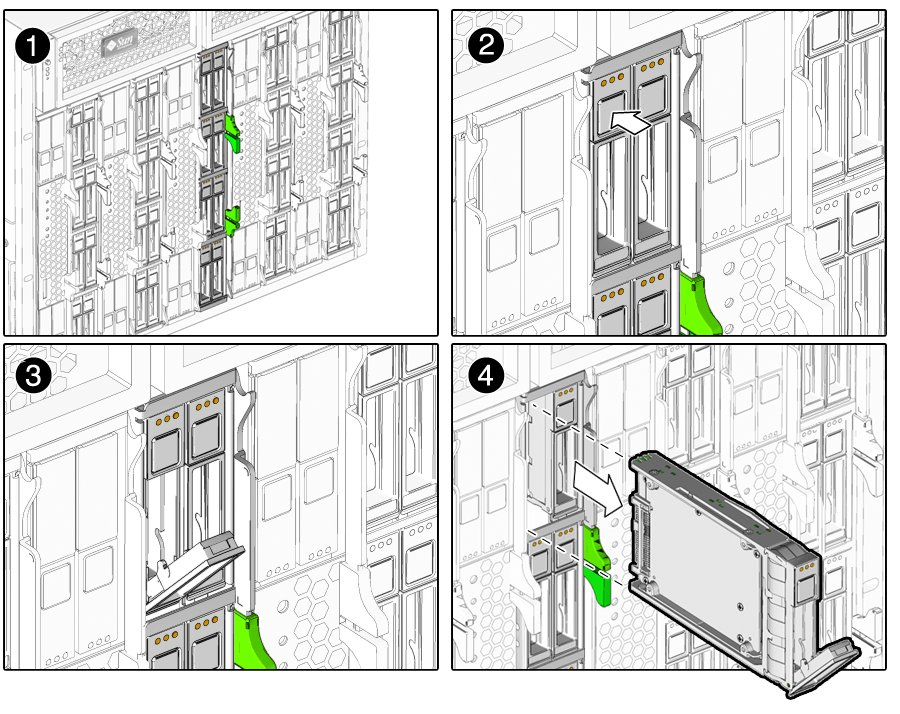
  1. Identify the disk to be removed as follows:
    • Look for an amber Fault LED on the face of the disks to identify a defective disk [1].
    • If the disk is not defective, use the disk management software to take the disk offline in order to stop all I/O and prevent possible data loss. If supported by the disk management software, the offline disk will light its blue ready-to-remove LED.
  2. Press the button on the face of the disk to release the spring-loaded securing latch [2].
  3. Grasp the securing latch [3] and remove the disk from the drive bay [4].

    Storage module disks are hot-pluggable, which means you can remove a disk when the storage module is in the chassis.


    Hot

    Caution - Slots should always contain either a disk drive or a filler in order to maintain adequate air flow. Do not operate the system with slots that are empty. Always insert a filler when you remove a disk drive from a slot.


    image:Graphic showing disk drive removal when disk module is installed in chassis.
  4. Make a note of the slot from which you removed the drive.

    If you are simply removing and reinserting a good drive, you need to put it back into the same slot it came from.