Chapter 2 Initial Runtime Configuration Program for Calendar Server 6.3 software (csconfigurator.sh)
After you install Calendar Server, and before running it, you must configure it. It is important that you run the two configuration programs in the following order:
-
comm_dssetup.pl
Configure the LDAP directory server as instructed in the Sun Java System Communications Suite 5 Installation and Configuration Guide.
-
csconfigurator.sh
Configure Calendar Server as described in this chapter.
This chapter contains the following topics:
Note –
If you had an earlier version of Calendar Server or Messaging Server installed, you might need to migrate your LDAP directory entries from Schema version 1 to Schema version 2.
Do not run the configuration utility described in this chapter until you have read the Sun Java Communications Suite 5 Schema Migration Guide. It will instruct you on the timing and options for running the configuration utilities.
2.1 Gathering Your Configuration Information for Calendar Server 6.3 Software
The Calendar Server configuration program csconfigurator.sh, creates a new ics.conf configuration file in the following directory:
For Solaris: /etc/opt/SUNWics5/config
For Linux: /etc/opt/sun/calendar/config
The configuration program will ask you many questions for which you must enter specific information about your installation.
Before running the configuration program, you should gather the following configuration information:
To help you keep track of the configuration information, use the worksheets in Appendix B, Calendar Server Configuration Worksheet. (However, you should determine this information before you run the Java Enterprise System installer to avoid conflicts (such as port numbers) with other component products.)
2.1.1 LDAP Server Options
Calendar Server requires a directory server for user authentication and for the storage and retrieval of user preferences. The following table lists the options used to gather host and port information for the LDAP server.
Table 2–1 User Preferences Directory Options|
Option |
Description |
|---|---|
|
LDAP Server Host Name |
Host name of the LDAP directory server you are using for user authentication and user preferences. The default is the current host. |
|
LDAP Server Port |
Port number that the LDAP directory server listens on. The default is 389. |
2.1.2 Directory Manager Options
The following table lists the options used to gather the name and password of the user that is designated the Directory Manager.
Table 2–2 Directory Manager Options|
Option |
Description |
|---|---|
|
Directory Manager DN |
User name that can make changes in the directory server schema. The default is cn=Directory Manager. |
|
Directory Manager Password |
Password of the Directory Manager DN. The password is not stored in plain text. There is no default. |
2.1.3 Calendar Server Administrator
The Calendar Server Administrator is the user account that overrides any other Calendar Server ACLs. The Calendar Server Administrator user account must exist in your user authentication directory server. It is also used for proxy authentication. The following table lists the options used to gather the Calendar Server Administrator’s user ID and password.
Table 2–3 Calendar Server Administrator Options|
Option |
Description |
|---|---|
|
Administrator User ID |
User ID of the Calendar Server Administrator; must be a user in the above LDAP directory server. The default is calmaster. |
|
Administrator Password |
Password of the Calendar Server Administrator. There is no default. |
2.1.4 Email and Email Alarms Options
You can configure Calendar Server to send an email alarm message to a Calendar Server Administrator in case a server problem occurs. The following table lists the options used to gather email information.
Table 2–4 Email and Email Alarms Options|
Option |
Description |
|---|---|
|
Email Alarms |
Enables or disables email alarms. The default is Enabled. |
|
Administrator Email Address |
Email address of the Calendar Server Administrator who will receive the email alarm messages. |
|
SMTP Host Name |
Host name of the SMTP server used by the Calendar Server system to send email alarm messages. The default is the current host. |
2.1.5 Runtime Configuration Options
You can configure the following Calendar Server runtime and system resource options.
Table 2–5 Runtime Configuration Options|
Option |
Description |
|---|---|
|
Service Port |
Port number that Calendar Server listens on to provide Web (HTTP) access to users. The default is 80. |
|
Maximum Sessions |
Maximum number of Calendar Server sessions to allow concurrently. The default is 5000. |
|
Maximum Threads |
Maximum number of Calendar Server threads to allow concurrently. The default is 20. |
|
Number of Server Processes |
For Solaris: Maximum number of Calendar Server processes to run concurrently. The default is the number of CPUs on the server where you are installing Calendar Server. For Linux: Only one process can run at a time. |
|
Runtime User ID |
UNIX user name under which Calendar Server will run. This user name should not be root. If the account does not exist, the configuration program will create it. The default is icsuser. |
|
Runtime Group ID |
UNIX group under which Calendar Server will run. If the group does not exist, the configuration program will create it. The default is icsgroup. |
2.1.6 Calendar Server Startup
You can configure the following options to automatically start Calendar Server.
Table 2–6 Calendar Server Startup Options|
Option |
Description |
|---|---|
|
Start after successful installation |
Whether to start Calendar Server automatically after a successful installation. The default is checked. |
|
Start on system startup |
Whether to start Calendar Server automatically after a system startup. The default is checked. |
2.1.7 Database, Logs, and Temporary Files Directories
Calendar Server creates and stores information in calendar database files, log files, and temporary files in specific directories.
Table 2–7 Database, Logs, and Temporary Files Directories Options|
Option |
Description |
|---|---|
|
Database Directory |
Directory where the Calendar Server system creates and stores the calendar database (*.db) files. The default is: /var/opt/SUNWics5/csdb |
|
Logs Directory |
Directory where Calendar Server writes log files. The default is: /var/opt/SUNWics5/logs |
|
Temporary Files Directory |
Directory where the Calendar Server system writes temporary files. The default is: /var/opt/SUNWics5/tmp |
|
Archive and hot backup Directories |
Directory where the Calendar Server system writes archive backups. User defined directory for storing the daily snapshot and transactions logs. If both types of backups are desired, then place them in different directories. If no directory is specified, backups are stored in the current directory. |
|
Attachment Store Directory |
Directory where the Calendar Server system stores attachments to events and tasks. |
Note –
Do not change the location or names of the logs and temporary files directories.
2.2 Running csconfigurator.sh
You can run the configuration program from a graphical user interface (GUI), or from the command line.
If you run the program remotely, you must set your DISPLAY environment variable properly and allow X-Windows connections from the server to display on your computer. For example, to use the xhost utility, execute the following command on your computer:
# xhost +
This section contains the following topics:
 To Run the Configuration Program from the Command
Line
-
Login as or become superuser (root).
-
Change to the /opt/SUNWics5/cal/sbin directory.
-
Run the script using the options chosen from the following table:
Option
Description
-nodisplay
Run the configuration script in text-only mode (non-GUI).
-noconsole
Do not display text output. Use this with -nodisplay to run the configuration script in silent mode.
-novalidate
Do not validate input field text.
-saveState [statefile]
Save the answers that you input in response to configuration questions to a state file (text file). Unless you specify a fully qualified path for the state file, it will be saved in the default directory: /opt/SUNWics5/cal/jconfigure.
-state [statefile]
Use the state file for setting input values. This option must be used in conjunction with -novalidate and -noconsole.
For example, to run the configuration script in command-line mode, issue the following command:
./csconfigurator.sh -nodisplay
The command-line version asks for the same information and in the same order as the GUI. Default values are indicated in square brackets, []. To accept a default value, press Enter on your keyboard.
Note –For the text of the information contained in the various questions presented by the script, see the text in the GUI screens shown in the sections that follow.
 To Run the Configuration Program from the GUI
-
Login as or become superuser (root).
-
Change to the /opt/SUNWics5/cal/sbin directory.
-
Run the command:
./csconfigurator.sh
The configuration program displays the following series of screens:
-
2.4 Administration, User Preferences and Authentication Screen
-
2.9 Directories to Store Configuration and Data Files Screen for Calendar Server 6.3
-
2.10 Archive and Hot Backup Configuration Screen for Calendar Server 6.3
 Caution –
 The configuration program only configures a single domain. If you plan to use multiple domains, you need to add the domains using Delegated Administrator.
Note –The title bars for all screens are incorrect. The version is 6.3, not 6.5 as shown.
2.3 Welcome Screen
Figure 2–1 Calendar Server Configuration Program Welcome Screen
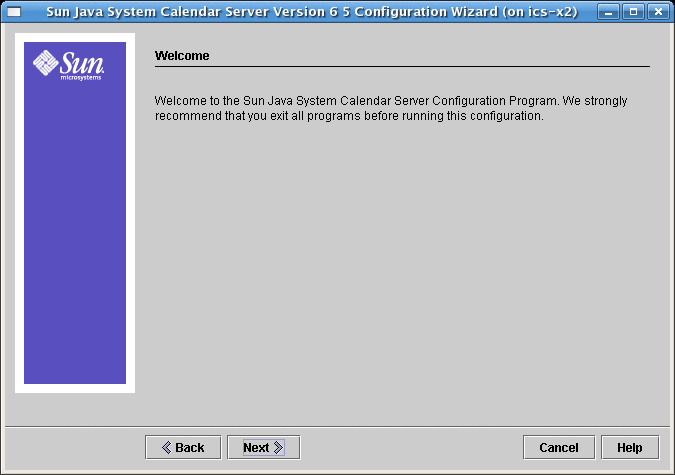
Click Next to continue or Cancel to exit.
2.4 Administration, User Preferences and Authentication Screen
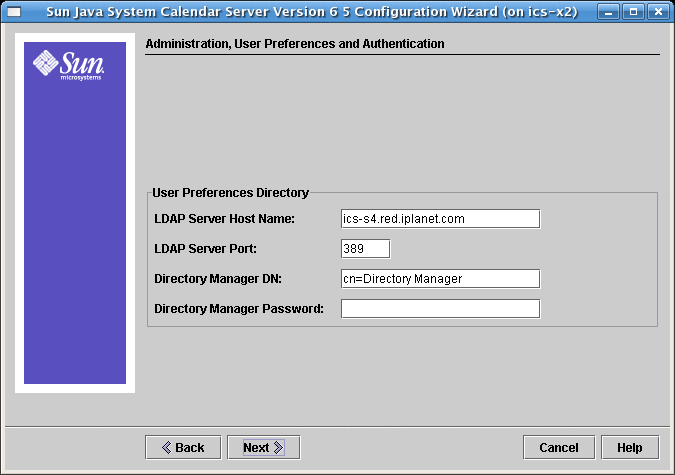
Figure 2–2 Administration, User Preferences and Authentication Configuration Screen
2.4.1 User Preferences Directory Options
- LDAP Server Host Name
-
Host name of the LDAP directory server you are using for user authentication. Default: current host
- LDAP Server Port
-
Port number that the LDAP server listens on. Default: 389
- Directory Manager DN
-
User name that can make changes in the directory server schema. Default: cn=Directory Manager
- Directory Manager Password
-
Password of the Directory Manager. This will not be stored in plain text. Default: None
2.5 Virtual Domains and Calendar Administrator Screen
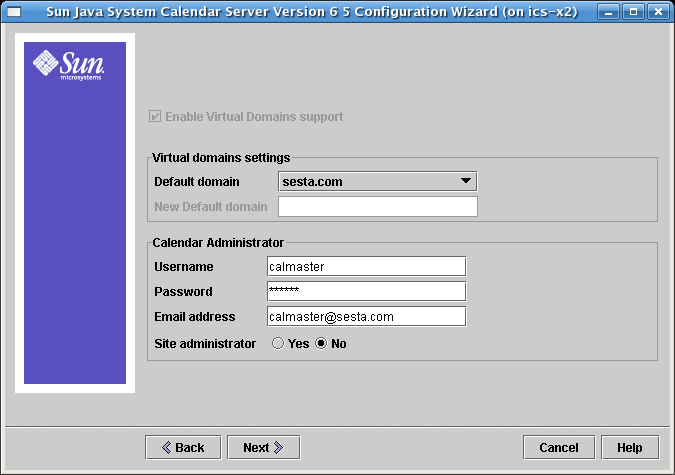
Figure 2–3 Virtual Domains and Calendar Administrator Screen
Note –
Virtual domains, hosted domains and multiple domains are all names for the same ability to have more than one LDAP domain with its corresponding user and group records.
If you are upgrading from a non-virtual domain environment, the Enable Virtual Domains Support checkbox must be selected. If you already have a multiple domain environment, the checkbox is greyed out. Virtual domains support is now the default behavior of Calendar Server, and is not optional.
2.5.1 Virtual Domains Settings for Calendar Server 6.3
Figure 2–4 Virtual Domain Structure

Virtual domains support is now the default behavior for Calendar Server for fresh installations. Using the configuration program graphical user interface, enter a default domain name in the New Default domain input box. The configuration program then creates the domain for you.
Choose your default domain from one of those showing in the Default domain box. If you already used multiple domains in the previous version of Calendar Server, and you do not want to use the domain showing in the Default domain box, click the box to see the list of domains you can choose from and select a new default domain.
2.5.2 Calendar Administrator Name and Password for Calendar Server 6.3
- Username
-
Username of the Calendar Server Administrator. Default: calmaster
- Administrator Password
-
Password of the Calendar Server Administrator. Default: None
- Email Address
-
Email address for the Calendar Server Administrator.
- Site Administrator
-
The Site Administrator is the user that has proxy authentication rights across domains.
Click the appropriate response: Yes if the Calendar Administrator is also the Site Administrator. No if the Calendar Administrator is not the Site Administrator.
Click Next to continue, Back to return to the previous screen, or Cancel to exit.
2.6 Email and Email Alarms Screen for Calendar Server 6.3
Figure 2–5 Email and Email Alarms Configuration Screen
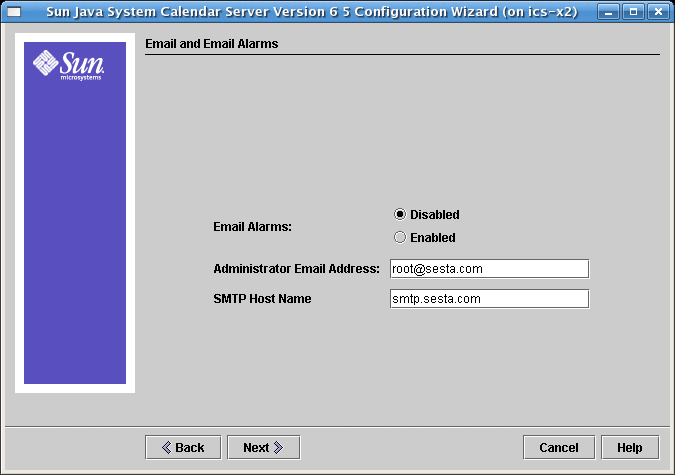
- Email Alarms
-
Specifies whether Calendar Server should send an email alarm message to a Calendar Server administrator in case a server problem occurs. Default: disabled. If you choose Disabled, no administrator receives email alarms for server problems.
- Administrator Email Address
-
Email address of the Calendar Server Administrator who will receive the email alarm messages. Default: None
- SMTP Host Name
-
Host name of the SMTP server where used to send alarm messages. Default: current host.
Click Next to continue, Back to return to the previous screen, or Cancel to exit.
2.7 Runtime Configuration Screen for Calendar Server 6.3
Figure 2–6 Runtime Configuration Screen
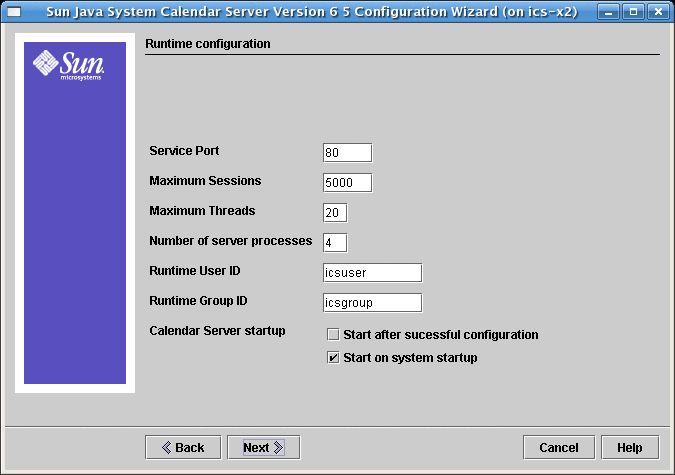
- Service Port
-
Port number that Calendar Server listens on to provide Web (HTTP) access to users. Default: 80.
- Maximum Sessions
-
Maximum number of concurrent Calendar Server sessions. Default: 5000
- Maximum Threads
-
Maximum number of concurrent Calendar Server threads. Default: 20
- Number of Server Processes
-
Maximum number of Calendar Server processes to run on the server. Default: Number of CPUs on the server where you are installing Calendar Server.
- Runtime User ID
-
UNIX user name under which Calendar Server will run. If the account does not exist, the configuration program will create it. Default: icsuser
 Caution –
 Do not use root as the Runtime User ID.
- Runtime Group ID
-
UNIX group under which Calendar Server will run. If the group does not exist, the configuration program will create it. Default: icsgroup
- Calendar Server Startup Options
-
Select one or both options by clicking in the check box.
-
Start after successful configuration
Specifies whether to start Calendar Server automatically after this configuration program successfully finishes running.
-
Start on system startup
Specifies whether to start Calendar Server automatically after a system startup.
Note –By default, only the Start on system startup checkbox is selected.
-
Click Next to continue, Back to return to the previous screen, or Cancel to exit.
2.8 Set Up a Front End-Back End Deployment Screen for Calendar Server 6.3
Choose whether to configure this server as a single server deployment, or a front-end, back-end deployment. If you choose to have a single server instance of Calendar Server, then do not select the checkbox on this screen. If you want to put your Calendar Server databases on one or more servers, while keeping the processes that communicate with the client on a different server, select the checkbox.
This section covers the following topics:
2.8.1 Single Server Deployment for Calendar Server 6.3
Figure 2–7 Single Server Deployment
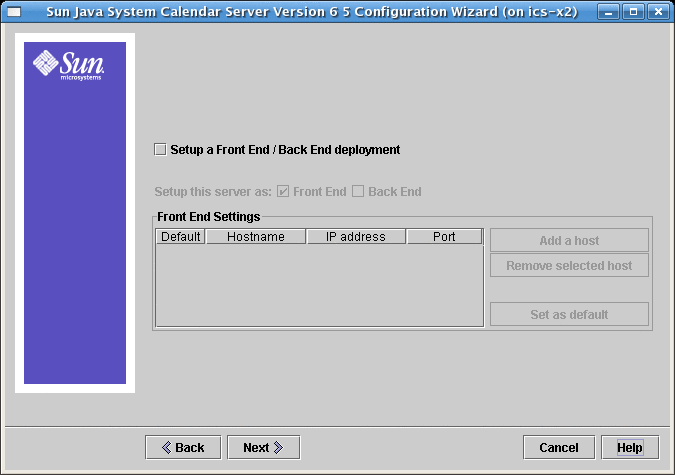
Do not change any part of this screen if you want a single server deployment where both the administrative processes and the databases reside on one server. Click Next to continue.
If you wish to deploy separate Front End and Back End machines, click the checkbox labeled: Setup a Front End/Back End deployment. The screen will change and you will be allowed to configure the front-end and back-end servers separately, as shown in the following two screen shots.
2.8.2 Front-End and Back-End Deployment for Calendar Server 6.3
Figure 2–8 Set Up a Front-End and Back-End Server
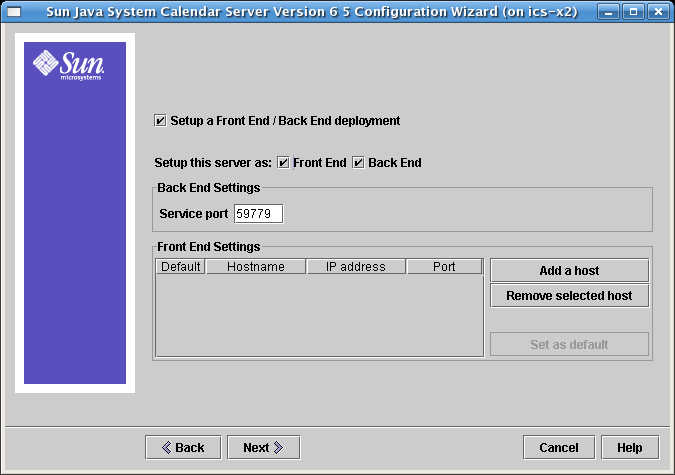
To complete this screen, perform the following steps:
-
To configure the back-end server, that is, the server on which to store calendar databases, you need only specify the service port.
The service port entry box is pre-filled with the port named in the ics.conf parameters service.dwp.server.hostname.port and service.dwp.port.
If you want to change the port number, enter the desired port number in the Service Port entry box.
-
To configure the front-end server, click Add a Host and then enter the host name and IP address of the server you are configuring.
Note –Add only the server you are currently configuring to the list. If you plan to configure other front-end servers, add them at the time you configure them. (You must run the configuration program on each server you add to your configuration.)
-
If this server is the default front-end server, select the Default checkbox.
-
Click Next.
Note –You may also remove servers from this list by clicking Remove Selected Host.
2.9 Directories to Store Configuration and Data Files Screen for Calendar Server 6.3
Accept the default directories on this screen. While you are allowed to choose the store configuration and data files directories, it is not advised.
Figure 2–9 Select Directories Configuration Screen
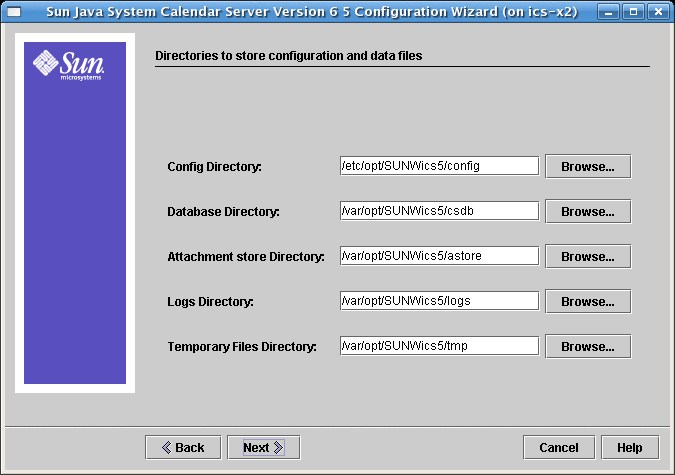
- Config Directory
-
Directory where the configuration file (ics.conf) resides.
- Database Directory
-
Directory where Calendar Server creates and stores the calendar database files. Default: /var/opt/SUNWics5/csdb
- Attachment Store Directory
-
Directory where the attachment store resides. Default: /var/opt/SUNWics5/astore
- Logs Directory
-
Directory where Calendar Server writes log files. Default: /var/opt/SUNWics5/logs
- Temporary Files Directory
-
Directory where the Calendar Server writes temporary files. Default: /var/opt/SUNWics5/tmp
Then, Click Next to continue, Back to return to the previous screen, or Cancel to exit.
Note –
If any of these directories do not already exist, a pop-up window appears for each missing directory. Click the appropriate button to choose whether to have the configuration program create the new directory, or to return you to the screen where you can choose a different directory.
For any directory that already exists but is not empty, a pop-up window appears with two choices. Click the appropriate button to accept the directory anyway, or to return to the screen where you can choose a different directory.
2.10 Archive and Hot Backup Configuration Screen for Calendar Server 6.3
This screen allows you to select both automatic backup types, or either one of the two, or none. Select or deselect the boxes appropriately. Using both archive backups and hot backups is strongly recommended.
Tip –
Prevent the catastrophic loss of all your database copies due to an equipment failure. Keep your automatic backup copies on a disk or disk system other than the one where your live databases reside.
For information on automatic backups, see Chapter 9, Configuring Automatic Backups (csstored).
Figure 2–10 Archive and hot backup Configuration Screen
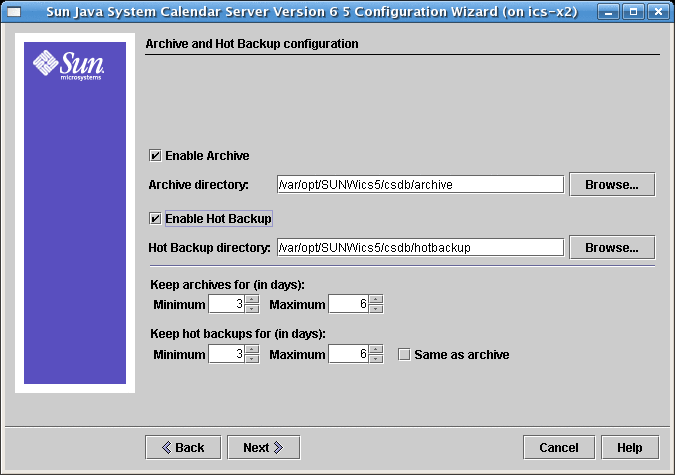
- Enable Archive
-
When this box is selected (default), csstored will take a snapshot of your calendar databases every 24 hours. Throughout the day, at regular intervals, it stores the transaction log files for that day with the snapshot in the archive backup directory.
If this box is not checked, the Archive Directory input field is greyed out.
- Archive Directory
-
Choose the backup directory by clicking Browse, or accept the default.
- Enable Hot Backup
-
When this box is selected (default), csstored takes a snapshot of your calendar databases every 24 hours, then applies the transaction logs to the snapshot at a set interval (default is two minutes), throughout the day, ensuring a nearly complete duplicate of your live database.
If this box is not checked, the Hot Backup Directory input field is greyed out.
- Hot Backup Directory
-
Choose the backup directory by clicking Browse, or accept the default.
- Keep Archives for (in days)
-
This field is only active if the Enable Archive box is selected; otherwise, it is greyed out.
Click the up or down arrows in the Minimum and Maximum fields to select range of days of archival backups to keep in the backup directory.
- Keep Hot Backups for (in days)
-
This field is only active if the Enable Hot Backup box is selected; otherwise, it is greyed out.
You can set the number of hot backups to keep in two ways:
-
Click the up or down arrows in the Minimum and Maximum fields to select the range of days of hot backups to keep in the directory.
The number of copies actually stored at any one time depends on the size of the files and the size of the directory. When either the size limits, or maximum number of copies exceeds the limit, the oldest copies are purged down to the minimum number specified on this configuration screen.
-
If you want the same settings for Hot Backups as for Archival Backups, you can check the Same As Archive box.
-
Click Next to continue, Back to return to the previous screen, or Cancel to quit the configuration program.
2.11 Ready to Configure Screen for Calendar Server 6.3
Up to now the screens have been gathering data needed for the configuration and performing some validity checking. You can go back and redo the configuration information at this point, or start the configuration.
Figure 2–11 Ready to Configure Screen
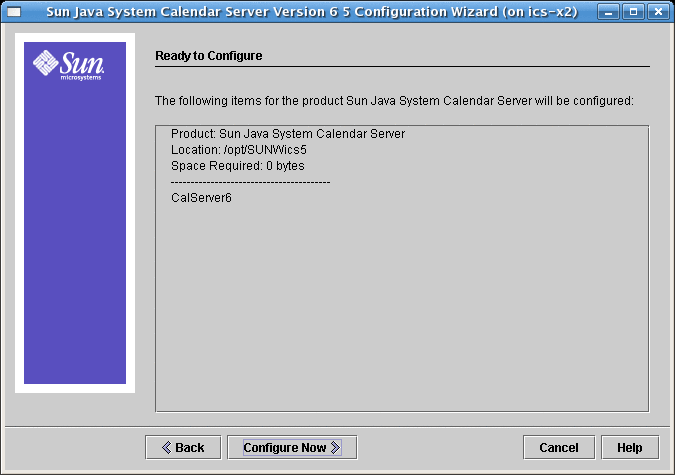
Click Configure Now to configure Calendar Server, Back to return to the previous screen, or Cancel to exit.
2.12 Sequence Completed Screen for Calendar Server 6.3
Figure 2–12 Sequence Completed Screen
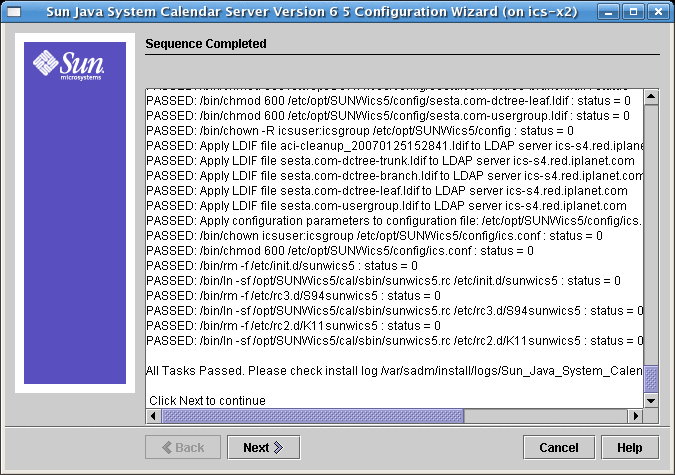
This panel provides a running update of all the tasks and the disposition (passed or failed). When the message “All Tasks Passed”, the configuration has finished. Check the log files indicated to see if there are any error messages.
Click Next when the configuration program completes.
2.13 Configuration Summary Screen for Calendar Server 6.3
Figure 2–13 Configuration Summary Screen
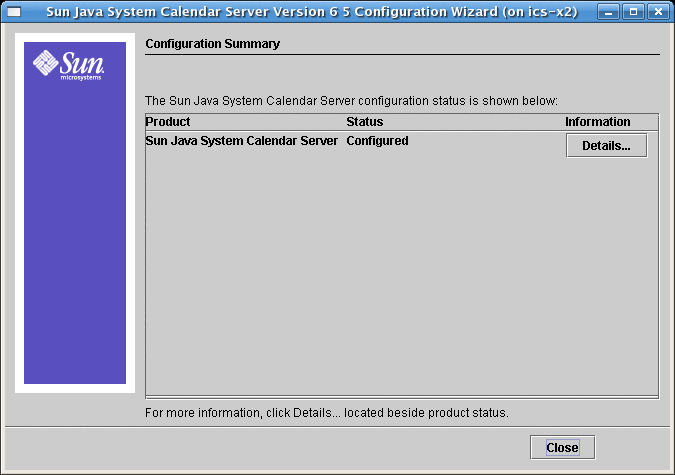
Click Details to view the details of the configuration log or Close to exit the configuration program.
- © 2010, Oracle Corporation and/or its affiliates
