Chapter 3 Managing System Power
This chapter explains how to use the dtpower program to manage system power, such as to specify when you want the desktop system to shut down automatically. This chapter also explains how to activate or turn off Power Management features for a system. This tool can be used within the OpenWindows(TM) and Common Desktop Environment (CDE) desktops.
This chapter also describes how to use the Suspend-Resume features to manually shut down your system and start it up again in the same working state.
This chapter points out the few differences in how the dtpower program operates on sun4m-architecture desktop machines (such as the SPARCstation 20) and on sun4u-architecture desktop machines (such as the Sun Ultra 1).
Note -
A command line interface is also provided for a system administrator to change a desktop machine's system default settings and to change the idleness definition. For information on using the pmconfig program and the power.conf file, see Appendix A, Configuring Power Management Using the Command Line.
Choosing to Use Power Management
Powering off a desktop system may interfere with some operations that involve that machine. Take the following guidelines into account before deciding when to use system Power Management features on a desktop machine.
Electronic Mail Issues
Mail is not sent to any mail spool file on a machine while the machine is suspended. Typically, if mail cannot be delivered for more than three days, it is returned to the sender as undeliverable.
If you suspend your system for three days or longer, and your machine has a local mail spool, you may fail to receive items of mail that have been bounced back to the sender.
Mail Alias Issues
Mail aliases on a machine are not available to other users while that machine is suspended. If the machine is suspended long enough (typically three days), messages sent to an alias on that machine are bounced back to the sender.
Remote Login Issues
You cannot use rlogin(1) to connect to a machine while that machine is suspended. This command does not cause the machine to power on from a suspended state.
While your machine is suspended, you cannot access it by remote dial in.
Networked Software Issues
Suspend-Resume may have an impact on a networked application. A networked program may fail if it is not resilient when a peer system is suspended and does not respond to network traffic.
One example of this is when you run an Xhosted application from one system and display it on another system. If Power Management software suspends the latter system, the application software may fail.
Solstice AutoClient Issues
Do not use Suspend-Resume features on a machine that uses Solstice(TM) AutoClient(TM) software.
ATM Issues
Power Management software is not supported on SunATM(TM) devices. The ATM protocol is connection oriented, which means calls must be established between two endpoints (such as workstations) before data can be transferred. Each end of the call must maintain the connection actively, so neither end of an ATM connection can use Power Management software to suspend and then resume the connection later.
Cron Job Issues
Operations specified in a cron file do not run while a machine is suspended.
When the time arrives for a cron job to begin for a machine that is suspended, that job does not run at that time, nor is the job queued up to run later when that machine resumes.
Calendar Manager Issues
Calendar Manager does not display pop-up windows for scheduled events that occur while the desktop machine is suspended.
Thermal Stress Issues
The goal of Power Management is to conserve electricity. However, you should also take into account how an increase in power cycling will affect the overall reliability of the hardware.
Power Management software is active by default on sun4u systems (such as the Sun Ultra(TM) 1). Accordingly, the Power Management system for those machines is designed to evaluate each automatic power-cycle request that occurs due to the system being idle. If this evaluation determines that the thermal shock of power cycling on this occasion would contribute to decreasing hardware reliability, then this power-cycle request is deferred.
Despite this feature, you can still choose to turn off a sun4u system manually at any time. This checking feature is intended as a brake on the hardware being subjected to an excessive number of automatic power-cycle requests.
Starting the dtpower Power Manager Program
You can use the Power Management program, dtpower, to do the following tasks for your system:
-
Check current Power Management settings
-
Set the idle time for the AutoShutdown feature
-
Set the portion of the day when AutoShutdown can take place to suspend your system
-
Set the time of day that AutoWakeup starts up your system each day
If dtpower is already running, it may appear on your desktop as this icon:
Figure 3-1 dtpower Icon
If you need to start dtpower, or need to start it again as superuser to make changes, perform one of the following procedures.
To Start dtpower From the Command Line
-
example% su Password: root_password You must become superuser before you can modify any settings in the Power Management software. Otherwise, the dtpower window only allows you to check current system power settings.
-
example% /usr/openwin/bin/dtpower &
To Start dtpower From a CDE or OpenWindows Menu
-
Select Power Manager under the Programs option in the Workspace menu.
For more information on the Workspace menu, refer to the Solaris Common Desktop Environment: User's Guide or the Solaris User's Guide.
Remember that you cannot modify settings in the Power Manager window unless you started dtpower as superuser.
To Start dtpower From the CDE Application Manager
-
Scroll up the Applications menu from the Program icon.
-
Select the Applications icon from that menu.
-
In the Applications Manager window select the System_Admin icon.
-
In the System_Admin window select the Power Manager icon.
Using the dtpower Program
The dtpower Window
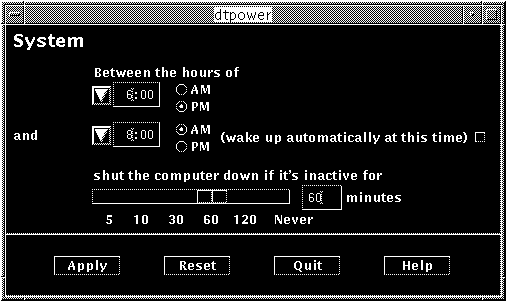
When you start up dtpower (or select the dtpower icon), the dtpower window is displayed, as shown in this figure:
Figure 3-2 The dtpower Window
Note -
The "wake up" option only appears in this window for sun4u desktop systems.
In this window, you can see the current settings for Power Management features on your system. If you started this program as superuser, you also can change the settings, as described in the procedures in this chapter.
Note -
If you are not superuser, the dtpower window will include this message: "Start dtpower as root to change settings."
General dtpower Window Controls
There are four buttons at the bottom of the dtpower window:
-
Apply puts into effect all of the settings currently displayed in the window.
-
Reset changes all of the settings back to the state they were in when Apply was previously selected (or to default values if this is the first time you have run dtpower). Reset, however, will not return to earlier values if you have already selected Apply.
-
Quit dismisses the dtpower window; no icon remains on the screen. Any setting that was not put into effect with the Apply button is lost.
You can reduce this dtpower window to an icon on your desktop.
System AutoShutdown and AutoWakeup Controls
You can specify, through the dtpower window, the timing conditions that will cause your system to shut down automatically. This feature is called AutoShutdown.
If you have a sun4u desktop machine, you can also set your system to power on automatically at a specified time. This feature is called AutoWakeup.
Note -
Be sure to read "Choosing to Use Power Management" before changing the AutoShutdown settings.
AutoShutdown uses the Suspend feature to automatically power off your system. When the system powers up again, it resumes in the state in which it was suspended.
Through the dtpower window, you can activate or deactivate the AutoShutdown and AutoWakeup features. You can also specify the following time values:
-
The number of minutes of idle time before AutoShutdown attempts to suspend the system
-
The start and finish times when AutoShutdown can occur during each day (if you specify the same time for both start and finish, AutoShutdown can occur at any time of day)
-
The time of day when the system will automatically power on and resume (AutoWakeup) after being suspended by AutoShutdown (available on sun4u desktop systems only)
Note -
AutoWakeup does not occur after you Suspend a system manually; it can occur only after an AutoShutdown.
Performing Tasks with dtpower
To Set an Idle Time for AutoShutdown
-
Start dtpower as superuser (see "Starting the dtpower Power Manager Program").
-
Drag the Suspend slider to indicate the number of minutes of idle time after which the system should power down automatically.
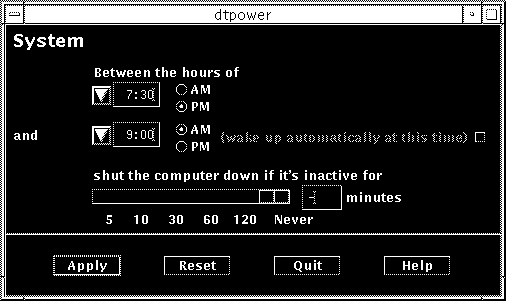
If you want to completely deactivate the AutoShutdown feature, select the Never setting at the far right of the slider. A dash symbol (-) appears in the numeric box when AutoShutdown is deactivated.
Also, you can type the number of minutes directly in the numerical box to the right of the slider.
Note -Consecutive executions of AutoShutdown do not occur less than five minutes apart, even if the idle time setting is under five minutes.
-
Select the time when the AutoShutdown feature will start to be active.
You can select the time (in 15-minute increments) through a menu that drops down from the button to the left of the numerical box.
Also, you can type the start time directly into the numerical box.
-
Click AM or PM for the start time.
-
Select the time when the AutoShutdown feature will cease being active.
You can select the time (in 15-minute increments) through a menu that drops down from the button to the left of the numeric box. The last setting on this menu is All Day, which means AutoShutdown can occur at any time of day.
Also, you can type the finish time directly into the numerical box and press the Enter key. You can specify "all day" this way by entering a finish time that is identical to the start time.
-
Click AM or PM for the finish time.
-
Click the Apply button when all the settings you want are displayed.
If you want to reject the displayed settings, select Reset; the currently active settings (that is, whatever settings were last put into effect by selecting Apply) will be displayed in the window.
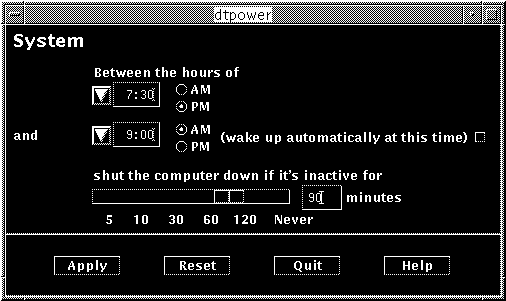
In Figure 3-3, the dtpower window is set for AutoShutdown to occur after 90 minutes of idle time between 7:30 pm and 9:00 am.
Figure 3-3 Setting the AutoShutdown Timing
In Figure 3-4, the dtpower window is set to disable the AutoShutdown feature on this system. Note that a dash appears in the numeric box showing the idle time.
Figure 3-4 Disabling AutoShutdown
To Enable or Disable AutoWakeup
Note -
AutoWakeup is available only on sun4u desktop systems.
-
Start dtpower as superuser (see "Starting the dtpower Power Manager Program").
-
Move the slider to indicate the amount of idle time (that is, any setting other than Never).
-
Set the finish time to the time you want the machine to power up and resume from a suspended state.
-
Click the button to the right of the "wake up" message to turn this feature on or off.
-
Click the Apply button to make the settings effective.
If you want to reject the displayed settings, select Reset and the currently active settings (that is, whatever settings were last put into effect by selecting Apply) will be displayed in the window.
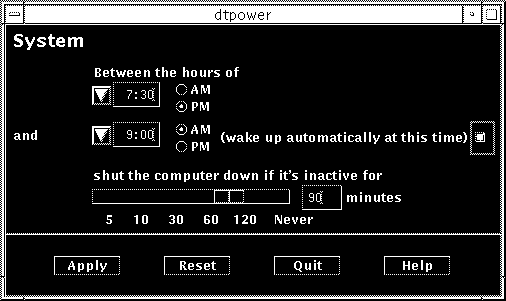
In Figure 3-5, the dtpower window is set for AutoWakeup to occur at 9:00 am every day if an AutoShutdown has occurred after 7:30 pm.
Figure 3-5 Enabling AutoWakeup
To Exit dtpower
-
Make sure to click Apply if you want to activate new settings you made in the dtpower window.
-
Click Quit.
The dtpower window closes. No dtpower icon remains on the screen.
Suspending and Resuming Your System Manually
Power Management software includes a timesaving feature, called Suspend-Resume. This feature is used by default through the AutoShutdown and AutoWakeup features of the dtpower program. You also can Suspend and Resume your system whenever you choose by following the procedures in "Suspending Your System" and "Resuming Your System".
The traditional process of powering off your system can be time consuming. Similarly, the process of rebooting and setting up your workspace also can take some time. With the Suspend-Resume feature, you can power off your system and quickly save all your current work-in-process automatically. Then, at the next power on, your workspace quickly returns to the way it was when you last used the system.
You can leave your system suspended and powered off for an indefinite length of time without losing data. However, there are some outside operations (such as receiving mail) that may be affected while your system is suspended. Before you use the Suspend-Resume features, be sure to read "Choosing to Use Power Management".
Note -
The Suspend-Resume feature is not supported on systems configured as diskless clients.
Suspending a system can occur automatically through the AutoShutdown feature in the Power Management software. Also, you can suspend your system manually using the keyboard by following instructions in the next section.
Suspend allows you to do the following without losing the current state of your system:
-
Move your system from one location to another
-
Power off your system to conserve energy
-
Switch the system power source from a battery to the wall outlet (AC power supply) or vice-versa (only on SPARCstation Voyager systems)
Note -
Do not use the Suspend feature if you need to reconfigure your system. You must halt the operating system whenever you want to reconfigure your system.
Before you suspend a system, you must wait for operations such as the following to finish:
Suspending Your System
Initiating a Suspend and a subsequent Resume usually requires less than a minute. You can initiate Suspend in several ways:
-
Use the power key, then respond to a prompt
-
Use the Shift and power keys to Suspend without a further prompt
-
Use the standby switch available on the front of systems such as the Sun Ultra 5 and Sun Ultra 10.
-
Use the CDE desktop Workspace menu
-
Using the OpenWindows desktop Workspace Utilities menu
-
Using the sys-suspend command
To Suspend Your System Using the Keyboard
-
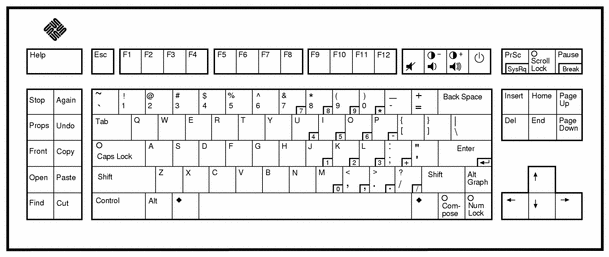
See Figure 3-6 and Figure 3-7 for the location of the power key.
Figure 3-6 Power Key Location: Sun Type 5 Keyboard
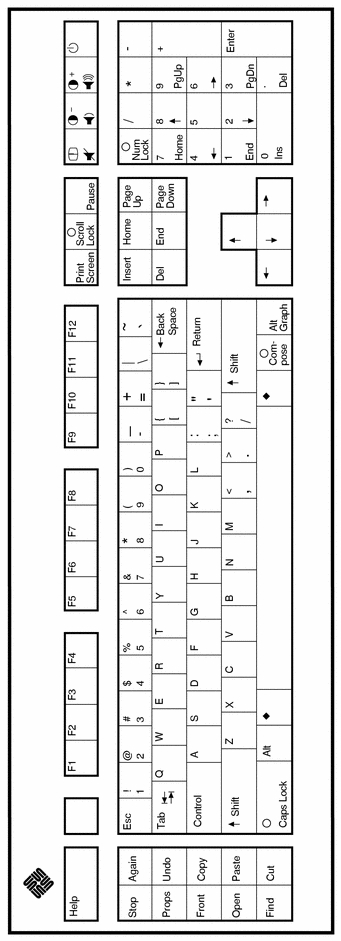
Figure 3-7 Power Key Location: Sun Compact 1 Keyboard
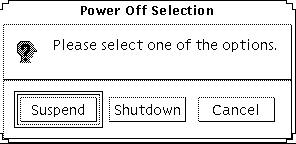
After you press the power key, a confirmation window is displayed:
Figure 3-8 Confirmation Window for Power Key
-
Select Suspend in the confirmation window.
Selecting Suspend saves the state of the system to disk, enabling you to return to the current system environment.
Selecting Shutdown syncs the disks to a neutral state and effectively shuts down the operating system. This is equivalent to running the shutdown(1M) command, which changes the system to state 5 without any grace period.
-
Wait for the system to power off.
-
Power off all external devices.
External devices include disk drives, printers, or other serial or parallel peripherals. See the manual supplied with the external device for instructions.
To Immediately Suspend Your System Using the Keyboard
-
Press Shift and the power key at the same time.
See Figure 3-6 or Figure 3-7 for the location of the power key.
-
Wait for the system to power off.
The suspend confirmation window isn't displayed if you use this method.
-
Power off all external devices.
External devices include external disk drives, printers, or other serial or parallel peripherals. See the manual supplied with the external device for instructions.
To Suspend Your System Using the Standby Switch
Some systems, such as the Sun Ultra 5 and Sun Ultra 10, have a standby switch on the front of the system.
-
Press the standby switch while you are in a windowing environment.
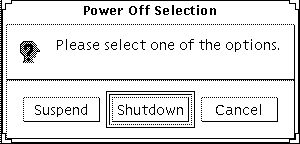
If you are not in a windowing environment, pressing the standby switch will immediately shutdown the system. In a windowing environment, the following GUI will appear:
Figure 3-9 Confirmation Window for Standby Switch
-
Select Suspend in the confirmation window.
Selecting Suspend saves the state of the system to disk, enabling you to return to the current system environment.
Selecting Shutdown syncs the disks to a neutral state and effectively shuts down the operating system. This is equivalent to running the shutdown(1M) command, which changes the system to state 5 without any grace period.
In the window for the standby switch, Shutdown is the default. In the similar window that appears when you press the power key, Suspend is the default.
-
Wait for the system to power off.
-
Power off all external devices.
External devices include disk drives, printers, or other serial or parallel peripherals. See the manual supplied with the external device for instructions.
To Suspend Your System Using CDE
-
Place your cursor in the workspace and hold down the menu button.
The Workspace menu is displayed.
-
Select Suspend System from the Workspace menu.
-
Select the Suspend menu option.
The Suspend confirmation window is displayed, as shown in Figure 3-8.
-
Select Suspend in the confirmation window.
-
Wait for the system to power off.
-
Power off all external devices.
External devices include disk drives, printers, or other serial or parallel peripherals. See the manual supplied with the external device for instructions.
To Suspend Your System Using OpenWindows
-
Place your cursor in the workspace and hold down the menu button.
The Workspace menu is displayed.
-
Select Utilities with the menu button.
-
Select the Suspend menu option.
The Suspend confirmation is displayed, as shown in Figure 3-8.
-
Select Suspend.
-
Wait for the system to power off.
-
Power off all external devices.
External devices include disk drives, printers, or other serial or parallel peripherals. See the manual supplied with the external device for instructions.
To Initiate Suspend Using the sys-suspend Command
Note -
You do not need to be running a windowing system, such as OpenWindows or CDE, for the sys-suspend shell command to work, nor do you need to be superuser.
-
example% /usr/openwin/bin/sys-suspend The Suspend confirmation pop-up window is displayed, as shown in Figure 3-8. If a window system is not running, the command executes without displaying the confirmation pop-up window.
-
Click Suspend.
-
Wait for the system to power off.
-
Power off all external units.
External devices include disk drives, printers, or other serial or parallel peripherals. See the manual supplied with the external device for instructions.
Resuming Your System
You can use the following method to manually Resume using a system that had been put into a suspended state by any method.
To Resume a Suspended System
-
Press the power key.
See Figure 3-6 or Figure 3-7 for power key locations.
-
Enter your password to unlock the system.
Whenever the system is suspended, it is automatically locked.
- © 2010, Oracle Corporation and/or its affiliates
