Chapter 35 SunButtons Test (sunbuttons)
The sunbuttons test verifies that the SunButtons graphics manipulation device is working correctly.
Note -
Install SunVTS 3.0 making sure that the following packages are installed: SUNWdial and SUNWdialh.
Note -
Do not run sunbuttons and sundials at the same time.
Running the sunbuttons Tests
The following tests verify the functionality of SunButtons:
Using the .customtest File
Modify the .customtest file as described below to verify that each button functions; each button lights up in a round-robin fashion.
Note -
The .customtest file is located in in two places. Modify the 32-bit (in the /opt/SUNWvts/bin directory) or the 64-bit (in the /opt/SUNWvts/bin/sparcv9 directory) .customtest file according to the Solaris environment that you are using.
-
Edit the .customtest file to include the following lines:
sunbuttons;sunbuttons; Mode<CYCLE|diag|diag|mode>
sundials;sundials; Mode<CYCLE|diag|diag|mode>
(you may have to execute the xhost + command)
Configure the Port Using the bdconfig Command
To configure the port, perform the following steps:
-
Run the /usr/sbin/bdconfig command to configure the /dev/term/a or /dev/term/b port and enable it. The following example shows how to check a configured serial port b:
# ls -l /dev/bd*
lrwxrwxrwx  1 root   other     11 Nov 12 15:39 /dev/bd -> /dev/term/b
#
-
Connect the sunbuttons/sundials device to your configured serial port (a or b).
Start SunVTS
After starting SunVTS, you should see Customtest as one of the available options with sundials and sunbuttons available for selection.
-
Change to the Functional test mode and enable intervention.
-
Enable the sunbuttons and sundials tests.
-
Start testing.
In Diag mode, a pop-up window is displayed.
-
Select the Diagnostics button.
Let the test run its course (the Diagnostics button will be selectable again).
-
Close the pop-up window.
The test should register a single pass.
Note -Do not run the sundials and sunbuttons tests at the same time.
Running the sunbuttons Test From a Shell Command Line
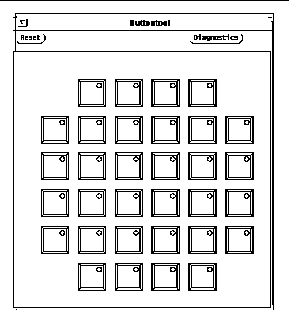
This is an interactive test. The test displays a screen representation of the buttonbox (see Figure 35-1) where you can press each of the buttons and see the corresponding button's display change.
-
To run the diagnostic test, select the Diagnostics Button on the top of the menu representation. The buttonbox buttons on the screen do not change while the diagnostics test is running.
Be sure that the buttonbox is connected to one of the serial ports, and that the buttonbox has a power transformer.
There is no option menu for this test.
Figure 35-1 sunbuttons Test Menu

sunbuttons Command Line Syntax
/opt/SUNWvts/bin/sunbuttons diag standard_arguments
Note -
64-bit tests are located in the sparcv9 subdirectory: /opt/SUNWvts/bin/sparcv9/testname. If a test is not present in this directory, then it may only be available as a 32-bit test. For more information refer to "32-Bit and 64-Bit Tests".
sunbuttons Test Modes
Available only in the Functional test mode. In the Functional test mode, the sunbuttons test verifies the functionality of each button, and that each button lights up in sequence.
sunbuttons Error Messages
Table 35-1 sunbuttons Error Messages|
|
Error Message |
Probable Cause(s) |
Recommended Action |
|---|---|---|---|
|
6000 |
Cannot open device |
|
|
|
6001 |
ioctl(VUIDSFORMAT, VUID_NATIVE) |
|
|
|
6002 |
Writing diag command failed |
|
|
|
6003 |
No response from Buttonbox |
|
|
|
6004 |
Selftest failed |
|
|
|
6005 |
Weird unknown kind of error |
|
|
|
6006 |
Can not open device /dev/db |
|
|
|
6007 |
ioctl(VUIDSFORMAT, VUID_NATIVE) -- you may need to run bdconfig |
|
|
- © 2010, Oracle Corporation and/or its affiliates
