Sun Blade 6000 Virtualized
Multi-Fabric 10GbE Network Express Module User’s Guide 6000 Virtualized
Multi-Fabric 10GbE Network Express Module User’s Guide |
| C H A P T E R 3 |
The drivers for the Virtualized Multi-Fabric 10GbE NEM are available on the NEM Tools and Drivers CD. You can access the Tools and Drivers CD at:
(http://www.sun.com/servers/blades/downloads.jsp)
Install the Virtualized Multi-Fabric 10GbE NEM drivers that are appropriate for the server module operating system. The locations of the drivers for each operating system are described in the corresponding operating system section.
This chapter also contains information on booting over the 10GbE network.
In order to perform a network boot via the Virtualized NEM, make sure that the Virtualized NEM and the boot server are on the same LAN. If you are loading an OS using PXE, you also need configure the boot server so that it knows which OS should be downloaded to the blade and what IP address should be used for the Virtualized NEM’s MAC.
The following procedures describe how to boot over the network using the system BIOS or OpenBoot.
This section covers the following topics:
Important Considerations for Booting Over the Network With an x86 Blade Server Over the Virtualized NEM
The x86 server blade system BIOS only recognizes that one Virtalized NEM is available as a network boot device. If more than one Virtualized NEMs is installed, only one Virtualized NEM device is displayed in the BIOS boot list
The Virtualized NEM is designed to boot from the first detected PXE server. If there are two NEMs in the chassis, and both are connected to a PXE server, you must use MAC address assignment booting to boot from the correct NEM.
If you plan to use the F12 network booting method, follow the instructions in these two procedures:
If you plan to use the F8 network booting method, follow the instructions in To Use the F8 Key to Boot Off the PXE Server.
When the BIOS boot screen appears, press F2 (or Ctrl-E from a remote console) to enter the BIOS Setup Utility.
Select Boot Device Priority and press Enter.
The following two screens show examples of Intel and AMD-based BIOS Setup Utility screens. The actual screens might vary by plaform.
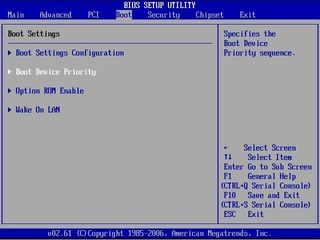

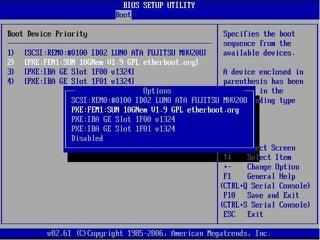
Select the first boot device position and presss Enter.
A drop-down list appears with the available boot devices listed.
From the drop-down list, select SUN 10GNem V1.9 GPL etherboot.org as the first boot device.
The following two screens show examples of Intel and AMD-based BIOS Setup Utility screens. The actual screens might vary by plaform.
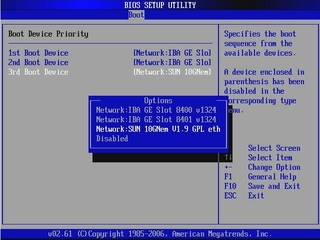
Press F10 to Save and Exit the BIOS Setup Utility.
The host blade server reboots.
Connect the Ethernet cable to the NEM Ethernet port.
See the driver installation section in this chapter that corresponds with the operating system installed on the blade module.
Boot the server from the PXE server to load an OS or install an OS.
Follow the instructions in To Set Up the BIOS for Booting From the Virtualized NEM to set up the Virtualized NEM as the first network boot device.
Press F12 to boot from the network.
Note - If the Virtualized NEM doesn’t detect a PXE Server, the CPU Host Blade will attempt to boot from the on-board 1 Gbps NIC devices. |
When prompted, press F8 to display the boot choices list.
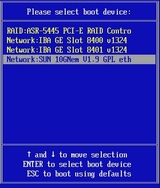
Select the SUN 10GNem V1.9 GPL etherboot.org NIC from the boot list.
Press Enter to boot from the PXE server.
Note - If the Virtualized NEM doesn’t detect a PXE Server, the CPU Host Blade will attempt to boot from the on-board 1 Gbps NIC devices. |
Install and configure the hxge driver. See the driver installation section in this chapter that corresponds with the operating system installed on the blade module.
Install and configure the hxge driver.
See the driver installation section in this chapter that corresponds with the operating system installed on the blade module.
Use the following procedure to boot over the network using the Virtualized NEM with a SPARC blade server.
|
Add a MAC address- IP-address pair to the /etc/ethers and /etc/hosts files on the boot server.
This enables the boot server to answer RARP calls from the blade for resolving the IP address for the Virtualized NEM local MAC address.
Add a client script on the boot server to specify which OS should be loaded to the SPARC blade.
Refer to the installation documentation for the operating system you want to install for details.
After the boot server has been configured, do one of the following:
Type show-nets to see all the network interfaces available for the blade to use. One of them should be the Virtualized NEM. For example:
{0} ok show-netsa) /pci@7c0/pci@0/pci@8/network@0b) /pci@780/pci@0/pci@1/network@0,1c) /pci@780/pci@0/pci@1/network@0q) NO SELECTIONEnter Selection, q to quit:
|
The path with a single network node should be the Virtualized NEM.
Change directory to that path.
cd /pci@7c0/pci@0/pci@8/network@0 |
Type command .properties to check its properties. If it is a Virtualized NEM, you should see:
{0} ok .properties
assigned-addresses       82520010 00000000 11000000 00000000 01000000                          82520018 00000000 10400000 00000000 00008000                          82520020 00000000 00000000 00000000 00008000                          82520030 00000000 10600000 00000000 00200000 local-mac-address        00 14 4f 63 00 09 phy-type                 xgfreg                      00520000 00000000 00000000 00000000 00000000                          03520010 00000000 00000000 00000000 01000000                          03520018 00000000 00000000 00000000 00008000                          03520020 00000000 00000000 00000000 00008000                          02520030 00000000 00000000 00000000 00100000 version                  Sun Blade 6000 Virtualized Multi-Fabric 10GbE NEM FCode 1.2 09/01/14board-model              501-7995-04model                    SUNW,pcie-hydracompatible               pciex108e,aaaa.108e.aaaa.1                         pciex108e,aaaa.108e.aaaa                         pciex108e,aaaa.1                         pciex108e,aaaa                         pciexclass,020000                         pciexclass,0200address-bits             00000030 max-frame-size           00002400 network-interface-type   ethernetdevice_type              networkname                     networkfcode-rom-offset         00006200 interrupts               00000001 cache-line-size          00000010 class-code               00020000 subsystem-id             0000aaaa subsystem-vendor-id      0000108e revision-id              00000001 device-id                0000aaaa vendor-id                0000108e
|
Type device-end then do netboot.
{0} ok device-end{0} ok /pci@400/pci@0/pci@9/pci@0/pci@1/network@0:dhcp
|
If successful, we should see something as follows on the blade’s console.
Boot device: /pci@400/pci@0/pci@9/pci@0/pci@1/network@0:dhcp File and args: SunOS Release 5.11 Version snv_116 64-bitCopyright 1983-2009 Sun Microsystems, Inc. All rights reserved.Use is subject to license terms.Configuring /devUsing DHCP for network configuration information.USB keyboardSetting up Java. Please wait...Reading ZFS config: done. |
The net installation menu appears which allows you to which allows you to choose the installation configuration.
If your system uses the Solaris SPARC or x86 operating system, you need to download and install the hxge device driver for Solaris platforms.
This section explains how to download, install, and configure the hxge driver on a Solaris system. The hxge GigabitEthernet driver (hxge(7D)) is a multi-threaded, loadable, clonable, GLD-based STREAMS driver.
This section covers the following topics:
Locate and copy the hxge device driver software from the Tools and Drivers CD for the server module on which you want to install the driver.
Uncompress the gzipped tar file. For example:
# gunzip hxge.tar.gz |
Unpack the tar file. For example:
# tar -xvf hxge.tar |
Install the software packages by typing the following at the command line:
#/usr/sbin/pkgadd -d . |
A menu similar to the following displays:
The following packages are available:

  1 SUNWhxge SUN 10Gb hxge NIC Driver
                    (i386) 11.10.0,REV=2008.04.24.11.05

Select package(s) you wish to process (or ’all’ to process
all packages). (default: all) [?,??,q]:
|
Select the packages to install.
Press Return or type all to accept the default and install all packages.
Type the specific numbers, separated by a space, if you prefer not to install any optional packages.
The following is an example of the displayed output:
SUN 10Gb hxge NIC Driver(i386) 11.10.0,REV=2008.04.24.11.05 Copyright 2008 Sun Microsystems, Inc.All rights reserved. Use is subject to license terms. Using </> as the package base directory. ## Processing package information. ## Processing system information. 3 package pathnames are already properly installed. ## Verifying package dependencies. ## Verifying disk space requirements. ## Checking for conflicts with packages already installed. ## Checking for setuid/setgid programs. This package contains scripts which will be executed with super-user permission during the process of installing this package Do you want to continue with the installation of<SUNWhxge>[y,n,?] |
Type y to continue the installation.
The following is an example of the displayed output for a successfully installed driver:
Installing SUN 10Gb hxge NIC Driver as <SUNWhxge> ## Installing part 1 of 1. /kernel/drv/amd64/hxge /kernel/drv/hxge [ verifying class <none> ] [ verifying class <renamenew> ] ## Executing postinstall script. System configuration files modified but hxge driver not loaded or attached. Installation of <SUNWhxge> was successful. |
This section describes how to configure the network host files after you install the hxge driver on your system.
At the command line, use the grep command to search the /etc/path_to_inst file for hxge interfaces.
# grep hxge /etc/path_to_inst "/pci@7c,0/pci10de,5d@e/pci108e,aaaa@0" 0 "hxge" |
In this example, the device instance is from a Sun Blade 6000 Virtualized Multi-Fabric 10GbE Network Express Module installed in the chassis. The instance number is shown in italics in this example.
Set up the NEM’s hxge interface.
Use the ifconfig command to assign an IP address to the network interface. Type the following at the command line, replacing ip-address with the NEM’s IP address:
# ifconfig hxge0 plumb ip-address netmask netmask-address broadcast + up |
Refer to the ifconfig(1M) man page and the Solaris documentation for more information.
(Optional) For a setup that remains the same after you reboot, create an /etc/hostname.hxgenumber file, where number is the instance number of the hxge interface you plan to use.
To use the NEM’s hxge interface in the Step 1 example, create an /etc/hostname.hxgex file, where x is the number of the hxge interface. If the instance number were 1, the filename would be /etc/hostname.hxge1.
Follow these guidelines for the host name:
The /etc/hostname.hxgenumber file must contain the host name for the appropriate hxge interface.
The host name must be different from the host name of any other interface. For example: /etc/hostname.hxge0 and /etc/hostname.hxge1 cannot share the same host name.
The host name must have an IP address listed in the /etc/hosts file.
The following example shows the /etc/hostname.hxgenumber file required for a system namedzardoz-c10-bl1.
# cat /etc/hostname.hxge0 zardoz-c10-bl1 |
Create an appropriate entry in the /etc/hosts file for each active hxge interface.
# cat /etc/hosts # # Internet host table # 127.0.0.1 localhost 129.168.1.29 zardoz-c10-bl1 |
The hxge device driver controls the Virtualized NEM Ethernet interfaces. You can manually set the hxge driver parameters to customize each device in your system.
The following procedures describe the two ways to set the hxge device driver parameters:
Note - If you use the ndd utility, the parameters are valid only until you reboot the system. This method is good for testing parameter settings. |
Change a parameter by uncommenting the line in the /kernel/drv/hxge.conf file and providing a new value.
The following is the content of the /kernel/drv/hxge.conf file. All parameters are listed and explained in this file. The default values are loaded when the hxge driver is started.
# cat /kernel/drv/hxge.conf # # # driver.conf file for Sun 10Gb Ethernet Driver (hxge) # # #------- Jumbo frame support --------------------------------- # To enable jumbo support, # accept-jumbo = 1; # # To disable jumbo support, # accept-jumbo = 0; # # Default is 0. # # #------- Receive DMA Configuration ---------------------------- # # rxdma-intr-time # Interrupts after this number of NIU hardware ticks have # elapsed since the last packet was received. # A value of zero means no time blanking (Default = 8). # # rxdma-intr-pkts # Interrupt after this number of packets have arrived since # the last packet was serviced. A value of zero indicates # no packet blanking (Default = 0x20). # # Default Interrupt Blanking parameters. # # rxdma-intr-time = 0x8; # rxdma-intr-pkts = 0x20; # # #------- Classification and Load Distribution Configuration ------ # # class-opt-****-*** # These variables define how each IP class is configured. # Configuration options includes whether TCAM lookup # is enabled and whether to discard packets of this class # # supported classes: # class-opt-ipv4-tcp class-opt-ipv4-udp class-opt-ipv4-sctp # class-opt-ipv4-ah class-opt-ipv6-tcp class-opt-ipv6-udp # class-opt-ipv6-sctp class-opt-ipv6-ah # Configuration bits (The following bits will be decoded # by the driver as hex format). # # # 0x10000: TCAM lookup for this IP class # 0x20000: Discard packets of this IP class # # class-opt-ipv4-tcp = 0x10000; # class-opt-ipv4-udp = 0x10000; # class-opt-ipv4-sctp = 0x10000; # class-opt-ipv4-ah = 0x10000; # class-opt-ipv6-tcp = 0x10000; # class-opt-ipv6-udp = 0x10000; # class-opt-ipv6-sctp = 0x10000; # class-opt-ipv6-ah = 0x10000; # # #------- FMA Capabilities --------------------------------- # # Change FMA capabilities to non-default # # DDI_FM_NOT_CAPABLE 0x00000000 # DDI_FM_EREPORT_CAPABLE 0x00000001 # DDI_FM_ACCCHK_CAPABLE 0x00000002 # DDI_FM_DMACHK_CAPABLE 0x00000004 # DDI_FM_ERRCB_CAPABLE 0x00000008 # # fm-capable = 0xF; # # default is DDI_FM_EREPORT_CAPABLE | DDI_FM_ERRCB_CAPABLE = 0x5 |
In the following example, the NEM discards the TCP traffic for this blade system. In other words, the hxge driver does not receive any TCP traffic.
class-opt-ipv4-tcp = 0x20000; |
In the following example, the FMA functionality will be disabled.
fm-capable = 0x0; |
For the new parameters to be effective, reload the hxge driver or reboot the system.
This section describes how to modify and display parameter values using the ndd utility.
Before you use the ndd utility to get or set a parameter for a hxge device, you must specify the device instance for the utility.
Use the ifconfig command to identify the instance associated with hxge device.
# ifconfig -a hxge0: flags=1000843<UP,BROADCAST,RUNNING,MULTICAST,IPv4> mtu 1500 index 2 inet 192.168.1.29 netmask ffffff00 broadcast 192.168.1.255 ether 0:14:4f:62:1:3 |
List all of the parameters supported by the hxge driver.
# ndd -get /dev/hxge0 ? ? (read only)instance (read only) rxdma_intr_time (read and write) rxdma_intr_pkts (read and write) class_opt_ipv4_tcp (read and write) class_opt_ipv4_udp (read and write) class_opt_ipv4_ah (read and write) class_opt_ipv4_sctp (read and write) class_opt_ipv6_tcp (read and write) class_opt_ipv6_udp (read and write) class_opt_ipv6_ah (read and write) class_opt_ipv6_sctp (read and write) |
Display the value of a parameter.
The following is an example for the rxdma_intr_time parameter:
# ndd -get /dev/hxge0 rxdma_intr_time 8 |
Modify the value of a parameter.
The following is an example for the rxdma_intr_time parameter. It changes the rxdma_intr_time parameter from 0x8 to 0x10:
# ndd -set /dev/hxge0 rxdma_intr_time 0x10 # ndd -get /dev/hxge0 rxdma_intr_time 10 |
This section describes how to enable the Jumbo Frames feature. It contains the following sections:
Configuring Jumbo Frames enables the Ethernet interfaces to send and receive packets larger than the standard 1500 bytes. However, the actual transfer size depends on the switch capability and the Ethernet Virtualized Multi-Fabric 10GbE NEM driver capability.
Note - Refer to the documentation that came with your switch for exact commands to configure Jumbo Frames support. |
The Jumbo Frames configuration checking occurs at Layer 2 or Layer 3, depending on the configuration method.
The following examples show uses of the kstat command to display driver statistics.
Display the receive packet counts on all of the four receive DMA channels on interface 1, for example:
# kstat -m hxge | grep rdc_pac rdc_packets 120834317rdc_packets 10653589436 rdc_packets 3419908534 rdc_packets 3251385018 # kstat -m hxge | grep rdc_jumbo rdc_jumbo_pkts 0 rdc_jumbo_pkts 0 rdc_jumbo_pkts 0 rdc_jumbo_pkts 0 |
Using the kstat hxge:1 command shows all the statistics the driver supports for that interface.
Display driver statistics of a single DMA channel, for example:
# kstat -m hxge -n RDC_0 module: hxge instance: 0name: RDC_0 class: net crtime 134.619306423 ctrl_fifo_ecc_err 0 data_fifo_ecc_err 0 peu_resp_err 0 rdc_bytes 171500561208 rdc_errors 0 rdc_jumbo_pkts 0 rdc_packets 120834318 rdc_rbr_empty 0 rdc_rbrfull 0 rdc_rbr_pre_empty 0 rdc_rbr_pre_par_err 0 rdc_rbr_tmout 0 rdc_rcrfull 0 rdc_rcr_shadow_full 0 rdc_rcr_sha_par_err 0 rdc_rcrthres 908612 rdc_rcrto 150701175 rdc_rcr_unknown_err 0 snaptime 173567.49684462 |
Display driver statistics of hxge0 interface, for example:
# kstat -m hxge -n hxge0 module: hxge instance: 0name: hxge0 class: net brdcstrcv 0 brdcstxmt 0 collisions 0 crtime 134.825726986 ierrors 0 ifspeed 10000000000 ipackets 265847787 ipackets64 17445716971 multircv 0 multixmt 0 norcvbuf 0 noxmtbuf 0 obytes 1266555560 obytes64 662691519144 oerrors 0 opackets 129680991 opackets64 8719615583 rbytes 673822498 rbytes64 24761160283938 snaptime 122991.23646771 unknowns 0 |
Display all driver statistics, for example:
# kstat -m hxge |
This section describes how to enable Jumbo Frames in a Solaris environment.
|
Enable jumbo frames using the hxge.conf file .
accept-jumbo=1; |
Note that the maximum (default) jumbo frame size is 9216 bytes including a 16 byte hardware header. It is not recommended to change this size. However, it may be changed by including the following line in the /etc/system file.
set hxge_jumbo_frame_size = value |
% reboot -- -r |
View the maximum transmission unit (MTU) configuration of an hxge instance at any time with the ifconfig command.
# ifconfig -a hxge0: flags=1000843<UP,BROADCAST,RUNNING,MULTICAST,IPv4> mtu 9178 index 4inet 192.168.1.29 netmask ffffff00 broadcast 192.168.1.255 ether 0:14:4f:62:1:3 |
Note that the MTU (9178) is 38 bytes fewer than the maximum jumbo frame size (9216). These 38 bytes include the 16 byte hardware header, the Ethernet header, maximum payload, and cyclic redundancy check (crc) checksum.
Check the Layer 3 configuration by using the dladm command with the show-link option.
# dladm show-link nge0 type: non-vlan mtu: 1500 device: nge0nge1 type: non-vlan mtu: 1500 device: nge1 nxge0 type: non-vlan mtu: 1500 device: nxge0 nxge1 type: non-vlan mtu: 1500 device: nxge1 hxge0 type: non-vlan mtu: 9178 device: hxge0 |
This section covers the following topics:
This section explains how to download, install, and remove the Linux hxge driver. The hxge 10 Gigabit Ethernet driver (hxge(1)) is a parallel multi-threaded and loadable driver supporting up to four transmit channels and four receive channels in simultaneous operation, taking advantage of up to eight CPUs to spread the 10 GbE network traffic and increase overall network throughput.
Use the ifconfig command to obtain a list of the current Ethernet network interfaces.
host #> ifconfig -a | grep eth eth0 Link encap:Ethernet HWaddr 00:14:4F:E2:BA:34 eth1 Link encap:Ethernet HWaddr 00:14:4F:E2:BA:35 |
After you have installed the Virtualized Multi-Fabric 10GbE NEM hardware and installed and loaded the driver, a new eth device appears. This will be the eth device for the NEM.
Locate and copy the hxge device driver .zip file from the Tools and Drivers CD for the server module operating system on which you want to install the driver.
The drivers are located in one of the following directories:
Note - Linux source files are also available at /linux/drivers/src |
Uncompress and unpack the driver download file, if necessary.
The following example shows all the files extracted into a tge10 subdirectory (The command sample below has been edited for brevity. Sections marked {....} denote output that has been removed for this example):
host #> mkdir tge10 host #> cd tge10Archive: sun_10_Gigabit_Ethernet_driver_update_10.zip host #> unzip sun_10_Gigabit_Ethernet_driver_update_10.zip creating: Linux/ creating: Linux/RHEL4.7/ creating: Linux/RHEL4.7/2.6.9-78.ELlargesmp/ [...] creating: Linux/RHEL4.7/2.6.9-78.ELsmp/ [...] creating: Linux/src/ extracting: Linux/src/hxge_src.zip creating: Linux/RHEL5/ [...] creating: Linux/SUSE10-SP2/ [...] creating: Docs/ inflating:Docs/x8_Express_Dual_10GBE_Low_Profile_Release_Notes.pdf inflating:Docs/x8_Express_Quad_Gigabit_Ethernet_Express_Module_Release_Notes.pdf inflating: Docs/x8_Express_Quad_Gigabit_Ethernet_Low_Profile_Release_Notes.pdf inflating: Docs/x8_Express_Dual_10GBE_Express_Module_Release_Notes.pdf creating: Firmware/ [...] creating: Windows/ [...] host #> |
Select and install the appropriate OS driver package.
Navigate to the Linux directory that contains the driver-specific files. For example:
host #> ls -l total 47908drwxr-xr-x 2 root root 4096 Sep 25 16:31 Docs drwxr-xr-x 2 root root 4096 Sep 25 18:46 Firmware drwxr-xr-x 12 root root 4096 Sep 25 16:31 Linux -rw-r--r-- 1 root root 48984046 Oct 7 12:13 sun_10_Gigabit_Ethernet_driver_update_10.zip drwxr-xr-x 2 root root 4096 Sep 25 16:31 Windows host #> cd Linux host #> ls -ldrwxr-xr-x 4 root root 4096 Sep 25 16:30 RHEL4.7 total 40drwxr-xr-x 2 root root 4096 Sep 25 16:30 RHEL5.2 drwxr-xr-x 2 root root 4096 Sep 25 16:30 src drwxr-xr-x 3 root root 4096 Sep 25 16:31 SUSE10-SP2 |
If you are not sure what release you are running, use the lsb_release command to show information about your host operating system
host #>lsb_release -a Distributor ID: RedHatEnterpriseServer Description: Red Hat Enterprise Linux Server release 5.2 (Tikanga) Release: 5.2 Codename: Tikanga |
Identify the OS-specific subdirectory and verify that no hxge driver is currently installed; for example: RHEL5.2 for RedHat Enterprise Linux 5 Update 2, or SUSE10-SP2 for Novell’s SuSE Linux Enterprise Server 10 Service Pack 2
The following example uses RHEL5.2:
host #> cd RHEL5.2 host #> ls -l-rw-r--r-- 1 root root 2752340 Oct 7 12:35 hxge-1.1.1_rhel52-1.x86_64.rpm total 2692host #> rpm -q hxge package hxge is not installed |
Note - If an hxge driver is already installed, uninstall the driver, in order to avoid complications. See To Remove the Driver From a Linux Platform for instructions on removing the driver. The update command (rpm -u) is not supported for updating the hxge driver. |
Install the appropriate package (.rpm) file.
host #> rpm -ivh hxge-1.1.1_rhel52-1.x86_64.rpm Preparing... ########################################### [100%] 1:hxge ########################################### [100%] post Install Done |
Once you have installed the hxge driver, you can immediately load the driver. If the NEM is physically and electrically installed, the driver automatically attaches to it and make it available to the system. Alternatively, on the next system reset and reboot, the hxge driver automatically loads if there are any NEM devices present and detected.
Verify that the NEM is available to the system (that is, it is actively on the PCIe I/O bus).
The command sample below has been edited for brevity. Sections marked [....] denote output that has been removed.
host #> lspci [...]07:00.0 Ethernet controller: Sun Microsystems Computer Corp. Unknown device abcd (rev 01) [...] 84:00.0 Ethernet controller: Intel Corporation 82575EB Gigabit Network Connection (rev 02) [...] 85:00.0 Ethernet controller: Sun Microsystems Computer Corp. Unknown device aaaa (rev 01) |
Device code 0xAAAA (Unknown device aaaa (rev 01) output) is the Virtualized NEM Device; presence of this line indicates the NEM is visible and available to the system.
Manually load the hxge driver.
host #> modprobe hxge |
host #>lsmod | grep hxge hxge 168784 0 host #>modinfo hxgefilename: /lib/modules/2.6.18-92.el5/kernel/drivers/net/hxge.ko version: 1.1.1 license: GPL description: Sun Microsystems(R) 10 Gigabit Network Driver author: Sun Microsystems, <james.puthukattukaran@sun.com> srcversion: B61926D0661E6A268265A9C alias: pci:v0000108Ed0000AAAAsv*sd*bc*sc*i* depends: [etc.] |
If you get the output above, the driver is loaded into memory and actively running.
If the modprobe command fails, you will receive the following output:
host #> modprobe hxge FATAL: Module hxge not found. |
This indicates that you probably installed the wrong driver version. Uninstall the hxge driver and install the correct package for your Linux release.
If you are running a custom or patched kernel, you might have to build a custom driver to match your custom kernel.
Once the NEM has been correctly installed, and the hxge software driver has been successfully installed and loaded, the new NEM eth device will be visible.
Execute the following command to view the available eth devices.
host #> ifconfig -a | grep eth eth0 Link encap:Ethernet HWaddr 00:14:4F:E2:BA:34 eth1 Link encap:Ethernet HWaddr 00:14:4F:E2:BA:35 eth2 Link encap:Ethernet HWaddr 00:14:4F:62:01:08 |
In this example, eth0 and eth1 were previously present; eth2 is new, this is the NEM Ethernet network interface device. If you had installed two NEMs, you would also see an eth3 device representing the other NEM. You can identify each eth device (NEM0 or NEM1) by matching the Ethernet MAC address with the one you recorded and saved when you physically installed the NEM into the chassis in Chapter 2.
Make sure that the eth2 driver is the correct Ethernet driver for the Virtualized NEM.
host #> ethtool -i eth2 driver: hxgeversion: 1.1.1 firmware-version: N/A bus-info: 0000:85:00.0 |
For more detail on eth2, use the ifconfig command.
host #>ifconfig eth2 eth2 Link encap:Ethernet HWaddr 00:14:4F:62:01:08 BROADCAST MULTICAST MTU:1500 Metric:1 RX packets:0 errors:0 dropped:0 overruns:0 frame:0 TX packets:0 errors:0 dropped:0 overruns:0 carrier:0 collisions:0 txqueuelen:1000 RX bytes:0 (0.0 b) TX bytes:0 (0.0 b) Memory:b7000000-b8000000 |
The eth2 device is active and available to the system, but has not yet been configured (assigned an IP address). See the next section for details on configuring the NEM for the Linux OS.
Use the modprobe -r command to unload the hxge driver at any time, without actually uninstalling the driver.
host #> lsmod | grep hxge hxge 168784 0 host #> modprobe -r hxge host #> lsmod | grep hxge host #> |
Once unloaded, you can manually load the hxge driver again, using the modprobe command; the driver has not been uninstalled.
This command permanently removes the hxge driver and all related files from the system (you will have to reinstall it again before you can use the NEM):
host #> rpm -q hxge hxge-1.1.1_rhel52-1host #> rpm -e hxge Uninstall Done. |
Note - Uninstalling the hxge driver does not unload the driver. If you elected to skip Step 1 (you did not unload the hxge driver), a loaded driver would remain active in memory, and the NEM would remain useable until the system resets and reboots. This behavior can vary with different Linux installations. |
Before being able to use the NEM Hydra 10GbE network interface, you must first configure the network interface. Use the ifconfig(8) command to control the primary network interface options and values for any given network device (such as eth2 for the NEM Hydra as demonstrated in the installation section). At a minimum, you must assign a network (TCP) IP address and netmask to each network interface.
To temporarily configure the NEM Hydra Ethernet interface (for example, to test it out), use the ifconfig command.
By assigning an IP network address (and corresponding IP network address mask), you can manually bring the interface fully online (or up). This temporary manual configuration is not preserved across a system reboot.
Assign both an IP address and a netmask to bring the interface online (up).
host #>ifconfig eth2 10.1.10.150 netmask 255.255.255.0 |
The system switches the device online automatically when it has the requisite information.
Verify by using the ifconfig command.
host #>ifconfig eth2 eth2 Link encap:Ethernet HWaddr 00:14:4F:29:00:01 inet addr:10.1.10.150 Bcast:10.1.10.255 Mask:255.255.255.0 inet6 addr: fe80::214:4fff:fe29:1/64 Scope:Link UP BROADCAST RUNNING MULTICAST MTU:1500 Metric:1 RX packets:2 errors:0 dropped:0 overruns:0 frame:0 TX packets:27 errors:0 dropped:0 overruns:0 carrier:0 collisions:0 txqueuelen:1000 RX bytes:300 (300.0 b) TX bytes:7854 (7.6 KiB) Memory:fb000000-fc000000 |
This example shows configuring the newly-installed NEM Ethernet interface eth2 to be IP address 10.1.10.150, which is declared in what used to be known as a Class C (8-bit/255-node) local area network (or LAN).
RX (receive) and TX (transmit) packet counters are increasing, showing active traffic being routed through the newly configured NEM Hydra eth2 network interface.
See the ifconfig(8) man page for more details and other options on using the ifconfig command to configure Ethernet interfaces.
Use the route(8) command to show the current networks.
host #>route Kernel IP routing tableDestination Gateway Genmask Flags Metric Ref Use Iface 10.1.10.0 * 255.255.255.0 U 0 0 0 eth2 10.8.154.0 * 255.255.255.0 U 0 0 0 eth1 default ban25rtr0d0 0.0.0.0 UG 0 0 0 eth1 |
Note - In this example, 10.1.10 LAN traffic is being routed through the newly-configured NEM eth2 network interface. |
To temporarily switch the network device back to an offline or quiescent state, use the ifconfig down command.
host #>ifconfig eth2 down host #>ifconfig eth2 inet addr:10.1.10.150 Bcast:10.1.10.255 Mask:255.255.255.0 eth2 Link encap:Ethernet HWaddr 00:14:4F:29:00:01 BROADCAST MULTICAST MTU:1500 Metric:1 RX packets:0 errors:0 dropped:0 overruns:0 frame:0 TX packets:0 errors:0 dropped:0 overruns:0 carrier:0 collisions:0 txqueuelen:1000 RX bytes:0 (0.0 b) TX bytes:0 (0.0 b) Memory:fb000000-fc000000 host #>route Kernel IP routing tableDestination Gateway Genmask Flags Metric Ref Use Iface10.8.154.0 * 255.255.255.0 U 0 0 0 eth1 default ban25rtr0d0 0.0.0.0 UG 0 0 0 eth1 |
Note the 10.1.10 local area network via eth2 is no longer available, but that the eth2 network interface itself is still present (but no longer in up state, packet counters now zero again).
For the NEM network interface to be automatically configured (that is, on every system boot), you need to define the network interface information in the network device database.
Linux maintains a separate network interface configuration file for each network interface possible in the system. This configuration file is used to automatically configure each network interface when the system is first booted. These configuration files are plain-text files, which may be created and edited with your favorite text editor, as well as using the Linux system-specific System Administration GUI.
You can configure the network interface for the Red Hat Linux platform by using the GUI or manually editing the configuration file.
For instructions on configuring the network interface using the GUI, refer to the documentation for your RHEL version at: (https://www.redhat.com/docs/)
For instructions on configuring the network interface manually, see To Configure the Network Interface File Automatically.
For RedHat systems, the interface configuration files are named ifcfg-ethn (for example., ifcfg-eth2 for the eth2 network device as shown in preceding examples). They reside in the /etc/sysconfig/network-scripts system directory.
Create a configuration file, as shown in the following example:
host #>ls -l /etc/sysconfig/network-scripts/ total 392-rw-r--r-- 3 root root 116 Oct 10 12:40 ifcfg-eth0 -rw-r--r-- 3 root root 187 Oct 10 12:40 ifcfg-eth1 -rw-r--r-- 3 root root 127 Oct 21 16:46 ifcfg-eth2 -rw-r--r-- 1 root root 254 Mar 3 2008 ifcfg-lo [...] host #>cat /etc/sysconfig/network-scripts/ifcfg-eth2 # Sun NEM Hydra 10GbEDEVICE=eth2 BOOTPROTO=static HWADDR=00:14:4F:29:00:00 IPADDR=10.1.10.150 NETMASK=255.255.255.0 ONBOOT=no |
This sample eth2 ifcfg file was created by hand using a text editor. The first line # Sun NEM Hydra 10GbE is a comment that is useful in keeping track of different files. For this particular example, ONBOOT=no is specified, which means that the network interface is not brought online (up) automatically when the system is booted. Specifying ONBOOT=yes would be the normal configuration.
Uuse the ifconfig command or the shorthand ifup script to bring the network interface online (up) for usage once the system has booted (to at least runlevel 3).
host #>ifconfig eth2 up |
host #>ifup eth2 |
You can configure the network interface for the SUSE Linux Server (SLES) platform either by using the GUI or manually editing the configuration file.
For instructions on configuring the network interface using the GUI, refer to the documentation for your SLES version at: (http://www.novell.com/documentation/suse.html)
For instructions on configuring the network interface manually, see To Configure the Network Interface Automatically.
For Novell systems, the interface configuration files are named ifcfg-eth-id (for example, ifcfg-eth-id-00:14:4F:29:00:01 for the NEM network device as used in proceeding examples), and reside in the /etc/sysconfig/network system directory. For example:
Create a configuration file, as shown in the following example.
host #>ls -l /etc/sysconfig/network total 88[...] -rw-r--r-- 1 root root 271 Oct 29 18:00 ifcfg-eth-id-00:14:4f:29:00:01 -rw-r--r-- 1 root root 245 Oct 29 18:00 ifcfg-eth-id-00:14:4f:80:06:ef -rw-r--r-- 1 root root 141 Apr 21 2008 ifcfg-lo [...] host #>cat /etc/sysconfig/network/ifcfg-eth-id-00:14:4f:29:00:01 BOOTPROTO=’static’BROADCAST=’’ ETHTOOL_OPTIONS=’’ IPADDR=’10.1.10.150’ NAME=’Sun Microsystems Ethernet controller’ NETMASK=’255.255.255.0’ NETWORK=’’ REMOTE_IPADDR=’’ STARTMODE=’auto’ UNIQUE=’DkES.he1wLcVzebD’ USERCONTROL=’no’ _nm_name=’bus-pci-0000:88:00.0’ |
This sample ifcfg file was created using the Network Setup Method GUI. Regardless of which method you employ to maintain the network device configuration database, once the appropriate ifcfg file has been properly created, it will automatically be applied whenever the system boots. All matched network interfaces are automatically configured.
Use the ifconfig command or the shorthand ifup script to bring the network interface online (up) for use once the system has booted (to at least runlevel 3).
host #>ifconfig eth2 up |
host #>ifup eth2 |
When you manually edit one of the ifcfg files, you might need to invoke an explicit (manual) ifdown/ifup sequence to apply the new configuration (for example, changing the IP address or netmask, changing the MTU, and so on).
Once you have the NEM network interface device properly configured and up (online and active), there are several ways you can verify the network interface operation.
ifconfig: Use the ifconfig command to see if the RX/TX (receive/transmit) packet counts are increasing. The TX packet count indicates that the local system network services (or users) are queueing up packets to get sent over that interface; the RX packet count indicates that externally-generated packets have been received on that network interface.
route: Use the route command to check that traffic for the network interface’s network is being routed to that interface. If there are multiple network interfaces connected to a given network (LAN), traffic may be directed to one of the other interfaces, resulting in a zero packet count on the new interface.
ping: If you know the name (IP address) of another node on the network, use the ping(8) command to send a network packet to that node and get a response back.
host 39 #>ping tge30 PING tge30 (10.1.10.30) 56(84) bytes of data.64 bytes from tge30 (10.1.10.30): icmp_seq=1 ttl=64 time=1.37 ms 64 bytes from tge30 (10.1.10.30): icmp_seq=2 ttl=64 time=0.148 ms 64 bytes from tge30 (10.1.10.30): icmp_seq=3 ttl=64 time=0.112 ms 64 bytes from tge30 (10.1.10.30): icmp_seq=4 ttl=64 time=0.074 ms 64 bytes from tge30 (10.1.10.30): icmp_seq=5 ttl=64 time=0.161 ms --- tge30 ping statistics --- 5 packets transmitted, 5 received, 0% packet loss, time 4001ms rtt min/avg/max/mdev = 0.074/0.373/1.372/0.500 ms |
By default, ping sends one ping packet out each second until it is stopped (for example, by typing ^C). A slightly more thorough test would be a ping flood test. For example:
host #>ping -f -i 0 -s 1234 -c 1000 tge30 PING tge30 (10.1.10.30) 1234(1262) bytes of data. --- tge30 ping statistics --- 1000 packets transmitted, 1000 received, 0% packet loss, time 1849ms rtt min/avg/max/mdev = 0.048/0.200/0.263/0.030 ms, ipg/ewma 1.851/0.198 ms |
This example sends out 1,000 ping packets (containing 1,234 bytes of data each or over a megabyte total) as fast as the other side responds. Note the 0% packet loss indicating a functional and sound network connection.
Check the network interface again, using ifconfig, to look for any apparent problems.
host #>ifconfig eth2 eth2 Link encap:Ethernet HWaddr 00:14:4F:29:00:01 inet addr:10.1.10.150 Bcast:10.1.10.255 Mask:255.255.255.0 inet6 addr: fe80::214:4fff:fe29:1/64 Scope:Link UP BROADCAST RUNNING MULTICAST MTU:1500 Metric:1 RX packets:2993 errors:0 dropped:0 overruns:0 frame:0 TX packets:2978 errors:0 dropped:0 overruns:0 carrier:0 collisions:0 txqueuelen:1000 RX bytes:3286970 (3.1 MiB) TX bytes:3287849 (3.1 MiB) Memory:fb000000-fc000000 |
Note that no errors, dropped, overruns, frame, carrier, or collision events are reported. Some network errors are expected even in normal operation, but should be insignificant relative to the packet counts.
ethtool: If ifconfig reports an accumulation of errors, then an extremely detailed breakdown of NEM traffic details (including error counts of all sorts) may be obtained using the ethtool(8) command.
The following is an excerpt of the total hxge detailed statistics output.
host #>ethtool -S eth2 NIC statistics: Rx Channel #: 0 Rx Packets: 3008 Rx Bytes: 3289580 Rx Errors: 0 Jumbo Packets: 0 ECC Errors: 0 RBR Completion Timeout: 0 PEU Response Error: 0 RCR Shadow Parity: 0 RCR Prefetch Parity: 0 RCR Shadow Full: 0 RCR Full: 0 RBR Empty: 0 RBR Full: 0 RCR Timeouts: 3008 RCR Thresholds: 0 Packet Too Long Errors: 0 No RBR available: 0 RVM Errors: 0 Frame Errors: 0 RAM Errors: 0 CRC Errors: 0 [...] |
The hxge network interface configuration generally concerns parameters that are external to the driver/interface parameters such as the IP network address. There is also a set of configuration parameters that are internal to the hxge driver. These parameters are not normally changed, and improper setting of these parameters can easily result in a dysfunctional network interface.
To see a list of the available hxge driver configuration parameters, use the modinfo(8) command.
host #>modinfo hxge filename: /lib/modules/2.6.18-92.el5/kernel/drivers/net/hxge.koversion: 1.1.1 license: GPL description: Sun Microsystems(R) 10 Gigabit Network Driver author: Sun Microsystems, <james.puthukattukaran@sun.com> srcversion: B61926D0661E6A268265A9C alias: pci:v0000108Ed0000AAAAsv*sd*bc*sc*i* depends: vermagic: 2.6.18-92.el5 SMP mod_unload gcc-4.1 parm: enable_jumbo:enable jumbo packets (int) parm: intr_type:Interrupt type (INTx=0, MSI=1, MSIx=2, Polling=3) (int) parm: rbr_entries:No. of RBR Entries (int) parm: rcr_entries:No. of RCR Entries (int) [...] parm: tcam_udp_ipv6:UDP over IPv6 class (int) parm: tcam_ipsec_ipv6:IPsec over IPv6 class (int) parm: tcam_stcp_ipv6:STCP over IPv6 class (int) parm: debug:Debug level (0=none,...,16=all) (int) |
Each parm: line identifies an hxge driver configuration parameter that the system administrator can override when loading the hxge driver.
There are two ways to configure the driver parameters:
To temporarily change the hxge driver configuration, use the modprobe(8) command to specify a parameter value when loading the driver. An hxge driver parameter can only be specified (that is, changed to a non-standard value) on initially loading the driver. If the hxge driver is already loaded, you must first unload it using modprobe -r hxge before you load it with a different parameter specification.
Check to see if the hxge driver is already loaded.
host #>lsmod | grep hxge hxge 148824 0 |
Unload the currently active driver.
host #>modprobe -r hxge |
Manually load the hxge driver, specifying desired hxge parameters and values. For example, to enable detailed driver activity logs (and fill up the root partition).
host #>modprobe hxge debug=0x2001 |
Add the hxge driver configuration to the modprobe.conf(5) file at /etc/modprobe.conf), using the options command.
For example, to automatically (always) disable DMA channel spreading whenever the hxge driver is loaded, add the following line to the /etc/modprobe.conf file:
options hxge tcam=0 |
Here is a sample modprobe.conf file that disables the receive DMA channel spreading:
host #>cat /etc/modprobe.conf alias eth0 e1000ealias eth1 e1000e alias scsi_hostadapter ata_piix options hxge tcam=0 |
The actual list of hxge driver parameters is subject to change from release to release. TABLE 3-1 lists the driver configuration parameters for the version 0.0.9 hxge driver. The table also lists the accepted values and defaults for the parameter, where applicable.
| Parameter | Description | Values | Default |
|---|---|---|---|
| enable_jumbo | Controls hxge driver runtime support of jumbo frames. hxge jumbo frame support is automatically enabled as needed (depending on the network interface-specified MTU value). | 0 = No | Automatic |
| intr_type | Controls what sort of interrupt mechanism (if any) is selected by the hxge driver. The hxge driver will automatically select the best (highest potential performance) interrupt support mechanism when it is initially loaded and started. | 0 = INTx | Determined by system hardware support (MSIx is "best"). |
| rbr_entries | Specifies how many 4KB receive buffers the hxge driver will allocate per receive channel (the NEM supports four parallel independent receive channels). | 4096 | |
| rcr_entries | Specifies how many receive pointers (effectively, packets; jumbo packets can require up to 3 RCR entries per single jumbo packet) the hxge driver will allocate per receive channel. | 8192 | |
| rcr_timeout | Magic internal unitless number. Do not change this number unless told to by a qualified Sun agent. | ||
| rcr_threshold | Magic internal unitless number. Do not change this number unless told to by a qualified Sun agent. | ||
| rx_dma_channels | Specifies how many receive DMA channels the hxge driver should attempt to activate when the driver is initialized and brought online. Each DMA channel represents an independent receive processing stream (interrupt and CPU with separate dedicated buffer pool, system resources permitting) capability. | 1 = minimum 4 = maximum | 4 |
| tx_dma_channels | Specifies how many transmit DMA channels the hxge driver should attempt to activate when the driver is initialized and brought online. | 1 = minimum 4 = maximum | 4 |
| num_tx_descs | Specifies how many transmit descriptors the hxge driver should allocate per transmit channel. Each transmit packet requires a transmit descriptor. | 1024 | |
| tx_buffer_size | Specifies the small transmit buffer size. For transmit packets smaller than this value, the hxge driver will coalesce all the packet fragments together into a single pre-allocated tx_buffer_size hxge buffer; for transmit packets larger than this size, the hxge driver will construct a scatter/gather pointer list for the hardware to decipher. | 256 | |
| tx_mark_ints | Magic internal unitless number. Do not change this number unless told to by a qualified Sun agent. | ||
| max_rx_pkts | Specifies the maximum number of receive packets (queued by the NEM network engine) will be processed on any one receive interrupt, before the hxge driver (interrupt service routine) will dismiss the interrupt, releasing the interrupted CPU to perform other actions. | 64 | |
| vlan_id | Specifies the implicit VLAN ID that the hxge driver will assign to non-VLAN-tagged packets. | 4094 | |
| debug | Controls hxge printout
verbosity of hxge driver progress, actions,
and events. Normally, only significant or serious (error) information
is printed out.
Note: Read Troubleshooting the Driver before changing this parameter. |
0x2002 = normal operation (don’t print DBG messages) 0x2001 = debug operation (print debug messages) | 2002 |
| strip_crc | Controls whether the hxge driver or the NEM network engine strips off the packet CRC. | 0 = disable | 0 |
| enable_vmac_ints | Controls whether or not the hxge driver enables VMAC interrupts. | 0 = disable | 0 |
| promiscuous | Controls whether or not the hxge driver enables the NEM engine to run in promiscuous mode. | 0 = disable | 0 |
| chksum | Controls whether or not the hxge driver enables the NEM engine hardware checksumming capability. | 0 = no hardware checksumming,
1 = hardware receive packet checksumming |
3 |
| tcam | Controls whether or not the hxge driver enables the Virtualized NEM ASIC hardware engine, spreading the receive traffic across multiple (up to 4) parallel independent receive streams (interrupts, CPUs). This might also be referred to as DMA channel spreading. See also rx_dma_channels in this table. | 0 = disable | 1 |
| tcam_seed | Magic internal unitless number. Do not change this number unless told to by a qualified Sun agent. | ||
| tcam_tcp_ipv4 | Controls whether or not the hxge driver enables DMA channel spreading for IPv4 UDP traffic. | 0 = disable | 1 |
This section describes the hxge driver debug messaging parameter that can be used to troubleshoot issues with the driver. The following topics are covered in this section:
The Linux hxge driver has a built-in message and event logging facility, controlled by a message level parameter and logged through the system’s syslog(2) facility, usually to the file /var/log/messages).
The debug messaging parameter has two possible modes:
0x2002 to disable debug messaging, but still list error messages: The hxge driver is configured by default (when it is initially loaded into the kernel memory) to list top-level startup messages and error events and messages.
For example, every time the hxge driver is loaded and started on an hxge network device, it will print a copyright statement, such as:
kernel: Sun Microsystems(R)10 Gigabit Network Driver-version 1.1.1 kernel: Copyright (c) 2009 Sun Microsystems. |
and list the Ethernet MAC address(es) configured for that hxge device:
kernel: hxge: ...Initializing static MAC address 00:14:4f:62:00:1d |
0x2001 to enable debug messaging: Debug messaging provides large amounts of internal packet flow and event tracing, including specific details on each Ethernet packet sent or received by the hxge driver.
As a 10GbE network is easily capable of flowing over a million packets a second (at a 10GbE rate, a one KB packet is about a microsecond of wire time), this represents a potentially overwhelming load on the kernel’s syslog facility’s ability to buffer and write system messages to disk.
The default value for the message level parameter is 0x2002.
The Linux hxge driver’s message logging can be statically specified via the debug driver configuration parameter. See Changing the hxge Driver Configuration. This will set the messaging level when the driver is initially loaded into memory and initializes itself. This message level remains in effect until the driver is unloaded or dynamically overridden. The debug configuration parameter can only be specified when the driver is first loaded into kernel memory.
In addition to the static debug driver configuration parameter, the currently-running Linux hxge driver’s message logging can be dynamically controlled via the ethtool(8) utility, using the -s switch.
To set the debug driver configuration parameter dynamically, use the following command:
ethtool -s ethn msglvl parameter value |
For example, still using eth2 as in previous examples, to dynamically turn on debug messaging in the currently-running hxge driver, use the command:
ethtool eth2 -s msglvl 0x2001 |
and to dynamically turn debug messaging back off again, leaving only error messages to be logged, use the command:
ethtool eth2 -s msglvl 2002 |
Configure the syslog parameter. See To Configure the Syslog Parameter.
By default, most Linux systems are configured to ignore (discard without logging) debug-level syslog messages. To see the Linux hxge driver’s debug messages when they are enabled, the syslog(2) facility must also be configured to capture and record debug-level messages.
The syslog configuration is usually stored in the /etc/syslog.conf file (see the syslog.conf(5) man page), and will usually contain an entry such as (excerpted from an RHEL5.3 /etc/syslog.conf file).
# Don’t log private authentication messages! # Log anything (except mail) of level info or higher.*.info;mail.none;authpriv.none;cron.none /var/log/messages |
Change the last line of the entry to enable debug-level messages to be captured and logged. For example, change info to debug.
*.debug;mail.none;authpriv.none;cron.none /var/log/messages |
Changes made to /etc/syslog.conf will not take effect until syslogd is restarted (for example, automatically when the system is first booted).
To make syslogd re-read the /etc/syslog.conf file without rebooting the system, use the command:
kill -SIGHUP ‘cat /var/run/syslogd.pid‘ |
This notifies the currently-running syslog daemon to re-read its configuration file (see the syslogd(8) man page for more information).
By default, Linux configures Ethernet network interfaces to support only standard-size Ethernet frames (1500 bytes). The NEM hardware supports Ethernet Jumbo Frames of up to 9216 bytes.
To enable hxge network interface support of Ethernet jumbo frames, use the ifconfig(8) command to set the network interface maximum transition unit (MTU) parameter to the desired frame size.
Note that there is no official or standard jumbo frame size specification. While the exact size chosen for your network’s jumbo frame support is typically not important, it is important that you configure all communicating nodes on the network to have the same size (in case a packet-size error occurs and the packet gets discarded).
Note - The commands shown in the following examples can be used for both RHEL and SLES. |
To temporarily enable (or change) jumbo frame support for an hxge network interface, use an ifconfig ethn mtu nnn command. You can do this while the interface is up and running (and actively passing network traffic), but if you set the maximum frame size to a smaller value, you might disrupt incoming traffic from other nodes that are using an older (larger) value.
Check the current frame size (MTU) value.
host #>ifconfig eth2 eth2 Link encap:Ethernet HWaddr 00:14:4F:29:00:01 inet addr:10.1.10.150 Bcast:10.1.10.255 Mask:255.255.255.0 inet6 addr: fe80::214:4fff:fe29:1/64 Scope:Link UP BROADCAST RUNNING MULTICAST MTU:1500 Metric:1 RX packets:1 errors:0 dropped:0 overruns:0 frame:0 TX packets:30 errors:0 dropped:0 overruns:0 carrier:0 collisions:0 txqueuelen:1000 RX bytes:150 (150.0 b) TX bytes:7850 (7.6 KiB) Memory:fb000000-fc000000 |
Note that in this example, eth2 (the NEM from previous examples) is currently running with the standard MTU of 1500 bytes.
Set the desired new value. For a 9000 byte example:
host #>ifconfig eth2 mtu 9000 |
host #>ifconfig eth2 eth2 Link encap:Ethernet HWaddr 00:14:4F:29:00:01 inet addr:10.1.10.150 Bcast:10.1.10.255 Mask:255.255.255.0 inet6 addr: fe80::214:4fff:fe29:1/64 Scope:Link UP BROADCAST RUNNING MULTICAST MTU:9000 Metric:1 RX packets:26 errors:0 dropped:0 overruns:0 frame:0 TX packets:40 errors:0 dropped:0 overruns:0 carrier:0 collisions:0 txqueuelen:1000 RX bytes:3900 (3.8 KiB) TX bytes:9352 (9.1 KiB) Memory:fb000000-fc000000 |
Note that ifconfig now reports the MTU size to be 9000 bytes. NFS 8KB pages will now flow (send or receive) as a single Ethernet packet.
To automatically have jumbo frame support enabled (whenever the hxge driver is loaded), specify the MTU parameter in the hxge device’s corresponding ifcfg file.
Set the MTU parameter in the corresponding ifcfg file (ifcfg-eth2 for the examples in this document). For example:
host #>cat /etc/sysconfig/network-scripts/ifcfg-eth2 # Sun NEM Hydra 10GbEDEVICE=eth2 BOOTPROTO=static HWADDR=00:14:4F:29:00:00 IPADDR=10.1.10.150 NETMASK=255.255.255.0 MTU=9124 ONBOOT=no |
Verify that MTU value for the hgxe device is as specified.
host #>ifconfig eth2 eth2 Link encap:Ethernet HWaddr 00:14:4F:29:00:01 inet6 addr: fe80::214:4fff:fe29:1/64 Scope:Link UP BROADCAST RUNNING MULTICAST MTU:9124 Metric:1 RX packets:0 errors:0 dropped:0 overruns:0 frame:0 TX packets:12 errors:0 dropped:0 overruns:0 carrier:0 collisions:0 txqueuelen:1000 RX bytes:0 (0.0 b) TX bytes:2670 (2.6 KiB) Memory:fb000000-fc000000 |
The following topics are covered in this section:
This section describes the process for installing network, VLAN, and enclosure drivers on an x64 (Intel or AMD) server module that supports Windows Server 2003 (32/64-bit) or Windows Server 2008 (32/64-bit).
The following sections describe the procedures for installing Windows drivers:
Installing and Uninstalling the Sun Blade 6000 10GbE Network Controller
Installing and Uninstalling the Sun Blade 6000 10GbE VLAN Driver (Optional)
Installing the Virtualized Multi-Fabric 10GbE NEM Enclosure Device
Unzip the drivers from the Tools and Drivers CD to a local file on your system or a remote location for a remote installation.
The drivers are located at: /windows/w2k3/Sun_Blade_6000_10Gbe_Networking_Controller.msi
Note - This installer installs the networking drivers for both Windows Server 2003 32-bit/64-bit and Windows Server 2008 32-bit/64-bit. |
Navigate to the Sun_Blade_6000_10Gbe_Networking_Controller.msi file on your local or remote system and double-click it to start the installation.
The License Agreement page displays.
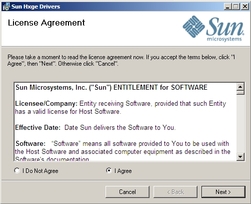
Select “I Agree”, then click Next to begin the installation.
The Confirm Installation page displays.
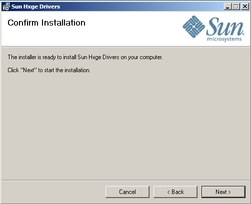
The Select Installation Folder page displays.
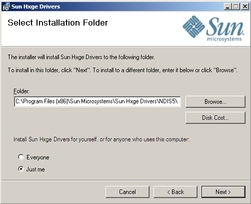
Select “Everyone” or “Just Me” and click Next.
The Installing Sun Hxge Drivers page displays.
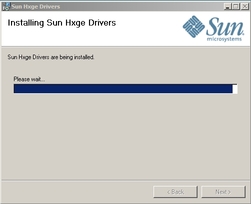
When the installation finishes, the Installation Complete page displays.
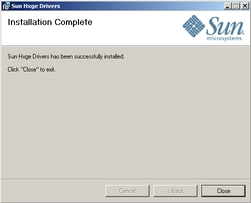
The Sun Blade 6000 10Gbe Networking Controller device is installed and visible in the Network Adapters section of the Windows Device Manager.
Verify that the Sun Blade 6000 10Gbe Network Driver is installed.
Type devmgmt.msc in the Open field, and click OK.
The Device Manager window displays.
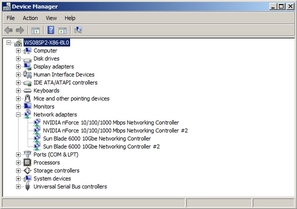
Click Network adapters and verify that the Sun Blade 6000 10Gbe Networking Controller is in the Network adapters list.
One controller will be displayed if you have one Virtualized NEM installed, and two will be displayed for two Virtualized NEMs.
Before uninstalling the networking controller, remove any VLANs that were installed on the controller. See To Remove a VLAN.
Double-click Programs and Features.
The Programs and Features dialog is displayed.
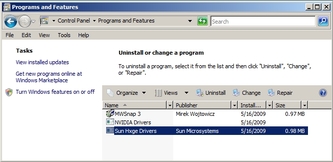
The networking controller is removed, unless you did not remove all VLANs installed on the Ethernet port. If VLANs remain on the Ethernet port, the following error message is displayed.

Remove all VLANs installed on the Ethernet port (see To Remove a VLAN).
Return to Step 2.
The Sun Blade 6000 10GbE VLAN driver enables creation of Virtual Local Area Networks (VLANs) on top of physical Ethernet ports. You only need to install this driver if you intend to create one or more VLANs. The VLAN driver is bundled with the Sun Blade 6000 10GbE Networking Controller.
Install the Sun Blade 6000 10GbE Networking Controller. See Installing and Uninstalling the Sun Blade 6000 10GbE Network Controller.
Right-click one of the Sun Blade 6000 10 GbE Networking Controllers and select Properties.
In the following example, Local Area Connection 3 is selected.
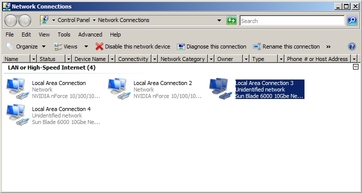
The Local Area Connection Properties dialog displays.

The Network Feature Type dialog displays.

Select Protocol and click Add.
The Select Network Protocol dialog.

The Install From Disk dialog displays.

Click Browse and choose one of the following paths, depending on the version of Windows Server that you have installed:
Windows Server 2003: C:\Program Files(x86)\Sun Microsystems\Sun Hxge Drivers\NDIS5\vlan\w2k3\{x86,x64}
Windows Server 2008: C:\Program Files(x86)\Sun Microsystems\Sun Hxge Drivers\NDIS6\vlan\w2k8\{x86,x64}
Use the x86 path if you have a 32-bit architecture and the x64 path if you have a 64-bit architecture.
The Locate File dialog displays.

Select either of the information setup files displayed and click Open.
The Select Network Protocol dialog displays.

The Sun Blade 6000 10GbE VLAN driver installs.
After the installation, the Sun Multiple VLAN Protocol Driver is viewable in the Local Area Connection Properties dialog for each Sun Blade 6000 10GbE Network Controller installed on the system.

Right-click one of the Sun Blade 6000 10GbE Networking Controllers and select Properties.
In the following example, Local Area Connection 3 is selected.

The Local Area Connection Properties dialog displays.

Select Sun Multiple VLAN Protocol Driver and click Uninstall.
The VLAN driver is now uninstalled and all VLANs that were installed on the controller are removed.
Right-click one of the Sun Blade 6000 10GbE Networking Controllers and select Properties.
Note - Note which controller port you use to create the VLAN. You will need to use the same controller port to remove the VLAN. |
In the following example, the VLAN will be added to the Local Area Connection 3 controller port.

Select Sun Multiple VLAN Protocol and click Properties.
The Sun Multiple VLAN Protocol dialog displays.
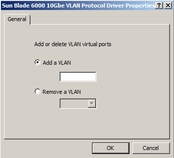
A new Local Area Connection icon called Sun Blade 6000 10GbE VLAN Virtual Miniport appears in the Network Connections window and in the Network Adapters section of Windows Device Manager. The physical LAN port used to create the virtual LAN loses its properties, because its been virtualized.
In the example below, the virtualized LAN is shown as Local Area Connection 5.

Right-click the Sun Blade 6000 10GbE Networking Controller used to create the VLAN that you are removing.
For example, in Step 5 of the “To Add a VLAN” procedure, the network controller port used to create the VLAN is Local Area Connection 3 controller port.
The Local Area Connection Properties dialog displays.

Select Sun Multiple VLAN Protocol and click Properties.
The Sun Multiple VLAN Protocol dialog displays.
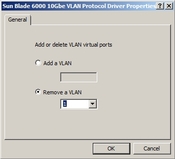
Select Remove a VLAN and choose the VLAN number from the drop-down list.
The Sun Blade 6000 VLAN Virtual Miniport icon for the VLAN selected is no longer visible in the Managed Network Connections and Adapter section of the Device Manager.
Use one of the following procedures to install the NEM enclosure device.
To Install the Enclosure Device on a Windows Server 2003 System
To Install the Enclosure Device on a Windows Server 2008 System
|
Click Other devices and find the Sun NEMHydra C10 SCSI Enclosure Device.
One enclosure device is displayed if you have one Virtualized NEM installed and two enclosure devices are displayed if you have two Virtualized NEMs installed.
Right-click on the Sun NEMHydra_C10 SCSI Enclosure Device, and select Update driver.
The Hardware Update Wizard displays.
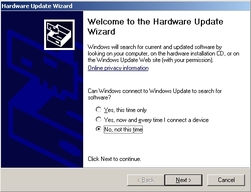
Select “No, not this time,” then click Next.
The Installation choices page displays.
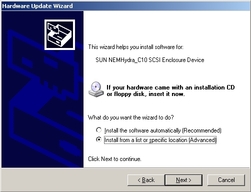
Select “Install from a list or specific location (Advanced),” then click Next.
The search and installation options page displays.
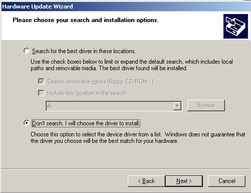
Select “Don’t search. I will choose the driver to install,” then click Next.
The Hardware Type page displays.
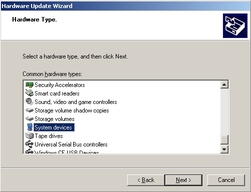
Select System devices, then click Next.
The Select the device driver page displays.
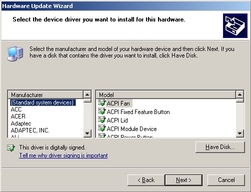
The Install From Disk page displays.
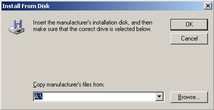
Click Browse and navigate to the directory that contains the Virtualized Multi-Fabric 10GbE NEM Enclosure Device information (lsinodrv.inf) file.
The path on the Tools and Drivers CD is:
DVDdrive:\windows\w2k3\{32-bit,64-bit}\lsinodrv.inf
The Locate File dialog box displays.
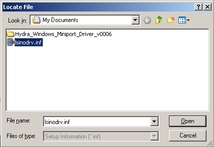
Select the lisnodrv.inf file, then click Open.
The Software Installing page displays as the device is installed, then the Completing the Hardware Update Wizard page displays.
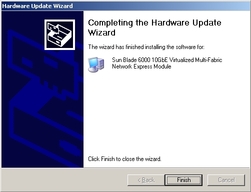
|
Click on System Devices and find the Generic SCSI Enclosure Device.
One enclosure device is displayed if you have one Virtualized NEM installed and two enclosure devices are displayed if you have two Virtualized NEMs installed.
Right-click on the Generic SCSI Enclosure Device, and select Update driver.
The How do you want to search for drive software? page displays.
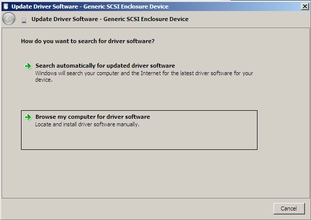
Click “Browse my computer for driver software”.
The Browse for driver software on your computer page displays.
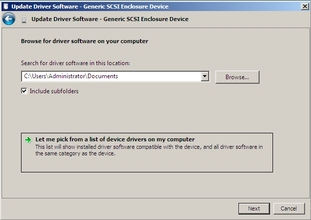
Click “Let me pick from a list of device drivers on my computer”, and click Next.
The Select the device driver you want to install for this hardware page displays.
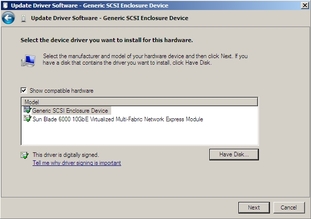
The Install From Disk page displays.
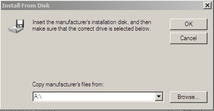
Click Browse and navigate to the directory that contains the Sun Blade 6000 10GbE Virtualized Multi-Fabric Network Express Module information (lsinodrv.inf) file.
The path on the Tools and Drivers CD is:
DVDdrive:\windows\w2k8\{32-bit,64-bit}\lsinodrv.inf
The selected Sun Blade 6000 10Gbe Virtualized Multi-Fabric- Network Express Module driver displays.
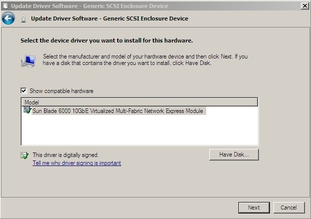
Click Next to install the Sun Blade 6000 10Gbe Virtualized Multi-Fabric Network Express Module driver.
The Software Installing page displays as the device is installed, then the Windows has successfully updated your driver software page displays.
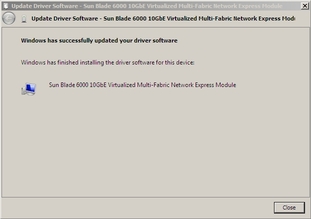
When the Jumbo Frames feature is enabled, the miniport driver becomes capable of handling packet sizes of up to 9216 bytes. Bigger size packets are split into supported sizes by the driver before they are handled.When the feature is disabled, the driver handles packet sizes of up to 1518 bytes.
This section describes the process for installing and configuring hxge drivers on a Sun Blade 6000 server module with VMware ESX Server installed.
The following topics are covered in this section:
This section describes the procedures for installing the VMware ESX Server drivers on a server module with ESX Server already installed. This section contains the following procedures:
To Install a Virtualized NEM Driver on an Existing ESX 3.5 Server
To Install a Virtualized NEM Driver on an Existing ESX/ESXi 4.0 Server Using vihostupdate
To Install a Virtualized NEM Driver on an Existing ESX 4.0 Server Using esxupdate
|
Obtain the hxge driver from one of the following:
The Virtualized NEM Tools and Drivers CD: /vmware/drivers/esx3.5u4/Vmware-esx-drivers-net-hxge-1.2.2. 11-00000.i386.rpm
Download the hxge driver from the following site: http://download3.vmware.com/software/esx/esx350-hxge-1.2.2.11-201041.isoand create a driver CD.
Start the ESX Server machine and log in to service console as root.
If the NEM is already installed in the modular system chassis, run the following command.
If the NEM is not already installed in the modular system, run the esxupdate command with the ---noreboot option, shut down the host machine manually, install the NEM, and then boot the host machine.
This allows you to install in a single boot.
Note - Remove the driver CD from the CD-ROM drive before the server reboots. |
Do the following to verify that the driver is installed successfully:
Run the esxupdate query command and verify that the information about the driver is mentioned in the resulting message.
View the PCI ID XML file in the /etc/vmware/pciid/ directory.
Check for the latest version of the driver module in /usr/lib/vmware/vmkmod/
To verify that the driver is loaded and functioning, run the vmkload_mod -l command.
|
Obtain the hxge driver from one of the following:
The Virtualized NEM Tools and Drivers CD: /vmware/drivers/esx4.0/Vmware-esx-drivers-net-hxge-1.2.2.11- 00000.i386.rpm
Download the hxge driver from the following site: http://www.vmware.com/support/vsphere4/doc/drivercd/esx-hxge_400.4.1.2.2.7.htmland create a driver CD.
Place the driver CD in the CD-ROM drive of the host where either the vSphere CLI package is installed or vMA is hosted.
Navigate to cd-mountpoint/offline-bundle/ and locate the hxge-vmware-driver-4-1-2-2-7-offline_bundle-193789.zip file.
Execute the command esxupdate to update the driver:
# vihostupdate conn_options --install --bundle hxge-vmware-driver-4-1-2-2-7-offline_bundle-193789.zip
For more details on vihostupdate, see http://www.vmware.com/pdf/vsphere4/r40/vsp_40_vcli.pdf
|
Obtain the hxge driver from one of the following:
The Virtualized NEM Tools and Drivers CD /vmware/drivers/esx4.0/Vmware-esx-drivers-net-hxge-1.2.2.11- 00000.i386.rpm
Download the hxge driver from the following site: http://www.vmware.com/support/vsphere4/doc/drivercd/esx-hxge_400.4.1.2.2.7.htmland create a driver CD.
Navigate to cd-mountpoint/offline-bundle/ and locate the hxge-vmware-driver-4-1-2-2-7-offline_bundle-193789.zip file.
Execute the command esxupdate to update the driver:
# esxupdate --bundle= hxge-vmware-driver-4-1-2-2-7-offline_bundle-193789.zip update.
For more details on esxupdate, see http://www.vmware.com/pdf/vsphere4/r40/vsp_40_esxupdate.pdf
This section describes the procedures for installing the VMware ESX Server drivers during an ESX server installation. This section contains the following procedures:
To Install a Virtualized NEM Driver With a New ESX3.5 Installation
To Install a Virtualized NEM Driver With a New ESX4.0 Installation
|
Obtain the hxge driver from one of the following:
The Virtualized NEM Tools and Drivers CD: /vmware/drivers/esx3.5u4/Vmware-esx-drivers-net-hxge-1.2.2.11-00000.i386.rpm
Download the hxge driver from the following site: http://download3.vmware.com/software/esx/esx350-hxge-1.2.2.11-201041.isoand create a driver CD.
Place the driver CD in the CD-ROM drive of the host machine.
When prompted for an upgrade or installation, press Enter for graphical mode.
After you are prompted to swap the driver CD with the ESX Server installation CD, insert the ESX Server 3.5 Update 3 installation CD and continue with ESX Server installation.
See http://www.vmware.com/pdf/vi3_301_201_installation_guide.pdffor detailed ESX installation instructions.
After ESX Server is installed and the system reboots, log in to ESX Server.
Verify that the driver is installed successfully:
Run the esxupdate query command.
A message containing the information about the driver appears.
View the PCI ID XML file in the /etc/vmware/pciid/ directory.
Check for the latest version of the driver module in the following directory: /usr/lib/vmware/vmkmod/
To verify that the driver is loaded and functioning, enter the following command:
|
Obtain the hxge driver from one of the following:
The Virtualized NEM Tools and Drivers CD: /vmware/drivers/esx4.0/Vmware-esx-drivers-net-hxge-1.2.2.11- 00000.i386.rpm
Download the hxge driver from the following site: http://www.vmware.com/support/vsphere4/doc/drivercd/esx-hxge_400.4.1.2.2.7.htmand create a driver CD.
Place the ESX installation DVD in the DVD drive of the host.
When prompted for Custom Drivers, select Yes to install custom drivers.
A dialog box displays the following message: Load the system drivers.
After the drivers are installed, replace the driver CD with the ESX installation DVD when prompted to continue the ESX installation.
Log in to the ESX host using Virtual Infrastructure Client GUI.
Click the Configuration Tab, then select Network Adapters from the Hardware list on the left side of the GUI.

Select the Sun Blade 6000 10GbE Network Controller driver that you want to configure.
Configure Networking using the Sun Blade 6000 10GbE Network Controller as you would any other network interface.
For more information on network configuration for ESX, refer
ESX Server 3 Configuration Guide available at: http://www.vmware.com/support/pubs/vi_pages/vi_pubs_35u2.htmlor
ESX Configuration Guide for ESX 4.0 available at:
http://www.vmware.com/support/pubs/vs_pages/vsp_pubs_esx40_vc40.html
The following topics are covered in this section:
Note the following guidelines for configuring Jumbo Frames for VMware ESX server.
Any packet larger than 1500 MTU is a Jumbo Frame. ESX supports frames up to 9kB (9000 Bytes). Jumbo frames are limited to data networking only (virtual machines and the VMotion network) on ESX 3i/3.5.
It is possible to configure Jumbo Frame for iSCSI Network, but it is not supported at this time.
Jumbo Frames must be enabled for each vSwitch or VMkernel interface through the command-line interface on your ESX Server 3 host.
To allow ESX Server to send larger frames out onto the physical network, the network must support Jumbo Frames end to end for Jumbo Frames to be effective.
For more information on Jumbo Frames configuration for ESX, refer to:
ESX Server 3 Configuration Guide available at: http://www.vmware.com/support/pubs/vi_pages/vi_pubs_35u2.htmlor
ESX Configuration Guide for ESX 4.0 available at:
http://www.vmware.com/support/pubs/vs_pages/vsp_pubs_esx40_vc40.html
Set the MTU size to the largest MTU size among all the virtual network adapters connected to the vSwitch. To set the MTU size for the vSwitch, run the following command:
where MTU is the MTU size and vSwitch is the name that has been assigned to the vSwitch.
To display a list of vSwitches on the host, run the following command:
To create a VMkernel connection with Jumbo Frame support, run the following command:
esxcfg-vmknic -a -i ip address -n netmask -m MTU portgroup name
where ip address is the ip addresss of the server, netmask is the netmask address, MTU is the MTU size and portgroup name is the name that has been assigned to the port group.
To display a list of VMkernel interfaces, run the following command:
Check that the configuration of the Jumbo Frame-enabled interface is correct.
Copyright © 2009, Sun Microsystems, Inc. All rights reserved.