Exit Print View

Sun Netra CP3270 ATCA Blade Server User’s Guide

Get PDF Book Print View
 

Document Information

Using This Documentation

UNIX Commands

Shell Prompts

Related Documentation

Documentation, Support, and Training

Documentation Feedback

Evaluating Product Compatibility

Evaluating the Blade Server

Qualifying Your System

Installing the Blade Server

Preparing to Install the Blade Server

Installing Components and Blade Server

Installing Optional Components

Software and Firmware Upgrades

Administering the System

Software and Firmware Upgrades

Performing a Server Recovery

Administering Parameters and Configurations

BIOS Settings

Keys for Directing Output to Remote Systems

Emulated Terminal Types and Key Mapping

Change BIOS Parameters

BIOS Screens

ShMM CLI and Commands

Change POST Options

View Electronic Blade Server ID

Restore the BIOS Settings

Change the OOS LED Color

Reset the System Time and Date

Configuring Ports and Pins

Administering the Network

Administering User Accounts and Security

Servicing the Blade Server

LEDs and Status Indicators

Reset the Blade Server

Replacing a Blade Server

Removing Optional Components

Return a Blade Server

Part Number, Serial Number, and MAC Address Label Locations

Programming the Blade Server

Sensors

I2C Device Mapping

AMC and ARTM Traffic Port

OEM and IPMI Commands

Glossary

Index

Change the OOS LED Color

The color of the OOS LED can be set to red or amber by moving jumper 18 to the appropriate position. Amber is the default color for the OOS LED.
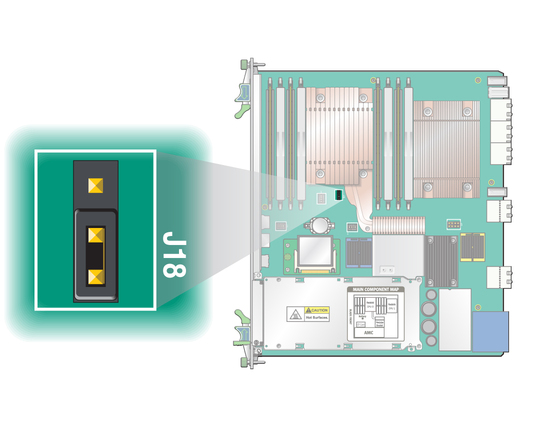
Figure showing OOS LED jumper.
  1. Remove the blade server.

    See Remove the Blade Server.

  2. Remove the jumper housing from the default (amber) position (P2/P3) and move it to the red position (P1/P2).

  3. Reinstall the blade server.

    See Installing Components and Blade Server.

Related Information