Installing the FastEthernet Card
The reference for this procedure is the Netra Proxy Cache 30 Hardware Installation Guide (part number 805-3246-10), which is shipped with the Netra Proxy Cache Server product.
The numbered panels in Figure 1-1 and Figure 1-2, below, illustrate the steps involved in installing the FastEthernet card. Detailed written instructions follow the figures.
Figure 1-1 Powering Off, Attaching Wrist Strap, Removing Filler Panel

Figure 1-2 Inserting Card, Attaching Card Bracket Tab, Removing Wrist Strap, Replacing Side Panel

To Install the FastEthernet Card
-
In the Netra Main Administration page, click Restart and Shutdown.
-
In the Restart and Shutdown Administration page, click Shutdown.
Make sure "Check for new devices during restart" is selected.
-
When the shutdown completes (after about 60 seconds), press the Standby (

-
) side of the power switch. See panel 1 of Figure 1-3.
-
Grasp the side panel and pull it toward the back of the system. Lift up and remove the panel. See panel 2 of Figure 1-3.
Note -If the lock block is installed, you must remove it before opening the system unit.
Figure 1-3 Power Switch and Side Panel

-
Locate the wrist strap (shipped with the PCI card), and attach its adhesive copper strip to the chassis back panel. Wrap the other end twice around your wrist, with the adhesive side against your skin.
-
Remove the filler panel from the back panel of the system chassis.
-
Locate a PCI card slot for Sun FastEthernet card.
Use Slot 2, unless that slot is already in use.
Table 1-1 PCI Card SlotsPCI Card Slot:
Operating Frequency
Input/Output Signaling Level:
Usable for Array Upgrade?
Slot 1 J1301
33 MHz or 66 MHz
3.3 volts
No
Slot 2 J1401
33 MHz
5.0 volts
Yes
Slot 3 J1501
33 MHz
5.0 volts
Yes
Slot 4 J1601
33 MHz
5.0 volts
Yes
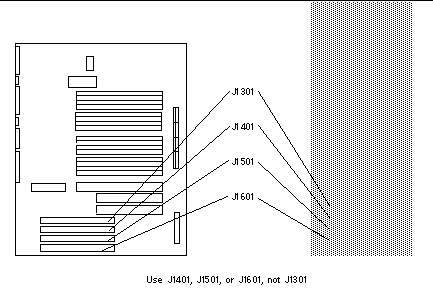
These slots are illustrated in Figure 1-4. The Sun FastEthernet card shipped in the upgrade kit is a 33 MHz card and thus cannot take advantage of the 66 MHz capability of slot 1 (J1301). It should be installed in slot 2 (J1401). If that slot is not available use slot 3 (J1501), or slot 4 (J1601).
Note -Examples that follow in this document and in the Netra Proxy Cache Array manuals assume that the second network interface is installed in slot 2 (J1401).
Figure 1-4 PCI Card Slots

-
Fit the card back panel into one of the system chassis card slots, and lower the card connector so that it touches its associated card slot on the main logic board.
-
Push the card by its corners straight down into the slot until the card is fully seated.
-
Use a magnetized Phillips screwdriver to attach the card bracket tab to the system chassis.
-
Detach the wrist strap and close the system unit.
-
Connect the just-installed network interface to your control network.
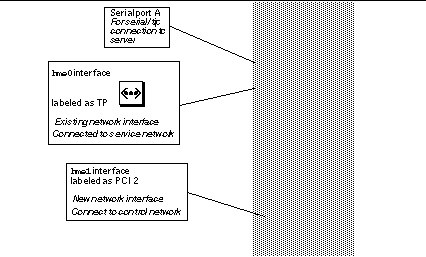
The location of the interface is illustrated in Figure 1-5.
Figure 1-5 Location of Control Network Interface

The new network interface (hme1) connects to a hub, to which you connect the hme1 interfaces on all of the hosts in the Netra Proxy Cache Array.
- © 2010, Oracle Corporation and/or its affiliates
