Chapter 2 Setting Up Serial Connections
You can set up network connections on a Windows 95 or Windows NT computer running the Solstice Network Client software by configuring the Microsoft TCP/IP protocol. Configuring a serial connection from a client to a point-to-point (PPP) server requires changing the default authentication method from broadcast to using a specific authentication server. This chapter describes how to set up a serial connection to a PPP server from a client running Windows NT or Windows 95.
Refer to your Microsoft Windows documentation for information on setting up a LAN connection and for switching between LAN and serial connections.
You can read background and procedural information throughout this chapter, or you can use the following references to go directly to a specific topic.
-
"Setting Up a Serial Connection to a PPP Server on Windows 95"
-
"Setting Up a Serial Connection to a PPP Server on Windows NT"
Gathering Information
For a serial connection, your Internet service provider determines the information you need. Your provider may require all or only some of the following information:
-
Your login user name
-
Telephone number of the service provider
-
PC COM port number
-
Name service (DNS)
-
IP address for your PC
-
Name and IP address of name server
-
Modem speed and parity setting
Installing Dial-Up Networking on Windows 95
This section explains how to install dial-up networking on a Windows 95 computer running Solstice Network Client software with the NFS Client component installed. If you have not yet installed and set up the Solstice Network Client software, refer to the "Installing Solstice NFS Client" for instructions.
To Install Dial-Up Networking
-
Double-click My Computer on the Windows 95 desktop.
If you do not see a Dial-Up Networking folder in the My Computer program group, then either dial-up networking software or a modem is not installed in the computer. If dial-up networking software is not installed, follow these steps to install it.
-
Make sure you have the Windows 95 CD-ROM. You will be asked to insert it in the CD-ROM drive during this procedure.
-
Click the Windows 95 Start button, point to Settings, and then click Control Panel.
-
Double-click Add/Remove Programs.
The Add/Remove Programs Properties dialog box opens.
-
Click the Windows Setup tab.
-
Select Communications.
-
Click Details.
The Communications page lists communications software components.
-
Select Dial-Up Networking and click OK.
-
Click OK to close the Windows Setup dialog box.
Note -If you are asked to insert the Windows 95 CD-ROM, insert the CD-ROM in the CD-ROM drive and then click OK.
-
Click Yes when asked to restart the computer.
Setting Up a Serial Connection to a PPP Server on Windows 95
Setting up a serial connection to a PPP server on a Windows 95 computer includes four steps.
To Create a Dial-Up Connection
-
Double-click the My Computer icon, and then double-click Dial-Up Networking.
If you do not see a Dial-Up Networking folder in My Computer, then either dial-up networking software or a modem is not installed in the computer. If dial-up networking software is not installed, see "To Install Dial-Up Networking".
-
Double-click Make New Connection.
The Make New Connection Wizard starts.
-
(Optional) Click Configure to customize the modem properties.
Click one or more of the tabs and make any desired changes. For example, select the Options tab and choose to open a terminal window before or after dialing the number. You can use this window to enter modem AT commands or dynamic passwords.
-
Type a name for the dial-up connection.
-
Type the telephone number of the service provider, and then click Next.
-
Click Finish.
The name of the new connection is listed in the Dial-Up Networking dialog box.
To Set Up TCP/IP Properties
-
Select the New Connection icon, click the right mouse button, and then select Properties.
-
Click Server Type.
-
In Type Of Dial-Up Server, select PPP: Windows 95, Windows NT 3.5, Internet.
-
Under Advanced Options, select Log On To Network.
Windows 95 prompts you to log in just after the connection is made.
-
Under Allowed Network Protocols, select TCP/IP.
-
Click TCP/IP Settings.
-
Type the IP address for the domain name service (DNS) server to use for this serial connection.
To use the same DNS server for all PPP connections, specify the DNS server in the TCP/IP property page in the Network dialog box.
-
Click OK to close the TCP/IP Settings dialog box.
-
Click OK to close the Server Types dialog box, and then click OK again.
To Configure the Authentication Server
-
Select Network Neighborhood and click the right mouse button.
The Network dialog box opens.
-
Select the Microsoft TCP/IP protocol and click Properties.
Make sure the TCP/IP protocol is selected next to the Dial-Up Adapter.
-
Select Solstice NFS Client and click Properties.
-
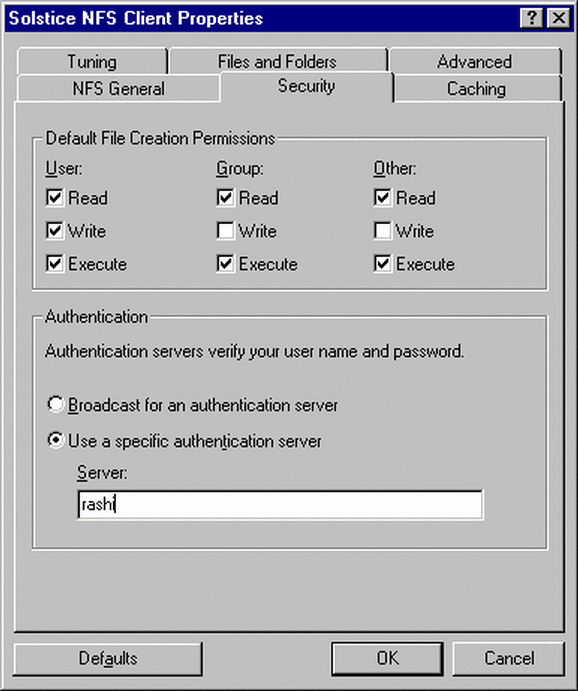
Click the Security tab (Figure 2-1).
Figure 2-1 Changing the Default Authentication Server
-
Type the name or IP address of your authentication server.
When you connect to a PPP server, only the client and the PPP server are considered hosts on the local subnet. You must specify the IP address of the authentication server if it is outside the local subnet.
To Log In and Connect to a PPP Server
-
Start Windows 95.
If you selected Solstice Network Client as the primary network logon, the Solstice Network Client login dialog box opens. If you selected Microsoft Windows as the primary network login, the Windows 95 login dialog box opens.
-
Click Cancel in the login dialog box.
You cannot successfully log in to the network and be authenticated until you establish a connection to the Solaris server. The Windows 95 desktop opens.
-
Select the Serial Connection icon and type your network user name and password.
-
Click Connect.
-
Log in to the PPP server.
You might need to type a string such as ppp to start the PPP server. The message, Verifying Username and Password, means that the PCNFSD server is authenticating your user name and password. The message, Logging on to Network is displayed, and then either the Solstice Network Client or Windows 95 network login dialog box opens.
-
In the login dialog box, type your user name and password.
If the login is successful, the message, "Connected at baud rate is shown." You can now run TCP/IP applications.
Adding and Removing an NFS Server
In a PPP configuration, the local subnet includes only your Windows computer and the PPP server. You cannot browse files on an NFS server that is outside the local subnet. To access files on an NFS server in a PPP configuration, you must add the NFS server.
To Add an NFS Server
-
Open Network Neighborhood and double-click Entire Network.
Network Neighborhood displays a list of NFS Servers and NFS Automount Maps.
-
Select NFS Servers and click the right mouse button.
-
Click Add/Remove NFS Servers.
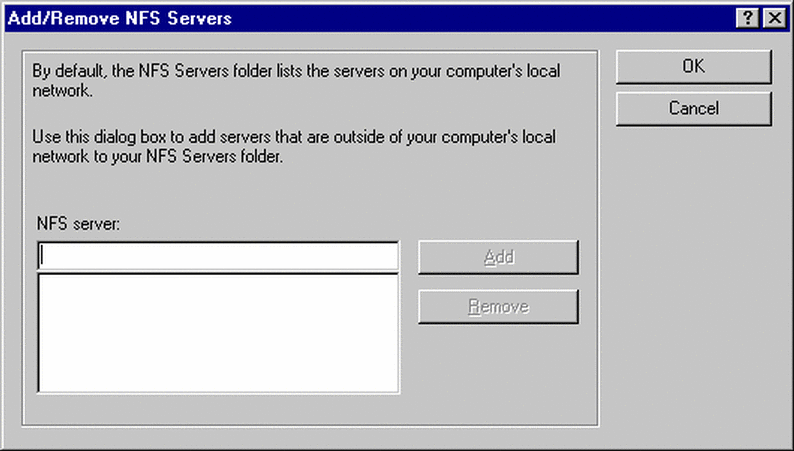
The NFS Servers dialog box opens (Figure 2-2).
Figure 2-2 NFS Servers Dialog Box
-
Type the name of an NFS server and then click Add.
-
Click OK to close the NFS Servers dialog box.
To Remove an NFS Server
-
Open Network Neighborhood and double-click Entire Network.
Network Neighborhood displays a list of NFS Servers and NFS Automount Maps.
-
Select NFS Servers and click the right mouse button.
-
Click Add/Remove NFS Servers.
The NFS Servers dialog box opens (Figure 2-2).
-
Select an NFS server to remove and then click Remove.
-
Click OK to close the NFS Servers dialog box.
Setting Up a Serial Connection to a PPP Server on Windows NT
If your computer has a network adapter card installed and you plan to use the computer to make both serial and LAN connections, create a separate Windows NT hardware profile for each configuration. Refer to Windows NT on-line Help for instructions on setting up hardware profiles.
Setting up a serial connection to a PPP server on a Windows NT computer includes five steps.
To Add Remote Access Service
-
Right-click Network Neighborhood icon, then click Properties.
The Network properties dialog box opens.
-
Click the Services tab, click Add, select Remote Access Service, and then click OK.
The Remote Access Setup program opens the Add RAS Device dialog box.
-
Follow the instructions on the screens to install your modem.
When you have installed your modem, it is listed in the Remote Access Setup dialog box.
-
Click Continue.
Remote Access Service is added to the list of services.
-
Click Close to close the Network dialog box.
-
Click Yes when asked if you want to restart your computer.
To Create a Dial-Up Connection
-
Double-click the My Computer icon, and then double-click Dial-Up Networking.
-
Click New.
The New Phonebook Entry Wizard starts. Fill in the information asked for on each screen with information provided by your Internet Service Provider.
-
Type a name for the connection and then click Next.
Answer questions about how you dial the Internet and then click Next.
-
Type the telephone number of the service provider, and then click Next.
-
Click Finish.
-
(Optional) Click More and choose from the menu to customize modem properties and dialing preferences.
-
Click Close.
To Configure an Authentication Server
-
Right-click Network Neighborhood and then click Properties.
The Network dialog box opens.
-
Click the Services tab, select Solstice NFS Client, and then click Properties.
The Solstice NFS Client Configuration page opens.
-
Click the Security tab.
-
In the Authentication field, select Use A Specific Authentication Server, type the IP address of your authentication server, and then click OK.
When you connect to a PPP server, only the client and the PPP server are considered hosts on the local subnet. You must specify the IP address of the authentication server if it is outside the local subnet.
-
Click Close to close the Network dialog box.
-
Click Yes when asked if you want to restart your computer.
To Grant Dialin Permission to a User
A Windows NT user must have dialin permission to log in to a network over a serial connection.
-
From the Start menu, select Programs, select Administrative Tools, and then click User Manager.
-
Double-click the user's name to open the User Properties dialog box.
-
Click Dialin.
-
Select Grant Dialin Permission To User, choose a Call Back option, and then click OK.
-
Click OK to close the User Properties dialog box.
To Log In and Connect to a PPP Server
-
Press Ctrl+Alt+Delete to log in to Windows NT.
-
Type your Windows NT user name and password, and then click OK.
You will see a message stating that the Solstice NFS Client was not started because a local network was not detected. You cannot successfully log in to the network and be authenticated until you establish a connection to the Solaris server.
-
Click OK.
The Windows NT desktop opens.
-
Double-click the Network Neighborhood icon, double-click Entire Network, and then double-click Solstice_NFS_Client.
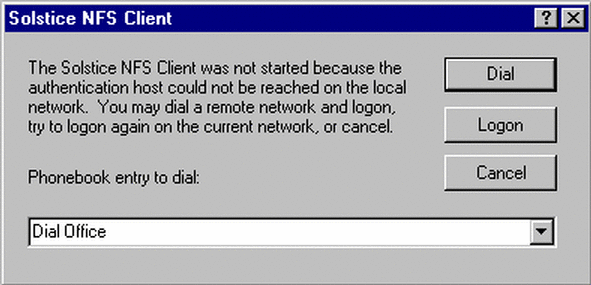
The Solstice NFS Client dialog box (Figure 2-3) opens.
Figure 2-3 Solstice NFS Client Dialog Box
-
Select a number to dial from the phonebook entries listed and click Dial to dial a network connection.
-
Log in to the PPP server.
You might need to type a string such as ppp to start the PPP server. The message, Registering Your Computer on the Network, means your computer has successfully connected to the PPP server. The message, Authenticated, means the PPP server has verified your user name and password.
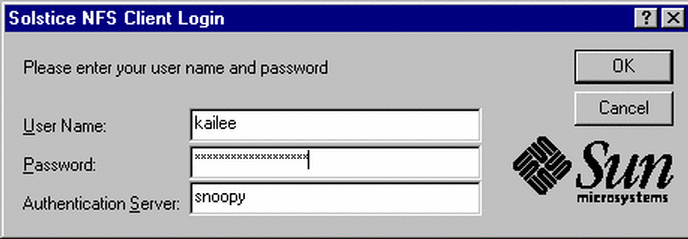
The Solstice NFS Client Login dialog box (Figure 2-4) opens.
Figure 2-4 Solstice NFS Client Login Dialog Box
-
Type your Solstice user name and password, type the name of an authentication server, and then click OK.
You are now logged in to the network and can use NFS to connect to network files.
To Log In to the Solstice Network
If you have set up an automatic dial-in connection, your computer might start dialing the remote server before you click Dial on the Solstice NFS Client dialog box. You are connected to the remote PPP server, but not yet logged in to the network. Logging in to the Network Provider allows you to access NFS files and printers.
-
Double-click the Network Neighborhood icon, double-click Entire Network, and then double-click Solstice_NFS_Client.
The Solstice NFS Client dialog box (Figure 2-5) opens.
Figure 2-5 Solstice NFS Client Dialog Box

-
Select a number to dial from the phonebook entries listed and click Dial to dial a network connection.
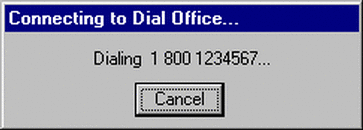
Your computer dials the number you selected.
-
Log in to the PPP server.
You might need to type a string such as ppp to start the PPP server. The message, Registering Your Computer on the Network, means your computer has successfully connected to the PPP server. The message, Authenticated, means the PPP server has verified your user name and password.
The Solstice NFS Client Login dialog box (Figure 2-6) opens.
Figure 2-6 Solstice NFS Client Login Dialog Box

-
Type your Solstice user name and password, type the name of an authentication server, and then click OK.
You are now logged in to the network and can use NFS to connect to network files.
Troubleshooting
Table 2-1 lists solutions to common problems connecting to the network from a Windows 95 computer running the Solstice Network Client software using a serial connection.
Table 2-1 Troubleshooting|
Problem |
Possible Cause |
Solution |
|
PC hangs on starting Windows 95 before any login dialog box appears. Pressing Ctrl+Alt+Del shows nothing running. |
DNS server address is configured incorrectly on the TCP/IP property page (e.g., 123.345.6.7 instead of 123.345.6.15). |
Boot in safe mode and fix the DNS server address. Click Start, point to Settings, click Control Panel, and then double-click Network. Double-click TCP/IP. After you correct the problem, restart your computer. |
|
Logging in fails after a few minutes with the message Unable to contact authentication server. |
When you make a serial connection, you must first connect to the Solstice network so that a PCNFSD server can authenticate your username and password. Then you can log in to the network provider. |
Click OK to close the message. Click Cancel in the Solstice or Windows 95 network login dialog box. When the Windows 95 desktop appears, double-click the icon for the dial-up connection you configured. When the network login dialog box again appears, type your user name and password for the Solstice network. You will see the message Logging on to network when the login succeeds. |
|
You can use TCP/IP applications, such as Netscape, but browsing or mapping NFS servers fails with the message You are not logged in to the network. |
You have a TCP/IP connection to the server, but were not authenticated by a PCNFSD server and are, therefore, not logged in to the network. |
Select the icon for the dial-up connection you are making. Select Properties, click Server Type, and then make sure Log On To Network is selected. Select Start, select Shutdown, and then click Close All Programs and Log On As A Different User. Then follow the procedure in "To Log In and Connect to a PPP Server". |
Table 2-2 lists possible solutions to problems logging in to a Windows 95 or Windows NT computer running the Solstice Network Client software using a serial connection.
Table 2-2 Solutions to Problems Logging In|
Possible Causes |
Solutions |
|---|---|
|
You entered the authentication server incorrectly or the authentication server is not working. |
Use the Windows ping command to reach the machine running the authentication server. Ask a network administrator for the correct IP address of the authentication server to use. Retype the correct authentication server address in the login dialog box and click OK. |
|
One or more TCP/IP settings are incorrect. |
On Windows 95, follow the steps in the "Checklist for TCP/IP Settings on Windows 95". On Windows NT, follow the steps in the "Checklist for TCP/IP Settings on Windows NT". |
|
You have not yet configured a serial connection. |
Click Cancel on the Solstice NFS Client login dialog box to log in without networking enabled. Follow the instructions in "To Create a Dial-Up Connection". |
|
You are trying to connect to a PPP server, and Solstice NFS Client is set up with an asterisk (*) for the authentication server. When you connect to a PPP server, the local network consists of only the client and the PPP server. Solstice NFS Client cannot broadcast beyond the local subnet. |
Select NFS Client, click Properties, and then click the Security tab. Type the IP address for an authentication server on the network. |
|
The name server cannot find an IP address for the remote computer. |
Verify that you typed the name for the remote computer correctly. Ping the remote computer's IP address. |
|
The remote computer, the network, or part of the network is down. |
Check your modem or network cables. Ping your computer to verify it can connect to itself (which verifies that your local interface is running). Ping your name server (by name or by IP address) and your local gateway. |
Table 2-3 lists solutions to common problems connecting to the network from a Windows NT computer running the Solstice Network Client software using a serial connection.
Table 2-3 Solutions to Common Problems Connecting to the Network|
Problem |
Possible Cause |
Solution |
|---|---|---|
|
You log in to NT and see the message The Solstice NFS Client was not started because a local network was not detected and the authentication server could not be reached. |
You cannot successfully log in to the network and be authenticated until you establish a connection to the Solaris server. |
Click OK to complete the NT login. Follow the procedure "To Log In and Connect to a PPP Server". |
Unable to browse the network. The network is not present or is not started. |
You cannot browse NFS servers until you connect to a PPP server and log in to the Solstice network. |
Follow the procedure "To Log In and Connect to a PPP Server". |
|
After you log in to NT, network drives fail to automatically reconnect and are marked with a red x in My Computer. |
You are not logged in to the network. |
Make sure you are logged in to the network. Follow the procedure "To Log In and Connect to a PPP Server". Double-click the drive to re-establish the connection. |
- © 2010, Oracle Corporation and/or its affiliates
