Modifying the i-Planet Desktop User Interface
You can modify the i-Planet Desktop to include Netlet-enabled client applications.
Introduction to NetFile/Netlet Pages
NetFile and Netlet pages are controlled by HTML files in the directory /etc/opt/SUNWstnr/html_templates/. The files in this directory contain tags that are swapped out to change the information that appears on the i-Planet Desktop and window that appears when the end user clicks the NetFile link on the i-Planet Desktop.
By editing the i-Planet Administration Console and the appropriate HTML pages in the directory /etc/opt/SUNWstnr/html_templates/, you can:
-
Change the text presented to the end user on the i-Planet Desktop
-
Remove the NetFile link
-
Add links to predefined applications
-
Add links for third-party applications
Modifying the i-Planet Desktop's References to the NetFile/Netlet Window
The default configuration of the i-Planet Desktop contains a link called NetFile, described as "Java Remote Access and Windowing" shown in Figure 1-2.
Figure 1-2 Desktop Front Page Showing the Default Name and Description for the NetFile Link
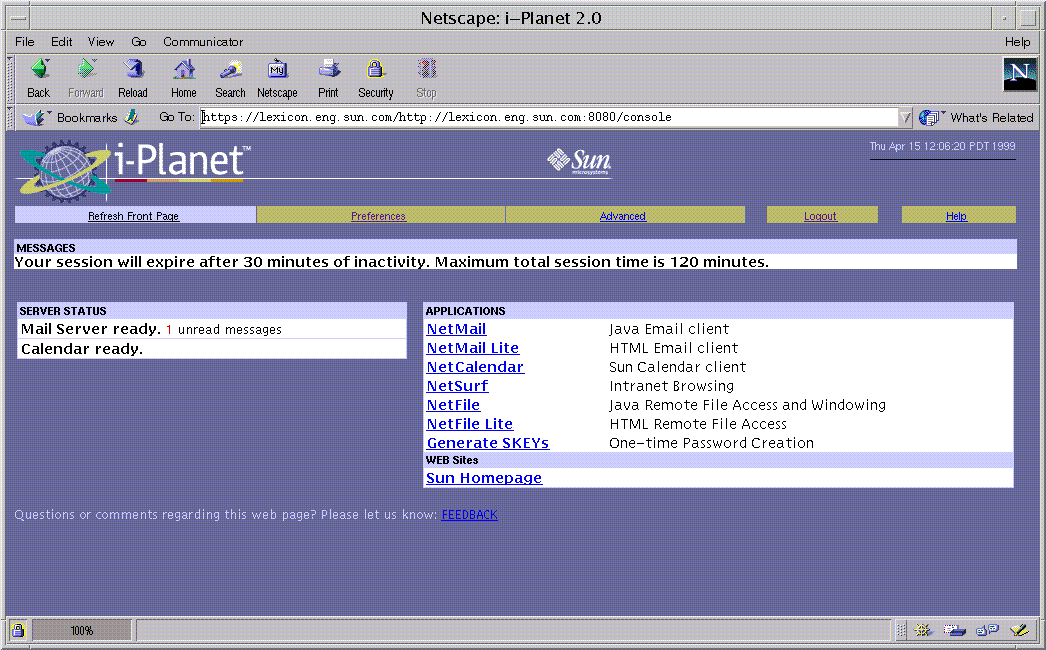
You can change the name of the link and its description through the Default User Preferences and Parameters page of the Administration Console in the section entitled "Specify the name and description of the link users will see for starting the Netlet."
This link uses the Java Script function startNetlet in userTemplate.html and opens a new browser window that has no navigation buttons. It contains a frameset with a frame to start the Netlet and a frame that presents the NetFile link.
To Edit the NetFile Link Name and Description
-
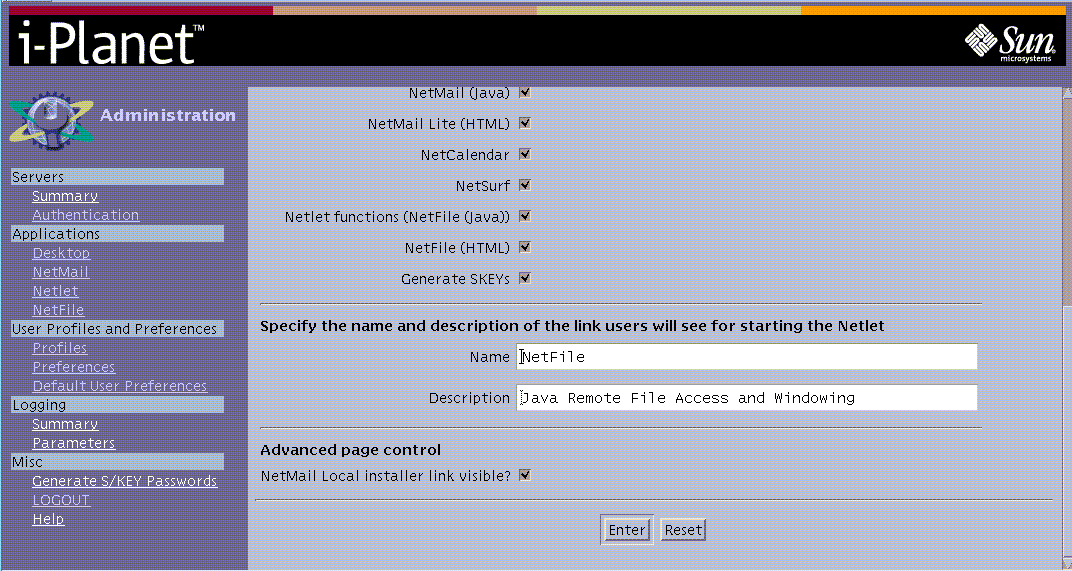
On the Administration Console, click the link Default User Preferences to move to the Default User Preferences and Parameters page shown in Figure 1-3.
Figure 1-3 Default User Preferences and Parameters Page--Lower Half
-
Edit the entries in the section entitled "Specify the name and description of the link users will see for starting the Netlet."
-
Click Enter at the bottom of the page to save your edits.
-
As root on the i-Planet server, type the following to stop and restart the web server so that your edits will take effect.
# /opt/SUNWjeev/bin/iplanet_serv stop
# /opt/SUNWjeev/bin/iplanet_serv start
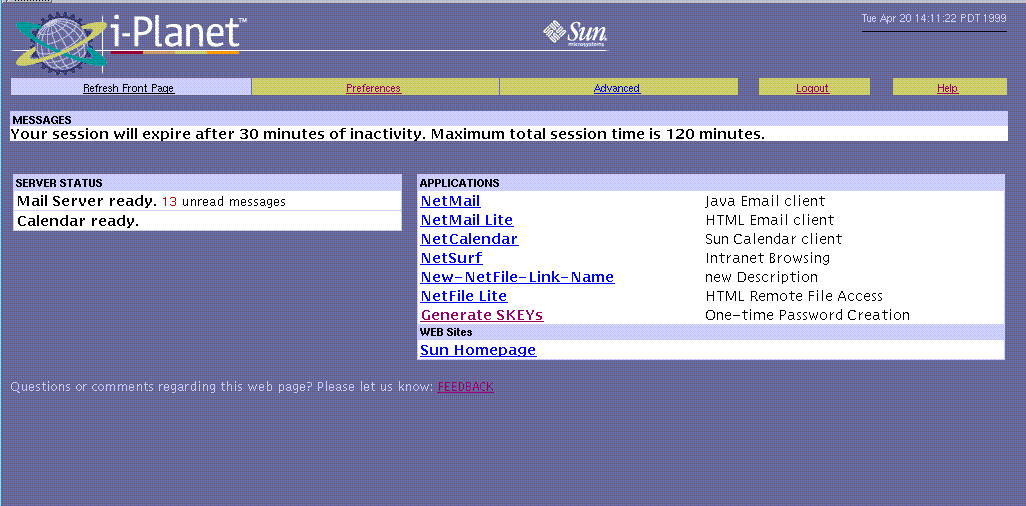
The Desktop Front page should now display the new name and description for the link as, for example, shown in Figure 1-4.
Figure 1-4 Desktop Front Page Showing New Link Name and Description
If the i-Planet end user clicks the NetFile link on the Desktop page twice, a warning appears that the function is available from the NetFile window shown in Figure 1-5 (that is, the small window that was launched when you clicked on the NetFile link). You can change the message by editing the file userTemplate.html.
Figure 1-5 Default Remote File and Windowing Functions Window for the NetFile Link
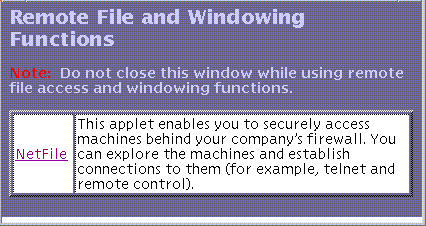
This Remote File and Windowing Functions window and the checks surrounding it prevent the Netlet from being reloaded or restarted while it is running. Reloading the Netlet closes the sockets that it is using and terminates any Netlet-enabled operations in progress.
The Remote File and Windowing Functions window contains the Netlet and links to start browser-based applications that will connect to the Netlet.
Modifying the Name and Description of a Link in the Remote File and Windowing Functions Window
This section describes how to add links and to remove or modify the NetFile link.
Although you cannot include a link for a non-browser-based application here, this window must be open so the Netlet is active before starting the application.
Use the following procedure to modify the Remote File and Windowing Functions window.
To Modify the Name and Description of a Link in the Remote File and Windowing Functions Window
-
On the i-Planet server, open the file /etc/opt/SUNWstnr/html_templates/netletApps.html in a text editor
-
To change the name of the NetFile link and the description:
-
Type a new name for NetFile in the line:
<TD ALIGN=TOP><a href="#"onclick="parent.f3.changeLoc()">

NetFile</a> </TD>
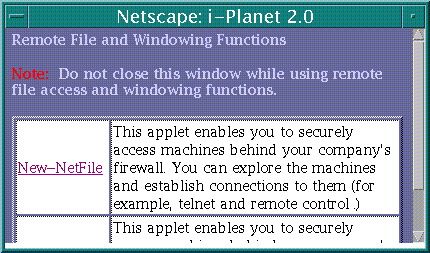
Figure 1-6 shows the Remote File and Windowing Function window with a new name for the NetFile link.
Figure 1-6 New Name for NetFile Link Name in Remote File and Windowing Function Window
-
Edit the text that describes the NetFile link, for example:
<TD><FONT COLOR="#000000">New description for NetFile here. </FONT>

</TD>
-
-
To remove the NetFile link and its description, remove the lines:
<TR BGCOLOR="#FFFFFF">
<TD ALIGN=TOP><a href="#" onclick="parent.f3.changeLoc()">NetFile</a> </TD>
<TD><FONT COLOR="#000000">This applet enables you to securely access machines behind your company's firewall. You can explore the machines and establish connections
to them (for example, telnet and remote control).</FONT>
</TD>
</TR>
Adding Links to Predefined Applications and to Third-Party Browser-Based Clients
Any links that you add must be targeted to new browser windows. If they are not, they will reload the frame when pressed, and the i-Planet end user will not be able to click other links in the small window. This would be confusing because the small window does not contain navigation buttons by design. The lack of navigation buttons is to prevent the frame in which the Netlet is running from being reloaded or browsed from.
When called with the startNetlet function of the /etc/opt/SUNWstnr/html_templates/userTemplate.html file, the frame is passed through the i-Planet Desktop's tag-swapping mechanism, so any HTML template tags that you wish to insert will be translated as they are for other i-Planet Desktop template files.
The window created by startNetlet cannot be resized since resizing the window on some clients will cause the Netlet to be restarted. This action will end any Netlet-enabled operations in progress.
The code related to the cookie named stnrawin should not be removed. It is necessary for ensuring that one (and only one) instance of this window can be displayed.
Some of the NetFile functions use the Netlet, but Netlet is a separate applet.
The Remote File and Windowing Functions window gives the applets a home window that will not be browsed away from or reloaded by the user. When the user browses away or reloads a page that contains an applet, the applet can be restarted or reinitialized (depending on the browser). To avoid that, the applets are "protected" in their own windows.
The small NetFile window contains two applets: NetFile, and Netlet.
Note -
When adding your own link, do not simply copy the HTML code that starts the NetFile applet. It uses JavaScript to communicate with other parts of the frameset. If you do not want to have the NetFile link visible, remove that table row and all the tags within it.
Use the following procedure to add links to predefined applications and to third-party browser-based clients.
To Add a Link to a Predefined Netlet Rule Without Using NetFile
-
To add links to predefined applications, insert the following lines for each predefined application after the end-of-row tag:
<TR BGCOLOR="#FFFFFF">

<TD ALIGN=TOP><A href="Put the product url here."

TARGET="WinName1"> name-of-link</A>

</TD>

<TD><FONT COLOR="#000000">a description of your applet here. </FONT>

</TD>

</TR>
-
(Optional) Type in a description for the predefined application whose link you are adding.
-
Set the href tag equal to the URL for the predefined application for which you want to add a link. The URL for each predefined application is as follows:
-
For Telnet, the URL is:
https://i-Planet_gateway_fully_qualified_name:port_number/http:

//i-Planet_fully_qualified_server_name:port_number/servlet/SRdoNetlet?func=openTelnet&machine=tgt_machine&username=[userName]
-
For GO-Joe (X Windows), the URL is:
https://i-Planet_gateway_fully_qualified_name:port_number/http:

//i-Planet_fully_qualified_server_name/servlet/SRdoNetlet?func=

openXWin&machine=tgt_machine&username=[userName]
-
For Citrix (NT applications), the URL is:
https://i-Planet_gateway_fully_qualified_name:port_number/http:

//i-Planet_fully_qualified_server_name/servlet/SRdoNetlet?func=

openNTApps&machine=tgt_machine&username=[userName]
-
For all options to control Microsoft Windows remotely, the URL to enable all selected applications at the same time is:
https://i-Planet_gateway_fully_qualified_name/http://i-Planet_

fully_qualified_server_name/servlet/SRdoNetlet?func=

openRemoteControl&machine=tgt_machine&username=[userName]
Note -For all of the above URLs, you will need to supply a real value for the tgt_machine.
-
To Add a Link for a User-Defined Netlet Rule
-
Insert the following lines after the end-of-table-row tag (</TR>) to add a link to the table:
<TR BGCOLOR="#FFFFFF">

<TD ALIGN=TOP><A href="http://localhost:8099/path-to-the-applet/appletPage.html"

TARGET="WinName1"> name-of-link</A>

</TD>

<TD><FONT COLOR="#000000">a description of your applet here. </FONT>

</TD>

</TR>
Figure 1-7 shows a sample Remote File and Windowing Functions window with an added link and description of that link.
Figure 1-7 Added Link in the Remote File and Windowing Functions Window
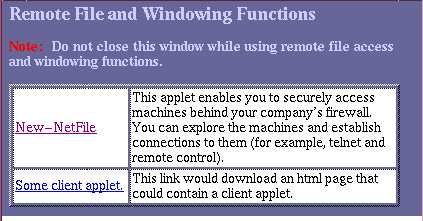
The HTML code that produces the new link shown in Figure 1-6 is shown in Adding a New Link and Description
<TR BGCOLOR="#FFFFFF"> <TD ALIGN=TOP><a href="http://localhost:8099/appletPath/startApplet.htm" target="newwin">Some client applet.</a> </TD> <TD><FONT COLOR="#000000">This link would download an html page that could contain a client applet. </FONT> </TD> |
This example assumes that you have created a Netlet rule that directs traffic from the client port 8099 to the web server and the port on which the HTML page resides.
- © 2010, Oracle Corporation and/or its affiliates
