Chapter 1 i-Planet Release Notes
The i-Planet 2.0 product is server software that allows authenticated users to connect to the corporate intranet, over the Internet, anytime.
The i-Planet Release Notes contain the latest information on the i-Planet product. These sections are included:
-
"Appendix D to the Administration Guide: Integrating Third-Party TCP/IP-Based Clients with i-Planet".
Getting Support for i-Planet Software
If you have any support issues, call your authorized service provider. For further information about support, see http://www.sun.com/service/contacting/wwssd.html.
To find out more about Sun Microsystems, Inc., see http://www.sun.com.
Product Requirements
This section describes product requirements, including system requirements, patches, and licensing.
System Requirements
The i-Planet hardware and software requirements are shown in the table below.
Table 1-1 System Requirements
Patches
Patches required from Sun Microsystems before using the Java(TM) Development Kit (JDK(TM)) in the Solaris 2.5.1 operating environment include: Patch No. 103566-08 or later (X11/OpenWindows(TM) patch) and Patch No. 103640-08 or later (kernel patch). Refer to the URL http: //www.javasoft.com/products/jdk/1.2/install-solaris-patches.html or to http://sunsolve.sun.com for patch information.
A patch from Netscape Communications Corporation is required if you are using the Netscape(TM) browser versions 4.04 or 4.05: Patch JDK 1.1AWT. This patch can be downloaded from the Netscape website.
Licensing
Licensing for the i-Planet product is provided with six (including a root user) initial product licenses and subsequently through FLEXlm license manager software.
For information about licensing for third-party software products used with i-Planet software, contact the appropriate third-party vendor. The initial product licenses provided with i-Planet software also apply to GO-Joe software from GraphOn Corporation.
Upgrading from Early Access Versions
If you have a prior version of i-Planet installed, for example, through an early access release, when you start the installation script, the script detects the previous version and you are prompted to remove it before starting the new installation.
If you have a prior version installed, verify that /etc/inetd.conf is a symbolic link to /etc/inet/inetd.conf and that /etc/services is a symbolic link to /etc/inet/services. If these symbolic links do not exist, create the links as root:
# ln -s /etc/inet/inetd.conf /etc/inetd.conf # ln -s /etc/inet/services /etc/services |
Documentation with This Release
i-Planet 2.0 documentation includes:
-
Quick Install card (in printed format)
-
Installation Guide (located on the CD in /docs/usenglish/manuals/ps/install.ps; installed in /opt/SUNWjeev/public_html/docs/usenglish/manuals/ps/install.ps; also in printed format)
-
Administration Guide (installed in /opt/SUNWjeev/public_html/docs/usenglish/manuals/ps/admin.ps; also in printed format)
-
Release Notes (this document, in printed format)
-
Online help for the remote user and for the system administrator
To access the HTML files, on the i-Planet server, point your browser to the URL file:///opt/SUNWjeev/public_html/docs/usenglish/manuals/html/install/installTOC.fm.html for the Installation Guide Table of Contents or to file:///opt/SUNWjeev/public_html/docs/usenglish/manuals/html/admin/remotepassageTOC.fm.html for the Administration Guide Table of Contents.
Documentation with this release, including these Release Notes, assumes that you install in the default installation directory, /opt. Substitute your installation directory where appropriate.
Known Problems in This Release
The basic firewall application and Security Dynamics' ACE software do not work under the Solaris 7 operating environment.
In the Open Windows(TM) environment with the NetFile application, the mouse buttons may not work as expected. Using the right mouse button is a workaround.
Browser issues:
-
In NetMail (Java), when a message that has one or more attachments is sent, the Netscape browser may crash on the sender's machine. The mail and attachment are received correctly on the receiver's machine.
-
Cookies must be enabled by the user's browser or the login sequence will continue to return the user to the login screen. To check on the Netscape browser setting, select Edit, select Preferences, then select Advanced. Occasionally, a user will receive a warning that the preferences are not set to accept cookies, even though the preferences are set to accept cookies.
-
Netscape browser and Netlet. The Netlet is not able to use the "Automatic Proxy Configuration" in the Advanced Proxies preferences. If your browser is set up to use automatic proxy configuration, make sure that, at a minimum, you have entries for "HTTP Proxy" and "Security Proxy" in the Manual Proxy Configuration preference page before using any Netlet-related functions.
-
In Netscape 4.06 in the Solaris operating environment, Java frames and dialogues may not appear until the mouse is moved.
-
With Microsoft Windows, the NetMail local installer bookmark saved can bring up the incorrect browser. If you install NetMail locally, check the box to run NetMail at the end of the installation, create a bookmark of the page, and then select the bookmark, the page will run in the "default browser" that Microsoft Windows knows about. This may not be the browser you are currently running. The workaround is to install with the "default browser" that your system knows about.
-
With Microsoft Windows, the Netscape browser may hang when you close the GO-Joe or pcANYWHERE applications.
-
With Microsoft Windows, text in "Edit Appointment" in NetCalendar can appear blurred. Refresh the screen to correct this.
-
Caching in Netscape Navigator versus Internet Explorer. Netscape does not distinguish between dynamic and persistent caching. In cases where no caching is allowed, nothing is written to disk. When the http headers "Pragma:no-cache" and "Expires:date" are used, no data is written to disk; pages that were sent and displayed with these headers cannot have the source viewed and you cannot go "back" to them. If you have a current active session, such pages may be reloaded, but otherwise they are not accessible. Netscape stores its cached objects under scrambled names. Internet Explorer appears to always write objects (for example, pages or images) to disk. The names used are the names of the object in clear text. As long as the browser is active, the objects can be accessed and viewed. To prevent Internet Explorer from writing to disk, you can set the browser preference "view/internet options/advanced/do not save encrypted pages to disk." However, this has a side effect of denying the user permission to open any non-HTML page in the browser. Users who want to open and view files with NetFile or who want to open attachments with NetMail are advised not to enable this setting. In the case where this browser preference is set, the user receives an error message: "Your security settings do not allow this file to be downloaded." When the browser is shut down, the objects disappear; however, as long as the browser is active, even if the i-Planet session has ended, a user who knows where to look could be able to see files that were displayed with NetFile, and anything that was displayed in a browser page, such as email attachments from NetMail Lite.
-
NetMail in Internet Explorer with aliases. Occasionally, the list of aliases or the alias content may seem incorrect. To fix this, restart the NetMail client.
-
NetMail and large attachments. If end users set their NetMail preferences through NetMail Session-Preferences-Cache to load attachments on disconnect and the attachments are very large, they may get uid/port number errors. These errors mean that the applet is out of memory. The user must print or save the files.
-
NetMail Lite doesn't display the list of messages when some email includes very large attachments.
-
NetMail can't remove more than one level of folder directories properly.
-
NetMail Lite properties and NetCalendar preference changes are lost when the user logs off.
-
NetCalendar doesn't show appointment reminders.
-
Changing the default view in NetCalendar from "week" does not work.
-
NetMail local installer may generate a JavaScript error.
-
In URLs, extra colons (:) are replaced by "%3A" in the URL because certain browsers do not handle embedded colons.
-
Small browser windows. Java applications, which are a part of the i-Planet installation (NetFile, NetMail) are launched by the i-Planet Desktop using separate browser windows. These new windows do not contain navigation buttons and, by design, cannot be resized. In certain situations, the End of Session page or the Desktop Login page is presented to the user in one of these small browser windows. When this occurs, the user should return to the i-Planet Desktop browser and click Refresh to present the Login page in that large browser window.
-
The desktop is not refreshed before an application is started.
Session timeout and session maximum time. After 30 minutes of inactivity or 120 minutes of total session time, a user is required to relogin to the i-Planet server before continuing. The login page will be displayed in the application or in the browser window that is currently being used. If the login page is not visible, the user should return to the main browser window and log in. It may be necessary to restart the browser in some cases. Operations that may span the maximum session time, such as FTP, could result in data loss if the session times out. The system administrator can change the values for both the inactive timer and the maximum session timer in the Administration Console.
SSL certificates and keys. To back up your certificate files, copy the following files from /etc/opt/SUNWstnr to a safe place: .rppass (the password file), rp.CAstore (the CA root certificate file) and rp.keystore (the certificate file). If you ever need to restore a certificate, you can copy these three files back to /etc/opt/SUNWstnr. This applies to both the i-Planet gateway and the i-Planet server.
Installation may appear to hang. If a package seems to be taking more than five minutes to install, check the log file for the installation. The installation script could be waiting for a yes or no answer to an unexpected question on the input line that the user did not see. This could result from an old package that was not removed from a prior installation, or from insufficient disk space in the / partition.
In a nondefault (customized) installation, if you select the same port numbers for the i-Planet gateway and i-Planet server, turn on SSL between the gateway and the server, and then turn off SSL, the software will not work correctly. The workaround is to change one of the port numbers in the platform.conf file on the i-Planet server.
If you install using the default port numbers, and have SSL turned on between the i-Planet gateway and the i-Planet server, if you want to do remote administration, you must add the following lines to the /etc/opt/SUNWstnr/gateway/secureURL.conf file on the i-Planet gateway:
https://server_name:443
https://server_ip_address:443
If you install in a directory other than /opt (the default installation directory), you must copy the license configuration file to your installation directory for licensing to work. As root, use the command:
# cp /opt/SUNWste/license_tools/LIC_CONFIG_FILE.i-Planet2.0
\
/your_install_dir/SUNWste/license_tools
If you place a firewall between the i-Planet gateway and the i-Planet server, you should open the well-defined ports between the gateway and the server, such as 8080 and 443 (for a default installation), and the ports for the services that the Netlet needs to connect to.
If the i-Planet server cannot resolve the name of the i-Planet gateway, you must add the gateway name and IP address to the /etc/hosts file.
If you have dual interfaces with the same name on the i-Planet gateway, after installing the i-Planet server you must edit the platform.conf file on the server. Modify the trustedProxyFullURL parameter to match the external interface IP address of the gateway.
If you are using a web proxy host with SSL between the i-Planet gateway and the i-Planet server, https traffic does not go through the web proxy host.
Netlet supports only 20 Netlet rules. The sum of the enabled, predefined rules and the user-defined rules cannot be more than 20. If there are more than 20 rules, the Netlet will not start and an error message will be displayed in the Java console.
GraphOn GO-Joe software is not supported on X86 clients, and does not run under the Solaris 7 operating environment in 64-bit mode. To determine whether you are using the 32-bit mode or the 64-bit mode, use the dmesg command.
RADIUS support and support for next token and new PIN modes for SecurID authentication require installation of an upcoming patch.
Known Documentation Problems in This Release
The Licensing chapter in the Installation Guide contains incomplete information for the field "Nodelocked to Host ID" in the Add License window in the License Installation Tool. If you enter your license information by hand, enter the value none in this field.
An Appendix to the Administration Guide, "Integrating Third-Party TCP/IP-Based Clients with i-Planet," is located at the end of these Release Notes.
Administration Guide:
-
In Chapter 2, "Administration Console," the reserved ports for pcANYWHERE should be 5631, 5632 in Table 2-5 "Reserved Listen Ports for Predefined Netlet Rules" (page 30).
-
In Chapter 3, "Other Administrative Tasks," section "Tuning the Web Server," (page 58), the file name in the "Overview" section should be S42iplanet_serv, not s42rp.
-
In Chapter 4, "User Administration Command Line Interface," in the procedure, "To Set Your Classpath," (page 66) remove "/classes.zip:" from the classpath you set.
-
In Chapter 4, "User Administration Command Line Interface," after the procedure, "To Set Your Classpath," (page 66), insert the following new section and procedure:
Setting Your LD_LIBRARY_PATH
Use the following procedure to set your LD_LIBRARY_PATH so that you can add users with IMAP.
To Set Your LD_LIBRARY_PATH:
1. As root, type the following to set your LD_LIBRARY_PATH so that you can add users with IMAP:
# LD_LIBRARY_PATH=/opt/SUNWjeev/lib/solaris/sparc/libCryption.so |
2. Type the following command to export your LD_LIBRARY_PATH:
# export LD_LIBRARY_PATH |
-
In Chapter 4, "User Administration Command Line Interface," in the section, "Using UserAdminCL Summary," (page 67), remove "delete" from the description for -older N and -nologin. These options can only be used with the list action.
-
In Chapter 4, "User Administration Command Line Interface," in the section, "Deleting i-Planet Users," (page 74), the first sentence should read: "You can remove i-Planet users from the system by user ID or by reading a list of login IDs from a text file."
Online help:
-
In certain versions of browsers, the online help for NetMail Lite may not display in an easily readable format.
-
Setting the NetMail attachment cache to 0 loads no attachments, rather than all attachments, as documented.
-
In the Administration online help for the NetFile configuration page, the NT domain name item was omitted. If you installed and enabled support for Microsoft Windows machines, the NT domain name is the domain that will be used to authenticate access to Microsoft Windows machines through NetFile.
-
The online help for NetMail incorrectly states that you can create an alias containing both an address and a real name, which would be contained in double quotes. Aliases can actually only contain addresses (for example, jane.doe@sun.com) or addresses in angle brackets (for example, <jon.doe@sun.com>).
HTML files. The Contents button links to the manual title page rather than to the Table of Contents; to reach the Table of Contents, page down using Next button from the title page. Appendix C in the Administration Guide is missing figures for the pcANYWHERE software; refer to the PostScript or printed versions of the manual to see these screen shots.
Appendix D to the Administration Guide: Integrating Third-Party TCP/IP-Based Clients with i-Planet
This appendix describes:
-
How to configure third-party client/server applications to allow them to work with i-Planet.
-
How to customize the i-Planet Desktop to provide links to user-defined applications.
Third-party remote-control products must:
-
Use only TCP/IP connections.
-
Use fixed port numbers to fixed servers that the i-Planet gateway can contact directly.
Netlet and Its Use
Many organizations have client/server applications that can be used only by clients on the intranet. These applications include clients such as Lotus Notes and applets. If the server for the client is behind the company's firewall, then a machine that is disconnected from the LAN cannot use the client application. i-Planet's Netlet enables these applications to connect to intranet servers using an encrypted connection through the i-Planet gateway.
There are two sets of Netlet rules:
-
Rules for predefined Netlet applications
-
Rules for user-defined Netlet applications
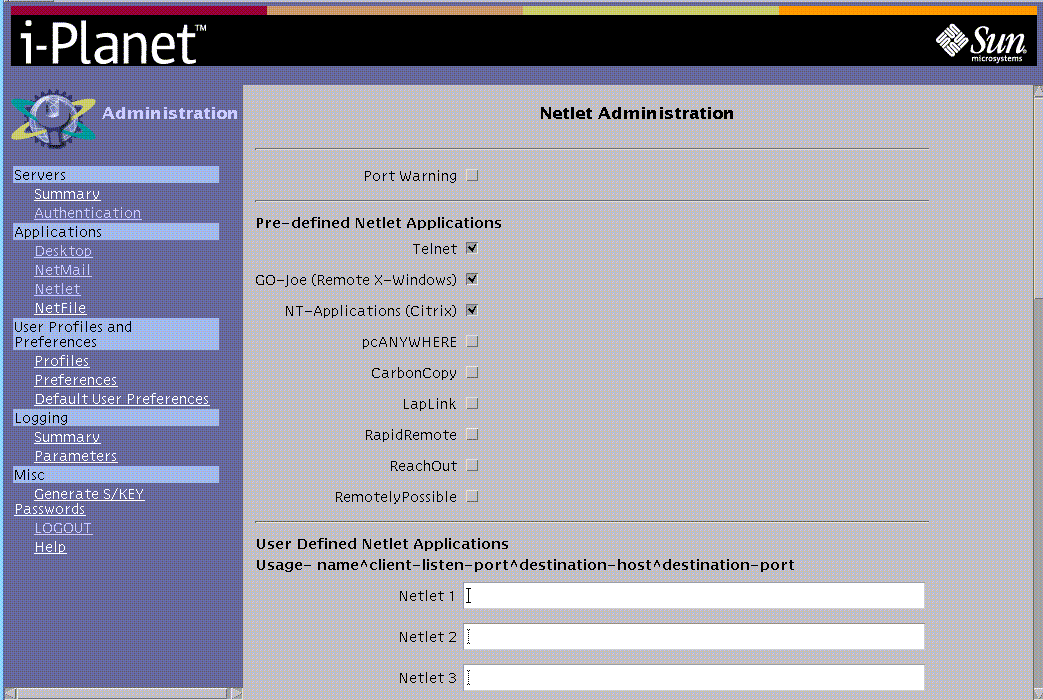
You administer the predefined Netlet application rules and the user-defined rules through the Netlet Administration page of the i-Planet Administration Console that is shown in Figure 1-1.
Figure 1-1 Netlet Administration Page of the i-Planet Administration Console
Rules for Predefined Netlet Applications
Rules for predefined Netlet applications govern using well-known third-party remote-windowing applications. You enable the rule for a predefined Netlet application by checking the box following the name of the predefined application shown in Figure 1-1.
In the case of pcANYWHERE and GO-Joe, client applets are shipped and integrated with the i-Planet software so that they will be started automatically.
Netlet connections to the predefined applications require that a destination server be specified at the time the connection is established; that is, the predefined rules have no fixed destination server.
i-Planet software uses the ports in Table 1-2 for the predefined Netlet rules.
Table 1-2 Ports Reserved for Predefined Netlet Applications
Rules for User-Defined Netlet Applications
Rules for user-defined applications are not associated with a particular application. These rules simply enable the redirection of TCP/IP traffic to the proper destination server and port using an encrypted connection between the client and the i-Planet gateway. You define these rules in section "User Defined Netlet Applications" in Figure 1-1.
Note -
Simply giving a rule for a user-defined application the name of one of the predefined Netlet applications or using one of the reserved ports will not cause the rule to be treated as a predefined application. Alternatively, disabling a rule for a predefined application will not affect any user-defined rules that happen to share the same name or ports. The only way to disable a rule for a user-defined application is to remove it.
For example, if a user-defined rule directs certain traffic to the Telnet port of a specific host (myTelnet^30001^myServer^23), this rule will operate independently of the rule for the predefined Netlet application for Telnet. It does not depend on whether or not the predefined Netlet application for Telnet is enabled on the Netlet Administration page of the i-Planet Administration Console that is shown in Figure 1-1.
Note -
Netlet rules cannot contain any port number higher than 64000.
Client Specifications and Examples
Third-party remote control products must:
-
Use TCP/IP
-
Use fixed ports to fixed servers
The i-Planet gateway must be able to contact these fixed ports and servers without using the optional web proxy.
Configuring Client Software
Clients must be configured to connect through the Netlet, which proxies that connection to the destination server. Since the Netlet resides on the client, the connections must be made to the machine named localhost.
Integrating Applet Clients
Java security restrictions require that applets can only make connections to the machine from which they are downloaded. This means that the client applet itself must be downloaded through the Netlet. Creating a Netlet rule to download an applet from the machine localhost allows the applet to connect to ports on localhost. If Netlet rules exist that accept connections on those ports, the applet will connect to the machines to which those ports are proxied.
Applets following this procedure require no reconfiguration because these applets normally determine the name of the host from which they were served and connect to that machine name. They will attempt to connect to localhost, which the Netlet accepts and proxies.
If an applet is configured to connect to a named machine, you have two choices for redirecting the applet to connect to localhost. You can either:
-
Have each user configure the client to use localhost as the server
or
-
Have DNS resolve the destination server's host name to 127.0.0.1 for external queries, and to the actual IP address for internal lookups.
The second choice is the recommended solution because it requires no changes to the client configuration, and the client will work correctly from the Internet and the intranet.
Use the following procedure to integrate applet clients.
To Integrate Applet Clients
-
On the Netlet Administration frame of the Administration Console, create a user-defined Netlet rule to map the applet TCP port over the Netlet.
The Netlet rule must be in the form: name^client-listen-port^destination-host^destination-host-port, for example:
Applet1-destination^5092^appletserver.com^5092
Note -The client-listen-port is arbitrary, but it must be a port that is not used by your client or any other Netlet rule. Ideally, the client-listen-port and the destination-host-port should be the same. You should use a value above 2048 for the client-listen-port because certain operating systems require the end user to be root with a client-listen-port below 2048. Table 1-2 shows the ports that are reserved for the predefined Netlet rules.
-
Repeat Step 1 for each port that the applet uses for connections.
-
Create a rule to allow the applet to be downloaded through the Netlet.
Applet1-source^8099^appletserver.com^80
The destination host and port will be the web server from which the applet is served.
-
Click the Enter button at the bottom of the Netlet Administration page to save the new Netlet rule or rules.
-
As root on the i-Planet server, type the following to stop and restart the web server so that the Netlet rule you just defined will take effect.
# /opt/SUNWjeev/bin/iplanet_serv stop
# /opt/SUNWjeev/bin/iplanet_serv start
-
(optional) As root on the i-Planet server, edit the i-Planet file /etc/opt/SUNWstnr/html_templates/netletApps.html to create a link that refers to localhost in order to download the applet.
For information on editing the i-Planet file /etc/opt/SUNWstnr/html_templates/netletApps.html, see the section, "Modifying the Name and Description of a Link in the Remote File and Windowing Functions Window", in this chapter.
You only need to do this if you want a link to appear on the Remote File and Windowing page of the i-Planet Desktop for this application.
The URL to download the applet client should look like the following:
http://localhost:8099/path-of-html-to-get-applet
localhost with the port defined in your loopback rule (see Step 3 of this procedure) must be used so that the loopback mechanism of the Netlet will be used. This ensures, for purposes of Java security, that the source host of the client applet will be the same as the host to which it is connecting, that is, localhost.
You can use whatever other mechanism that you have to allow the end user to select an option to request that an applet be downloaded.
-
Edit the HTML file that starts the client applet to reflect the correct port number and localhost as the host name. Do not use the client's IP address.
If the applet has parameters to configure the host to which it connects and the port number, edit this startup HTML file so that it has
-
localhost as the destination host
-
The client-listen-port as the port number
from the Netlet application rule that you wrote in Step 1 of this procedure.
If the applet does not have parameters to specify the host or port number or both, it, in all likelihood, will connect back to the host from which it was downloaded. You only have to know that the port number (specified as the second parameter in Step 1 of this procedure) must match the fixed port that applet is programmed to use.
-
This procedure allows the end user to click on the NetFile option on the i-Planet Desktop to download the Netlet. After the Netlet is downloaded, the end user has to click on the link that you created to download and start the applet.
End users can also just start a new browser window and type the following for the example given above:
http://localhost:8099/path-of-html-to-get-applet
Integrating Non-Applet Clients
Non-applet clients, such Lotus Notes or Microsoft Exchange, must be directed to connect to the client machine on which they are running. You can do this in two ways. You can either:
-
Have each user configure the client to use localhost as the server.
or
-
Have DNS resolve the destination server's host name to 127.0.0.1 for external queries and to the actual IP address for internal lookups.
The second choice is the recommended solution because it requires no changes to the client configuration, and client will work correctly from the Internet and the intranet.
Use the following procedure to integrate non-applet clients.
To Integrate Non-Applet Clients
-
On the Netlet Administration page of the Administration Console, create a user-defined Netlet rule to map the application's TCP port over the Netlet.
The Netlet rule must be in the form: name^client-listen-port^destination-host^destination-host-port
Netlet-1^20000^appletserver^2000
Note -The client-listen-port is arbitrary, but it must be a port that is not used by your client or any other Netlet rule. Ideally, the client-listen-port and the destination-host-port should be the same. You should use a value above 2048 for the client-listen-port because certain operating systems require the end user to be root with a client-listen-port below 2048. Table 1-2 shows the ports that are reserved for the predefined Netlet rules.
-
Repeat Step 1 for each port that the application uses for connection.
-
Click Enter at the bottom of the Netlet Administration frame to save the new Netlet rule or rules.
-
As root on the i-Planet server, type the following to stop and restart the web server so that the Netlet rule you just defined will take effect.
# /opt/SUNWjeev/bin/iplanet_serv stop
# /opt/SUNWjeev/bin/iplanet_serv start
-
At runtime, the end user must first start the Netlet by clicking the NetFile link on the i-Planet Desktop.
The only way that an end user will know that the Netlet is running is to check in the browser's Java Console.
-
Once the Netlet is running, the end user must start the client software.
The destination host must be localhost and the port must be the port specified in Step 1 of this procedure.
Modifying the i-Planet Desktop User Interface
You can modify the i-Planet Desktop to include Netlet-enabled client applications.
Introduction to NetFile/Netlet Pages
NetFile and Netlet pages are controlled by HTML files in the directory /etc/opt/SUNWstnr/html_templates/. The files in this directory contain tags that are swapped out to change the information that appears on the i-Planet Desktop and window that appears when the end user clicks the NetFile link on the i-Planet Desktop.
By editing the i-Planet Administration Console and the appropriate HTML pages in the directory /etc/opt/SUNWstnr/html_templates/, you can:
-
Change the text presented to the end user on the i-Planet Desktop
-
Remove the NetFile link
-
Add links to predefined applications
-
Add links for third-party applications
Modifying the i-Planet Desktop's References to the NetFile/Netlet Window
The default configuration of the i-Planet Desktop contains a link called NetFile, described as "Java Remote Access and Windowing" shown in Figure 1-2.
Figure 1-2 Desktop Front Page Showing the Default Name and Description for the NetFile Link
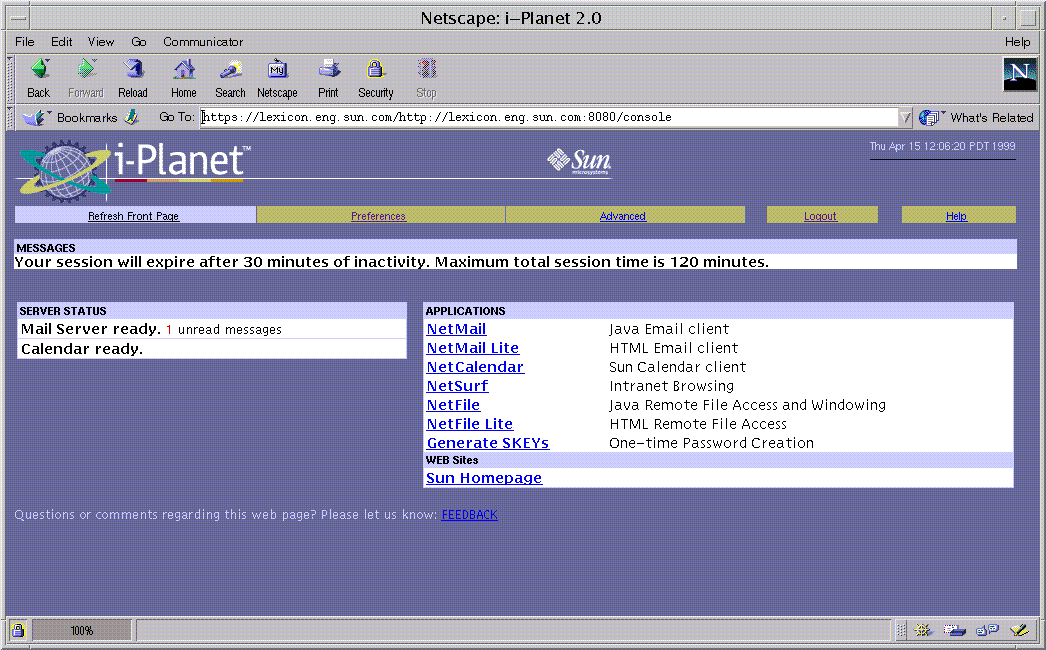
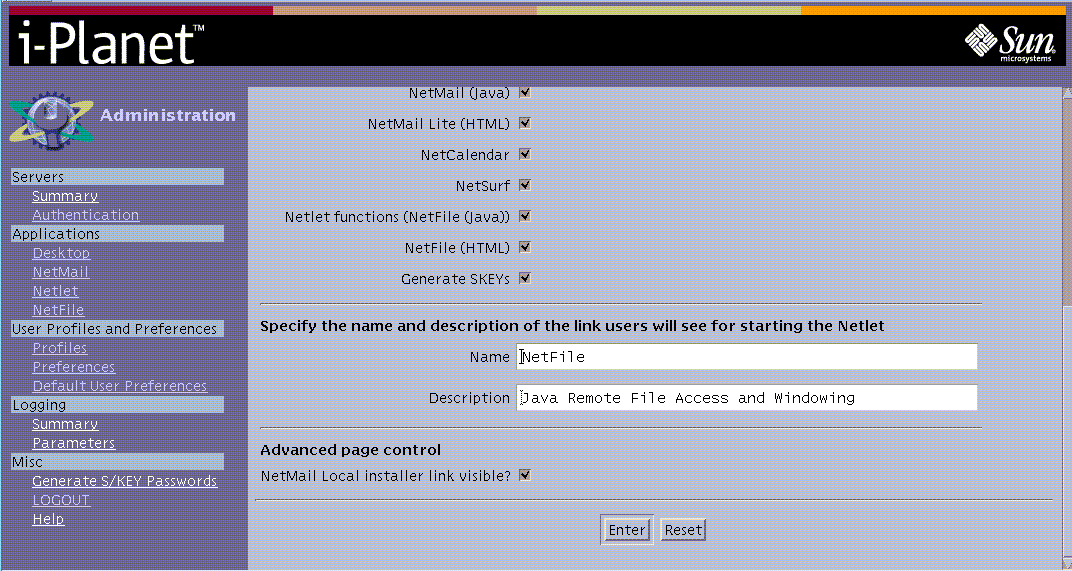
You can change the name of the link and its description through the Default User Preferences and Parameters page of the Administration Console in the section entitled "Specify the name and description of the link users will see for starting the Netlet."
This link uses the Java Script function startNetlet in userTemplate.html and opens a new browser window that has no navigation buttons. It contains a frameset with a frame to start the Netlet and a frame that presents the NetFile link.
To Edit the NetFile Link Name and Description
-
On the Administration Console, click the link Default User Preferences to move to the Default User Preferences and Parameters page shown in Figure 1-3.
Figure 1-3 Default User Preferences and Parameters Page--Lower Half
-
Edit the entries in the section entitled "Specify the name and description of the link users will see for starting the Netlet."
-
Click Enter at the bottom of the page to save your edits.
-
As root on the i-Planet server, type the following to stop and restart the web server so that your edits will take effect.
# /opt/SUNWjeev/bin/iplanet_serv stop
# /opt/SUNWjeev/bin/iplanet_serv start
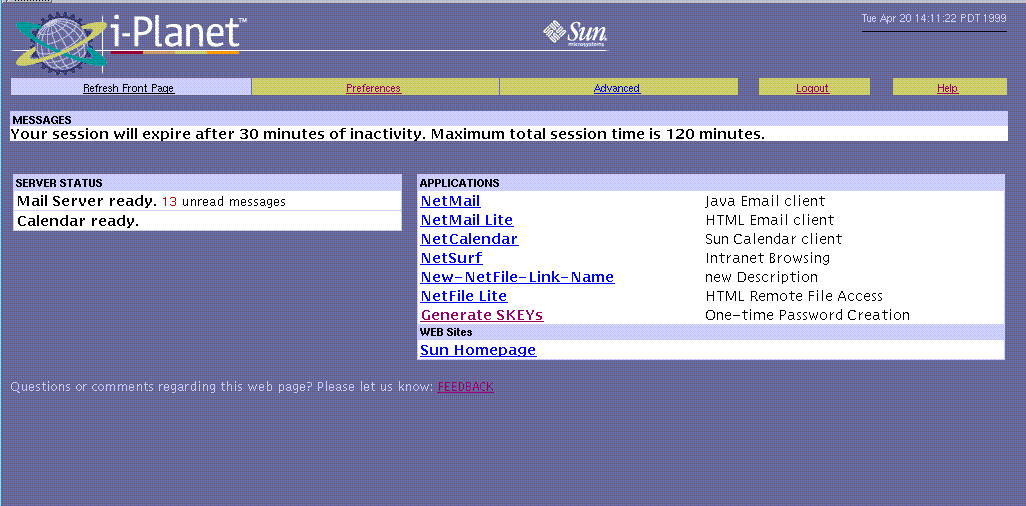
The Desktop Front page should now display the new name and description for the link as, for example, shown in Figure 1-4.
Figure 1-4 Desktop Front Page Showing New Link Name and Description
If the i-Planet end user clicks the NetFile link on the Desktop page twice, a warning appears that the function is available from the NetFile window shown in Figure 1-5 (that is, the small window that was launched when you clicked on the NetFile link). You can change the message by editing the file userTemplate.html.
Figure 1-5 Default Remote File and Windowing Functions Window for the NetFile Link
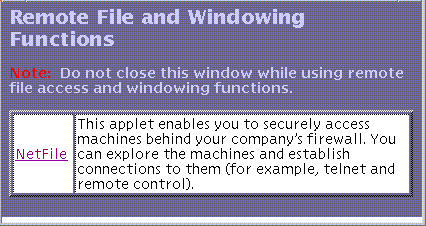
This Remote File and Windowing Functions window and the checks surrounding it prevent the Netlet from being reloaded or restarted while it is running. Reloading the Netlet closes the sockets that it is using and terminates any Netlet-enabled operations in progress.
The Remote File and Windowing Functions window contains the Netlet and links to start browser-based applications that will connect to the Netlet.
Modifying the Name and Description of a Link in the Remote File and Windowing Functions Window
This section describes how to add links and to remove or modify the NetFile link.
Although you cannot include a link for a non-browser-based application here, this window must be open so the Netlet is active before starting the application.
Use the following procedure to modify the Remote File and Windowing Functions window.
To Modify the Name and Description of a Link in the Remote File and Windowing Functions Window
-
On the i-Planet server, open the file /etc/opt/SUNWstnr/html_templates/netletApps.html in a text editor
-
To change the name of the NetFile link and the description:
-
Type a new name for NetFile in the line:
<TD ALIGN=TOP><a href="#"onclick="parent.f3.changeLoc()">

NetFile</a> </TD>
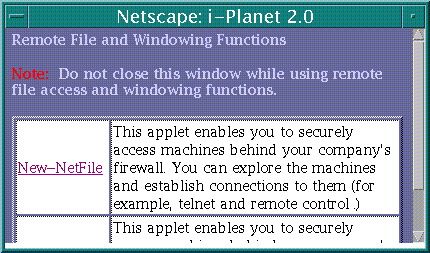
Figure 1-6 shows the Remote File and Windowing Function window with a new name for the NetFile link.
Figure 1-6 New Name for NetFile Link Name in Remote File and Windowing Function Window
-
Edit the text that describes the NetFile link, for example:
<TD><FONT COLOR="#000000">New description for NetFile here. </FONT>

</TD>
-
-
To remove the NetFile link and its description, remove the lines:
<TR BGCOLOR="#FFFFFF">
<TD ALIGN=TOP><a href="#" onclick="parent.f3.changeLoc()">NetFile</a> </TD>
<TD><FONT COLOR="#000000">This applet enables you to securely access machines behind your company's firewall. You can explore the machines and establish connections
to them (for example, telnet and remote control).</FONT>
</TD>
</TR>
Adding Links to Predefined Applications and to Third-Party Browser-Based Clients
Any links that you add must be targeted to new browser windows. If they are not, they will reload the frame when pressed, and the i-Planet end user will not be able to click other links in the small window. This would be confusing because the small window does not contain navigation buttons by design. The lack of navigation buttons is to prevent the frame in which the Netlet is running from being reloaded or browsed from.
When called with the startNetlet function of the /etc/opt/SUNWstnr/html_templates/userTemplate.html file, the frame is passed through the i-Planet Desktop's tag-swapping mechanism, so any HTML template tags that you wish to insert will be translated as they are for other i-Planet Desktop template files.
The window created by startNetlet cannot be resized since resizing the window on some clients will cause the Netlet to be restarted. This action will end any Netlet-enabled operations in progress.
The code related to the cookie named stnrawin should not be removed. It is necessary for ensuring that one (and only one) instance of this window can be displayed.
Some of the NetFile functions use the Netlet, but Netlet is a separate applet.
The Remote File and Windowing Functions window gives the applets a home window that will not be browsed away from or reloaded by the user. When the user browses away or reloads a page that contains an applet, the applet can be restarted or reinitialized (depending on the browser). To avoid that, the applets are "protected" in their own windows.
The small NetFile window contains two applets: NetFile, and Netlet.
Note -
When adding your own link, do not simply copy the HTML code that starts the NetFile applet. It uses JavaScript to communicate with other parts of the frameset. If you do not want to have the NetFile link visible, remove that table row and all the tags within it.
Use the following procedure to add links to predefined applications and to third-party browser-based clients.
To Add a Link to a Predefined Netlet Rule Without Using NetFile
-
To add links to predefined applications, insert the following lines for each predefined application after the end-of-row tag:
<TR BGCOLOR="#FFFFFF">

<TD ALIGN=TOP><A href="Put the product url here."

TARGET="WinName1"> name-of-link</A>

</TD>

<TD><FONT COLOR="#000000">a description of your applet here. </FONT>

</TD>

</TR>
-
(Optional) Type in a description for the predefined application whose link you are adding.
-
Set the href tag equal to the URL for the predefined application for which you want to add a link. The URL for each predefined application is as follows:
-
For Telnet, the URL is:
https://i-Planet_gateway_fully_qualified_name:port_number/http:

//i-Planet_fully_qualified_server_name:port_number/servlet/SRdoNetlet?func=openTelnet&machine=tgt_machine&username=[userName]
-
For GO-Joe (X Windows), the URL is:
https://i-Planet_gateway_fully_qualified_name:port_number/http:

//i-Planet_fully_qualified_server_name/servlet/SRdoNetlet?func=

openXWin&machine=tgt_machine&username=[userName]
-
For Citrix (NT applications), the URL is:
https://i-Planet_gateway_fully_qualified_name:port_number/http:

//i-Planet_fully_qualified_server_name/servlet/SRdoNetlet?func=

openNTApps&machine=tgt_machine&username=[userName]
-
For all options to control Microsoft Windows remotely, the URL to enable all selected applications at the same time is:
https://i-Planet_gateway_fully_qualified_name/http://i-Planet_

fully_qualified_server_name/servlet/SRdoNetlet?func=

openRemoteControl&machine=tgt_machine&username=[userName]
Note -For all of the above URLs, you will need to supply a real value for the tgt_machine.
-
To Add a Link for a User-Defined Netlet Rule
-
Insert the following lines after the end-of-table-row tag (</TR>) to add a link to the table:
<TR BGCOLOR="#FFFFFF">

<TD ALIGN=TOP><A href="http://localhost:8099/path-to-the-applet/appletPage.html"

TARGET="WinName1"> name-of-link</A>

</TD>

<TD><FONT COLOR="#000000">a description of your applet here. </FONT>

</TD>

</TR>
Figure 1-7 shows a sample Remote File and Windowing Functions window with an added link and description of that link.
Figure 1-7 Added Link in the Remote File and Windowing Functions Window
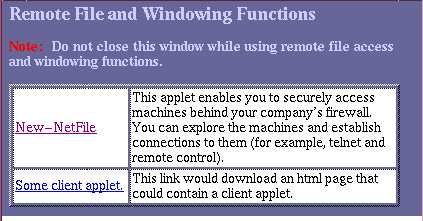
The HTML code that produces the new link shown in Figure 1-6 is shown in Adding a New Link and Description
<TR BGCOLOR="#FFFFFF"> <TD ALIGN=TOP><a href="http://localhost:8099/appletPath/startApplet.htm" target="newwin">Some client applet.</a> </TD> <TD><FONT COLOR="#000000">This link would download an html page that could contain a client applet. </FONT> </TD> |
This example assumes that you have created a Netlet rule that directs traffic from the client port 8099 to the web server and the port on which the HTML page resides.
- © 2010, Oracle Corporation and/or its affiliates
