| C H A P T E R 9 |
|
Store List Wizard |
A wizard is an application that makes it easier to perform a complicated task. The Store List Wizard enables you to create Java code that saves related data from multiple 3270 screens into a single variable. The Store List Wizard saves you from having to access each screen and manually copy the data into a list.
The length of a list can vary depending on runtime factors. Because it is not possible to guarantee the length of the list at runtime, a function that can traverse a list and determine when the end of the list has been reached is needed. The Store List Wizard provides this functionality.
This chapter contains the following topics:
When you start the Store List Wizard, a dialog guides you through a series of pages. Typically, the wizard requests some information on each page. You supply the required information and click the Next button to go to the next page of the wizard.
The Store List Wizard requires answers to the following questions:
After the wizard has obtained enough information, it can create Java source code to perform the list retrieval. This source code is displayed in the Code Viewer window of the Navigation Recorder.
1. Make sure the 3270 Pathway Recorder is in recording mode.
2. Make sure you are on the first page of your list.
If not, close the Store List Wizard and in the 3270 emulator screen navigate to the start of the list.
3. Use either method to start the wizard:
 Store List Wizard.
When you are recording the traversal of a list, it is a good idea to use a list that spans more than one 3270 emulator screen. The Store List Wizard needs to record the key strokes necessary to make the host application proceed to its next screen.
The Store List Wizard is displayed as a dialog within the 3270 Pathway Recorder. FIGURE 9-1 is an example of the basic structure, which is a page at the top of the window with a set of controls beneath it.
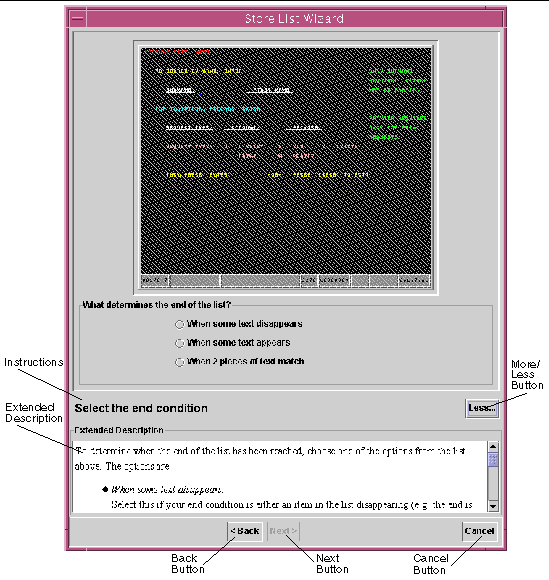
The labels in FIGURE 9-1 identify the following items on the Store List Wizard window:
This section contains an example of a route through the Store List Wizard, which uses the Sun MTP transaction CTBL. If you have the Sun MTP software installed, you can follow this example by displaying the Program Control Table (PCT) before starting the Store List Wizard.
1. Start the Sun MTP region and make a connection.
2. Type the CTBL transaction to display the Table Manager menu.
3. Press PF4 to display the Standard Tables menu.
4. Press PF6 to display the PCT.
5. Start the Store List Wizard as described in Starting the Store List Wizard.
When the Store List Wizard starts, a Welcome screen is displayed, which gives some general information about the Store List Wizard. No information is required from the user at this point.
6. Click the Next button to move to the next page.
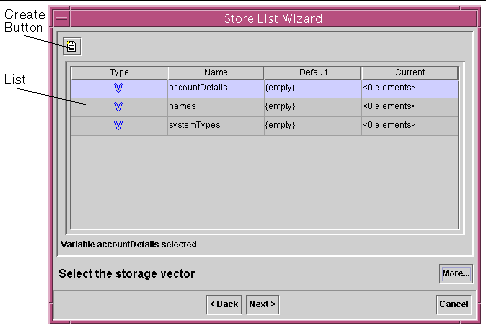
The Select the storage vector page is used to define the Vector variable in which to store the data. The page has two areas, which are identified with labels in FIGURE 9-2.
|
Area in the middle of the screen that lists all the Vector variables that were created in this navigation. If none were created, the list is empty. |
|
 Select the correct Vector variable in the list and click Next.
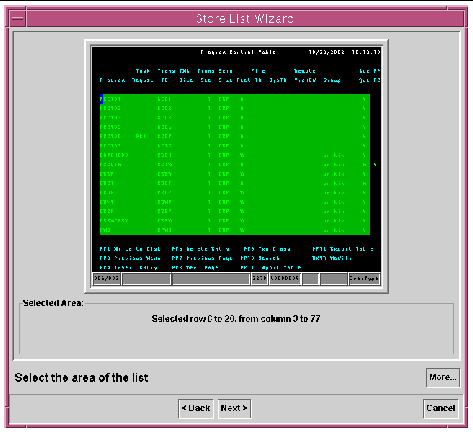
The list area is defined as the area on the 3270 emulator screen where the data for the list appears. When the Store List Wizard navigates to a new 3270 emulator screen, the data defined by the list area is stored in the storage vector. Each row of the list area is stored as a separate element within the storage vector.
1. Use the mouse to highlight the list area on the 3270 emulator.
When a selection is made, the Selected Area portion of the window indicates the area of the list that was highlighted, and the Next button becomes active (see FIGURE 9-3).
2. When you are satisfied that you have selected the correct area click Next.
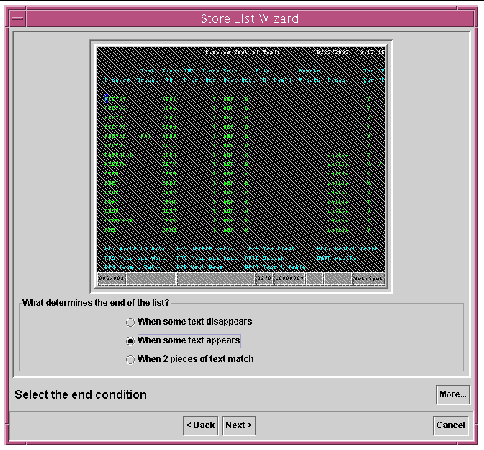
There are three conditions you can use to determine the end of the list:
Use this condition when a message is displayed on the screen informing you that the end of the list has not been reached, or when the next item in the list is different from the previous item.
Use this condition when a message is displayed on the screen informing you that the end of the list has been reached, or when the next item in the list matches a specific piece of text.
Use this condition for lists that display the current page number of the list and a page total, for example, Page 1 of 5.
FIGURE 9-4 shows a screen with the When some text appears option selected.
You must record the page advance actions, even if you are already at the end of the list, so that the wizard knows how to advance at runtime if the list is more than one page.
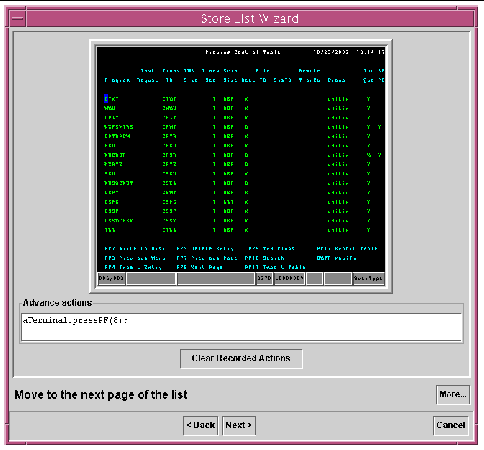
On the 3270 emulator, record the actions required to advance the list by one screen. These actions are displayed in the Advance actions list below the 3270 emulator screen. After you press an AID key, the 3270 emulator does not accept any keyboard input. If you need to correct a mistake, click the Clear Recorded Actions button.
If your key strokes are not being recorded, ensure that the 3270 emulator screen has focus by clicking it with the mouse and trying your commands again.
Press the PF8 key to display the results shown in FIGURE 9-5.
 [ D ]
[ D ]
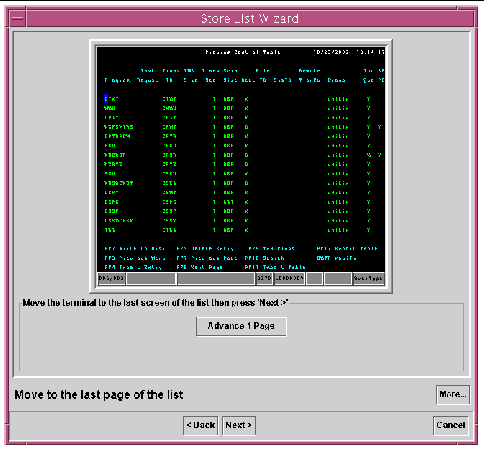
Move the 3270 emulator to the end of the list by using the Advance 1 Page button or by directly manipulating the 3270 emulator. See FIGURE 9-6.
The Advance 1 Page button repeats the actions performed on the Record the advance actions page. You should use the Advance 1 Page button so that when you finish with the Store List Wizard, the storage vector contains the list data. No matter which method you use to arrive at the end of the list, the runtime storage of the list into the storage vector is not affected.
When you reach the screen that identifies the end of the list, advance to the next page of the Store List Wizard by clicking Next.
For this example, make sure that you continue to advance forward until the end of the list message is displayed.
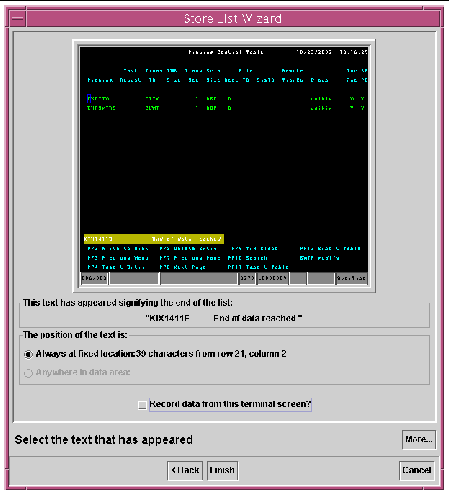
Specify which text is to be displayed on the 3270 emulator when the end of the list is reached by highlighting the selection on the 3270 emulator using the mouse.
Select the position of the text using one of the following options:
When the 3270 emulator screen has the selected text at this position, the end of the list has been encountered.
To activate this option, the selected text must be wholly contained within the list area and cannot span more than one 3270 emulator row. If the selected text is found at the appropriate column on any row within the data area, the end of the list has been encountered.
Certain applications only provide information stating that the end of the list has been reached after an attempt is made to move past the end of the list. In these cases, do not store the final screen, because it is a retransmission of the last page of the list. To ensure that the wizard stores the correct cases for these applications, make sure that the Record data from this emulator screen check box is not checked.
When you click Finish, the Store List Wizard closes and generates code in the Code Viewer window. For this example, ensure that the check box is not checked as shown in FIGURE 9-7.
This concludes a typical walkthrough for the Store List Wizard. There are three other screens in the Store List Wizard that are described in the following sections.
To make text disappear when the end of the list is reached, you must select the position of the disappearing text using one of the following options:
When the 3270 emulator screen does not have the selected text at this position, the end of the list has been encountered.
To activate this option, the selected text must be wholly contained within the list area and cannot span more than one 3270 emulator row. If the selected text is found at the appropriate column on any row within the data area, the end of the list has been encountered.
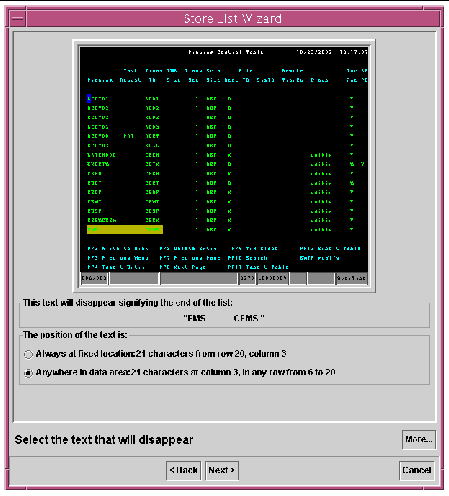
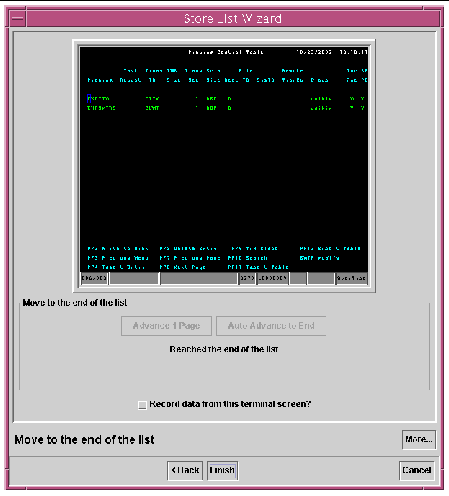
Move the 3270 emulator to the end of the list by clicking the Advance 1 Page or the Auto Advance to End button. If the 3270 emulator is at the end of the list already, these two buttons are disabled.
The Auto Advance to End button attempts to take you automatically to the end of the list. If it succeeds, the button becomes deselected and the Finish button becomes active. However, if it seems that the list is not going to reach the end, click the button again and use the Back button to return to previous pages to check that you have correctly defined the scope of the list.
Certain applications only provide information stating that the end of the list has been reached after an attempt is made to move past the end of the list. In these cases, it is not desirable to store the final screen because it is a retransmission of the last page of the list. To ensure that the wizard stores the correct cases for these applications, make sure that the Record data from this emulator screen check box is not checked. See FIGURE 9-9.
When you click Finish, the Store List Wizard closes and generates code in the Code Viewer window.
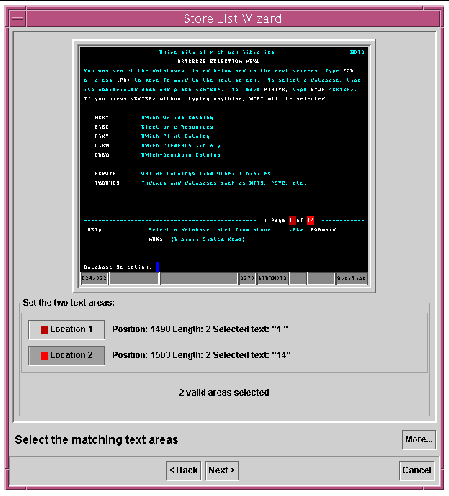
Certain applications provide a message informing the user which page of the list is currently displayed and how many pages the list spans. With these applications, you know when you are on the last page because the two values match. To define this to the Store List Wizard, you must select two areas on the 3270 emulator screen as shown in the following figure.
 [ D ]
[ D ]
1. Click either the Location 1 or Location 2 button.
2. Select the area on the 3270 emulator screen.
The highlighted area matches the respective location color.
3. Click the other location button.
4. Select the second area on the 3270 emulator screen.
The two text areas must be the same length and must not overlap.
Copyright © 2003, Sun Microsystems, Inc. All rights reserved.