| C H A P T E R 10 |
|
TCP Routing Program |
This chapter describes the configuration, execution, and use of the TCP Routing program. It contains the following topics:
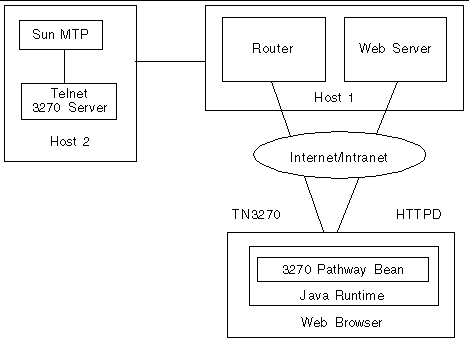
The Java security model prevents any applet from connecting to any host except the one from which it was originally downloaded. This means that if a Java applet must communicate to a TN3270 server, the TN3270 server must be located on the same host as the web server. To overcome this limitation, the TCP Routing program (router) can run on the web server system to route client requests to the destination TN3270 server. FIGURE 10-1 illustrates a configuration in which the TCP Routing program is used as an intermediary.
 [ D ]
[ D ]
The procedures in this section describe how to start the router on various platforms.
On Solaris or UNIX systems, there are two ways to start the router.
1. Ensure that the required level of JRE is on your path.
See Obtaining a Java Runtime Environment (JRE).
2. Run the pathway_router.sh shell script located in the bin directory of the product installation.
1. Ensure that the required level of JRE is on your path.
See Obtaining a Java Runtime Environment (JRE).
2. Run the executable JAR file located in the lib directory of the product installation.
Change to the lib directory and type the following command:
There are three ways to start the router.
1. On the desktop, click the Start button.
2. Select Start  Programs
  Sun 3270 Pathway 2.0.0
  Router.
 Run the pathway_router.exe program located in the bin directory of the product installation.
1. Ensure that the required level of JRE is on your path.
See Obtaining a Java Runtime Environment (JRE).
2. Run the executable JAR file located in the lib directory of the product installation.
Change to the lib directory and type the following command:
You can invoke the TCP Router with a series of parameters on startup.
pathway_router [-h Target-Host] [-p Target-Port] [-l Local-Port] [-g] [-t]
|
Name of the machine on which the TN3270 server and the Sun MTP region are executing. |
|
|
Port number at which the TN3270 server is listening. The default is 2001. |
|
|
Port number at which the router is to listen on the local machine. The default is 2001. |
|
|
Starts the router with the graphical user interface (GUI). See Graphical User Interface (GUI). |
|
|
Starts the router with all connections having diagnostic tracing in the active state. See Diagnostic Tracing. |
The router can be started with or without a graphical user interface (GUI). By default, the router starts with a GUI.
To start the router without a GUI, you must specify as a command-line parameter, the target host to connect to. Optionally, you can specify the target port and local port. If you do not specify these, the router uses the default values.
If the router is started without a GUI, it automatically starts routing to the specified target host. If you want the router to automatically start routing to a particular host and want a graphical display, you must specify the -g option as a command-line parameter.
The GUI enables you to see the current number of connections going through the router. It also enables you to enable or disable diagnostic tracing at any time.
|
Note - Starting the router with the GUI enabled adds some processor overhead. |
1. Type the following command to start the router with the GUI:
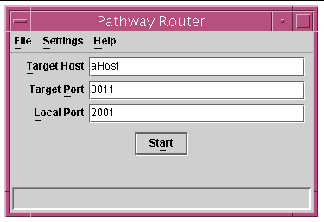
The connection dialog shown in FIGURE 10-2 is displayed.

2. Type values in the following fields: Target Host, Target Port, and Local Port.
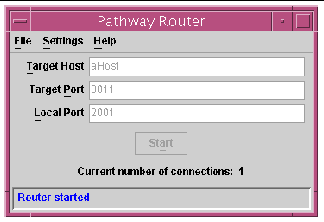
3. Click the Start button, which attempts to connect to the specified host and disables the input fields as shown in the following figure.
 [ D ]
[ D ]
The current number of connections is shown below the Start button.
The following table lists the menu bar items on the GUI connection dialog.
|
Check box toggles a setting so that any new connections have diagnostic tracing set to on or off. See Diagnostic Tracing. |
|
|
Contains an About option that displays router product information. |
A diagnostic trace stores the data sent to and received from the target host. The data is stored in trace files in the current working directory on your disk. There is a file for each connection through the router and it contains both the data sent to and data sent from the target host. You can review this information to determine if the data was what you were expecting.
|
Note - Do not start diagnostic tracing unless you must review the data or are asked to obtain a diagnostic trace by your authorized Sun service provider. |
When you use a diagnostic trace, be aware that:
The following table shows the structure of a diagnostic trace file name.
|
The client port number, followed by an underscore. Note that the client port is not the same as the local port. |
|
When a trace is started, the start time and date of that trace is written to the trace file. When there is a transfer of data, the following information is written to the file:
The following figure shows an example of a trace file.
Copyright © 2003, Sun Microsystems, Inc. All rights reserved.