Using the Preferences Tab
The Preferences tab allows you to define and edit push synchronization settings common to all users. If you enable push synchronization, you can send messages to users asking them to perform a synchronization.
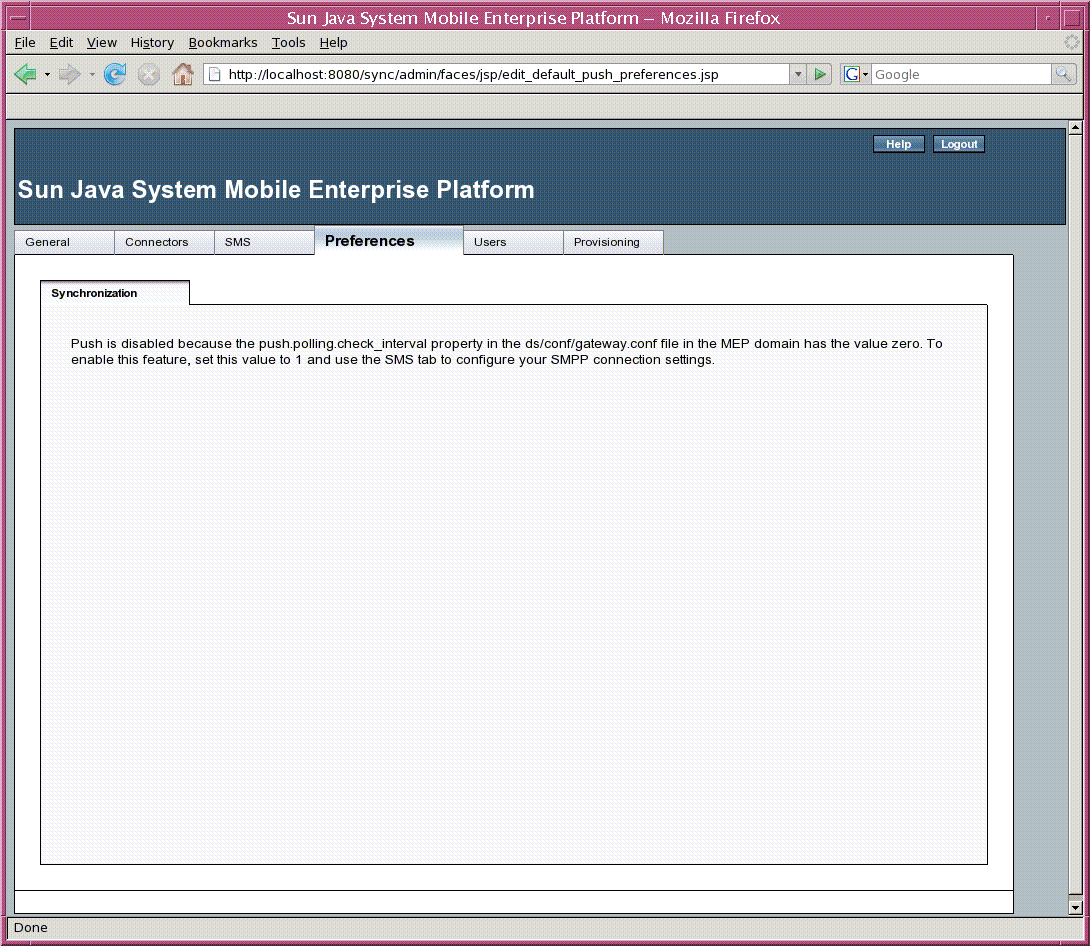
You can use the Preferences tab only if the MEP Gateway is configured to allow push synchronization. By default, the MEP Gateway is not configured to allow push synchronization, and a message stating this appears in the Preferences tab panel.
Figure 1–6 shows the Preferences tab with the default setting.
Figure 1–6 Preferences Tab with Default Push Synchronization Setting

This section describes the following tasks:
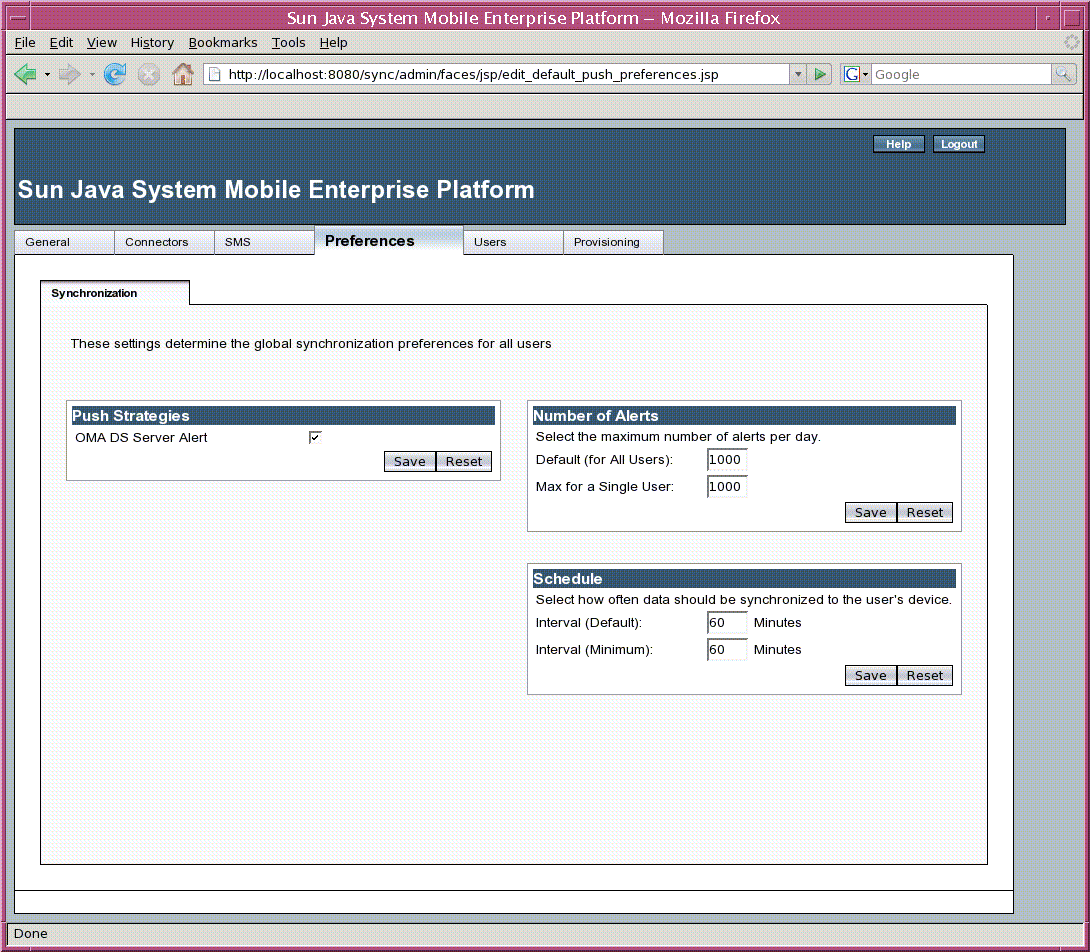
Figure 1–7 shows the Preferences tab with push synchronization enabled.
Figure 1–7 Preferences Tab with Push Synchronization Enabled

 To Enable Push Synchronization for All Users
To enable push synchronization, you must edit a configuration file and then stop and restart the Application Server. You perform these tasks outside the Admin Console.
-
Open the file mep-domain-dir/ds/conf/gateway.conf in a text editor (mep-domain-dir is the location of the Application Server domain for MEP).
-
Locate the following line:
push.polling.check_interval = 0
-
Change the 0 to a value that specifies how often, in milliseconds, the Gateway Engine should check for updates on the EIS/EAI system or database. The following setting specifies an interval of two minutes:
push.polling.check_interval = 120000
-
Save and close the file.
-
Stop the Application Server (as-install represents the directory where the Application Server is installed):
as-install/bin/asadmin stop-domain mep
-
Start the Application Server again:
as-install/bin/asadmin start-domain mep
You will be asked for the master password; the default is adminpass.
Next Steps
After you restart the Application Server, the Preferences tab contains three panels. In the Push Strategies panel, the OMA DS Server Alert checkbox is selected, indicating that push synchronization is enabled.
 To Enable and Disable Push Synchronization
Use the Push Strategies panel to turn push synchronization on and off for all users. If you enable push synchronization for all users, you can configure it for individual users in the Users panel, as described in To Edit User Preferences.
In order for changes in this panel to take effect, you must stop and restart the Application Server.
To use this feature, follow these steps.
-
To enable push synchronization for all users, select the OMA DS Server Alert checkbox. To disable this feature, deselect the checkbox.
-
Click Save to store and apply your settings, or click Reset to return to the original setting.
-
Stop the Application Server (as-install represents the directory where the Application Server is installed):
as-install/bin/asadmin stop-domain mep
-
Start the Application Server again:
as-install/bin/asadmin start-domain mep
You will be asked for the master password; the default is adminpass.
 To Change the Number of Alerts
Use the Number of Alerts panel to set the maximum number of alerts (push synchronization messages) that can be sent in a day, both for all users (combined) and for each individual user. Use this feature to control the cost or bandwidth usage incurred by push synchronization. Follow these steps:
-
In the Default (for all Users) field, type the maximum number of alerts per day for all users.
Once this value is reached, push synchronization is disabled for all users until the next day. The default value is 1000.
-
In the Max for a Single User field, type the maximum number of alerts per day for a single user.
Once this value is reached, push synchronization is disabled for this user until the next day. The default value is 1000.
-
Click Save to store and apply these settings, or click Reset to return to the original settings.
 To Set the Schedule for All Users
Use the Schedule panel to specify how often MEP checks the server for updated data for a user. If updated data is found, a push synchronization message is sent to a user's mobile device. To use this panel, follow these steps.
-
In the Interval (Default) field, type the desired number of minutes MEP waits before it checks the server for updated data for a user.
When you create a new user, the default value is used automatically. To modify the value for an individual user, use the Users tab as described in To Edit User Preferences. The default value for this field is 60.
-
In the Interval (Minimum) field, type the minimum number of minutes that can be specified for an individual user.
The default value for this field is 60.
-
Click Save to store and apply these settings, or click Reset to return to the original settings.
- © 2010, Oracle Corporation and/or its affiliates
