Using the Users Tab
The Users tab and its sub-tabs allow you to add new users, delete users, view users' synchronization logs, change synchronization settings for individual users, and perform other tasks.
This section describes the following tasks:
Creating New Users
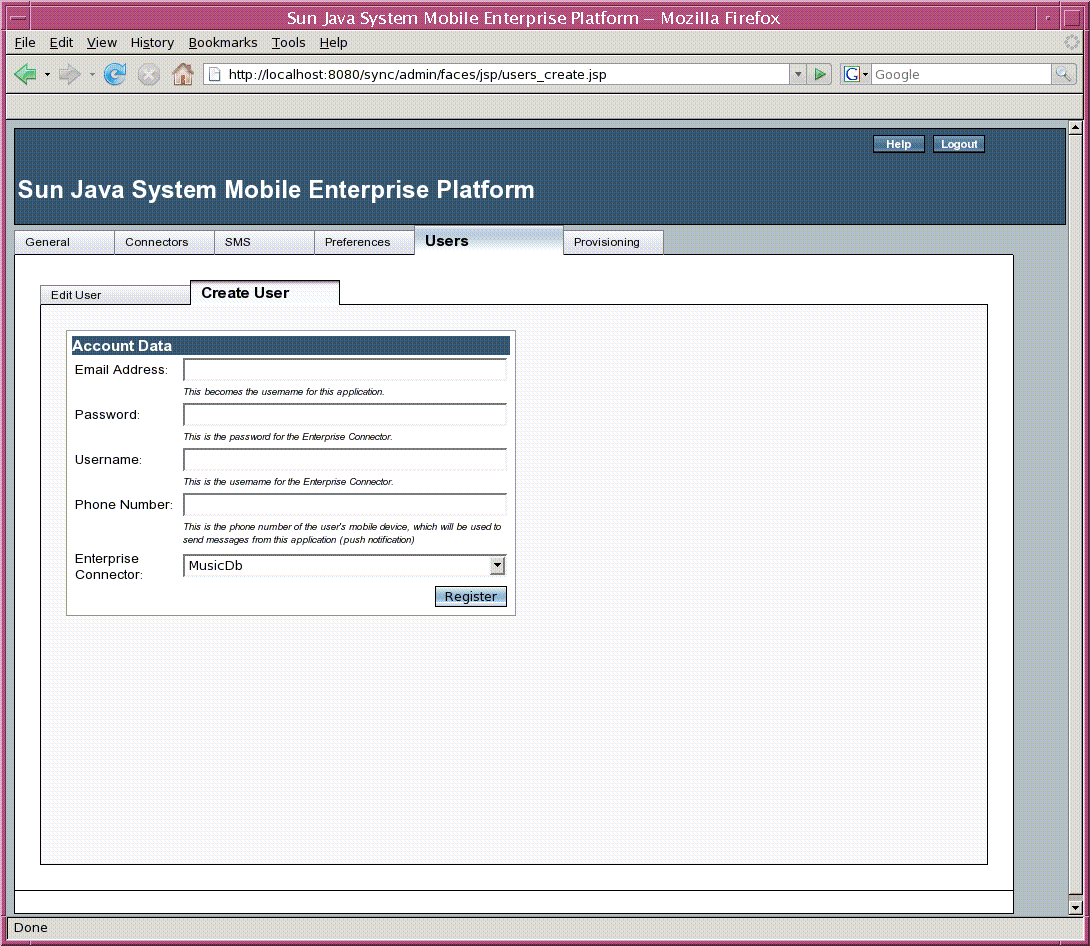
To create a MEP user, use the Account Data panel of the Create User sub-tab to create a user for a specific connector.
Users identify and authenticate themselves in the different parts of MEP by using three different credentials: an email address, a username, and a password.
-
A mobile client user authenticates with the Gateway tier using an email address and a password.
-
A Gateway tier user authenticates with the Enterprise Connector using a username and password. In a two-tier system, these credentials are passed to the Enterprise tier. In a single-tier system, they are passed directly to the Enterprise Connector.
-
An Enterprise tier user has two possibilities for authenticating with the Enterprise Connector:
-
It may use a username and password, which are treated as different from the ones used on the Gateway tier.
-
It may choose not to specify a username and password, in which case the username and password from the Gateway tier are used.
The Enterprise Connector establishes credentials for authenticating with the EIS/EAI system or database.
For a two-tier MEP installation, you should specify the user mapping on the Enterprise tier before you create the users on the Gateway tier. See Using the Users Tab for the Enterprise Tier
-
Figure 1–8 shows the Create User sub-tab of the Users tab.
Figure 1–8 Create User Sub-tab of Users Tab

 To Create a New User
Follow these steps to create a user that will be used to authenticate with the Enterprise Connector.
-
Click the Create User sub-tab.
-
In the Email Address field, type the user's email address, which will serve as the user name for the client application to identify itself to the MEP Gateway.
-
In the Password field, type the password.
-
On a single-tier system, this is the password for both the Gateway and the Enterprise Connector.
-
On a two-tier system, this is the password for the Gateway.
-
-
In the Username field, type the user name for the Enterprise Connector
-
On a single-tier system, this is the user name for both the Gateway and the Enterprise Connector.
-
On a two-tier system, this is the user name for the Gateway.
-
-
In the Phone Number field, type the phone number of the mobile device, to be used for sending messages to the device for push synchronization, poison pills, or client provisioning.
Specify the full international phone number, including the initial plus sign (for example, +19995551212).
-
Choose the Enterprise Connector for the application from the Enterprise Connector drop-down list.
Do not choose Auto-select by Remote DB Name.
-
Click Register to create the user.
Editing and Deleting Users
The Edit User sub-tab allows you to view information on all users, modify the settings for a user, or delete a user. You can perform the following tasks:
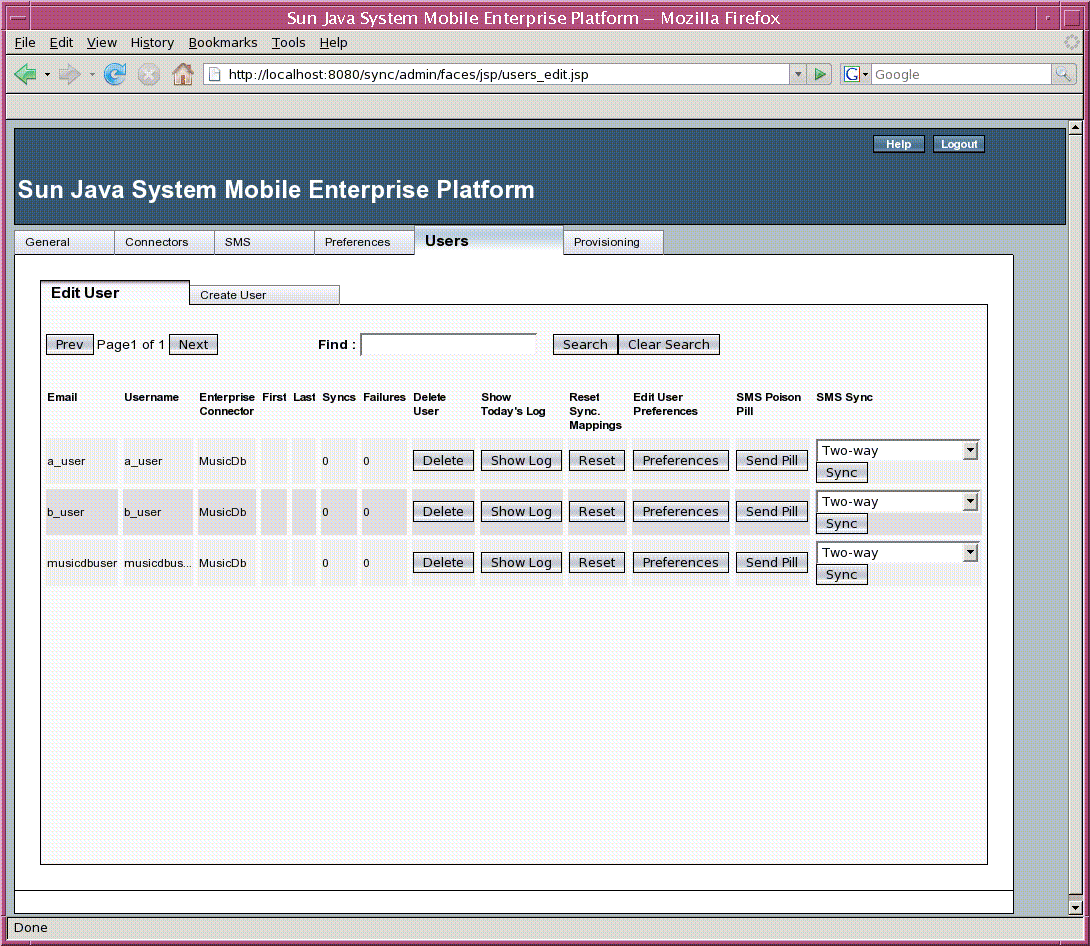
Figure 1–9 shows the Edit User sub-tab of the Users tab.
Figure 1–9 Edit User Sub-tab of Users Tab

Viewing User Information
The Edit User sub-tab lists all the MEP users for your installation in a table that contains the columns shown in Table 1–2.
Table 1–2 Columns in the User Information Table|
Column |
Description |
|---|---|
|
|
The user's email address |
|
Username |
The user name for the user |
|
Enterprise Connector |
The name of the Enterprise Connector as specified in the Connectors tab |
|
First |
The date of the first synchronization session for the user |
|
Last |
The date of the last synchronization session for the user |
|
Syncs |
The total number of synchronization sessions. For some mobile devices, a synchronization session may consist of multiple sub-sessions. |
|
Failures |
The number of failed synchronization sessions. Failure can be caused by a synchronization error or a wireless link interruption. Use the log file to determine the cause of failure. |
|
Delete User |
See To Delete a User |
|
Show Today's Log | |
|
Reset Sync. Mappings | |
|
Edit User Preferences | |
|
SMS Poison Pill | |
|
SMS Sync |
Use this list as follows:
-
Click the Prev and Next buttons to move from page to page of a multi-page user list.
-
Type text in the Find field and click Search to find the user whose email address, user name, or back end matches the string typed.
Note –The text you type must be the exact user name, not a substring.
Click Clear Search to restore the complete user list after a search.
-
Click a column label to sort by that column.
 To Delete a User
Use the Delete User column to delete a user's account. This action deletes the user's MEP account and removes all information about previous synchronization sessions from the MEP database, but it does not delete any data on the EIS/EAI server or database or on the mobile device.
Note –
Before you can remove an Enterprise Connector from the Connectors sub-tabs, you must first delete all users for that Enterprise Connector.
-
Find the user whose account you want to delete.
-
Under the Delete User column, click Delete for that user.
There is no confirmation dialog. The user's account is now deleted.
 To View a User's Log
Use the Show Today's Log column to view the current log for a user.
This action displays a summary of all user sessions in a new browser tab or window. Use the log to troubleshoot synchronization problems and report errors.
Note –
Only synchronization sessions for the current day are displayed. You can use the command line to view the complete log, which is at the path shown in the Logging Configuration panel of the General tab.
-
Find the user whose log you want to view.
-
Under the Show Today's Log column, click Show Log for that user.
The log appears in a new browser tab or window. If there is no log for the current day, the following message appears:
    There are no synchronization sessions
    for the selected user
 To Reset Synchronization Mappings for a User
Use the Reset Sync. Mappings column to reset the synchronization mappings for a particular user. You can reset the mappings for all users from the Gateway tab; see Resetting Synchronization Mappings.
This action resets the stored synchronization information (mapping) for the particular user, which will cause a complete synchronization of all data during the next synchronization. Perform this action if a particular user has problems synchronizing. This action will significantly slow down the next synchronization for that user.
-
Find the user whose synchronization mappings you want to reset.
-
Under the Reset Sync. Mappings column, click Reset for that user.
 To Edit User Preferences
Use the Edit User Preferences column to edit push synchronization preferences as well as the telephone number for a particular user's mobile device.
For more information on push synchronization, see Using the Preferences Tab.
-
Find the user whose preferences you want to edit.
-
Under the Edit User Preferences column, click Preferences.
Another version of the Edit User tab appears, with a Close button at the top and the label “Edit preferences for user”, where user is the user's email address.
-
You can enable server push for a user only if push synchronization is enabled for all users. (See To Enable Push Synchronization for All Users.) To enable automatic server push for the user, use the Server Push panel as follows:
-
In the Mobile Device Configuration panel, edit the telephone number or type a new telephone number in the Phone Number field, then click Save.
A success message appears at the bottom of the window.
-
The Schedule panel is enabled only if push synchronization is enabled for all users and if Server Push is enabled for that particular user. (See To Enable Push Synchronization for All Users.) To modify the schedule for a particular user, use the Schedule panel as follows:
-
To return to the original Edit User display, click the Close button.
 To Send a Poison Pill to a Client
Use the Send Poison Pill column to destroy all the data on a mobile device. You may need to do this if, for example, the mobile device is stolen. The poison pill is a message sent to the device. If the client application on the device is set up to handle this message, the application will destroy the data.
Before you can use the Send Poison Pill column, you must use the SMS tab to set up the SMPP connection for your SMS provider, as described in Using the SMS Tab.
 To Send a Synchronization Message to a Client
Use the SMS Sync column to notify a client application that it needs to synchronize data with the server. This notification is a message sent to the mobile device. If the client application on the device is programmed to listen for alerts and to act on them appropriately without user intervention, the client application will perform the synchronization.
Before you can use the SMS Sync column, you must use the SMS tab to set up the SMPP connection for your SMS provider, as described in Using the SMS Tab.
- © 2010, Oracle Corporation and/or its affiliates
