| Oracle® Enterprise Data Quality for Product Data Knowledge Studio Reference Guide Release 5.6.2 Part Number E23610-03 |
|
|
View PDF |
| Oracle® Enterprise Data Quality for Product Data Knowledge Studio Reference Guide Release 5.6.2 Part Number E23610-03 |
|
|
View PDF |
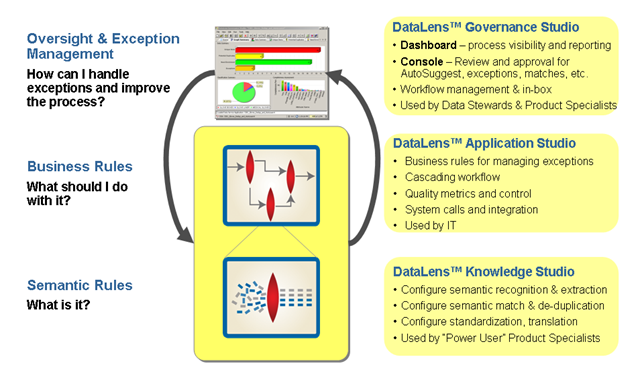
Oracle DataLens Server is built on industry-leading DataLens™ Technology to standardize, match, enrich, and correct product data from different sources and systems. The core DataLens Technology uses patented semantic technology designed from the ground up to tackle the extreme variability typical of product data.
Oracle Enterprise Data Quality for Product Data, formerly Oracle Product Data Quality, uses three core DataLens Technology modules: Governance Studio, Knowledge Studio, and Application Studio. The following figure illustrates the process flow of these modules.
This guide describes basic and advanced techniques that you can use to maximize the effectiveness of the Enterprise DQ for Product (EDQP) Knowledge Studio. These techniques help refine your knowledge about your data and supply your Subject Matter Experts (SME) with in-depth information on important aspects of the DataLens methodology.
The Knowledge Studio allows you to create data lenses, which are collections of rules that enable the recognition, classification, and standardization of data. There are three main activities required to build a data lens:
Create rules to recognize the data and build variant forms into the lens.
Identify the attributes necessary to accurately define an item.
Create standardization rules for terms, phrases, and Item Definitions.
This reference guide will help you understand the process of building a data lens using writing instruments product data.
You can start Enterprise DQ for Product by using either the desktop shortcut or the Windows Start menu as follows:
Note:
If Enterprise DQ for Product is not installed, you can install it using the instructions in Appendix A, "Installing the Client Software."Double-click the desktop shortcut.
Click Start, Programs, Oracle Enterprise Data Quality for Product Data, and select Oracle Enterprise Data Quality for Product Data.
The Oracle Enterprise Data Quality for Product Data Login dialog box appears.
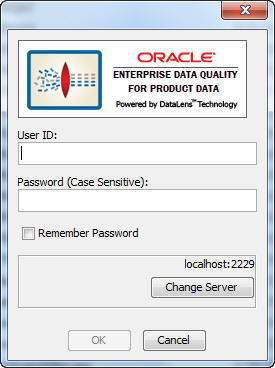
Enter your user name and password . You can avoid entering your password every time you logon by selecting the Remember Password check box.
If you want to change your Oracle DataLens Server or use HTTP Secure (HTTPS), click Change Server. The HTTPS option is only certified to run on an Oracle DataLens Server using WebLogic as the application server.
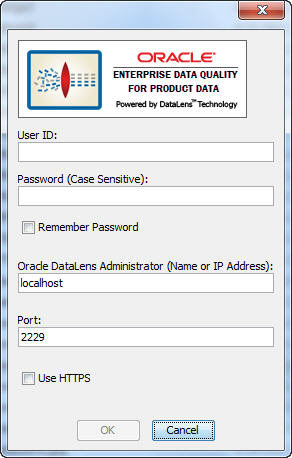
To change your Oracle DataLens Server, enter the hostname or IP Address of your Oracle DataLens Administration Server and its port number.
Note:
When the Oracle DataLens Server is using a WebLogic Application Server, this port number must match the port number of the WebLogic Domain Server.To use HTTPS to contact your Oracle DataLens Server, select the Use HTTPS checkbox.
Note:
Your Oracle DataLens Server (and all other servers in the EDQP topology) must all be configured to use HTTPS. For more information about configuring and using HTTPS, see the Oracle Enterprise Data Quality for Product Data Oracle DataLens Server Administration Guide.When all of the information is correct, click OK.
The Oracle Enterprise Data Quality for Product Data Launch Pad appears.

The Oracle Enterprise Data Quality for Product Data Launch Pad allows you to quickly start any of the Oracle DataLens Server applications by clicking on any of the buttons. You can close all open Enterprise DQ for Product applications using the Close All button.
Click the Oracle Knowledge Studio button to start the application.
The Knowledge Studio graphical user interface (GUI) provides the client workspace used to create and manage a data lens.
Note:
Functionality that has not been configured or that the current user is not authorized to use is dimmed.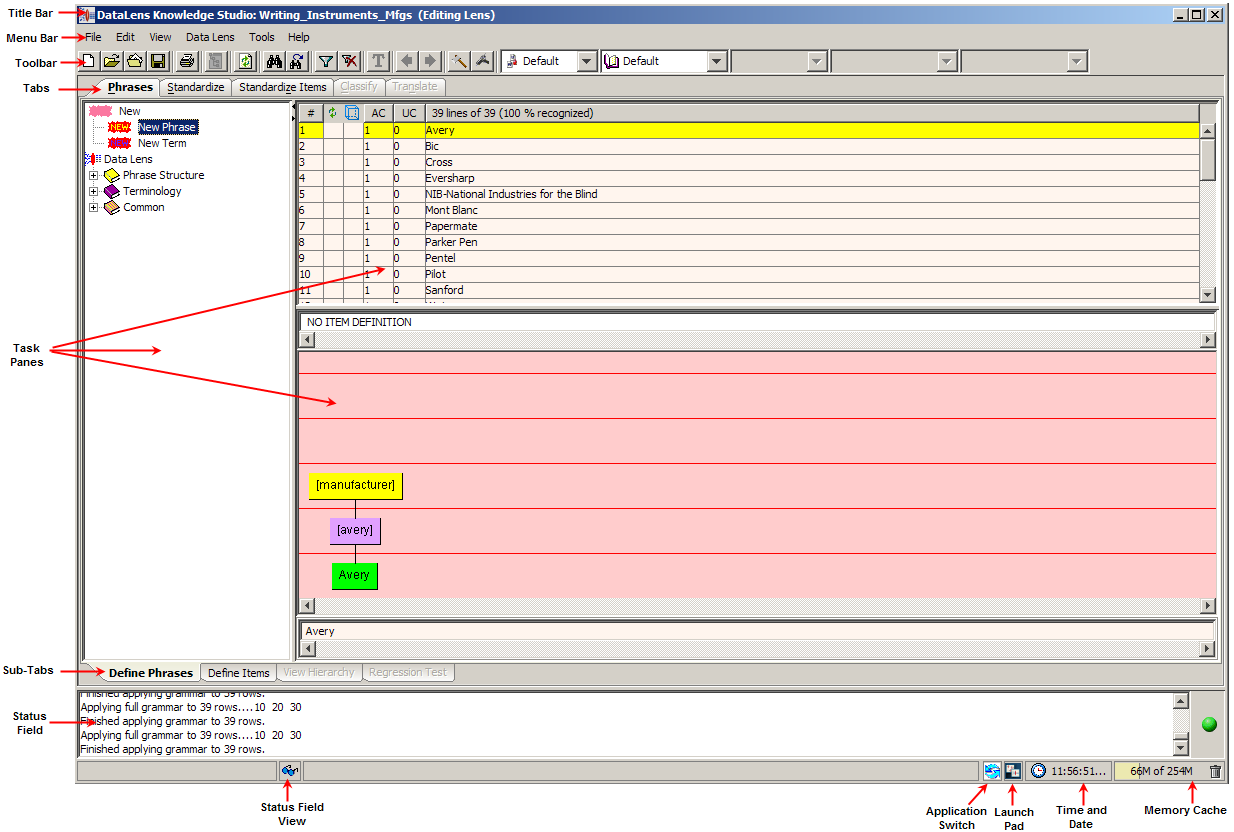
The Knowledge Studio client workspace frame contains useful information and interactive functions including the following:
Indicates the current application and open project.
Provides the processing status of the data lens one line at a time. This field can be resized and the scroll arrows on the right-hand side can be used to view all available status information. The status data does not change based on the selected tab, rather it is a compilation of all data.
Controls whether the Status Field is displayed or not.
Returns you to the last Enterprise DQ for Product application used.
This button opens the Oracle Enterprise Data Quality for Product Data Launch Pad so that you can select other applications.
The time is displayed and when you hover over this field, the date displays.
Indicates the amount of memory cache currently used and the total amount allowed. You can dump the memory cache by clicking on the trash can icon in this interactive field.
Note:
This feature is only used for system diagnosis and should not be used unless requested by the support team.The Knowledge Studio toolbar allows easy access to the most frequently used Knowledge Studio functions. Though the set of toolbar buttons remains the same during user interface operation the buttons are enabled or disabled based the current state of you interface and options set. Buttons displayed with shades of gray are disabled. Full-color buttons are enabled. All toolbar buttons are standard push buttons, requiring a single click of the mouse to activate.
The following briefly describes the toolbar buttons from left to right.

The Knowledge Studio GUI menus provide access to most Knowledge Studio functions. All of the buttons on the toolbar have a corresponding menu command, which are indicated on each menu with the button icon displaying adjacent to the command. The set of menu commands remains the same during the GUI operation.
Menu commands are enabled or disabled based on the current state of the data lens; commands that are dimmed are unavailable. Some menu commands perform functions that are more complex and are indicated by an ellipsis symbol (...). These commands open dialogs to collect information needed to complete the requested function. Menu commands that toggle user functions are preceded by check mark.
Tip:
The tooltips appear when you rest your mouse pointer on a menu item, button, tab, icon, or similar content.The following sections briefly describe each of the Knowledge Studio menu commands and corresponding buttons.
| New Data Lens…
Creates a new data lens file for processing data. Data lens files are stored in the following directory:
or
Open Data Lens… Opens an existing data lens file and closes any open data lens file. Recent Lens Provides a list of recently opened data lens for you to select from so that you can quickly open your data lenses. Select Data File Opens a sample data file associated with the current data lens and closes the currently open sample data file. Close Data Lens Closes the open data lens file. Save Saves all contextual changes to disk and creates a version of the data lens that you can revert to.Save As Allows you to save the current data lens to a new name. Delete Data Lens Allows you to delete the open data lens from your local |
 |
| machine. A warning message is displayed prior to deletion. Only the local copy of the data lens is deleted. If you checked in the data lens into the server, that copy is still present on the server and must be deleted from the server. For more information, see "Deleting Data Lenses". | |
| Delete Read-Only Lenses…
Allows you to delete any unwanted 'read only' data lens from your local machine. For more information, see "Deleting Read-only Data Lenses". |
|
| Delete Sample Files…
Allows you to delete the sample files associated with the data lens that you are currently editing. You can designate 'All' or a specific sample file for deletion. For more information, see "Deleting Sample Files". |
|
| Update Regression Base
Allows you to update the current regression testing base based on contextual changes in the tab currently open. |
|
| Create New Regression Base
Creates a new regression base file, which identifies the effects of your changes as context changes are made to terminology and phrases. |
|
| Reports
Allows you to select a report formats for viewing results. For more information, see "Complexity Reports". |
|
| Complexity Reports
Allows you to select a report that shows the complexity of the data. For more information, see "Complexity Reports". |
|
| Semantic Reports
Allows you to select a report that counts the parsed phrase context of the data within the selected data lens. For more information, see "Semantic Reports". |
|
| Export Phrases for Translation
Exports phrases from the translation dictionary. For more information, see "Translation Tab". |
|
| Import Translated Phrases
Imports phrases into the translation dictionary. |
|
| Import Current/All Translated Phrases
Imports some or all phrases. For more information, see "Translation Tab". |
|
| Create/Update Glossary
Allows you to create or update a glossary on the Oracle DataLens Server. For more information, see "Creating a Smart Glossary". |
|
| Export Data Lens
Exports the complete results and data lens from a data lens project and creates a data lens export file project directory:
For more information, see "Exporting a Data Lens". |
|
| Import Data Lens
Imports an exported data lens from the specified export directory. For more information, see "Importing a Data Lens". |
|
| Export Rules
Allows you to export term and phrase rules. For more information, see "Exporting Rules". |
|
| Export Rules by Domain
Allows you to export term and phrase rules by a domain. For more information, see "Exporting Rules". |
|
| Export Attributes
Allows you to export attributes (from Item Definitions) to an Excel spreadsheet file. The report provides attribute information at Item Definition level that shows Attribute Type, Attribute Alias, Attribute Name, Rules defining the attribute and the order for each Standardization. |
|
| Import Phrases and Terms
Allows you to import knowledge, mainly terminology rules, into a data lens from an Excel spreadsheet or a tab-delimited file. For information, see "Importing Phrases and Terms". |
|
| Import Item Definitions
Allows you to import Item Definitions into a data lens from a tab-delimited file. For more information, see "Exporting and Importing Item Definitions". |
|
| Import Smart Glossaries
Allows you to import foundation data lenses to facilitate phrase editing of the current data lens. For more information, see "Importing a Smart Glossary". |
|
| New Sample Data
Allows you to create new sample data file to add to the existing set of samples. For more information, see "Sample Files". |
|
| Rename Sample Files…
Allows you to rename existing sample files associated with the data lens. For more information, see "Sample Files". |
|
| Combine sample data
Allows you to combine selected sample files into a single file to be used for regression testing. For more information, see "Sample Files". |
|
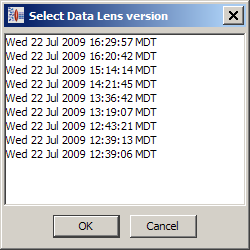
| Revert to prior Data Lens
Allows you to revert to a previous version of the current data lens. The data lenses that are listed are local copies only and are not the Oracle DataLens Server. Exit Exits the Knowledge Studio application; a prompt is given for unsaved changes. |
 |
| Cut
Deletes the selection and copies it to the clipboard. Copy Copies the selection to the clipboard. Paste Pastes contents of the clipboard at the current insertion point. Replace Searches for and replaces the specified text on the Translate tab. Rename Rules Allows you to globally rename phrase rules to consolidate them. This feature is only available on the Define Phrase sub-tab of the Phrases tab. For more information, see "Global Phrase Rule Renaming". |
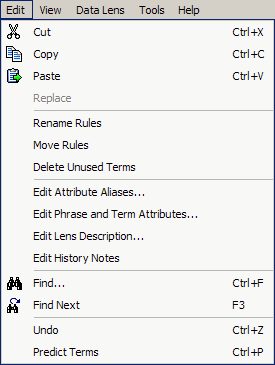 |
| Move Rules
Allows you to drag and drop rules across Domains (folders) in the hierarchical folder style Move Rules dialog. For example, you can move a rule from a Smart Glossary into the phrase structure of your data lens. |
|
| Delete Unused Terms
Allows you to delete unused terms. An unused term is a term that is not referenced by any rules or phrases. It is denoted by the purple ball with a "u" inside icon. |
|
| Edit Attributes Aliases…
Allows you to edit the attribute aliases of phrases and terminology. For more information, see "Aliases". |
|
| Edit Phrase and Term Attributes…
Allows you to edit the attributes of phrases and terminology. For more information, see "Editing Attributes". |
|
| Edit Lens Description…
Allows you to modify the data lens description. For more information, see "Editing a Data Lens Description". |
|
| Edit History Notes
Allows you to enter text regarding the data lens maintenance to provide an audit trail for ongoing support. If Foundation or Domains are imported into the data lens, this information is included with a date and timestamp. For more information, see "Editing Data Lens History Notes". |
|
| Find…
Allows you to specify a search string (regular expression) and attempts to find it. The left-hand tree panes of the Knowledge Studio creation tabs (Phrases, Standardize, and Classify tabs) are searched. |
|
| Find Next
Repeats the last search defined by a Find operation. |
|
| Undo
Removes any changes that you have made and reverts the data lens to the last saved state. |
|
| Predict Terms
All possible rules that could apply to the input data for an individual sample row, based on confidence ratings and meeting the Prediction Threshold, are displayed for you to choose from or a message that advises you why no predictions are available. Predict Terms only works in the context of Item Definition where the sample row has an associated Item Definition. You can select the appropriate rule or reject the predictions. Rejecting predictions is only applicable to the current data lens editing session and is reset when you close the data lens. |
|
| View My Tasks
Allows you to view any tasks that are scheduled or have run. For more information, see "Viewing Tasks". Filter… Allows you to filter the displayed data based on text or a text pattern. The filter operation applies only to the currently selected tab. Only the rows that match the text entered in the Filter dialog are displayed in the task pane. Remove Filter: Removes the filter currently applied and all data is displayed. Refresh Redisplays the data including changes that were just applied using the Apply function. Show ID Displays the ID column in tabular panes when selected; selecting again removes the column from the task pane. |
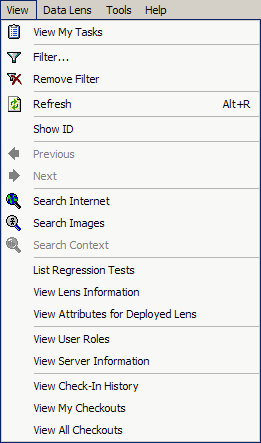 |
| Next
Advances to the next phrase or rule ambiguity. |
|
| Previous
Returns to the previous phrase or rule ambiguity. |
|
| Search Internet
Allows you to search the Internet for the text selected in the Input Data field on the Define Phrases or Define Items sub-tabs of the Phrases tab. Your default browser application is launched and a search is performed using the selected text as the search string. |
|
| Search Images
Allows you to search the Internet for the images matching the text selected in the Input Data field on the Define Phrases or Define Items sub-tabs of the Phrases tab. Your default browser application is launched and an image search is performed using the selected text as the search string. |
|
| Search Context
Allows you to search for the selected line of data so that you can select it in a different context. This feature is only available on the Translation tab. |
|
| List Regression Tests
Displays information about regression tests that are associated with selected data lens. The display will show the type of regression created and the sample file that the regression test is against. |
|
| View Lens Information
Displays specific information about the data lens and data file that is currently being used. |
|
| View Attributes for Deployed Lens
Displays attribute information about the currently deployed data lens by Item Definition including attribute use. |
|
| View User Roles
Displays the current user role information. |
|
| View Server Information
Displays server information for the Oracle DataLens Server. |
|
| View Check-In History
Lists the data lenses that you have checked in including the comments regarding the check-in. |
|
| View My Checkouts
Lists the data lenses that you have checked out. |
|
| View All Checkouts
Lists all data lenses on the Oracle DataLens Server that have been checked out. |
|
| View as Production
Displays the output data from Item Definitions set to inactive. For more information, see "Active vs. Inactive Item Definitions". |
|
| Check-In Data Lens…
Allows you to check-in a data lens file into your Oracle DataLens Server repository. Each time you check a data lens into the Oracle DataLens Server, the data lens revision number is incremented. The Oracle DataLens Server maintains all of the previous revisions of a data lens. You can check in a data lens under one of two conditions: it has never been checked in before or it was previously checked out and locked for editing by you. The Check-In dialog allows you to enter a comment to be stored with this revision of the data lens. If you want to continue to edit the data lens, select the Keep Locked for More Editing check box so the data lens can only be checked-out by another person in a 'Read Only' mode. Selecting this option dims the Delete local Data Lens command, which removes the local copy of the data lens from your client. For more information, see "Checking In a Data Lens". Check-Out Data Lens… Allows you to select the data lens and the specific revision number to check out from the Oracle DataLens Server repository and automatically locks it for editing. You can also check out the data lens and assign a new name, which creates a new data lens from an existing data lens. For more information, see "Checking Out a Data Lens" |
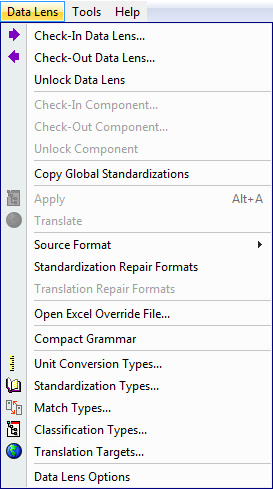 |
| Unlock Data Lens
Unlocks the current data lens from the repository in the Oracle DataLens Server. |
|
| Check-In Component…
This feature is deprecated. |
|
| Check-Out Component…
This feature is deprecated. |
|
| Unlock Component
This feature is deprecated. |
|
| Copy Global Standardizations
Copies the global standardization rules from the current Standardization Type to another. For more information, see "Copying Global Standardizations". |
|
| Apply
Activates the knowledge that you have just created. After you apply your changes, use the Refresh command to see the effect on your sample data. |
|
| Translate
Performs the translation of phrases (Translate tab) or complete content lines (Test Translations tab). For more information, see "Translating Data". |
|
| Source Format
Allows you to edit the source formatting expressions. For more information, see "Source Format". |
|
| Standardization Repair Formats
Allows you to enter |
|
| Translation Repair Formats
Allows you to enter |
|
| Open Excel Override File
Starts Excel with a spreadsheet that can be used to enter specific context to be used within this data lens. This feature will be deprecated and should not be used. |
|
| Compact Grammar
Allows you to remove any grammar rules that are not being utilized based on the data within the lens. For more information, see "Compacting Grammar". |
|
| Unit Conversion Types…
Allows you to add, select, and activate the Enterprise DQ for Product supplied unit conversions. Unit conversions enable the creation of output with consistent use of units. For example, your data may express resistance in ohms, kilo-ohms, and mega-ohms. With a unit conversion, consistency of output could be maintained by converting each of the preceding to ohms. For more information, see "Unit of Measure Standardization Types". |
|
| Standardization Types…
Allows you to add, select, and activate the Enterprise DQ for Product supplied unit conversions. Standardization types also allows you to create your own standardization schemas for use throughout your data lens. For more information, see "Standardization Types". |
|
| Match Types…
Allows you to add and use schemas to automatically match data. For more information, see "Match Type". |
|
| Classification Types…
Allows you to add and use schemas to automatically classify data. For more information, see "Classification Type". |
|
| Translation Targets…
Allows you to select the locales/languages for which you want data translation. This option is not available until your data lens is standardized. Activates the Translation tab. For more information, see "Translation Target". |
|
| Data Lens Options
Allows selection of the global data lens parameters including text case sensitivity, whether the data lens can be imported, and the behavior of the Apply functionality. For more information, see "Setting Data Lens Options". |
|
| Open Oracle DataLens Governance Studio…
Starts the EDQP Governance Studio. See Oracle Enterprise Data Quality for Product Data Governance Studio Reference Guide. Open Oracle DataLens Task Manager… Starts the EDQP Task Manager. See Oracle Enterprise Data Quality for Product Data Task Manager Guide. Open Oracle DataLens Application Studio… |
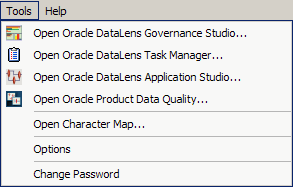 |
| Starts the EDQP Application Studio. See Oracle Enterprise Data Quality for Product Data Application Studio Reference Guide.
Open Oracle Enterprise Data Quality for Product Data… Starts the Oracle Enterprise Data Quality for Product Data Launch Pad. |
|
| Open Character Map…
Opens the Windows Character Map dialog to enable character mapping changes. This function is provided as a shortcut way of inserting special characters and symbols not available on the keyboard when translating phrases. |
|
| Options
Allows selection of the following application options from the Options dialog Parse Tree Node Font Size Allows you to select the font size you want for the display of phrase trees in the Graphical Rule Editor pane on the Define Phrases tab. A smaller font allows you to see more phrases for longer lines. Number of Apply's before Save Allows you to automatically save your data lens as you apply knowledge. Number of Saves before Backup Allows you to automatically backup your data lens after a determined number of Saves. Ghosting Percent Allows you to set to percentage of ghosting that will be used to display terms and phrases that are not associated with an Item Definition. Percentage can be from 10% to 100%. A lower percentage setting will result in the terms and phrases being shown lighter (more ghosted). |
 |
| Two-line tool bar
Allows you to choose whether the toolbar is display on a single line or on two lines. Choosing a two-line tool bar allows you to see all of the toolbar items even when the Knowledge Studio screen is smaller than normal size. |
|
| Double-click Jump
Allows you to 'jump' or switch to between views of a selected node by double-clicking on an empty area of the pane. This functionality is context-sensitive and changes the active tab. |
|
| Show Source-Formatted Text
Enables the display of text that has been reformatted by the Source Formatting feature so that you can quickly identify this data for further standardization. |
|
| Show Predictions
Enables the textual display of the predictions for unknown data nodes. Controls whether the prediction options on the Edit menu and the Define Phrases sub-tab Graphical Rule Builder pane context-sensitive menu are active. |
|
| Change Password
Allows you to change your password. Choosing this check box starts the Change Password dialog so that you can enter your old password followed by the new password. |
|
| Product Guide
Opens a list of Enterprise DQ for Product documents for your selection in a browser. Help About |
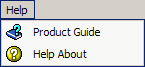 |
| Provides information regarding the product including the version number and a link to view third party product licenses. | |
The following table contains keyboard shortcuts that can help make the Knowledge Studio easier to use.
| Function | Shortcut Key |
|---|---|
| Save | Ctrl+S |
| Undo | Ctrl+Z |
| Find | Ctrl+F |
| Find Next | F3 |
| Apply | Alt+A |
| Refresh | Alt+R |
| Cut | Ctrl+X |
| Copy | Ctrl+C |
| Paste | Ctrl+V |
| Predict | Ctrl+P |
| New Data Lens | Ctrl+N |
| Open Data Lens | Ctrl+O |
A tab groups like information into easy to read and access areas that include sub-tabs, panes, and text entry boxes. Tabs are displayed in the Workspace directly under the toolbar and can be invoked in any order. Not all tabs are available at all times. For example, the Translate tab and sub-tabs are not visible until a translation target is activated.
A sub-tab operates like a tab and provides specific functionality or utilities related to each tab and so are different for each tab.
The tabs and the related sub-tabs included in the Knowledge Studio are as follows:
| Tab | Related Sub-Tabs |
|---|---|
| Phrases (Chapter 2, "Phrases in Data" ) | Define Phrases
Define Items View Hierarchy Regression Test |
| Standardize (Chapter 3, "Standardize Data") | Standardize Terms
Standardize Phrases Standardize Lines Unit Conversion Test Global Standardization Regression Test |
| Standardize Items (Chapter 4, "Standardizing Item Definitions") | Standardize Attributes
Order Attributes Match Weights Test Attributes Test Item Standardization Regression Test |
| Classify (Chapter 5, "Classify Data") | Classify from Data
Classify from Item Definitions Classify from Rules Test Classification Regression Test |
| Translate (Chapter 6, "Translating Data") | New Phrases and Known Phrases
New and Known Variable Term Phrases Reorder Test Translated Attributes Test Item Translation Test Global Translation Regression Test |
The interactive task panes allow you to perform actions specific to the type of pane and these actions are described throughout this reference. In general, the task panes included in the Knowledge Studio are as follows:
Data is represented in a tree-like structure that shows how nodes are related. You can drag and drop the nodes into other panes some though not all cases. The parent nodes can be expanded to view all related children nodes.
Data is entered into fields and options are selected to build knowledge.
Data is represented with graphical icons that you can drag and drop to change it.
Data is displayed in tabular form similar to a Microsoft Excel spreadsheet.
Data is collected via queries in a step-by-step manner.
The small up/down arrows between the panes, allow you to resize the panes. In addition, you can fully expand either pane to see more data by clicking on an arrow, which makes the pane inactive. To redisplay the inactive pane, click the opposite arrow and the pane reappears.
There are various context-sensitive (shortcut) menus that appear in the Knowledge Studio panes when you right-click on data within a task pane. The contents of these menus are described throughout this reference though may contain the following standard options:
These options filter and un-filter data as previously described.
Explains each of the icons that can appear and is context-sensitive.
Expands all sub-nodes (phrases or terms) of the selected node in a hierarchical manner.
Expands all sub-nodes (phrases or terms) of the selected node in a hierarchical manner.
Locates text data as previously described.
Removes the selected category from displaying in the pane. The categories are only removed for the current data lens editing session and are reset when you close the data lens.
Searches the Internet for the selected text, which appears as part of the menu selection name.
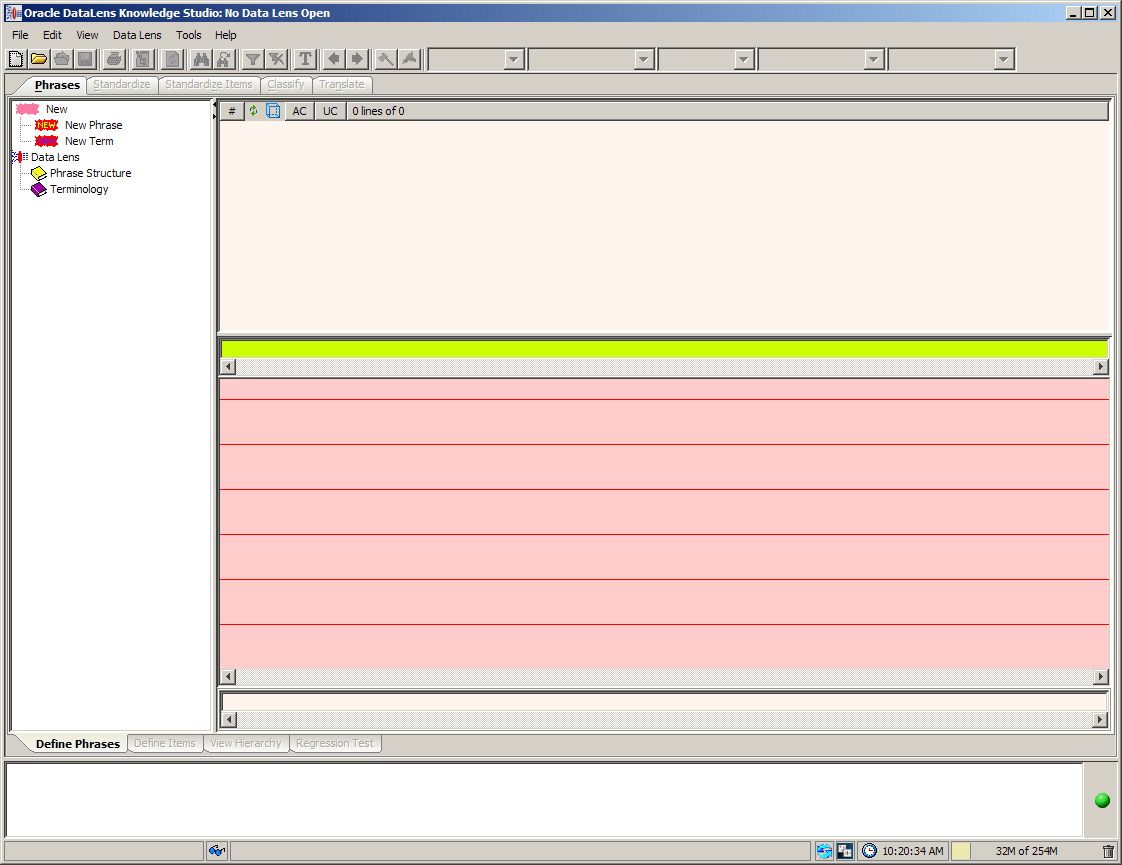
If this is the first time you have started the Knowledge Studio, the client workspace appears blank as in the following figure; otherwise, the results from the last job run are displayed.
The status field at the bottom of the Knowledge Studio client workspace provides information about any data lenses you load in the white field, and the date and time, and memory usage are displayed in the grey fields. The status field is blank until you have created your first Knowledge Studio project, at which time the status of your project is displayed. For more information, see "Understanding the Client Workspace".
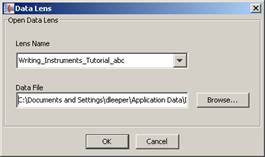
When you launch the Knowledge Studio, you are prompted to select an existing data lens to open.
Since you are starting a new data lens, click Cancel to close this dialog. From the File menu, click New Data Lens data lens create your new data lens.
Enter the unique name for this data lens.
Note:
Entering a space results in an underscore.Enter a description and select a Character Encoding from the list.
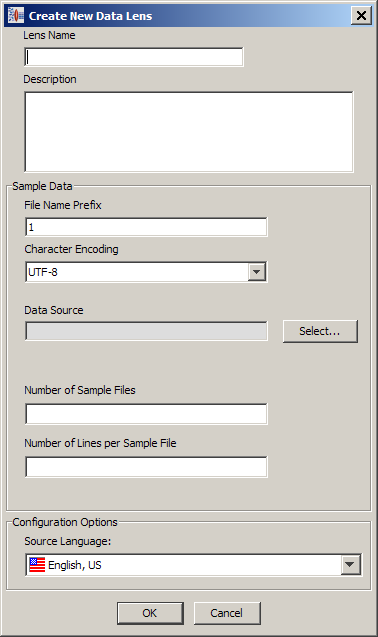
Click on the Select button adjacent to the Data Source field to select the file that contains your data. The Data Source dialog appears.
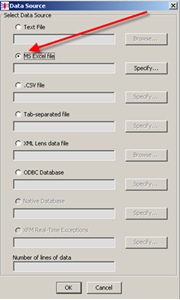
Select the MS Excel file option and click the Specify button.
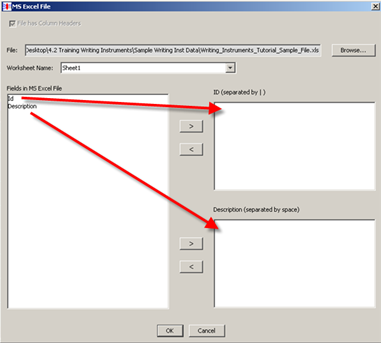
Click Browse, locate your data file, and then select it.
The Excel file field names are displayed.
Select the Id field and click on the right arrow to populate the ID list, and then select the Description field to populate the Description list. The ID corresponds to a part number field in the Excel spreadsheet; the Description is a description of a part, including the item name and several attributes.
Click OK. The Data Source dialog appears, indicating the source file that you specified and the number of lines of data.
Click OK.
You are returned to the New Data Lens dialog.
Click OK. The Knowledge Studio creates your new data lens, including a set of sample files. These sample files are XML representation of the data in your Excel spreadsheet.
Your new project is located in:
C:\Documents and Settings\Username\Applications\DataLens\data\project
or
C:\Users\Username\AppData\DataLens\export
Your content and sample files are located in:
…\data lens name\inputData
The sample files have the .xml file extension.
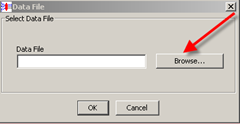
When prompted to select a sample data file, click Browse.
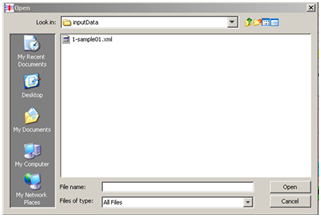
Select your sample data file, and click Open.
Your data lens opens and is now ready for use.
|
Copyright © 2001, 2011, Oracle and/or its affiliates. All rights reserved. Legal Notices |
|