| Skip Navigation Links | |
| Exit Print View | |

|
Sun Blade 6000 Virtualized 40 GbE Network Express Module User's Guide |
| Skip Navigation Links | |
| Exit Print View | |

|
Sun Blade 6000 Virtualized 40 GbE Network Express Module User's Guide |
RJ-45 Ethernet Connector Port LEDs
Performing Hot-plug Insertion and Removal
Prepare the PCIe Interface for Hot-plug Removal
Performing SAS Interface Hot-plug
Prepare SAS Interfaces for Hot-plug Removal
Restoring SAS Configurations After NEM Installation
Saving the Zoning Configuration to a Backup File
Recovering Zoning Configurations
Determine the CMM Part Number Using ILOM 3.0x Web Interface
Determine the CMM Part Number Using ILOM 3.1x Web Interface
Determine the CMM Part Number Using ipmitool
Find the CMM Part Number on the CMM Label
Verify Installation (CMM ILOM Web)
Verify Installation (CMM ILOM CLI)
Installing and Removing SFP+ Optical Transceiver Modules
Install an SFP+ Optical Transceiver Module
Remove an Optical Transceiver SFP+ Module
SFP+ Connector Cabling Options
Configuring Jumbo Frames (Solaris)
Jumbo Frames Configurations and Driver Statistics
Configuring Jumbo Frames (Linux)
Temporarily Configure Jumbo Frames (Linux)
Permanently Enable Jumbo Frames (Linux)
Configuring Jumbo Frames (VMware ESX)
Create a Jumbo Frames-Enabled vSwitch (VMWare)
Create a Jumbo Frames-Enabled VMkernel Interface (VMWare
Configuring Static Link Aggregation
Example (Oracle Solaris 11 OS)
Example (Oracle Solaris 10 OS)
Booting an x86 Server Over the Network
Booting the NEM on an x86 Blade Server Over the Network
Set Up the BIOS for Booting From the NEM
Use the F12 Key to Initiate the Network Boot
Use the F8 Key to Boot Off the PXE Server
Boot a SPARC Blade Over the Network
Installing Drivers on Oracle Solaris OS SPARC or x86 Platform
Configure the Network Host Files
Configure the sxge Device Driver Parameters
Installing Drivers on a Linux Platform
Downloading, Installing, and Removing Drivers
Download and Install the Drivers
Configuring the Network Interface
Temporary Network Interface Configuration
Permanent Network Interface Configuration
Bring the Interface Online Manually
Configure the Network Interface File Automatically for Red Hat Linux
Configure the Network Interface Automatically for SUSE Linux
Configure the Syslog Parameter
Installing Drivers on a Windows Platform
Installing Drivers on a Windows Platform
Installing and Uninstalling the Network Controller
Installing and Uninstalling the Sun Blade 6000 40 GbE VLAN Driver (Optional)
Install the Enclosure Device on a Windows Server 2008 System
Installing Drivers on a VMware ESX Server Platform
Install a NEM Driver for a New ESX4.0 Installation
Install a NEM Driver on an Existing ESX 4.0 Server
Install a NEM Driver on an ESX/ESXi Server
Configure the NEM Network Adapters
Configuring Blade and Port Parameters and Managing the NEM
Configuring and Viewing Parameters
Saving User Configurations or Resetting to Defaults
Viewing Parameter Settings, Firmware Versions, and Configuration File
Configuring NEM for Oracle VM Para-Virtualization
Configure Para-Virtualization Without Live Migration
Configure Para-Virtualization With Live Migration
Managing the NEM Using CMM ILOM
ILOM Documentation and Updates
Start NEM CLI from CMM ILOM CLI
Verify and Enable Hot Plug (Oracle Solaris OS)
Verify and Enable Hot Plug (Linux OS)
Obtain and Apply the Newest Firmware
You can remove a NEM from a powered-on chassis using a hot-plug operation, or from a powered-off chassis. The server modules must be informed if you are replacing a non-redundant NEM.
This procedure is for removing a NEM if you do not plan to replace it. If you plan to replace a NEM, see Replace a NEM.
 | Caution - If the chassis is powered on and you are not replacing the NEM within 60 seconds, install a NEM filler panel to ensure proper system operation. |
Note - Hot-plug service has to be enabled on all blades in the chassis for the hot-plug removal to properly initiate. If the Ready-to-Remove LED does not light, check the configuration of the blades, or power off all of them.
Note - Pushing the ATTN button twice within five seconds will cause the Power/OK LED to return to solid green. This action will cancel the request for a NEM removal.
If the action is successful:
The NEM green Power/OK begins to slowly blink.
The OK- to-Remove blue LED illuminates and the Power LED turns off.
In the ILOM System Information —> Components screen: The Return-to-Service option is available in the Actions drop-down list for the NEM and the Ready-to-Remove status column for the NEM is Ready.
In the ILOM CLI show /CH/NEMx command output, the following status is listed in the Properties section: prepare_to_remove_status = Ready
/CH/NEMx/OK reads Off in either the ILOM web interface or CLI.
If the action is unsuccessful:
The NEM green Power/OK LED begins to slowly blink, then returns to solid green, and the Ready-to-Remove LED does not go on.
In the ILOM System Information —> Components screen, the Return to Service option does not become available in the Actions drop-down list and the Ready-to-Remove status column for the NEM still reads Not Ready.
In the ILOM CLI show /CH/NEMx command output, the following status is listed in the Properties section: prepare_to_remove_status = NotReady
/CH/NEMx/OK reads On in either the ILOM web interface or CLI.
Note - Wait five minutes after CMM boot up or NEM insertion before removing the NEM.
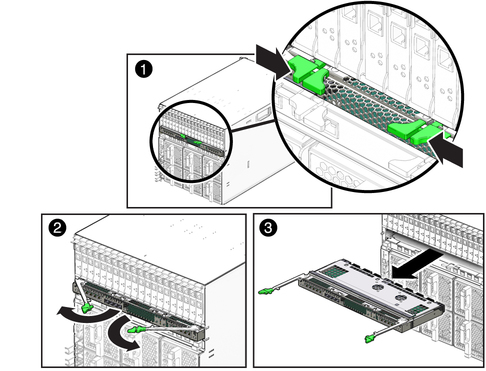
Support the weight of the NEM, with one hand at the bottom of the NEM.
